

On the Settings > Administration > Administrators & Roles page > Administrators tab, you can see the list of all admins configured for your organization.
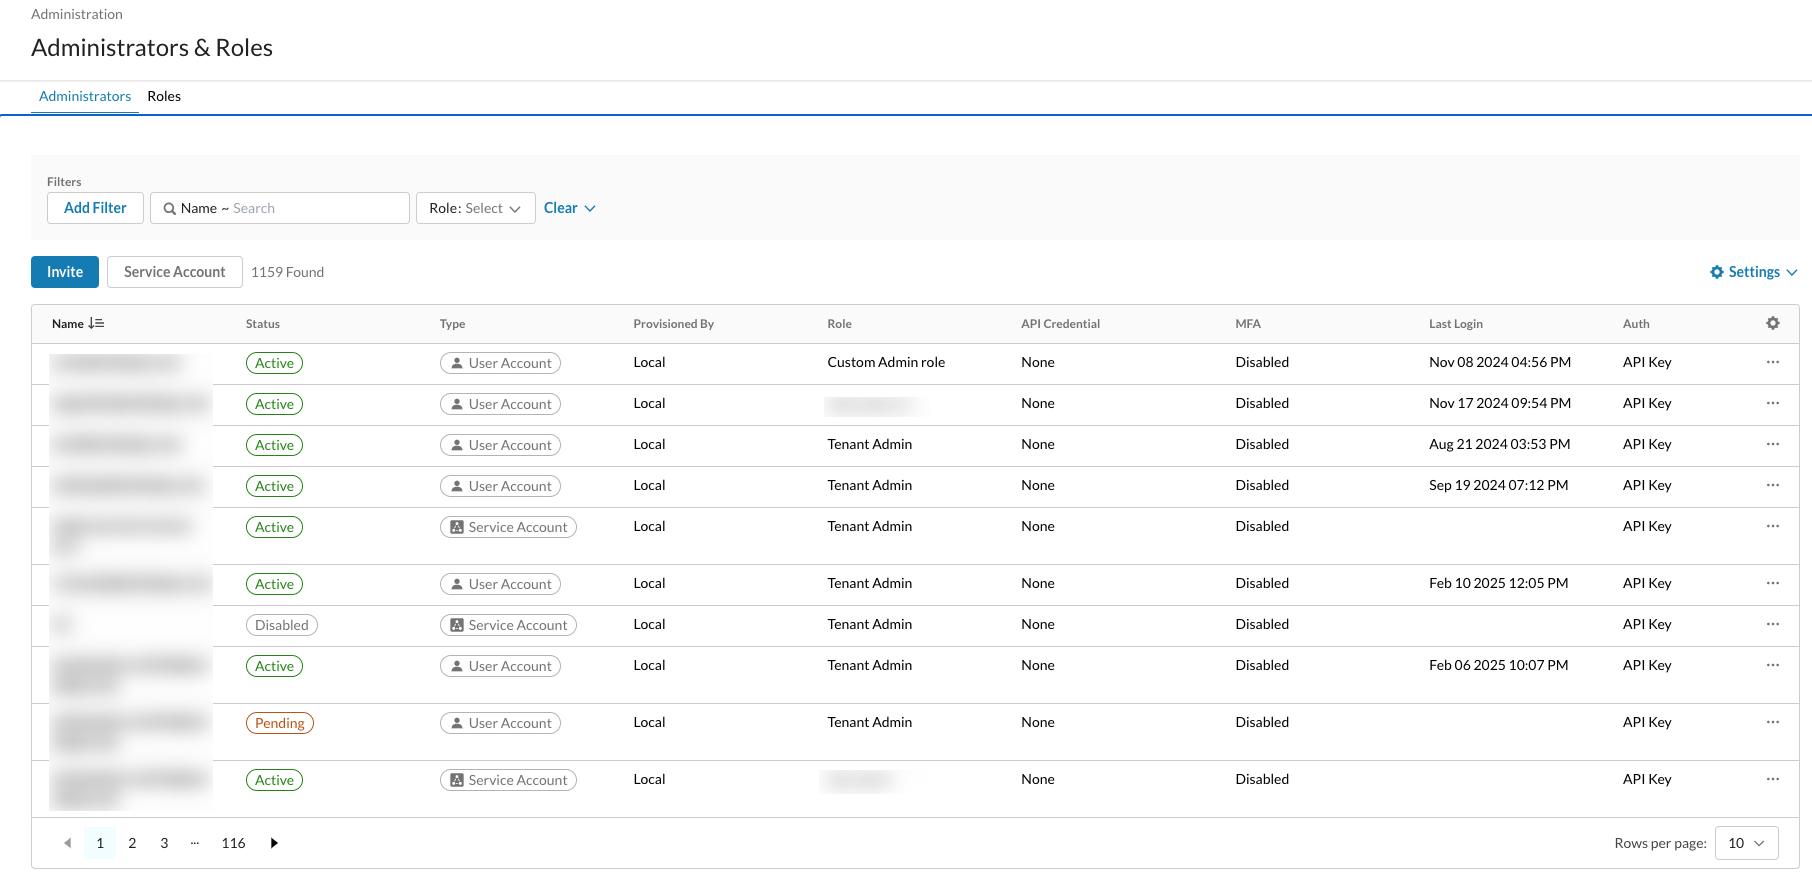
For each admin, you can see the following:
- Name: email or username of the user/invitee.
- Status: displays Active or Pending option based on whether the user has accepted the invitation.
- Type: displays the admin’s type of role (User or Service Account).
- Provisioned By: the user/role type that created the admin user (Local, SCIM, or SAML).
- Role: the admin’s level of access to the functional areas, page permissions, and file access. This is the role chosen which can be a predefined or custom role.
- API Credential: displays the status of the REST API Token, date the token expires, option to generate/change/revoke the token.
- MFA: displays the status, Disabled/Enabled.
- Last Login: date and time of the user’s last login.
- Auth: the method by which the admin was authenticated, e.g. API Key, etc.
- Ellipses: click to edit/disable the admin, generate/change/revoke the token, or delete the user from the administrators list.
You can filter the admin list by:
- Name
- Role
- Provisioned By (Local, SCIM, or SAML)
- Type (User Account or Service Account)
Clicking Clear all filters clears the filter selections and clicking Clear and remove all filters clears the selections and removes the filters from the Filters bar view.
Tenant Admins
In Role-Based Access Control (RBAC) V3, a Tenant Admin has the highest level of administrative permissions within their tenant/account, including the ability to manage other administrators and roles. However, when a user attempts to create or clone a role, the permission “Administration > Admins > Manage” is intentionally disabled for all roles other than the core Tenant Admin role.
This is a critical security feature designed to prevent privilege escalation.
The Purpose of the Security Control
The primary reason for this behavior is to maintain a secure and robust RBAC framework. The ability to manage other administrators and roles is a unique privilege reserved exclusively for the pre-defined Tenant Admin role. This restriction is a fundamental principle of the RBAC V3 design and applies to all user-created or cloned roles, not just those derived from the Tenant Admin role.
Here’s why this security control is in place:
- Preventing Privilege Escalation: If any user can create a new role and grant the ability to manage other admins and roles, it would create a potential loophole. A malicious actor can create a new role with this permission and then use it to create new users or roles with even higher privileges, effectively bypassing the security controls. This allows them to grant full administrative access to unauthorized users.
- Maintaining a Secure Hierarchy: The RBAC V3 model is designed with a clear and secure hierarchy. The Tenant Admin role acts as the root administrator for the tenant/account. Allowing other, potentially less-controlled roles to manage admins would compromise this structure and make it difficult to track and control administrative permissions.
- Ensuring the Integrity of the RBAC System: By restricting the “Manage” permission to the original Tenant Admin role, the system ensures that the fundamental controls for user and role creation remain in a trusted and uncompromised state. This prevents a user with a non-standard or cloned role from rendering the RBAC controls ineffective.
Expected Behavior
- The only predefined role that has “Administration > Admins > Manage” permission is the Tenant Admin.
- When any other role is created or cloned, the “Administration > Admins > Manage” permission will be grayed out and disabled. This is a deliberate design choice to protect against privilege escalation.
This design ensures that only the designated Tenant Admin can perform critical functions like creating new roles and managing user accounts, thus protecting the integrity of the entire system.
Local User Account
Click Settings to access the Local User Account page.

- Max Failed Login Attempt: specify the minimum number of log in attempts that can be allowed before the admin user is locked out of the UI. The minimum is three log in attempts
- Idle Timeout: set how often a session times out, minimum is 5 minutes and the max is 60 minutes.
- Password Expiration: set how often a password expires.
- Allow concurrent logins by the same admin: select the checkbox to disallow concurrent log ins by the same admin. This means if an admin logs in from a second browser instance, they will be logged out from their first browser session.
- Verification Link Validity: set how many hours and/or minutes the verification link is valid.
Migrating Local and SSO Users
In some cases, you may have a local and SSO user with the same email address. If you have a user that has both a local login and SSO login, after migrating to RBAC V3, the ‘provisioned by’ will be Local . The role that shows in the Role column in the UI is the role that was assigned to the local user.
REST API Auth Settings
Click Settings to access the REST API Auth Settings page.
Your options include via API Key.
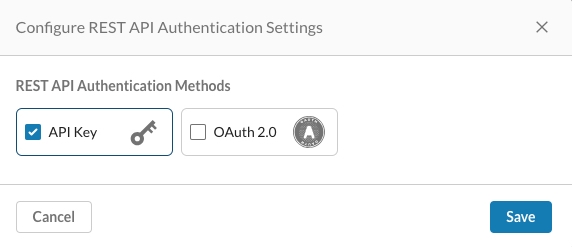
Or via OAuth 2.0

Invite a New Admin
Navigate to the Settings > Administration > Administrators & Roles page > Administrators tab > click Invite
The Invite page appears.

- Type the email of the new administrator. Ensure the email domain for the new administrator is part of the Admin Account Domains.
- Select a Role from the dropdown list. Tip: ensure the role exists prior to inviting admins.
- Optionally, enable MFA for the admin.
- Click Done.
Netskope will send a verification email with an account activation URL.
The new admin user can change the password during the account verification process.
The user will receive a second email with the one-time password (OTP) to add in addition to changing their password.
The admin account will be activated once the account verification is complete.
Go to Settings to configure the verification time period. Users will receive a verification link via email when the admin creates or resets passwords for a local account. You can define how long the verification link is valid. The minimum is 15 minutes and the maximum is 72 hours.
Create a New Service Account
Service accounts enable admins to create non-interactive admin accounts to use with REST APIs.
Navigate to the Settings > Administration > Administrators & Roles page > Administrators tab > click Service Account
The New Service Account page appears.

- Type the name of the service account.
- Select a Role from the dropdown list. Tip: ensure the role exists prior to creating a service account.
- Optionally, you can generate a REST API Token and set the expiration by number of days.
- Optionally, select the checkbox to generate the token later.
- Click Create.
To generate the token later from step 4 above, navigate to the Administrators list page and click the ellipsis at the end of the row.

Understanding Authentication for Service Accounts
You will not see an “Enable multi-factor authentication” (MFA) option for accounts with the Service Account role. This is by design.
- Admin Accounts are used by humans to log in to the user interface. They authenticate with an email and password, and can have MFA enforced as an additional security layer for that interactive login.
- Service Accounts are non-interactive. They are designed for programmatic access to the Netskope API and do not log in to the UI. Instead of a password and MFA, they authenticate using a secure, revokable API token.
Because service accounts do not have a password and cannot log in to the UI, traditional MFA is not applicable. Security is maintained through the proper management and safeguarding of their API tokens.