

This document explains how to configure the AWS Inspector v1.0.0 plugin in the Netskope Cloud Exchange platform.This plugin is used to fetch Workloads from the AWS Inspector > Inventory > Findings for EC2 instance resources. This plugin also supports Create Suppression Rule action on AWS Inspector.
Prerequisites
To complete this integration, you need:
- A Netskope tenant (or multiple, for example, production and development/test instances).
- A Netskope Cloud Exchange tenant with the Tenant plugin and Risk Exchange plugin already configured.
- Connectivity to the AWS Inspector.
AWS Inspector Plugin Support
This plugin is used to fetch Workloads from the AWS Inspector > Inventory > Findings for EC2 instance resources. This plugin also supports Create Suppression Rule action on AWS Inspector.
| Type of Data Pulled | Actions |
|---|---|
| Workloads | Create Suppression Rule No Action |
Mappings
Mappings are used to view the pulled Workloads along with their respective details. Fields mapped during plugin configuration will be visible on the Records page after the data is pulled. Here are the suggested mappings to use while configuring the plugin.
Pull Mapping for Devices(Workloads)
| Netskope CRE Field | Plugin Field | Expected Datatype | CRE Aggregate Strategy | Sample Value |
|---|---|---|---|---|
| Finding ID | findingArn | String | Unique | arn:aws:inspector2:us-east-1:123456789012:finding/abc123def456 |
| Private IP | resources[x].details.awsEc2Instance.ipV4Addresses[x] (private) | String | Unique | 10.0.1.45 |
| Public IP | resources[x].details.awsEc2Instance.ipV4Addresses[x] (public) | String | Overwrite | 52.23.145.210 |
| Region | resources[x].region | String | Overwrite | us-east-1 |
| Resource Name | resources[x].tags[“Name”] | String | Overwrite | prod-web-server-01 |
| Resource UID | resources[x].id | String | Overwrite | i-0abcd1234ef567890 |
| Resource Tags | resources[x].tags | List | Overwrite | [“Env:prod”, “Team:platform”] |
| Subnet ID | resources[x].details.awsEc2Instance.subnetId | String | Overwrite | subnet-0abc12345def67890 |
| VPC ID | resources[x].details.awsEc2Instance.vpcId | String | Overwrite | vpc-0a1b2c3d4e5f67890 |
| Severity | severity | String | Overwrite | HIGH |
| Finding Title | title | String | Overwrite | CVE-2023-44487 – nghttp2 |
| Finding Description | description | String | Overwrite | A flaw was found in the HTTP/2 protocol… |
| First Seen | firstObservedAt | Datetime | Overwrite | 2024-01-15T08:30:00+00:00 |
| Last Seen | lastObservedAt | Datetime | Overwrite | 2024-03-10T14:22:00+00:00 |
| Inspector Score | inspectorScore | Float | Overwrite | 8.5 |
| Exploit Available | exploitAvailable | String | Overwrite | YES |
| Finding Type | type | String | Overwrite | PACKAGE_VULNERABILITY |
| Vulnerability ID | packageVulnerabilityDetails.vulnerabilityId | String | Overwrite | CVE-2023-44487 |
| Port | networkReachabilityDetails.openPortRange.begin | Integer | Overwrite | 443 |
| Protocol | networkReachabilityDetails.protocol | String | Overwrite | TCP |
| Risk Score | findingDetails[x].riskScore (via batch_get_finding_details) | Integer | Overwrite | 85 |
| EPSS Score | findingDetails[x].epssScore (via batch_get_finding_details) | Float | Overwrite | 0.04321 |
Permissions
AWS Inspector permissions to the IAM user to pull Workload information.
- inspector2:ListFindings
- inspector2:ListCoverage
- inspector2:BatchGetFindingDetails
- inspector2:CreateFilter
- inspector2:ListFilters
API Details
List of APIs used
This plugin uses Python libraries to get findings of resource type EC2 Instance from AWS Inspector.
Library: The AWS SDK for Python (Boto3)
Usage: The AWS SDK for Python (Boto3) to create, configure, and manage AWS services, such as Amazon Inspector. The SDK provides an object-oriented API as well as low-level access to AWS services.
Creating Inspector Client:
inspector_client = boto3.client(
         "inspector2",
         aws_access_key_id=self.aws_public_key,
         aws_secret_access_key=self.aws_private_key,
         aws_session_token=self.aws_session_token,
         region_name=self.configuration["region_name"].strip(),
         config=Config(
                proxies=self.proxy,
                user_agent=self.useragent,
                retries={
                         "total_max_attempts": 3,
                          "mode": standard,
                 },
         ),
)
Getting Inspector EC2 findings:
Parameters
{
    "filterCriteria": {
        "resourceType": [
            {"comparison": "EQUALS", "value": "AWS_EC2_INSTANCE"}
        ],
        "updatedAt": [
            {
                "startInclusive": start_time,
                "endInclusive": end_time,
            }
        ],
        "findingStatus": [
            {"comparison": "EQUALS", "value": "ACTIVE"}
        ],
    },
    "sortCriteria": {
        "field": "LAST_OBSERVED_AT",
        "sortOrder": "ASC",
    },
    "maxResults": BATCH_SIZE,
    # "nextToken": next_token  # included on subsequent pages
}
response = inspector_client.list_findings(**params)
Parameters
{
    "findingArns": chunk   # list of up to 10 Inspector finding ARNs
}
response = inspector_client.batch_get_finding_details(findingArns=chunk)
Checking existing Suppression rules:
Parameters
{
    "action": "SUPPRESS",
    "maxResults": LIST_FILTERS_MAX_RESULTS,
    # "nextToken": next_token  # included on subsequent pages
}
response = inspector_client.list_filters(**kwargs)
Performing to create Suppression rule action:
Parameters
{
    "name": rule_name,
    "action": "SUPPRESS",
    "filterCriteria": criteria,              # built from suppression params, e.g.:
    # {
    #   "findingArn":    [{"comparison": "EQUALS",  "value": "..."}],
    #   "resourceTags":  [{"comparison": "EQUALS",  "key": "k", "value": "v"}],
    # }
    "description": "Created by Netskope Cloud Exchange on <ISO-date>.",
    # "reason": reason  # optional, user-provided
}
response = inspector_client.create_filter(**kwargs)
arn = response.get("arn", "")
Performance Matrix
Below is the performance matrix conducted on a Large CE Stack with below-mentioned specifications by pulling 500k workloads.
| Description | Specification |
|---|---|
| Stack details | Size: Large RAM: 32 GB CPU: 16 Cores |
| Workloads fetched and updated from AWS Inspector | ~22 minutes |
User Agent
APN/1.1 (ahq9d89xj9gspapczzdb59goq)
Workflow
- Generate credentials for AWS Inspector authentication methods.
- Configure the AWS Inspector plugin.
- Configure a Business Rule.
- Configure an Action.
- Validate the plugin.
Watch a Video
Click play to watch a video.
Obtaining configuration parameter
Create an AWS Inspector Policy
-
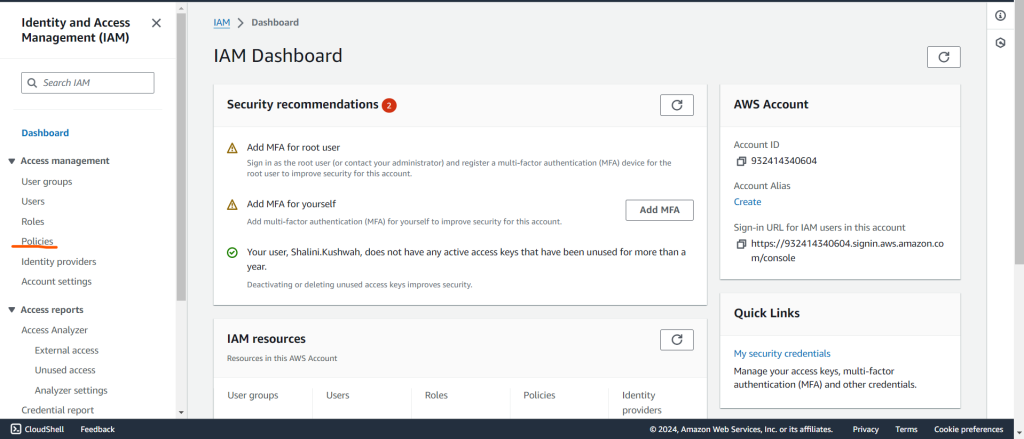
Search for “IAM” in the search box and from the left panel Click on “Policies”.
-
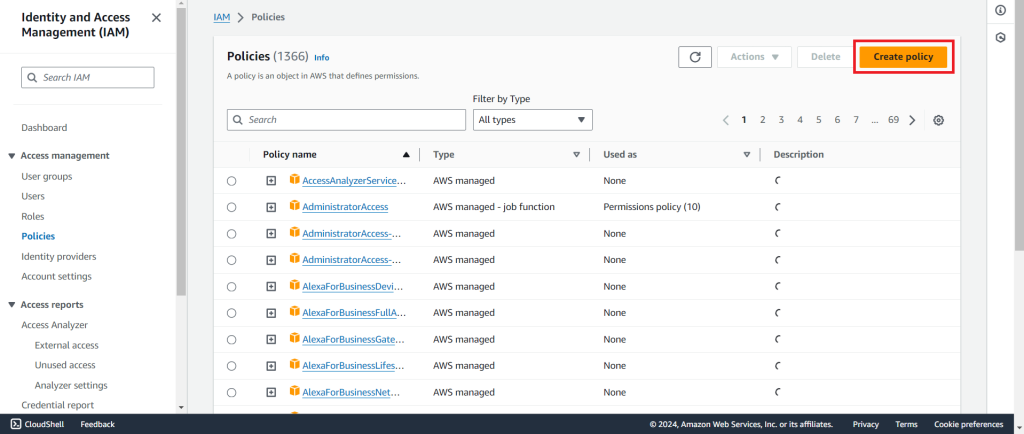
Click on Create Policy.
-
Click on the JSON tab, and enter the below-mentioned policy. Click on Next: Tags, Click on Next: Review.
{ "Version": "2012-10-17", "Statement": [ { "Sid": "Statement1", "Effect": "Allow", "Action": [ "inspector2:ListFindings", "inspector2:ListCoverage", "inspector2:BatchGetFindingDetails", "inspector2:CreateFilter", "inspector2:ListFilters" ], "Resource": "*" } ] } -
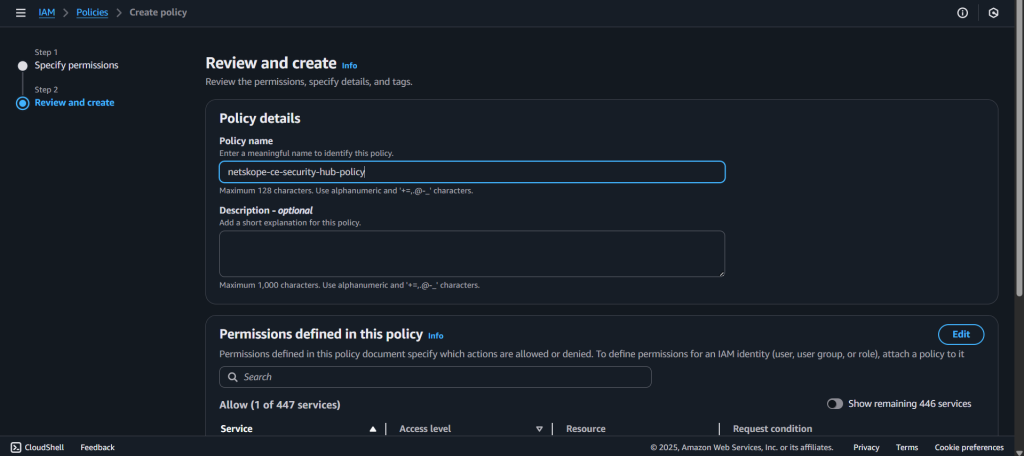
Enter Name and Click on Create Policy.
-
Attach this policy to the user, using the following steps:
-
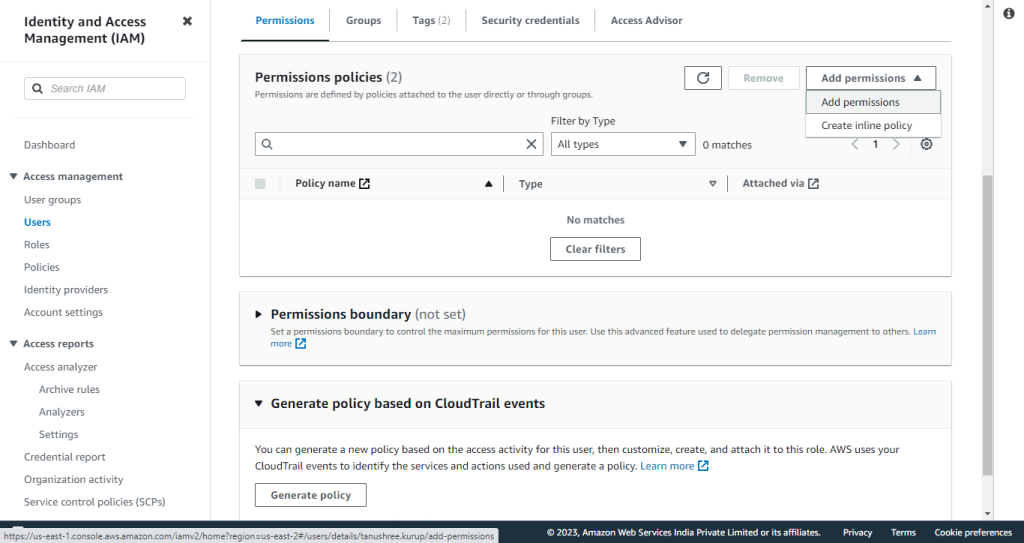
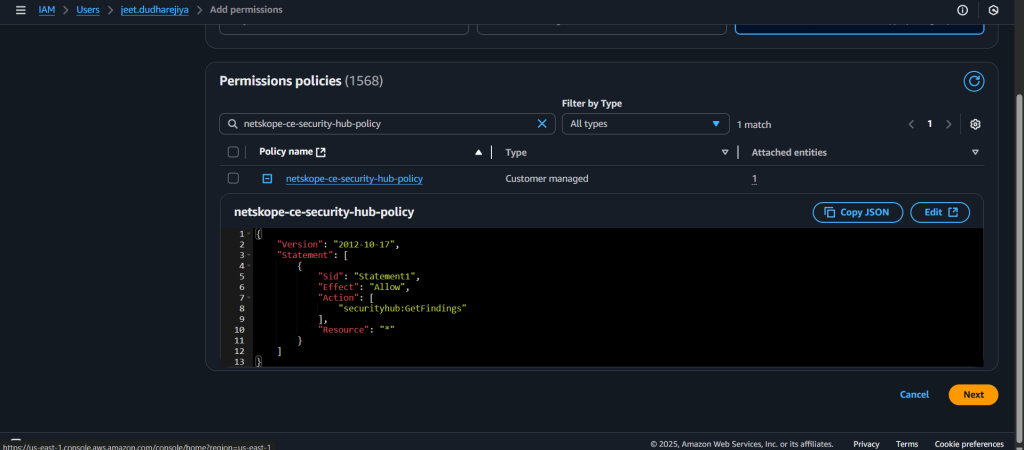
Navigate to IAM > Users. Select the user on which you want to attach a policy, and click on Add permissions and click on Add permissions options.
-
Select “Attach policies directly” option under Permissions options and search and select the policy created in the previous step for the source queue.
-
Click on Next and then click on Add permissions. Policy will be attached to the user.
-
-


IAM Role Anywhere Authentication
Prerequisites
The AWS Certificate Manager service is required to be enabled to authenticate the plugin using the AWS IAM Roles Anywhere Authentication Method.
Create a Policy
This Policy contains the required permissions for creating Private CA Certificate (including Permissions for creating a Trust Anchor and Profile) and using the IAM Roles Anywhere.
- Go to Policy Generator and select IAM Policy as policy type, enter Add Statement details, and generate a policy.
- Select Type of Policy: IAM Policy
- Effect: Allow
- AWS Service: AWS Private Certificate Authority
- Actions:
- CreateCertificateAuthority
- DescribeCertificateAuthority
- GetCertificate
- GetCertificateAuthorityCertificate
- GetCertificateAuthorityCsr
- ImportCertificateAuthorityCertificate
- IssueCertificate
- ListCertificateAuthorities
- ARN: *
- Click Add Statement.

- Scroll back up to add another statement.
- Select Type of Policy: IAM Policy
- Effect: Allow
- AWS Service: AWS Identity and Access Management (IAM)
- Actions:
- AttachRolePolicy
- CreateAccessKey
- CreateRole
- DeleteRole
- PassRole
- ARN: *
- Click Add Statement.

- Scroll back up to add another statement.
- Select Type of Policy: IAM Policy
- Effect: Allow
- AWS Service: AWS Certificate Manager
- Actions:
- DescribeCertificate
- ExportCertificate
- GetCertificate
- ListCertificates
- ListTagsForCertificate
- RequestCertificate
- ARN: *
- Click Add Statement.

- Scroll back up to add another statement.
- Select Type of Policy: IAM Policy
- Effect: Allow
- AWS Service: AWS Identity and Access Management Roles Anywhere
- Actions:
- CreateProfile
- CreateTrustAnchor
- GetProfile
- GetTrustAnchor
- ListProfiles
- ListTrustAnchors
- ARN: *
- Click Add Statement.

- Click Generate Policy.

- Copy the Policy as it will be used in the next step for creating the policy required for creating the Private CA certificates.
- Go to AWS Console and select IAM from All Services. Click Policies in the left panel, and then click Create Policy.

- Copy the policy to the JSON tab, click Next:Tags, and then click Next:Review
.

- Enter a name (like netskope-ce-rolesAnywhere-policy) and click Save Changes.

Create a Private Certificate Authority
- Log in to AWS Console.
- Search for Certificate Manager.

- Click AWS Private CA.
- Click Create a private CA.

- For Mode Options, select General-purpose.
- For CA type options, select Root.

- Enter the Organization (O).

- For Key algorithm options, select RSA 2048.


- Add tags if any (optional).
- Check the checkbox in the CA permissions options section.
- Check the checkbox in the Pricing section.
- Click Create to create the CA certificate.


- From Actions, select Install CA Certificate.

- Click Confirm and Install.


Create a Trust Anchor
- Search for the IAM service, go to Roles under Access management scroll down to Roles Anywhere and select Manage.

- Click Create a Trust anchor.
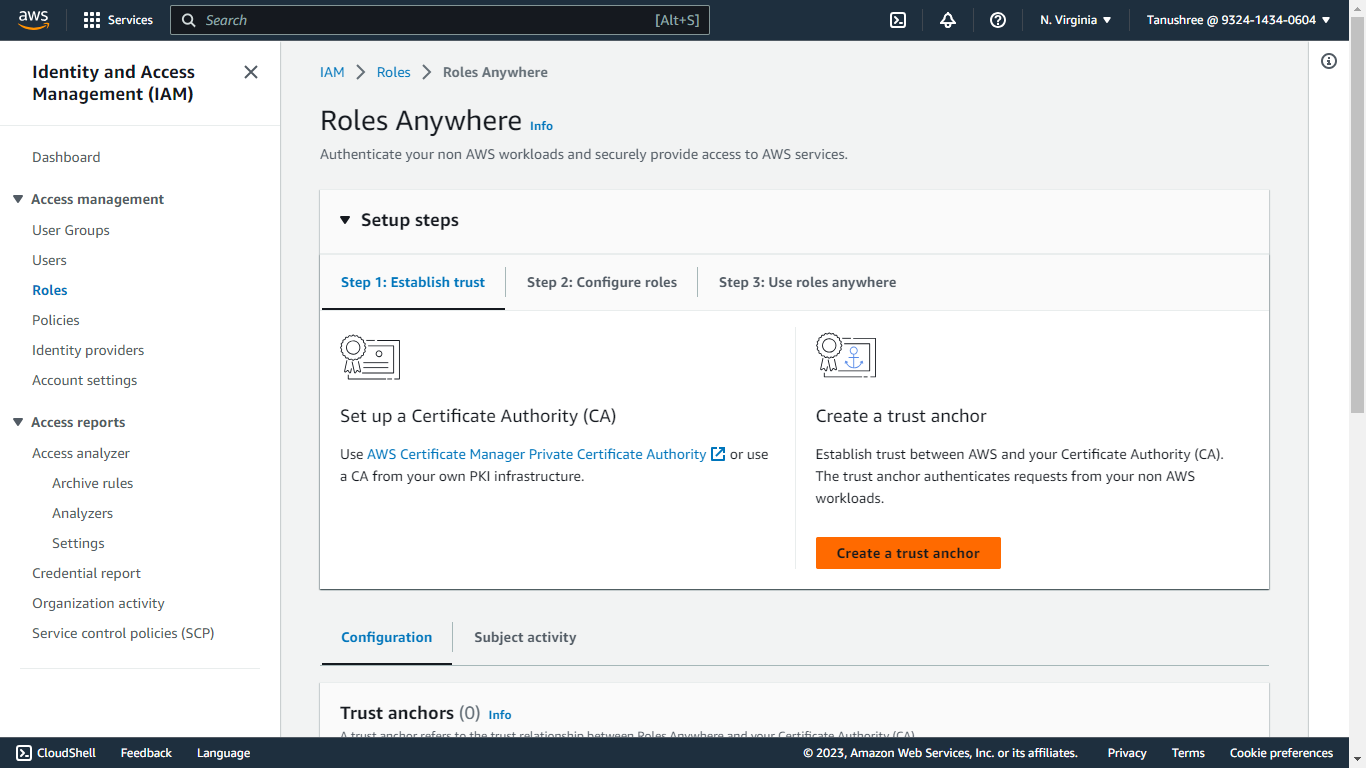
- Enter a Trust anchor name.
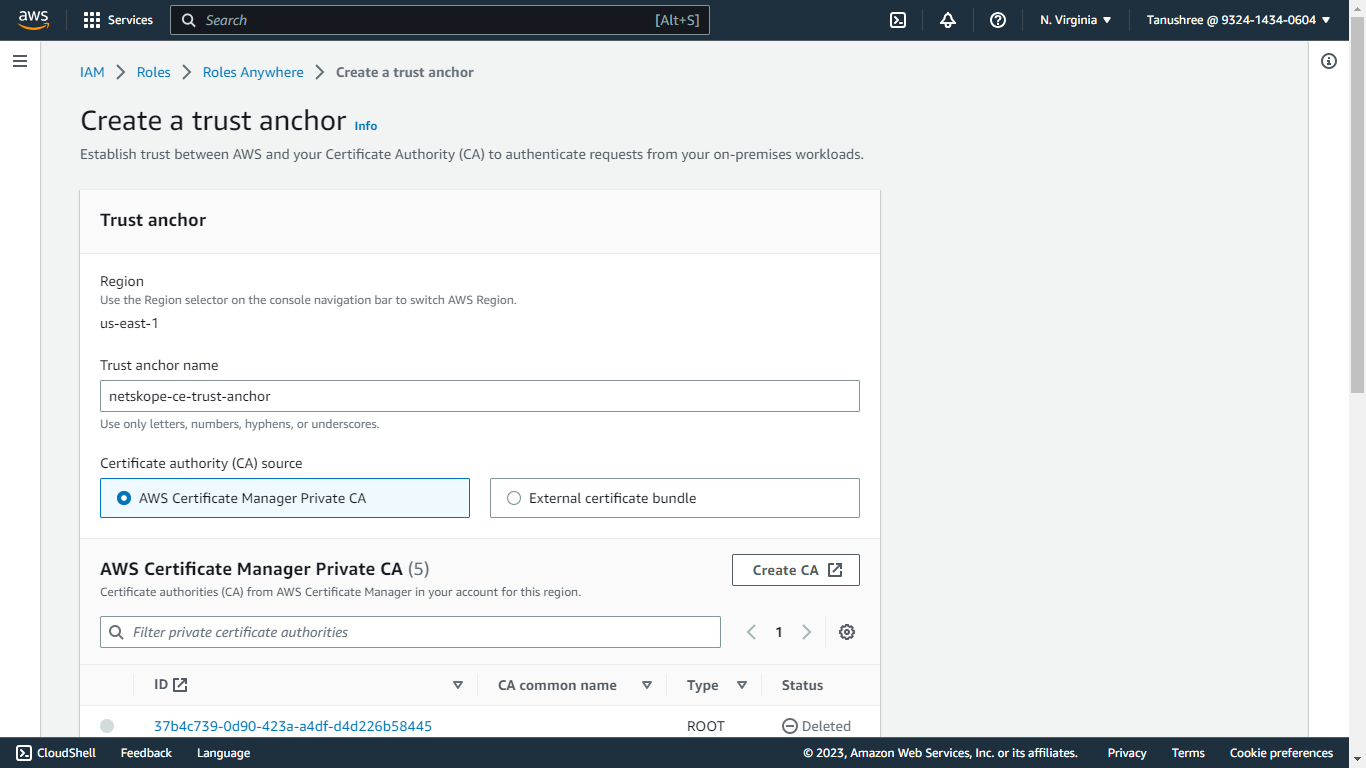
- Select AWS Certificate Manager Private CA (created in the previous steps) as a Certificate authority (CA) source. Select the Certificate that was created in the previous step in AWS Private Certificate Authority.
- Add tags if required.
- Click Create a trust anchor.

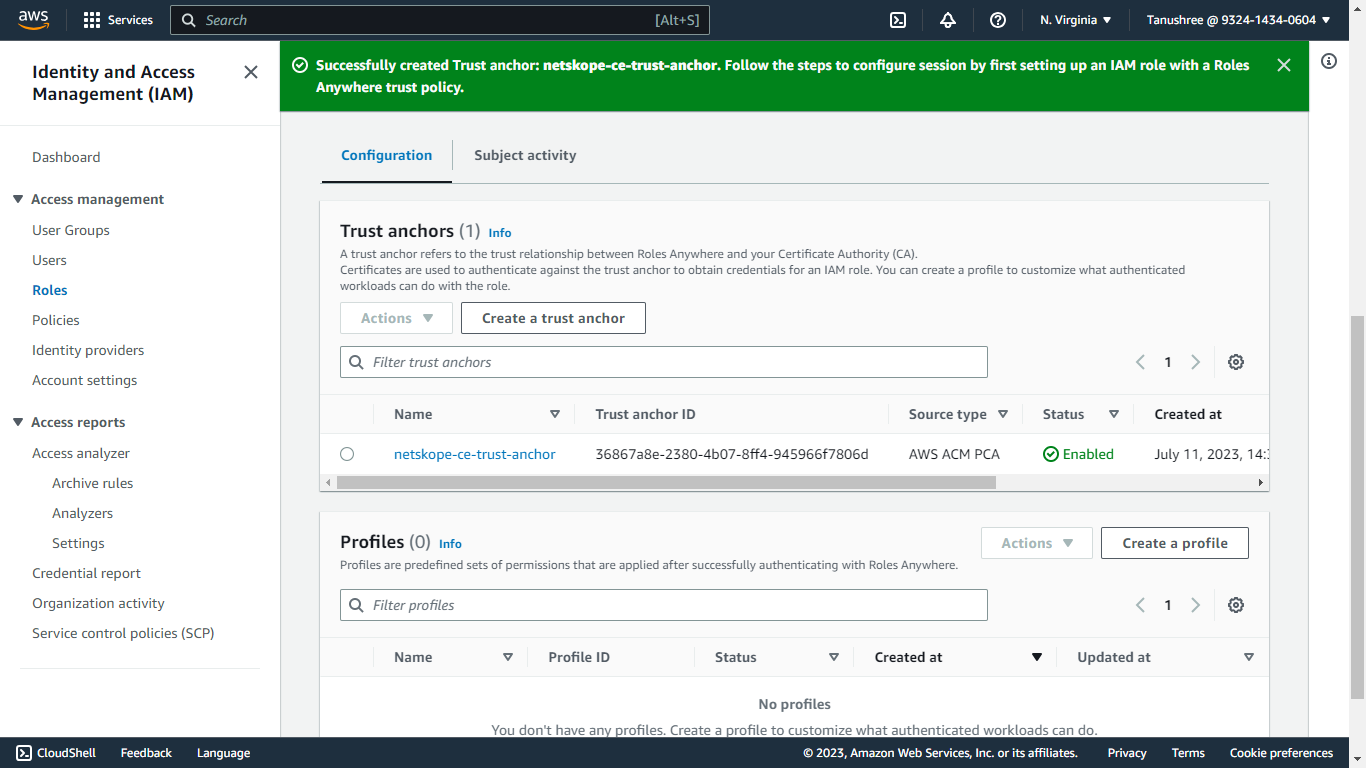
- Click on the created Trust Anchor and copy the Trust Anchor ARN. This will be required in the Plugin configuration Trust Anchor ARN parameter for the authentication method AWS IAM Roles Anywhere.

Create an IAM Role
- Go to IAM services in the AWS Console.
- Click Role in the Access Management submenu.
- Click Create Role.

- In the Trusted entity type, select Custom Trust Policy.

- Replace the Custom trust Policy with this Trust Policy. This policy contains the permissions for using the roles anywhere service:
{
    "Version": "2012-10-17",
    "Statement": [
        {
            "Effect": "Allow",
            "Principal": {
                "Service": [
                    "rolesanywhere.amazonaws.com"
                ]
            },
            "Action": [
                "sts:AssumeRole",
                "sts:TagSession",
                "sts:SetSourceIdentity"
            ]
        }
    ]
}
- Click Next.
- In the Permissions policies, select the policy created in Create an AWS Security Hub Policy.
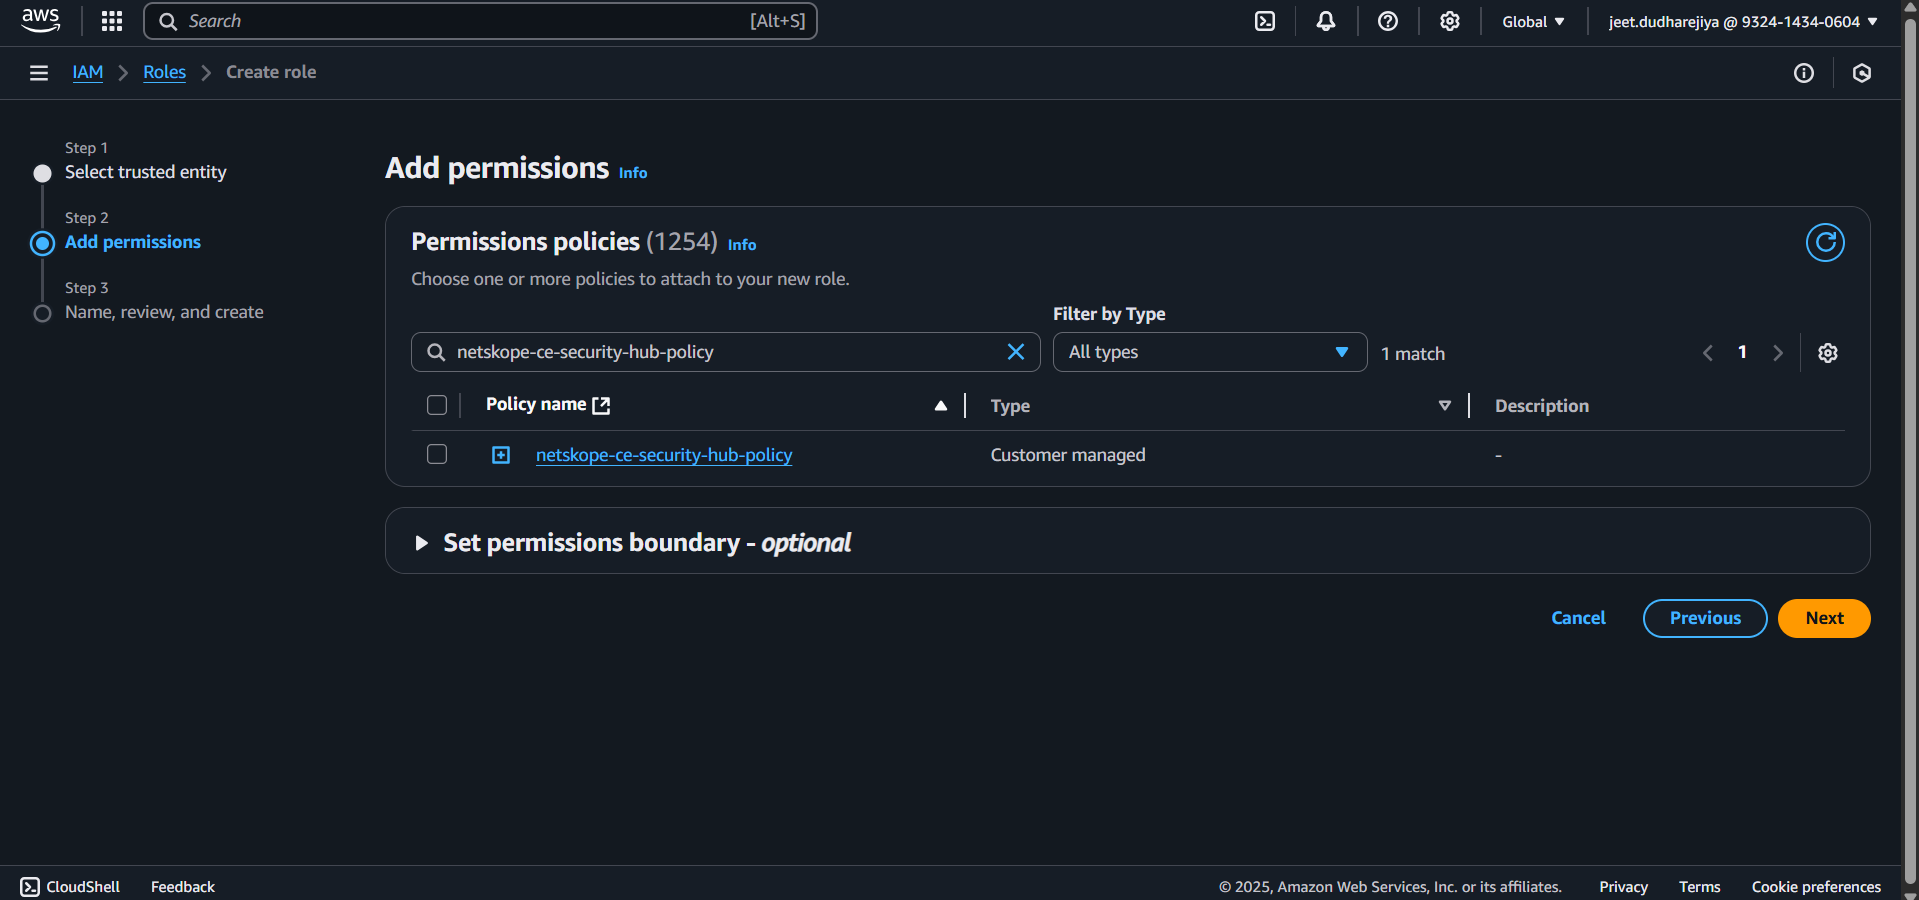
- Click Next.
- Provide a Role name (like netskope-ce-aws-verified-access-role) and Description for the role.
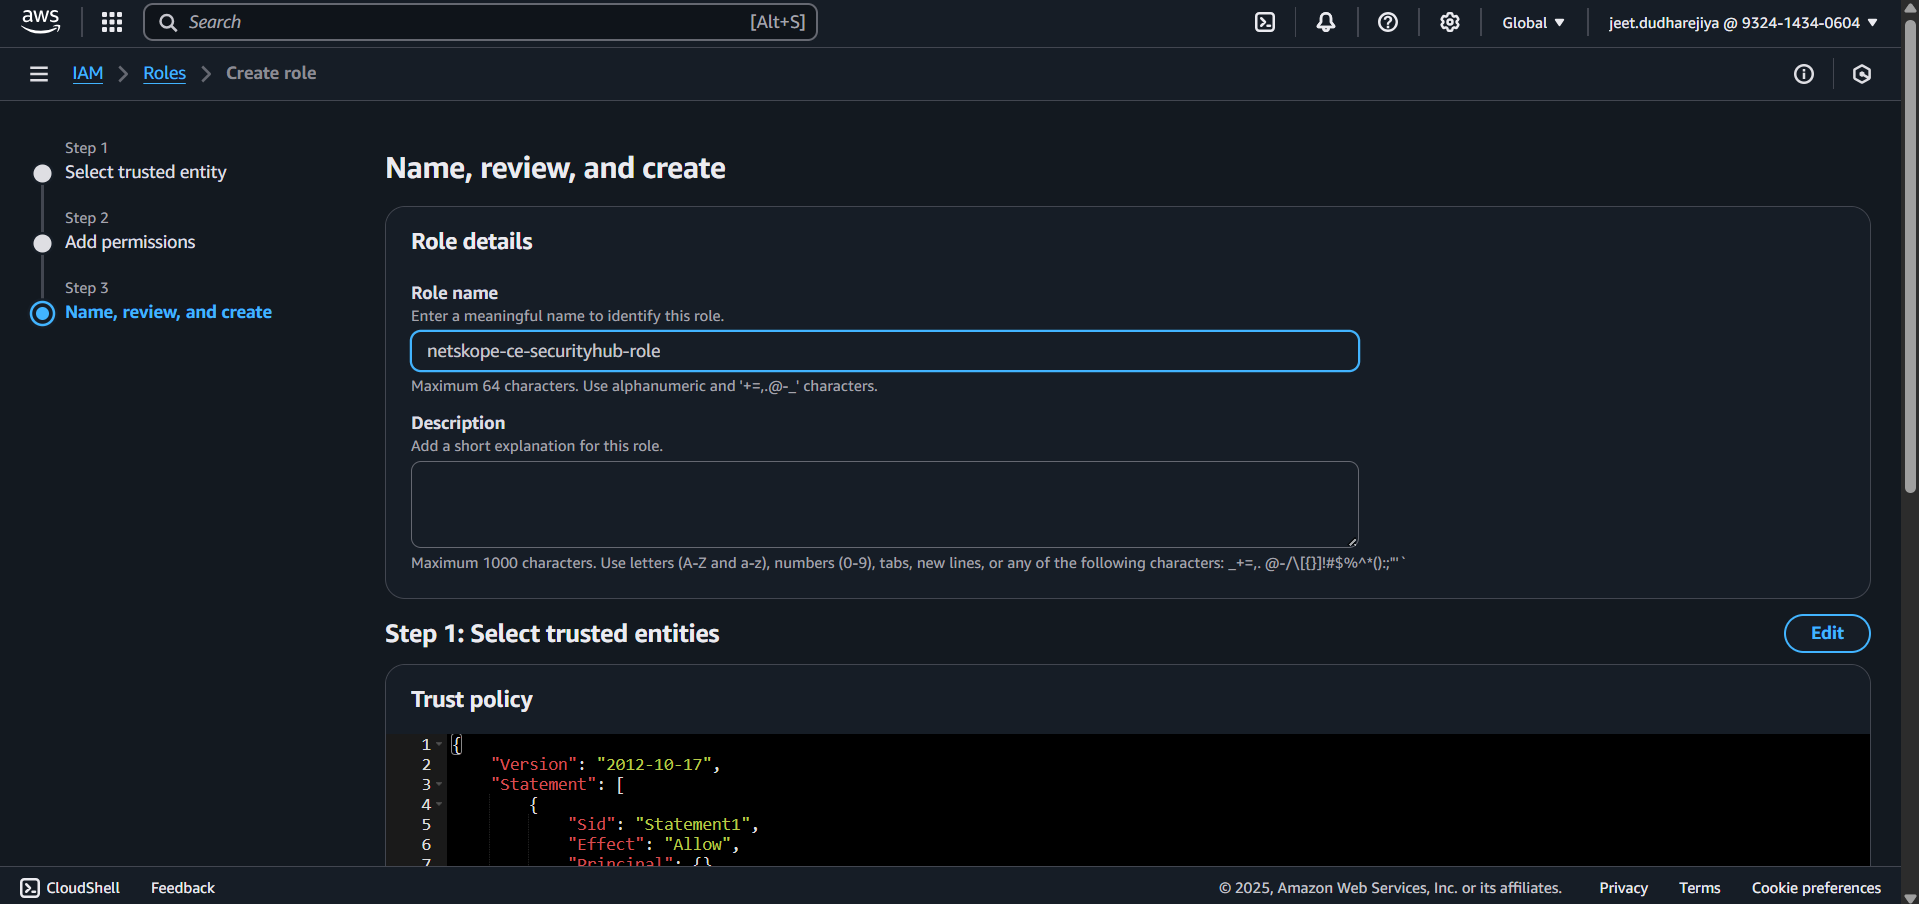
- Click Create role. Search for the created role and click on the Role Name.
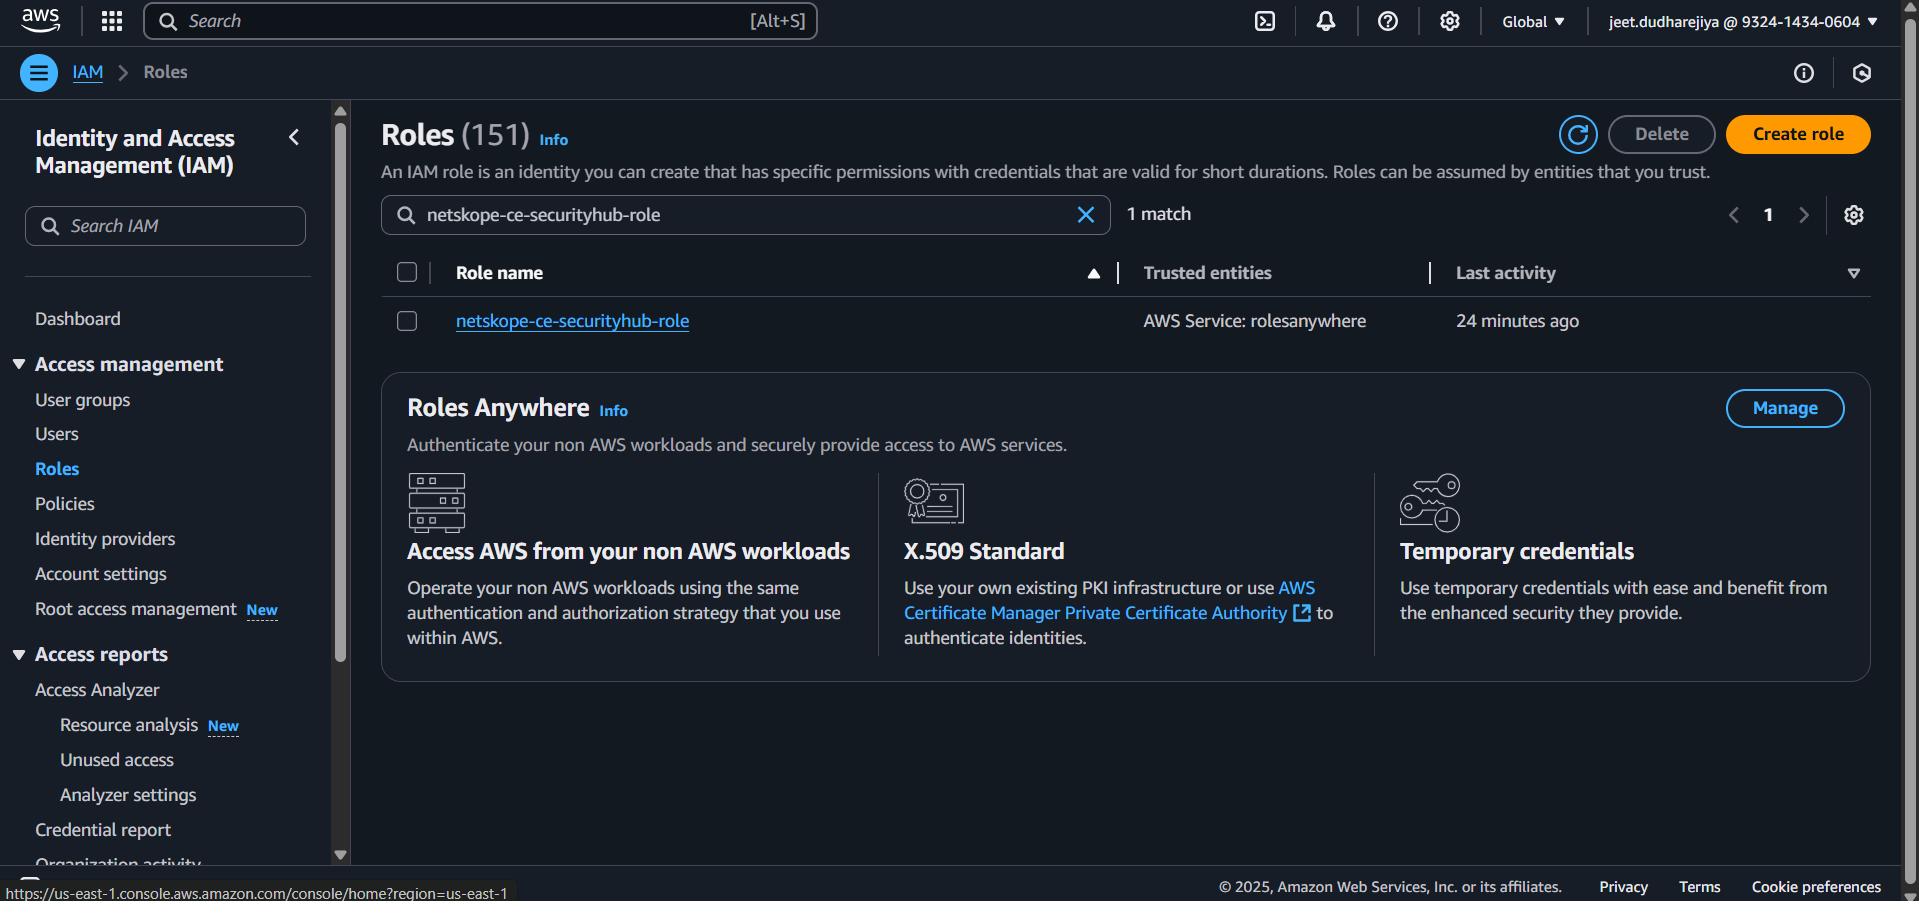
- Make a note of the Role ARN. This will be required in the Plugin configuration Role ARN parameter for the authentication method AWS IAM Roles Anywhere.

Create a Profile
- Select Roles under Access management.
- Scroll down to Roles Anywhere and click Manage.

- Expand the Setup steps.
- Click Step 2: Configure roles.
- Click Configure a profile.

- Enter a Profile Name.
- Select the role created in the Create IAM Role section.
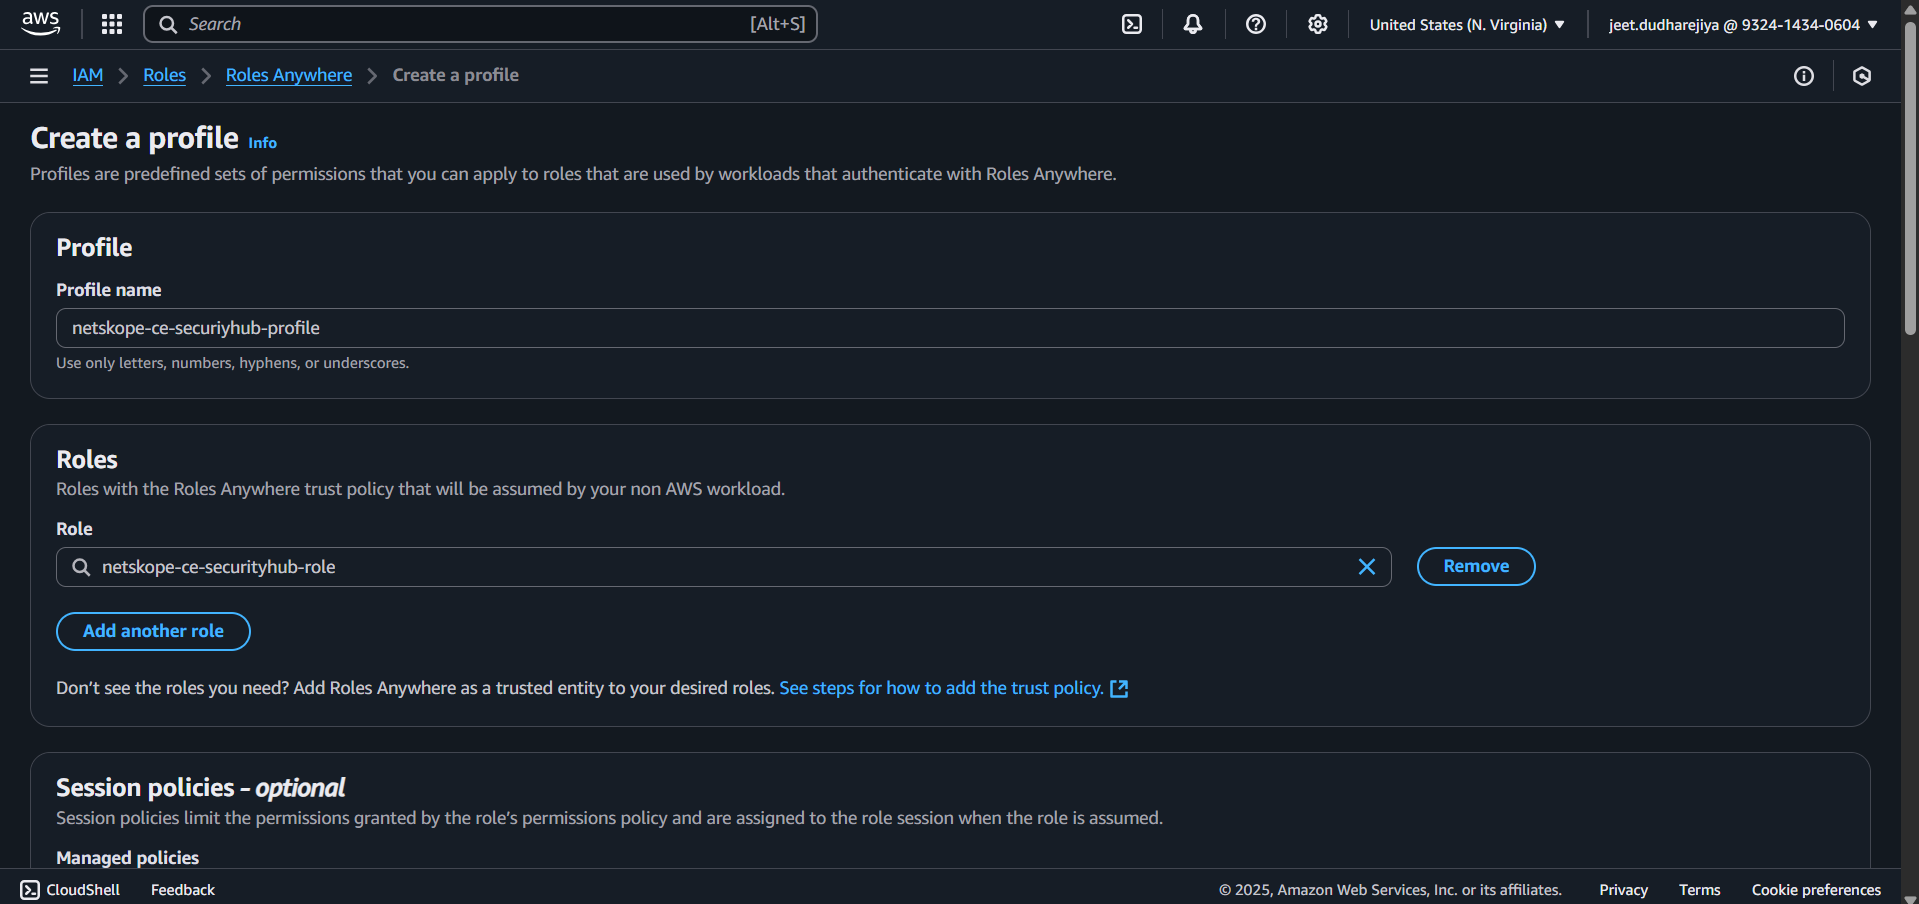
- Remove the Inline Policy.

- Click Create a profile.

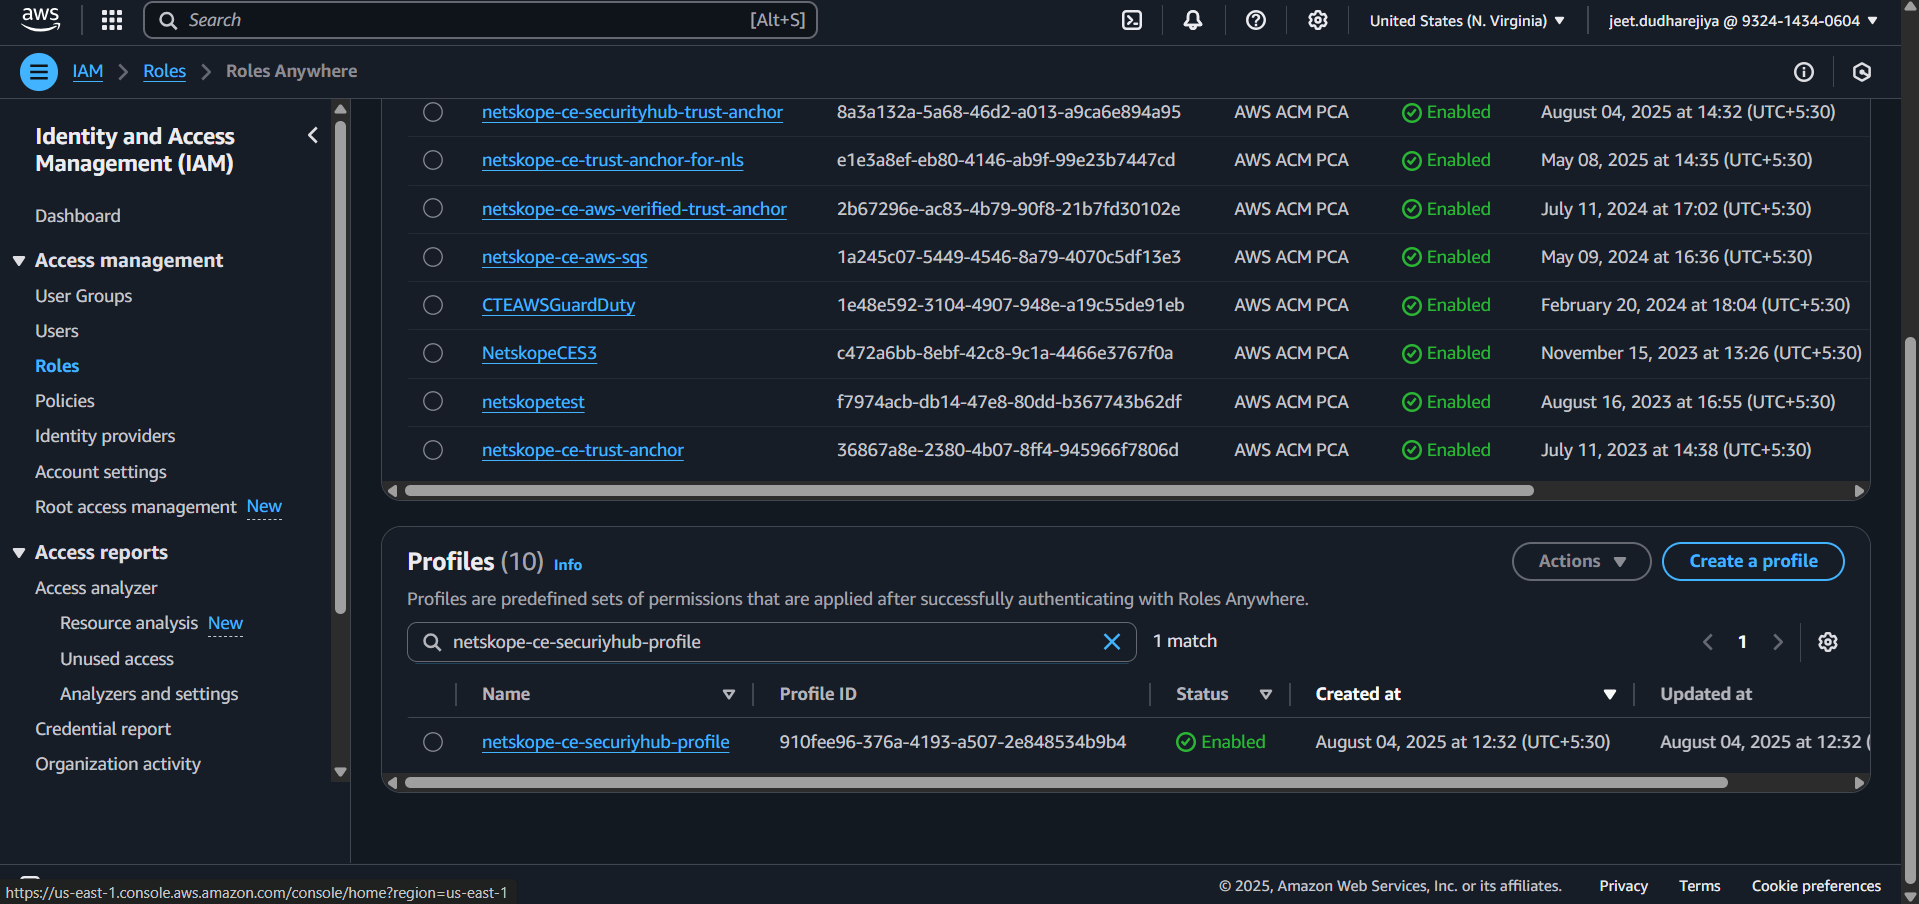
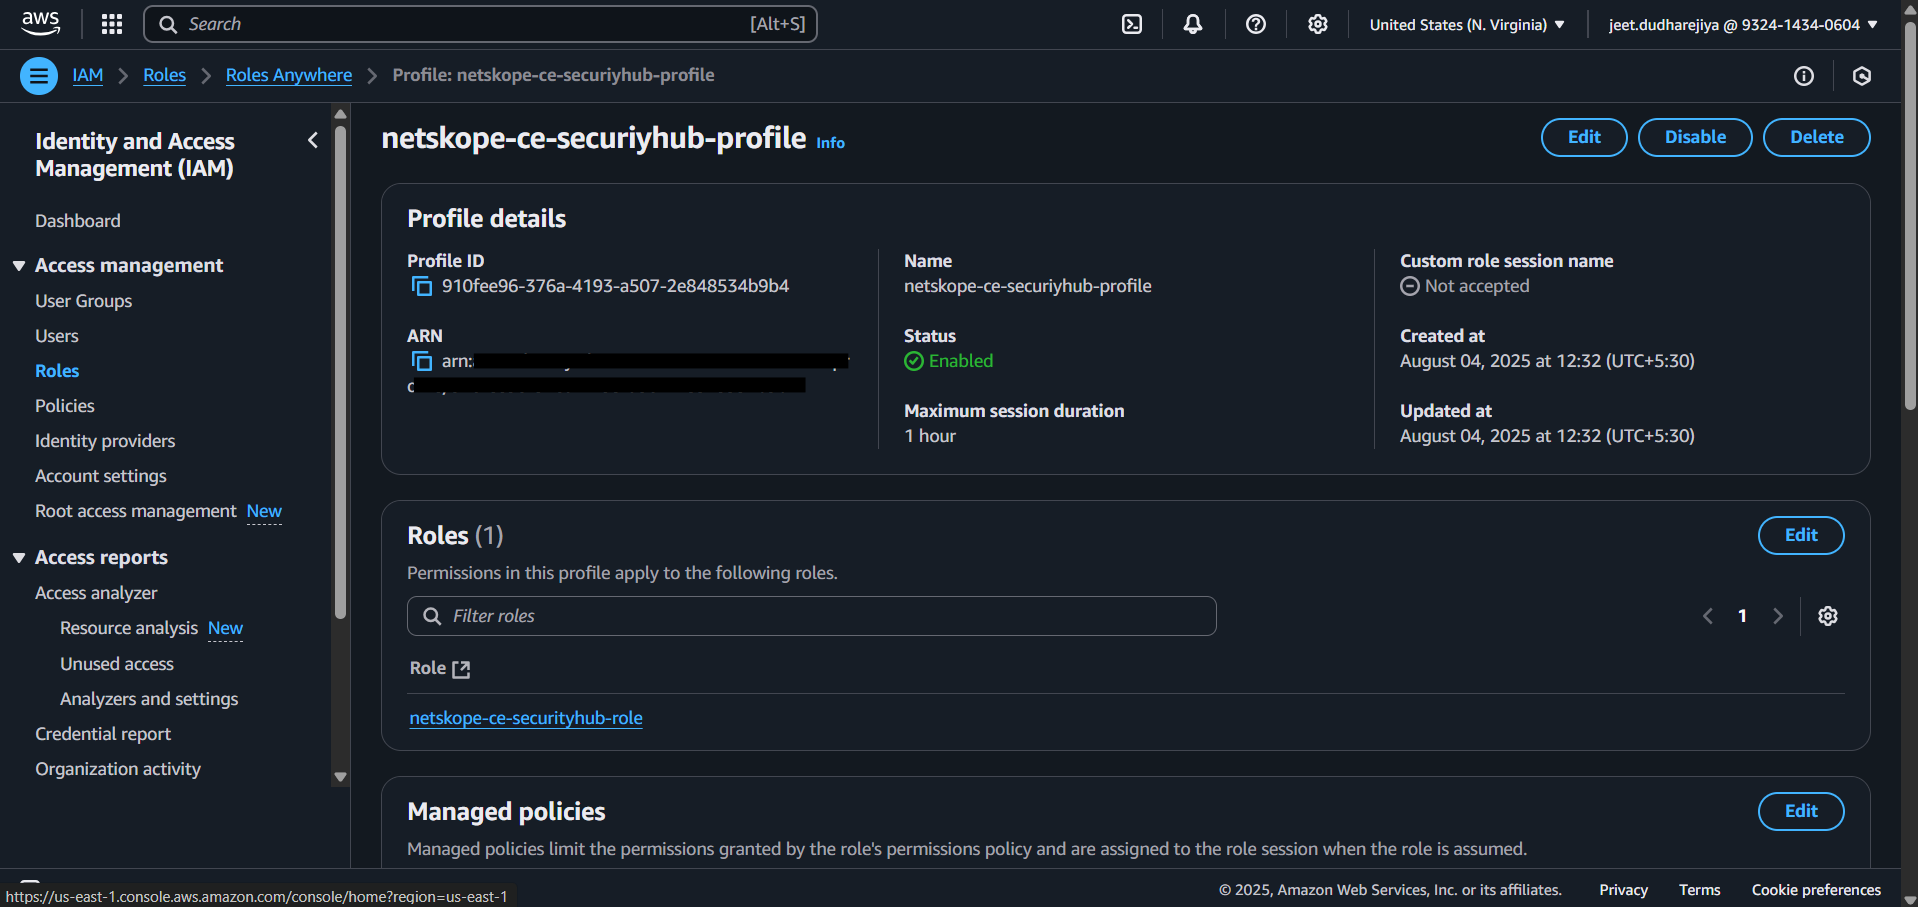
- Select the created Profile and copy the Profile ARN.
Request a Private Certificate
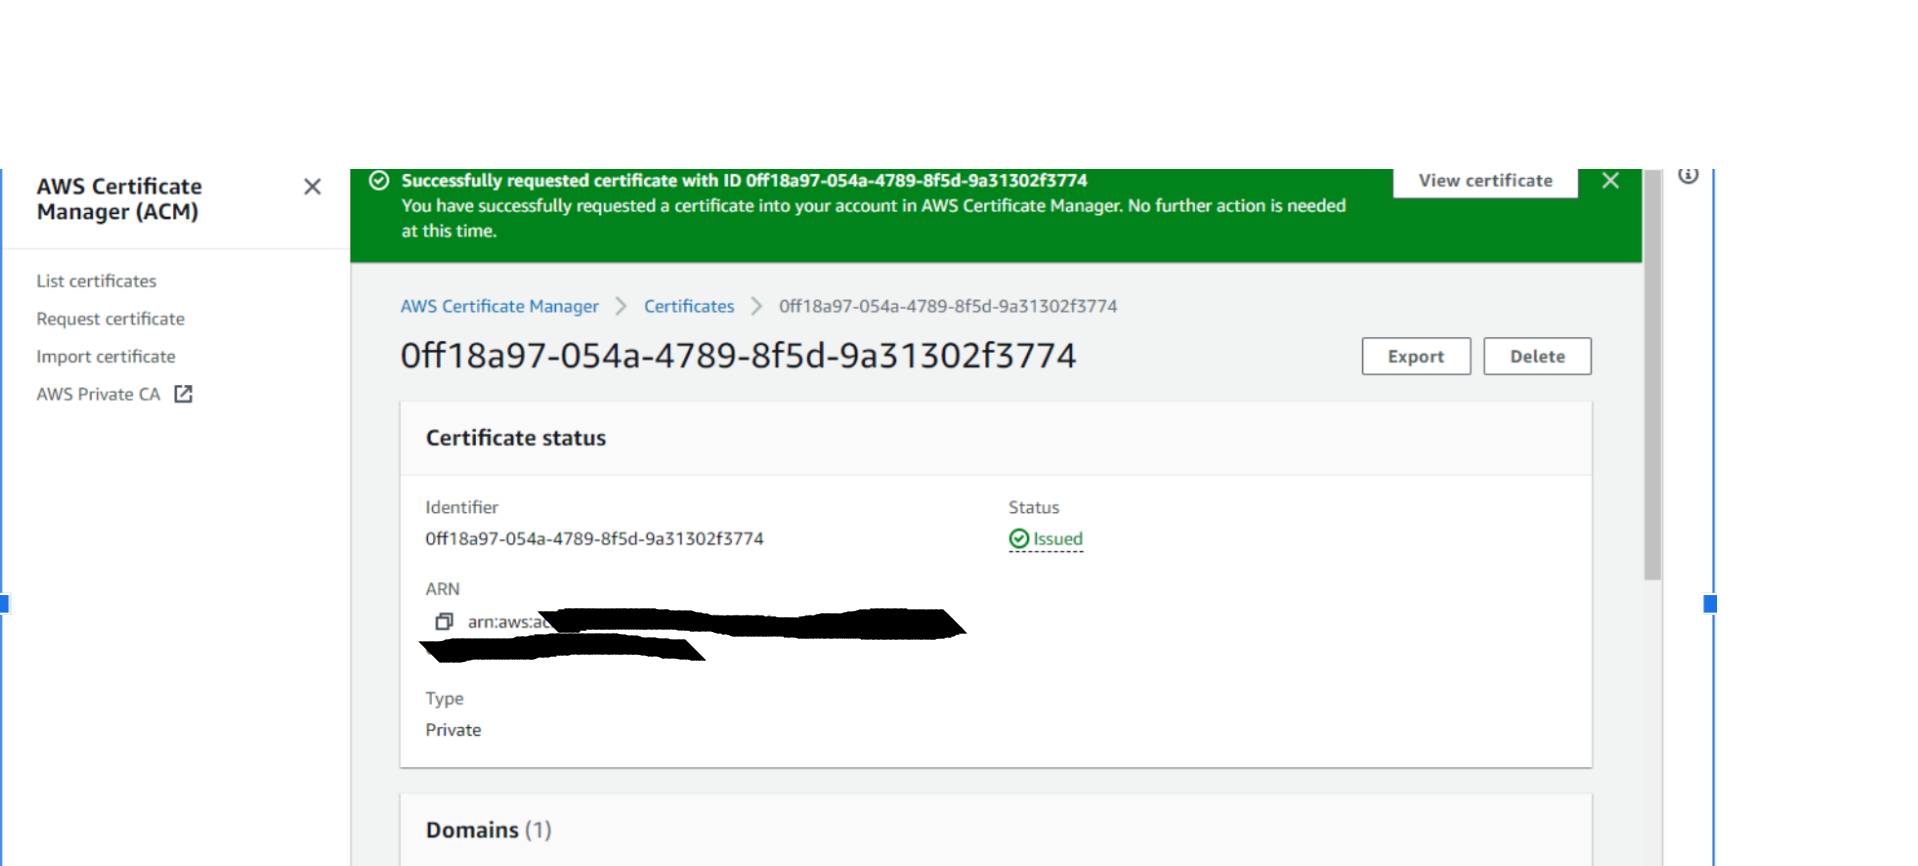
- Go to AWS Certificate Manager > Request certificate.
- Select Request a private certificate.

- Click Next.
- Select the Certificate authority created in the previous step.

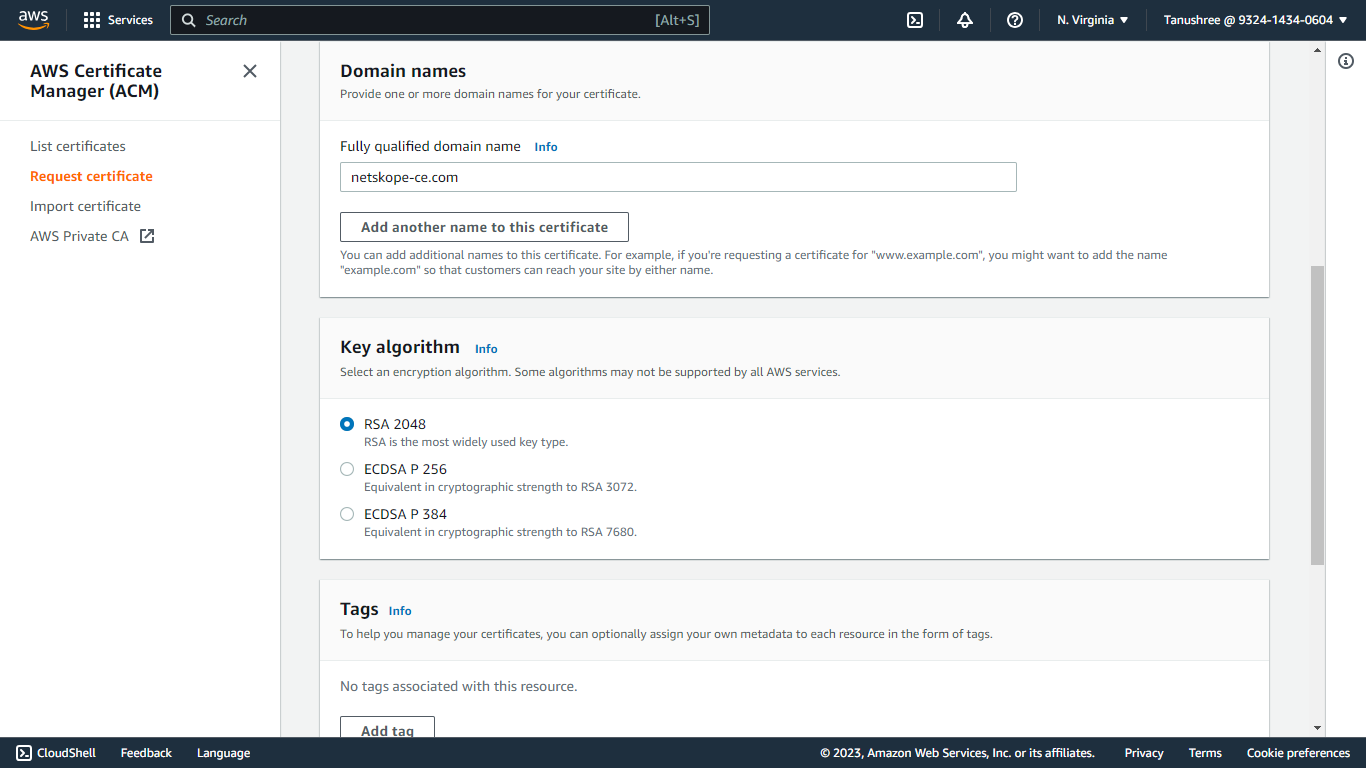
- Provide a domain name in the Fully qualified domain name field, like netskope-ce-verified-access.com.
- Select RSA 2048 as the Key algorithm.
- Add tags if required.
- Acknowledge the Certificate renewal permissions.
- Click Request.

- Go to List certificates from the navigation pane of AWS Certificate Manager.
- Select the certificate created previously.
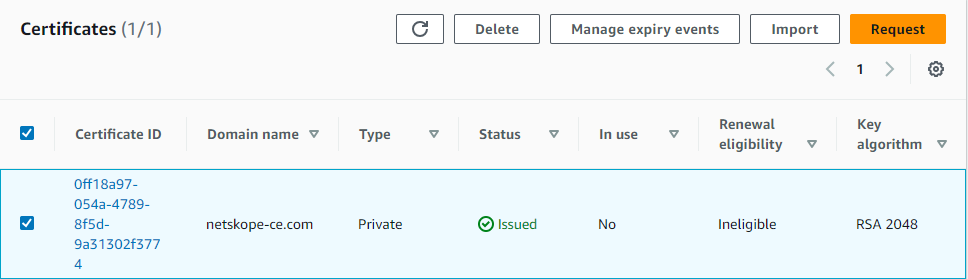
- Click Export.
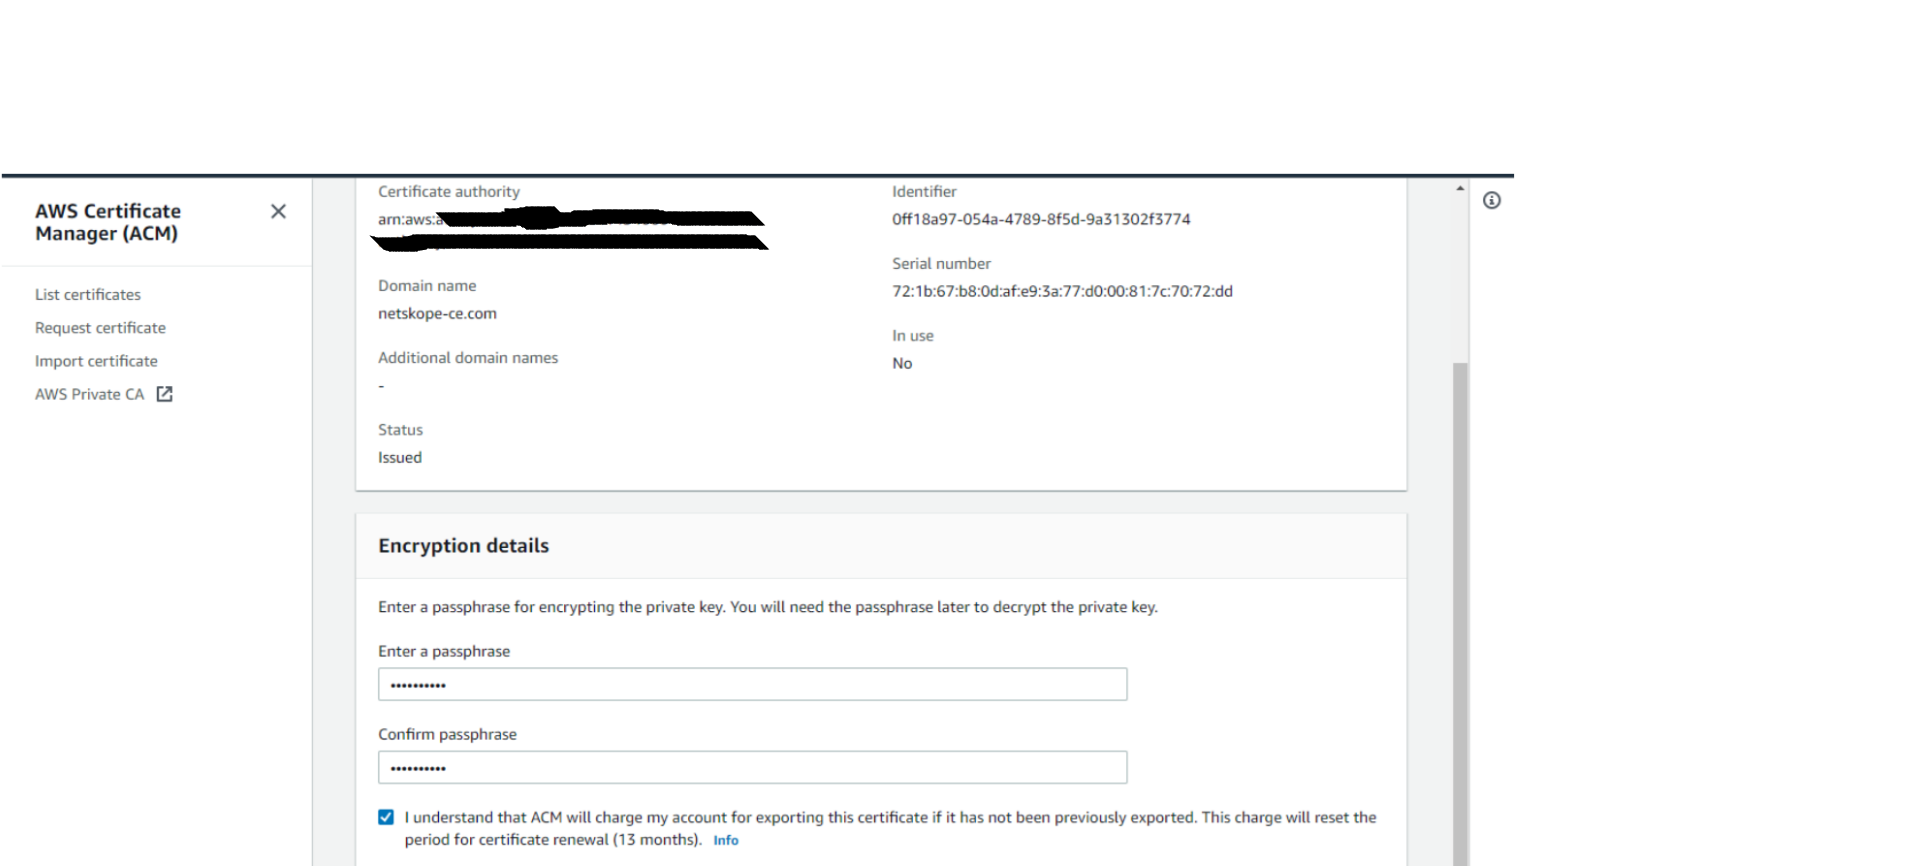
- Enter a passphrase. Make a note of the passphrase as it will be required for the Configuration of the AWS Security Lake Plugin using the AWS IAM Roles Anywhere Authentication method.
- Click Generate PEM Encoding.
- Download all the Certificates as it won’t be visible again. For new certificates, you will need to Export them again.
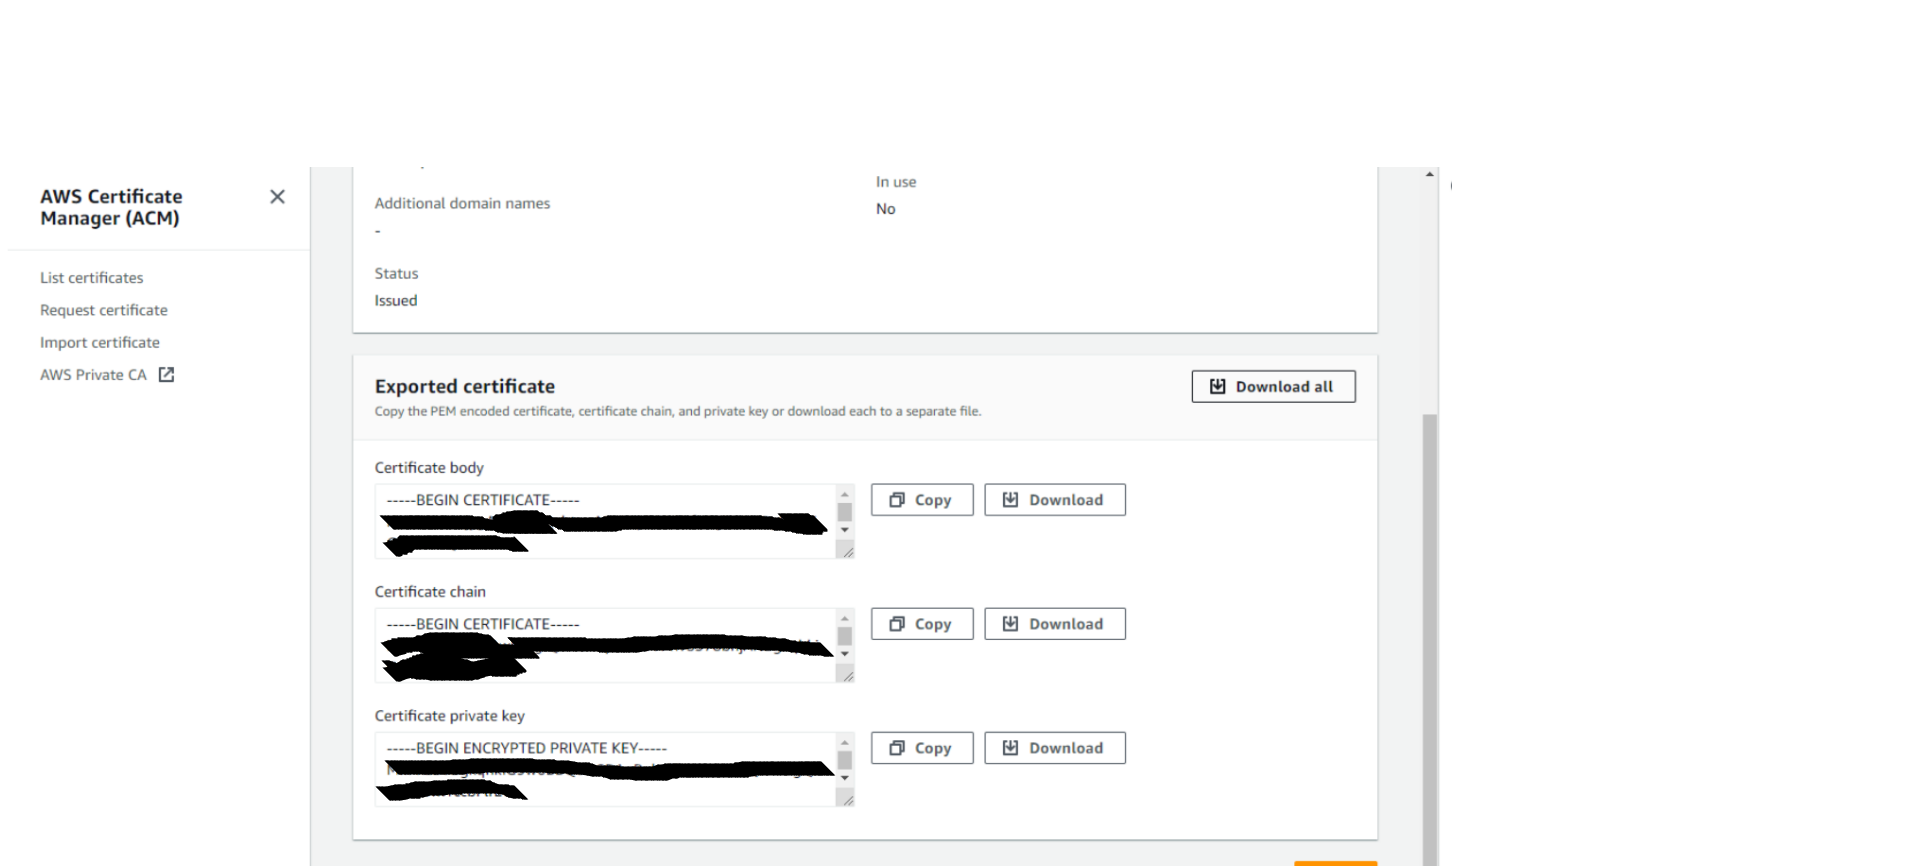
The Certificate body, Certificate Private Key will be required for the Configuration of the AWS Verified Access Plugin using the AWS IAM Roles Anywhere authentication method. For more info, go to AWS IAM Role Anywhere.
AWS Authentication
Create a Role
- Go to IAM services in the AWS Console.
- Click Create role.

- Select the AWS Service.
- Under Use case, select EC2.
- Click Next.

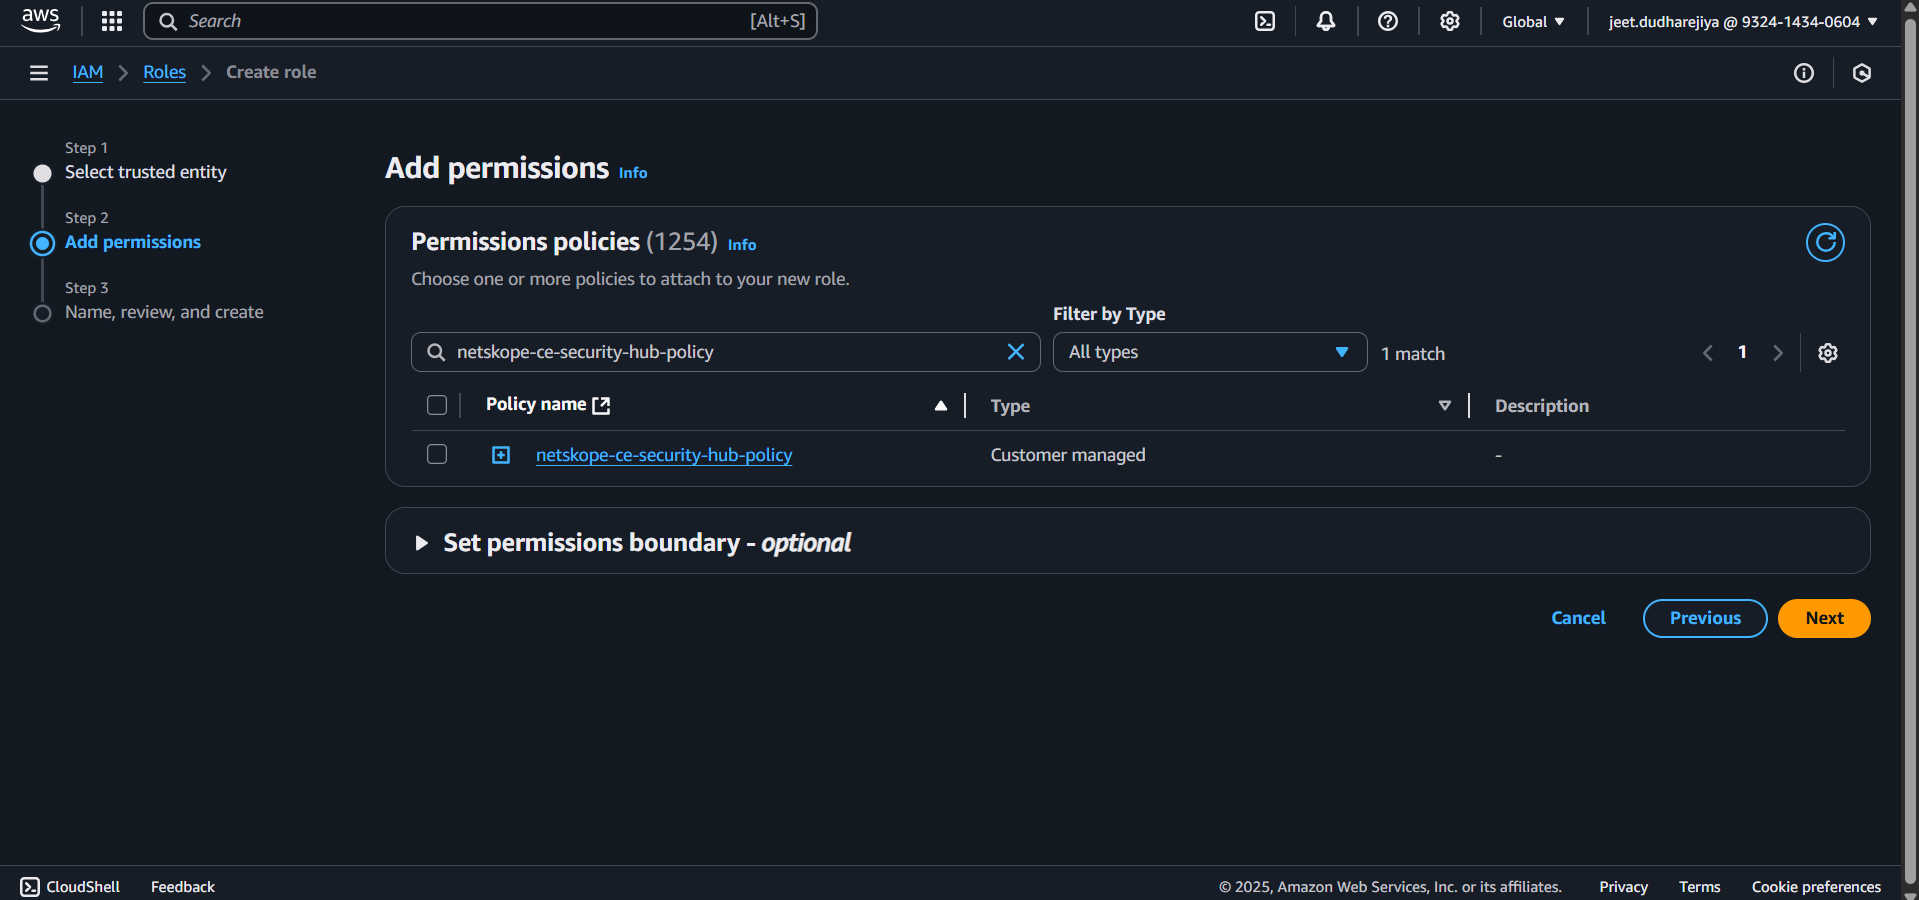
- Select the permission policy created in Create an AWS Security Hub policy.
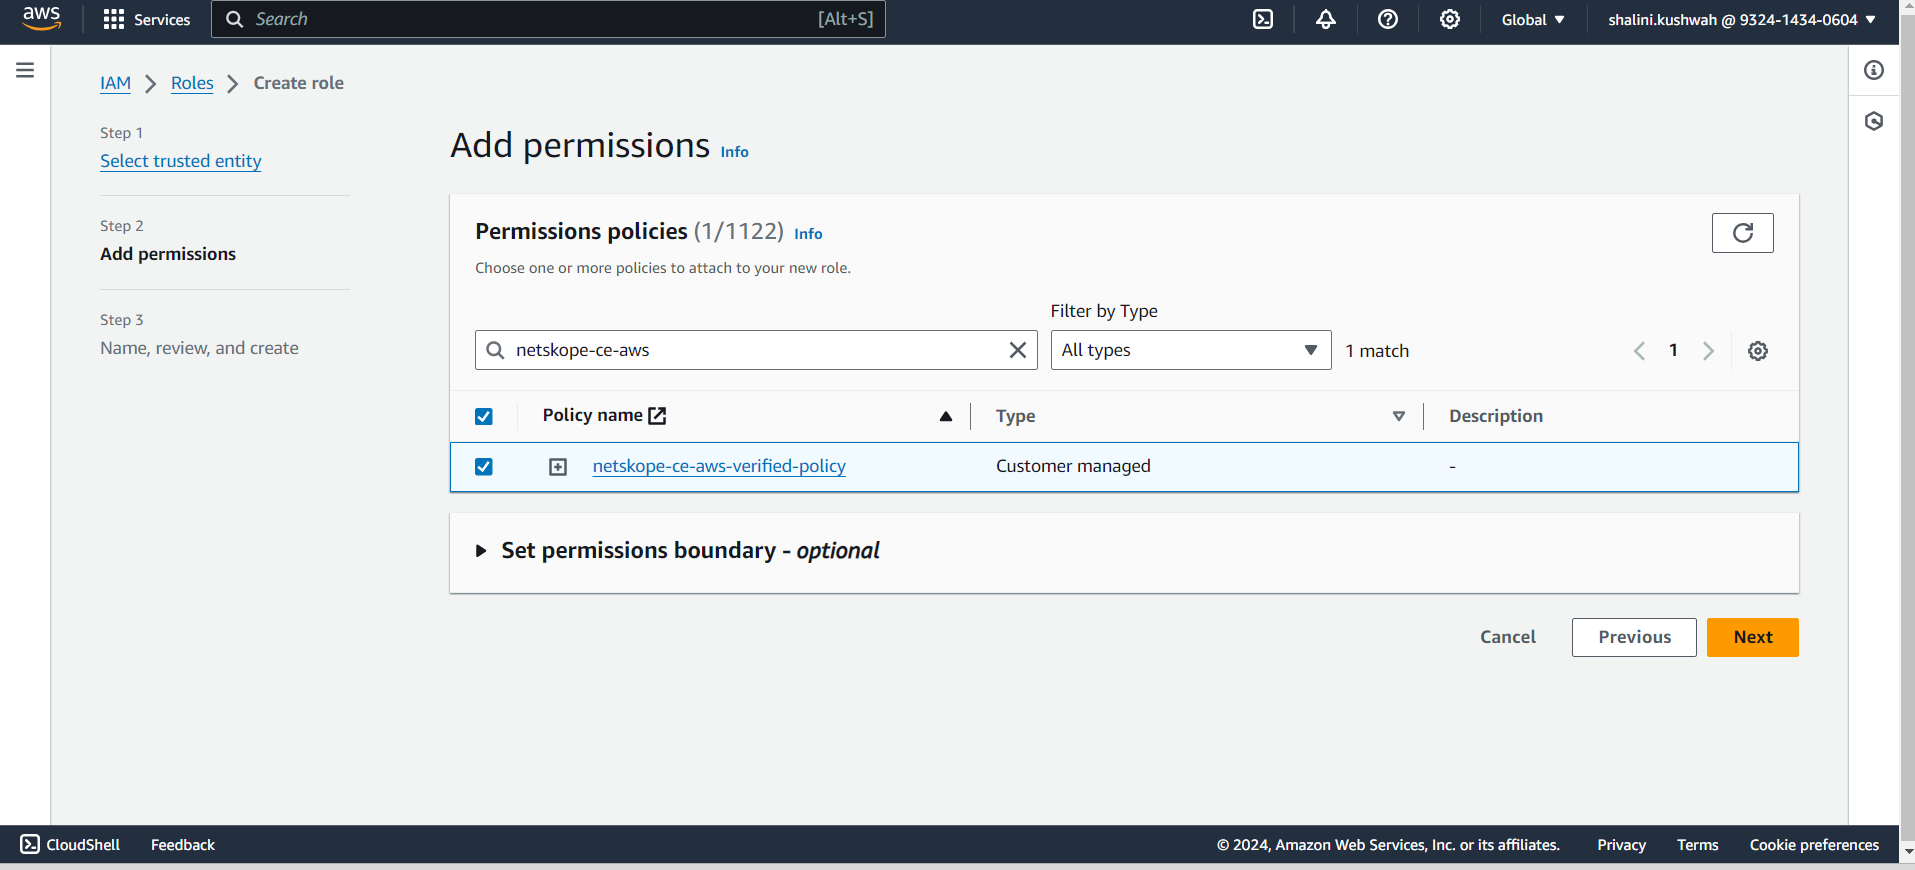
- Click Next.
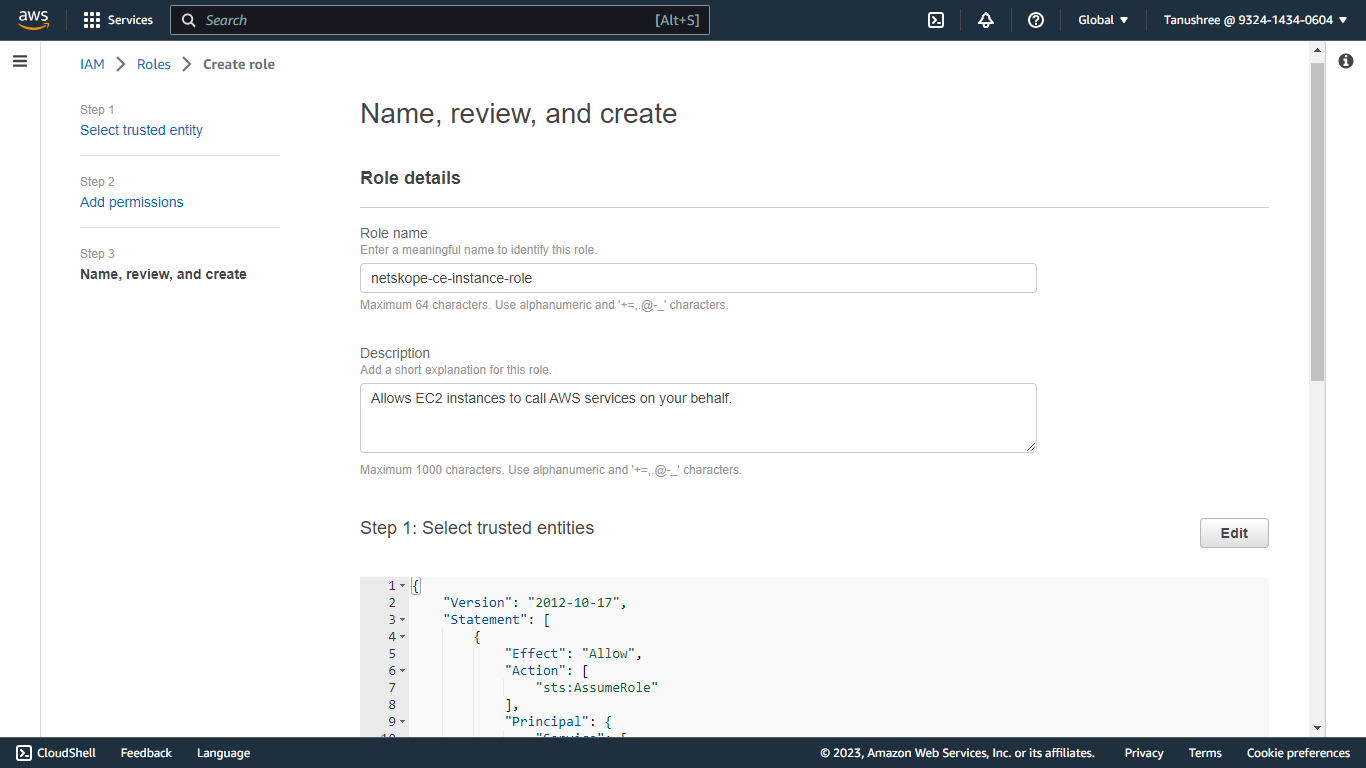
- Enter a Role Name and Description.
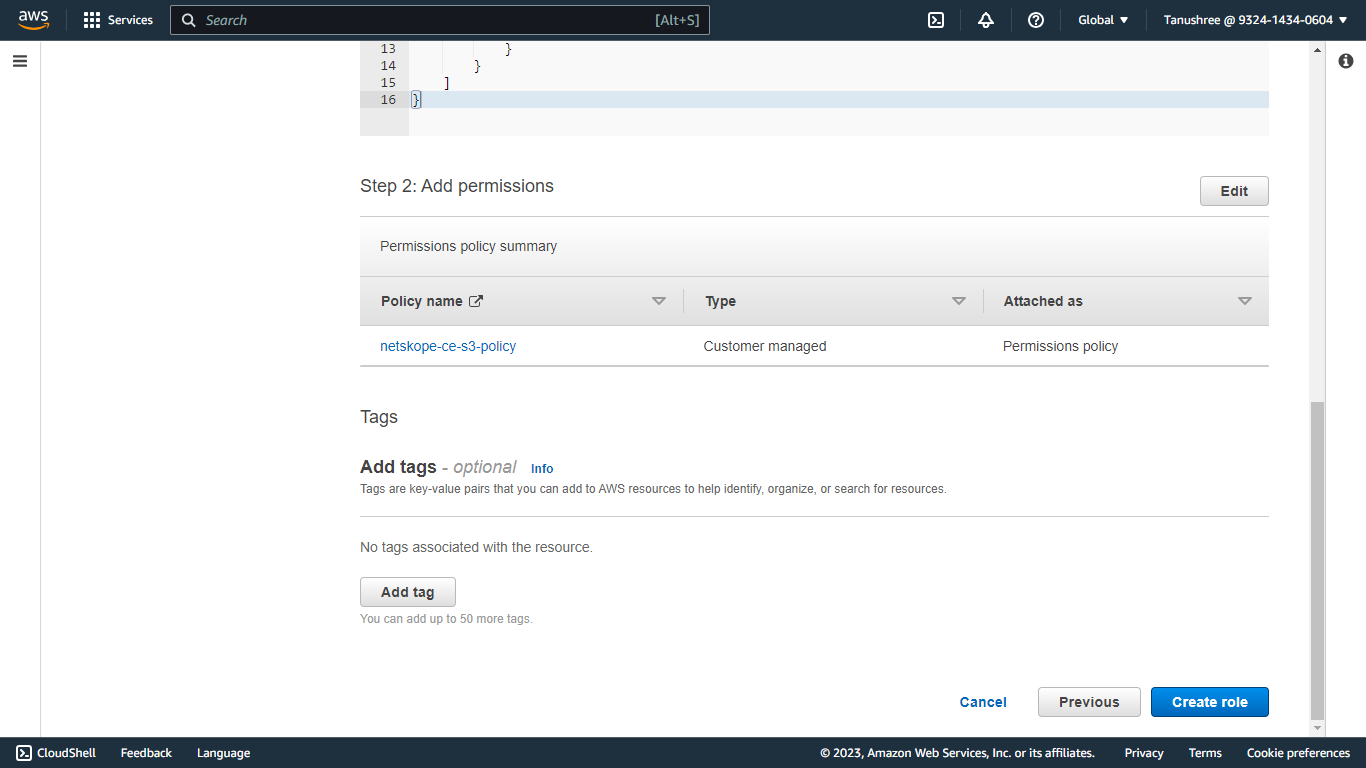
- Click Create Role.
Assign a Role to an EC2 Instance
- Log in to your EC2 instance console.
- Click Instances under Instances.


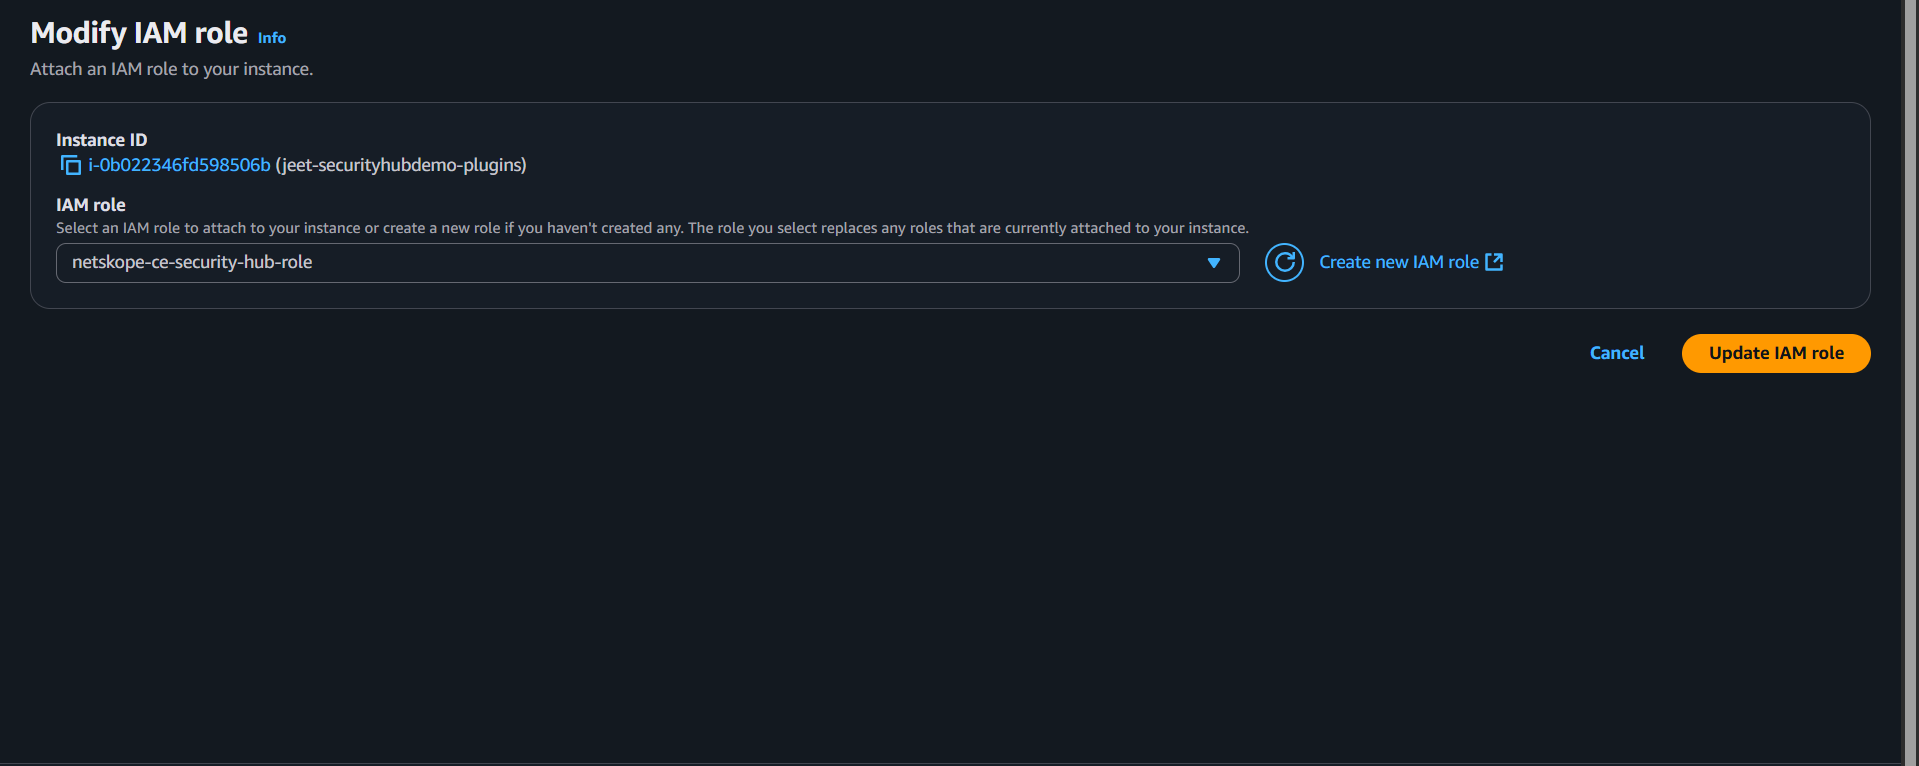
- Go to Action > Security > Modify IAM Role.

- Select the Role that you created above in Create a Role. (netskope-ce-instance-role).
- Click Add IAM Role or Modify IAM Role. Note that both EC2 instance and Queue should be on the same region.
Configure the AWS Inspector Plugin
-
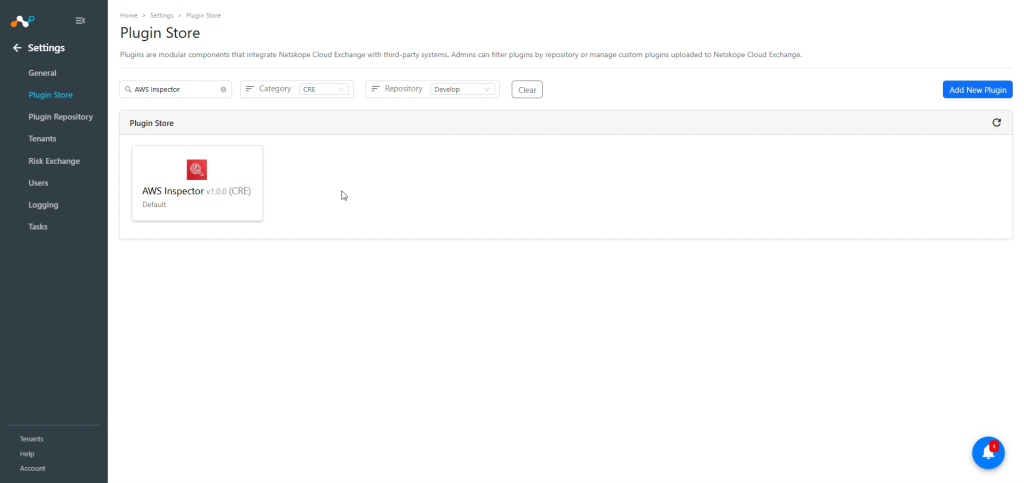
In Cloud Exchange, go to Settings > Plugin Store. Search for and select the AWS Inspector v1.0.0 (CRE) plugin.
-
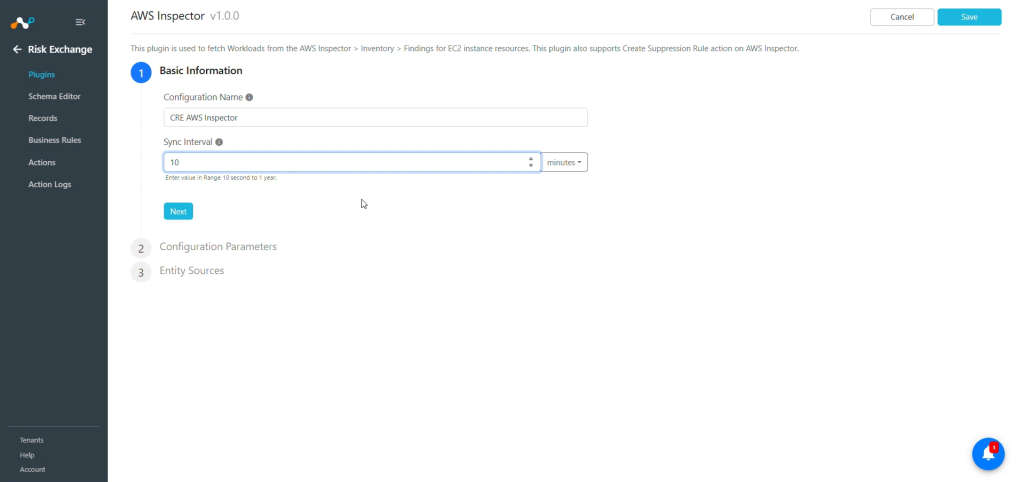
Add plugin configuration name and change sync interval if needed.
-
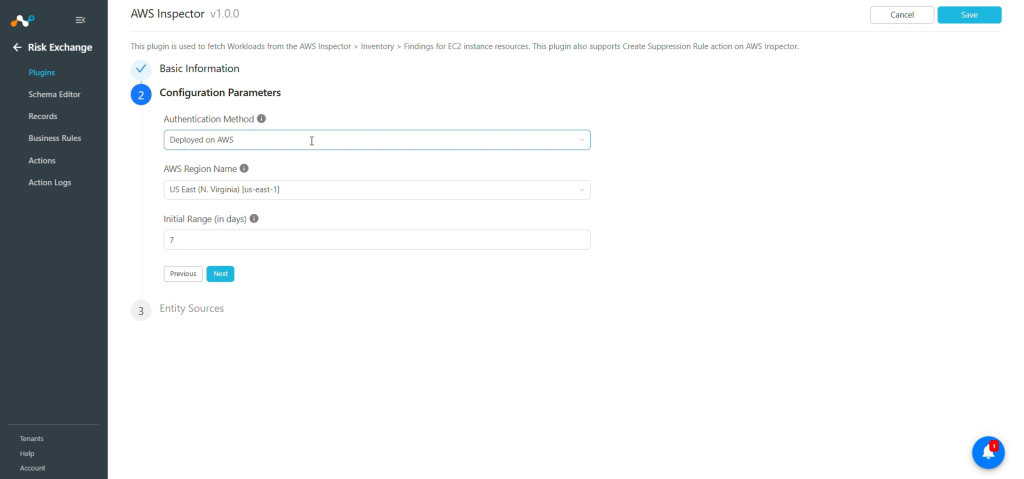
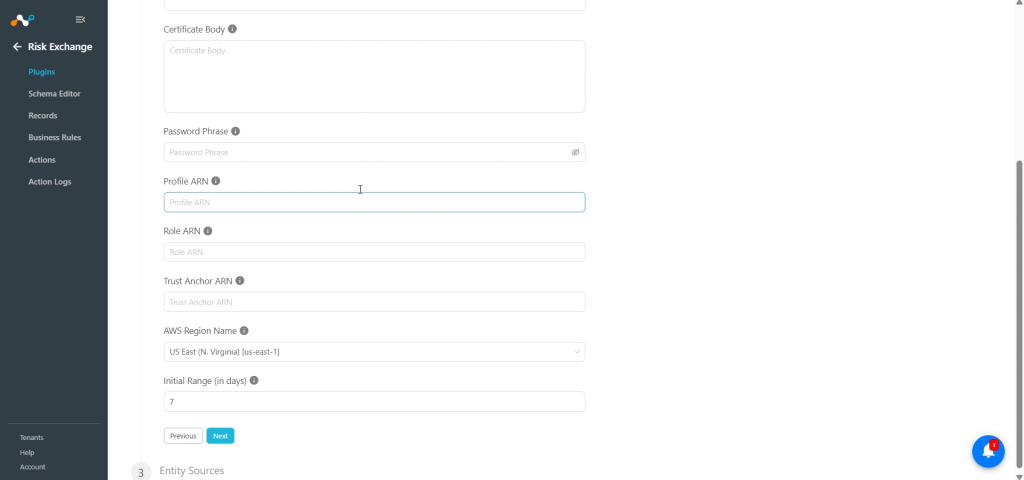
Click Next and the Configuration Parameters:
-
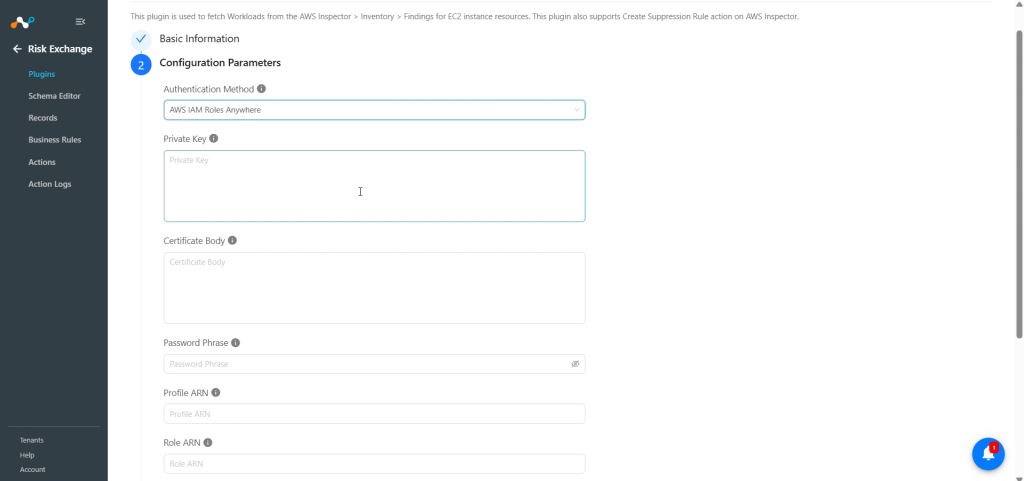
Authentication Method: Select the method to be used for authentication (Deployed on AWS/AWS IAM Roles Anywhere)
-
Private Key: Private Key for decrypting the AWS Private CA Certificate. Required for the AWS IAM Roles Anywhere authentication type.
-
Certificate Body: Certificate Body for AWS Public/Private CA Certificate. Required for the AWS IAM Roles Anywhere authentication type.
-
Password Phrase: Password Phrase for decrypting the CA Certificate. Required for the AWS IAM Roles Anywhere authentication type authentication type.
-
Profile ARN: AWS Profile ARN for AWS client authentication. Required for the AWS IAM Roles Anywhere authentication type.
-
Role ARN: AWS Role ARN for AWS client authentication. Required for the AWS IAM Roles Anywhere authentication type.
-
Trust Anchor ARN: AWS Trust Anchor ARN for AWS client authentication. Required for the AWS IAM Roles Anywhere authentication type.
-
AWS Region Name: AWS Region Name. Make sure that the region name matches the region in the Profile ARN and Trust Anchor ARN.
-
Initial Range: Number of days to pull the data for the initial run.
-
-
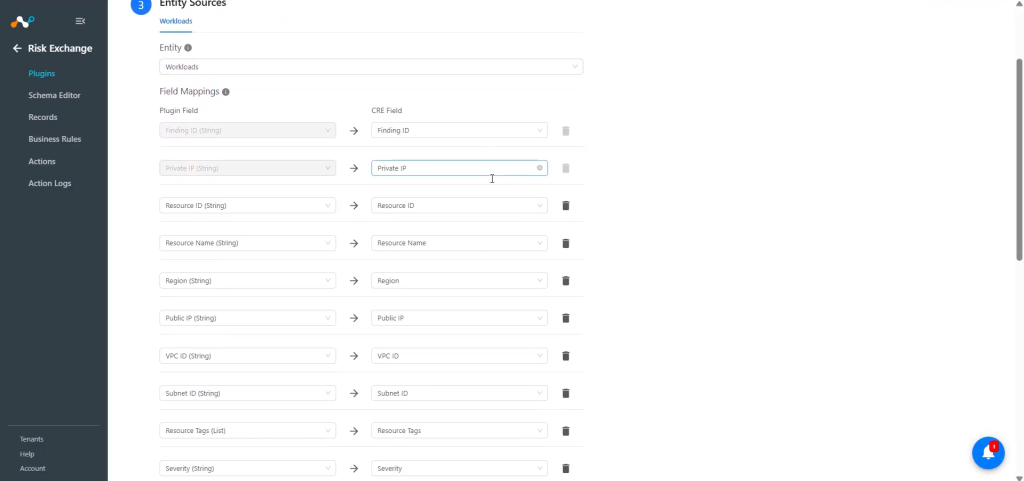
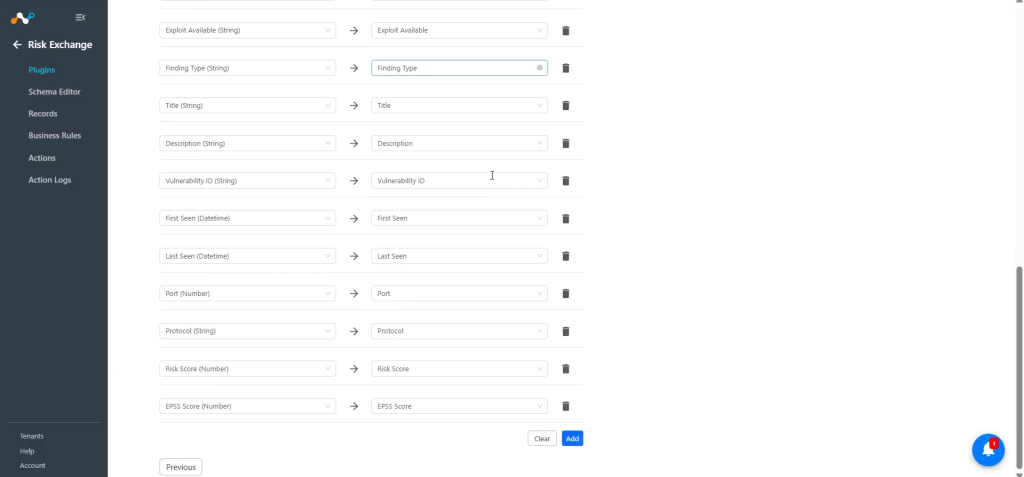
Click Next and select the required Entity from the Entity dropdown. Provide the field mappings per your requirements. You can create a new one by clicking Add.
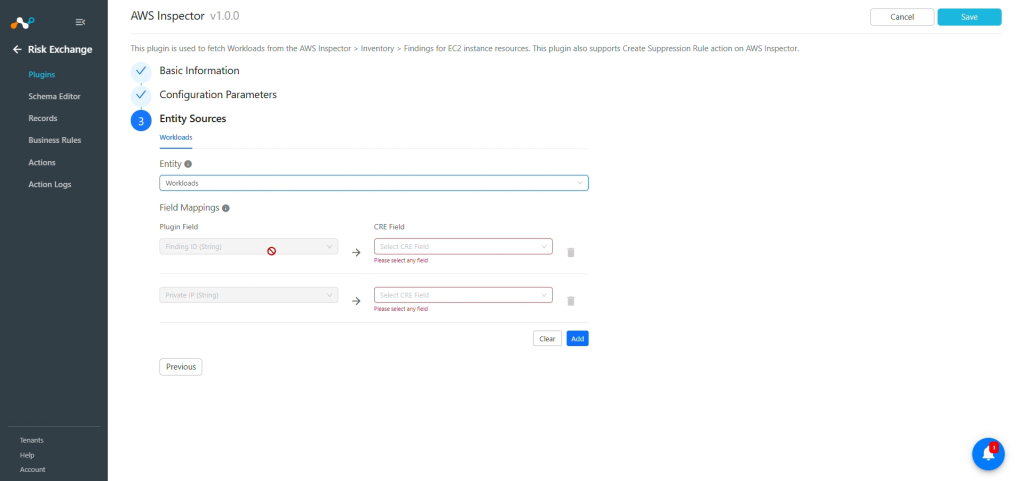
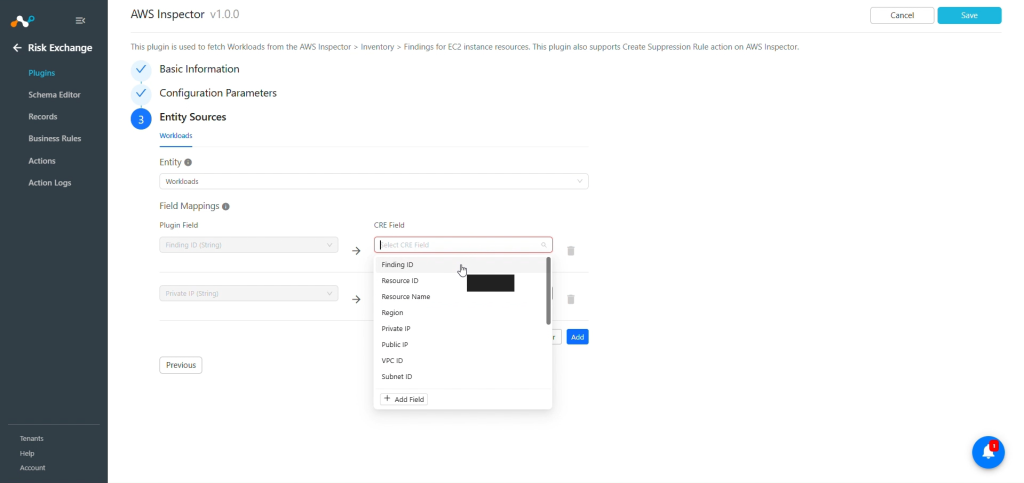
To create a new field, click Add field.
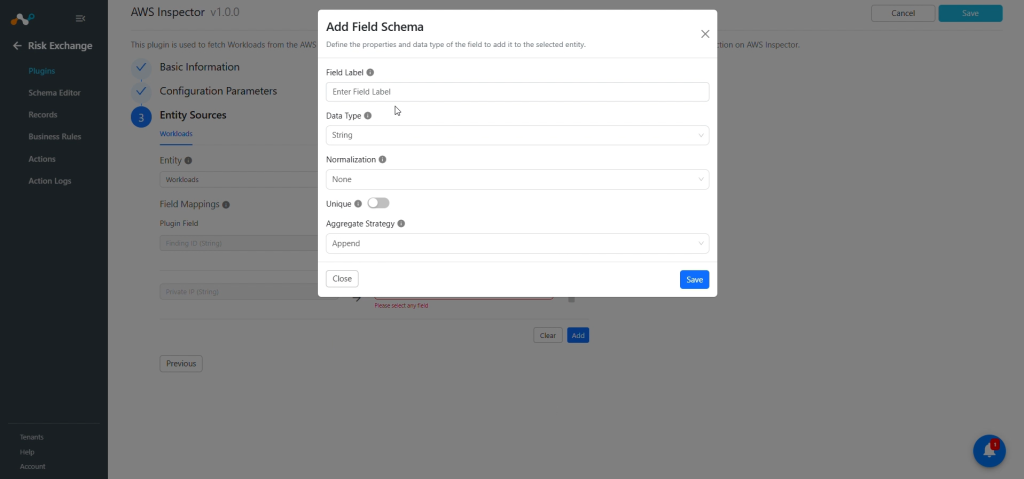
Provide the Field Label, Data Type, Normalization and Aggregate Strategy per your requirements, and then click Save.
Map the created fields:
Note
- Refer to the Mappings section while configuring the plugin.
- Finding ID and Private IP fields will be required to pull the Workloads.
-
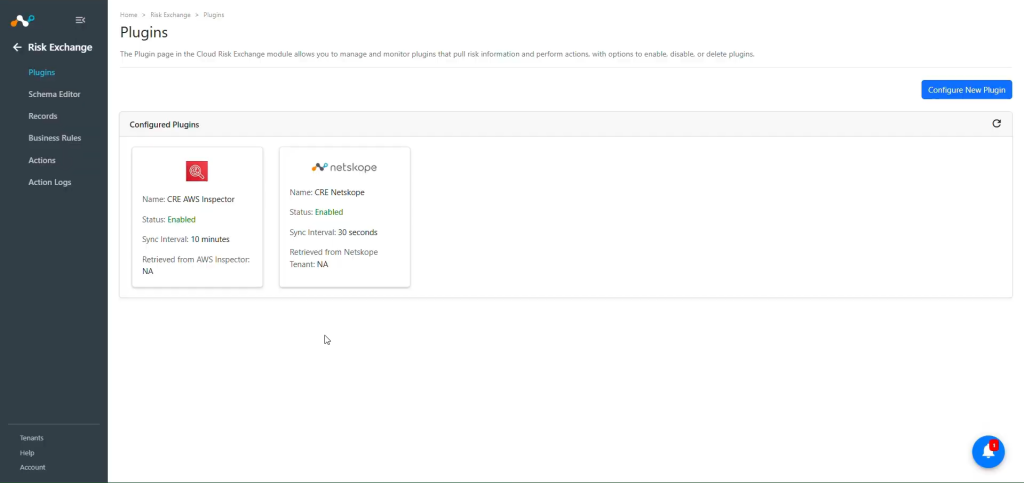
Click Save.


Configure a Risk Exchange Business Rule for the AWS Inspector Plugin
-
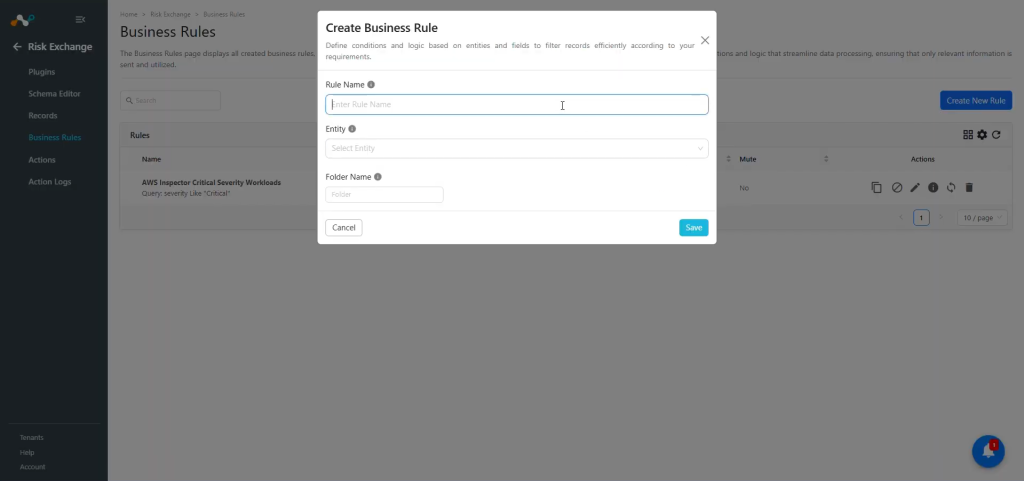
In Risk Exchange, click Business Rules and Create New Rule.
-
Enter a Rule Name. Select the Entity for which Fields have been configured for the AWS Inspector plugin, and configure the query based on your requirements. This example filters the data fetched from the plugin.
-
Click Save.

Configure Risk Exchange Actions for the AWS Inspector Plugin
The AWS Inspector plugin supports the following action types:
- Create Suppression Rule: Create Suppression Rule action can be used to create a suppression rule on AWS Inspector.
- No Action: No action will be performed for this action. Users can generate UBA alerts in Ticket Orchestrator by using this action and enabling the Generate Alerts toggle.
Create a Suppression Rule
-
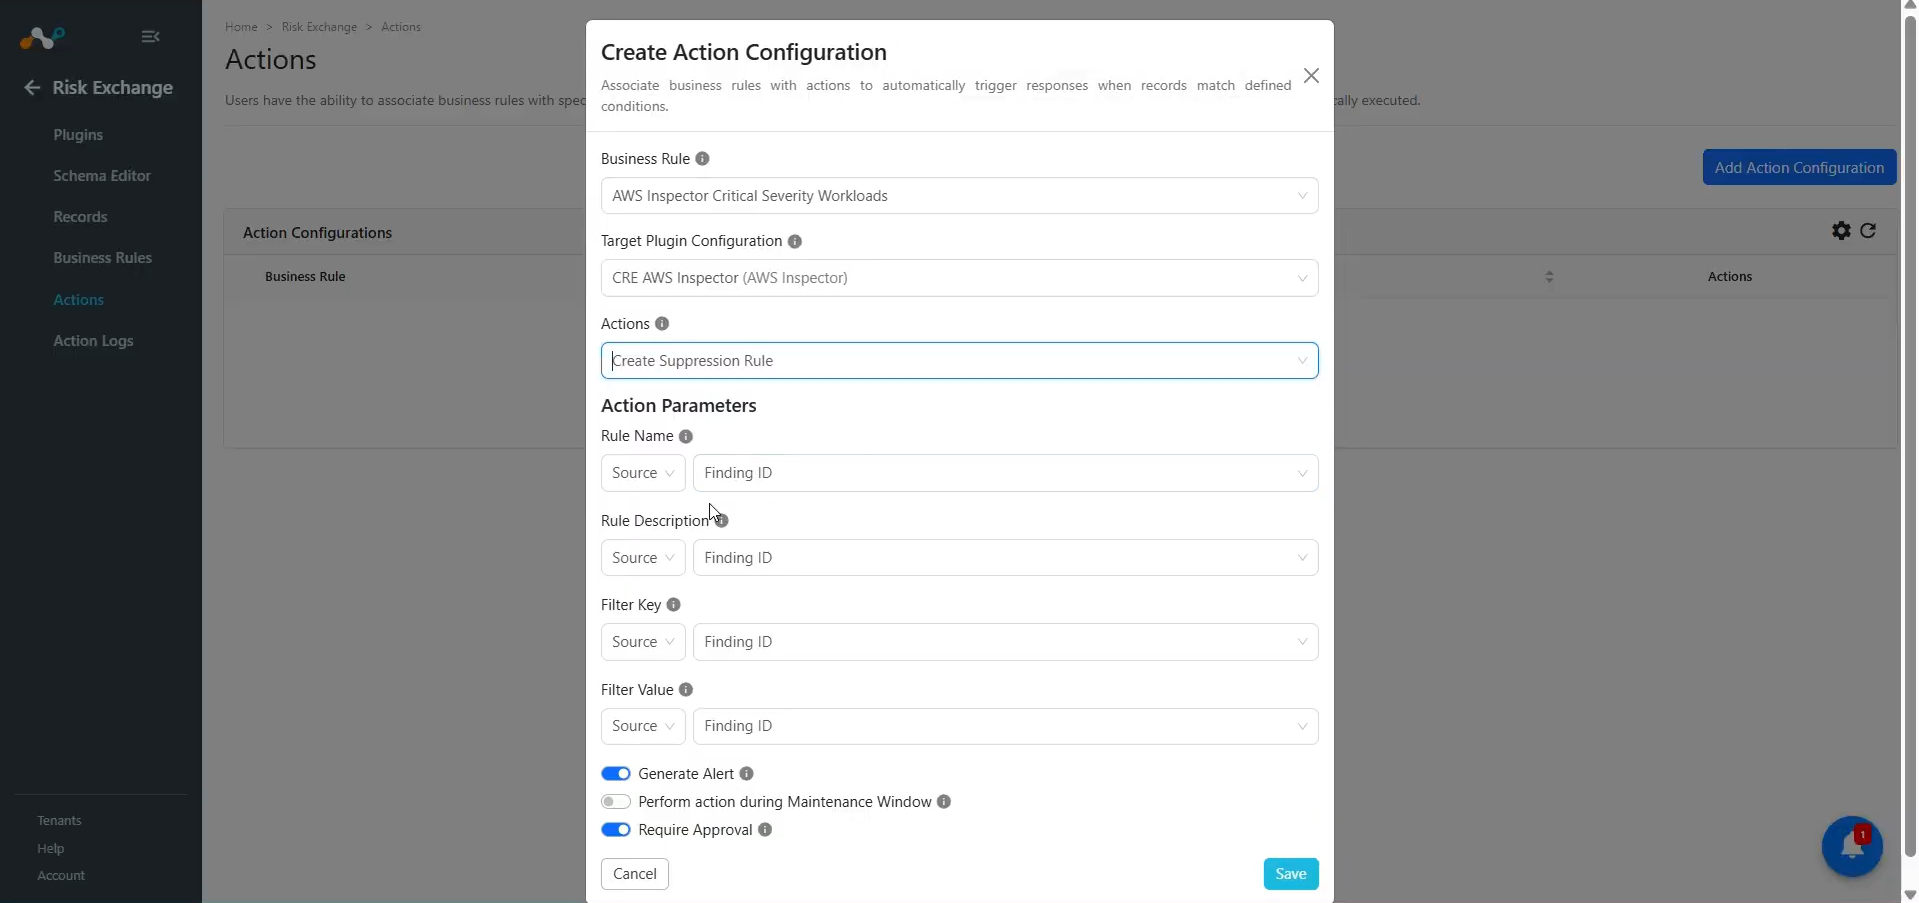
In Risk Exchange, go to Actions and click Add Action Configuration.
-
Select the required Business Rule, Target Plugin Configuration, and Action from their respective dropdowns.
-
Enable the Require Approval toggle if Approval is needed before performing action on the pulled records. If the Require Approval toggle is enabled, then users need to manually approve the execution of each action from Risk Exchange on the Action Logs page.
-
Enter the Action Parameters:
- Rule Name: Name of the Suppression rule to create in AWS Inspector. Provide rule name in Static field. A maximum of 128 characters are allowed.
- Rule Description: Description for Suppression rule. Provide a description in the Static field.
- Filter Key: The AWS Inspector field is used as the suppression filter criteria. Select from Static field dropdown.
- Filter Value: Value to match for the selected filter field. Map to a source field or provide a static value.
-
Click Save.
No Action
- In Risk Exchange, go to Actions and click Add Action Configuration.
- Select the required Business Rule, Configuration, and Action from their respective dropdowns.
- Enable the Require Approval toggle if Approval is needed before performing action on the pulled records.
- Click Save.
Validate the AWS Inspector Plugin
Validate in Cloud Exchange
To validate the pulling:.
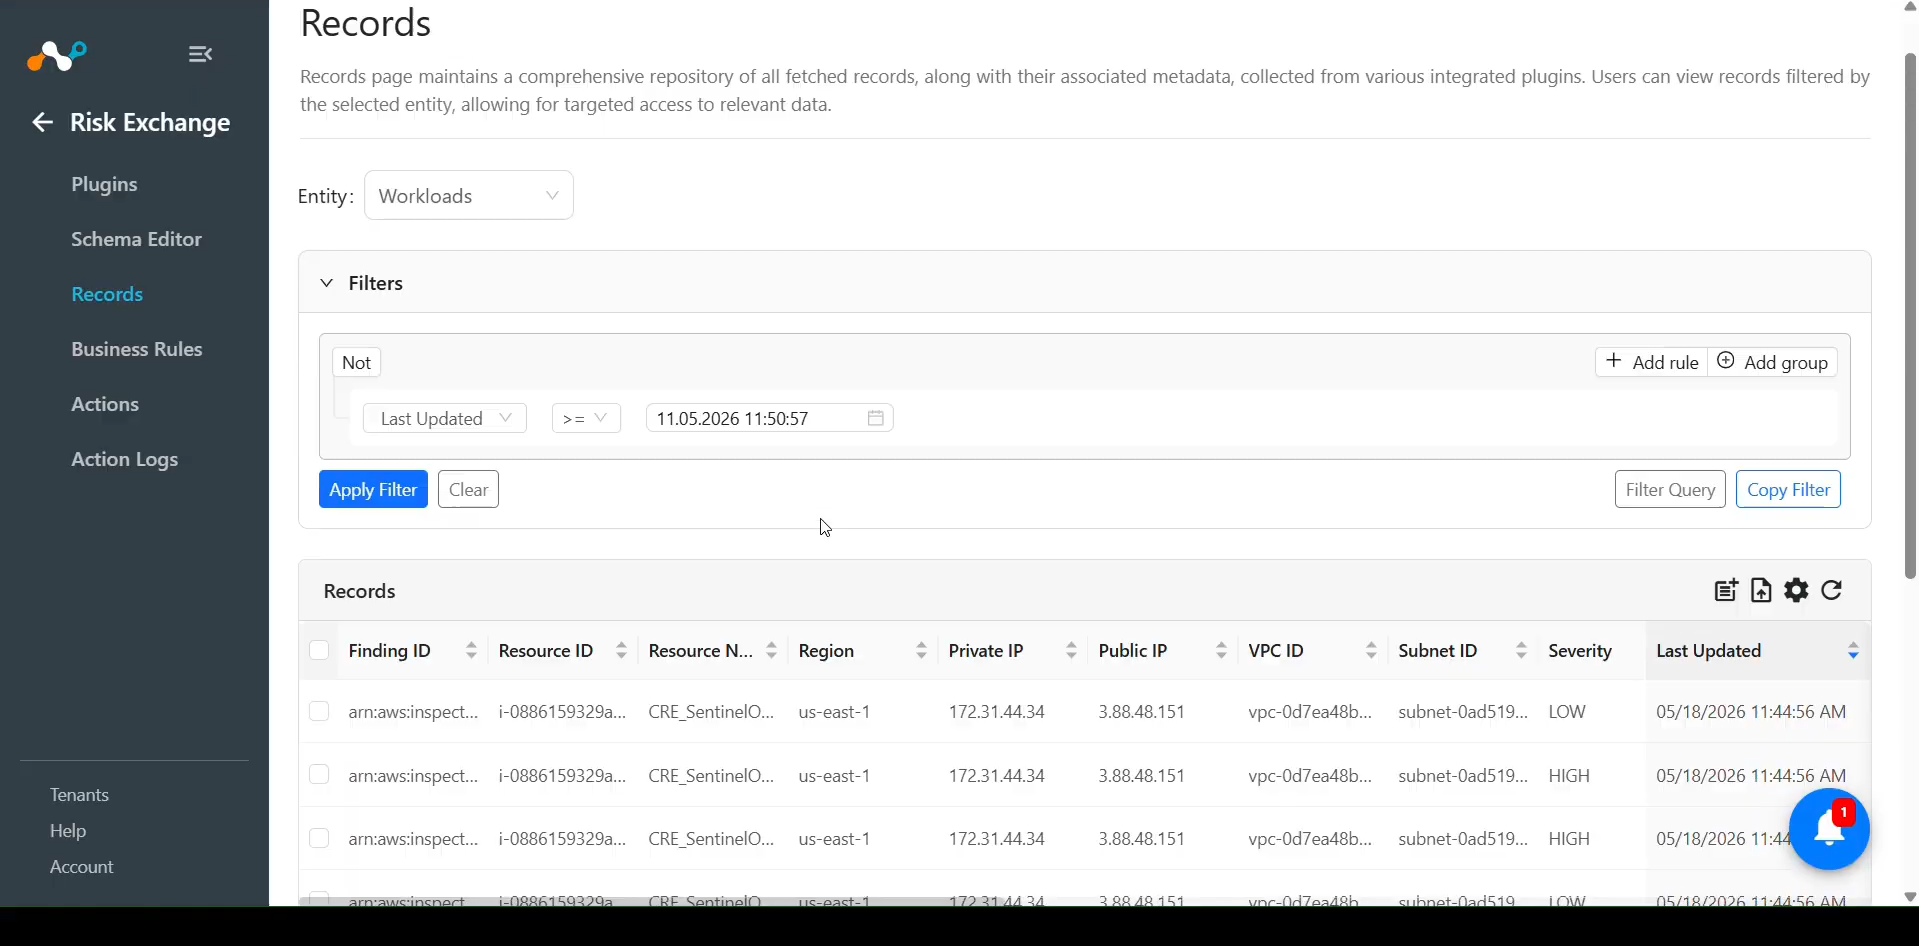
In Risk Exchange, and click on Records. Select the Entity that was selected while configuring the field mapping to view the pulled records.
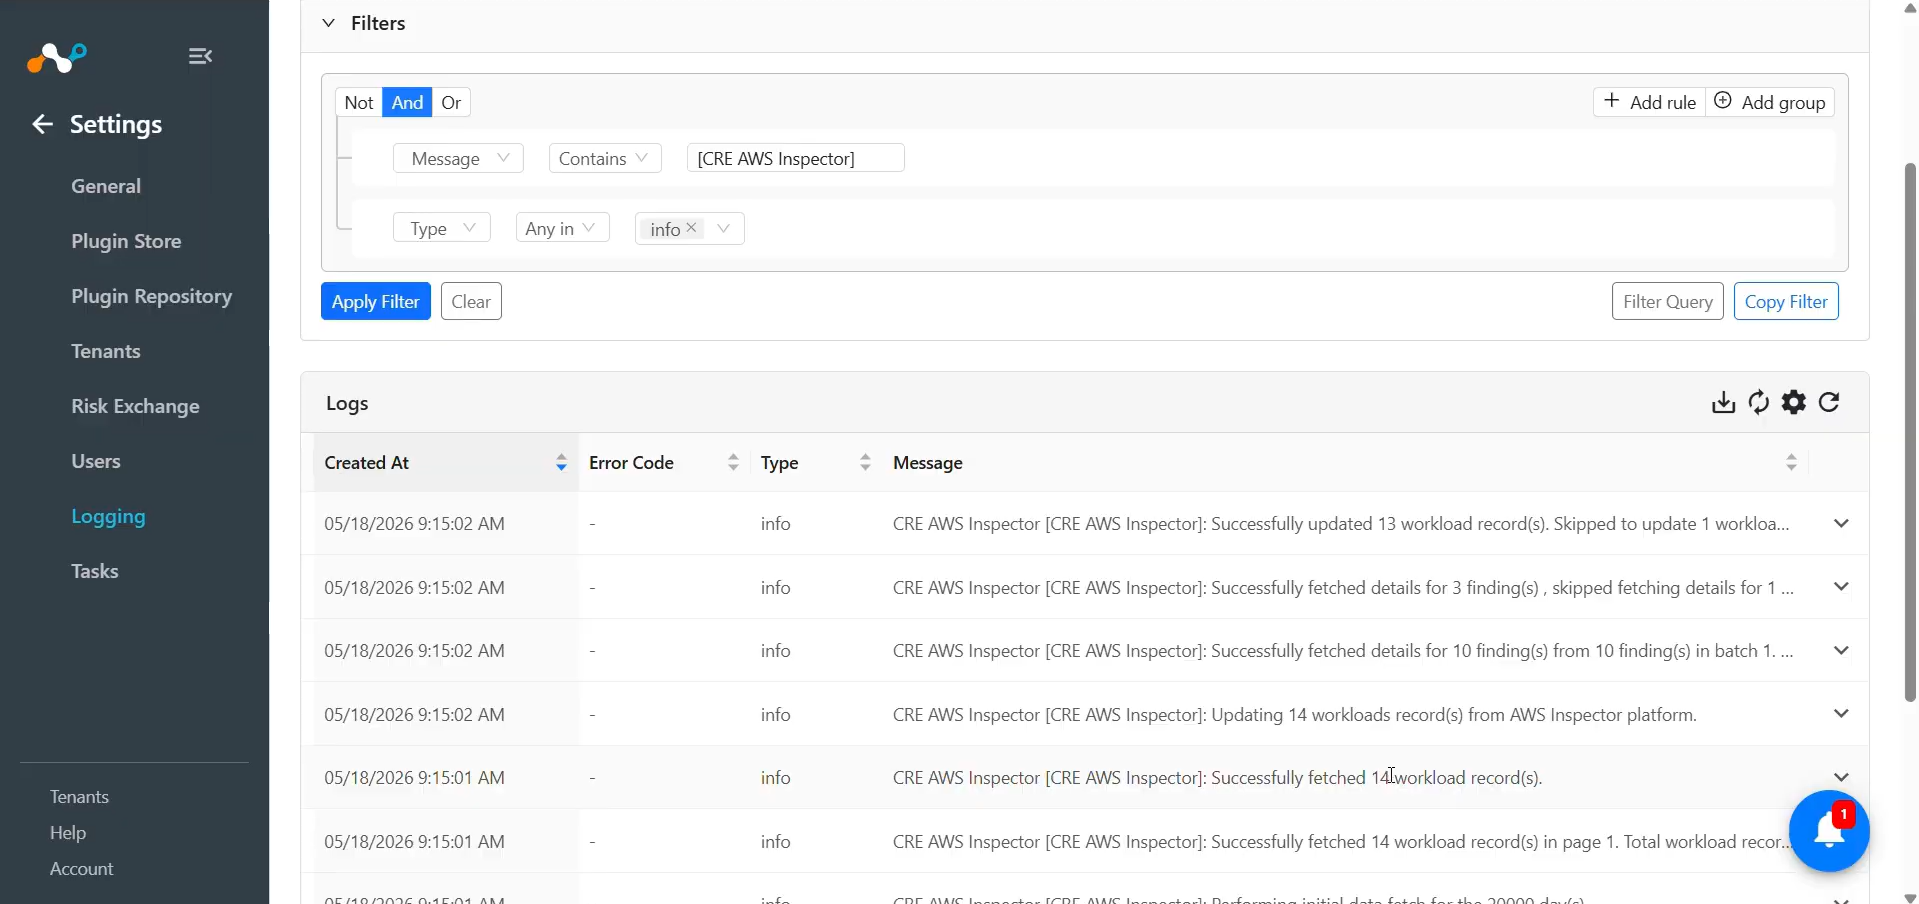
To verify the logs related to pulled records, navigate to the Home > Settings > Logging page and apply the filter with plugin name or plugin configuration name.
Logs for performed Create Suppression Rule action:
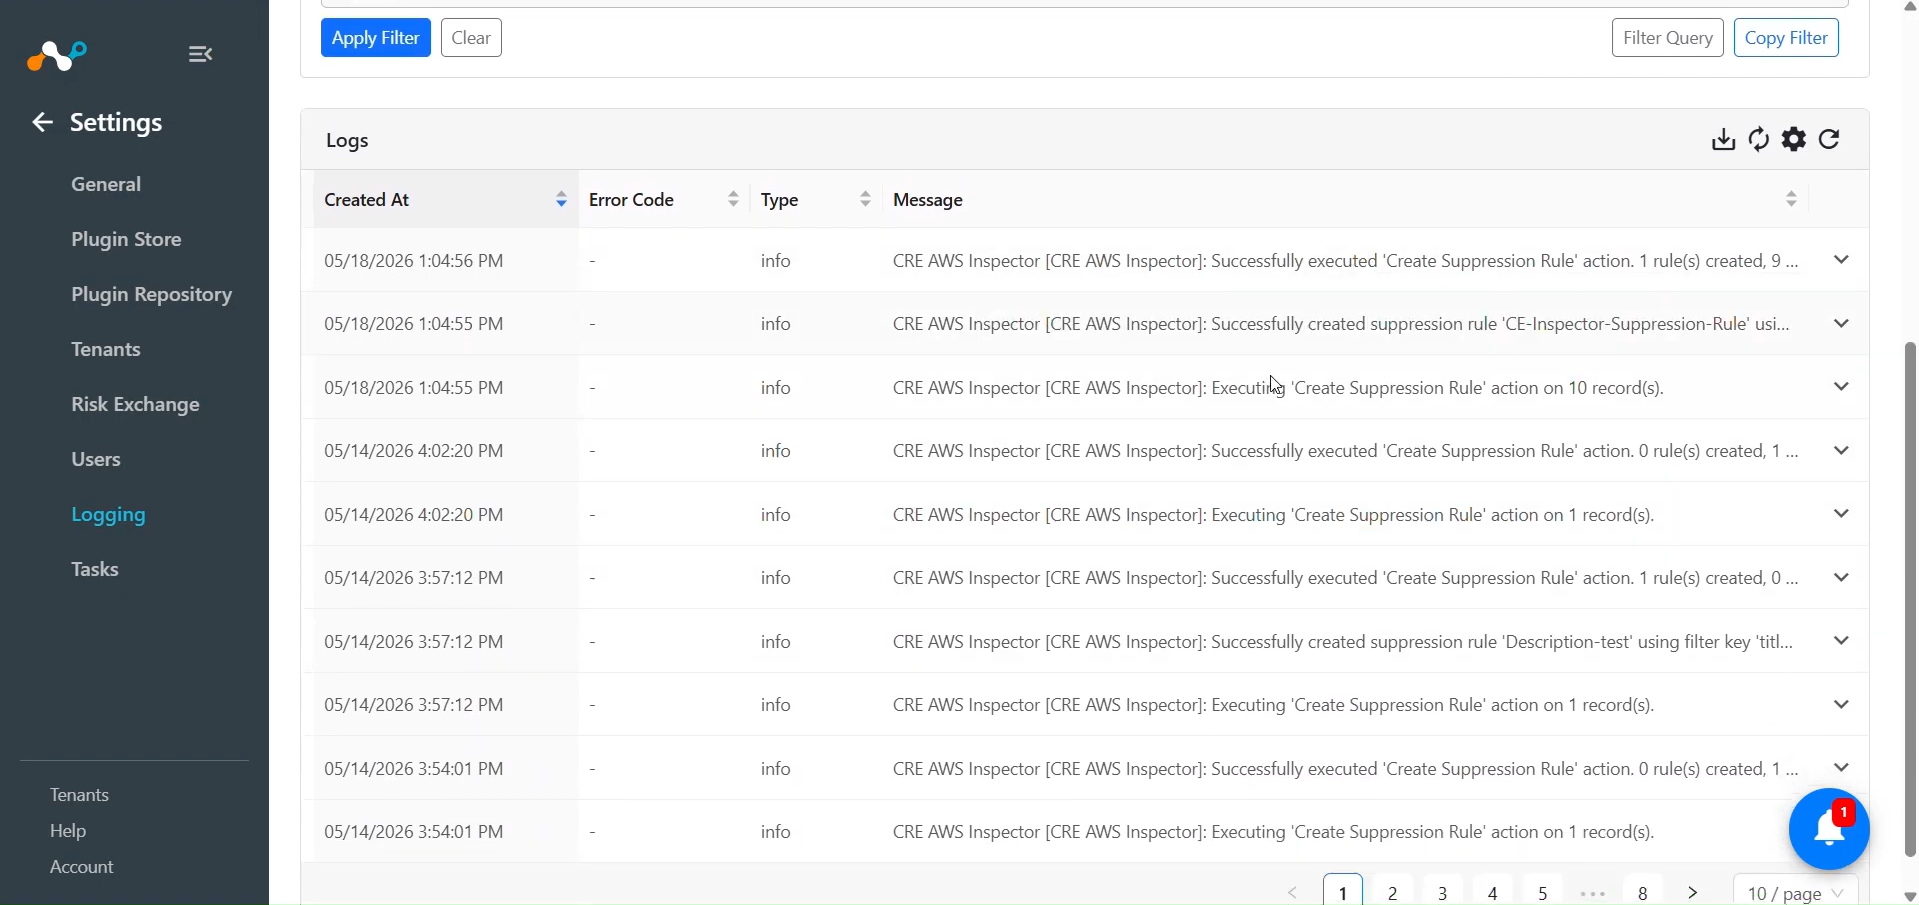
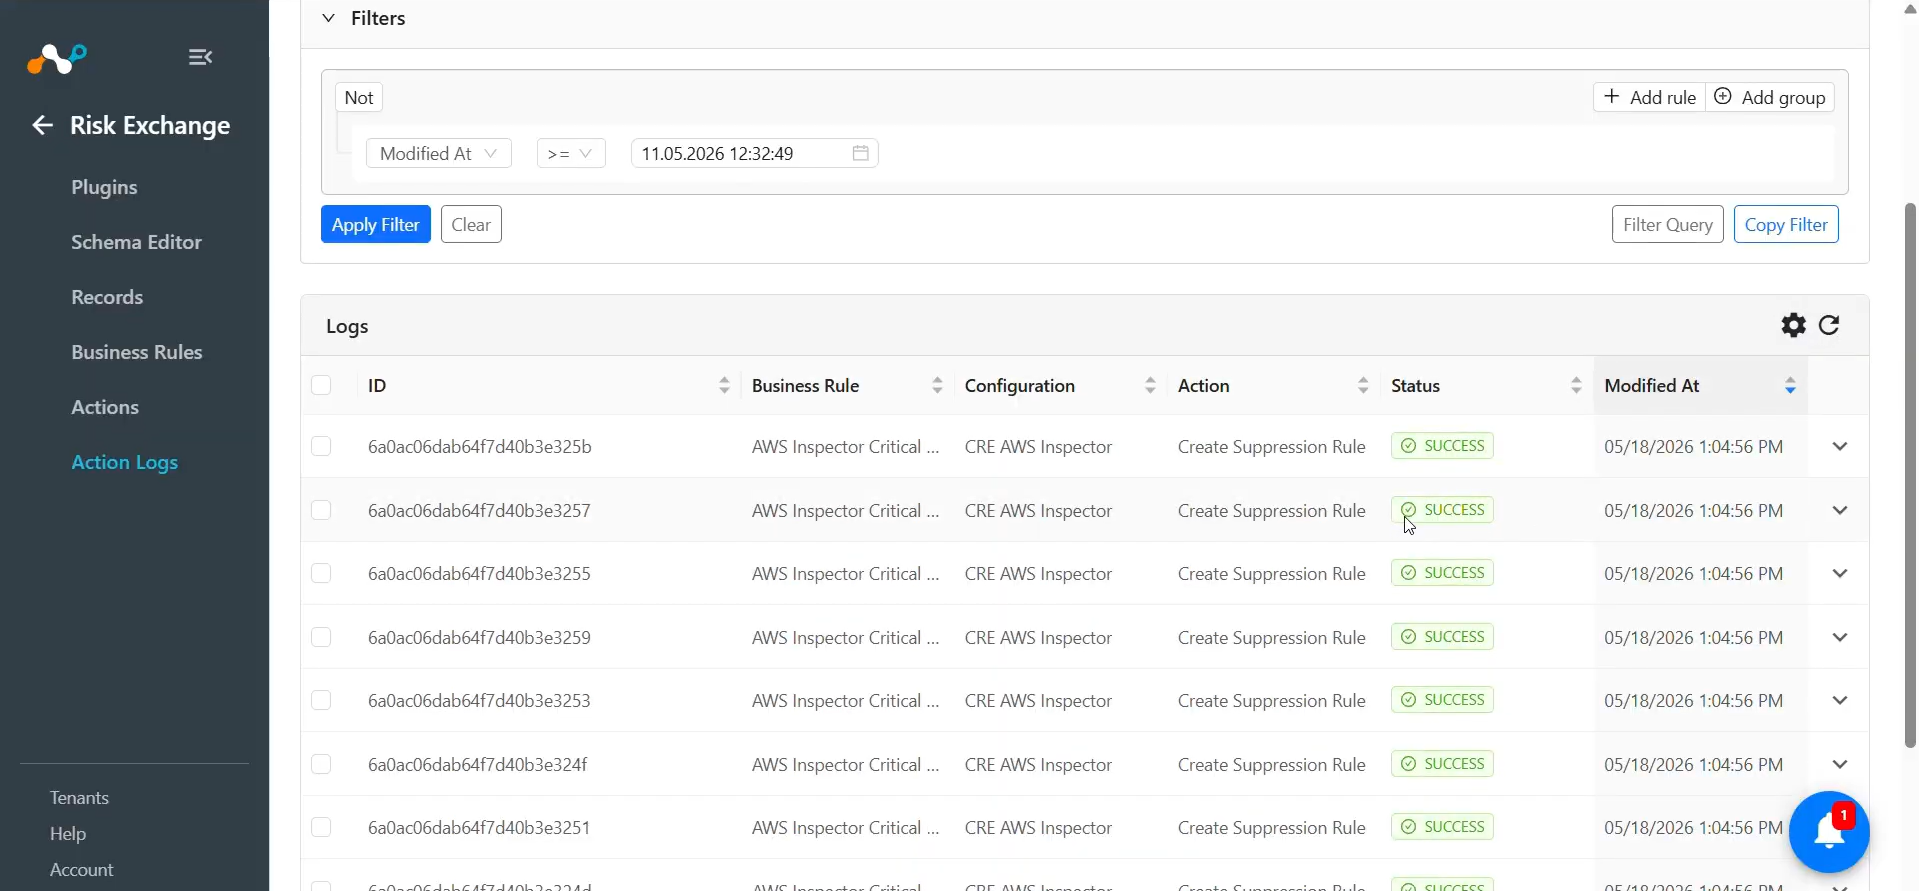
When a pulled record matches one of the configured business rules, the configured action will be performed on the record. This can be seen at Risk Exchange > Action Logs.
Validate in AWS Inspector
To validate the workloads available on AWS Inspector:
Log in to AWS instance, and go to the Inspector service.
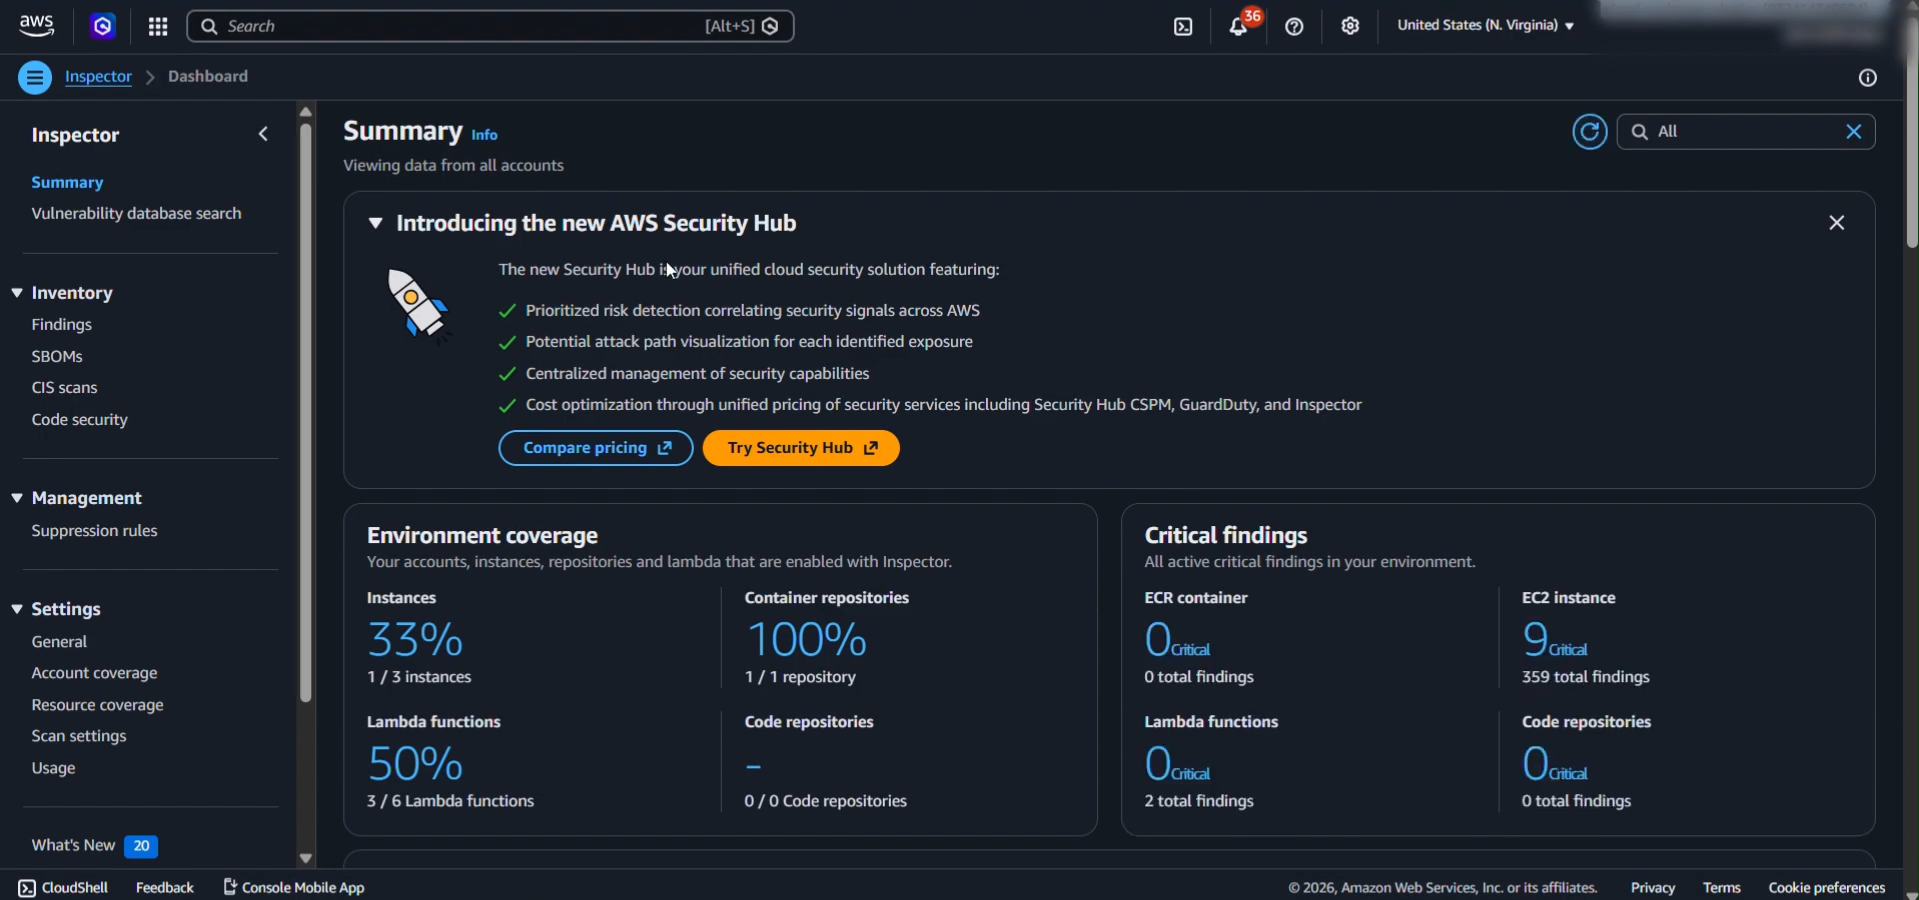
Move to the Findings page under Inventory.
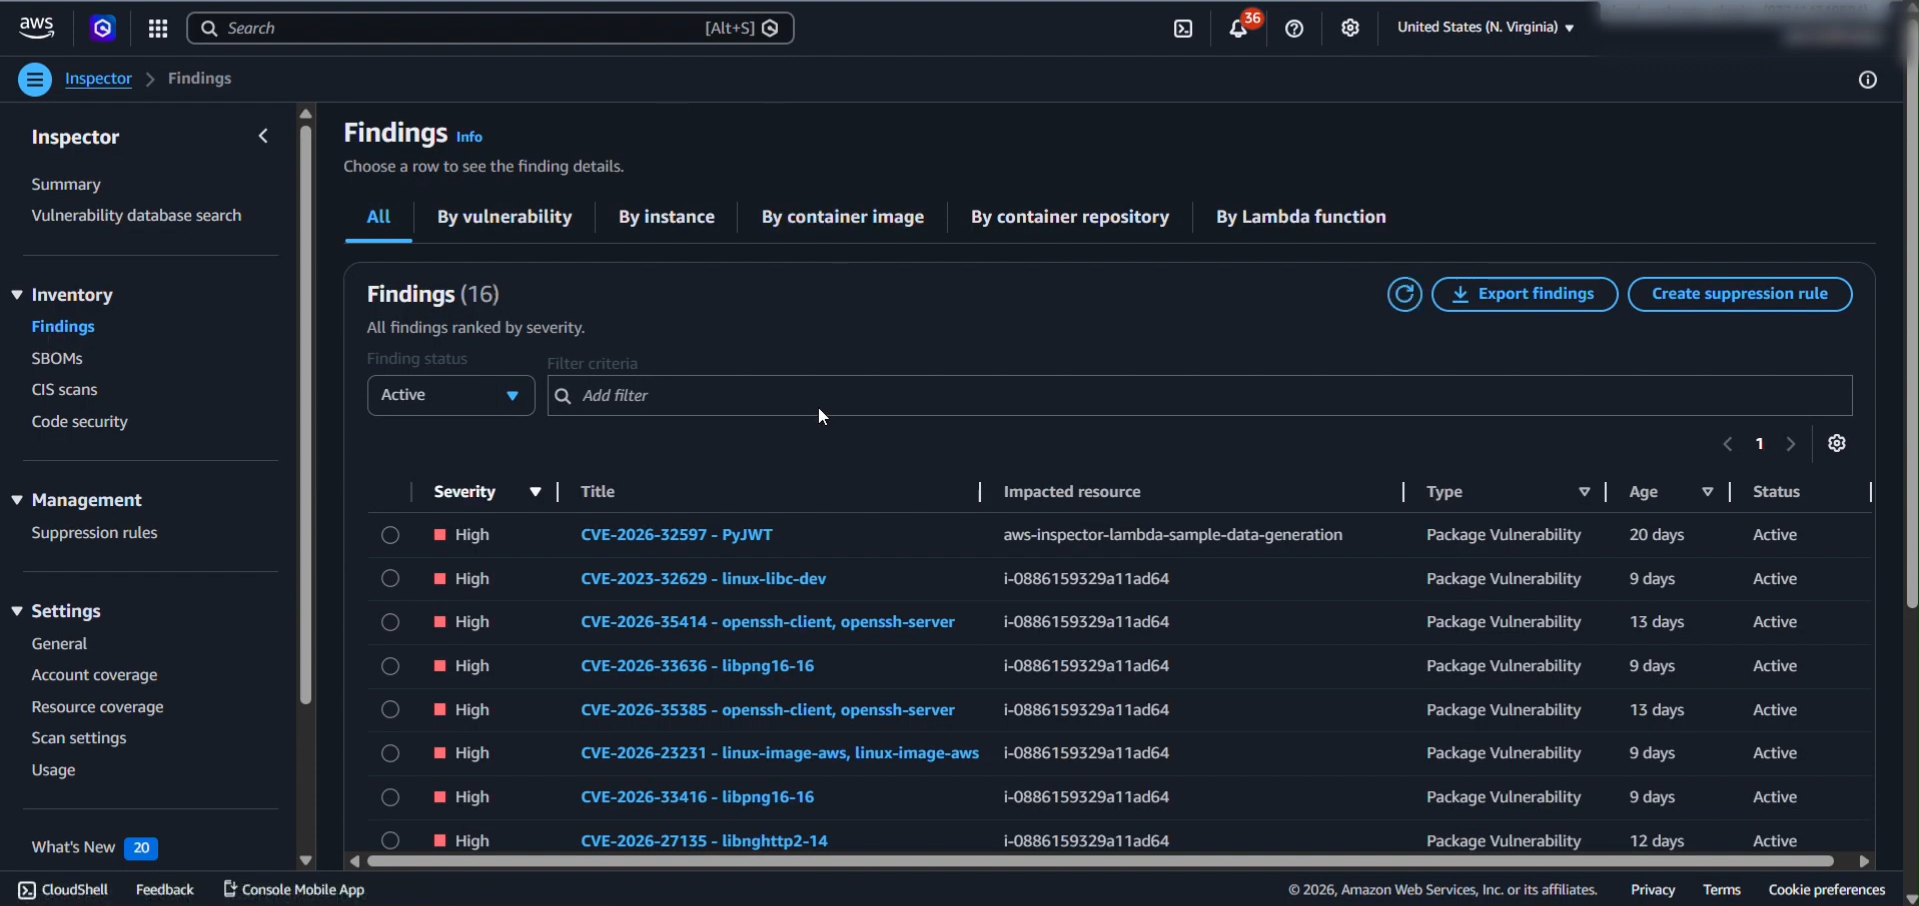
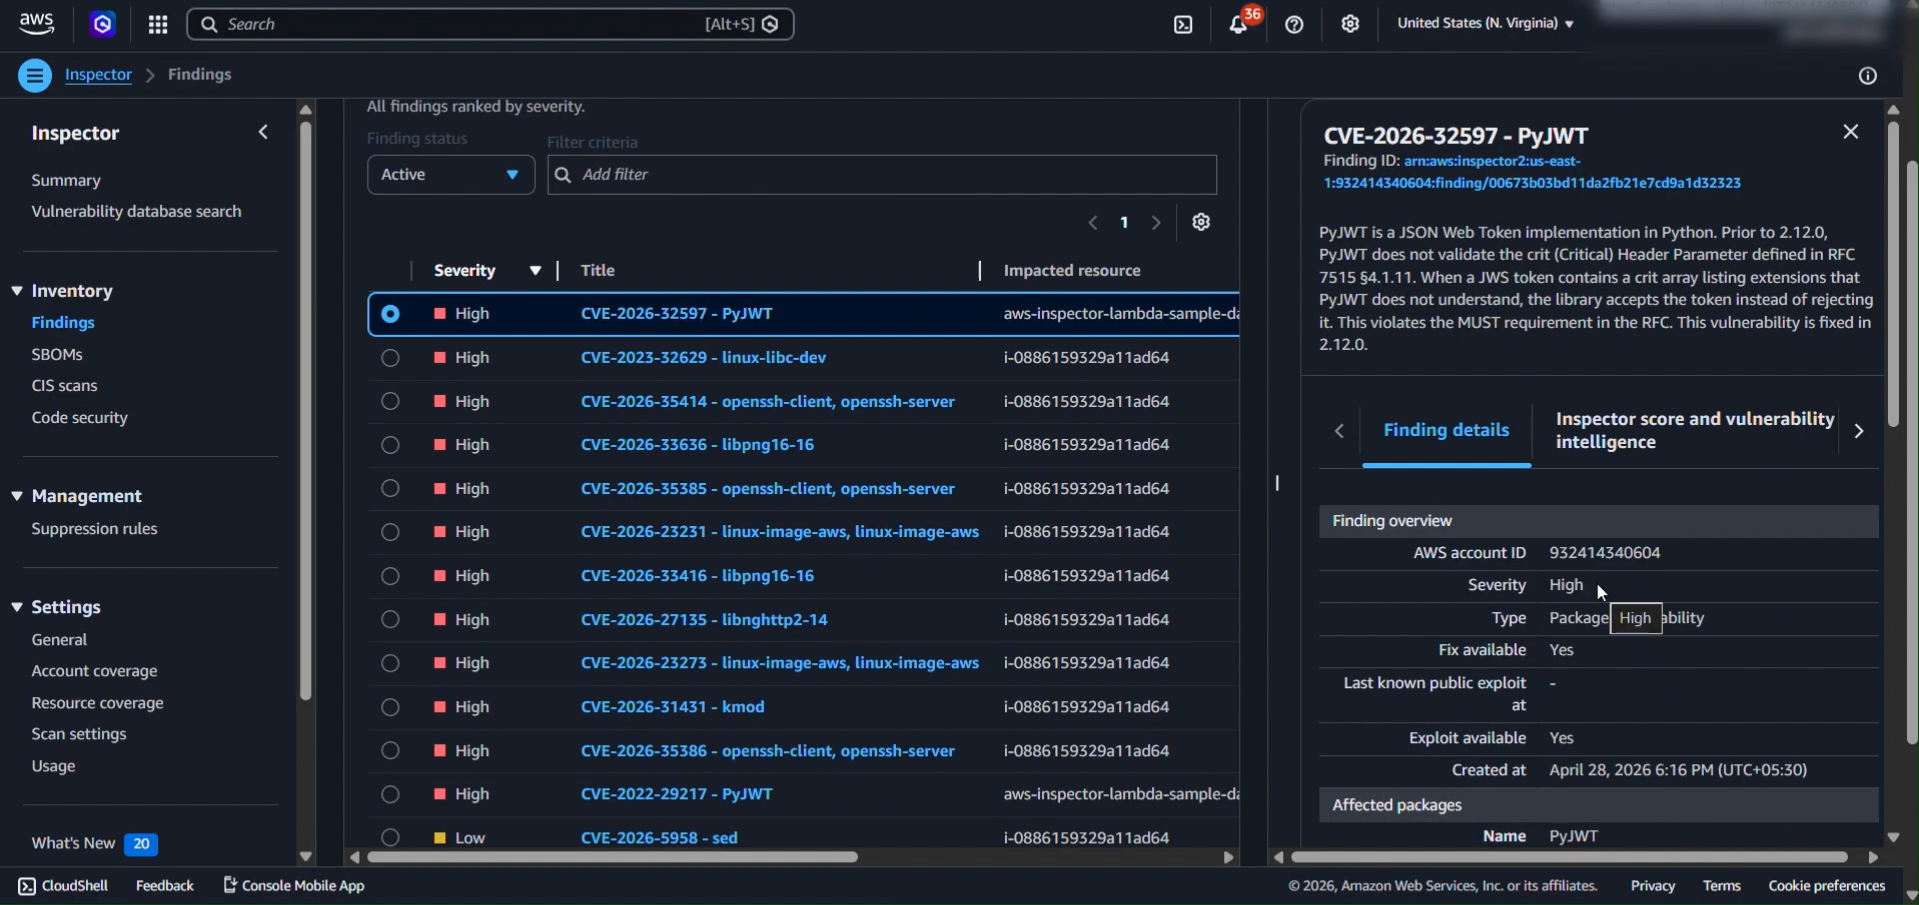
Here are all the findings listed. To check the details of a particular finding, click on that finding.
Validate the Create Suppression Rule Action
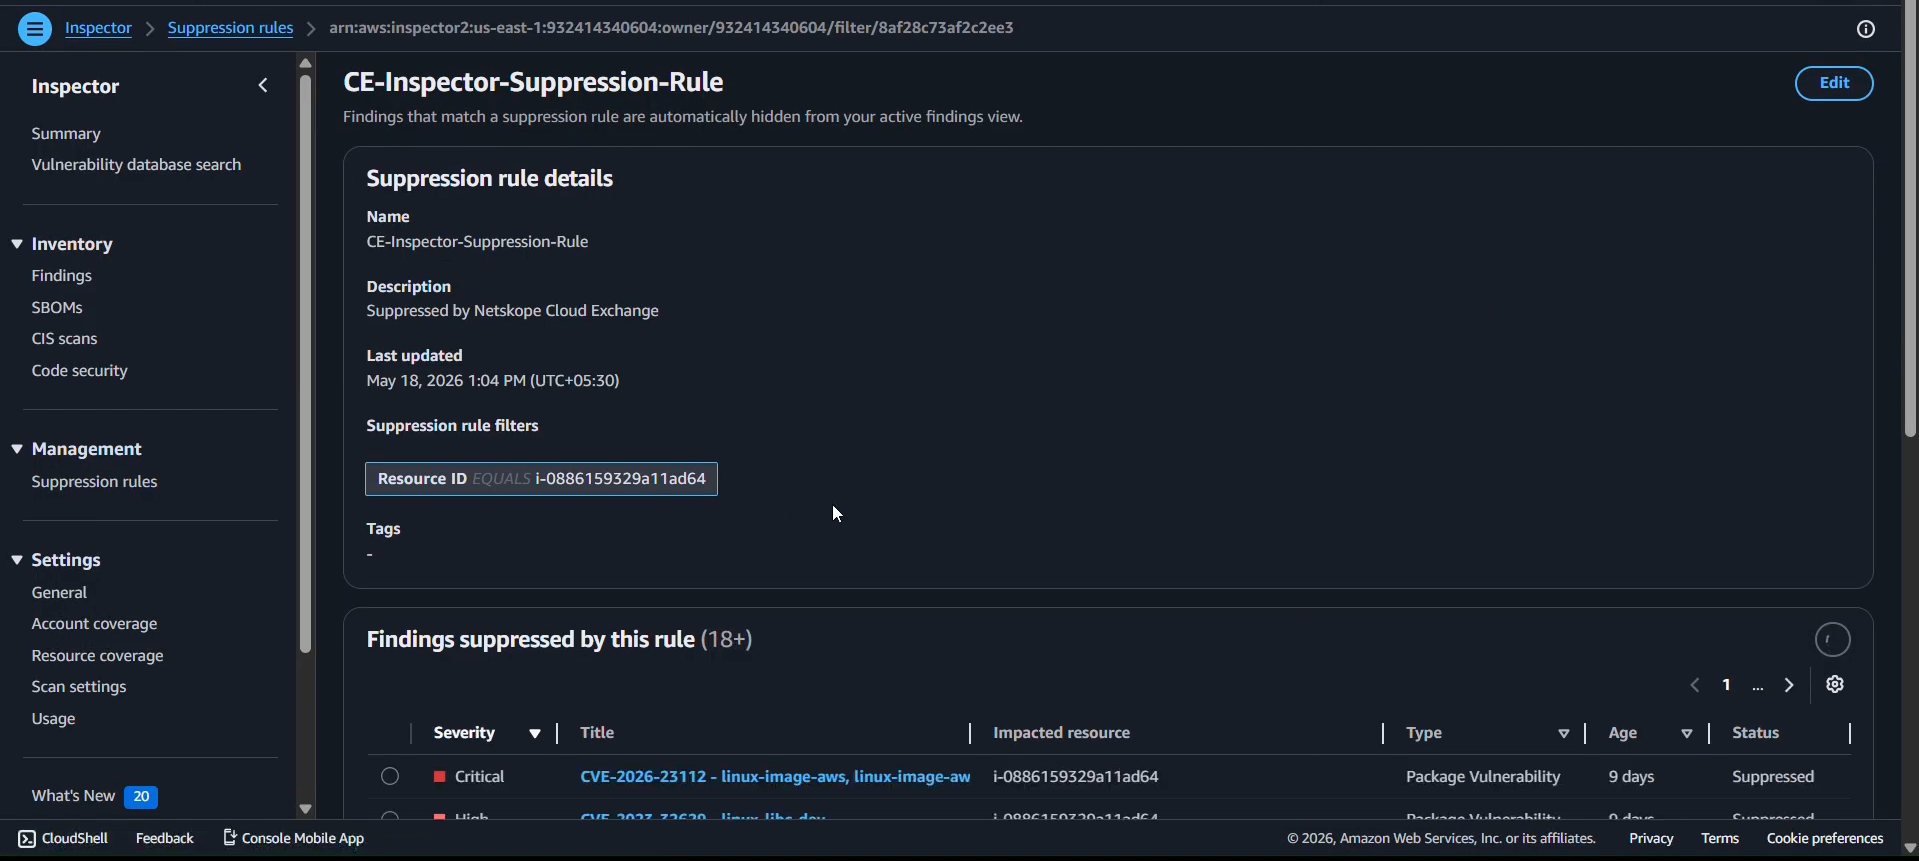
To validate the Create Suppression Rule Action, navigate to the Inspector service of AWS.
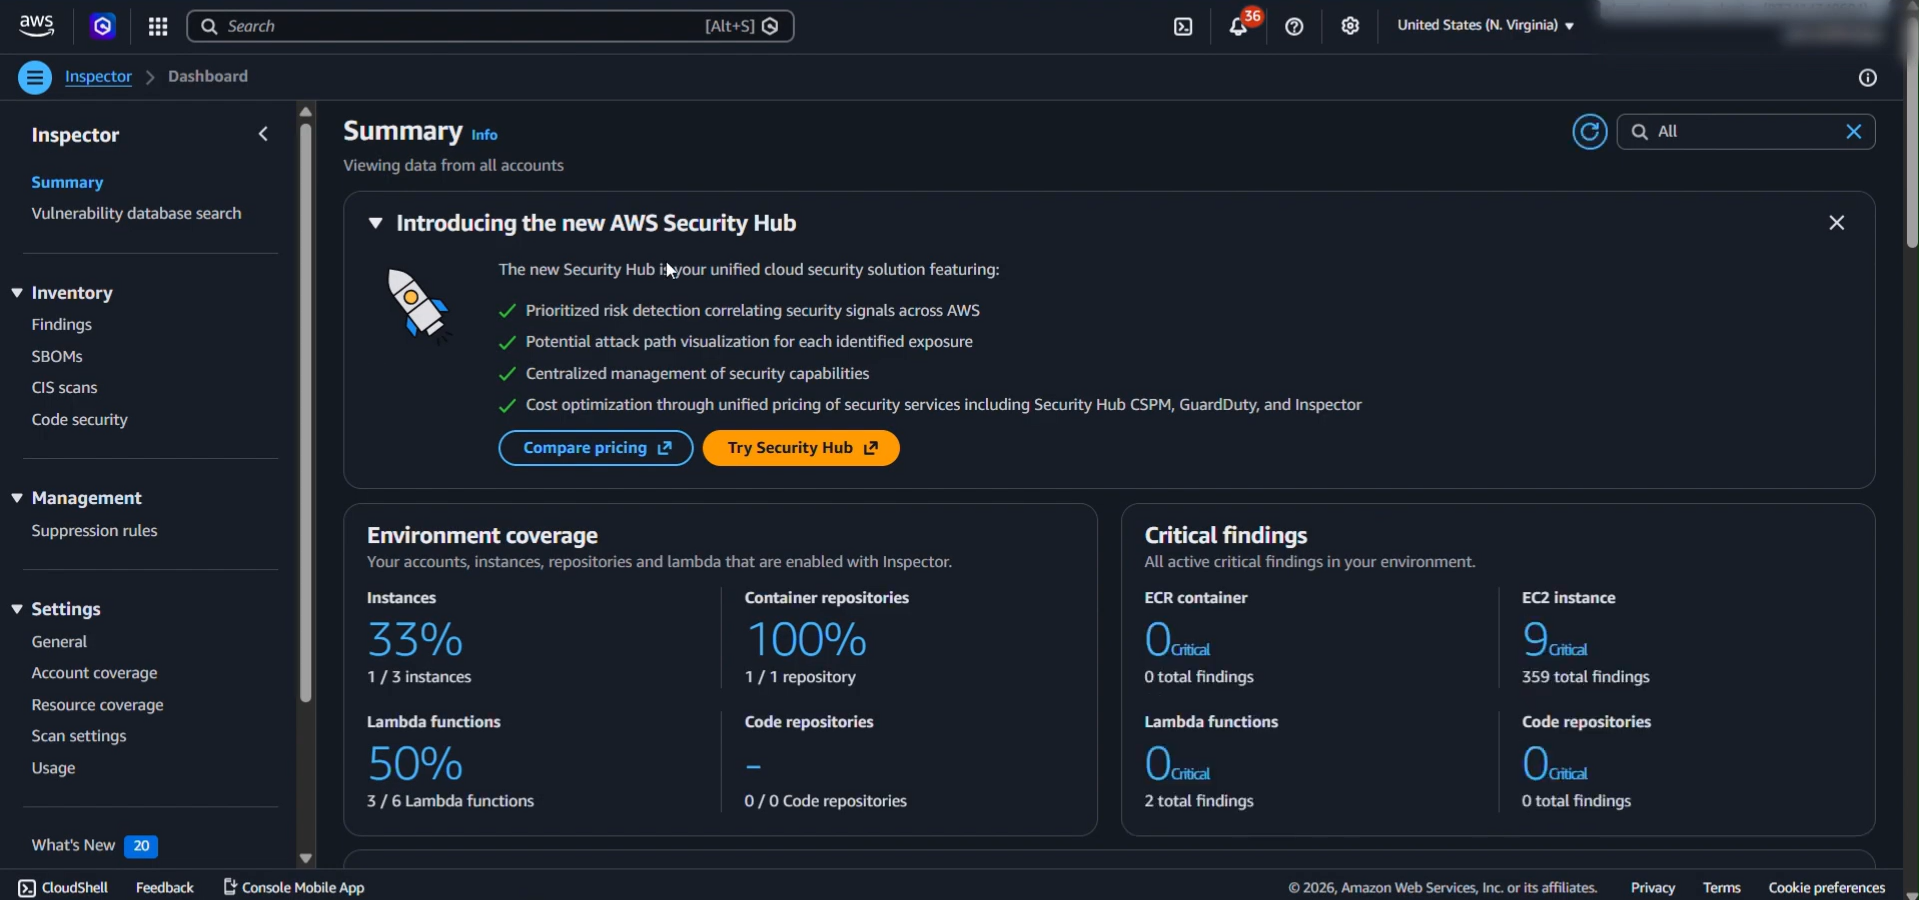
Go to the Suppression Rules page under the Management section.

Click on the created Suppression rule to verify the description and filter for the rule.
Troubleshooting AWS Inspector Plugin
Unable to pull Workloads or the field values from the plugin
If you are not able to pull Workloads from the AWS Security Hub Findings, it could be due to there being no data available to pull due to:
- No data available for pulling.
- No fields are mapped.
What to do:
- Go to AWS Inspector > Findings. Check if the findings are available to pull for the same time range and same region name as provided in the plugin configuration.
- If the findings are available and still not pulled, check the Resource value for those findings. Only findings with the EC2 Instance or Amazon EC2 Instance Resource type are pulled.
- If the Findings are available, make sure the fields are mapped in the plugin.
Facing issues while configuring the new plugin
If you’re creating a new plugin with AWS IAM Roles Anywhere and see this error while configuring the plugin:

What to do:
This error could possibly mean that one of the Trust Anchor ARN, Role ARN, or Profile ARN has a different account ID, so you need to check that the provided parameters are generated from the same account, and have the same region.