

Release Notes
1.3.0 (Minimum required CE version 6.0.0)
Added
- Added support for external provisioned buckets.
- Added resolutions for error logs.
Changed
- Changed bucket existence and connectivity checks to use HeadBucket, which requires only the s3:ListBucket permission on the target bucket instead of the account-wide s3:ListAllMyBuckets permission.
1.2.0
Added
- Added support for dynamic field population based on selected Authentication Method. To use the dynamic field population feature, update your CE version to 6.0.0.
1.1.0
Added
- Added two new authentication methods.
- Added Support for the incident event type. To pull and ingest this event type, update your CE version to 4.1.0
- Added Support for the CTEP alert type. To pull and ingest this alert type, update your CE version to 4.2.0.
Removed
- Removed secret credentials for authentication.
Changed
- Updated object structure in push functionality.
1.0.0
Added
- Initial release.
This document explains how to configure the AWS S3 Events, Alerts v1.3.0 plugin with the Log Shipper module of the Netskope Cloud Exchange platform. This plugin is used to send Netskope Alerts (DLP, Malware, Policy, Compromised Credential, Malsite, Quarantine, Remediation, Security Assessment, Watchlist, UBA, CTEP, Device, Content) and Events (Page, Application, Audit, Infrastructure, Network, Incident, Endpoint, Client Status) logs to the specified AWS S3 bucket. Note: This plugin is designed to send only JSON formatted data to S3 bucket.
Prerequisites
To complete this configuration, you need:
- A Netskope tenant (or multiple, for example, production and development/test instances).
- A Netskope Cloud Exchange tenant with the Tenant plugin and Log Shipper plugin already configured.
- Amazon S3 bucket permissions to the IAM user.
- ListBucket
- CreateBucket
- GetBucketLocation
- PutObject
- For Externally Provision bucket, need to configure policies in both accounts as provided in Configure Externally Provisioned Bucket.
- Connectivity to the following hosts: AWS S3 Bucket access.
AWS S3 Events, Alerts Plugin Support
This plugin is used to send Netskope Alerts (DLP, Malware, Policy, Compromised Credential, Malsite, Quarantine, Remediation, Security Assessment, Watchlist, UBA, CTEP, Device, Content) and Events (Page, Application, Audit, Infrastructure, Network, Incident, Endpoint, Client Status) logs to the specified AWS S3 bucket. Note: This plugin is designed to send only JSON formatted data to S3 bucket.
| Data Type | Description |
|---|---|
| Event Support | Yes: Page, Application, Audit, Infrastructure, Network, Incident, Endpoint and Client Status |
| Alert Support | Yes: DLP, Malware, Policy, Compromised Credential, Malsite, Quarantine, Remediation, Security Assessment, Watchlist, UBA, CTEP, Device, and Content |
| WebTx Support | No |
| Cloud Exchange Logs | No |
Permissions
Amazon S3 bucket permissions to the IAM user to send Events and Alerts data to buckets.
- ListBucket
- CreateBucket
- GetBucketLocation
- PutObject
API Details
List of APIs Used
This plugin uses Python libraries to create file objects in AWS S3.
Library: The AWS SDK for Python (Boto3)
Usage: The AWS SDK for Python (Boto3) to create, configure, and manage AWS services, such as Amazon Elastic Compute Cloud (Amazon EC2) and Amazon Simple Storage Service (Amazon S3). The SDK provides an object-oriented API as well as low-level access to AWS services.
Create a Client
s3_client = boto3.client(
               "s3",
               aws_access_key_id=self.aws_public_key,
               aws_secret_access_key=self.aws_private_key,
               aws_session_token=self.aws_session_token,
               region_name=self.configuration.get("region_name",   "").strip(),
               config=Config(proxies=self.proxy, user_agent=self.useragent),
           )
Create an STS Client
sts_client = boto3.client(
    "sts",
    aws_access_key_id=self.aws_public_key,
    aws_secret_access_key=self.aws_private_key,
    aws_session_token=self.aws_session_token,
    region_name=self.configuration.get("region_name", "").strip(),
    config=Config(proxies=self.proxy, user_agent=self.useragent),
)
Create a Bucket
s3_client.create_bucket(
    Bucket=bucket_name,
    CreateBucketConfiguration={"LocationConstraint": region_name},
)
Upload to File to the Bucket
s3_client.upload_file(
               file_name,
               bucket_name,
               object_name,
           )
Get an AWS Resource
s3_resource = boto3.resource(
               "s3",
               aws_access_key_id=self.aws_public_key,
               aws_secret_access_key=self.aws_private_key,
               region_name=self.region_name,
               config=Config(proxies=self.proxy, user_agent=self. user-agent),
           )
Check Bucket Existence and Accessibility (HeadBucket)
s3_client.head_bucket(Bucket=bucket_name)
Verify Bucket Ownership (HeadBucket with ExpectedBucketOwner)
s3_client.head_bucket(
    Bucket=bucket_name, ExpectedBucketOwner=own_account_id
)
Get Caller Identity
sts_client.get_caller_identity()
Verify Bucket Region
location = s3_client.get_bucket_location(Bucket=bucket_name)
Performance Matrix
This performance reading is for a Large Stack CE tested on these VM specifications. These readings are added with the consideration that it will ingest around 10K file size in 30 seconds.
| Description | Specification |
|---|---|
| Stack details | Size: Large RAM: 32 GB CPU: 16 Cores |
| Events, Alerts ingested to third-party SIEM | ~ 200K EPM |
User Agent
User-Agent: APN/1.1 (ahq9d89xj9gspapczzdb59goq)
Workflow
- Generate required credentials for AWS S3 bucket access.
- Create an S3 Bucket and Policy.
- Generate Private Key, Certificate Body, Password Phrase, Profile ARN, Role ARN, Trust Anchor ARN if using AWS IAM Role Anywhere.
- Configure the AWS S3 Events, Alerts plugin.
- Configure Log Shipper Business Rules for the AWS S3 Events, Alerts plugin.
- Configure Log Shipper SIEM mappings for the AWS S3 Events, Alerts plugin.
- Validate the AWS S3 Events, Alerts plugin.
Watch a Video
Click play to watch a video.
Create AWS S3 Source Bucket
This bucket will be used in the AWS S3 Source Bucket configuration parameter while configuring the plugin.
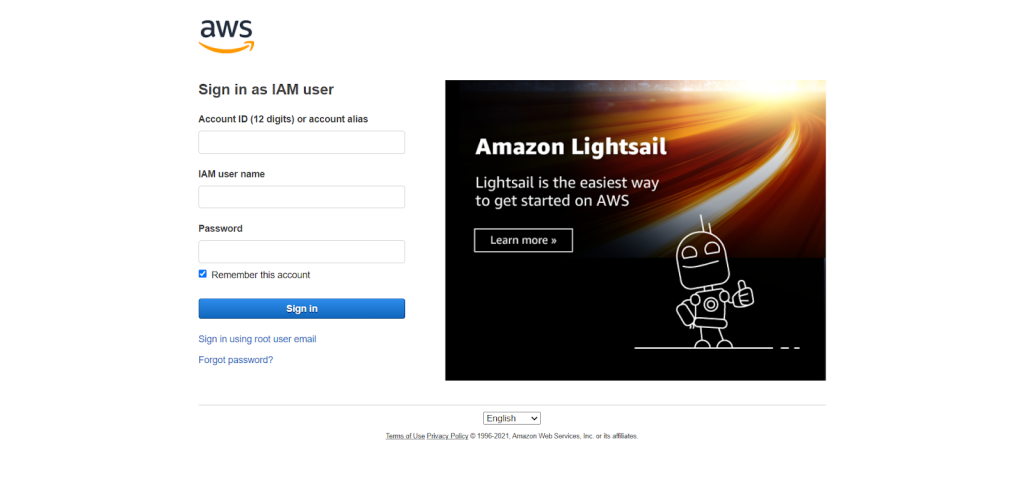
- To Create a Bucket and Set the required policies, log in to the AWS console.

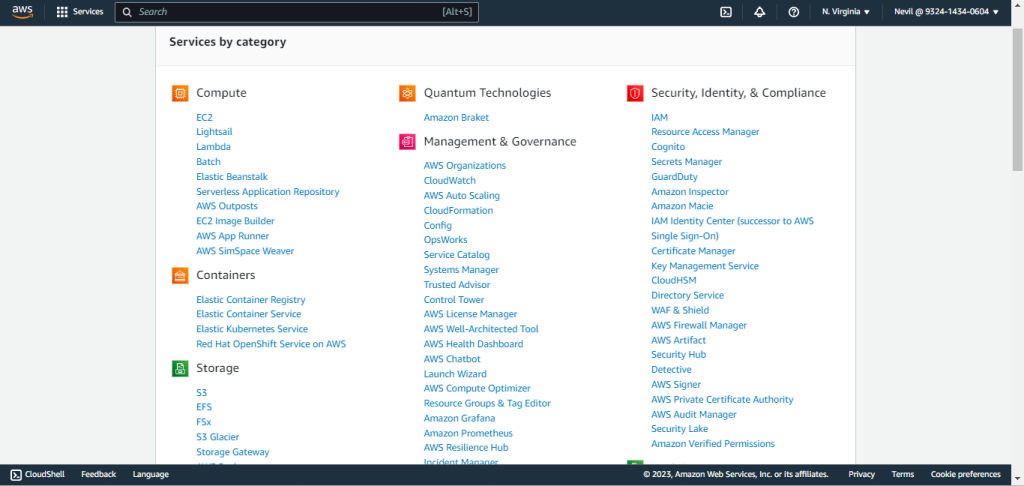
- From All Services, select S3 or search for S3 in the search bar.

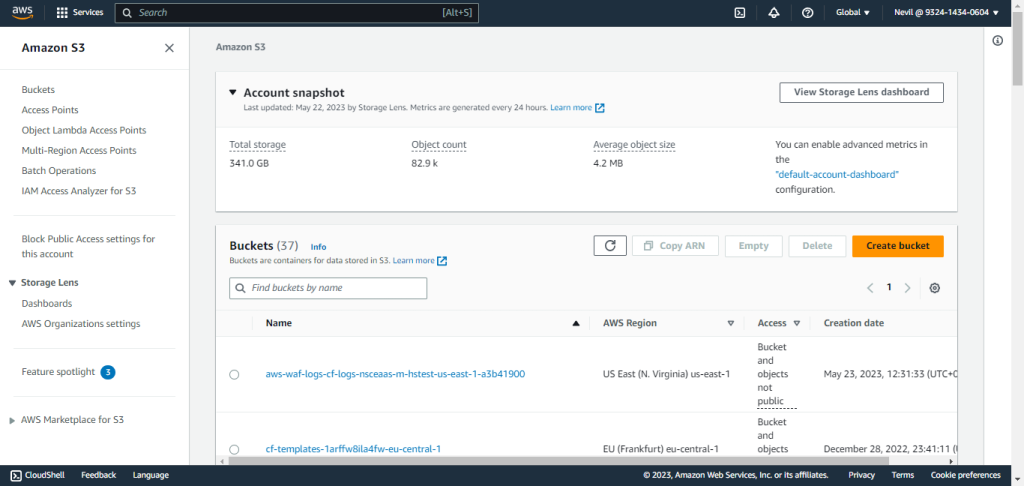
- Click Create Bucket.

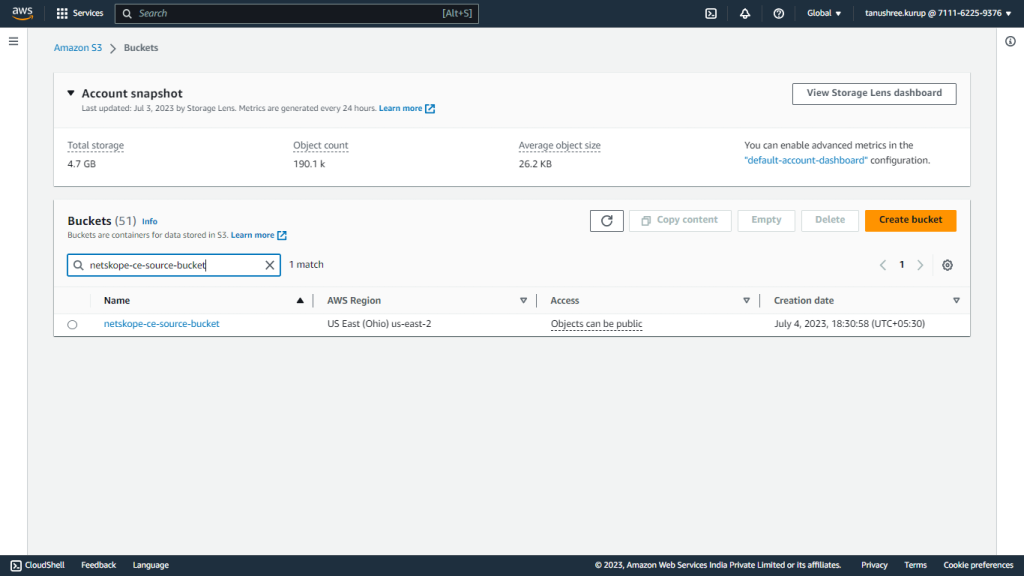
- Enter Bucket Name, scroll down, and click Create Bucket. Example: netskope-ce-source-bucket.
- Search for your bucket and click on the bucket name to open it.

- Click Permissions to open the permission tab and to set the policy.
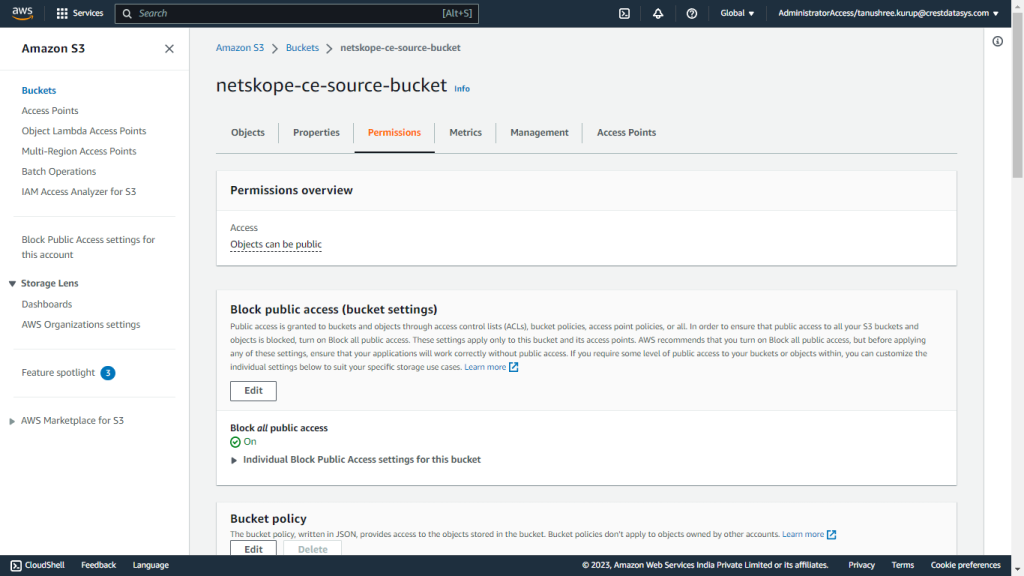

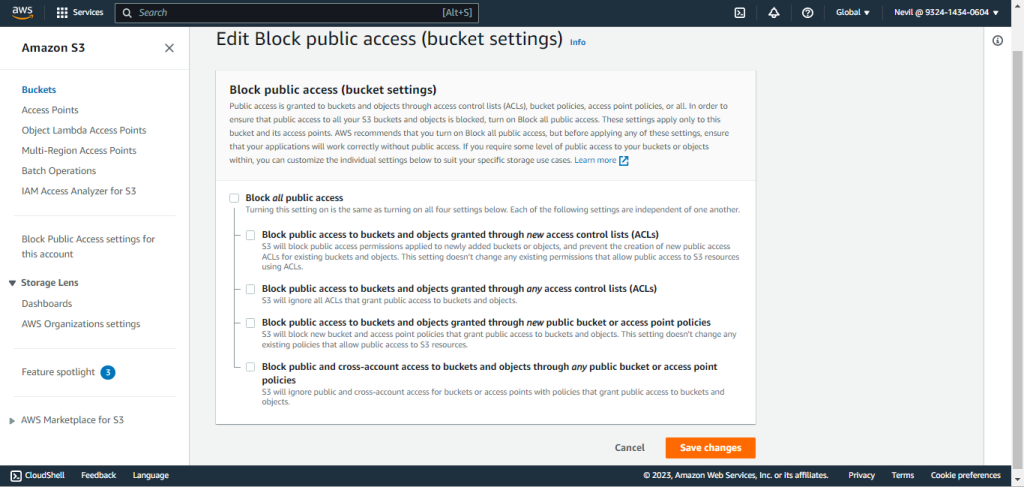
- Click Edit in the Block public access (bucket settings) section. Uncheck all checkboxes and click Save Changes. You’ll be asked for confirmation; confirm it and click Confirm.

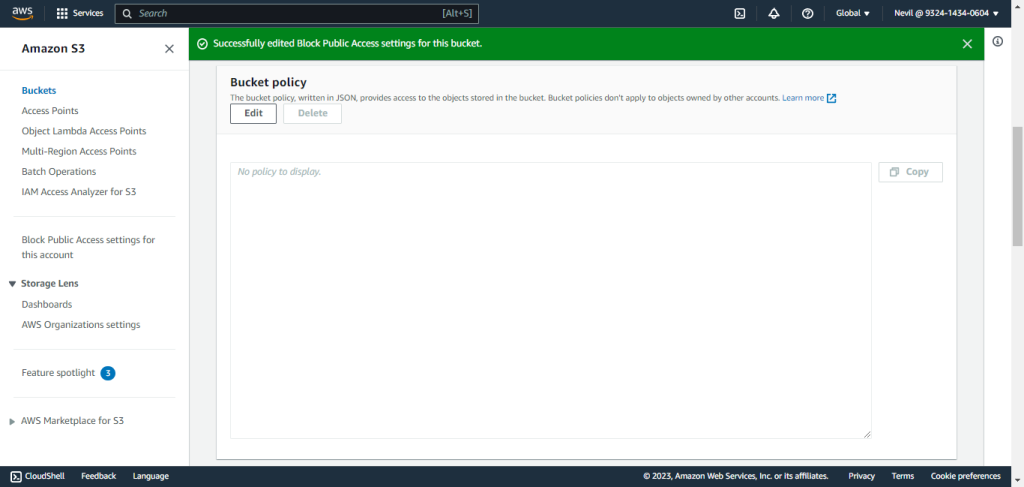
- Under the Permissions tab in the bucket, click Edit in the Bucket Policy section.

- Click Policy generator.
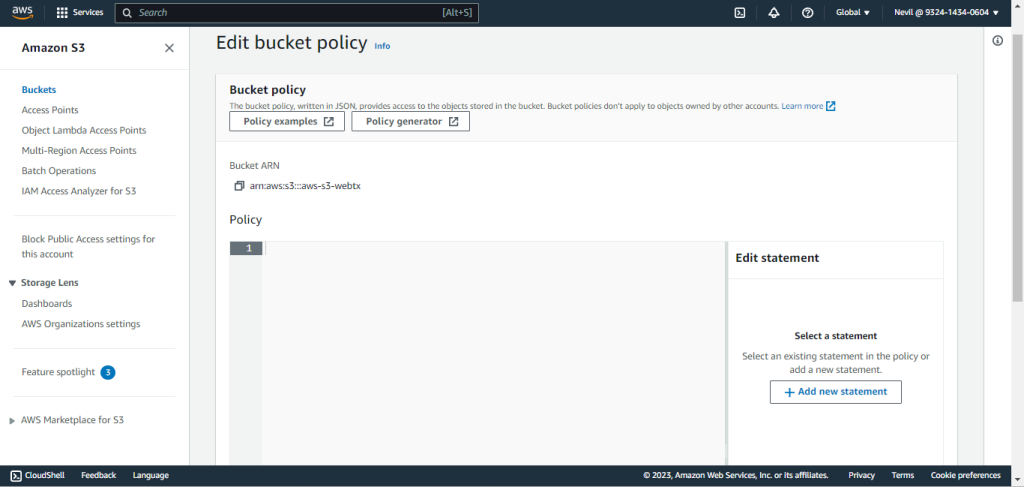

- Select S3 Bucket policy as the policy type, add statement details, and generate the policy:
Replace the <user-arn> with the user ARN used for accessing the source bucket and <bucket-name> with the source bucket created above. Sample<user-arn>: arn:aws:iam::7111xxxxxxxx:user/xxxxxxxx, and <bucket-name>: netskope-ce-source-bucket- Select Type of Policy: S3 Bucket Policy
- Effect: Allow
- Principal: <user-arn>
- Actions:
- GetBucketAcl
- GetBucketPolicy
- ARN: arn:aws:s3:::<bucket-name>
- Click Add Statement.
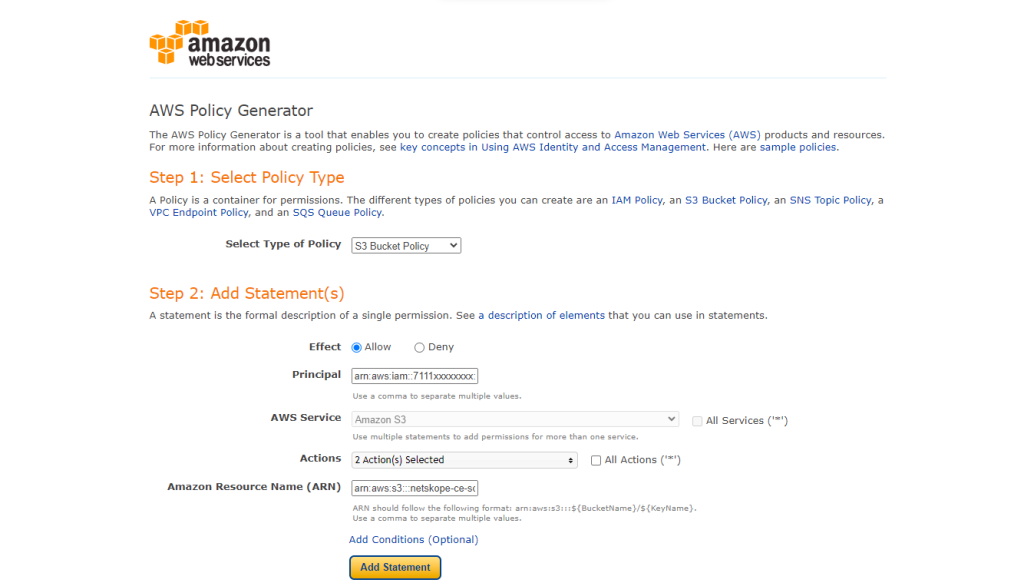

- Scroll back up and add another statement.
- Select Type of Policy: S3 Bucket Policy
- Effect: Allow
- Principal: <user-arn>
- Actions:
- PutObject
- PutObjectAcl
- ARN: arn:aws:s3:::<bucket-name>/*
- Click Add Statement.
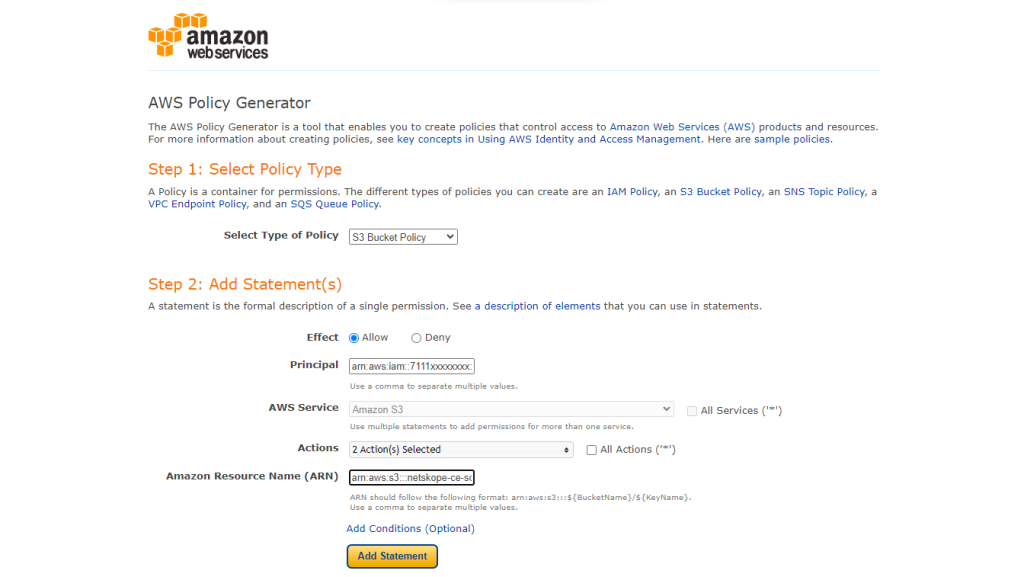


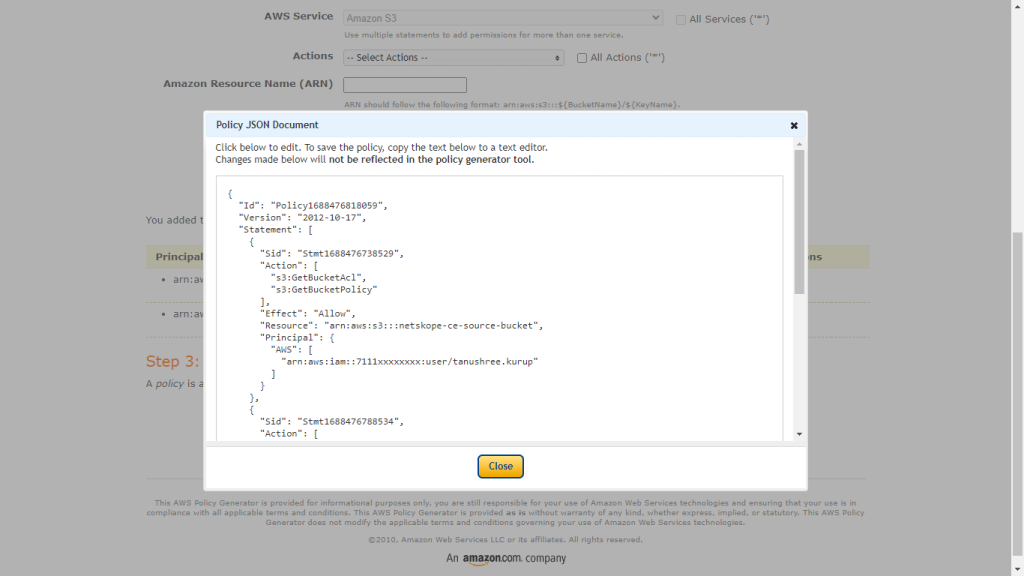
- Click Generate Policy. Make sure to copy the policy generated in this step because it will be used in the next step to attach in the source bucket.

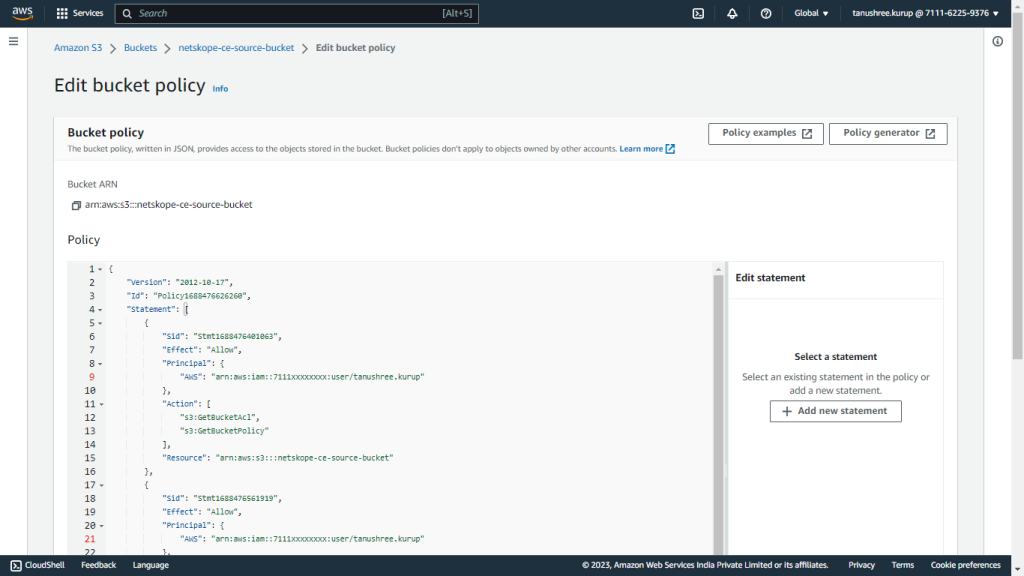
- Add this policy to the Textbox. Scroll to the bottom and click Save Changes.

Create a Bucket Policy
- Search for IAM in the search box, and in the left panel, click Policies.
- Click Create Policy.
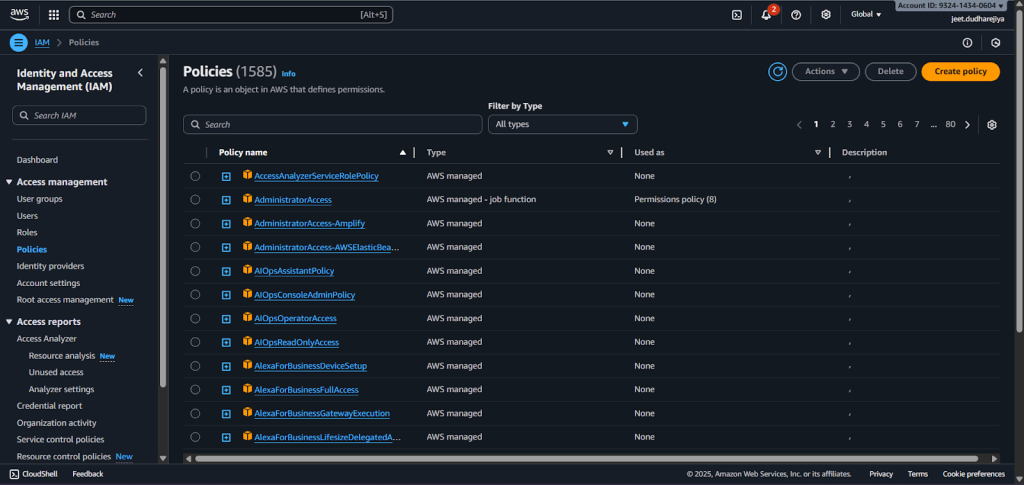

- On the JSON tab, enter this policy. Click Next: Tags, and click Next: Review.
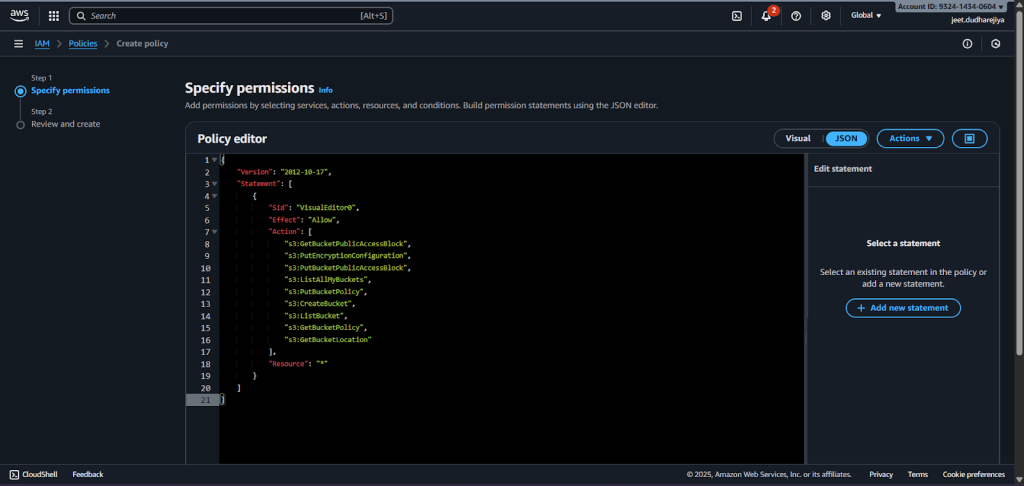
{
    "Version": "2012-10-17",
    "Statement": [
        {
            "Sid": "VisualEditor0",
            "Effect": "Allow",
            "Action": [
                "s3:GetBucketPublicAccessBlock",
                "s3:PutEncryptionConfiguration",
                "s3:PutBucketPublicAccessBlock",
                "s3:ListAllMyBuckets",
                "s3:PutBucketPolicy",
                "s3:CreateBucket",
                "s3:ListBucket",
                "s3:GetBucketPolicy",
                "s3:GetBucketLocation"
                "s3:PutObject"
            ],
            "Resource": "*"
        }
    ]
}

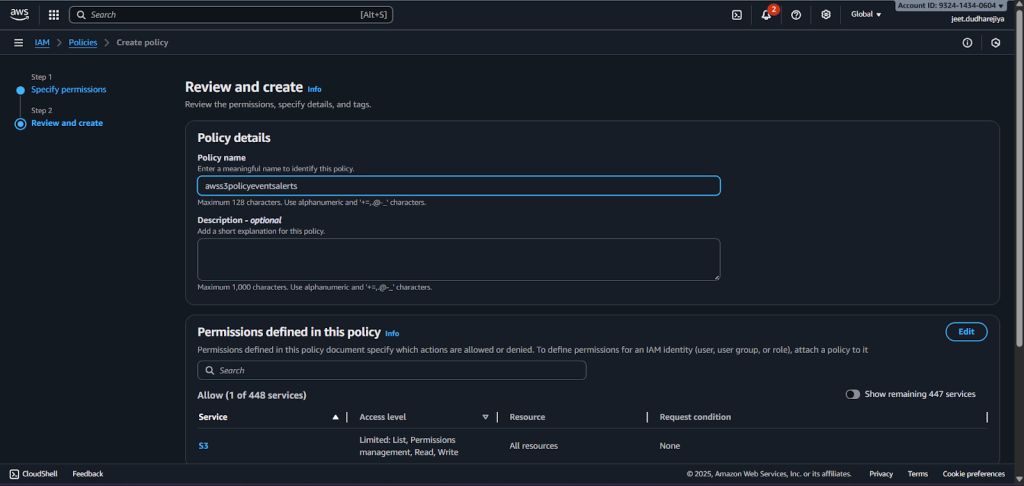
- Enter a Name and click Create Policy.

- Attach this policy to the user. Go to IAM > Users and select the user for which you want to attach a policy. Click Add permissions, and click Add permissions again.
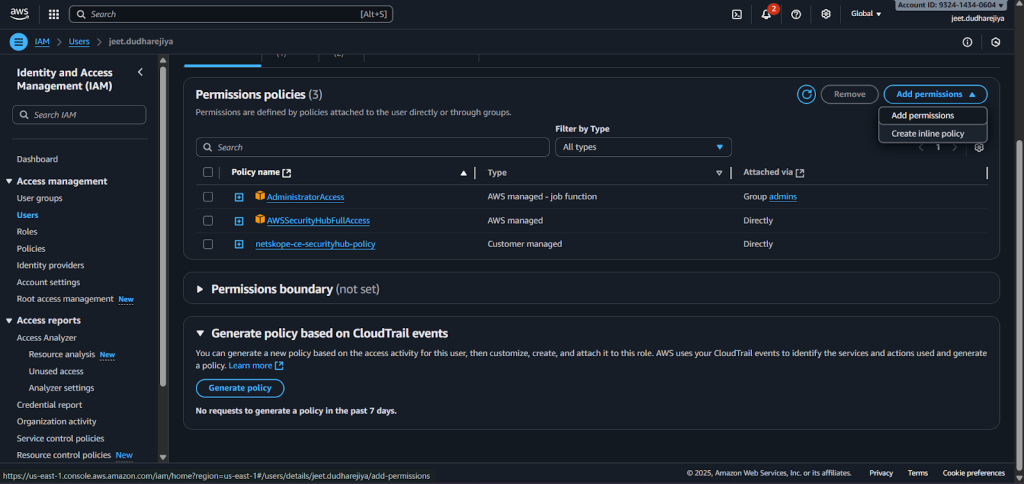

- Select Attach policies directly under Permissions, and then search for and select the policy created in the previous step for the source queue.
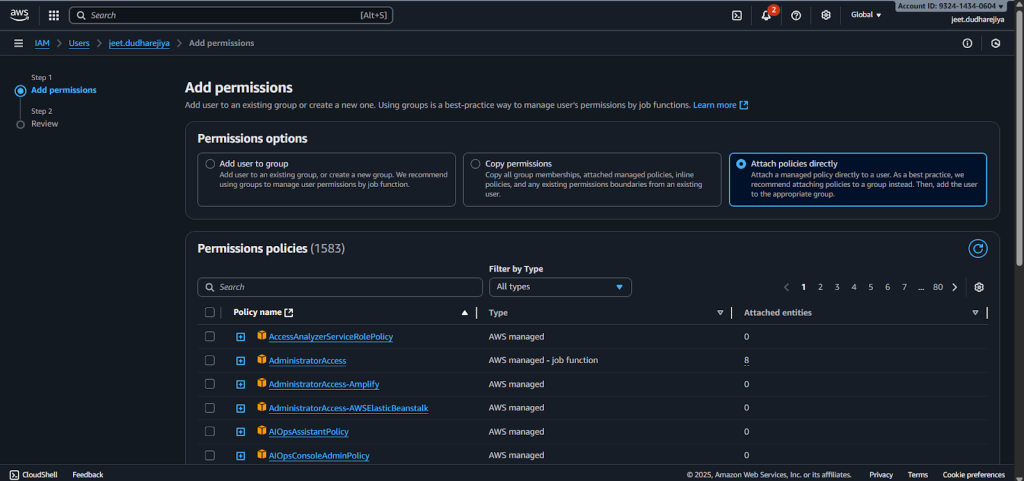

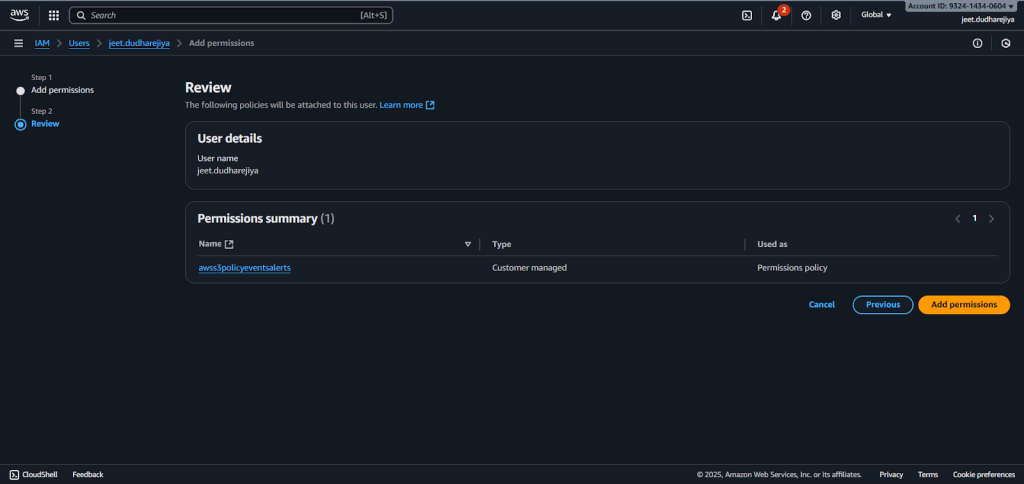
- Click Next and then click Add permissions. A policy will be attached to the user.

Plugin Authentication Methods
IAM Role Anywhere Configuration
Prerequisites
The AWS Certificate Manager service is required to be enabled to authenticate the plugin using the AWS IAM Roles Anywhere Authentication Method.
Note
Make sure you create the Private Certificate Authority, Trust Anchor, and Profile in the same region in which your AWS S3 Source Bucket resides.
Create an IAM Policy
This Policy contains the required permissions for creating a Private CA Certificate (including Permissions for creating a Trust Anchor and Profile) and using IAM Roles Anywhere.
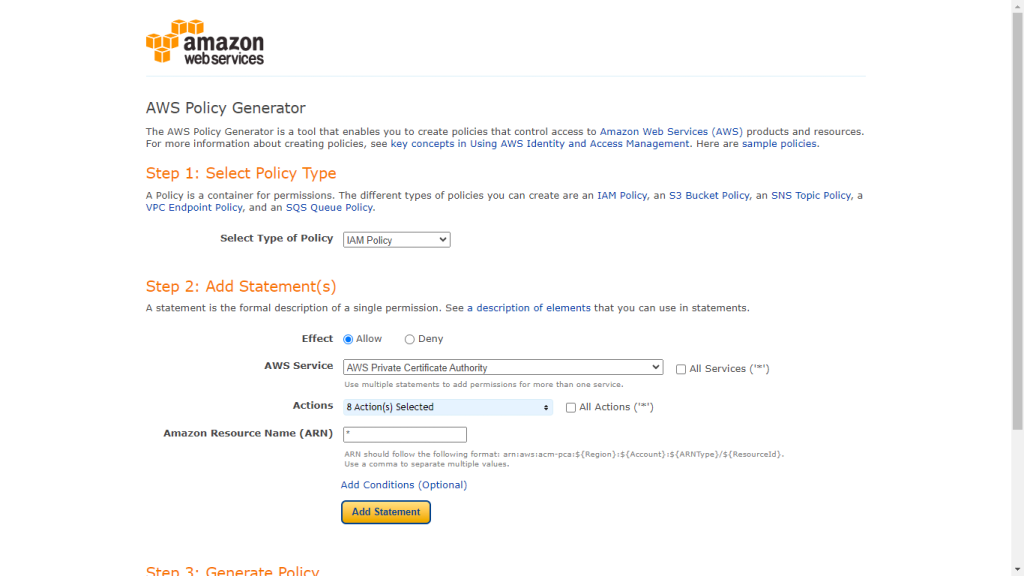
- Go to Policy Generator and click Add Statement to generate a policy.
- Select Type of Policy: IAM Policy
- Effect: Allow
- AWS Service: AWS Private Certificate Authority
- Actions:
- CreateCertificateAuthority
- DescribeCertificateAuthority
- GetCertificate
- GetCertificateAuthorityCertificate
- GetCertificateAuthorityCsr
- ImportCertificateAuthorityCertificate
- IssueCertificate
- ListCertificateAuthorities
- ARN: *
- Click Add Statement.

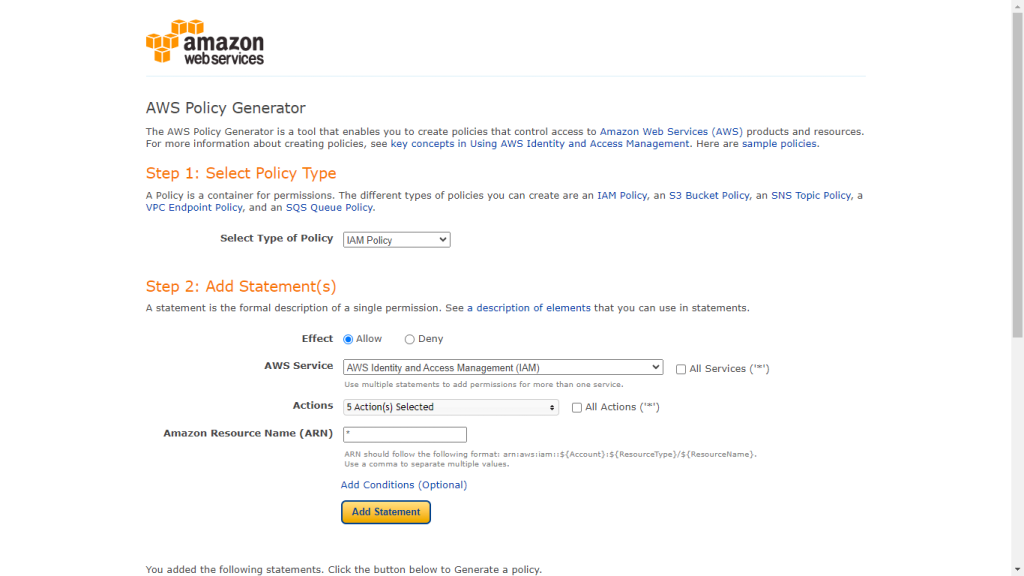
- Select Type of Policy: IAM Policy
- Effect: Allow
- AWS Service: AWS Identity and Access Management (IAM)
- Actions:
- AttachRolePolicy
- CreateAccessKey
- CreateRole
- DeleteRole
- PassRole
- ARN: *
- Click Add Statement.

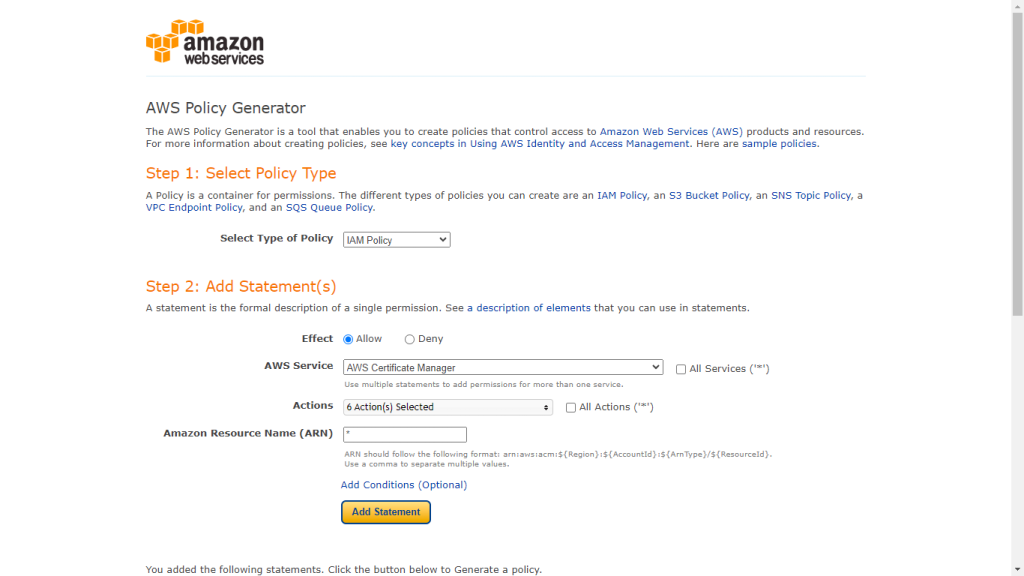
- Select Type of Policy: IAM Policy
- Effect: Allow
- AWS Service: AWS Certificate Manager
- Actions:
- DescribeCertificate
- ExportCertificate
- GetCertificate
- ListCertificates
- ListTagsForCertificate
- RequestCertificate
- ARN: *
- Click Add Statement.

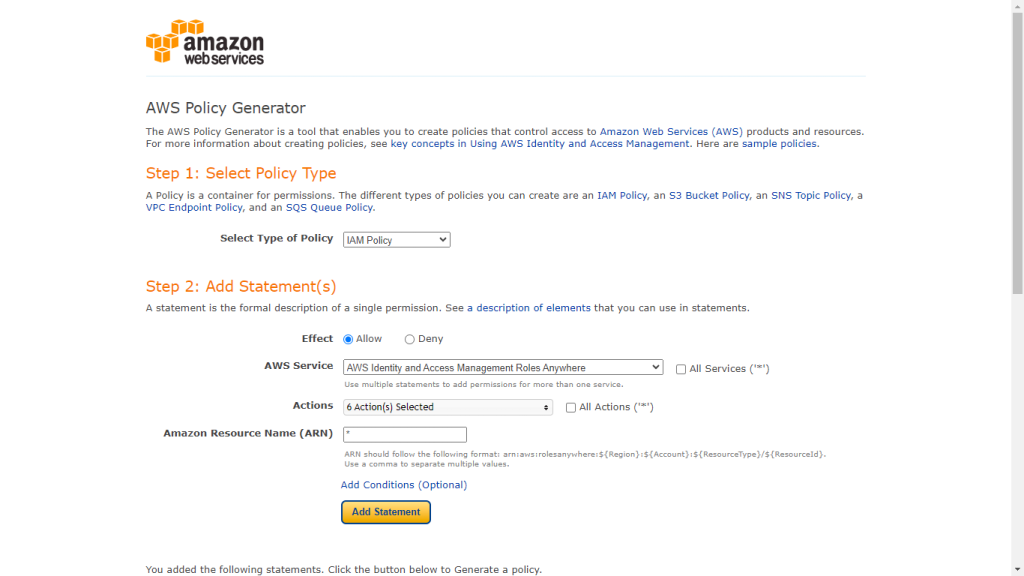
- Select Type of Policy: IAM Policy
- Effect: Allow
- AWS Service: AWS Identity and Access Management Roles Anywhere
- Actions:
- CreateProfile
- CreateTrustAnchor
- GetProfile
- GetTrustAnchor
- ListProfiles
- ListTrustAnchors
- ARN: *
- Click Add Statement.

- Click Generate Policy.
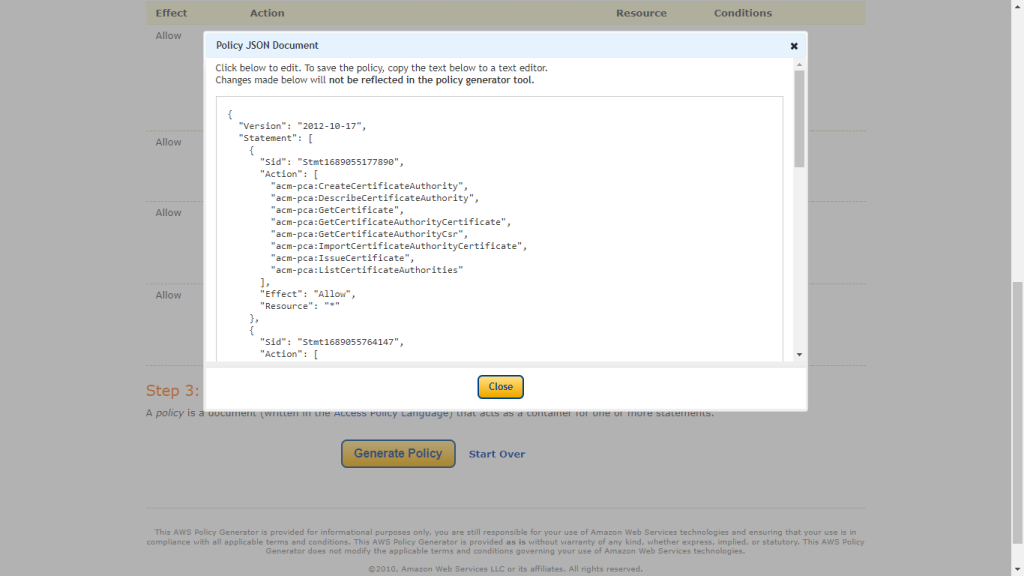

- Copy the Policy as it is used in the next step for creating the policy required for creating the Private CA certificates.
- Go to the AWS Console and select IAM from All Services. Click Policies from the left panel, and click Create Policy.
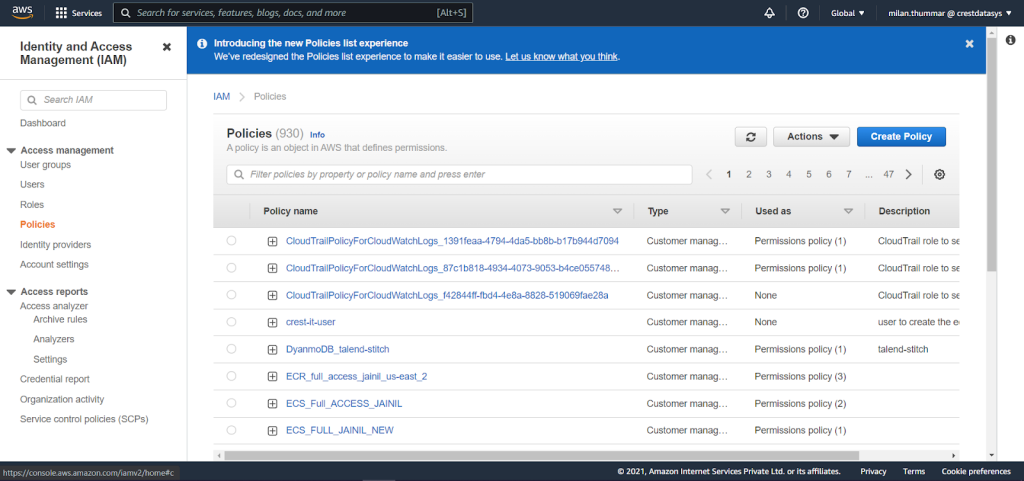

- Copy the policy to the JSON tab, and then click on Next: Tags and Next: Review..
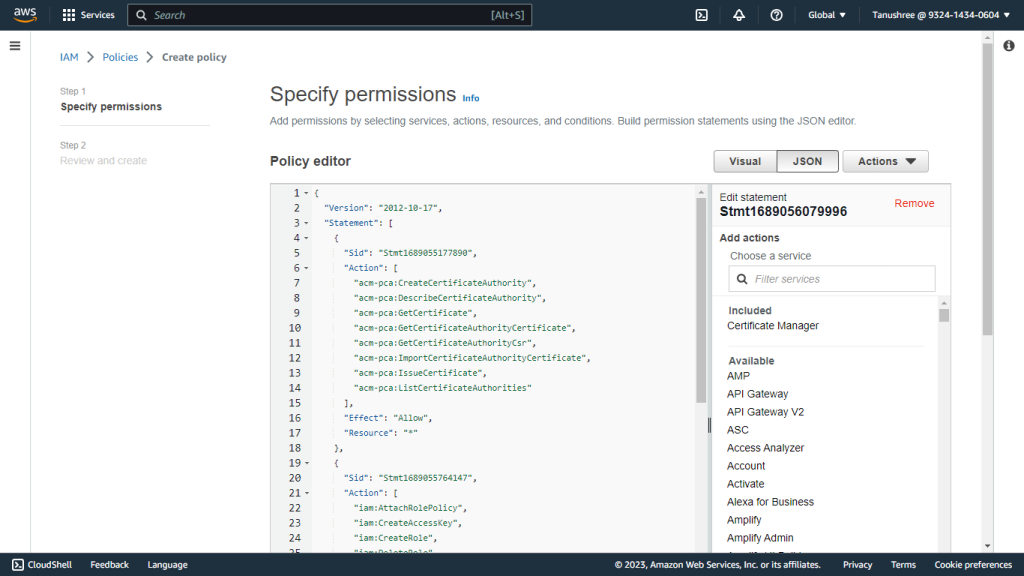

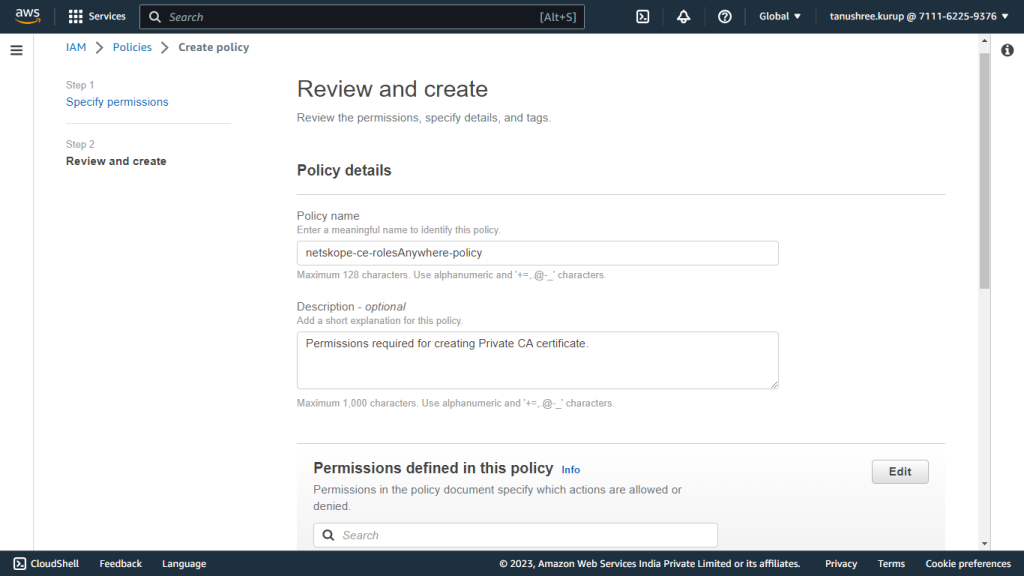
- Enter a name, like netskope-ce-rolesAnywhere-policy, and click Save Changes.

Create a Private Certificate Authority
- Log in to AWS Console.
- Search for Certificate Manager.
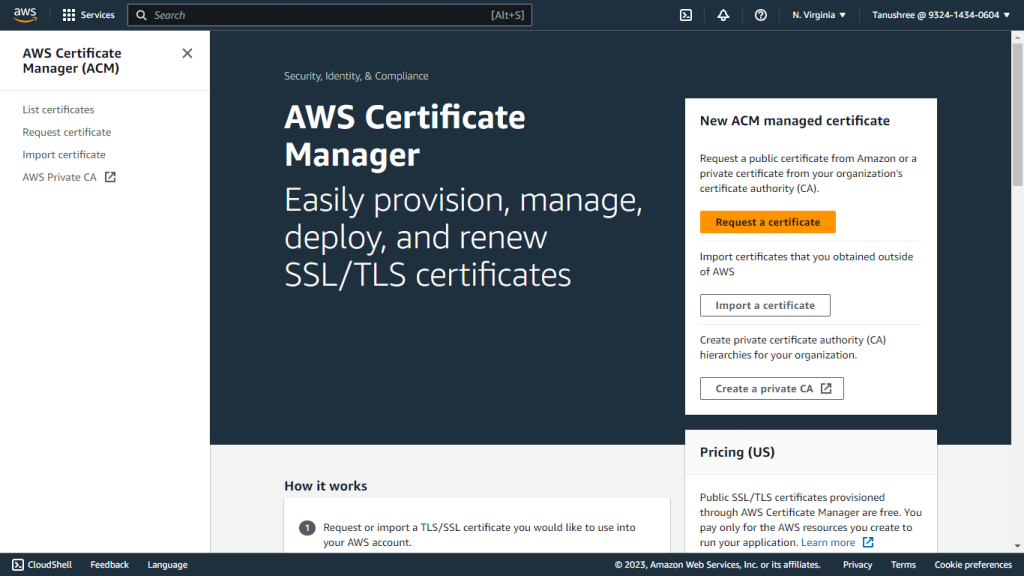

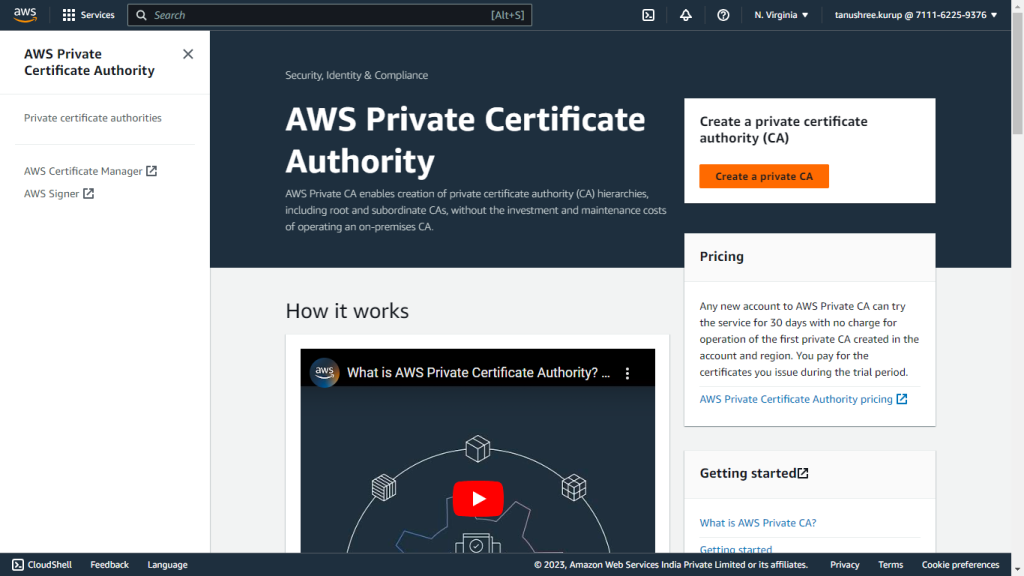
- Click AWS Private CA.
- Click Create a private CA.

- Select General-purpose for Mode Options.
- Select Root for CA Type Options.
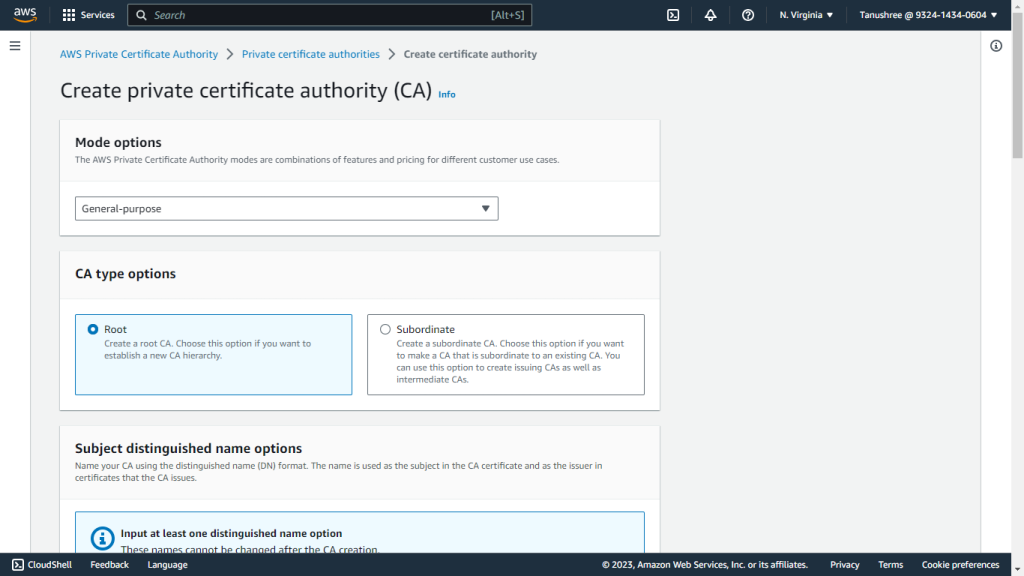

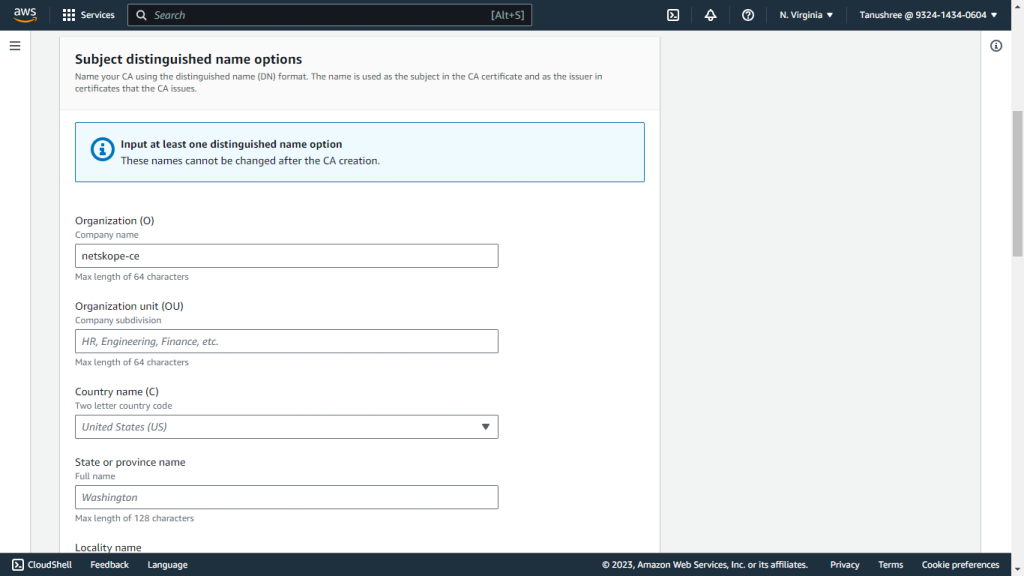
- Enter the Organization (O).

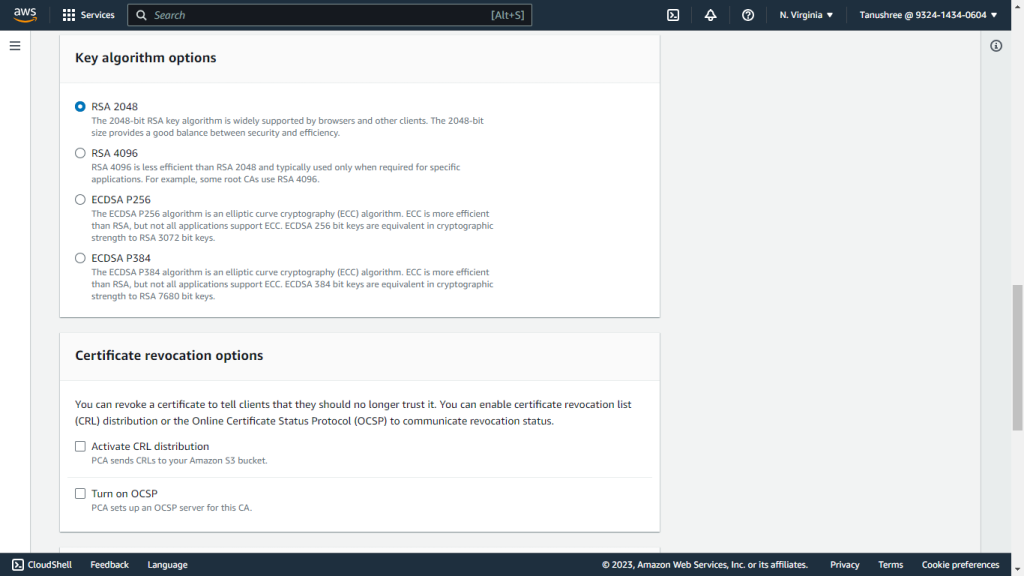
- Select RSA 2048 for Key Algorithm Options.
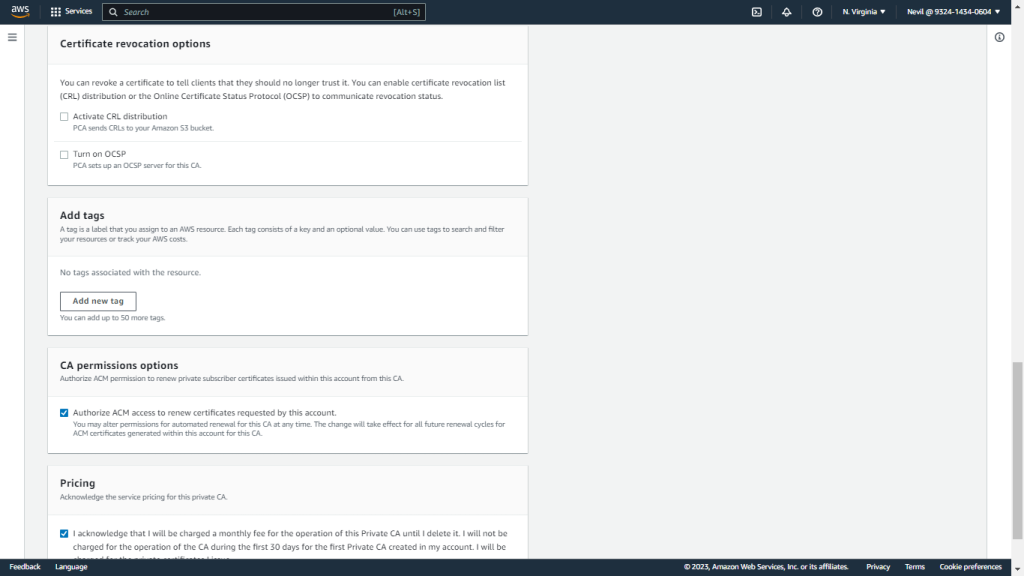


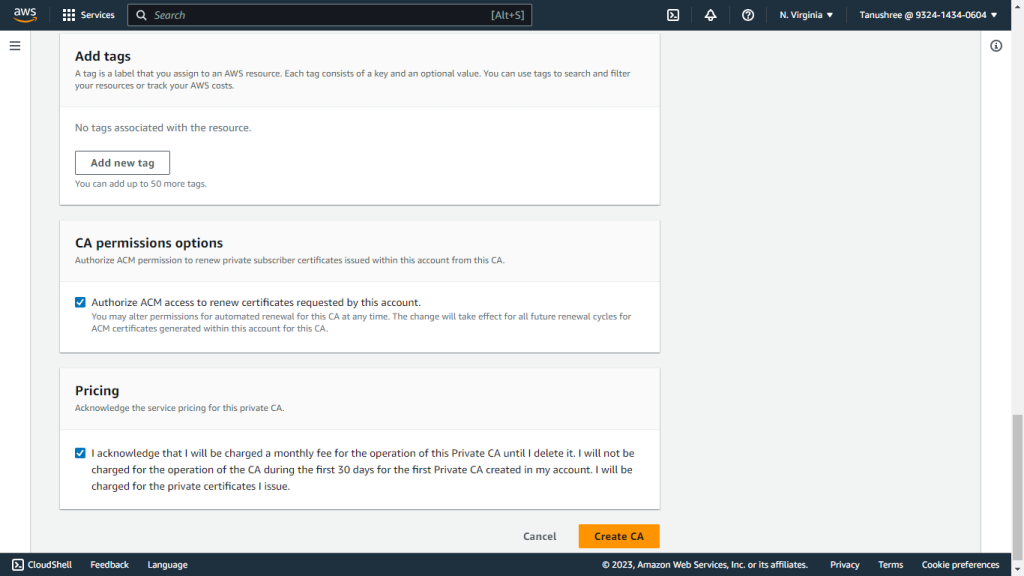
- Add tags if any (optional).
- Enable the checkbox in the CA permissions options section.
- Enable the checkbox in the Pricing section.
- Click Create to create the CA certificate.
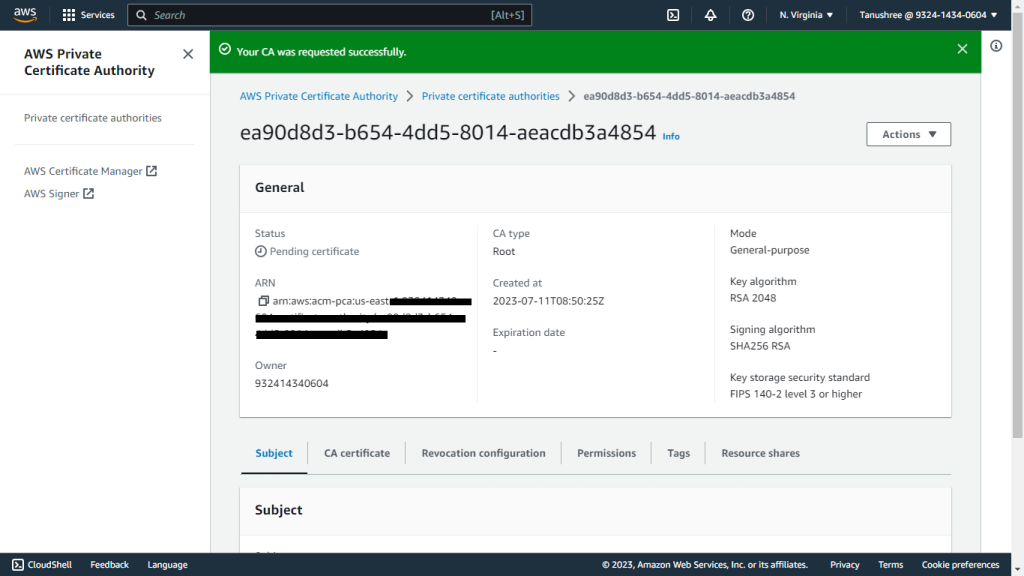


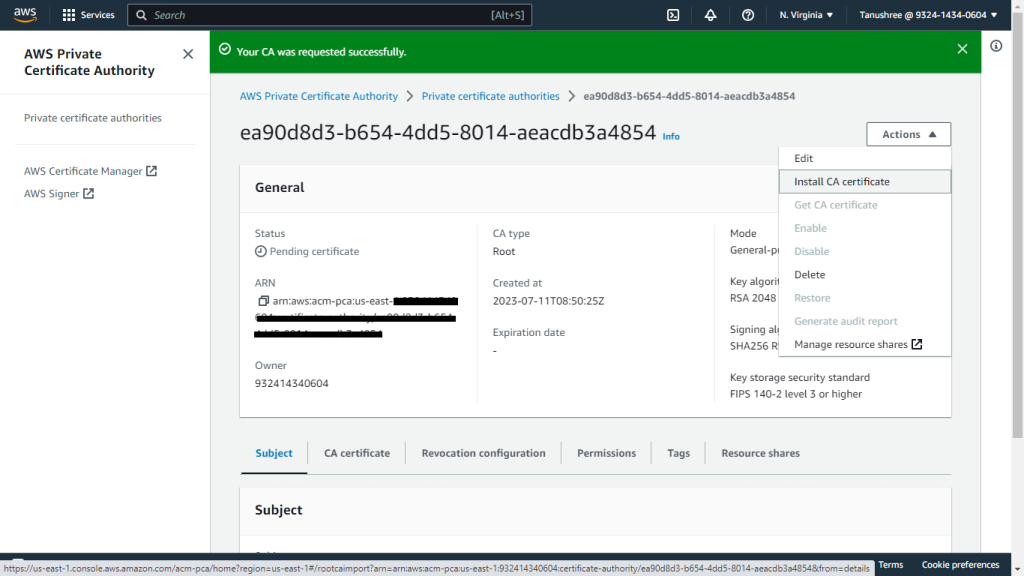
- From Actions, select Install.

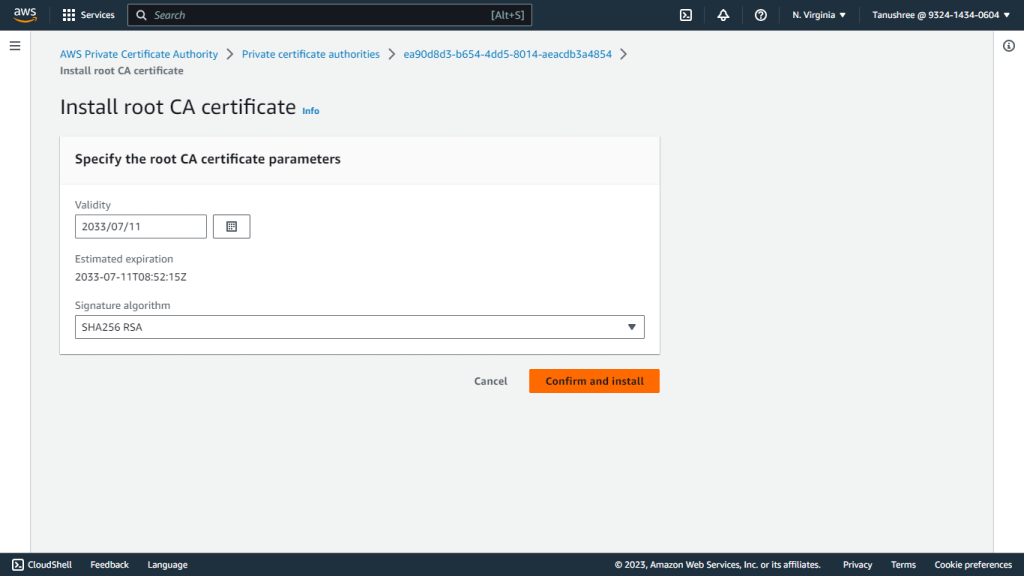
- Click Confirm and Install.
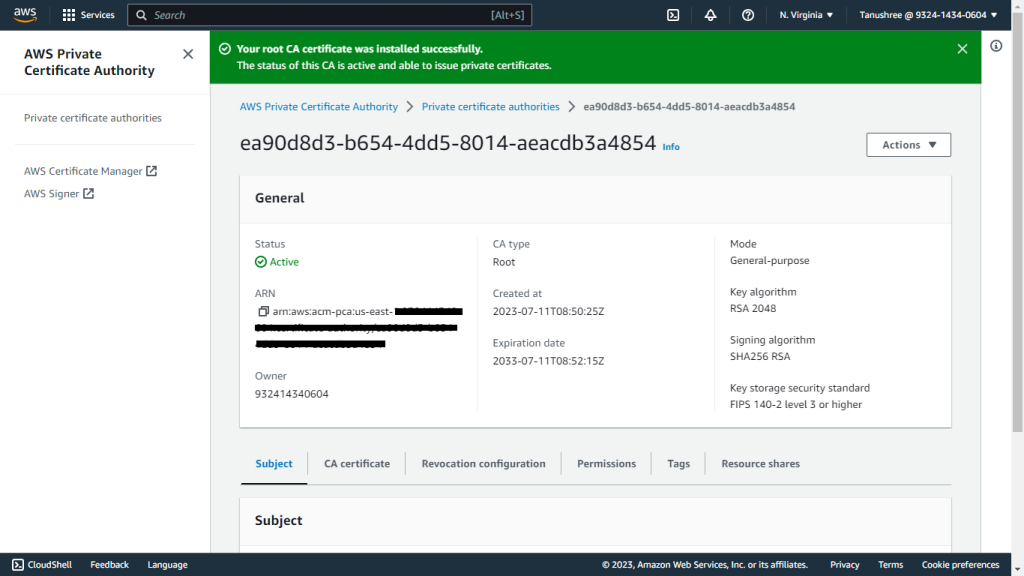


Create a Trust Anchor
- Search for the IAM service, and go to Roles under Access management. Scroll down to Roles Anywhere and select Manage.
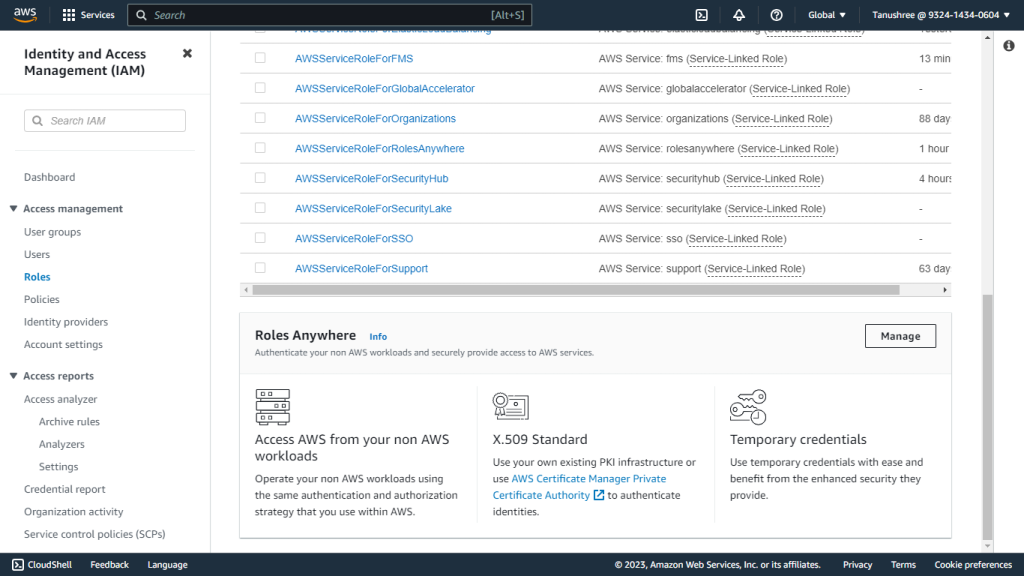

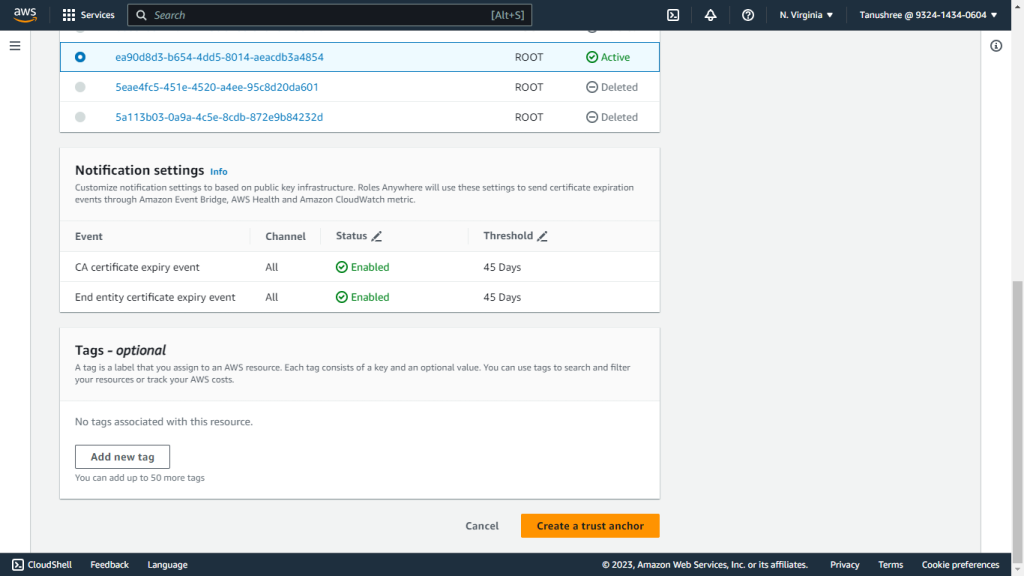
- Click Create a Trust anchor.
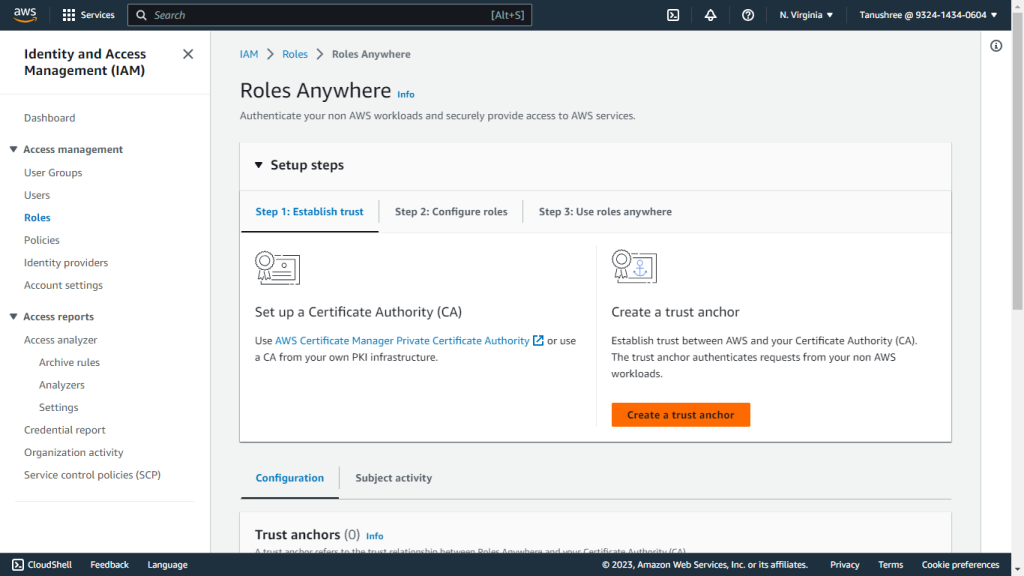

- Enter the Trust anchor name, like netskope-ce-trust-anchor.
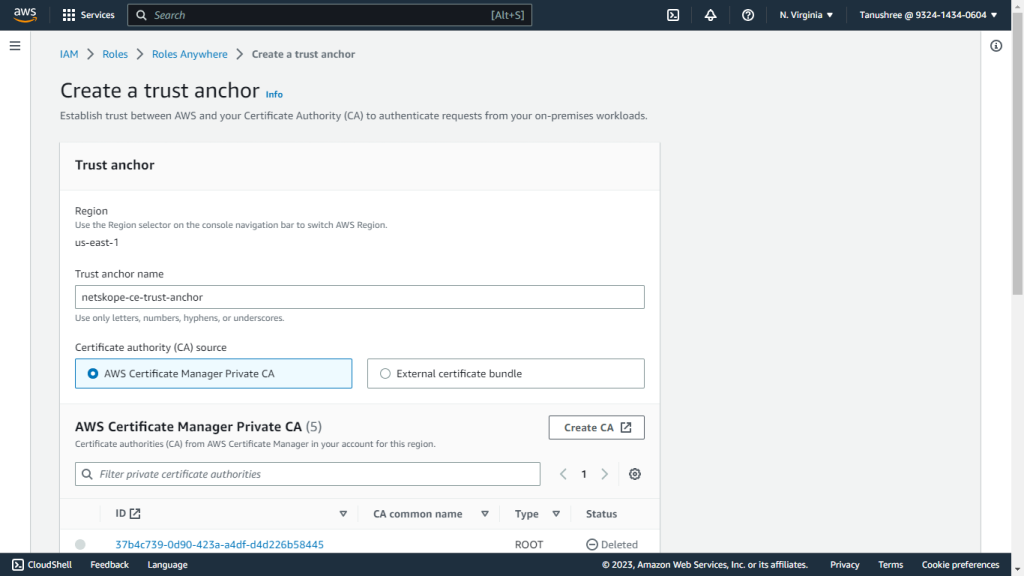

- Select AWS Certificate Manager Private CA (created in the previous steps) as a Certificate authority (CA) source.
- Add tags if required.
- Click Create a trust anchor.
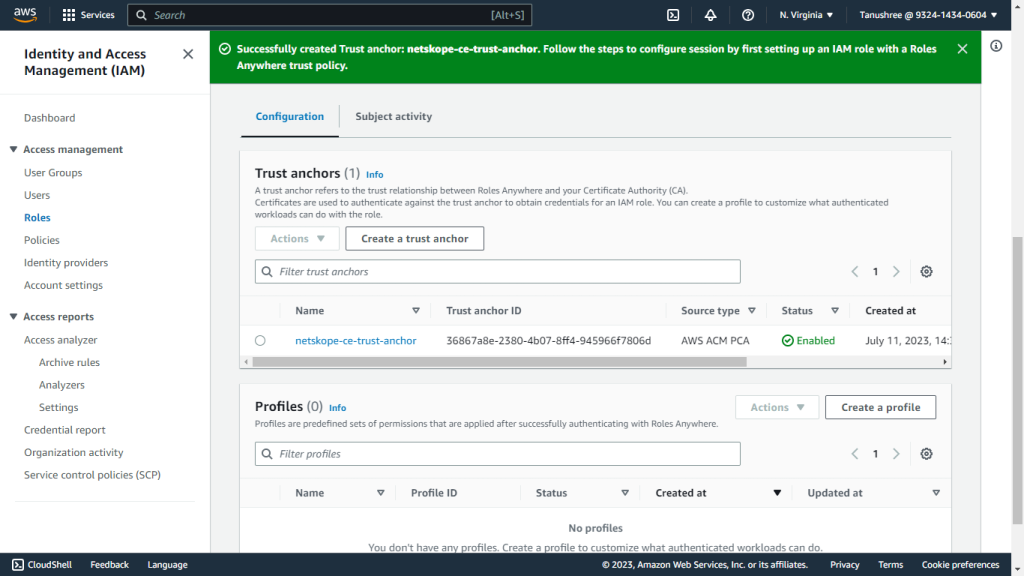


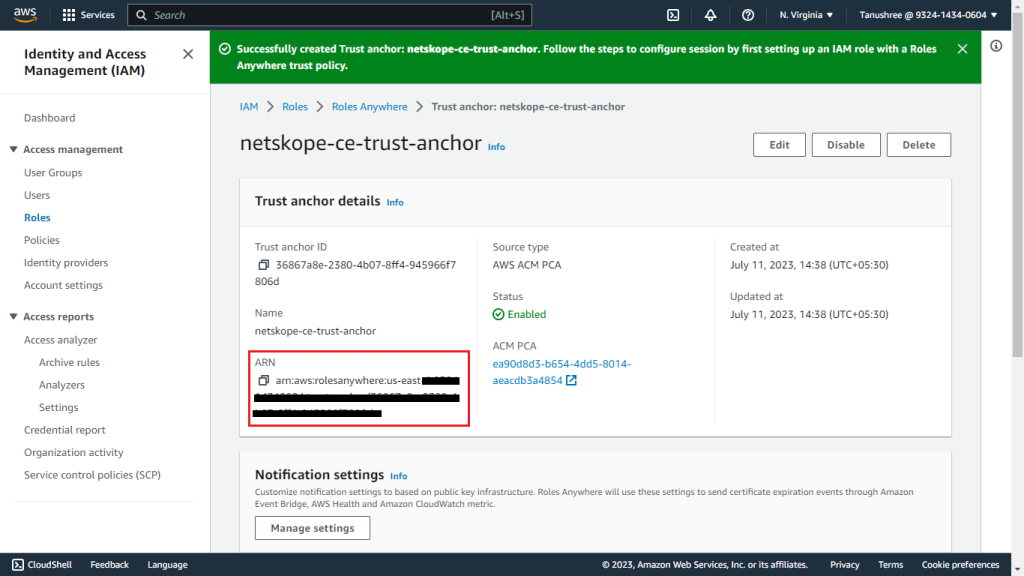
- Click on the created Trust Anchor and copy the Trust Anchor ARN.

Create an IAM Role
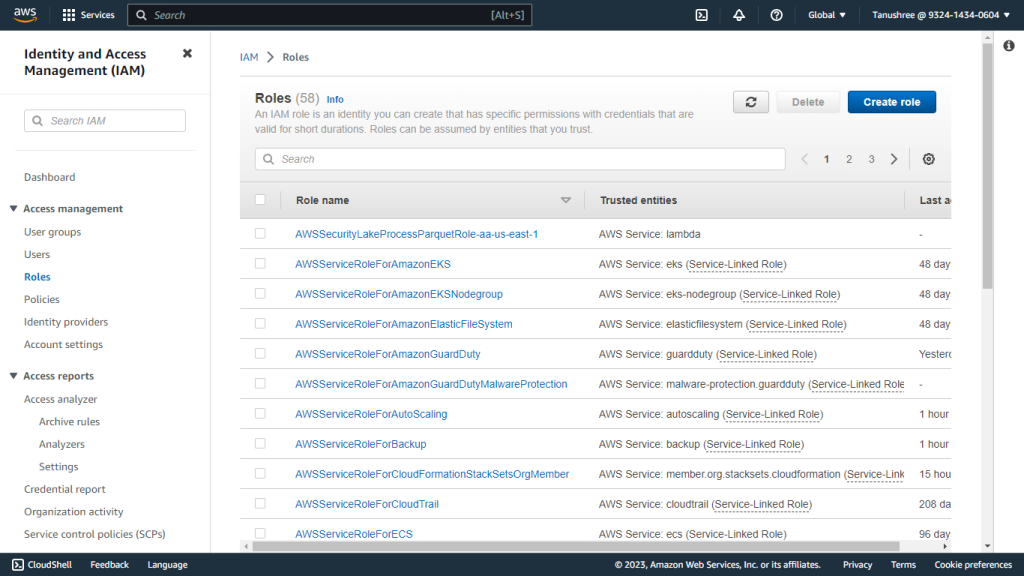
- Go to IAM services in the AWS Console.
- Click Role under Access management.
- Click Create Role.

- For the Trusted entity type, select Custom Trust Policy.
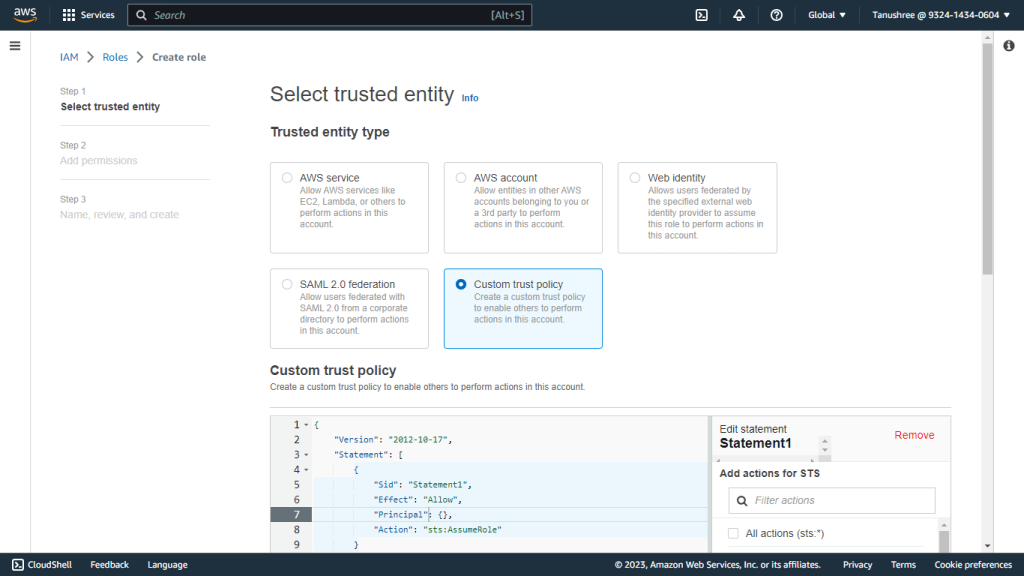

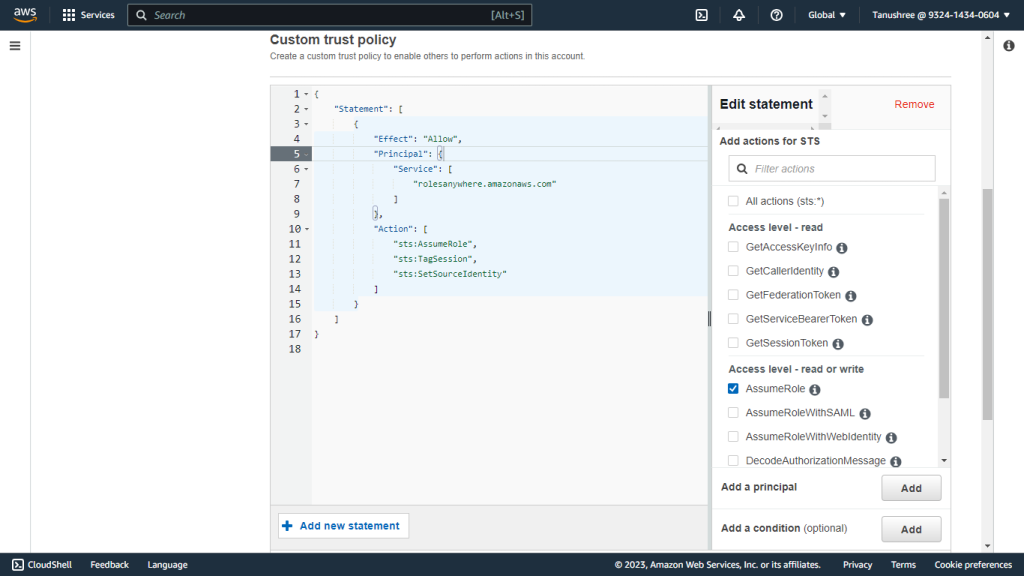
- Replace the Custom trust Policy with the below Trust Policy. This policy contains the permissions for using the Roles Anywhere service:
{
    "Version": "2012-10-17",
    "Statement": [
        {
            "Effect": "Allow",
            "Principal": {
                "Service": [
                    "rolesanywhere.amazonaws.com"
                ]
            },
            "Action": [
                "sts:AssumeRole",
                "sts:TagSession",
                "sts:SetSourceIdentity"
            ]
        }
    ]
}

- Click Next.
- In the Permissions policies, select the previously created Bucket Policy.
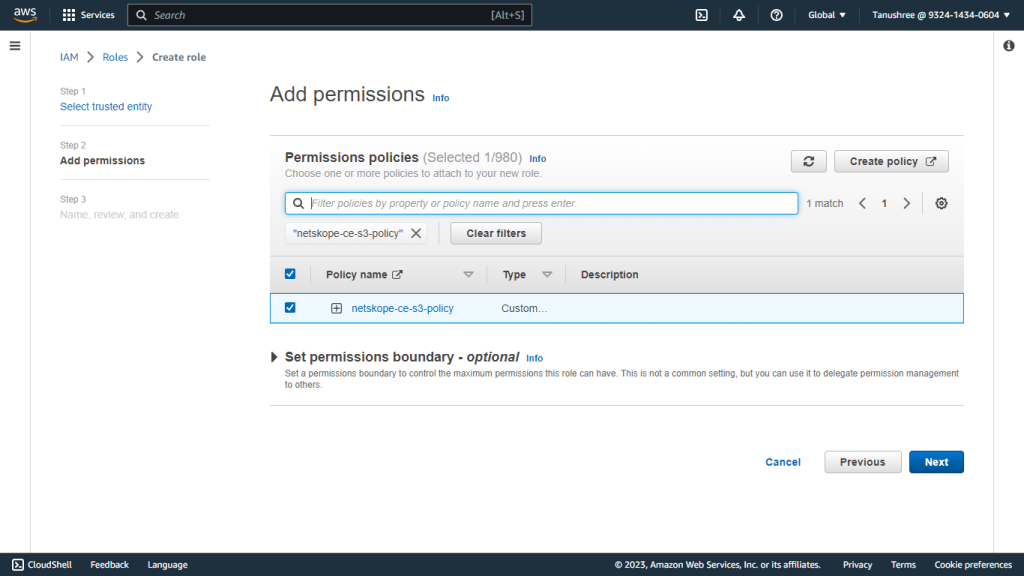

- Click Next.
- Provide a Role name, like netskope-ce-roleAnywhere, and add a Description for the role.
- Click Create role.
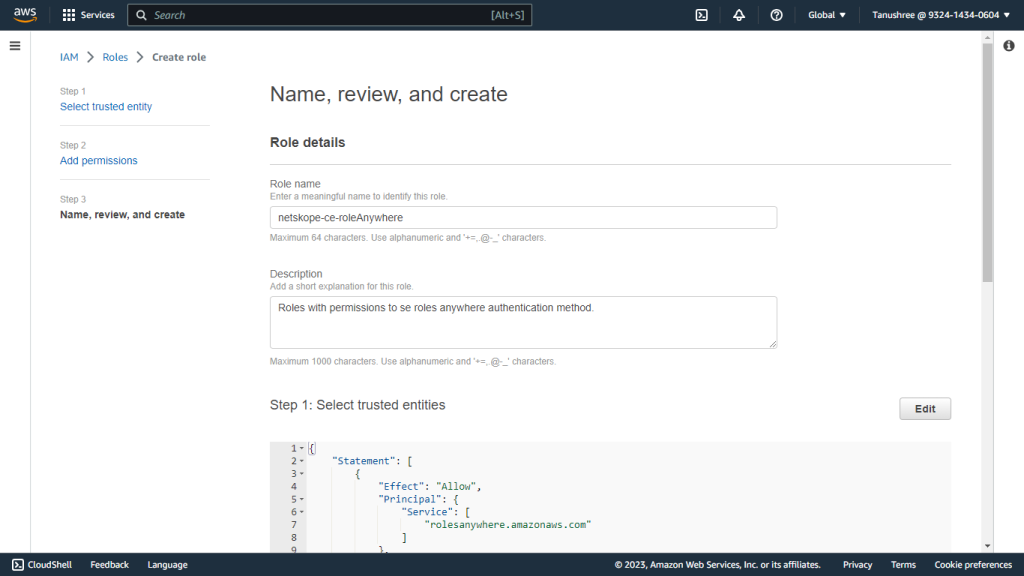

- Make a note of the Role ARN as this will be required in the Plugin configuration parameter: Role ARN for the authentication method AWS IAM Roles Anywhere.
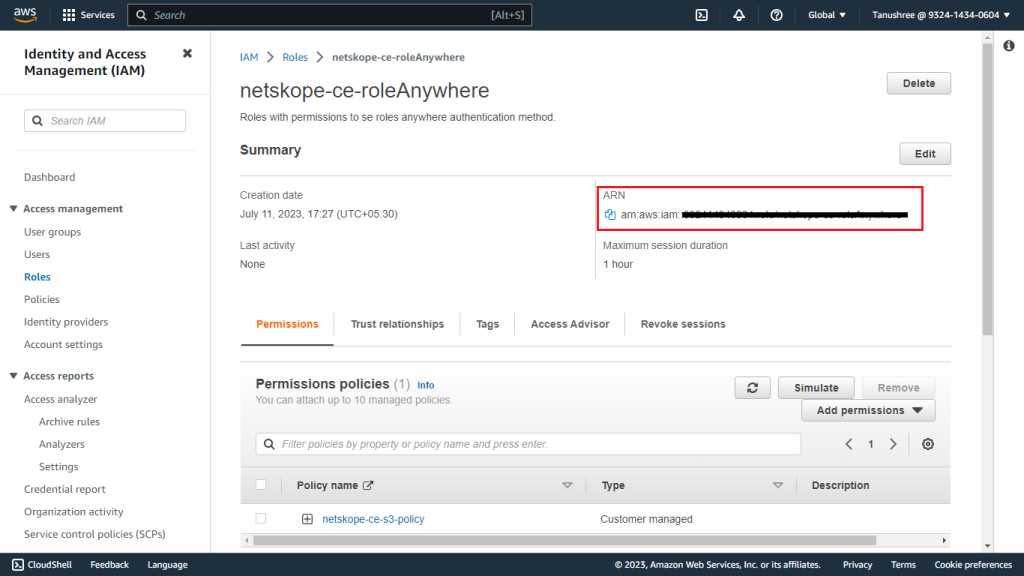

Create a Profile
- Select Roles under Access management.
- Scroll down to Roles Anywhere and click Manage.
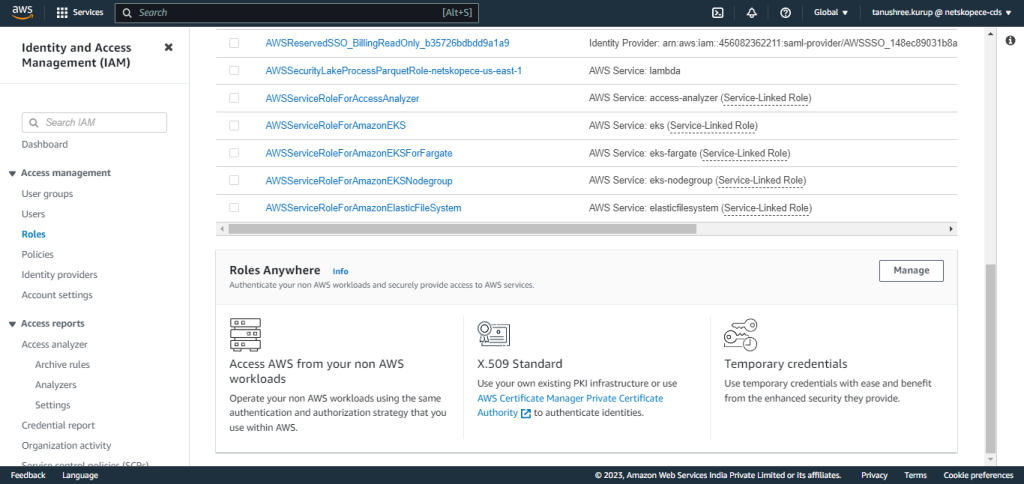

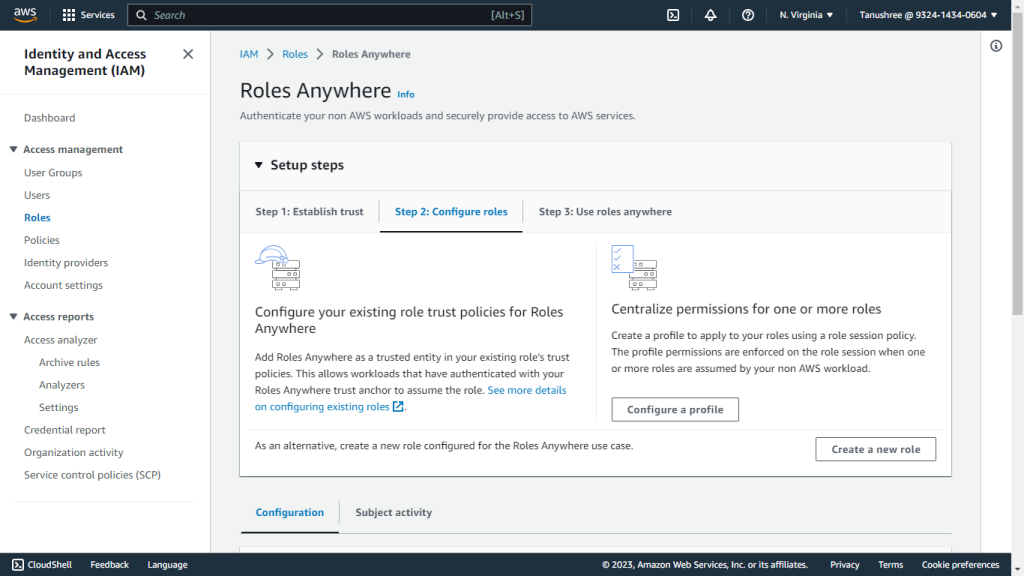
- Expand the Setup steps.
- Click Step 2: Configure roles.
- Click Configure a profile.

- Enter a Profile name, like netskope-ce-profile.
- Select the role created in Create IAM Role section (netskope-ce-roleAnywhere).
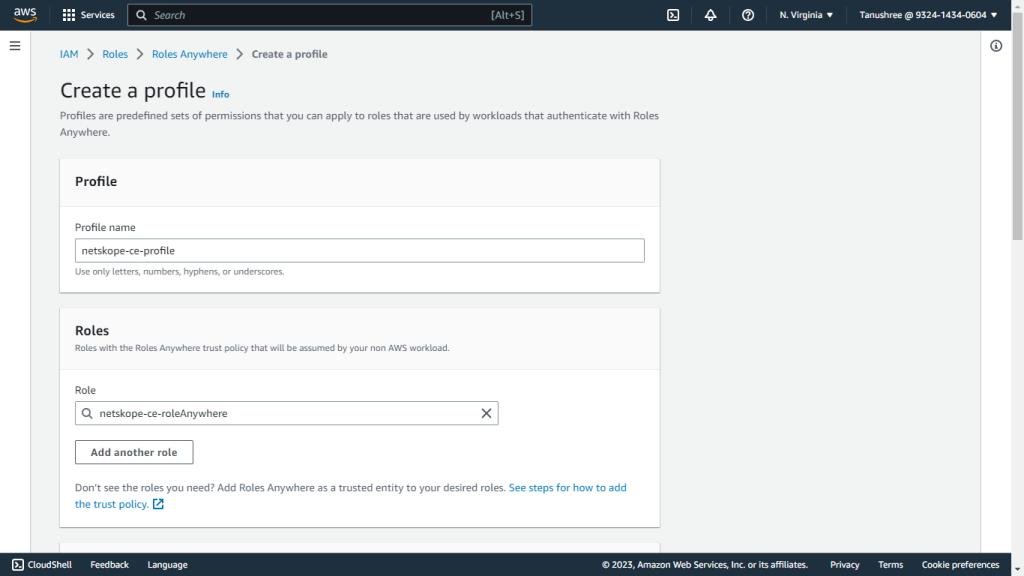

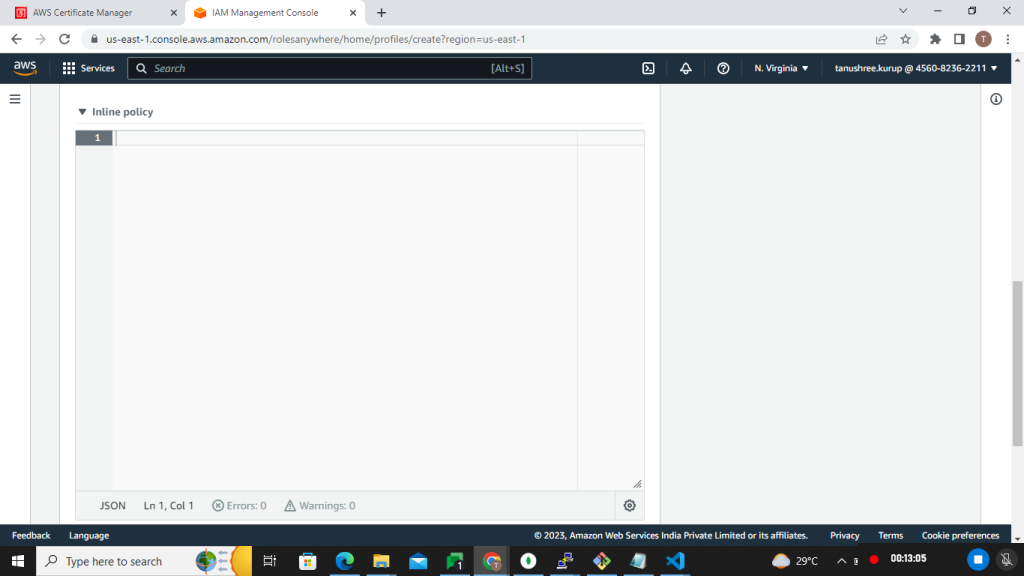
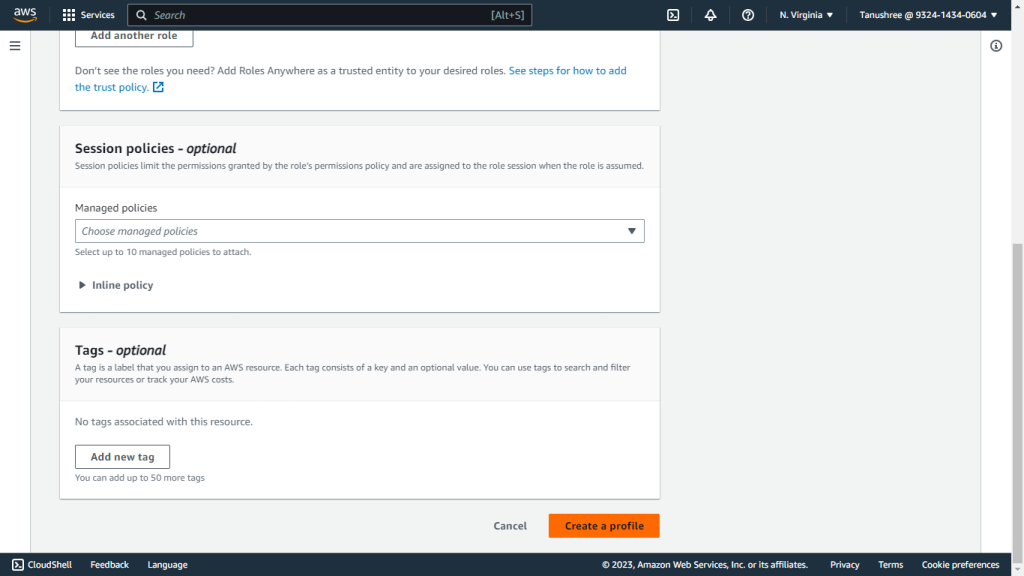
- Remove the Inline Policy.
- Click Create profile.
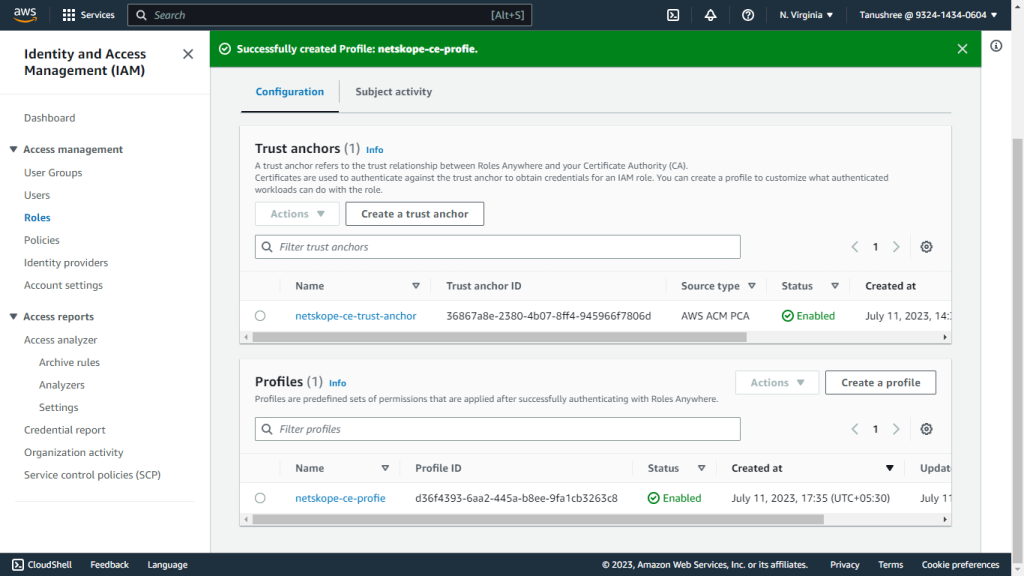


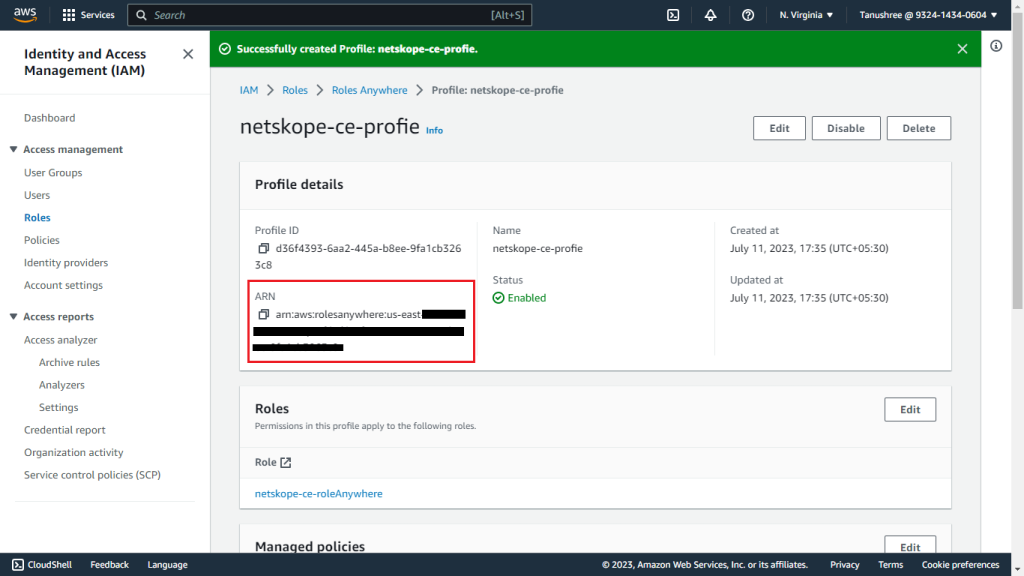
- Click on the created Profile and copy the Profile ARN.

Request a Private Certificate
- Go to AWS Certificate Manager > Request certificate.
- Select Request a private certificate.
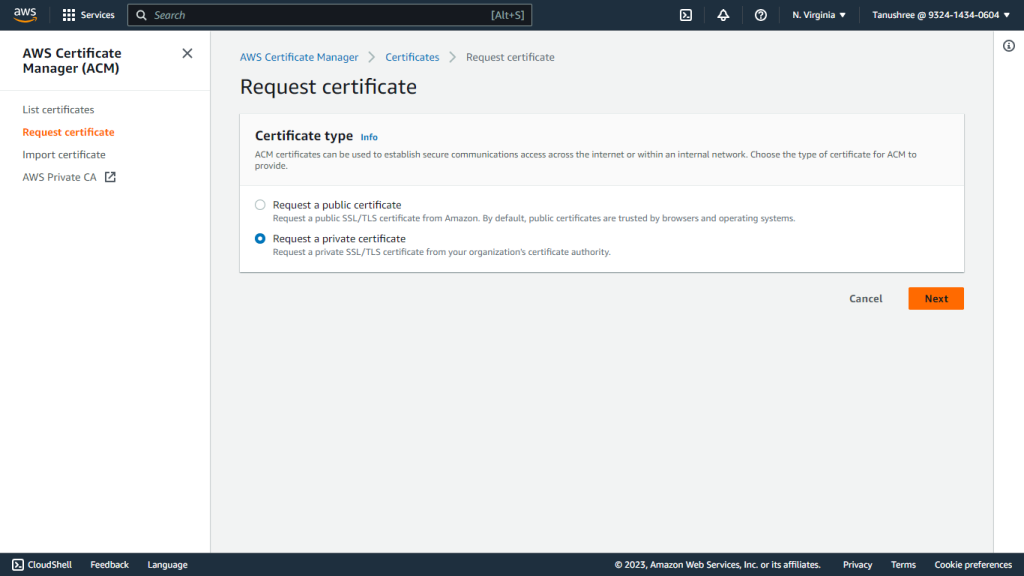

- Click Next.
- Select the Certificate authority created in the previous steps.
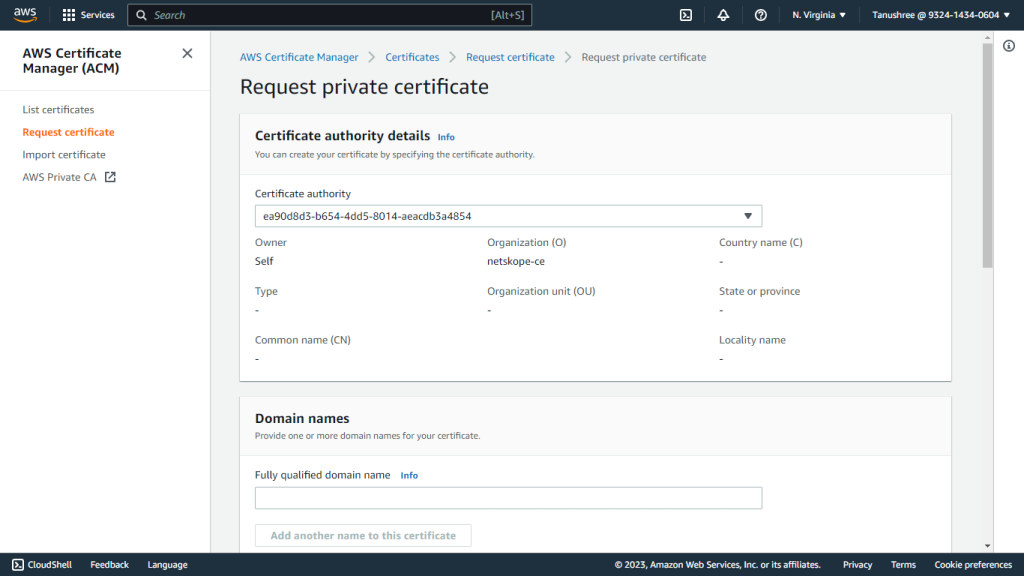

- Provide a domain name in the Fully Qualified Domain Name field, like netskope-ce.com.
- Select RSA 2048 for the Key algorithm.
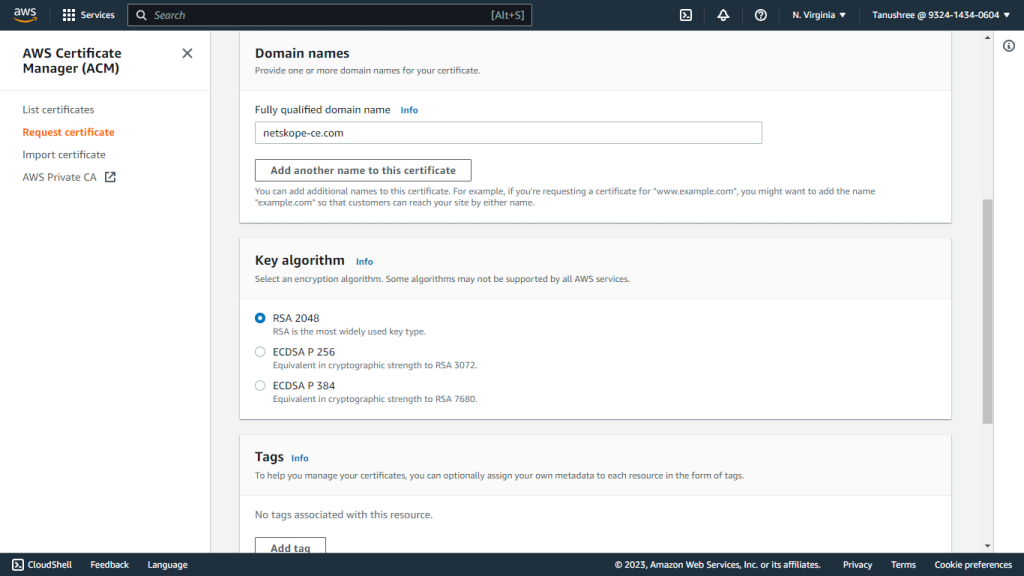

- Add tags if required.
- Acknowledge the Certificate renewal permissions.
- Click Request.
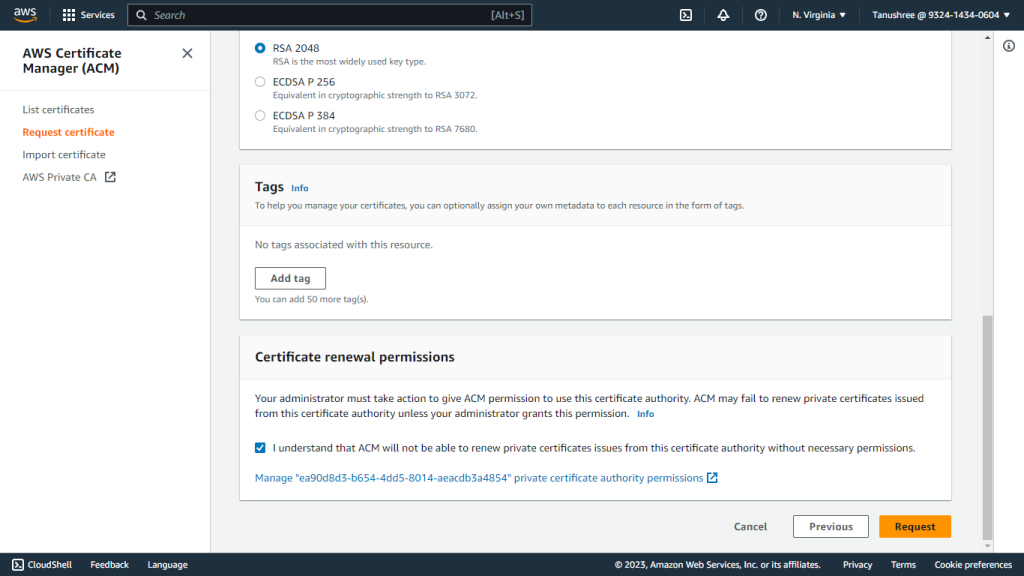

- Go to List certificates from the navigation pane of AWS Certificate Manager.
- Select the certificate created previously.

- Click Export.
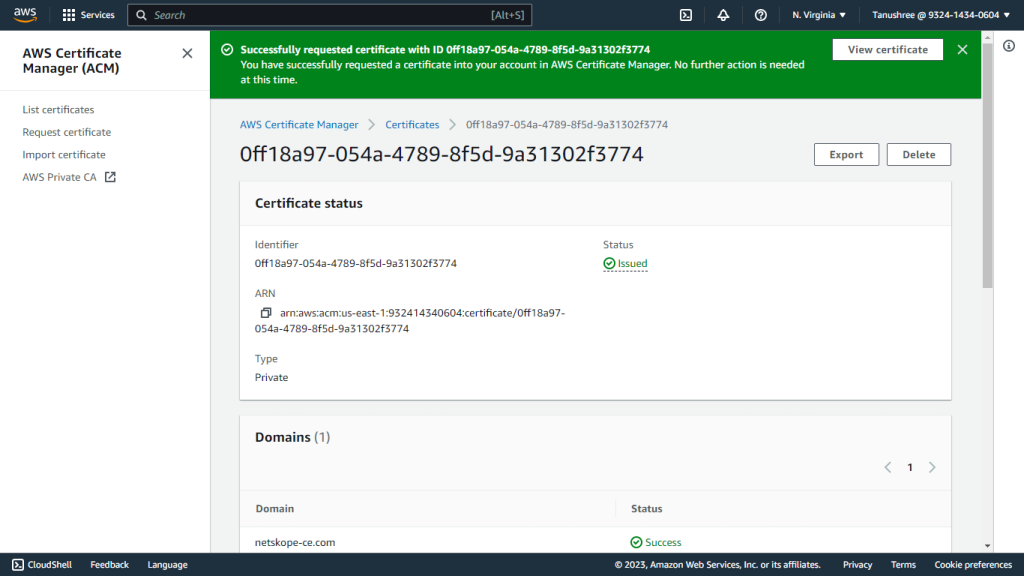

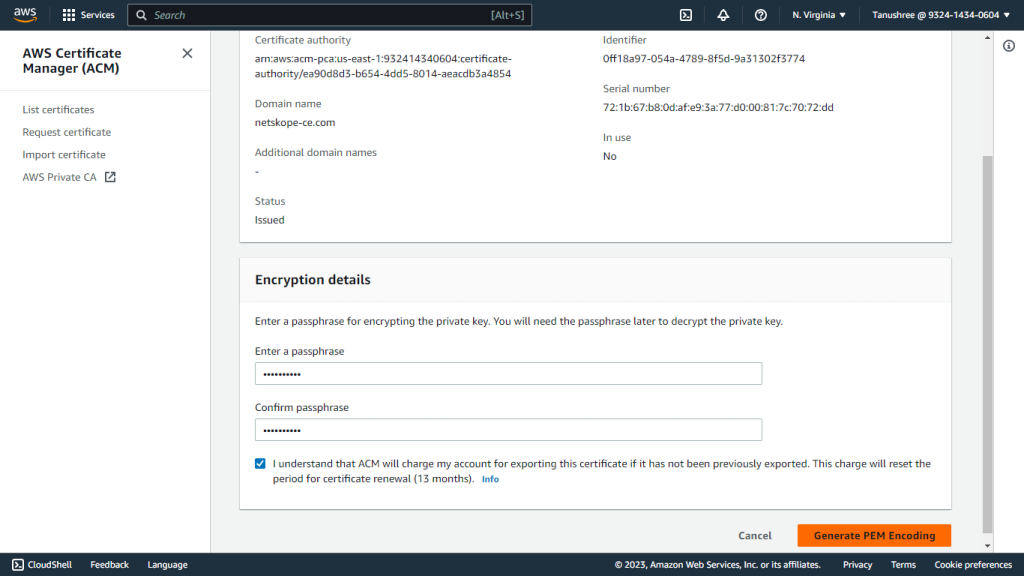
- Enter the passphrase. Make a note of the passphrase as it will be required for the Configuration of the AWS S3 Plugin using the AWS IAM Roles Anywhere Authentication method.
- Click Generate PEM Encoding.

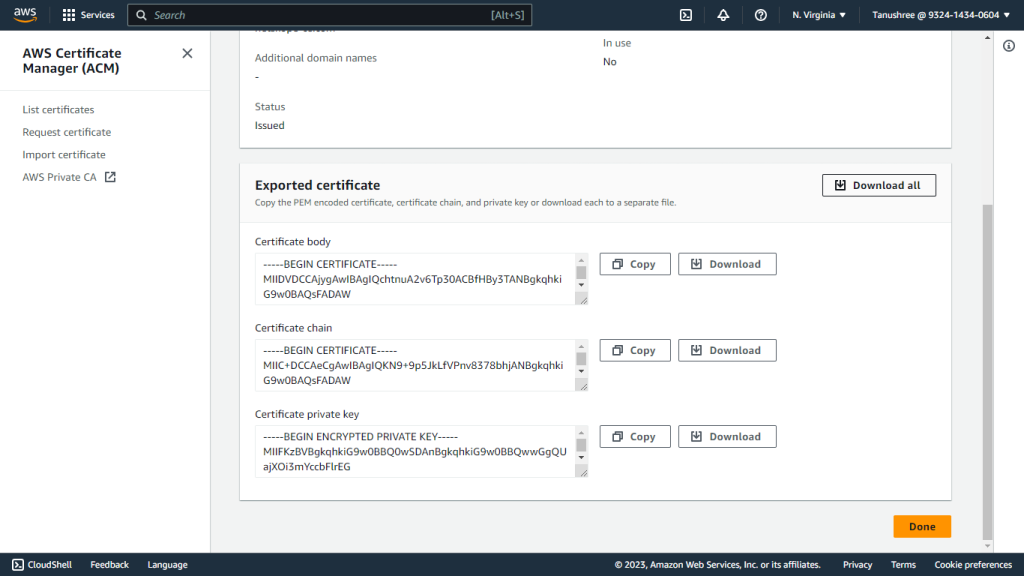
- Download all the Certificates because they won’t be visible again. For new certificates, you will need to Export it again. For More Info visit AWS IAM Role Anywhere

Deployed on AWS Configuration
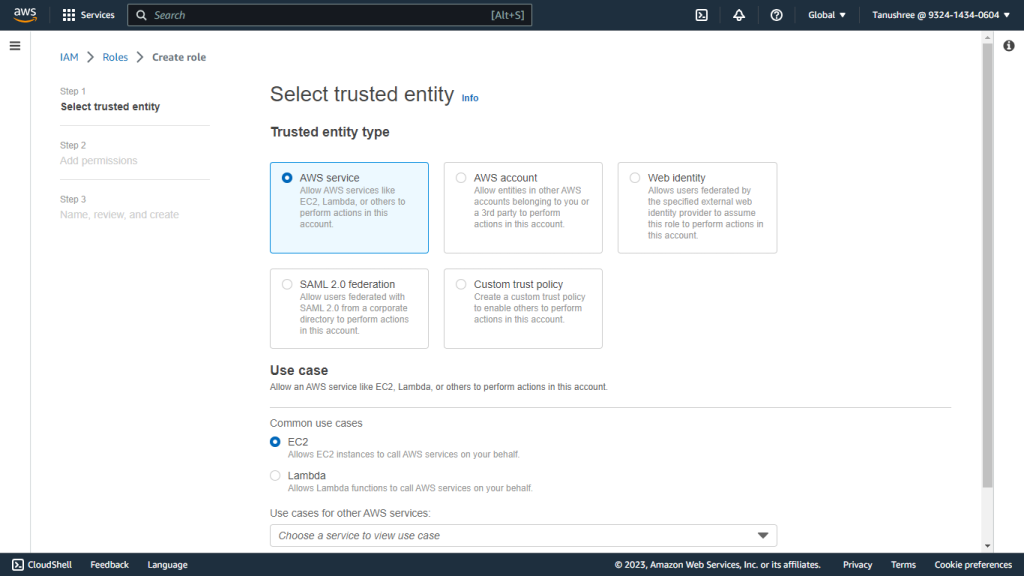
Create a Role
- Go to IAM services in the AWS Console.
- Click Create role.
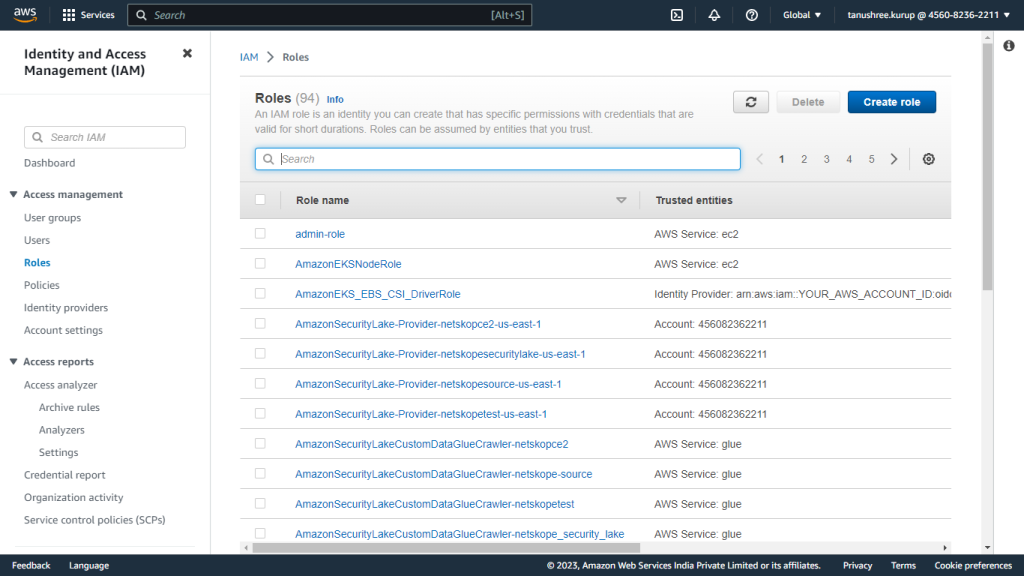

- Select the AWS Service.
- For Use Case, select EC2.
- Click Next.

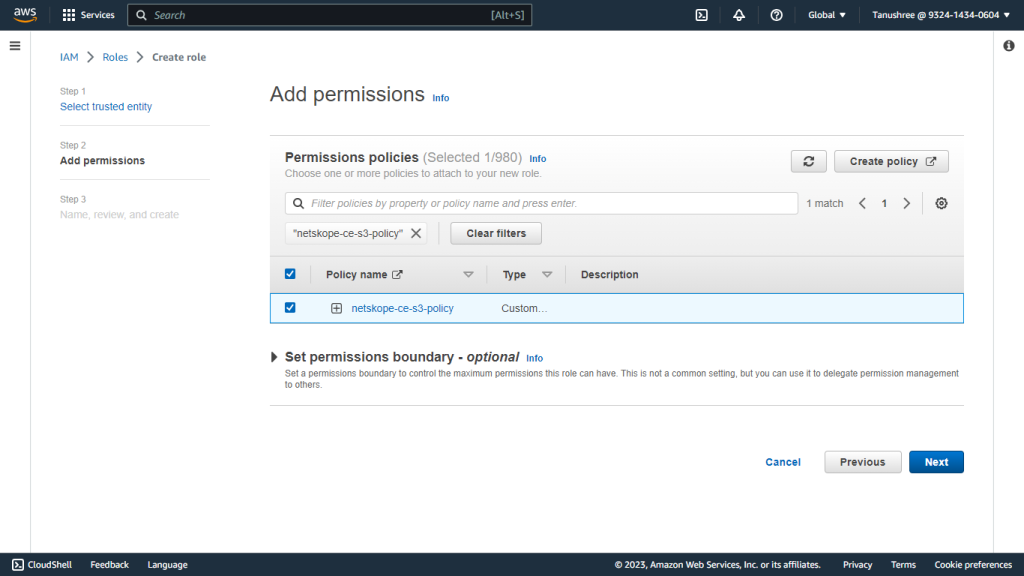
- Select the permission policy created in your Bucket Policy.
- Click Next.

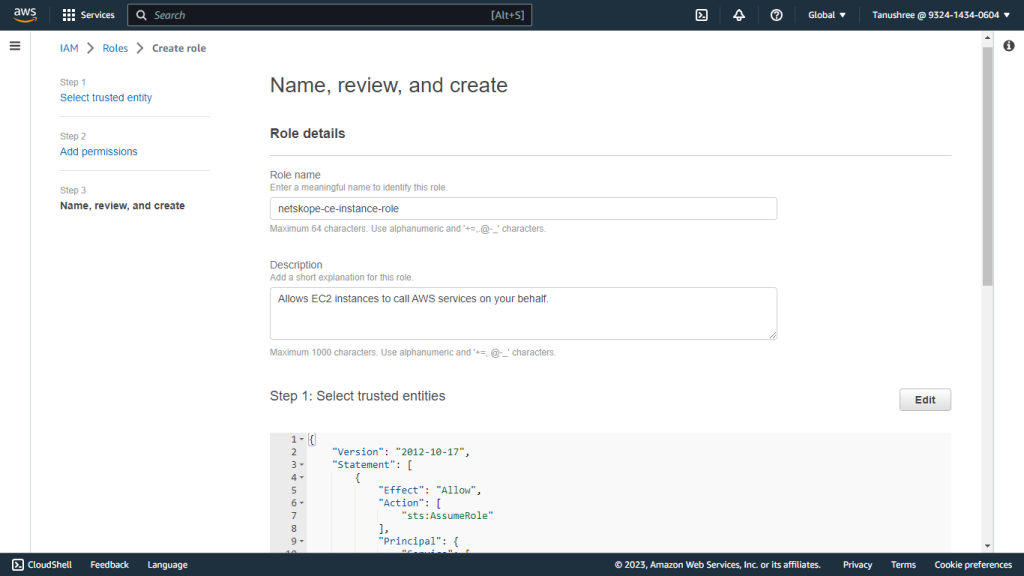
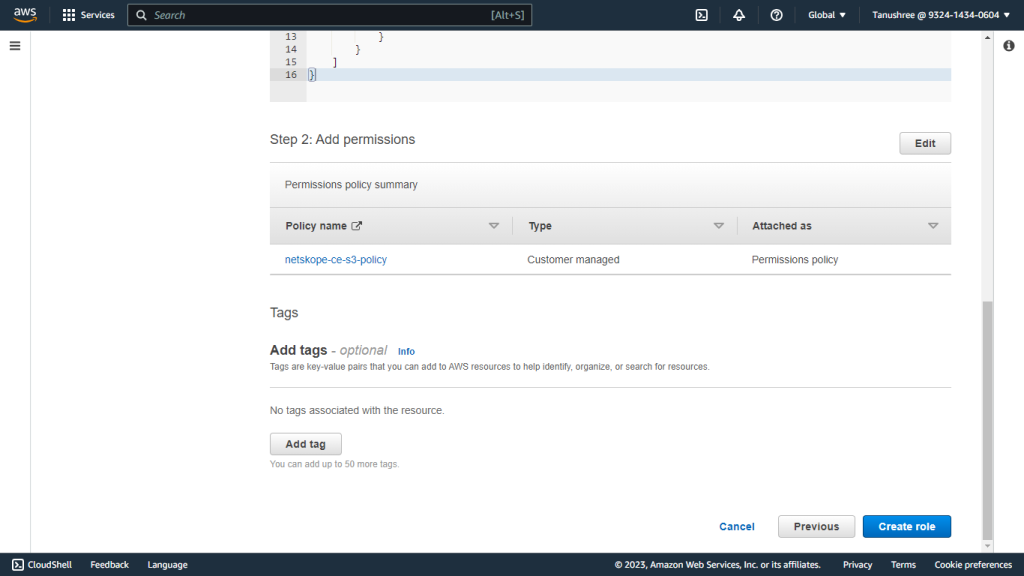
- Enter a Role Name, like netskope-ce-instance-role, and add a Description.
- Click Create Role.


Assign a Role to an EC2 Instance
- Open your EC2 instance console.
- Click Instances under Instances.
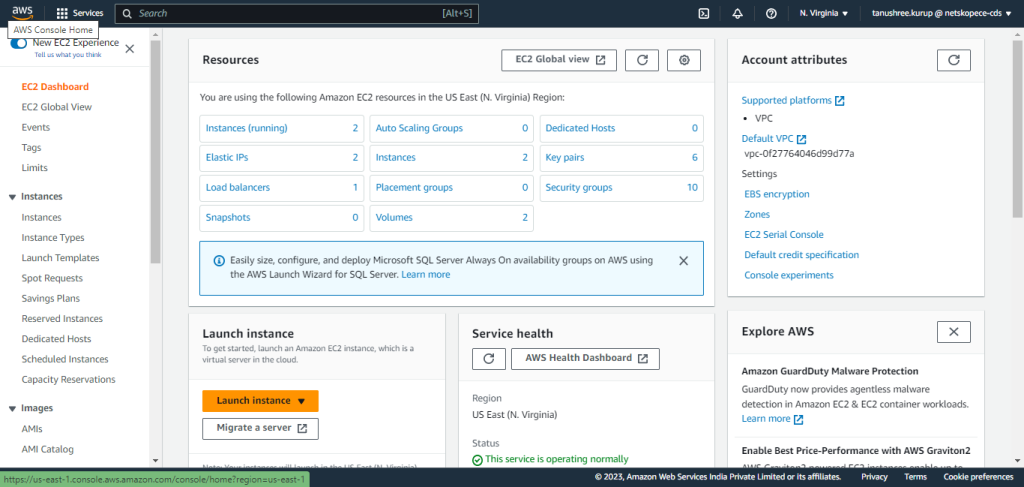
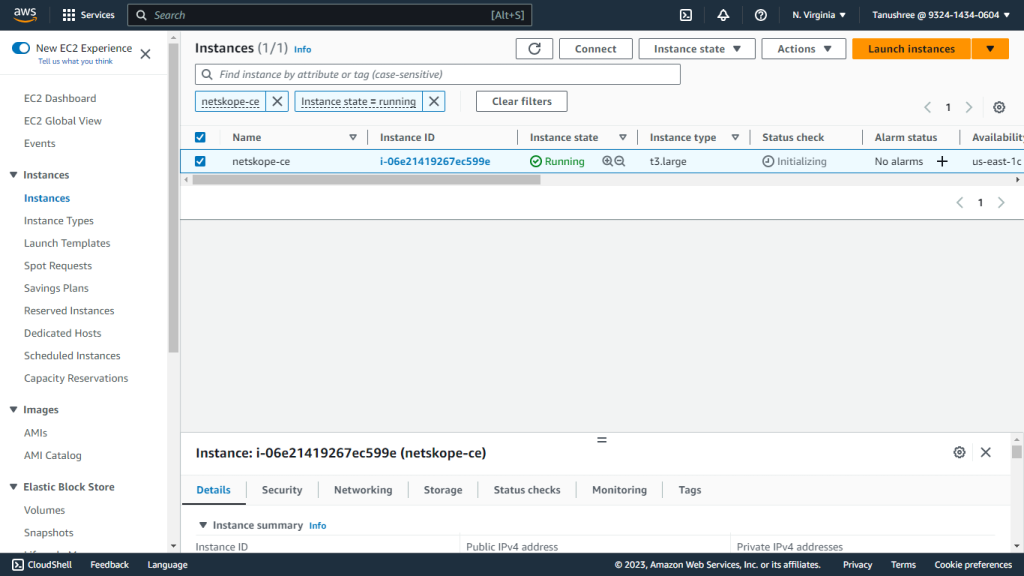


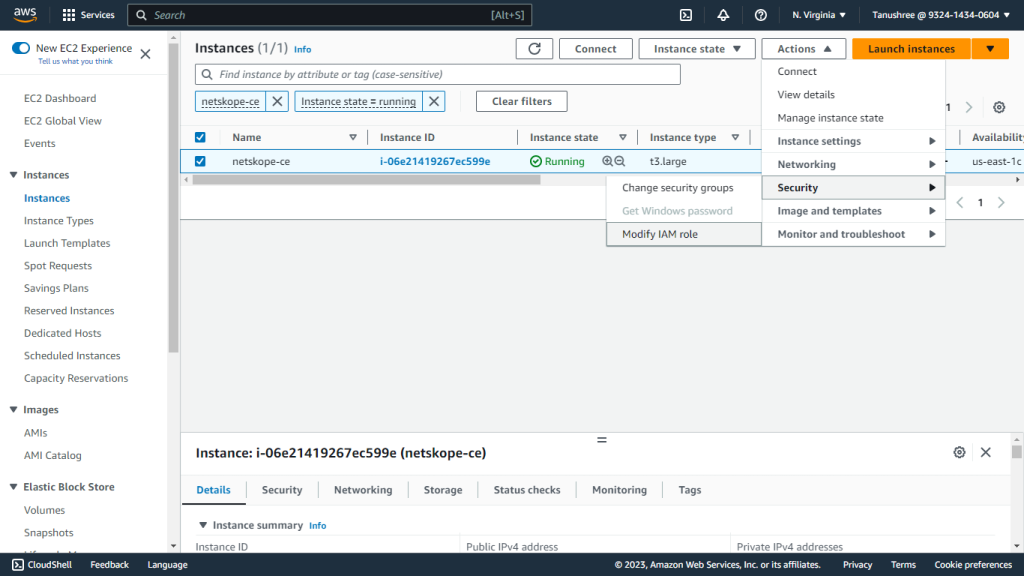
- Go to Action > Security > Modify IAM Role.

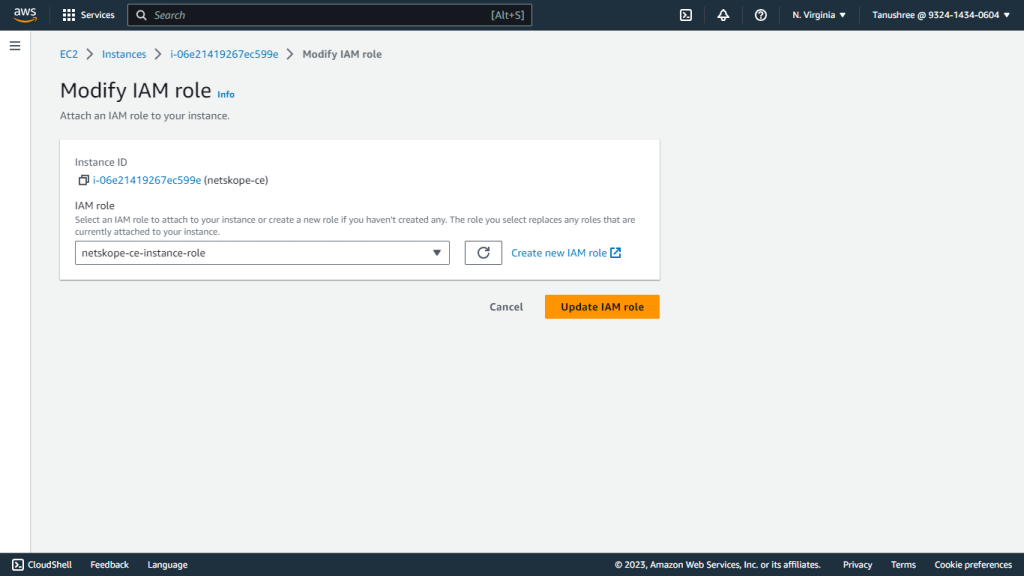
- Select the Role that you created previously (like netskope-ce-instance-role).
- Click Update IAM Role.

Assign a Role to a Fargate Instance
- Open your CFN script.
- Get the ExistingECSTaskRole Parameter value if present.
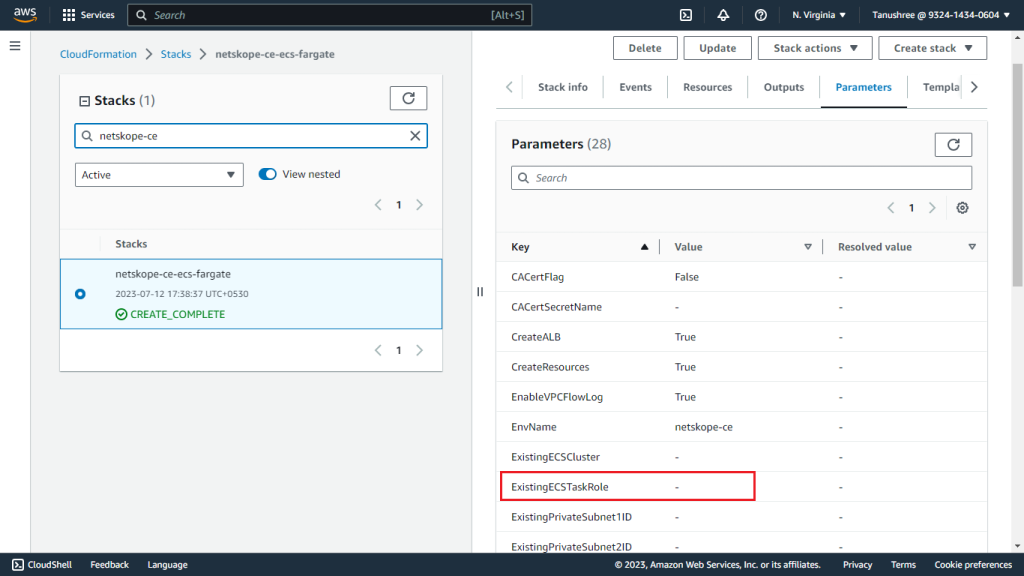

- Go to IAM > Roles.
- Search for the ExistingECSTaskRole parameter value. Otherwise, search for NetskopeCloudExchangeTaskRole-<CFN name> and select the role.
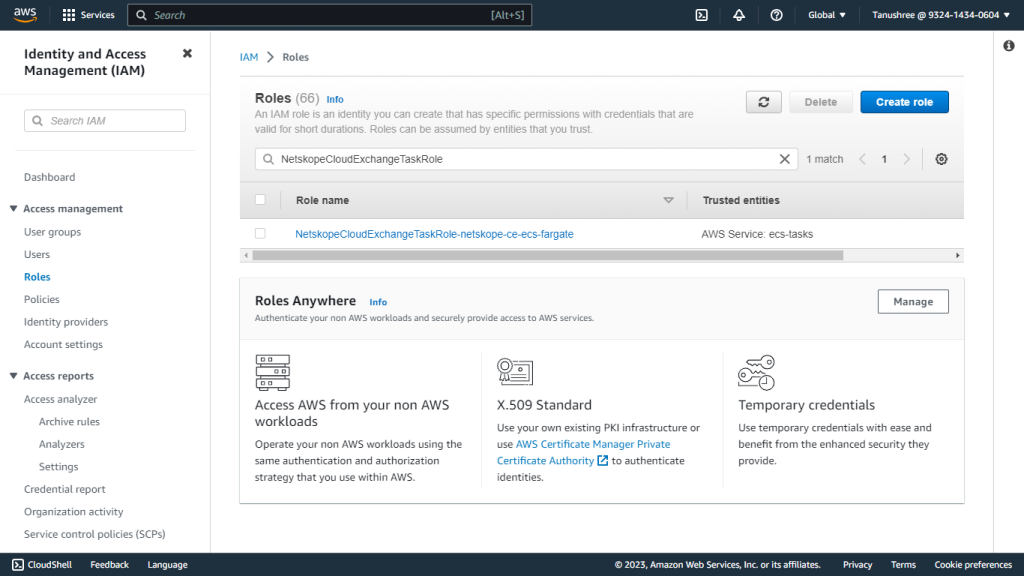

- Attach the previously created Create Bucket Policy to this role.
- Click Add permission > Attach policies.
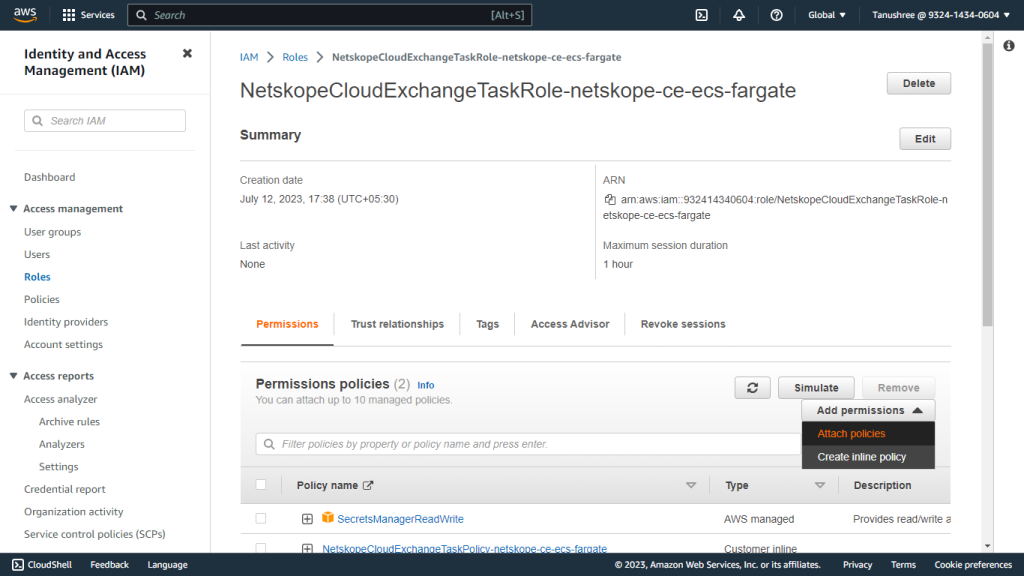

- Search and select the bucket policy previously created (netskope-ce-s3-policy).
- Click Add permissions.
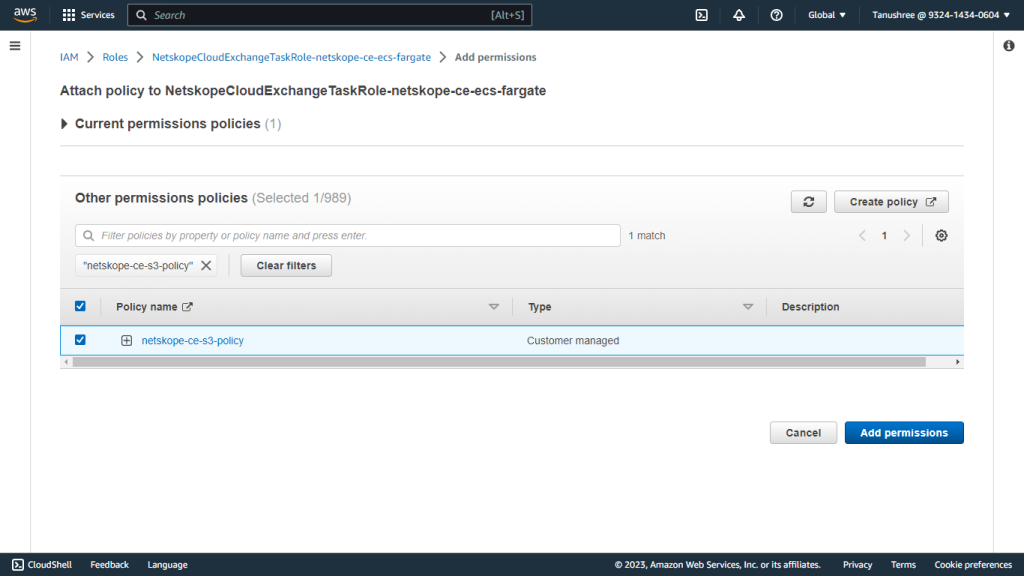

Assign the Role to a K8s Instance
- Open your Role created for ServiceAccount while creating K8s instance.
- Attach the Bucket policy created previously.
Configure an Externally Provisioned Bucket
For External Provisioned bucket, you will have 2 different accounts:
- Account A (Plugin Account): Runs the CE instance (EC2 / Ubuntu VM with IAM Roles Anywhere)
- Account B (Core Account): Rwns the externally provisioned S3 bucket
Below are the exact steps we followed to make the plugin work with an externally provisioned bucket.
On Account A (Plugin Account — CE instance)
Go to IAM > Roles > <CE_ROLE_NAME> (the role attached to the EC2 instance, or the role configured in the IAM Roles Anywhere profile) > Add permissions > Create inline policy and add:
{
  "Version": "2012-10-17",
  "Statement": [
    {
      "Effect": "Allow",
      "Action": [
        "s3:ListBucket",
        "s3:GetBucketLocation"
      ],
      "Resource": "arn:aws:s3:::<external bucket name>"
    },
    {
      "Effect": "Allow",
      "Action": [
        "s3:PutObject"
      ],
      "Resource": "arn:aws:s3:::<external bucket namme>/*"
    }
  ]
}
On Account B (Core Account — bucket owner)
-
Navigated to S3 > Bucket > Permissions > Bucket Policy and added the following policy to grant Account A’s CE role access:
{ "Version": "2012-10-17", "Statement": [ { "Sid": "AllowCECrossAccountAccess", "Effect": "Allow", "Principal": { "AWS": "arn:aws:iam::<ACCOUNT_A_ID>:role/<CE_Account_A_ROLE_NAME>" }, "Action": [ "s3:ListBucket", "s3:GetBucketLocation", "s3:PutObject" ], "Resource": [ "arn:aws:s3:::<bucket name>", "arn:aws:s3:::<bucket name>/*" ] } ] } -
Navigate to S3 > Bucket > Permissions > Object Ownership > Edit and set it to Bucket owner enforced. This ensures objects uploaded by Account A are owned by Account B.
Configure the AWS S3 Events, Alerts Plugin
-
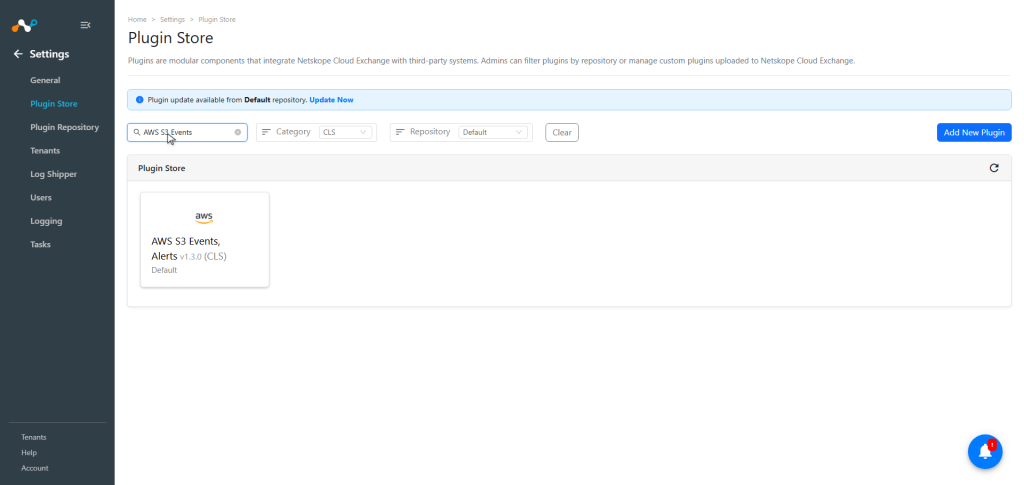
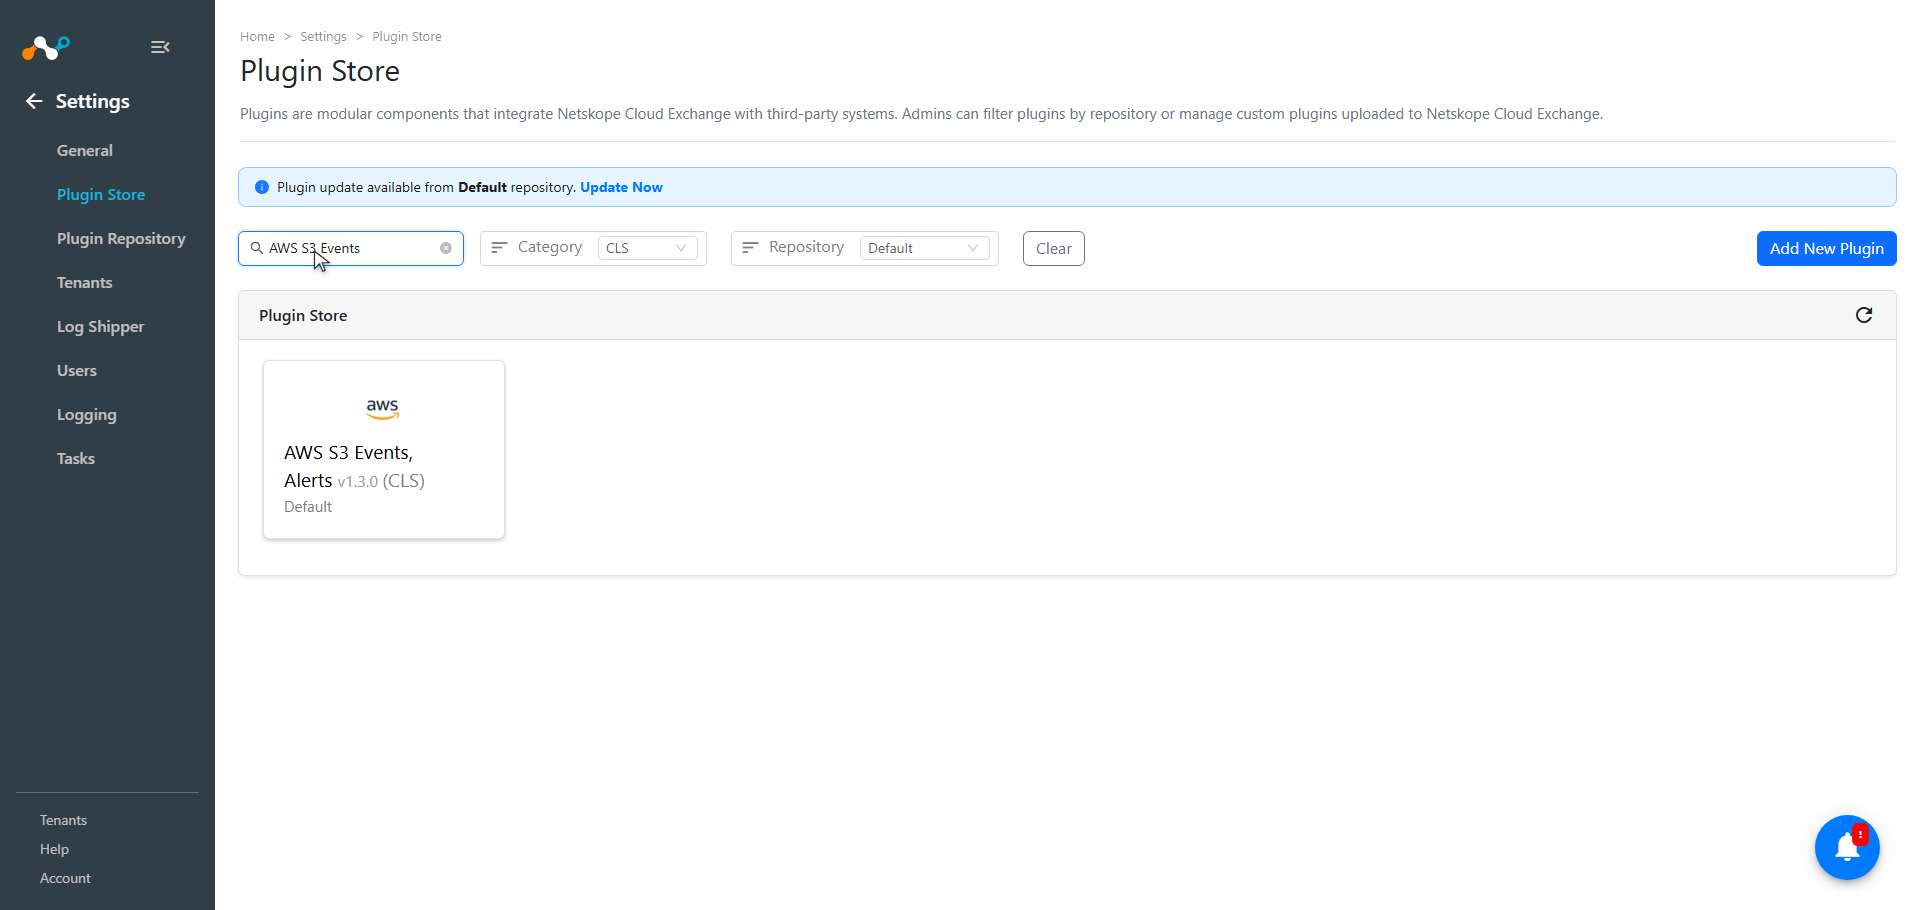
Log in to Cloud Exchange and go to Settings > Plugin Store. Search for and select the AWS S3 Events, Alerts v1.3.0 (CLS) plugin.
-
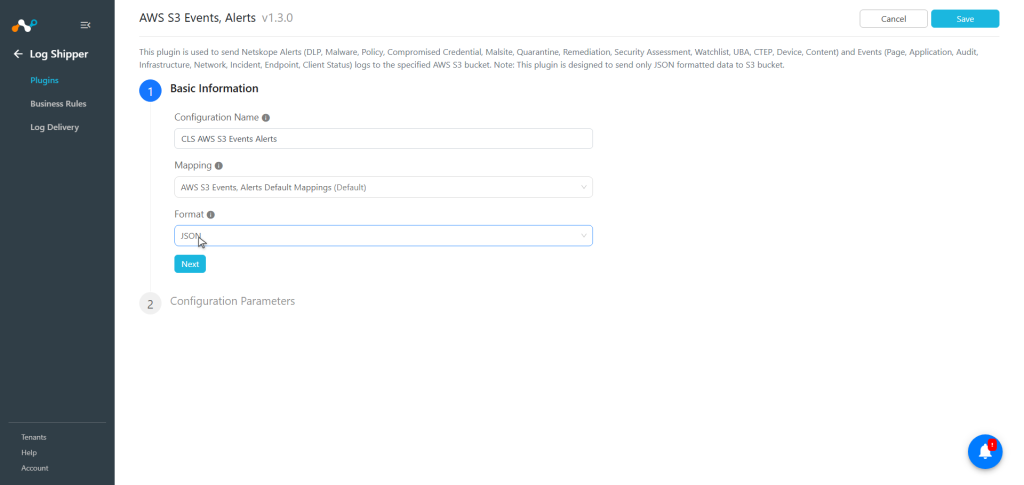
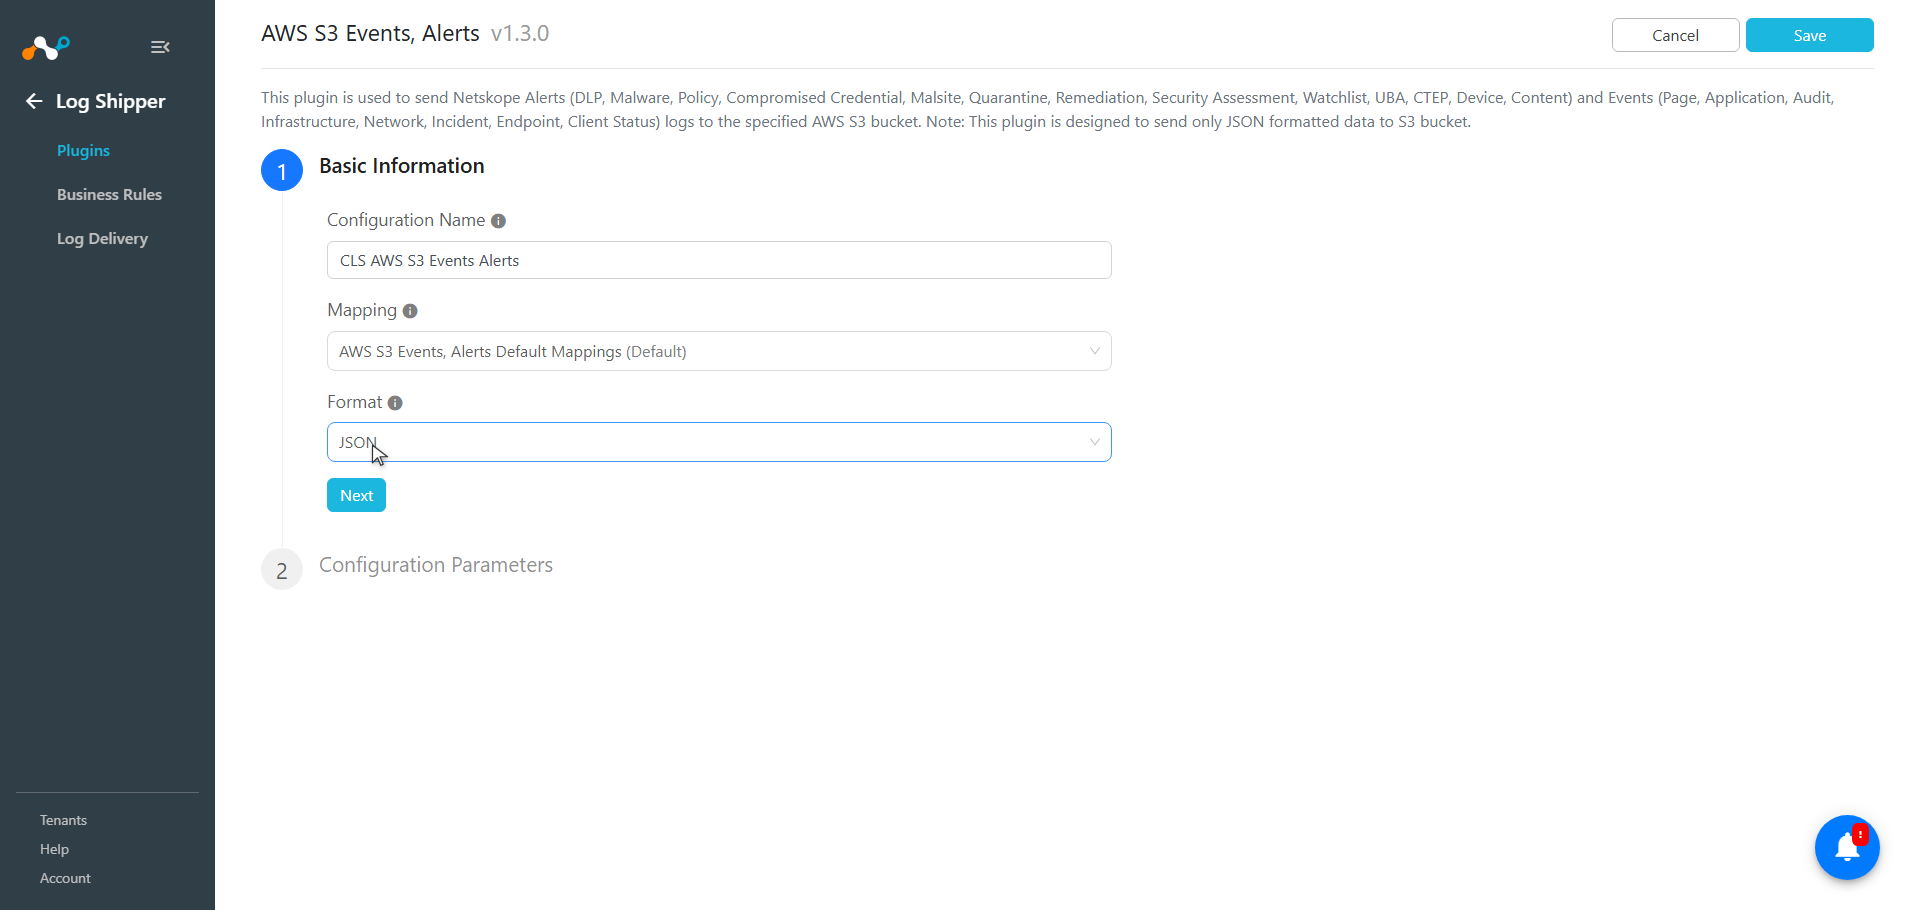
Enter a plugin configuration name, and make sure the AWS S3 Events, Alerts Default Mappings are selected.
-
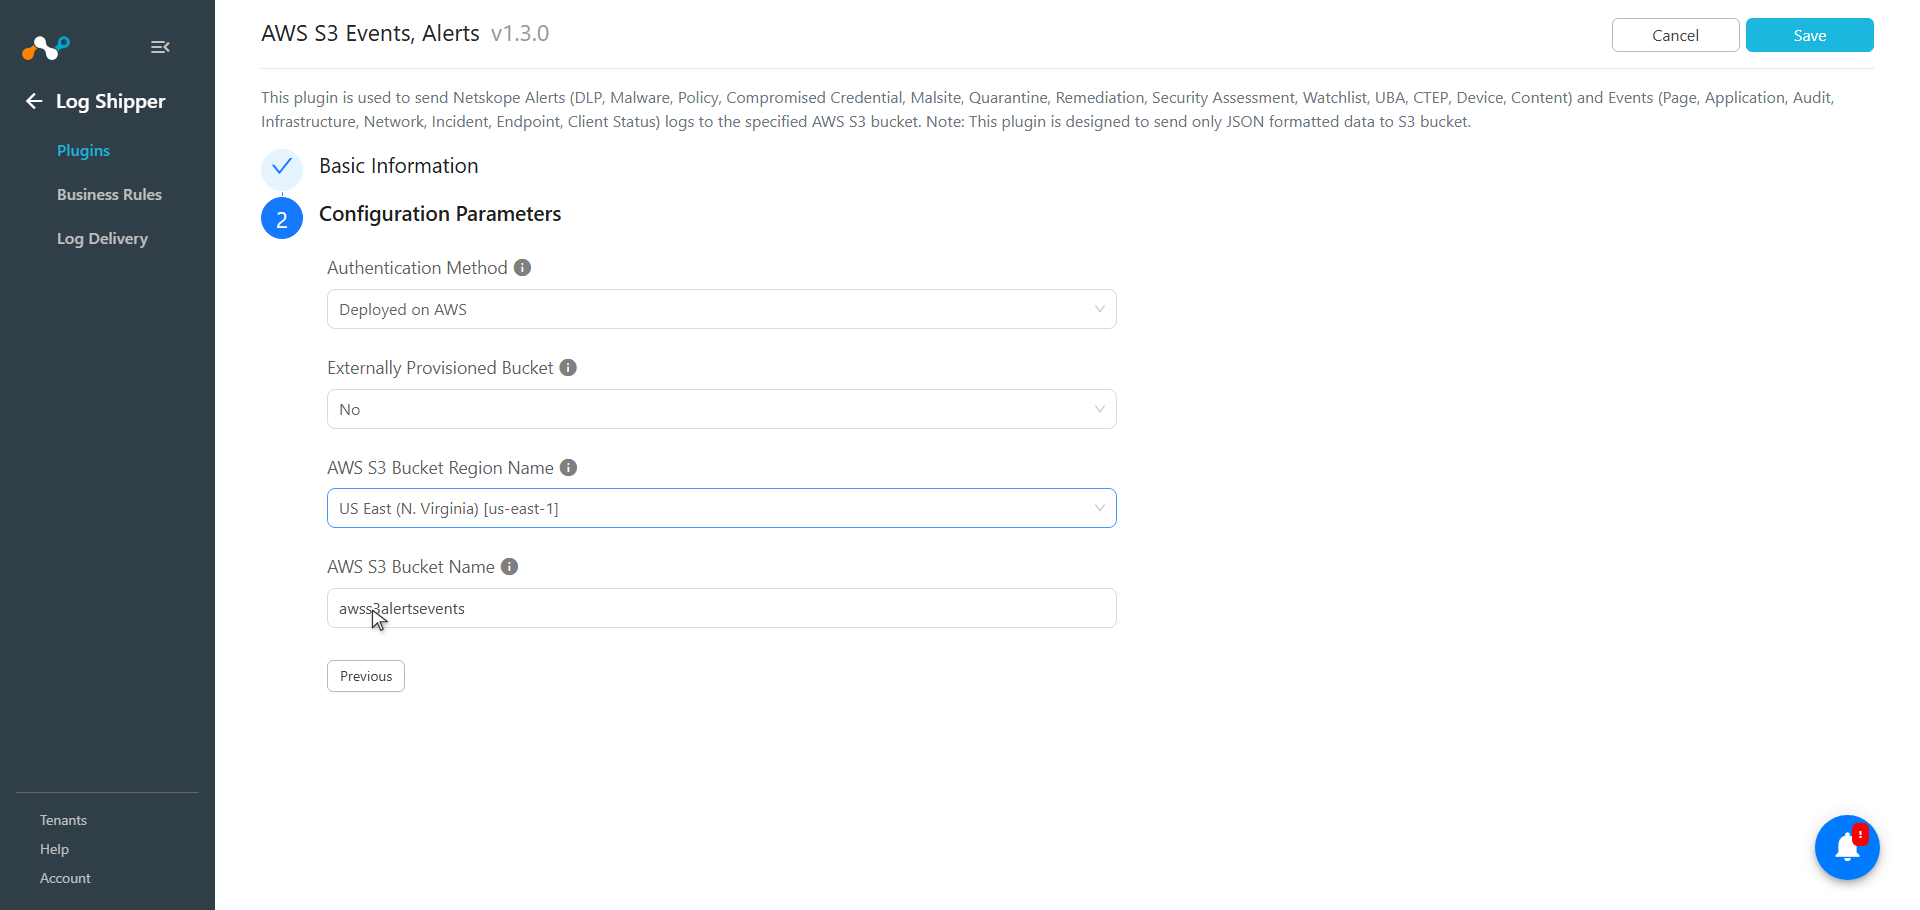
Click Next and enter the Configuration Parameters:
- Authentication Method: Selects the AWS client authentication method. Select Deployed on AWS to use the ambient AWS credential chain, or AWS IAM Roles Anywhere to use certificate-based authentication.
- Externally Provisioned Bucket: Select Yes if the target S3 bucket resides in an external AWS account. Select No to have the plugin auto-create the bucket if it does not already exist in your account.
- AWS S3 Bucket Region Name: AWS region where the target S3 bucket resides.
- AWS S3 Bucket Name: Name of the target AWS S3 bucket where Netskope Alerts/Events data will be stored.
- Private Key: PEM-encoded private key used to sign the IAM Roles Anywhere CreateSession request. Applicable only when AWS IAM Roles Anywhere is selected as the Authentication Method.
- Certificate Body: PEM-encoded X.509 certificate issued by the AWS Private or Public CA. Applicable only when AWS IAM Roles Anywhere is selected as the Authentication Method.
- Password Phrase: Passphrase used to decrypt the private key if it is encrypted. Applicable only when AWS IAM Roles Anywhere is selected as the Authentication Method.
- Profile ARN: ARN of the IAM Roles Anywhere profile. Applicable only when AWS IAM Roles Anywhere is selected as the Authentication Method.
- Role ARN: ARN of the IAM role to be assumed. Applicable only when AWS IAM Roles Anywhere is selected as the Authentication Method.
- Trust Anchor ARN: ARN of the IAM Roles Anywhere trust anchor. Applicable only when AWS IAM Roles Anywhere is selected as the Authentication Method.
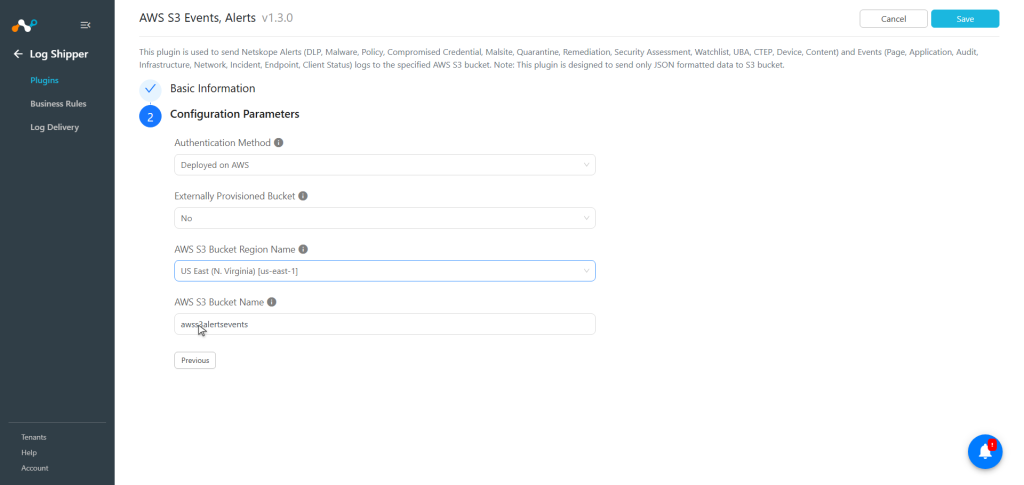 If Externally Provisioned Bucket is set to Yes, the target bucket must already exist in the external AWS account. The plugin will not attempt to create it, and validation will give validation if the bucket is missing or inaccessible.
 -
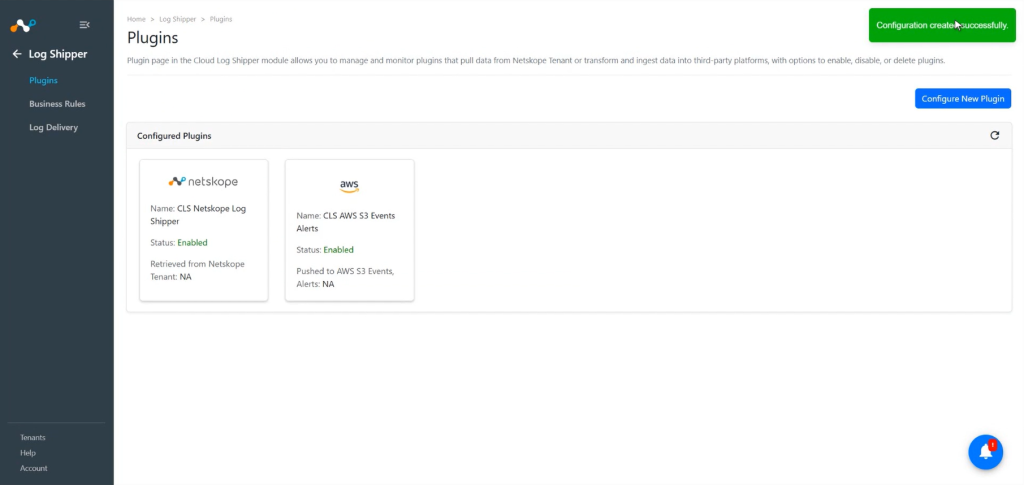
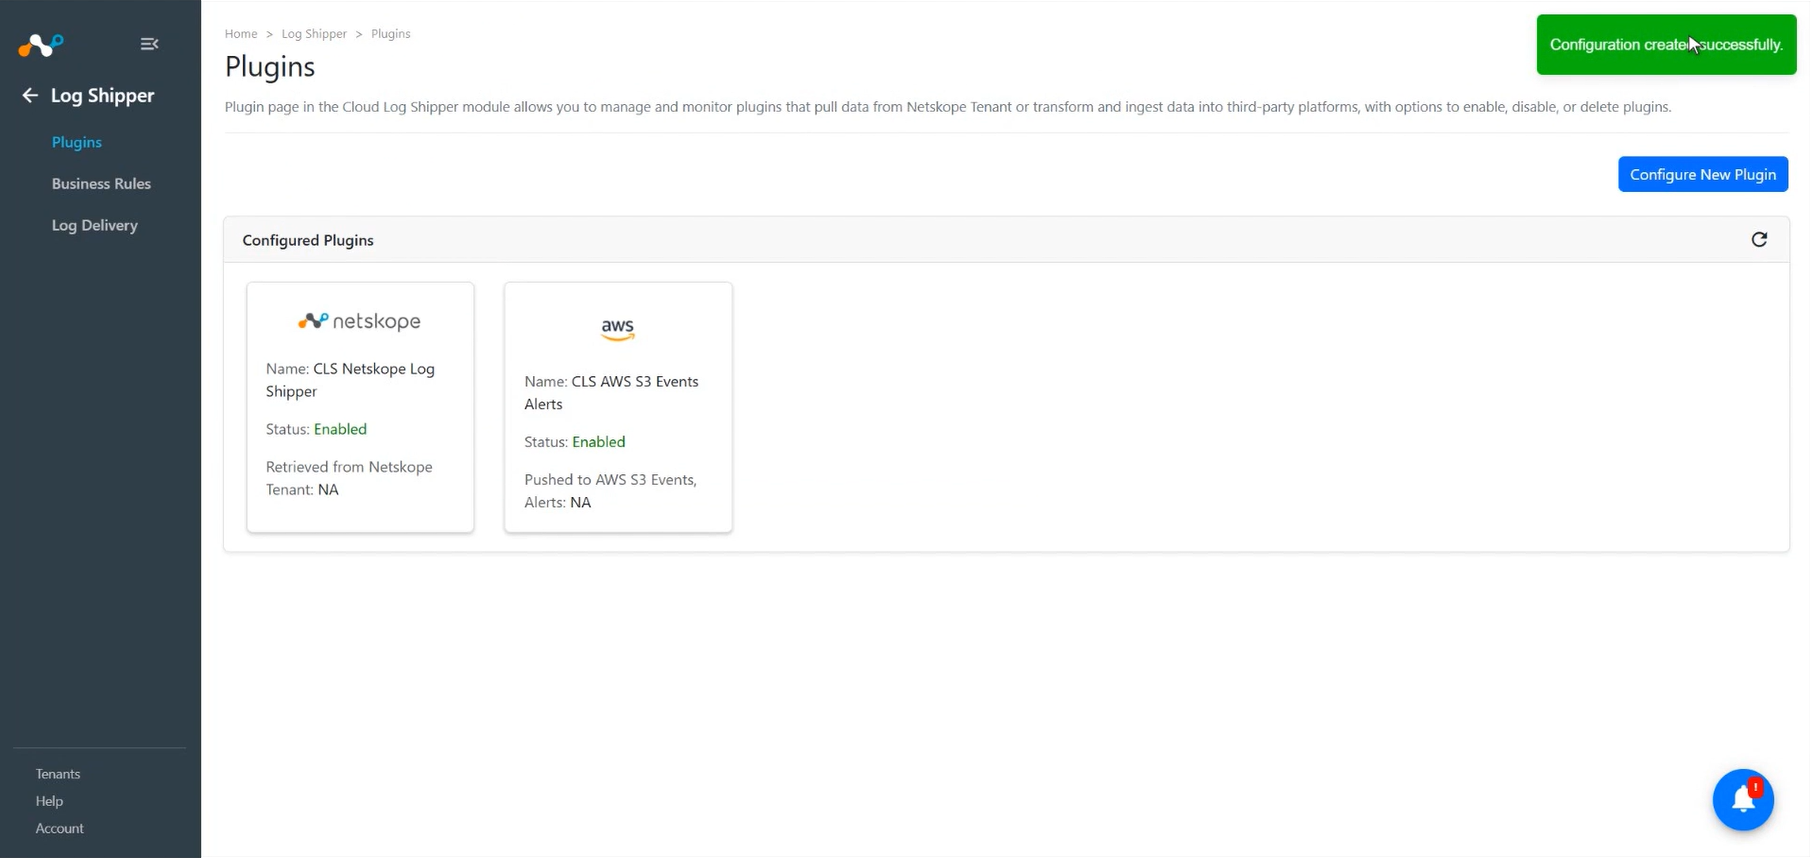
Click Save.
Configure a Log Shipper Business Rule for AWS S3 Events, Alerts
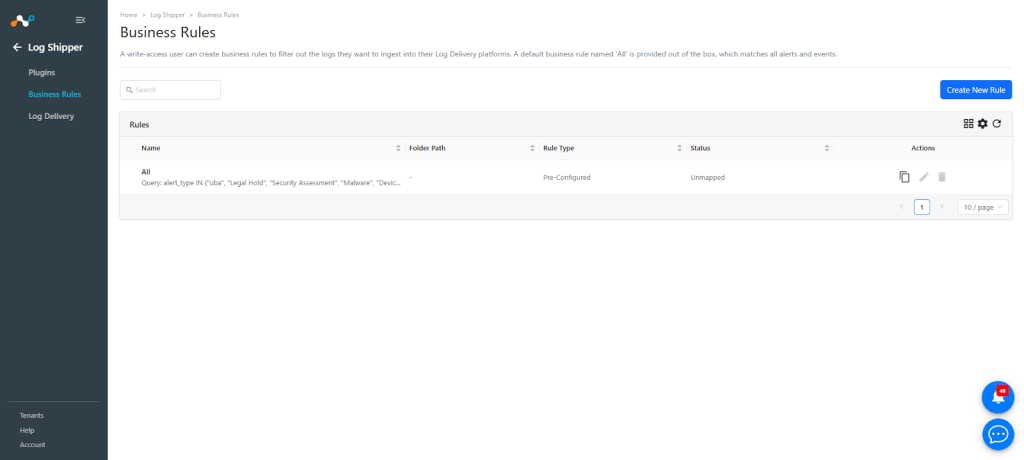
- In Log Shipper, go to the Business Rules.
- By default there is a business rule that filters all alerts and events. If you want to filter out any specific type of alert or event, click Create New Rule and configure a new business rule by adding the rule name and filter(s).
- Click Save.

Configure Log Deliver for AWS S3 Events, Alerts
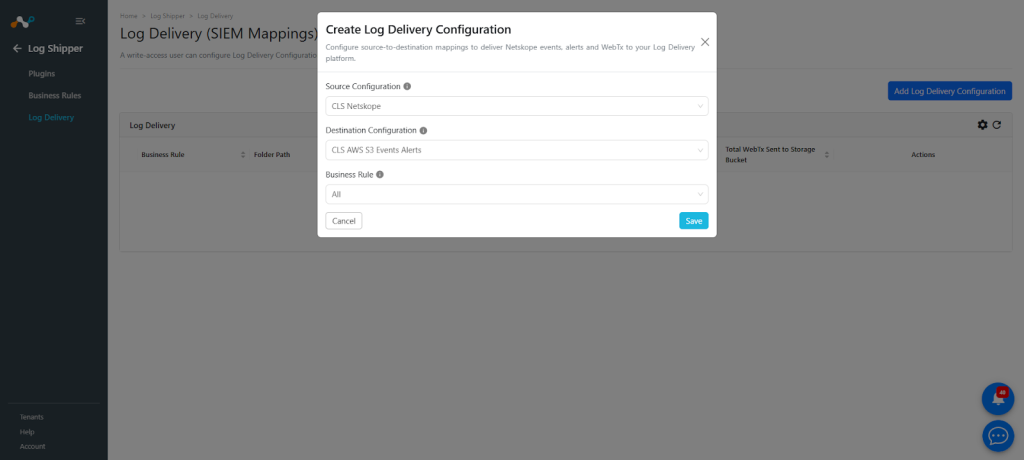
- Go to Log Delivery and click Add Log Delivery Configuration.
- Select the Source plugin (Netskope CLS), the Destination plugin (AWS S3 Events, Alerts), your business rule, and click Save.
- After the Log Delivery mapping is added, the data will start to be pulled from the Netskope tenant, transformed, and ingested into the AWS platform.

Validate the AWS S3 Events, Alerts Plugin
Validate the Pull
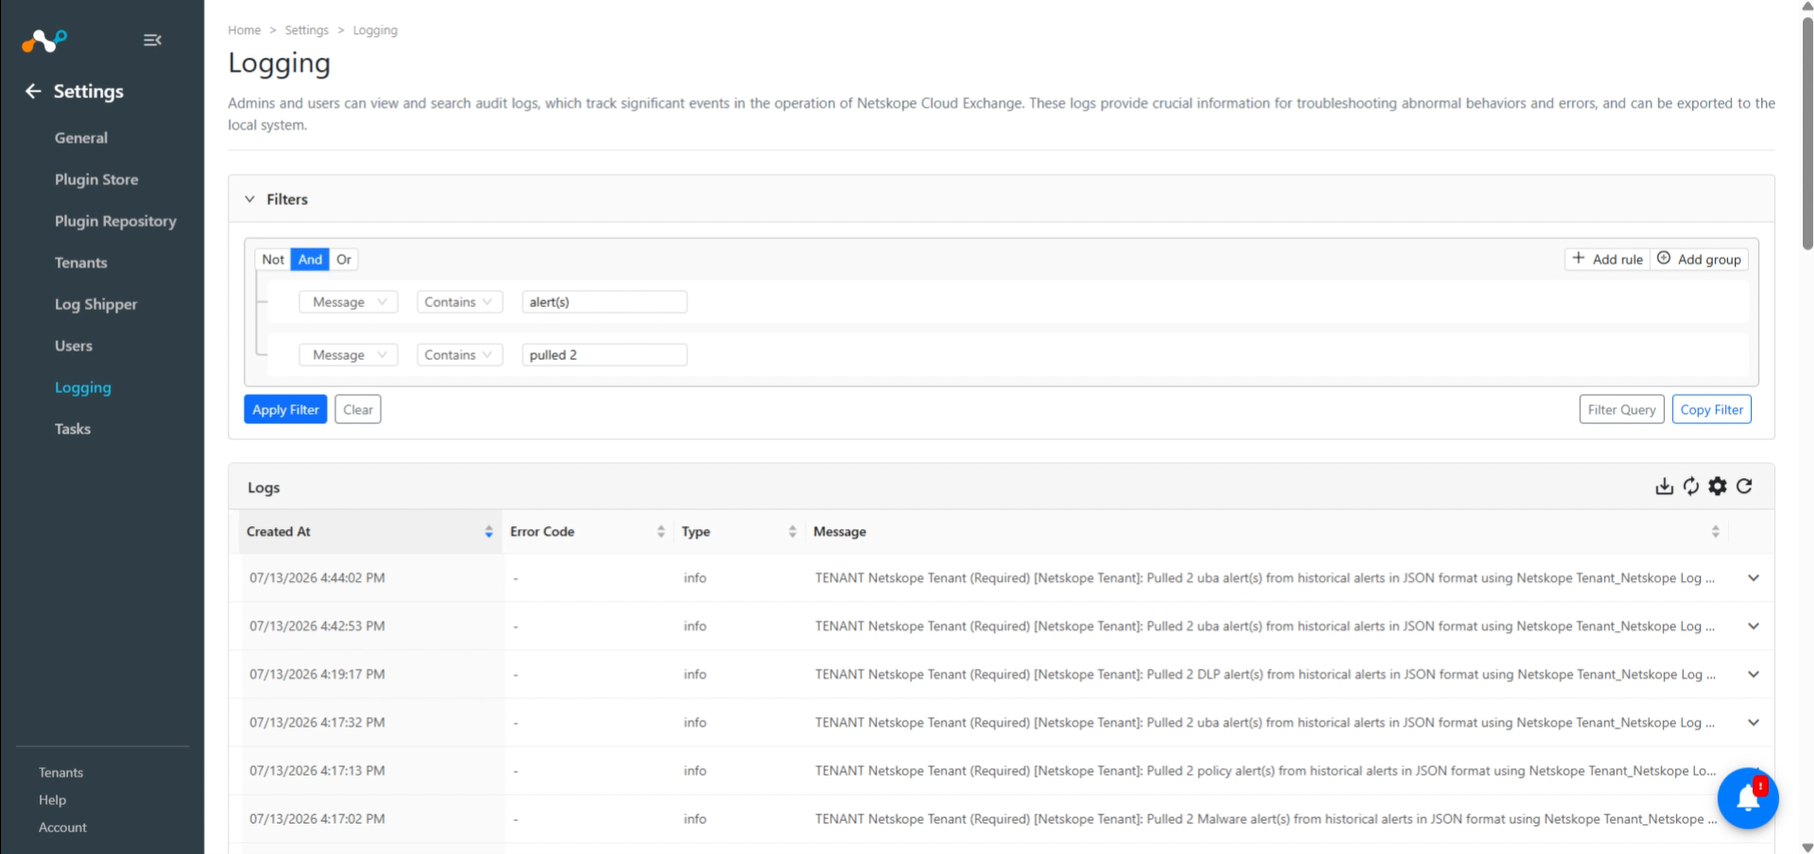
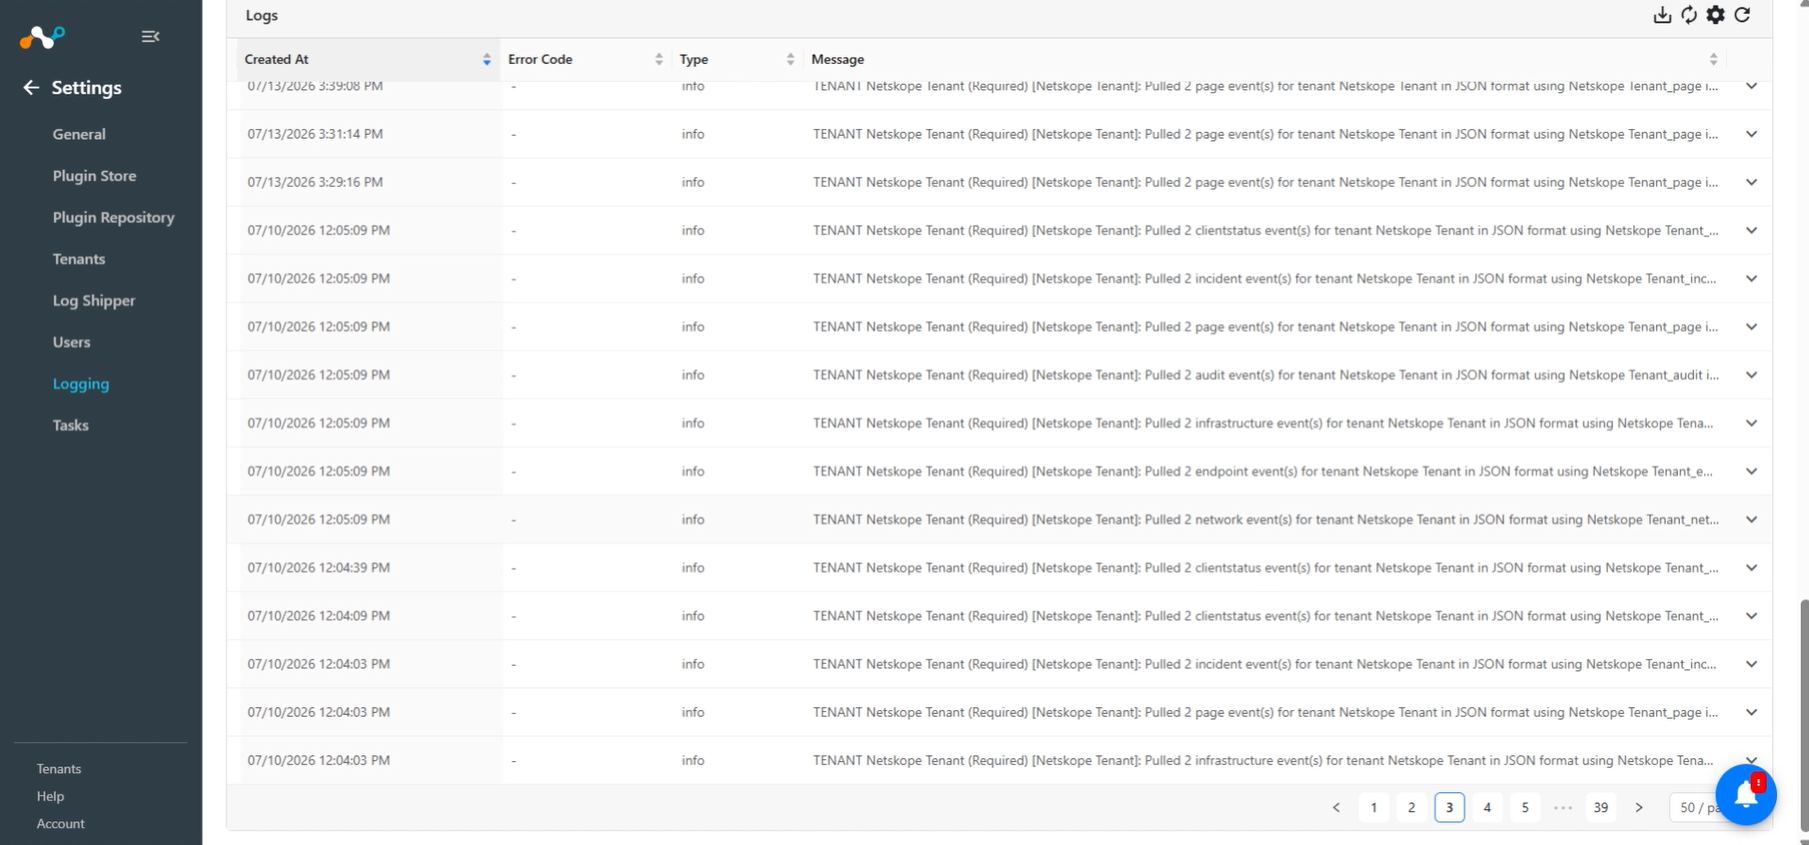
To validate the pulling of indicators from the Netskope tenant.
Go to Logging in Cloud Exchange and search for the pulled logs.
Validate the Push
To validate the plugin workflow on Netskope Cloud Exchange.
-
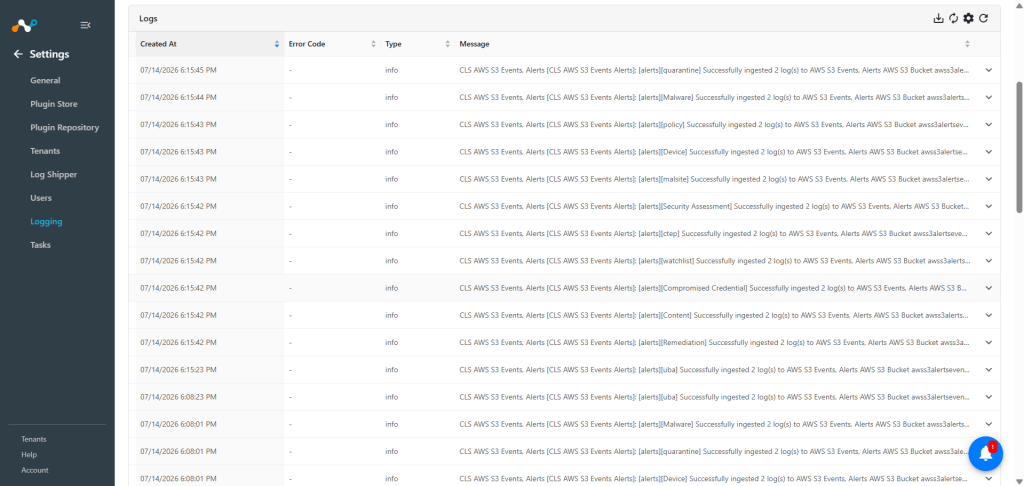
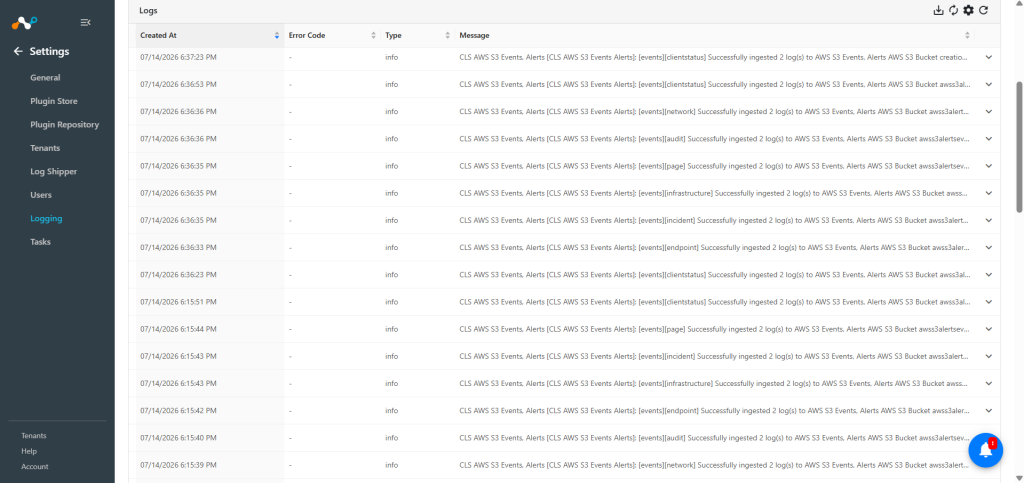
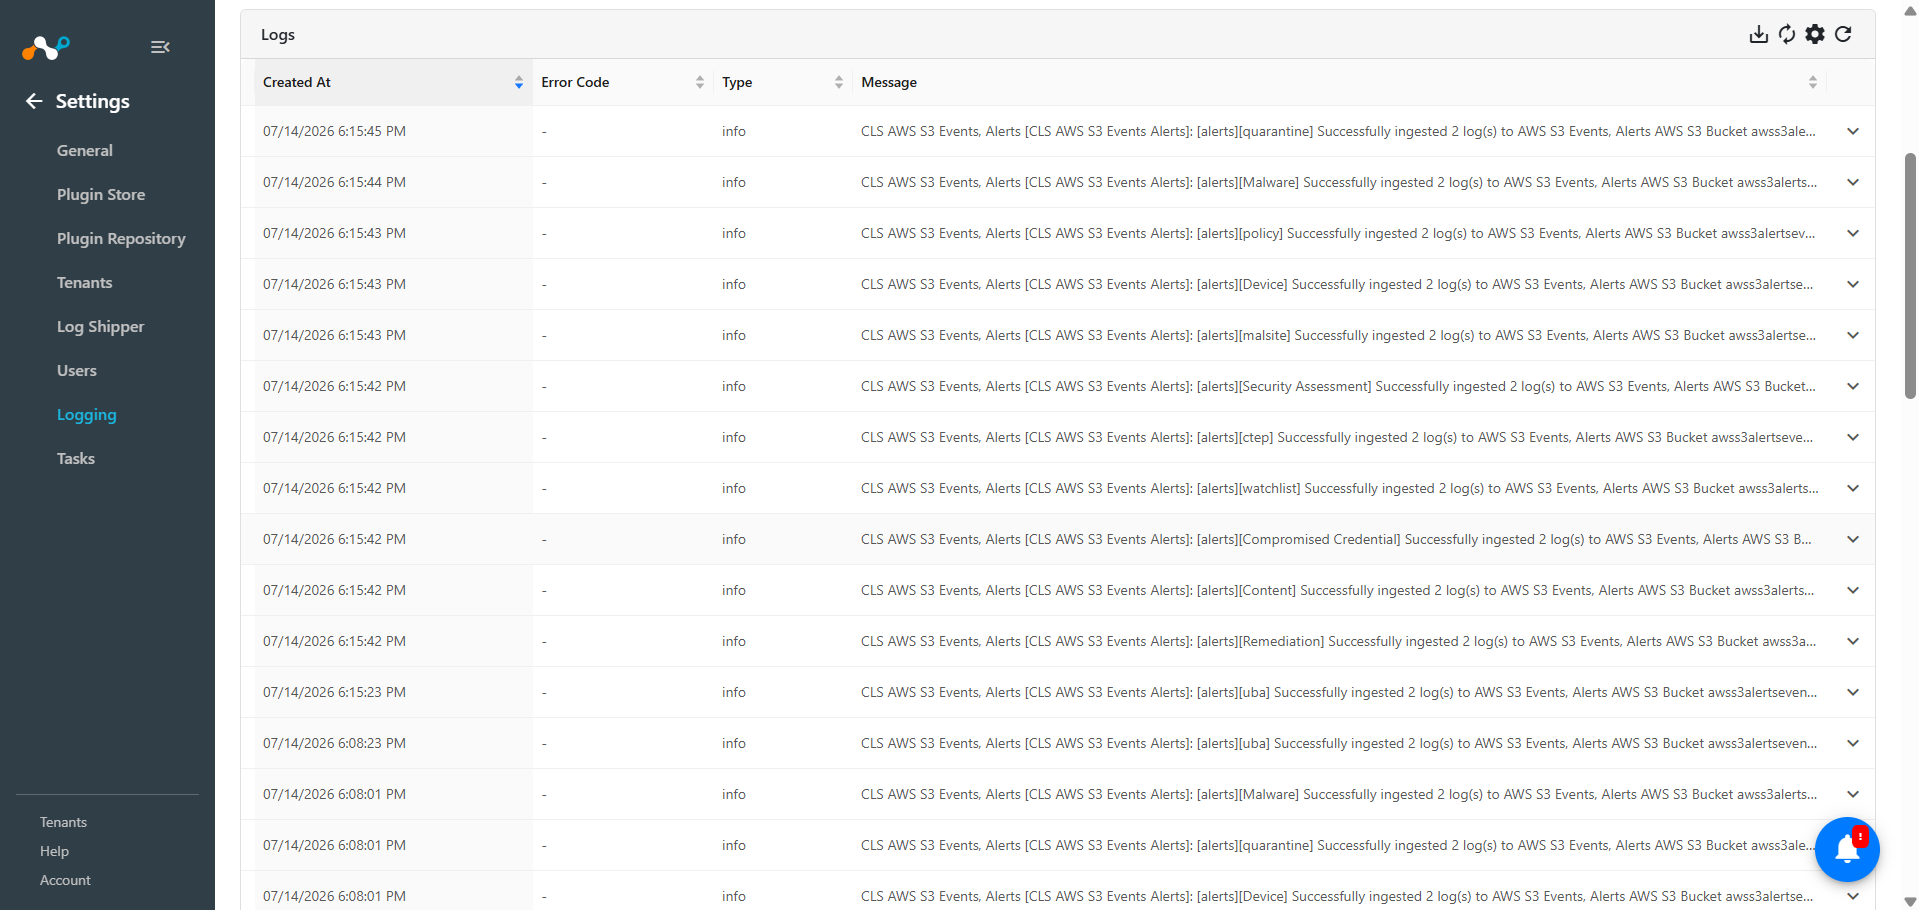
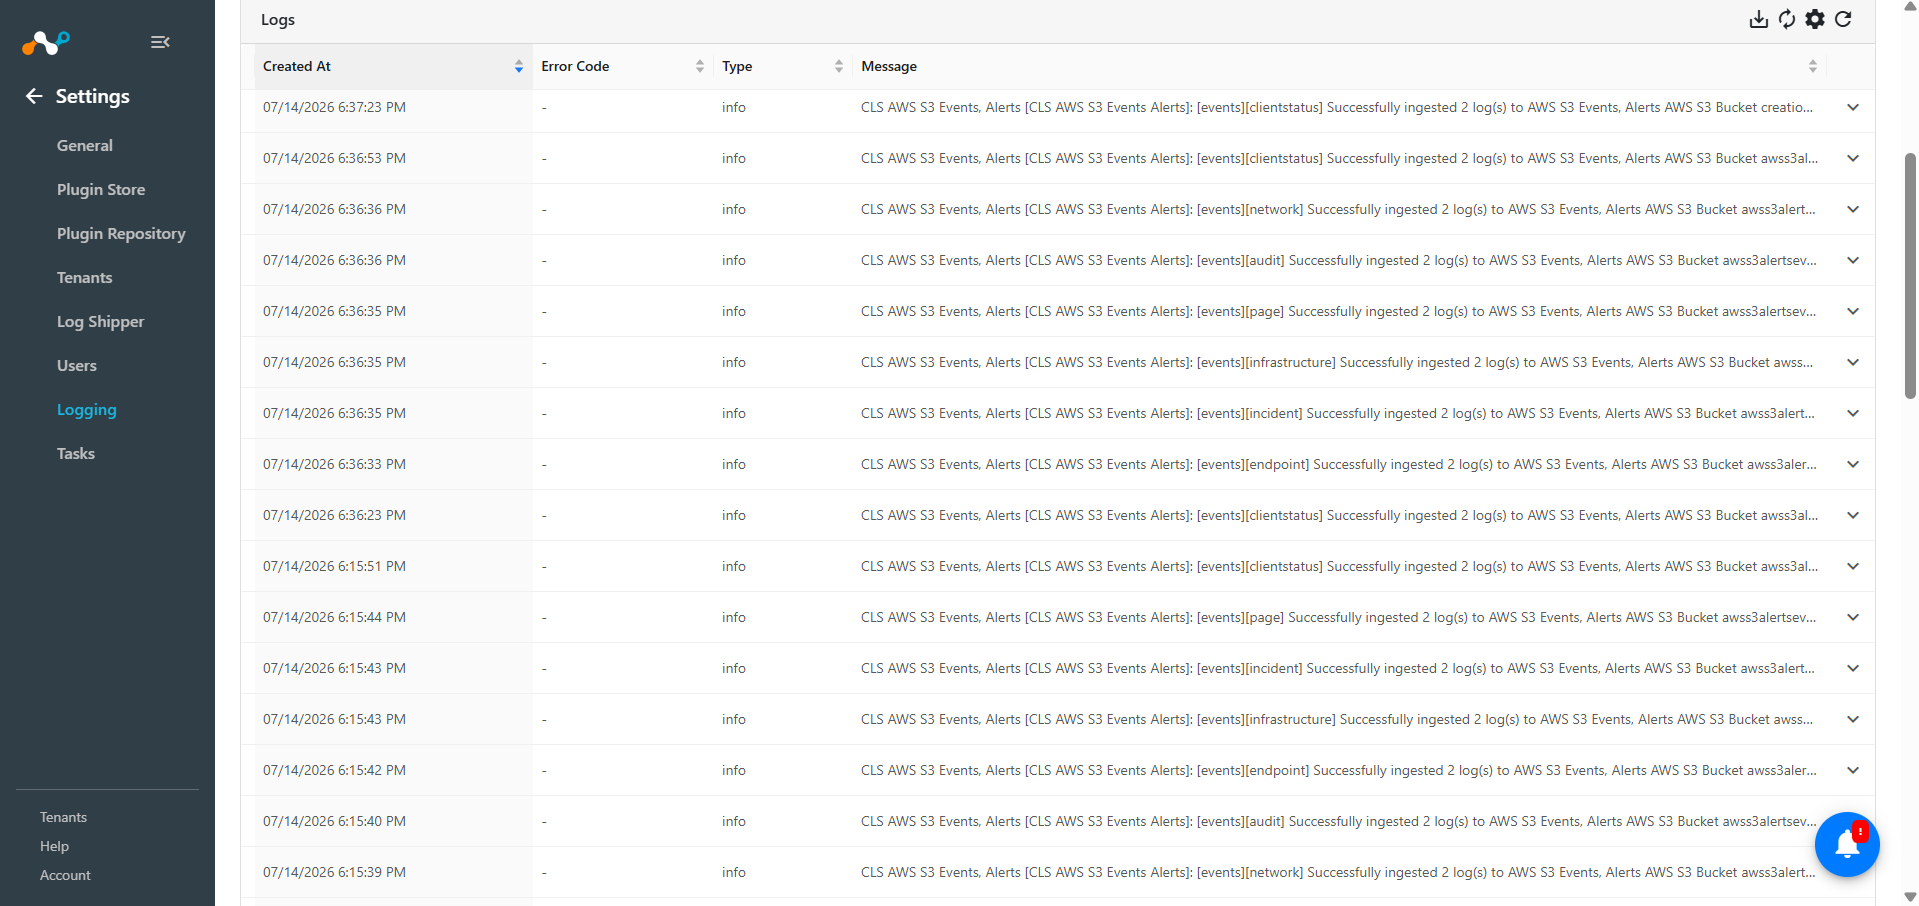
Go to Logging and search for ingested Events and Alerts with the filter: message contains “ingested”.
-
To validate the push on AWS S3:
- Go to AWS S3. On the Search bar, search for and select Buckets.
- Search the bucket you used while creating the plugin.
- Click on the bucket name.
Note
The folder structure will be like alerts/feedname/year/month/day/hour/filename.gz
Example: awsdemobucket/alerts/feedname=Malware/year=2023/month=11/day=30/hour=9/1701336881_139977276685128.txt


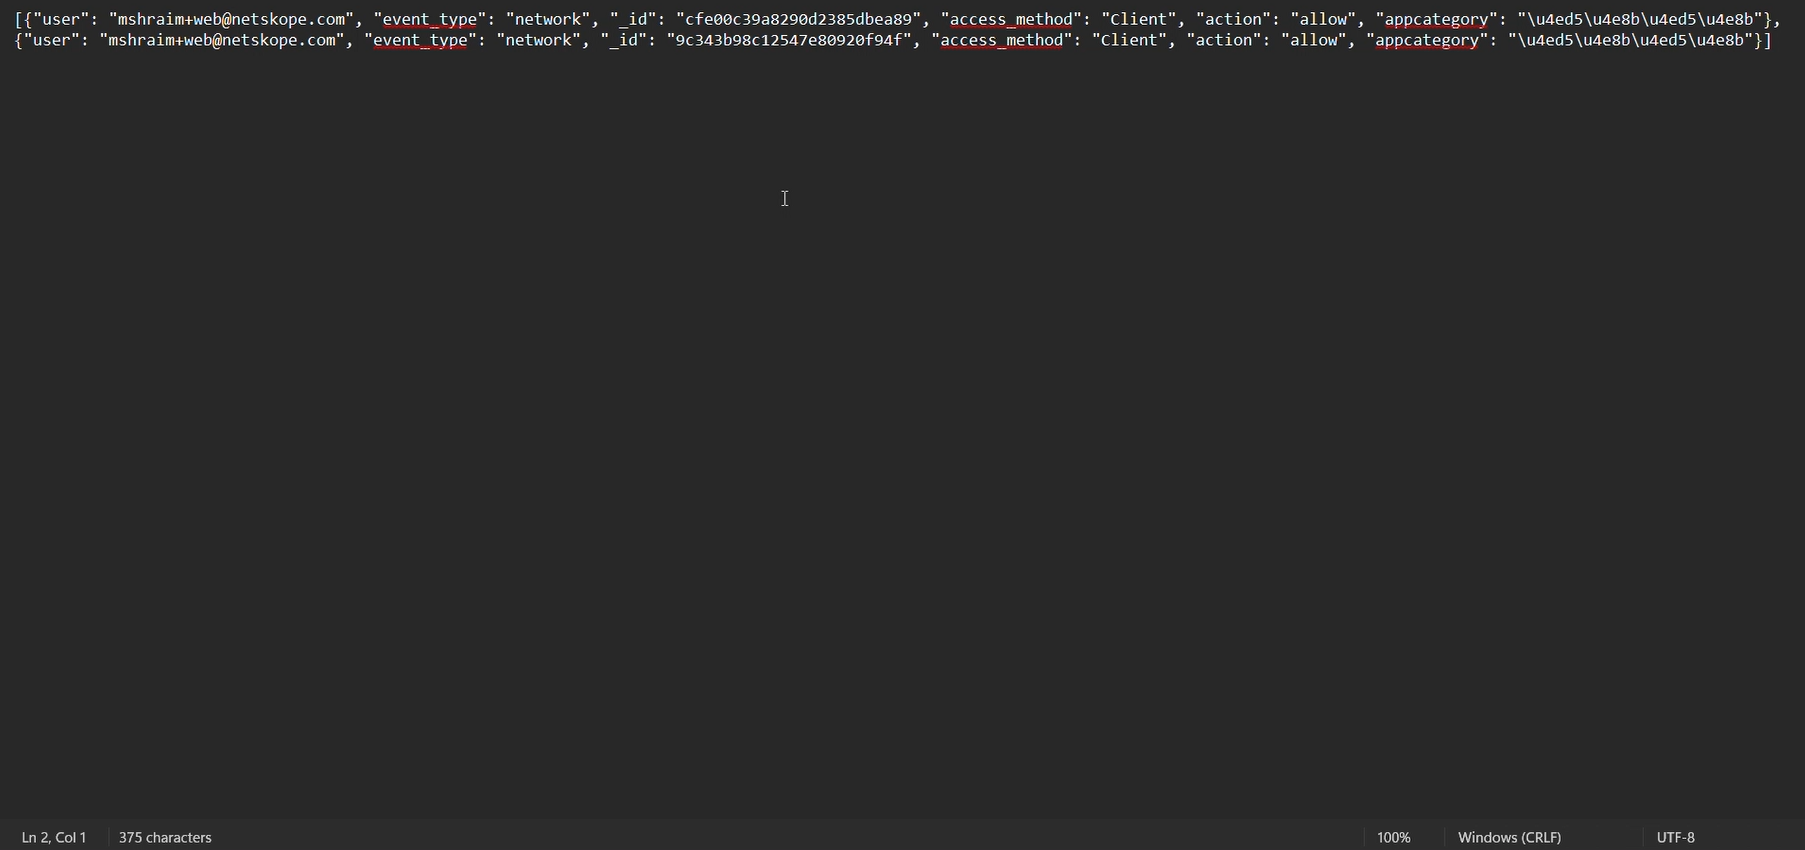
After downloading the file, the alert/event will look like this:


Sample ingested data in JSON format with custom mapping having only selected fields:
Troubleshooting the AWS S3 Events, Alerts Plugin
Facing issues in the existing plugin configuration after the plugin update
If you’ve recently updated your AWS S3 plugin, there might be an issue where editing the existing plugin configuration leads to a blank Cloud Exchange interface. This problem may occur in Cloud Exchange versions 4.2.0 and 5.0.0 if users try to modify the plugin configuration after the update and go to the Configuration Parameters page.
Here’s what you can do on your Cloud Exchange version:
For version 4.2.0, 5.0.0: The only solution available is to delete the current plugin configuration and set up a new one from scratch.
Facing issues while configuring the new plugin
If you’re creating a new plugin with AWS IAM Roles Anywhere and face an error of 400, the root cause for not being able to save the plugin can be found in the logging section when expanding the logs


What to do:
While expanding the log, you can see At least one of the Trust Anchor ARN, Role ARN, and Profile ARN has a different account ID, so you would have to check that the provided parameters are generated from the same account and have the same region.
No AWS Credentials Found in the Environment
If the user encounters the message “No AWS Credentials were found in the environment. Deploy the plugin into an AWS environment or use AWS IAM Roles Anywhere authentication”, it could be due to one of the following reasons:
- The Deployed on AWS authentication method is selected, but no instance profile or IAM role is attached to the CE host.
- AWS IAM Roles Anywhere is misconfigured and the ambient credential chain is being used unintentionally.
What to do:
- Verify that the CE host has an IAM instance profile with the required S3 permissions attached, or switch the Authentication Method to AWS IAM Roles Anywhere.
- If using IAM Roles Anywhere, confirm that the Private Key, Certificate Body, Profile ARN, Role ARN, and Trust Anchor ARN are correctly configured.
Access Denied for AWS IAM Roles Anywhere
If the user encounters the message “Access Denied. Verify the Profile ARN, Role ARN and Trust Anchor ARN provided in configuration parameters and the policies attached to the role”, it could be due to one of the following reasons:
- The ARNs provided in the configuration are mismatched or incorrect.
- The IAM role’s trust policy does not permit the Roles Anywhere service principal.
What to do:
- Verify that the Profile ARN, Role ARN, and Trust Anchor ARN are correct and reference existing resources in your AWS account.
- Confirm that the IAM role’s trust policy grants the required permissions to the AWS IAM Roles Anywhere service.
Resource Not Found for AWS IAM Roles Anywhere
If the user encounters the message “Resource not found. Verify the Profile ARN, Role ARN and Trust Anchor ARN provided in configuration parameters”, it could be due to one of the following reasons:
- One or more of the configured ARNs reference a non-existent profile, role, or trust anchor.
- The ARN format is incorrect.
What to do:
- Log in to the AWS console and verify that the profile, role, and trust anchor referenced by the configured ARNs exist and are active.
- Ensure the ARN format is correct: arn:aws:rolesanywhere:{region}:{account-id}:profile/{profile-id}.
Invalid Private Key or Certificate Body
If the user encounters the message “Invalid Private Key provided. Private Key should be in a valid PEM format” or “Invalid Certificate Body provided. Certificate Body must be in valid PEM format”, it could be due to one of the following reasons:
- The Private Key field does not contain a valid PEM-encoded private key.
- The Certificate Body field does not contain a valid PEM-encoded X.509 certificate.
- The Password Phrase is incorrect for an encrypted private key.
What to do:
- Verify that the Private Key begins with —–BEGIN RSA PRIVATE KEY—– or —–BEGIN PRIVATE KEY—– and is complete.
- Verify that the Certificate Body begins with —–BEGIN CERTIFICATE—– and is complete.
- Confirm that the Password Phrase matches the passphrase used when the private key was generated, or leave it empty if the key is not encrypted.
S3 Bucket Not Accessible
If the user encounters messages such as “AWS S3 Bucket ‘{bucket}’ already exists at a different region or is not accessible” or “AWS S3 Bucket ‘{bucket}’ is not accessible. Since the bucket is configured as externally provisioned, this is most likely a missing cross-account IAM permission rather than a bucket name collision”, it could be due to one of the following reasons:
- The IAM credentials lack the required s3:ListBucket, s3:GetBucketLocation, or s3:PutObject permissions on the target bucket.
- For externally provisioned buckets, the bucket policy in the owning account is missing a cross-account grant for the configured IAM role.
- The bucket name collides with a bucket owned by a different AWS account.
What to do: To solve the above-mentioned issue, follow the points mentioned below.
- Verify that the IAM role or instance profile has s3:ListBucket, s3:GetBucketLocation, and s3:PutObject permissions on the target bucket.
- For externally provisioned buckets, request that the owning team add a cross-account bucket policy granting the required permissions to the configured IAM role.
- If the bucket name is already taken by another AWS account, choose a different unique bucket name.
S3 Bucket Region Mismatch
If the user encounters the message “AWS S3 bucket ‘{bucket}’ exists but is in region ‘{actual}’, not the configured region ‘{configured}'”, it could be due to one of the following reasons:
- The AWS S3 Bucket Region Name configured in the plugin does not match the actual region where the bucket resides.
What to do:
- Log in to the AWS S3 console, navigate to the bucket, and confirm its actual region.
- Update the AWS S3 Bucket Region Name field in the plugin configuration to match the actual bucket region.
Known Behavior
- If the entire batch of records handed to the plugin consists of empty or falsy records, the push reports success with the message “No log(s) to push to … AWS S3 Bucket …” and no object is uploaded to S3. This is expected behavior, not a failure.
- The plugin uploads the full batch as a single S3 object per push cycle with no chunking or size splitting. Very large batches from CE core produce correspondingly large S3 objects with no built-in size ceiling.