

Release Note
1.0.0 (Requires minimum Cloud Exchange version 6.0.0)
Added
- Initial release.
- Entity: Hosts
This document explains how to configure the Cisco ISE v1.0.0 plugin with the Risk Exchange module of the Netskope Cloud Exchange platform. This plugin fetches Security Group Tag (SGT) to IP address mappings from Cisco Identity Services Engine (ISE) and makes them available as Hosts records in Netskope Cloud Exchange. It pulls live session data from the Operations > RADIUS > Live Sessions page, and static IP to SGT mapping data from the Work Centers > TrustSec > Components > IP SGT Static Mapping page. This plugin does not support performing any actions on Cisco ISE.
Prerequisites
To complete the configuration, you need:
- A Netskope tenant (or multiple, for example, production and development/test instances).
- A Netskope Cloud Exchange tenant with the Tenant plugin and Risk Exchange plugin already configured.
- A Cisco ISE instance with an user account.
- ERS and pxGrid APIs are enabled on Cisco ISE.
- The ERS-Admin or ERS-Operator role assigned to the ERS user account on Cisco ISE.
- In case of an on-prem Cisco ISE instance, IP to Hostname mapping should be added as extra host in Cloud Exchange’s docker-compose.yml file.
- Connectivity to the following hosts:
- Cisco ISE Primary Administration Node on port 9060 (ERS API) and port 8910 (pxGrid API)
- For Secret Manager configuration, refer to this documentation, and to set up Azure Key Vault Secrets Manager, refer to this documentation.
Cisco ISE Plugin Support
This plugin fetches Security Group Tag (SGT) to IP address mappings from Cisco Identity Services Engine (ISE) and makes them available as Hosts records in Netskope Cloud Exchange. It pulls live session data from the Operations > RADIUS > Live Sessions page, and static IP to SGT mapping data from the Work Centers > TrustSec > Components > IP SGT Static Mapping page.
| Type of data pulled | Actions |
|---|---|
| Hosts | No Action |
Mappings
Mappings are used to view the pulled Hosts details. Fields mapped during plugin configuration will be visible on the Records page after the data is pulled. Here are the suggested mapping to use while configuring the plugin.
Pull Mapping for Hosts
| Plugin Field Label | Expected Data Type | Suggested Field Label | Aggregate Strategy | Example |
|---|---|---|---|---|
| IP Address | String | IP Address | Unique | 10.20.30.40 |
| MAC Address | String | CiscoISE_mac_address | Overwrite | AA:BB:CC:00:11:22 |
| Security Group Tag | String | CiscoISE_security_group_tag | Overwrite | BU-Servers |
| Security Group Tag Value | Number | CiscoISE_security_group_tag_value | Overwrite | 16 |
| Secondary Security Groups | List | CiscoISE_secondary_security_groups | Overwrite | [“BU-Printers”] |
| Session State | String | CiscoISE_session_state | Overwrite | AUTHORIZED |
| User Name | String | CiscoISE_user_name | Overwrite | jdoe |
| AD User | String | CiscoISE_ad_user | Overwrite | EXAMPLE\jdoe |
| NAS IP Address | String | CiscoISE_nas_ip_address | Overwrite | 10.1.1.1 |
| Authorization Profiles | List | CiscoISE_authorization_profiles | Overwrite | [“PermitAccess”] |
| MDM Compliant | String | CiscoISE_mdm_compliant | Overwrite | True |
| MDM Disk Encrypted | String | CiscoISE_mdm_disk_encrypted | Overwrite | True |
| MDM Jail Broken | String | CiscoISE_mdm_jail_broken | Overwrite | False |
| MDM Pin Locked | String | CiscoISE_mdm_pin_locked | Overwrite | True |
| Last Seen | DateTime | CiscoISE_last_seen | Overwrite | 2026-09-14T08:48:02.248Z |
| Source | String | CiscoISE_source | Overwrite | Live Sessions |
Permissions
The ERS-Admin or ERS-Operator role assigned to the ERS user account on Cisco ISE.
API Details
List of APIs Used
| API Endpoint | Method | Use Case |
|---|---|---|
| /ers/config/sgt | GET | Fetch the SGT dictionary (id/name/value index) used to resolve tag names and numeric values for both sources |
| /ers/config/sgt/{id} | GET | Fetch Security Group Tag detail (name, value) for a given tag ID |
| /ers/config/sgmapping | GET | List static IP-to-SGT mappings (IP SGT Static Mapping source), paginated |
| /ers/config/sgmapping/{id} | GET | Fetch static IP-to-SGT mapping detail for a given mapping ID |
| /pxgrid/control/AccountCreate | POST | Register (bootstrap) the plugin’s pxGrid client account |
| /pxgrid/control/AccountActivate | POST | Activate / check approval status of the pxGrid client account |
| /pxgrid/control/ServiceLookup | POST | Discover the Session Directory service node |
| /pxgrid/control/AccessSecret | POST | Obtain the short-lived secret for the session node |
| /pxgrid/mnt/sd/getSessions | POST | Retrieve live network sessions (Live Sessions source) |
List Security Group Tags
Endpoint: GET https://{ise_host}:9060/ers/config/sgt
Request Headers:
| Key | Value |
|---|---|
| Accept | application/json |
| Content-Type | application/json |
| Authorization | Basic base64(ers_username:ers_password) |
| User-Agent | netskope-ce-7.0.0-cre-cisco-ise-v1.0.0 |
Query Parameters:
| Parameter | Description |
|---|---|
| page | Page number to fetch |
| size | Page size (100) |
Response:
{
    "SearchResult": {
        "total": 1,
        "resources": [
            {
                "id": "934557f0-8c01-11e6-996c-525400b48521",
                "name": "Auditors",
                "description": "Auditor Security Group",
                "link": {
                    "rel": "self",
                    "href": "https://10.50.1.14:9060/ers/config/sgt/934557f0-8c01-11e6-996c-525400b48521",
                    "type": "application/json"
                }
            }
        ]
    }
}
Get Security Group Tag by ID
Endpoint: GET https://{ise_host}:9060/ers/config/sgt/{id}
Request Headers:
| Key | Value |
|---|---|
| Accept | application/json |
| Content-Type | application/json |
| Authorization | Basic base64(ers_username:ers_password) |
| User-Agent | netskope-ce-7.0.0-cre-cisco-ise-v1.0.0 |
Response:
{
    "Sgt": {
        "id": "93ad6890-8c01-11e6-996c-525400b48521",
        "name": "Employees",
        "description": "Employee Security Group",
        "value": 4,
        "generationId": "0",
        "propogateToApic": true,
        "link": {
            "rel": "self",
            "href": "https://10.50.1.14:9060/ers/config/sgt/93ad6890-8c01-11e6-996c-525400b48521",
            "type": "application/json"
        }
    }
}
List SGT-to-IP Mappings
Endpoint: GET https://{ise_host}:9060/ers/config/sgmapping
Request Headers:
| Key | Value |
|---|---|
| Accept | application/json |
| Content-Type | application/json |
| Authorization | Basic base64(ers_username:ers_password) |
| User-Agent | netskope-ce-7.0.0-cre-cisco-ise-v1.0.0 |
Query Parameters:
| Parameter | Description |
|---|---|
| page | Page number to fetch |
| size | Page size (100) |
| filter | sgtName.EQ.<sgt_name> — included only when ‘SGT Name Filter’ is configured; one paginated pass is made per configured tag name |
Response:
{
    "SearchResult": {
        "total": 2,
        "resources": [
            {
                "id": "439afd13-a7e3-40cd-87f1-20a70069ed7e",
                "name": "10.50.2.120/32",
                "link": {
                    "rel": "self",
                    "href": "https://10.50.1.14:9060/ers/config/sgmapping/439afd13-a7e3-40cd-87f1-20a70069ed7e",
                    "type": "application/json"
                }
            }
        ]
    }
}
Get SGT Mapping by ID
Endpoint: GET https://{ise_host}:9060/ers/config/sgmapping/{id}
Request Headers:
| Key | Value |
|---|---|
| Accept | application/json |
| Content-Type | application/json |
| Authorization | Basic base64(ers_username:ers_password) |
| User-Agent | netskope-ce-7.0.0-cre-cisco-ise-v1.0.0 |
Response:
Sample 1 (id=439afd13-a7e3-40cd-87f1-20a70069ed7e)
{
    "SGMapping": {
        "id": "439afd13-a7e3-40cd-87f1-20a70069ed7e",
        "name": "10.50.2.120/32",
        "sgt": "93837260-8c01-11e6-996c-525400b48521",
        "deployTo": "70c79c30-8bff-11e6-996c-525400b48521",
        "deployType": "NDG",
        "hostIp": "10.50.2.120/32",
        "sgtDomain": [],
        "link": {
            "rel": "self",
            "href": "https://10.50.1.14:9060/ers/config/sgmapping/439afd13-a7e3-40cd-87f1-20a70069ed7e",
            "type": "application/json"
        }
    }
}
Create pxGrid Account
Endpoint: POST https://{ise_host}:8910/pxgrid/control/AccountCreate
Request Headers:
| Key | Value |
|---|---|
| Content-Type | application/json |
| Accept | application/json |
| User-Agent | netskope-ce-7.0.0-cre-cisco-ise-v1.0.0 |
Request Body:
{ "nodeName": "<node_name>" }
Response:
{
    "nodeName": "netskope-cre-postman-1",
    "password": "••••••••••••••••",
    "userName": "netskope-cre-postman-1"
}
Activate pxGrid Account
Endpoint: POST https://{ise_host}:8910/pxgrid/control/AccountActivate
Request Headers:
| Key | Value |
|---|---|
| Content-Type | application/json |
| Accept | application/json |
| Authorization | Basic base64(nodeName:password) |
| User-Agent | netskope-ce-7.0.0-cre-cisco-ise-v1.0.0 |
Request Body:
{ "description": "Netskope CRE Integration" }
Response:
{
    "accountState": "ENABLED",
    "version": "2.0"
}
Discover Session Directory Service
Endpoint: POST https://{ise_host}:8910/pxgrid/control/ServiceLookup
Request Headers:
| Key | Value |
|---|---|
| Content-Type | application/json |
| Accept | application/json |
| Authorization | Basic base64(nodeName:password) |
| User-Agent | netskope-ce-7.0.0-cre-cisco-ise-v1.0.0 |
Request Body:
{ "name": "com.cisco.ise.session" }
Response:
{
    "services": [
        {
            "name": "com.cisco.ise.session",
            "nodeName": "~ise-mnt-ciscoise-50-1-14",
            "properties": {
                "sessionTopic": "/topic/com.cisco.ise.session",
                "groupTopic": "/topic/com.cisco.ise.session.group",
                "wsPubsubService": "com.cisco.ise.pubsub",
                "restBaseURL": "https://CiscoISE-50-1-14.domain.local:8910/pxgrid/mnt/sd",
                "restBaseUrl": "https://CiscoISE-50-1-14.domain.local:8910/pxgrid/mnt/sd",
                "sessionTopicAll": "/topic/com.cisco.ise.session.all"
            }
        }
    ]
}
Obtain Session-Node Secret
Endpoint: POST https://{ise_host}:8910/pxgrid/control/AccessSecret
Request Headers:
| Key | Value |
|---|---|
| Content-Type | application/json |
| Accept | application/json |
| Authorization | Basic base64(nodeName:password) |
| User-Agent | netskope-ce-7.0.0-cre-cisco-ise-v1.0.0 |
Request Body:
{ "peerNodeName": "<provider_node_name>" }
Response:
{ "secret": "••••••••••••••••" }
Retrieve Live Sessions
Endpoint: POST https://{ise_host}:8910/pxgrid/mnt/sd/getSessions
Request Headers:
| Key | Value |
|---|---|
| Content-Type | application/json |
| Accept | application/json |
| Authorization | Basic base64(nodeName:secret) |
| User-Agent | netskope-ce-7.0.0-cre-cisco-ise-v1.0.0 |
Request Body:
{ "filter": "ctsSecurityGroup == '<sgt_name>'" }
Response:
{
  "sessions": [
    {
      "timestamp": "2026-09-14T08:48:02.248Z",
      "state": "AUTHENTICATED",
      "userName": "scanuser",
      "callingStationId": "AA:BB:CC:11:22:33",
      "calledStationId": "CORP-WIFI-AP1",
      "ipAddresses": ["192.168.100.10"],
      "macAddress": "AA:BB:CC:11:22:33",
      "nasIpAddress": "10.50.14.30",
      "nasPortType": "Wireless - IEEE 802.11",
      "endpointProfile": "Unknown",
      "ctsSecurityGroup": "Production_Users",
      "adNormalizedUser": "scanuser",
      "providers": ["None"],
      "endpointCheckResult": "none",
      "identitySourcePortStart": 0,
      "identitySourcePortEnd": 0,
      "identitySourcePortFirst": 0,
      "serviceType": "Framed",
      "networkDeviceProfileName": "Cisco",
      "radiusFlowType": "Wireless802_1x",
      "ssid": "CORP-WIFI-AP1",
      "mdmRegistered": false,
      "mdmCompliant": false,
      "mdmDiskEncrypted": false,
      "mdmJailBroken": false,
      "mdmPinLocked": false,
      "selectedAuthzProfiles": ["PermitAccess1"],
      "authMethod": "dot1x",
      "authProtocol": "PAP_ASCII",
      "ctsSecondarySecurityGroups": [],
      "sxpDomains": [],
      "inboundSgtDomainRules": [],
      "workloadClassification": [],
      "sessionSource": 0,
      "vrf": "",
      "destinationIPAddress": "10.50.1.14"
    }
  ]
}
Performance Matrix
Here is the performance matrix conducted on a Large CE Stack with these specifications by pulling 500k Hosts.
| Description | Specification |
|---|---|
| Stack details | Size: Large RAM: 32 GB CPU: 16 Cores |
| Hosts fetched and stored from ̧Cisco ISE | ~42 minutes |
User Agent
netskope-ce-7.0.0-cre-cisco-ise-v1.0.0
Workflow
- Get your ISE Primary Admin Node Base URL.
- Create a user on Cisco ISE.
- Configure the Cisco ISE Plugin.
- Approve the pxGrid Clients on Cisco ISE for the configured plugin.
- Configure a Business Rule.
- Configure Risk Exchange Actions.
- Validate the plugin.
Watch a Video
Click play to watch a video.
Get your ISE Primary Admin Node Base URL
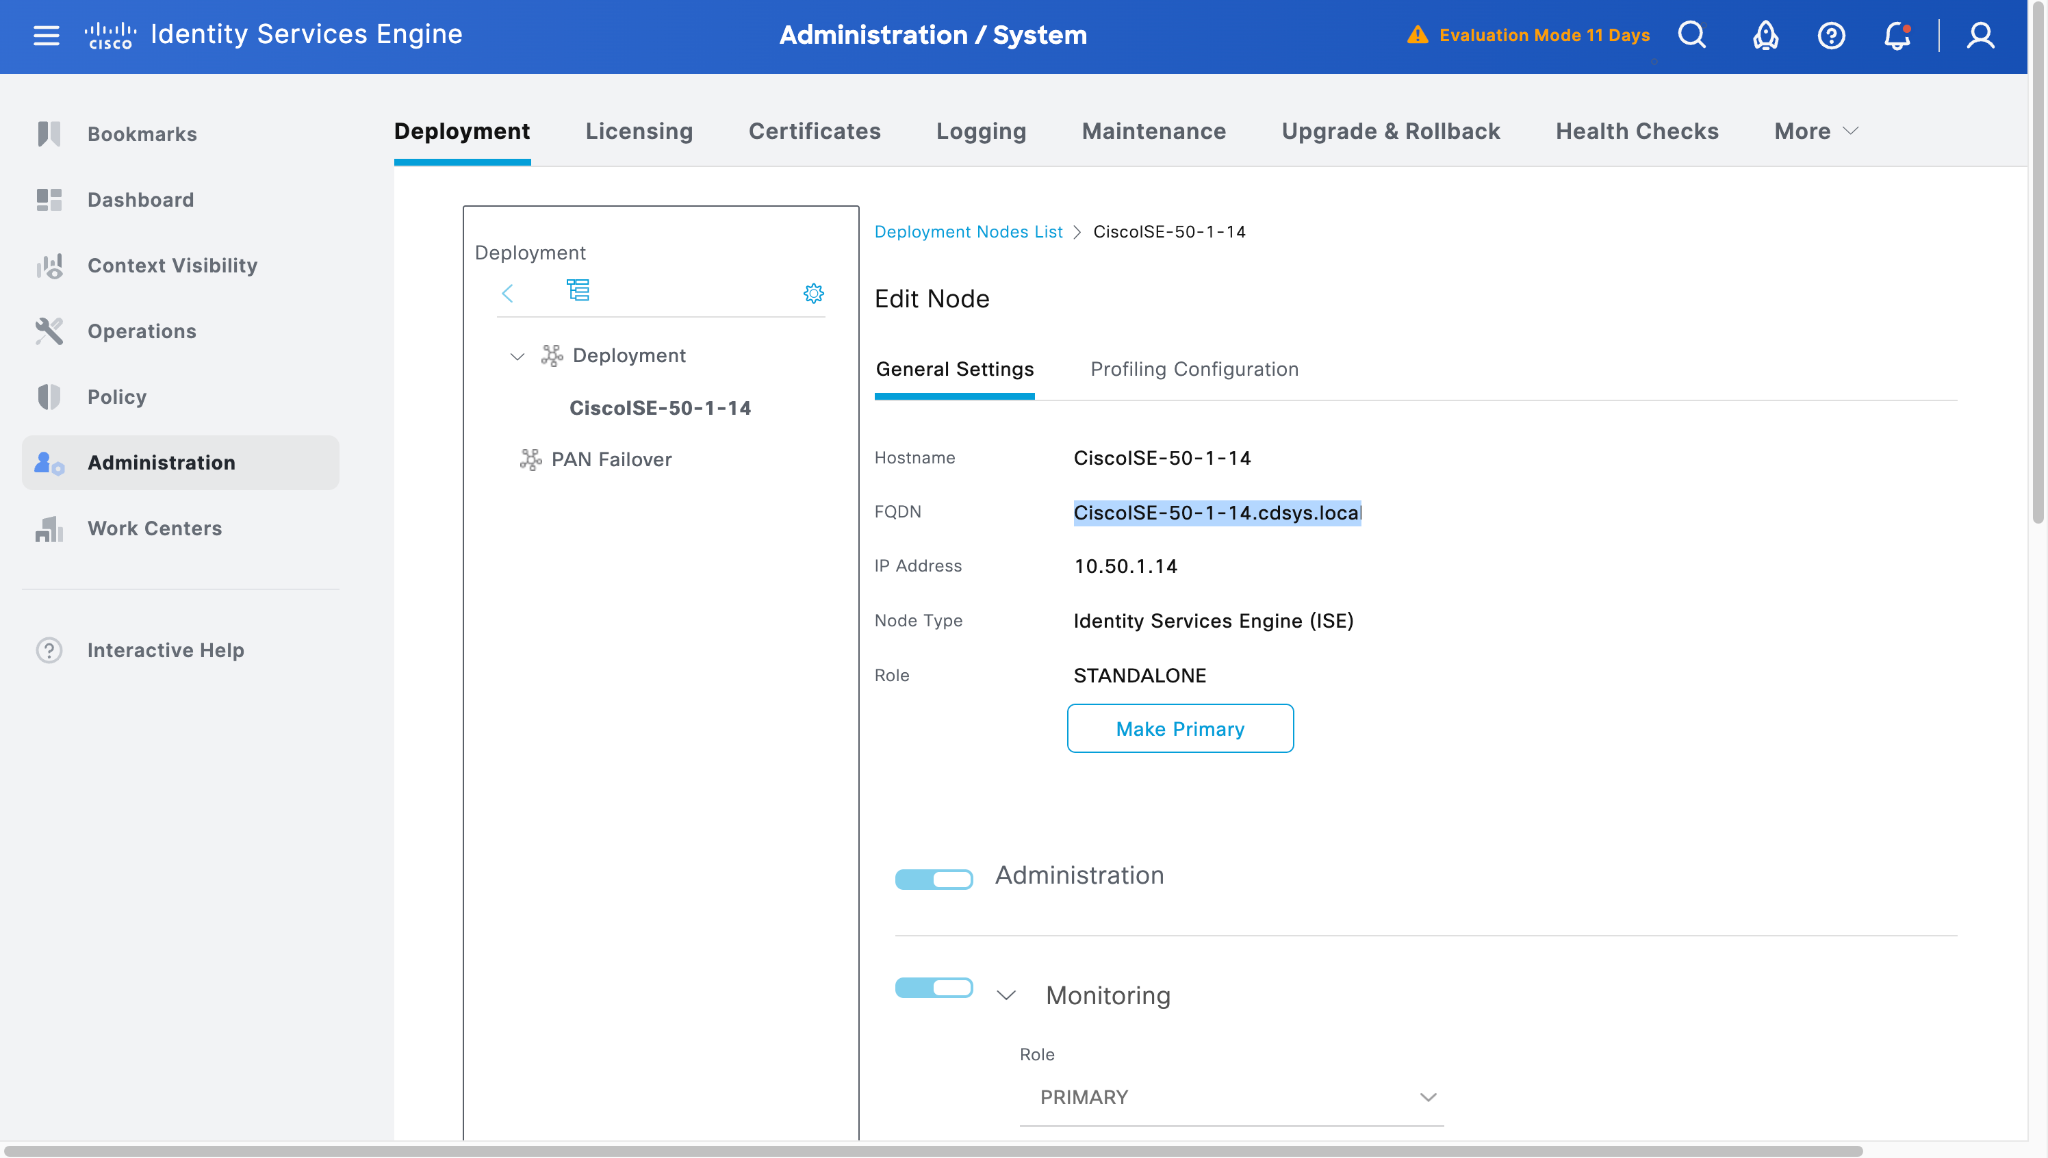
- Log in to your Cisco ISE instance, and go to Administration > System > Deployment.
- Use the FQDN to form the ISE Primary Admin Node Base URL.
Create a User on Cisco ISE
-
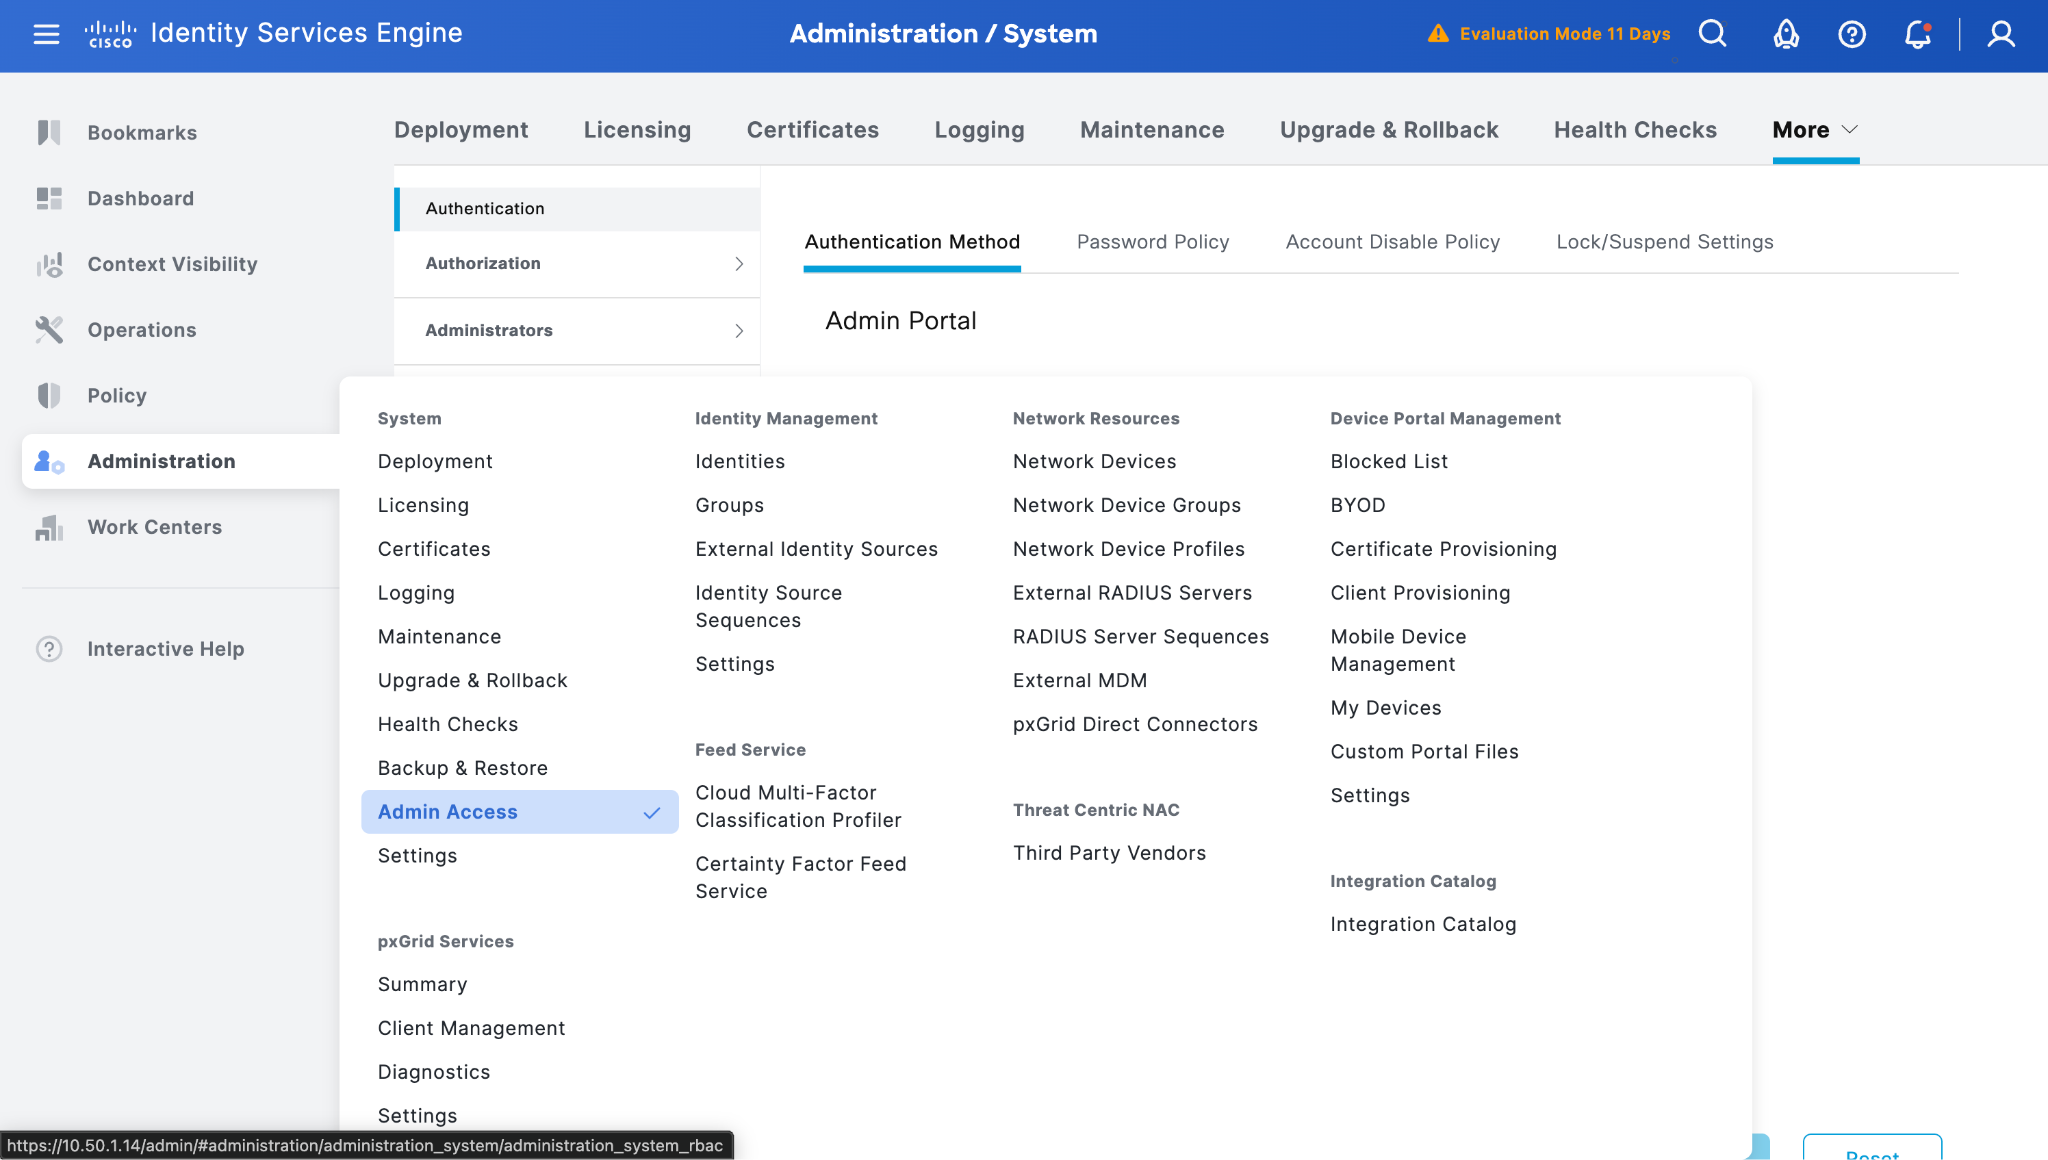
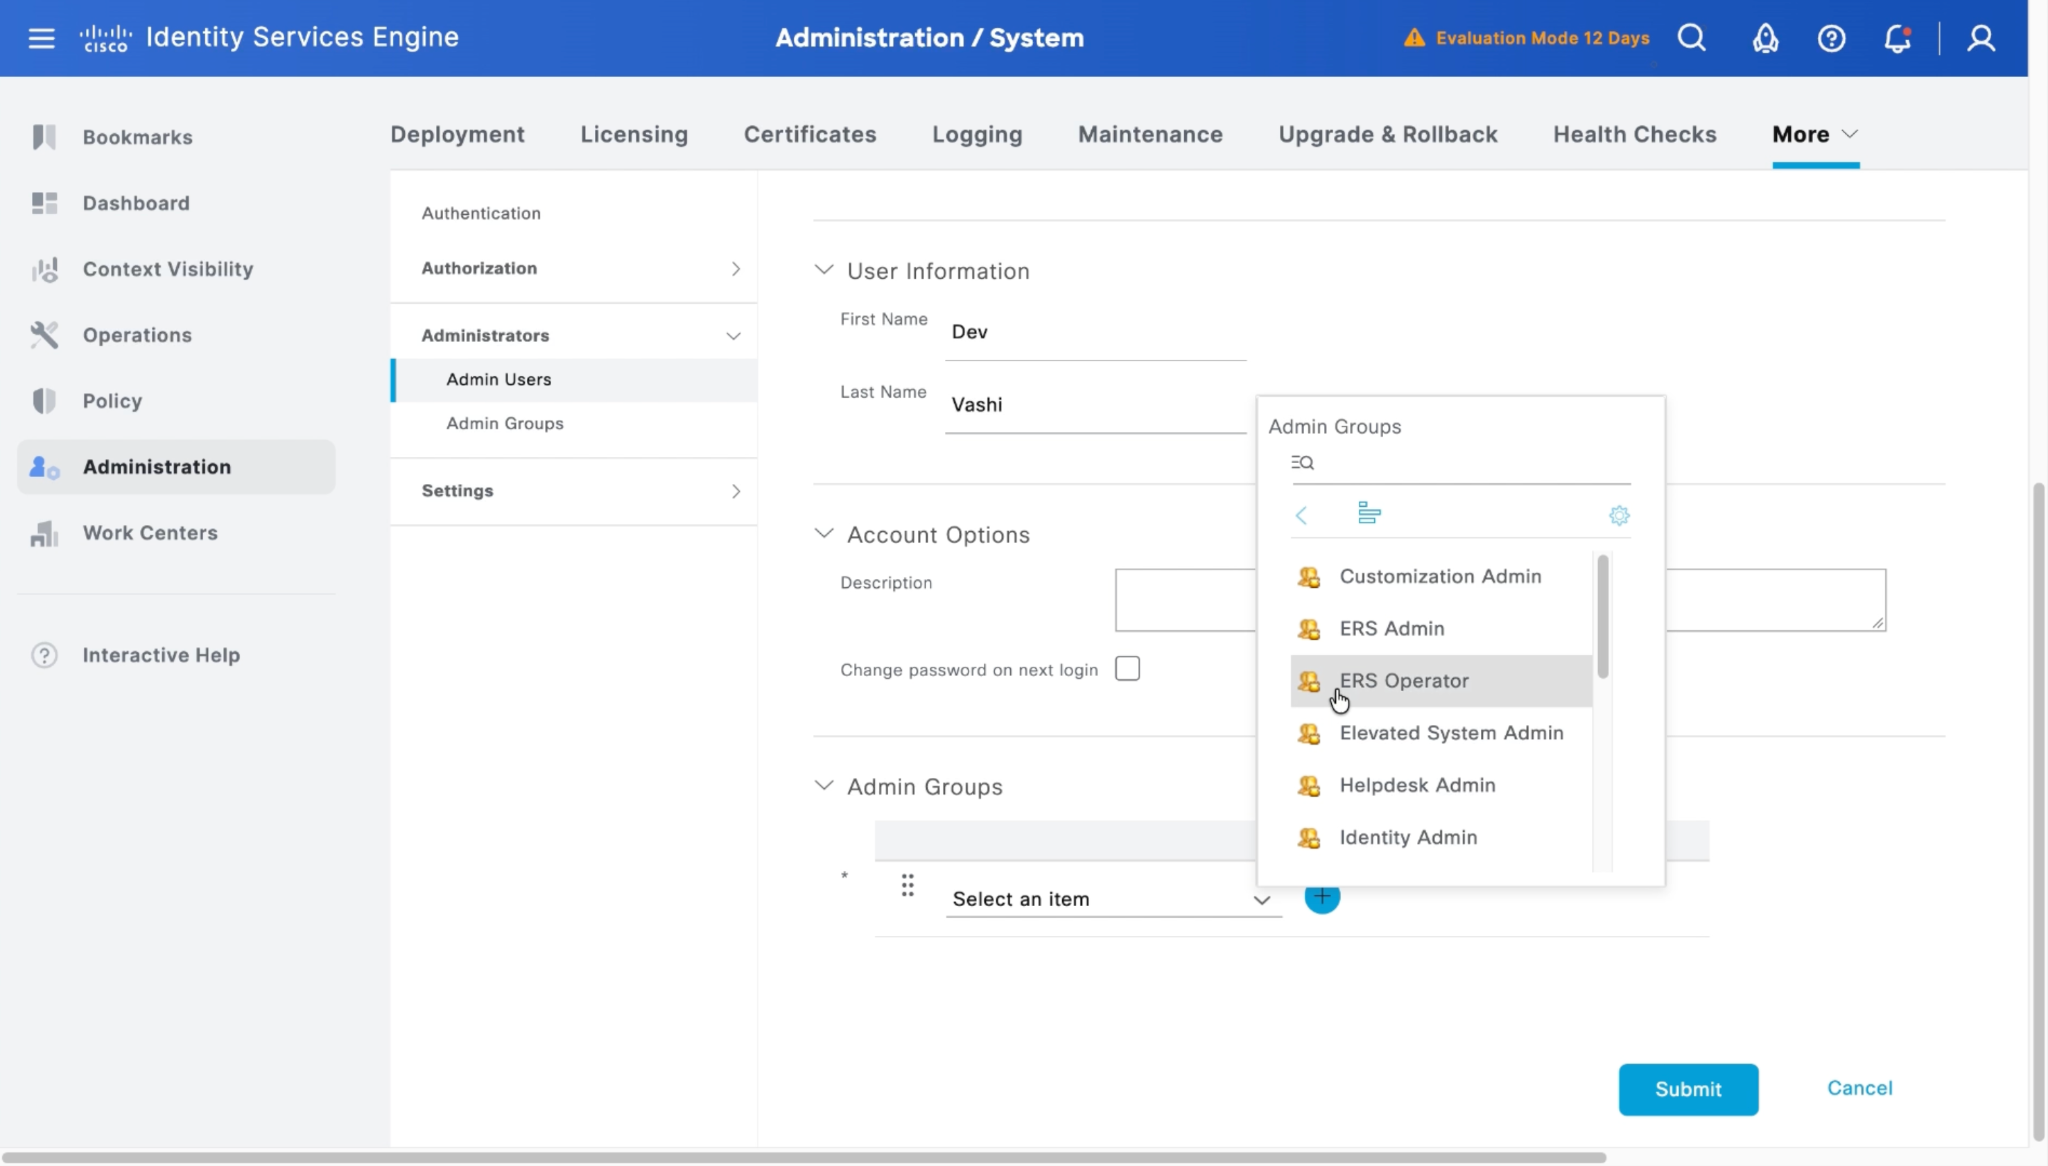
Log in to your Cisco ISE instance, and go to Administration > Admin Access > Administrators > Admin Users.
-
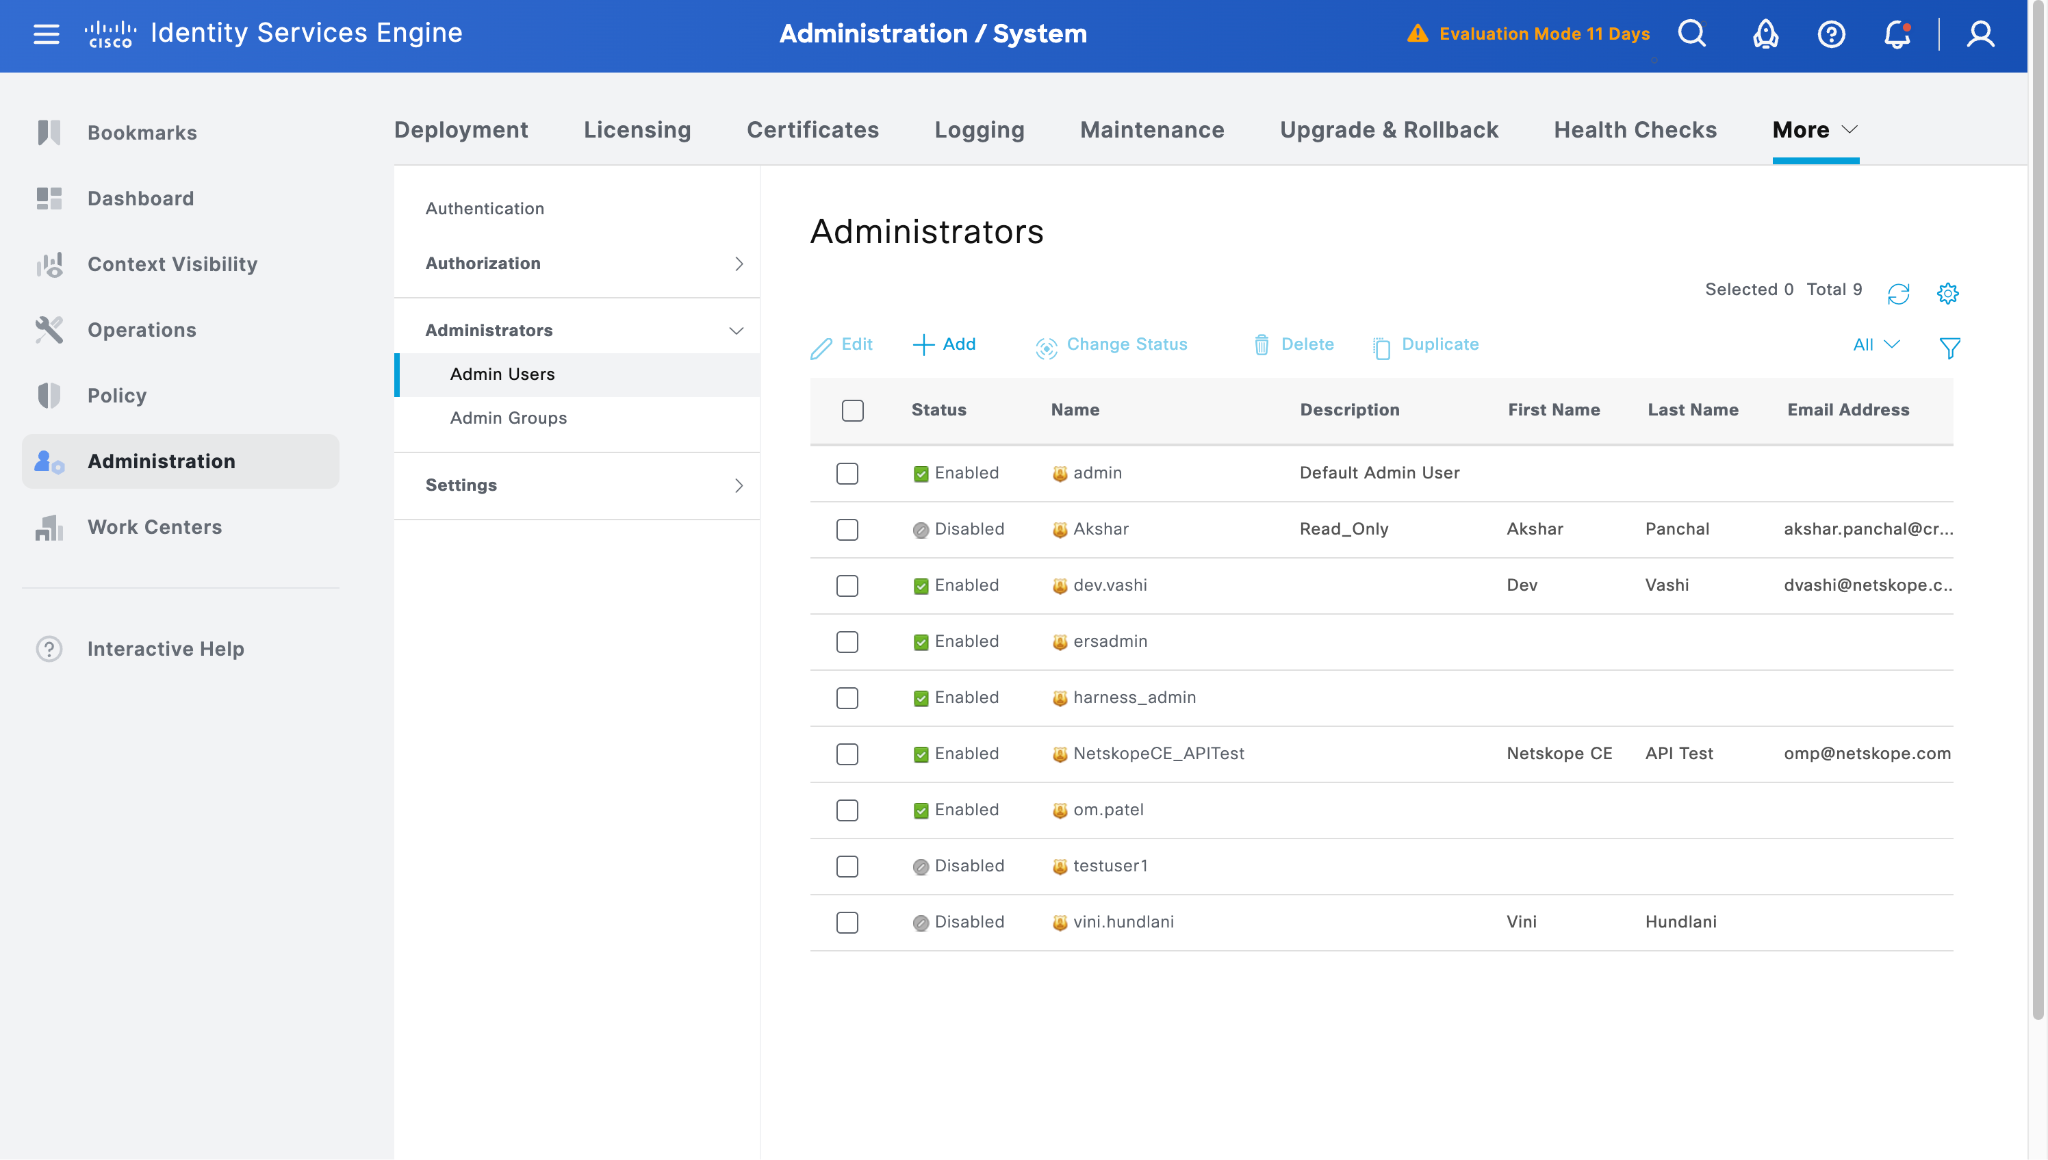
Click Add to create a new user.
-
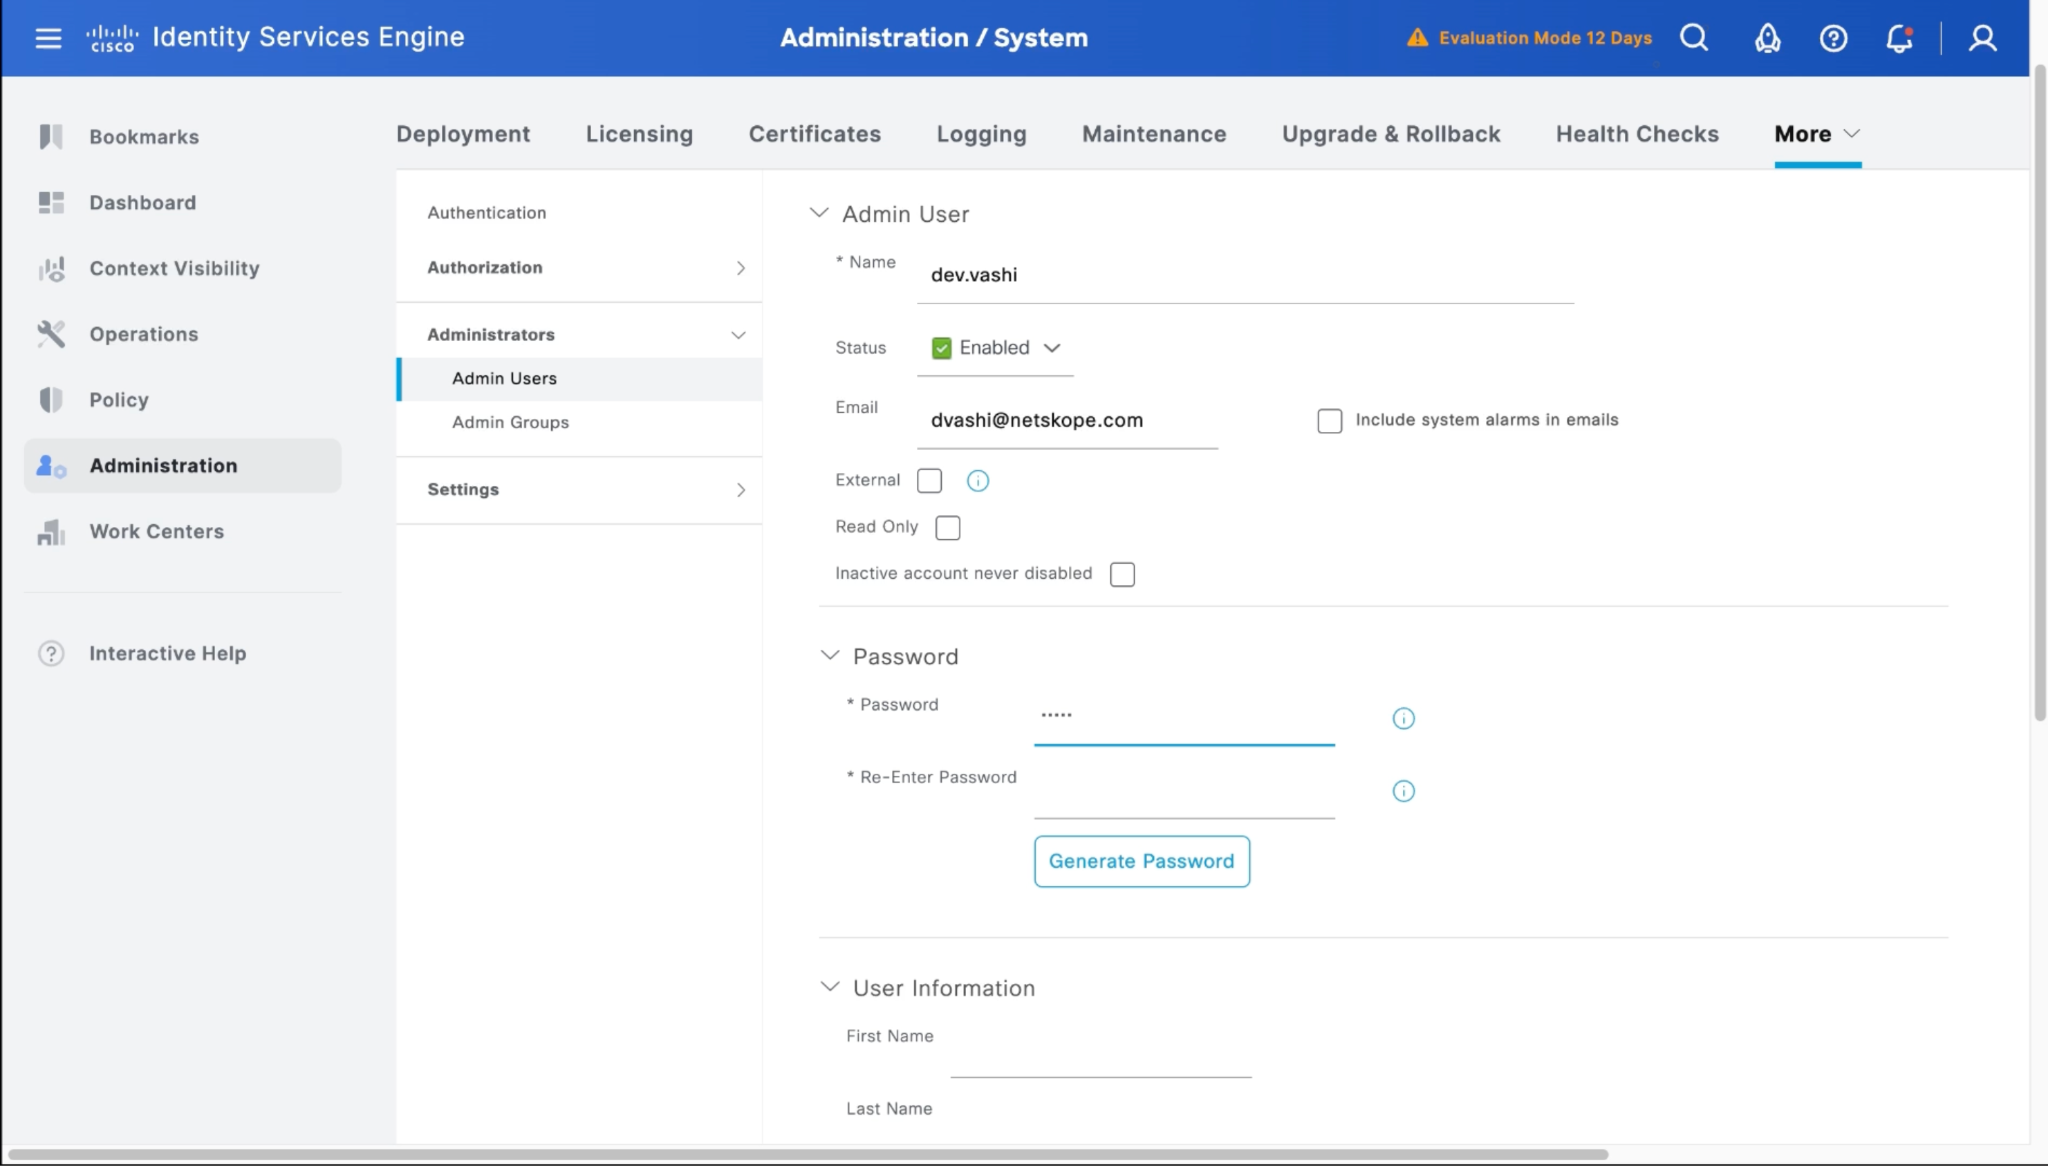
Provide the name and email asper your needs, then set the password for the user.
-
Provide the user information, and then set the Admin Groups as ERS Operator.
-
Click Submit to create the new user. Copy the user name and password as it will be used while configuring the Cisco ISE plugin.
Configure the Cisco ISE Plugin
-
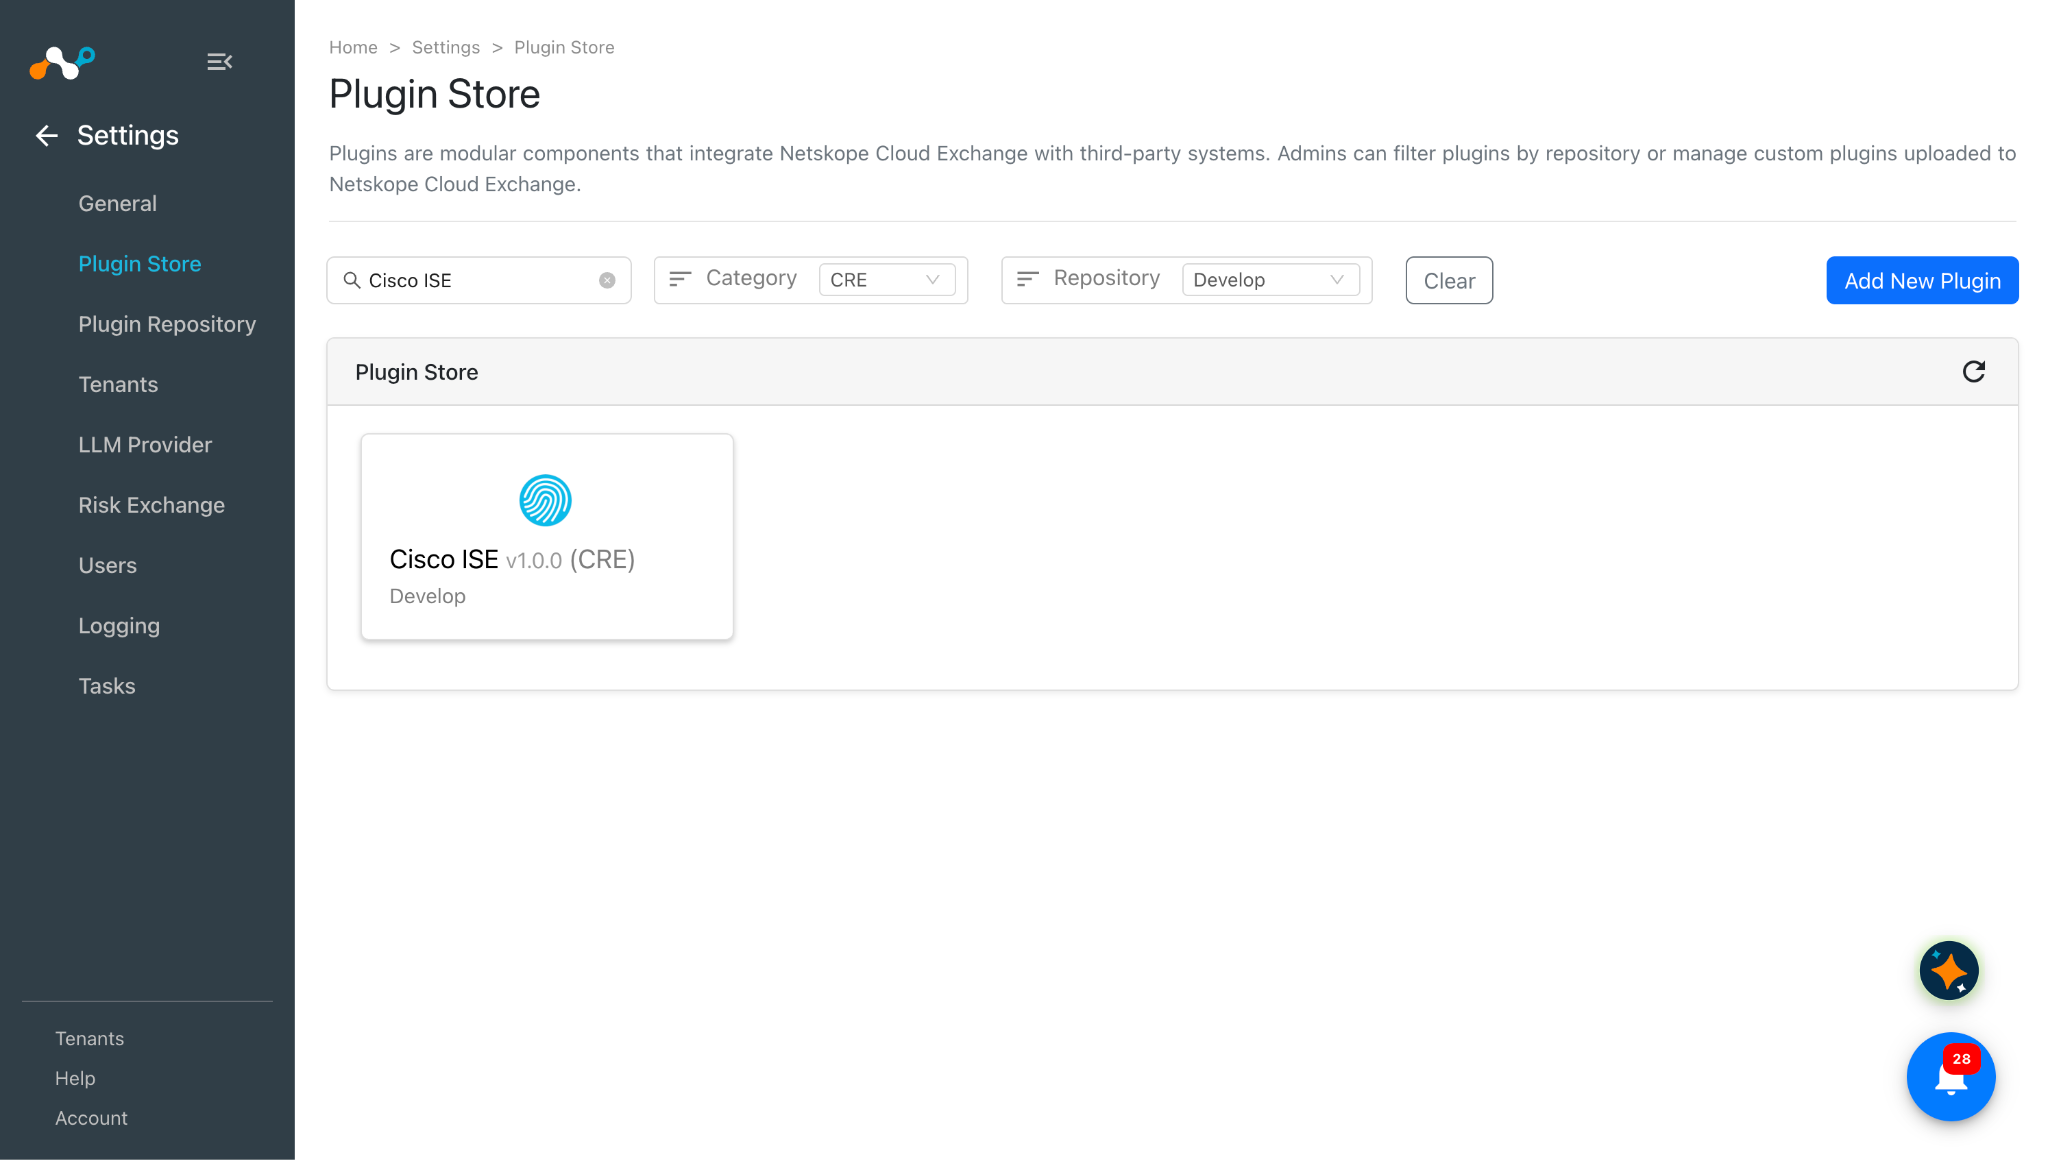
In Cloud Exchange, go to Settings > Plugin Store. Search for and select the Cisco ISE v1.0.0 (CRE) plugin.
-
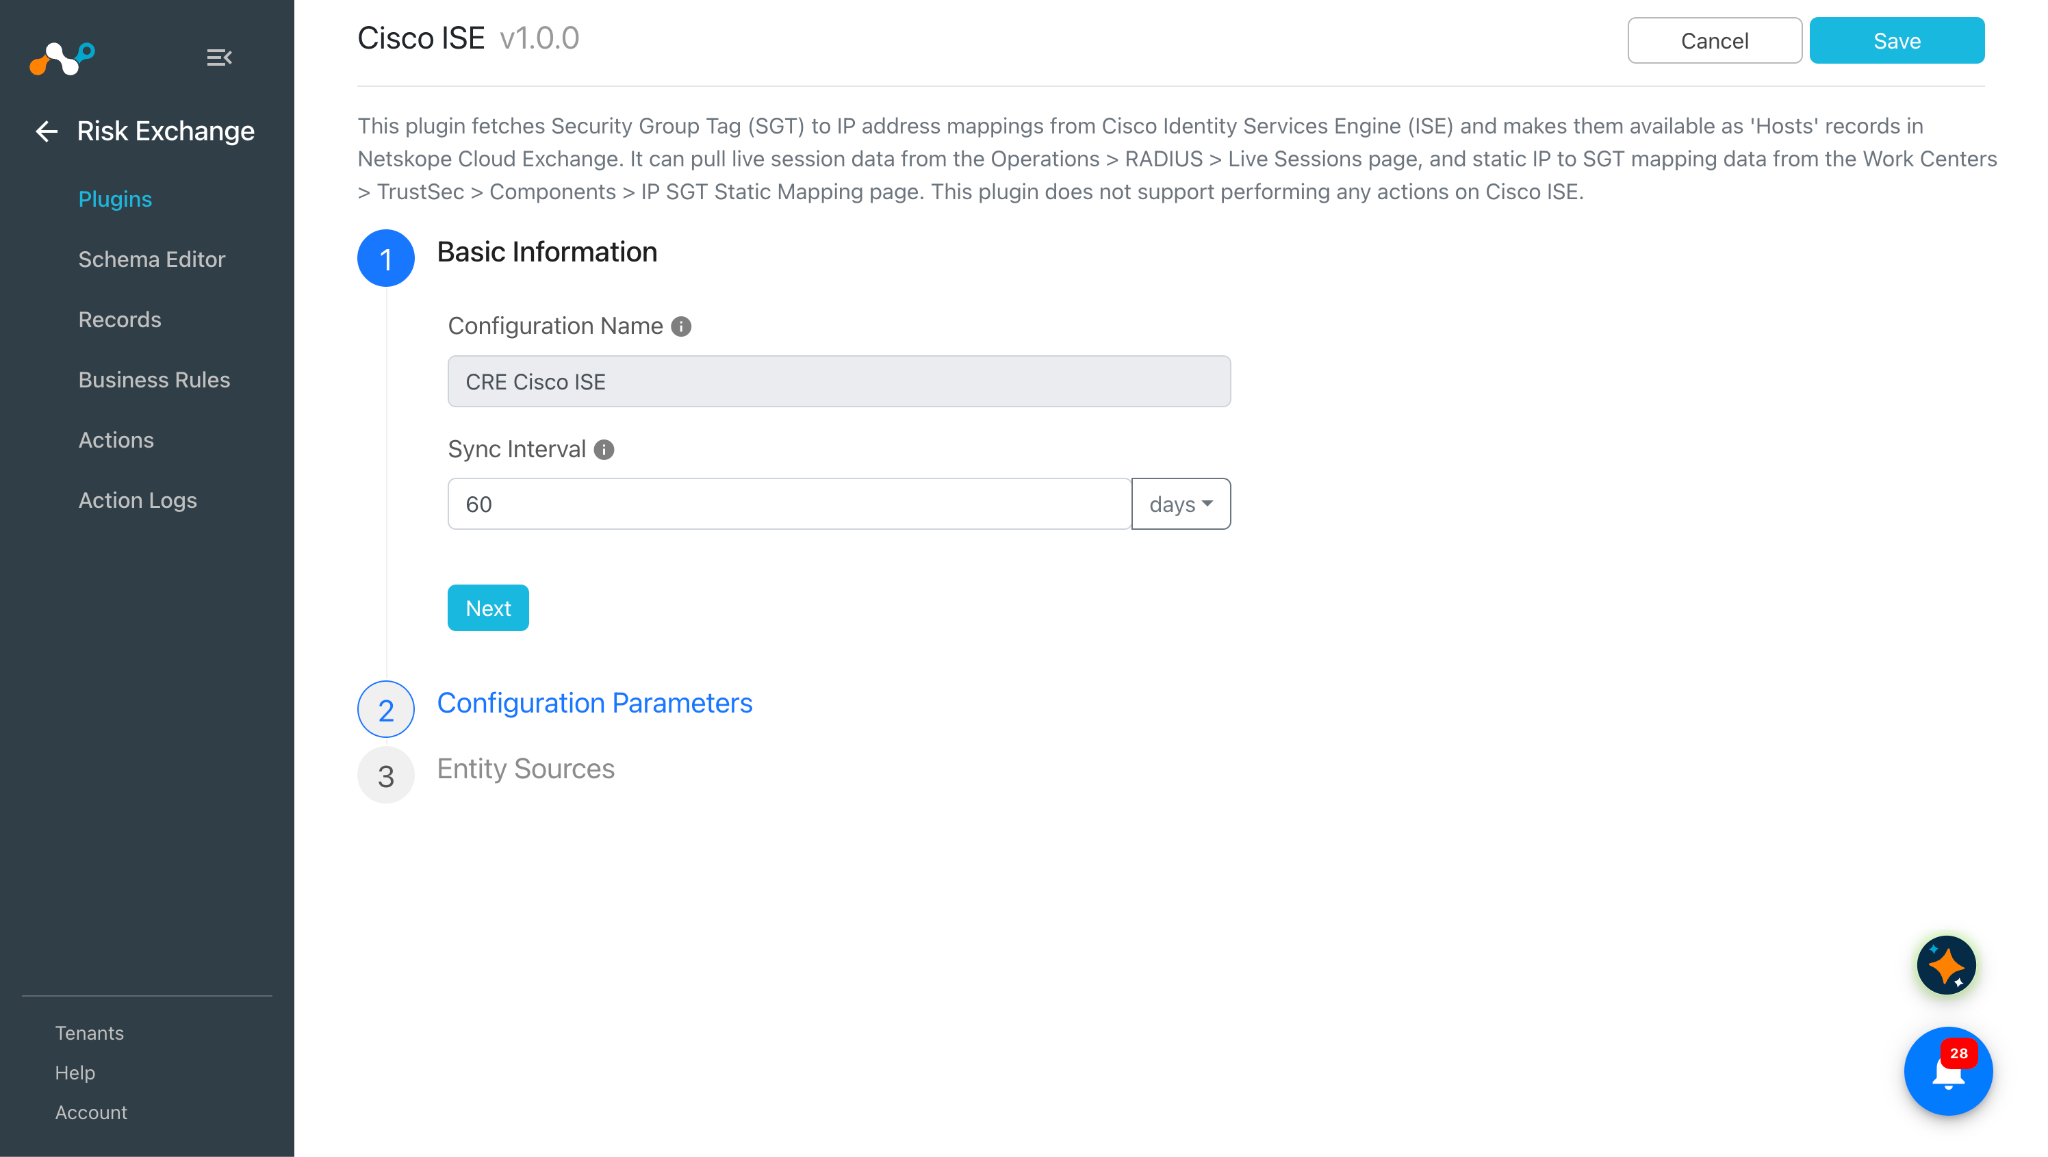
Enter a plugin configuration name and change the Sync Interval if needed.
-
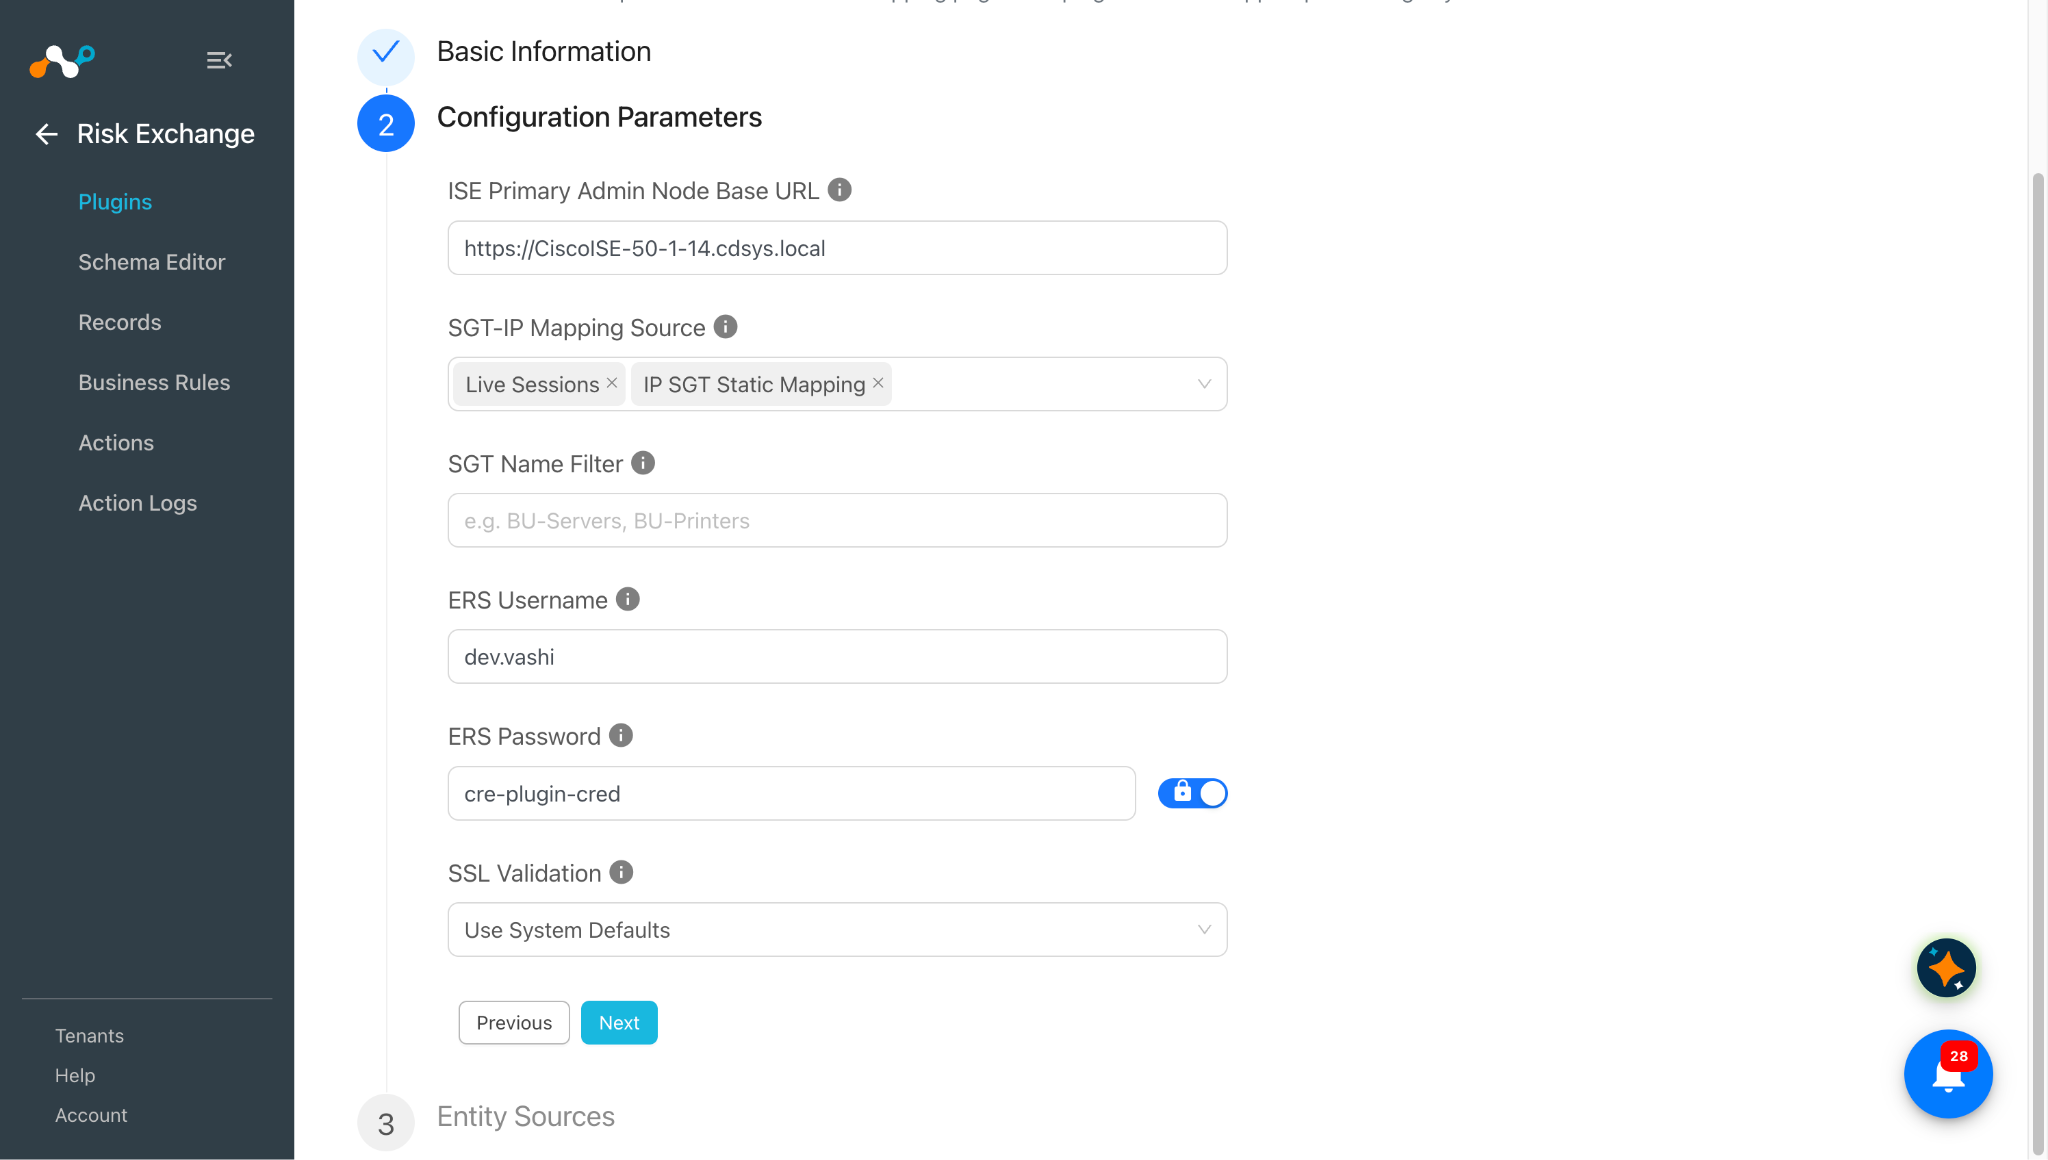
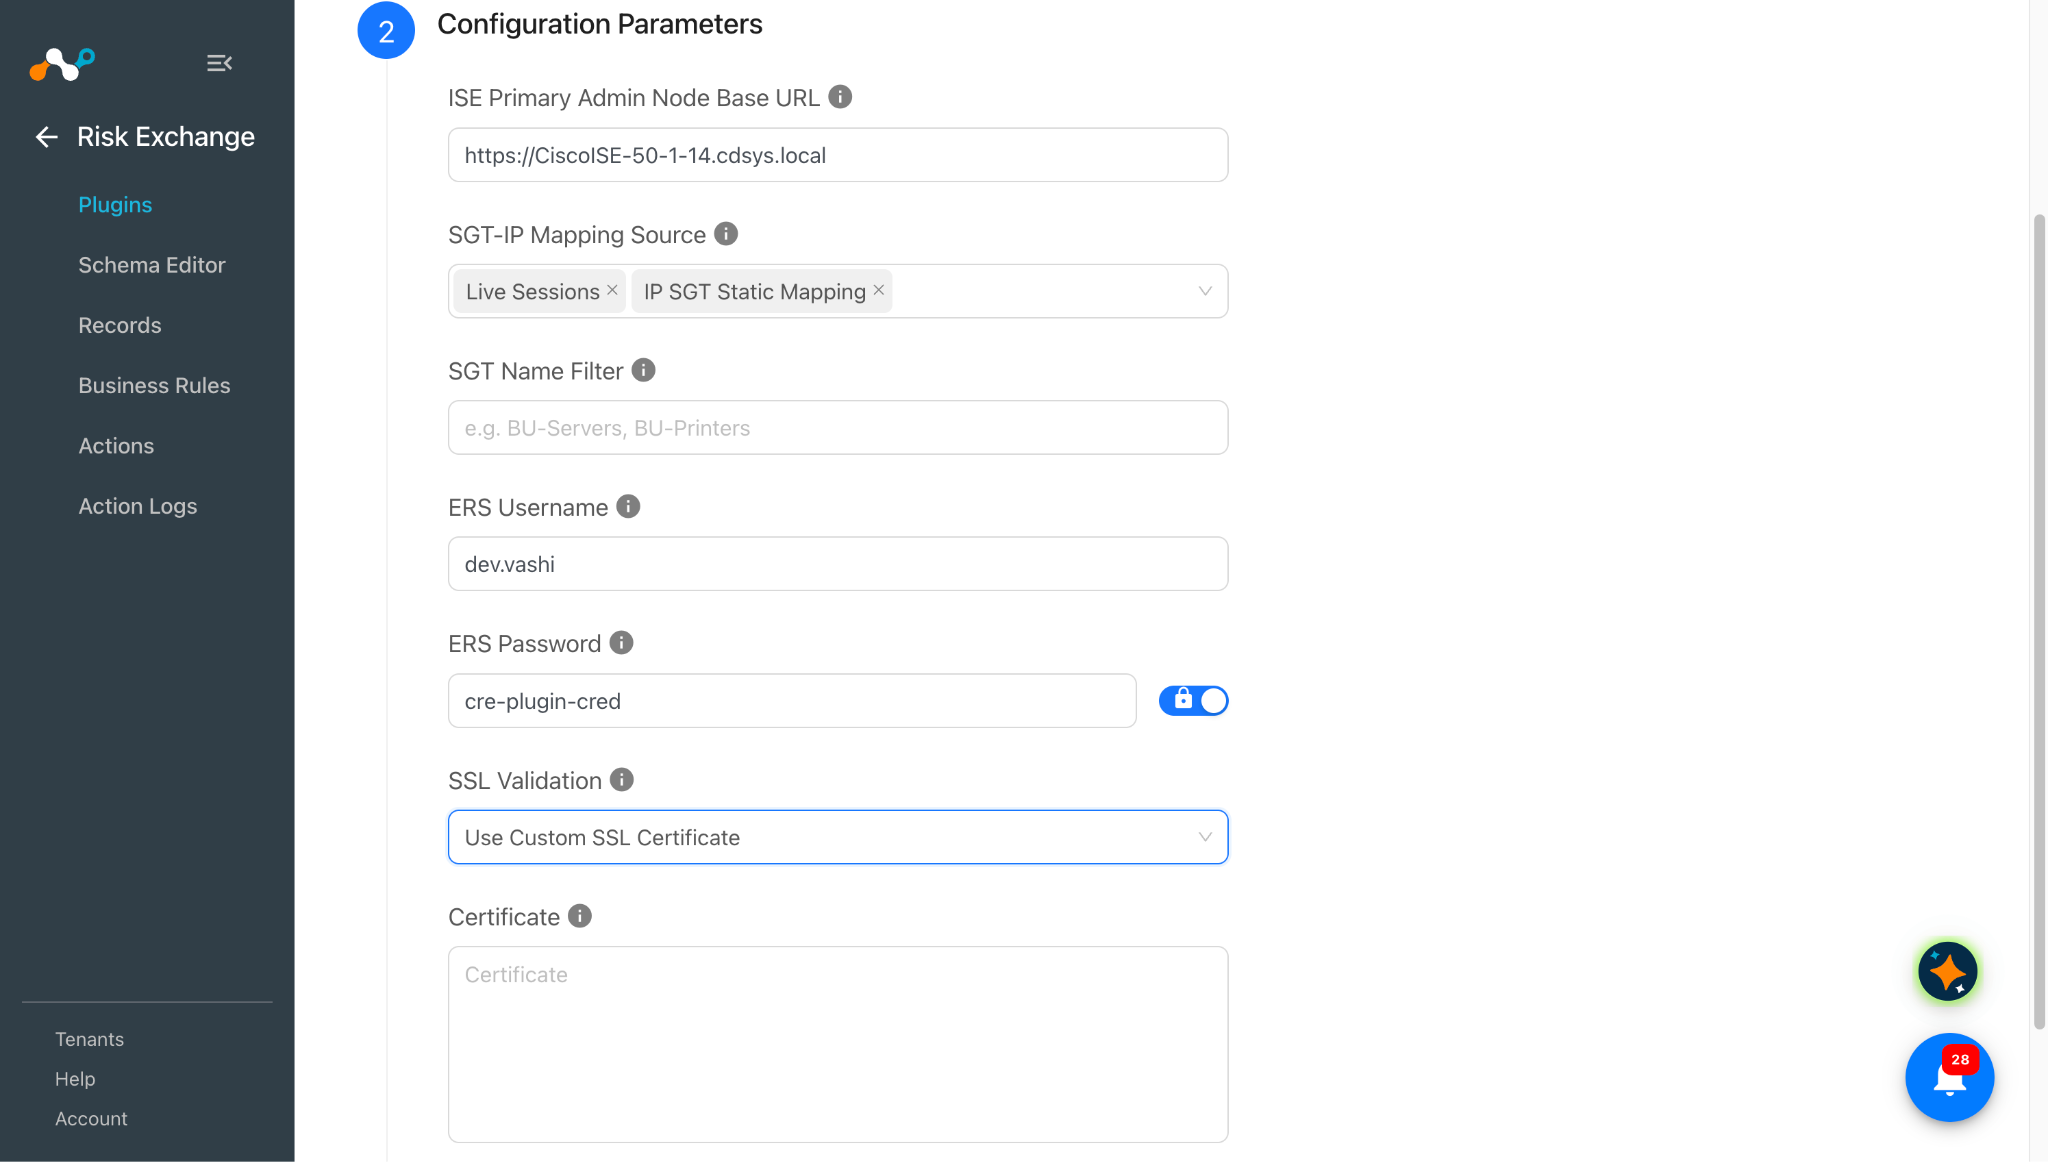
Click Next and enter the Configuration Parameters:
- ISE Primary Admin Node Base URL: Base URL of the Cisco ISE Primary Administration Node. Note that if you have an on-premises Cisco ISE instance, then the IP to Hostname mapping should be added as an extra host in Cloud Exchange’s docker-compose.yml file.
- SGT-IP Mapping Source: Choose where this plugin should get SGT-to-IP mapping data from.
Live Sessions pulls live session data using the pxGrid API.
IP SGT Static Mapping pulls static SGT-to-IP mappings configured in ISE using the ERS API. You can select both; if a conflict occurs between the two for the same IP address, Live Sessions data takes precedence over IP SGT Static Mapping data. - SGT Name Filter: Optional comma-separated list of Security Group Tag names to restrict data collection to. Applies to both the Live Sessions and IP SGT Static Mapping sources. Leave empty to pull data for every Security Group Tag.
- ERS Username: Username for the Cisco ISE ERS API. Available under Administration > Identity Management > Identities > Users in the ISE Admin Console.
- ERS Password: Password for the Cisco ISE ERS API user specified in the ERS Username.
- SSL Validation: Controls SSL/TLS certificate validation for every ERS and pxGrid request to the ISE Primary Admin Node, independent of Cloud Exchange’s own SSL validation checkbox.
Disable SSL Validation skips certificate validation entirely.
Use System Defaults validates against the Cloud Exchange host’s default trusted CA store.
Use Custom SSL Certificate reveals a certificate text area below, provide ISE’s certificate(s) there, like for its self-signed or private-CA certificates. Note that if SSL validation is enabled, certificates for both Live Sessions and IP SGT Static Mapping will be required. - Certificate: Go to Administration > System > Certificates > Certificate Management > System Certificates in the ISE Admin Console, find the certificate in the table whose Used By column shows Admin, and export it. Go to Administration > System > Certificates > Certificate Authority > Certificate Authority Certificates, find the certificate in the table whose name is like
Certificate Services Root CA - <ISE hostname>, and export it. Both certificates are required; paste them one after another in this same field. Paste only the ‘—–BEGIN CERTIFICATE—–‘/’—–END CERTIFICATE—–‘ block(s). Remove any additional text ISE or your browser may add before or after them.
-
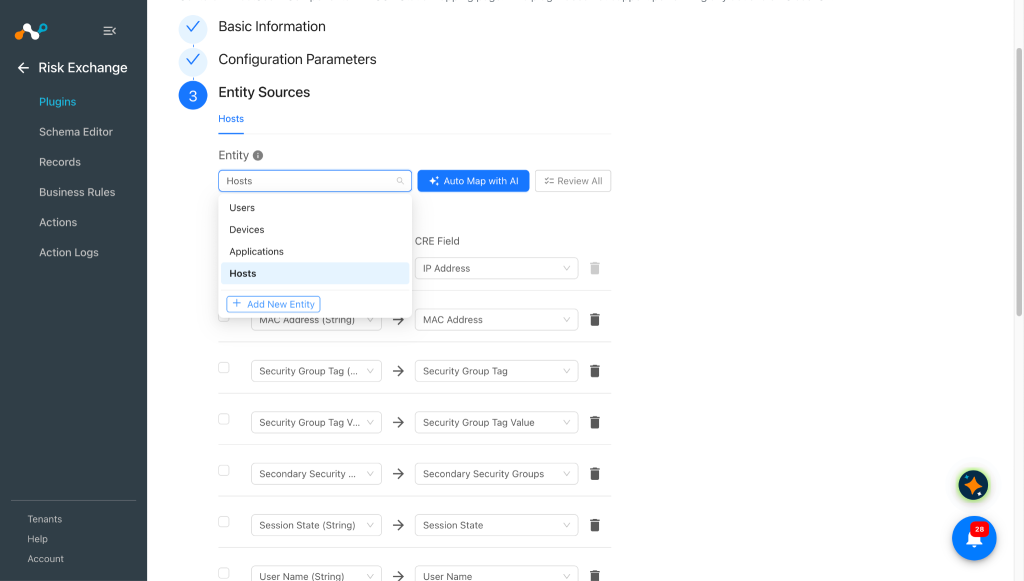
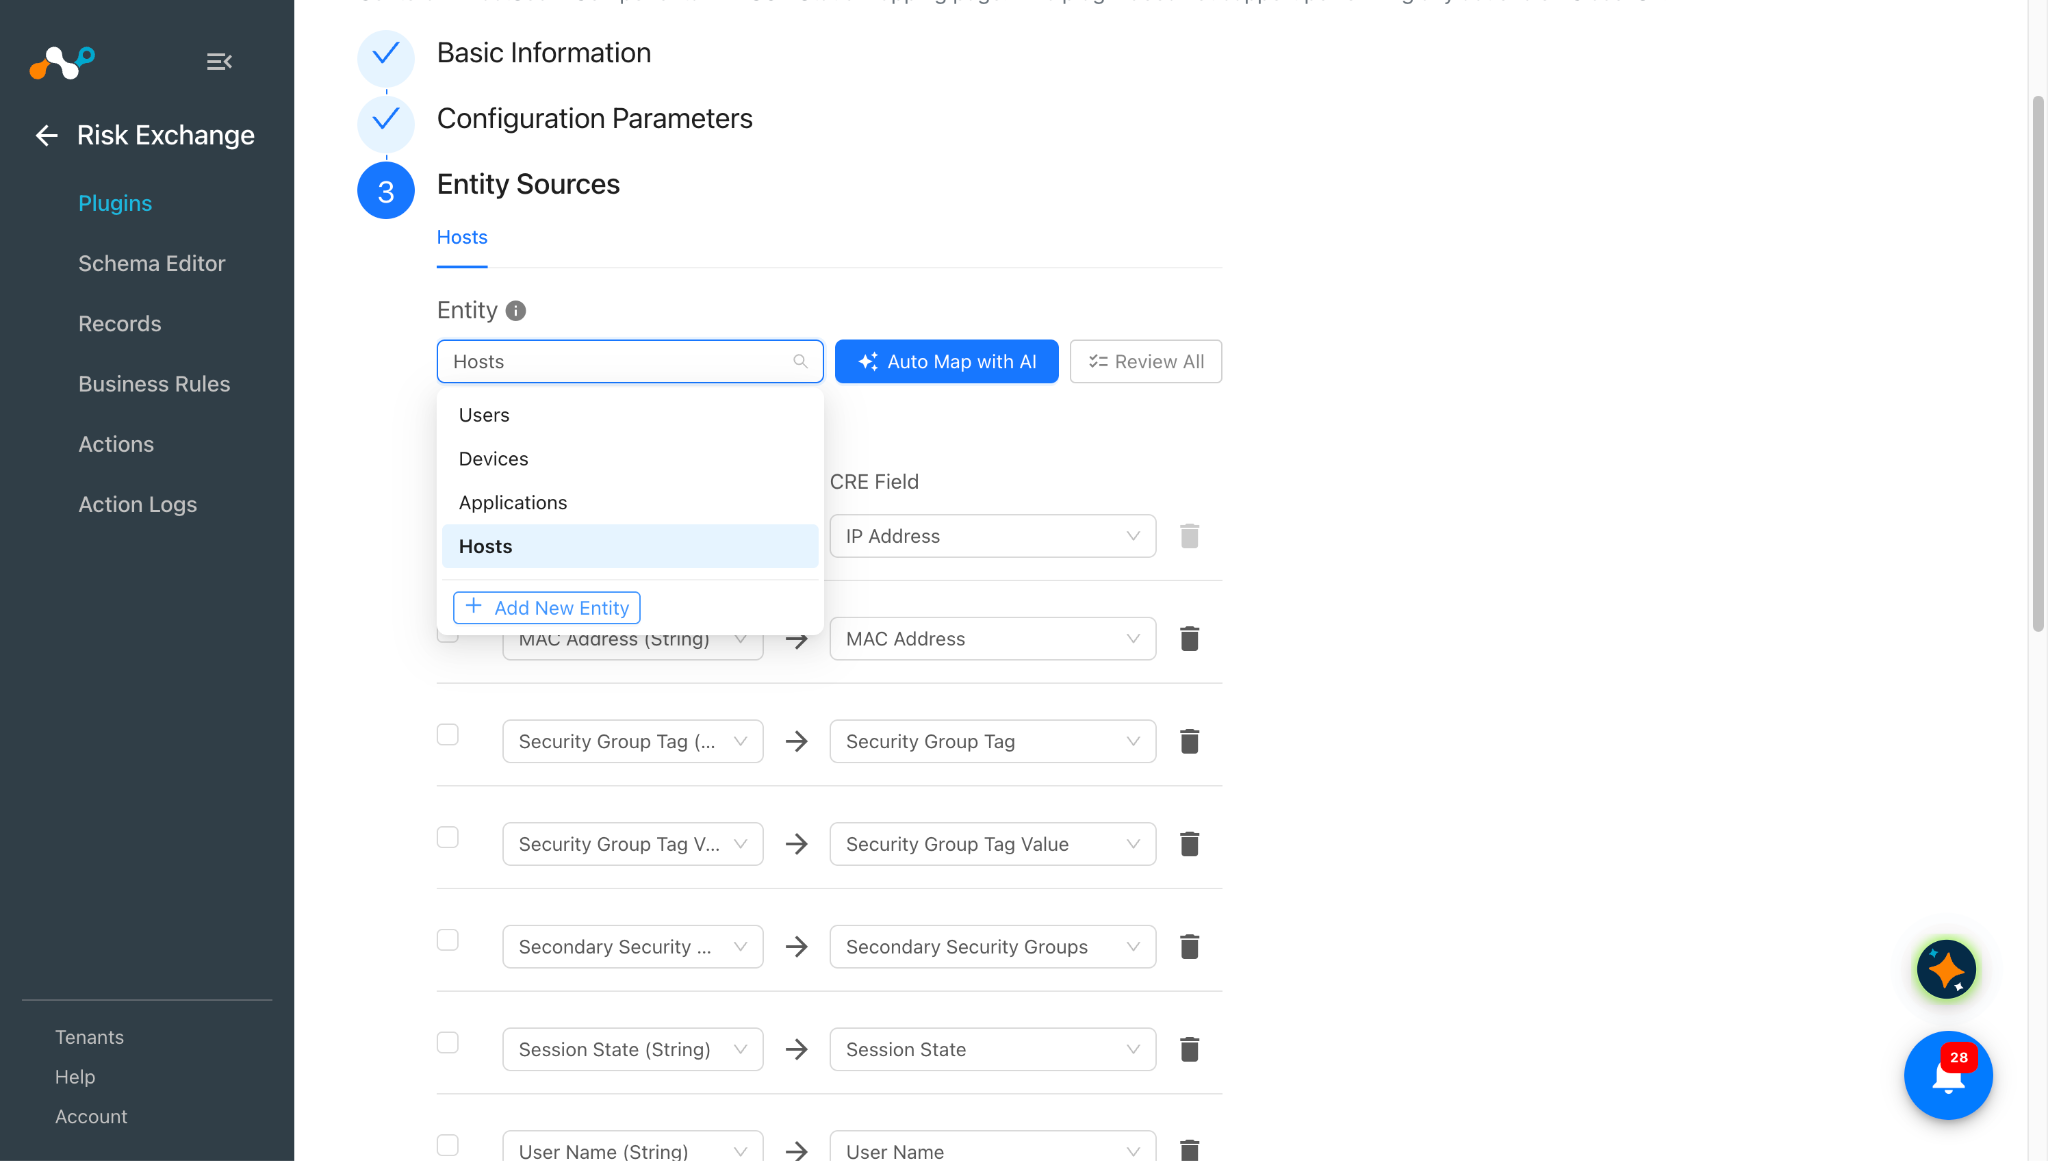
Click Next. Select the required Entity from the Entity dropdown and provide the field mappings per your needs. You can create new entity by clicking Add New Entity.
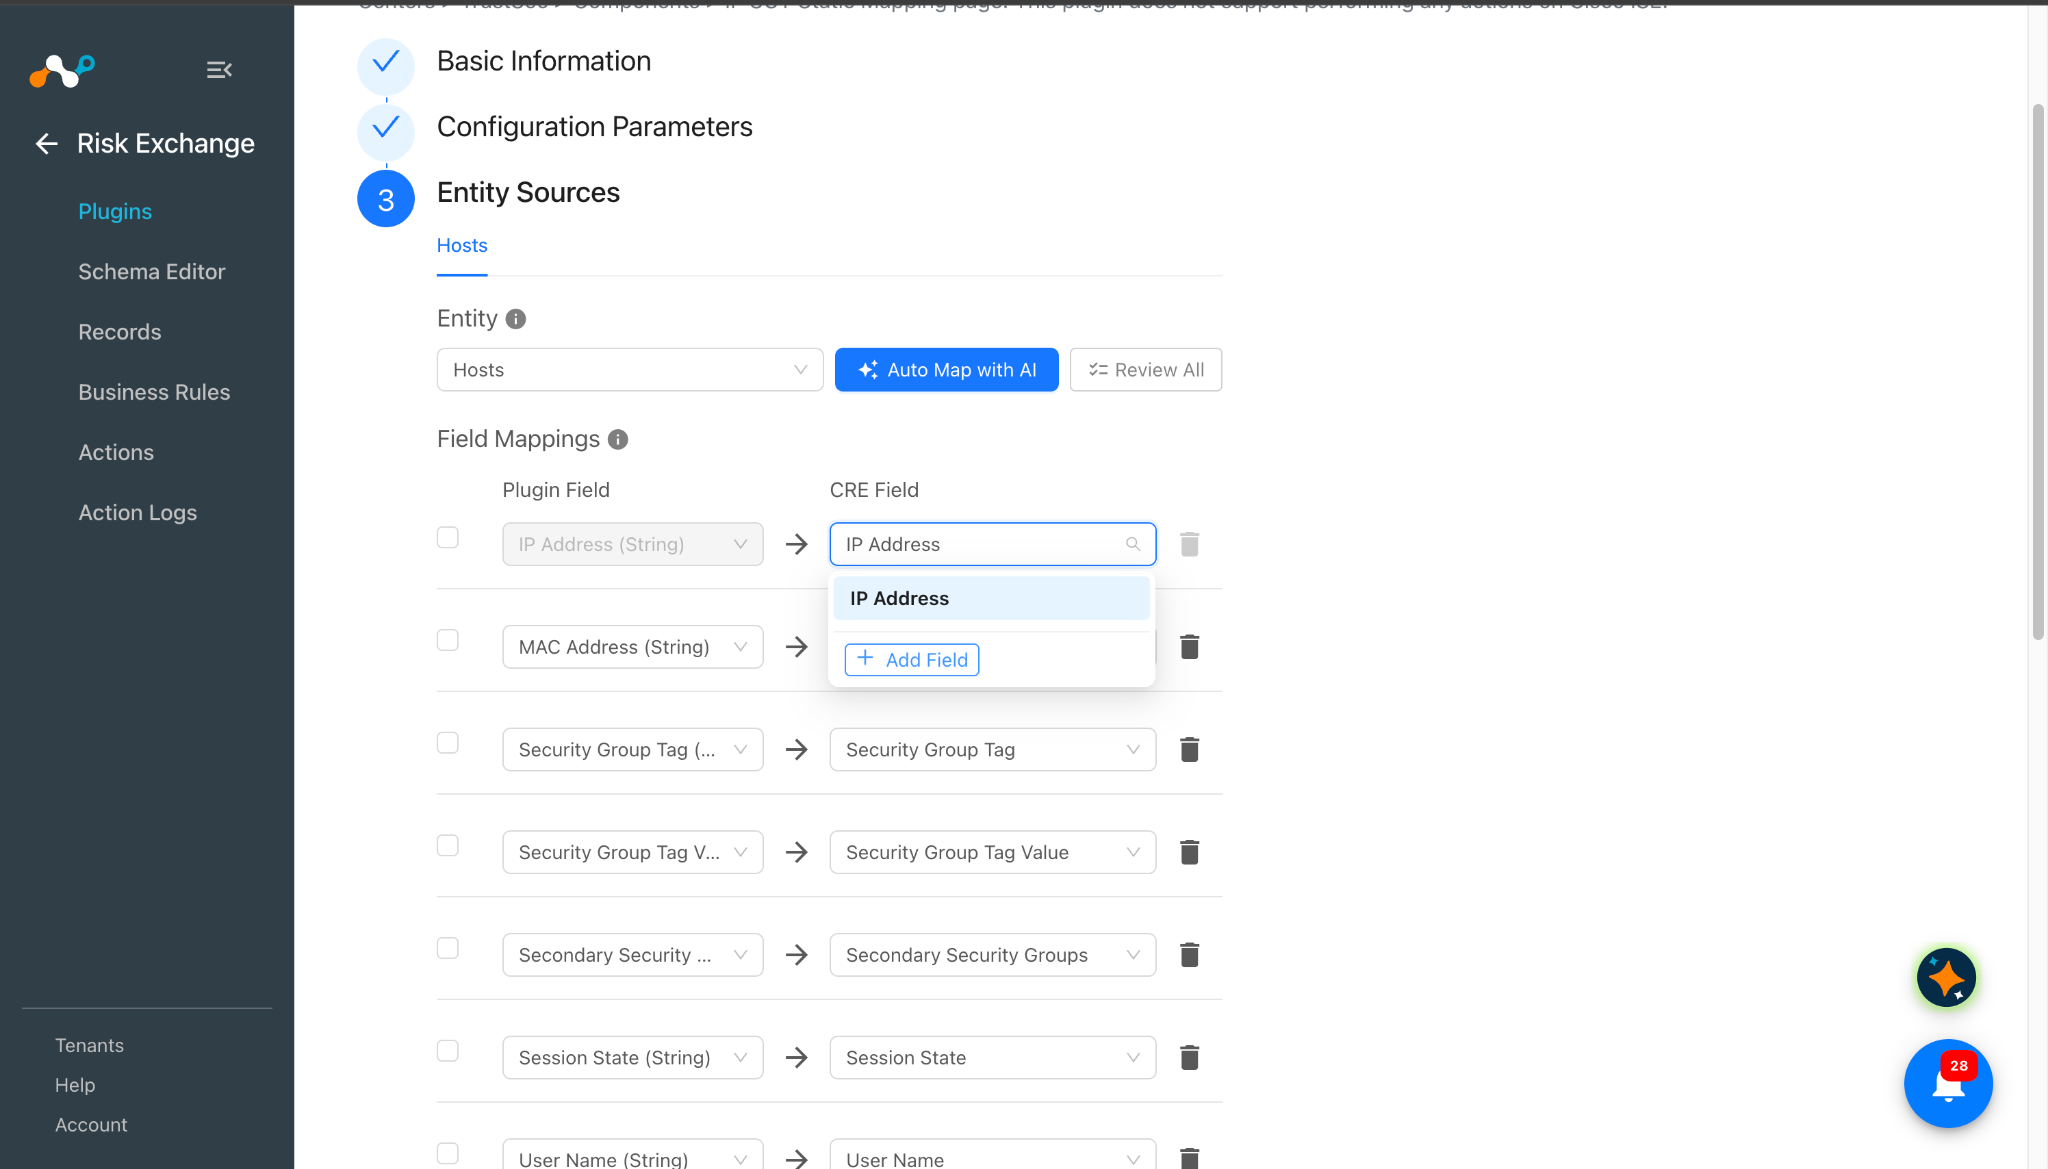
To create a new field, click Add Field.
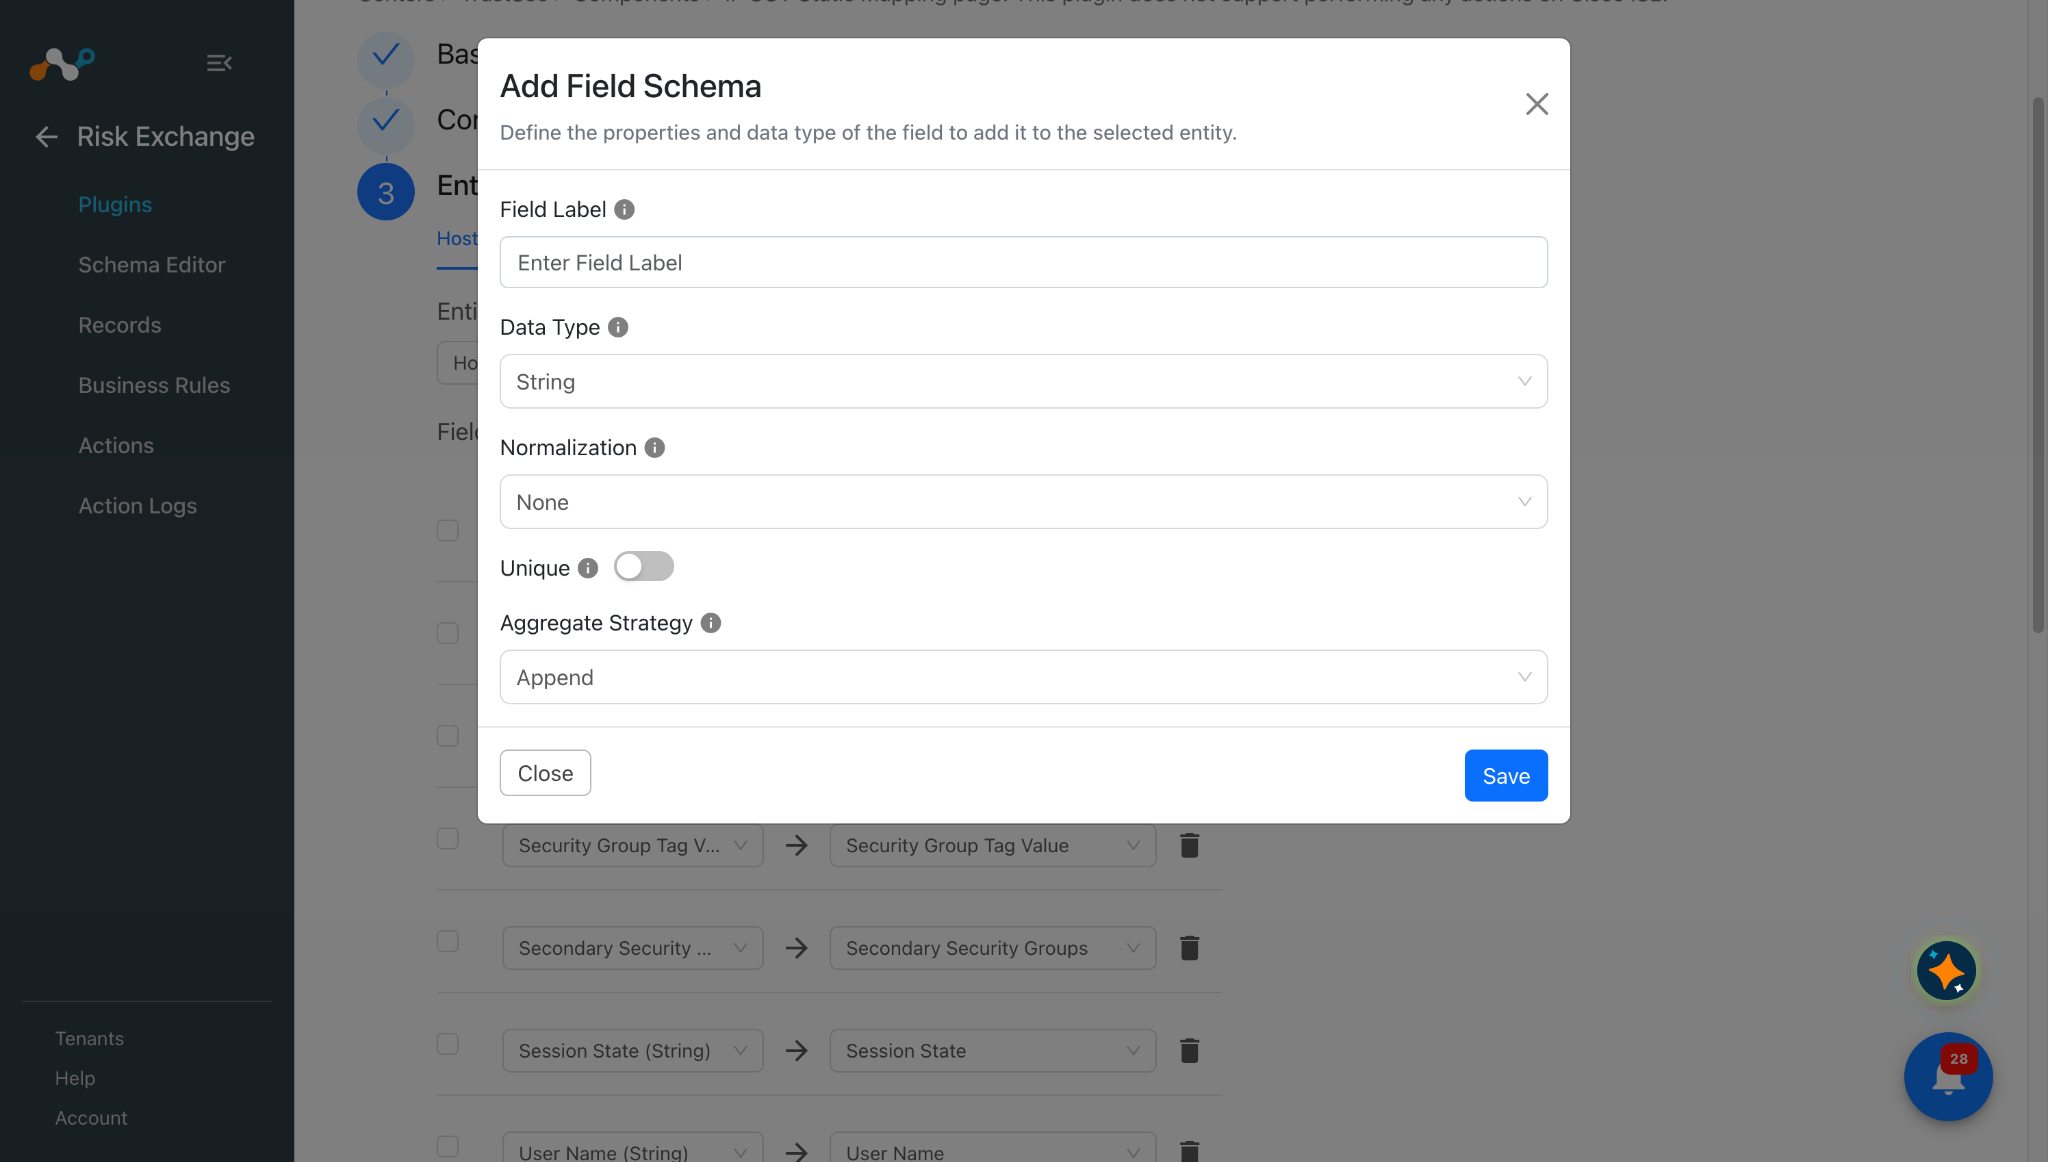
Provide the Field Label, Data Type, Normalization, and Aggregate Strategy per your needs, and then click Save.
Map the created fields:
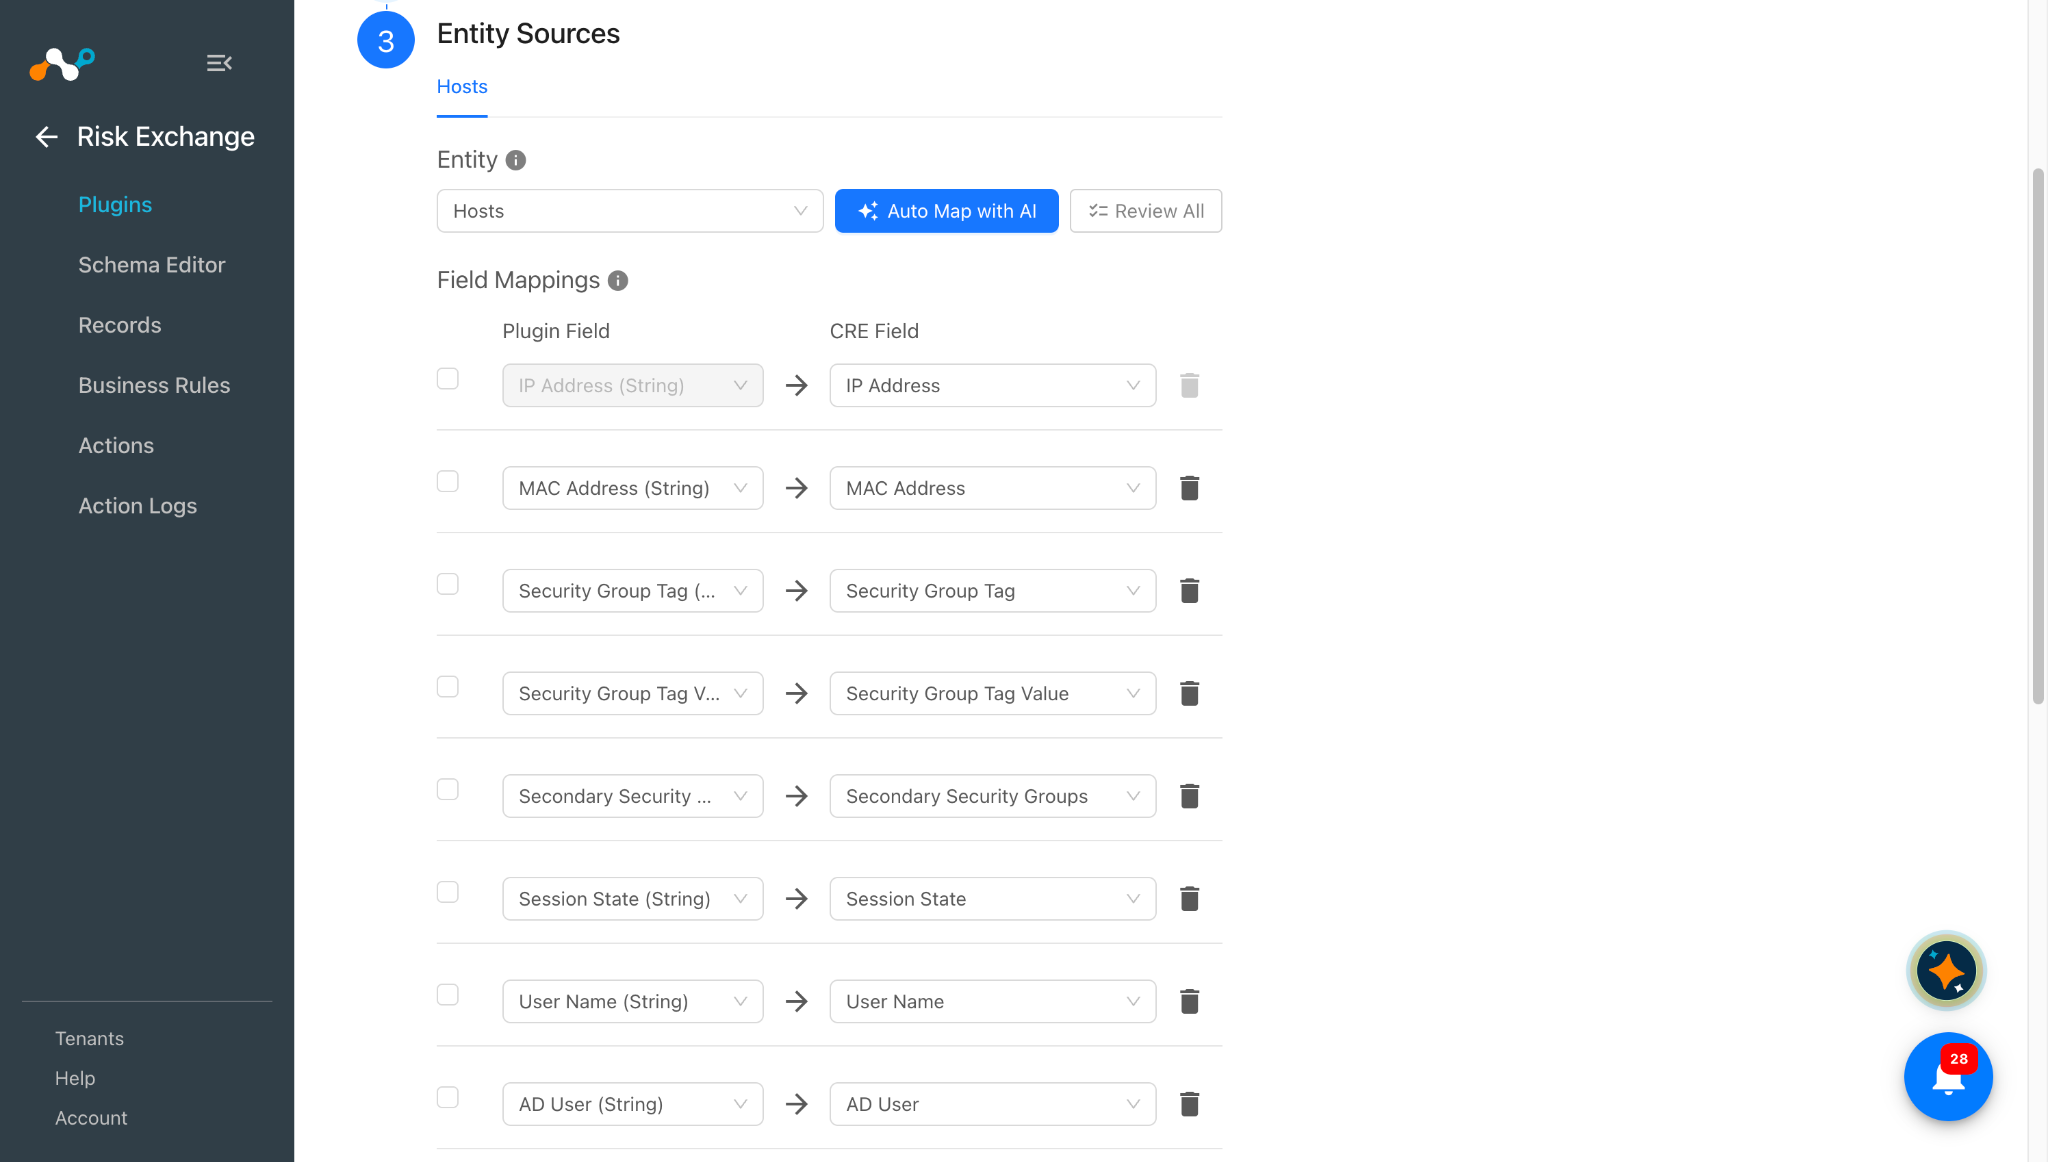
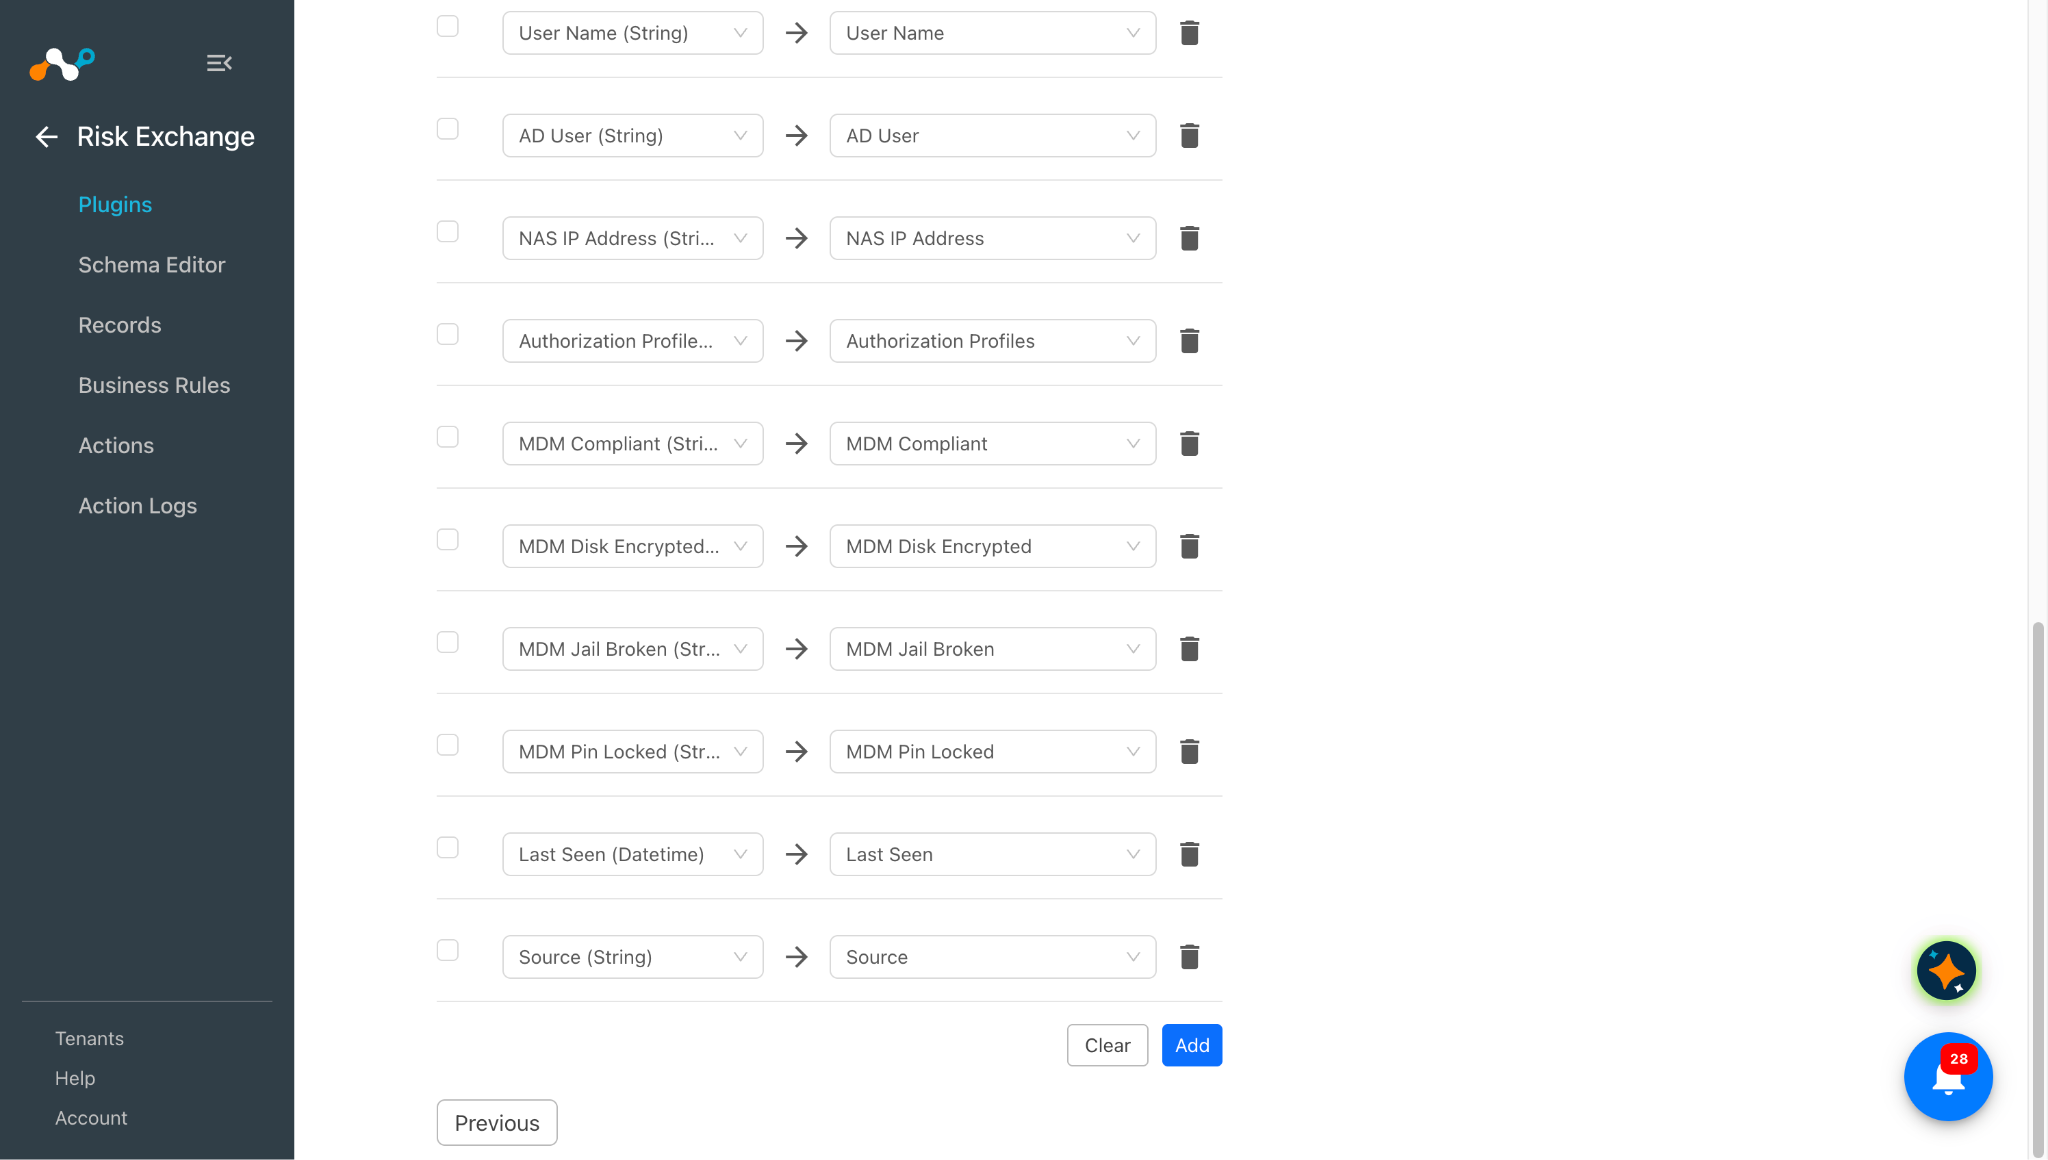 Refer to the Mappings section before configuring the plugin.
-
Click Save.
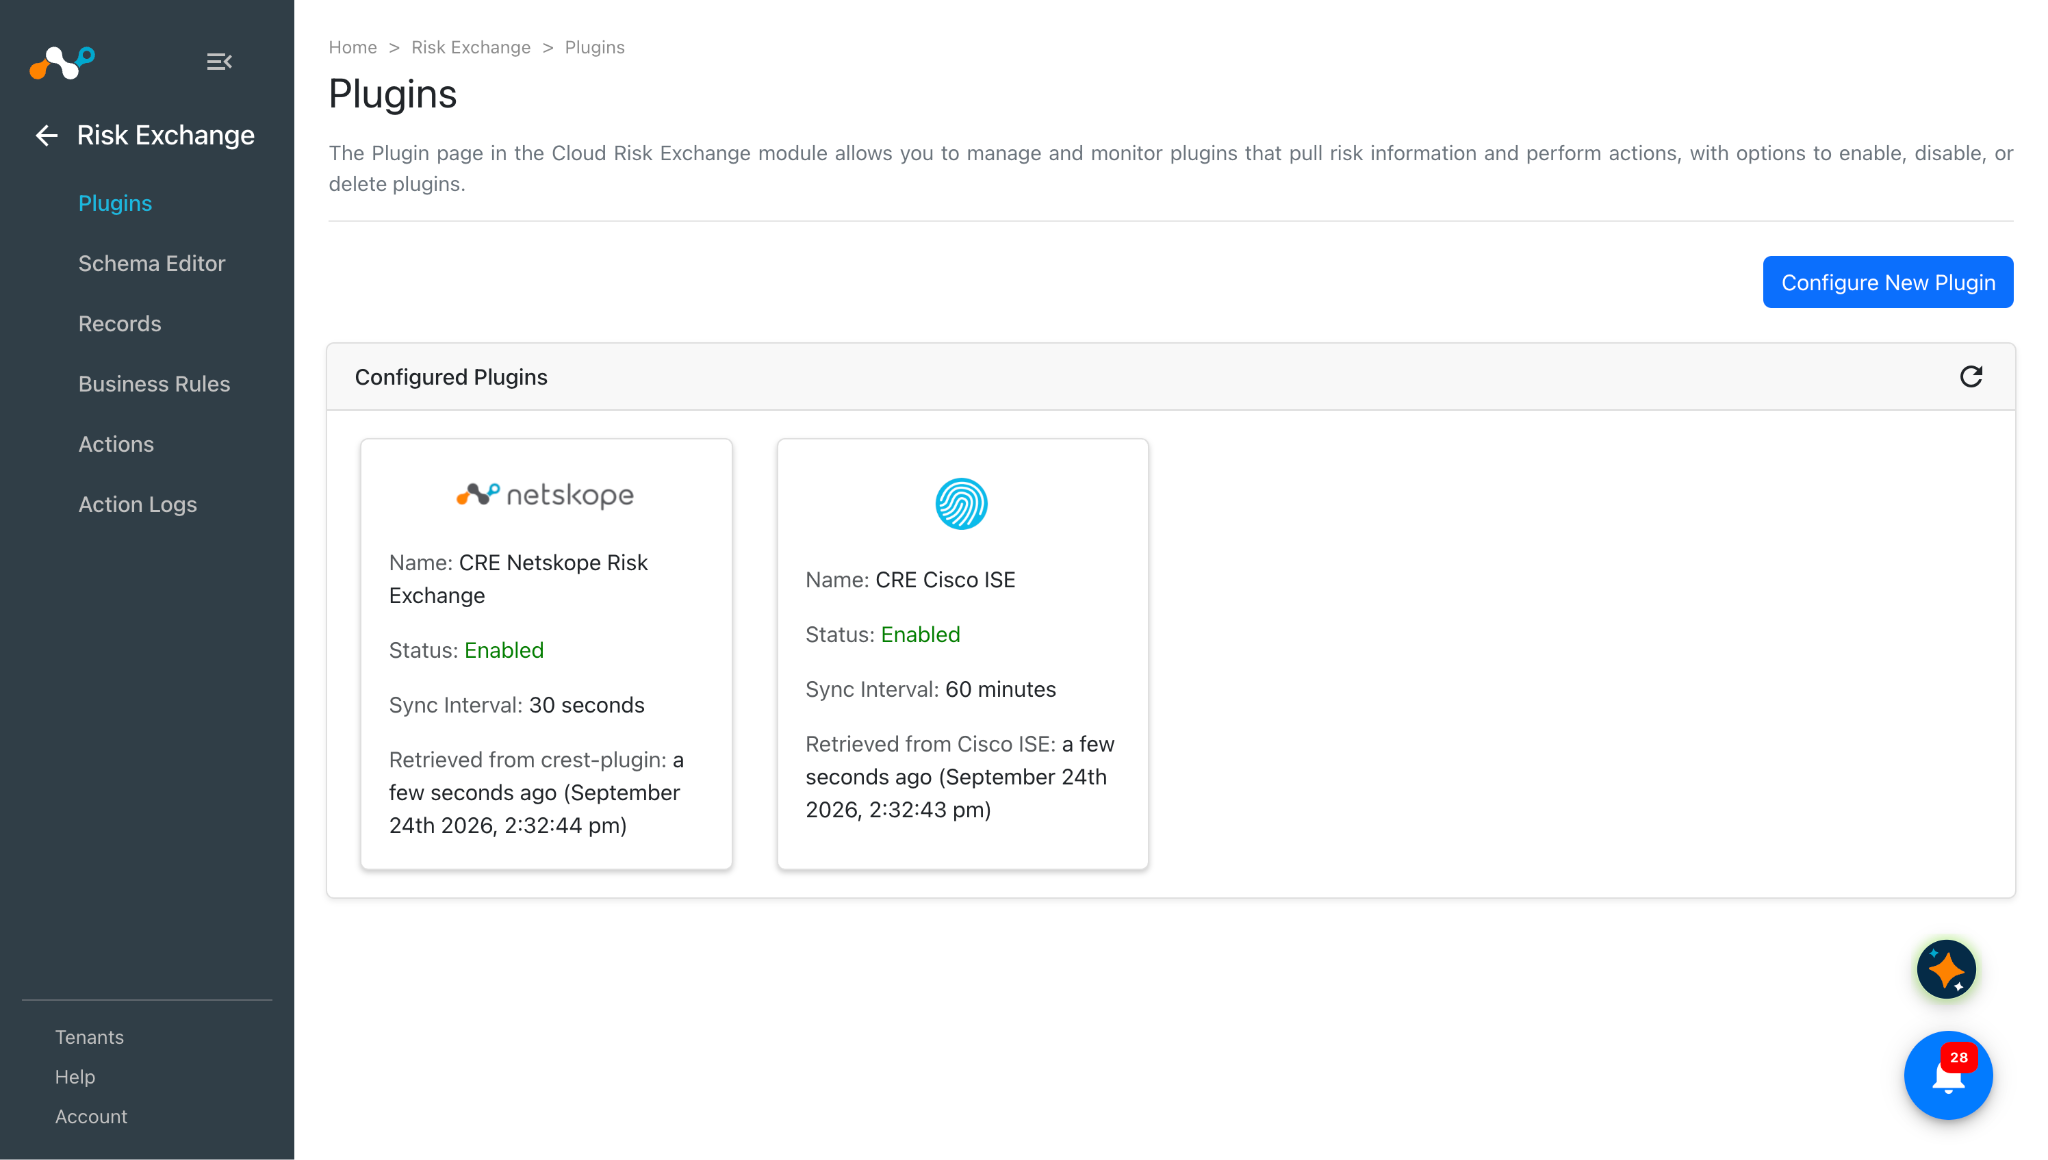
Approve the pxGrid Clients for the Configured Plugin
-
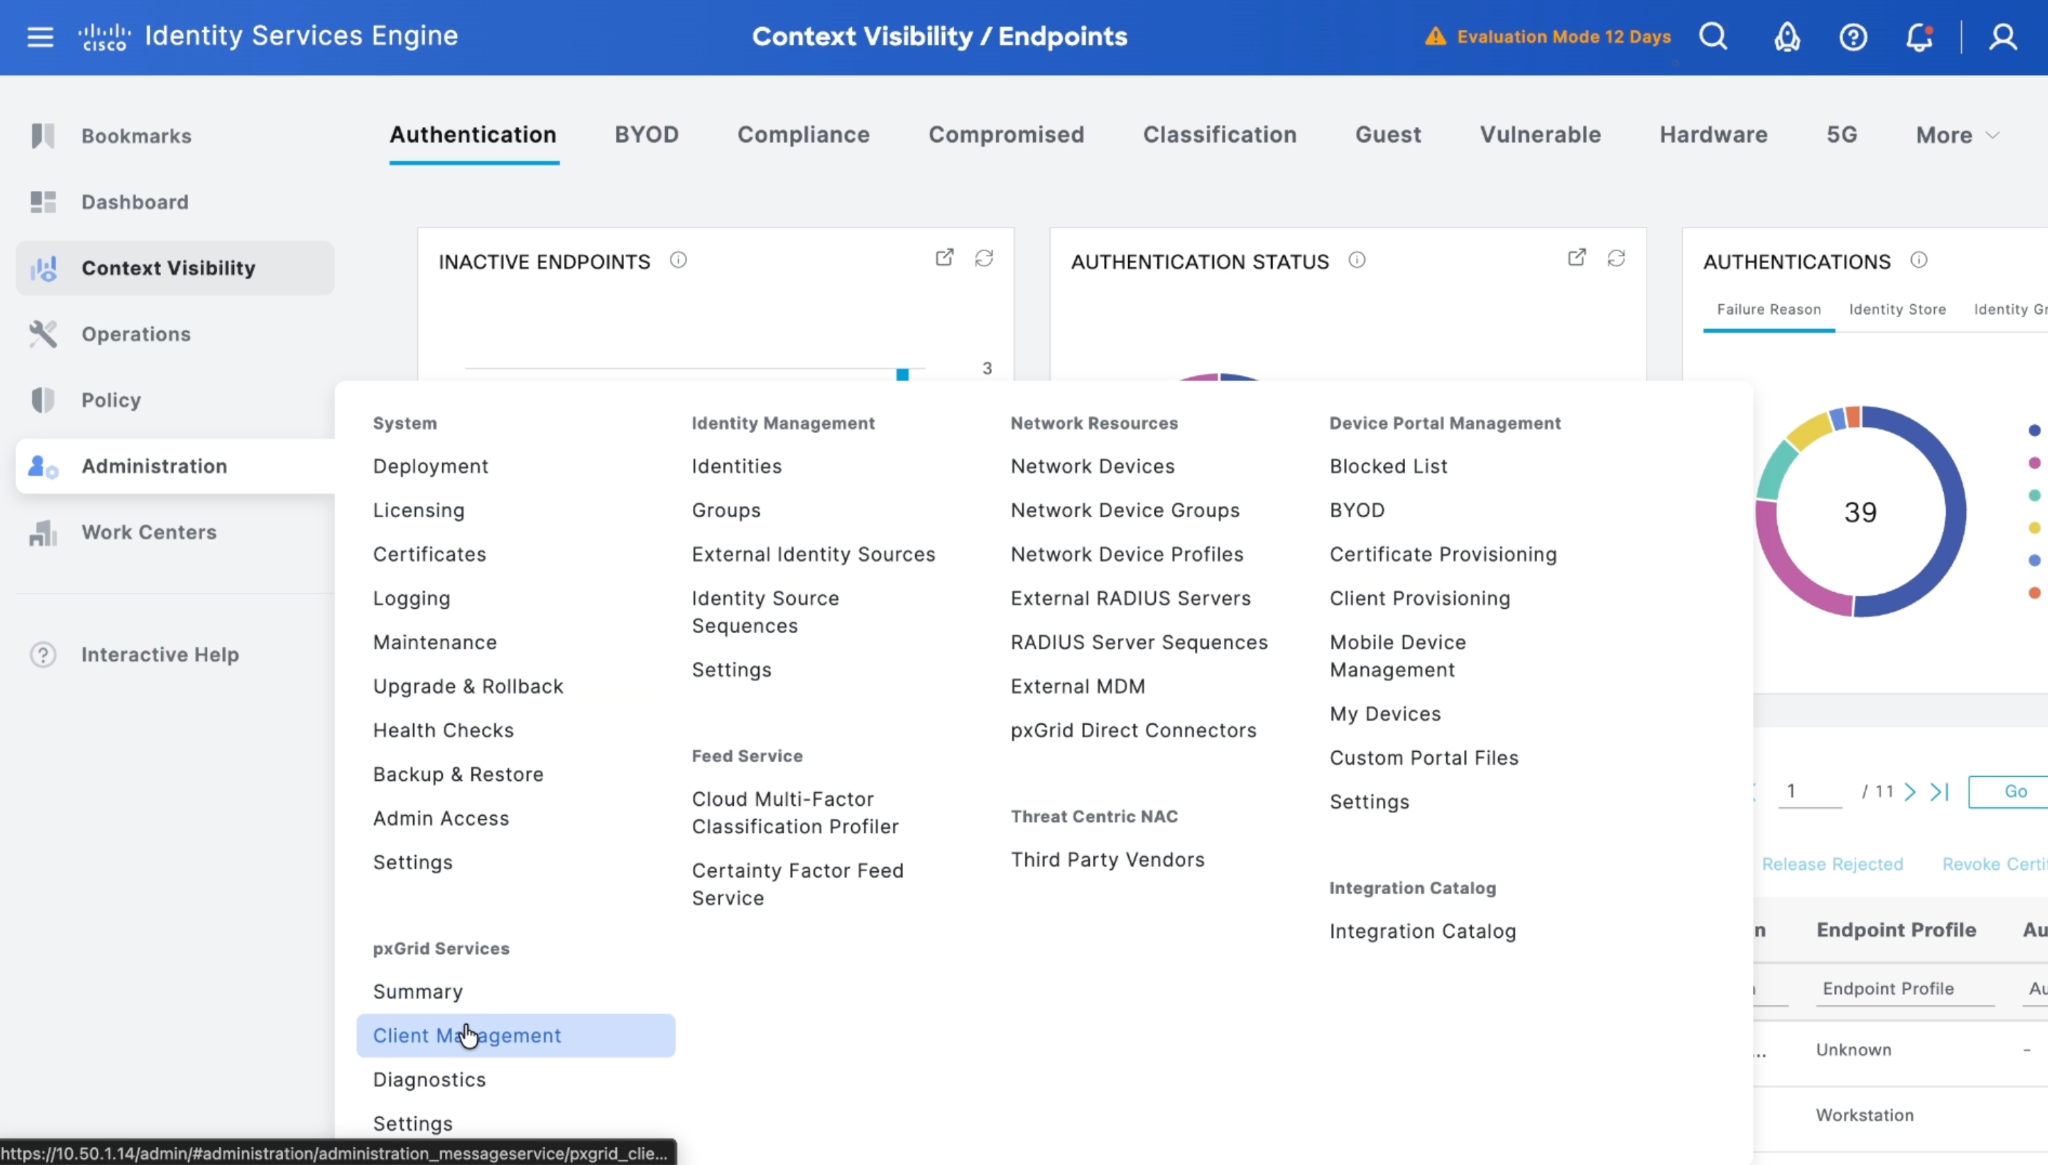
In Cisco ISE, go to the Administration > pxGrid Services > Client Management.
-
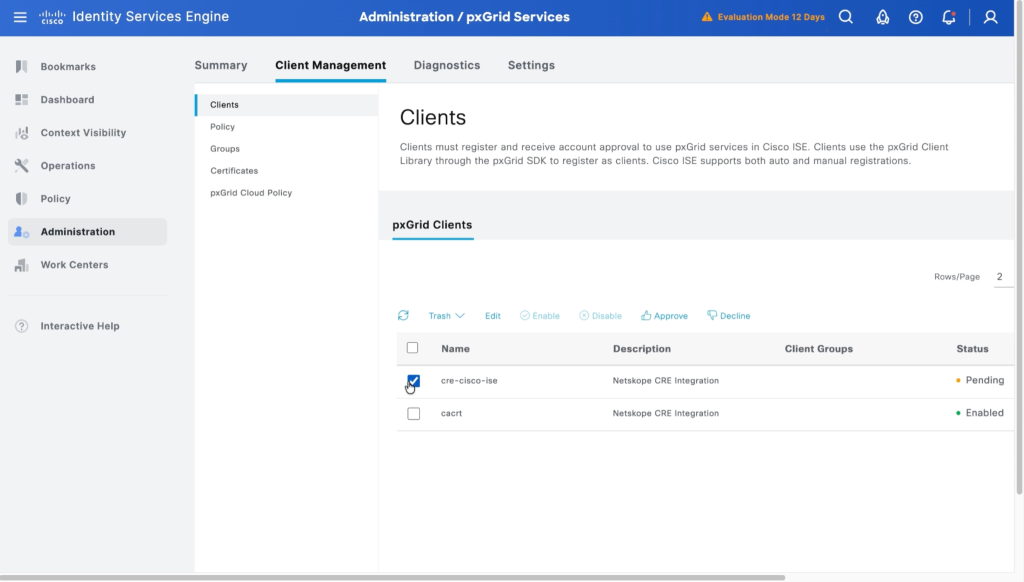
Here you will be able to see the already created pxGrid client for the configured plugin in pending state.
-
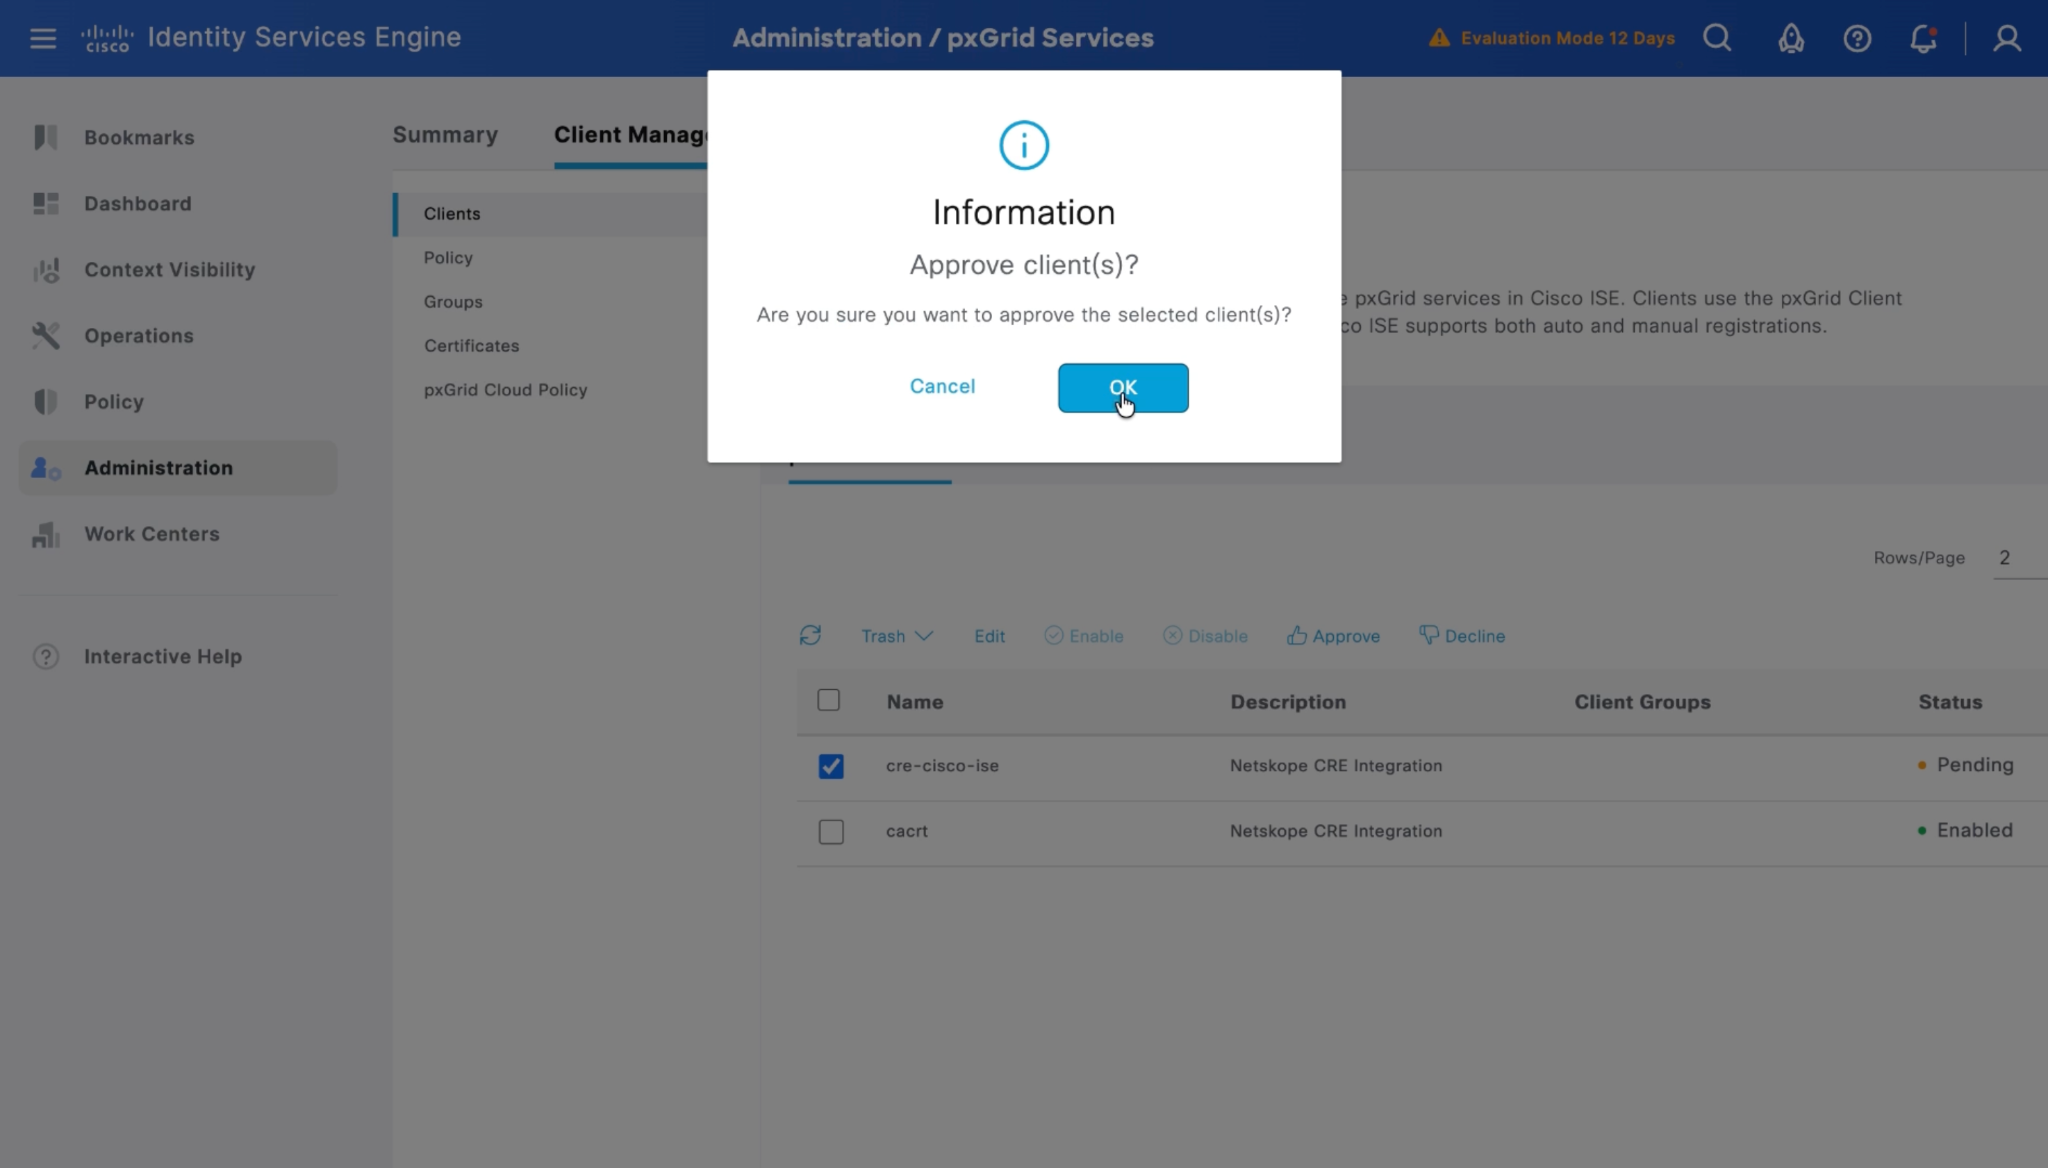
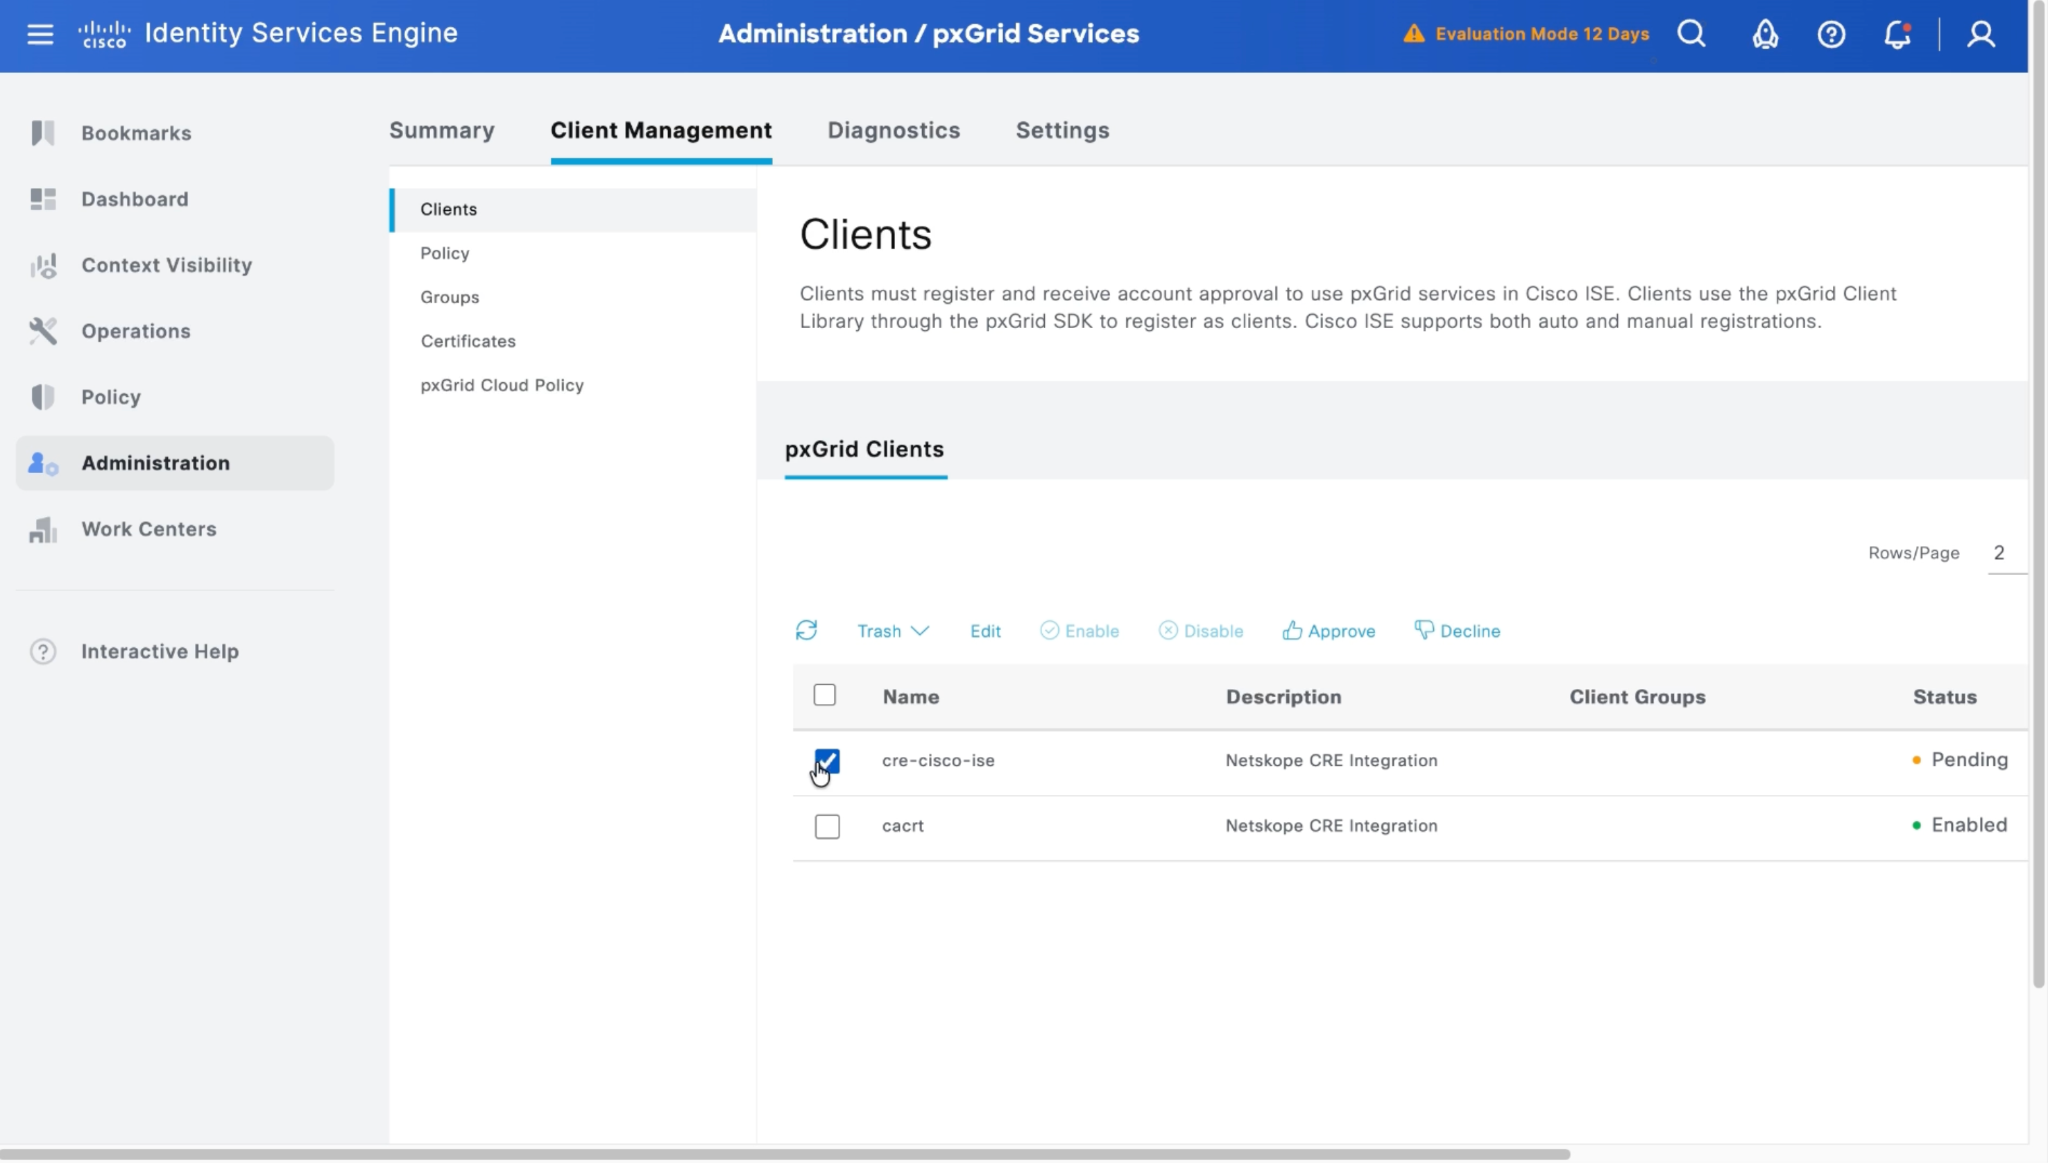
Select that pxGrid client and click Approve to approve it.
Configure a Risk Exchange Business Rule for Cisco ISE
-
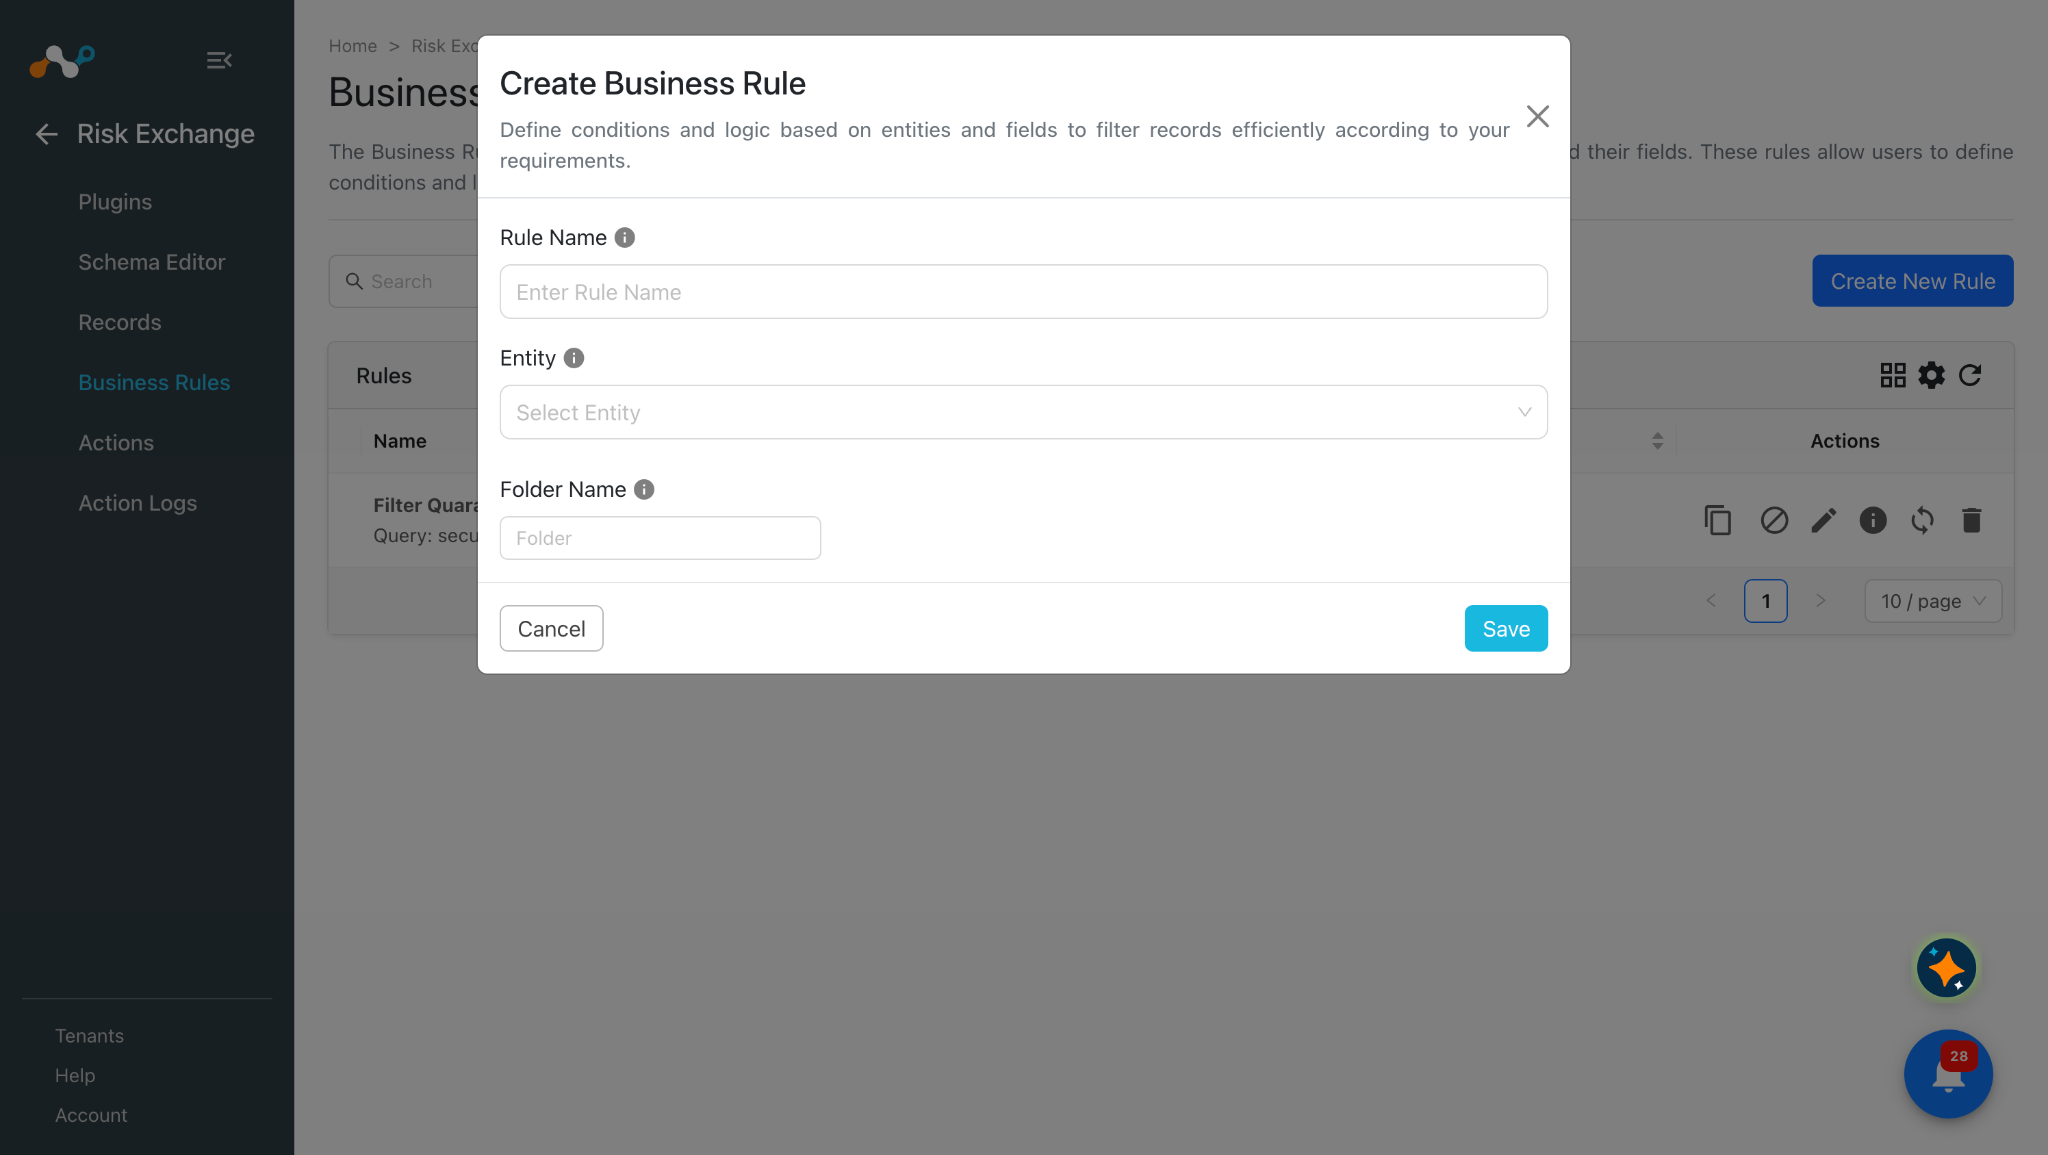
In Risk Exchange, go to Business Rules.
-
Click Create New Rule in the top right corner.
-
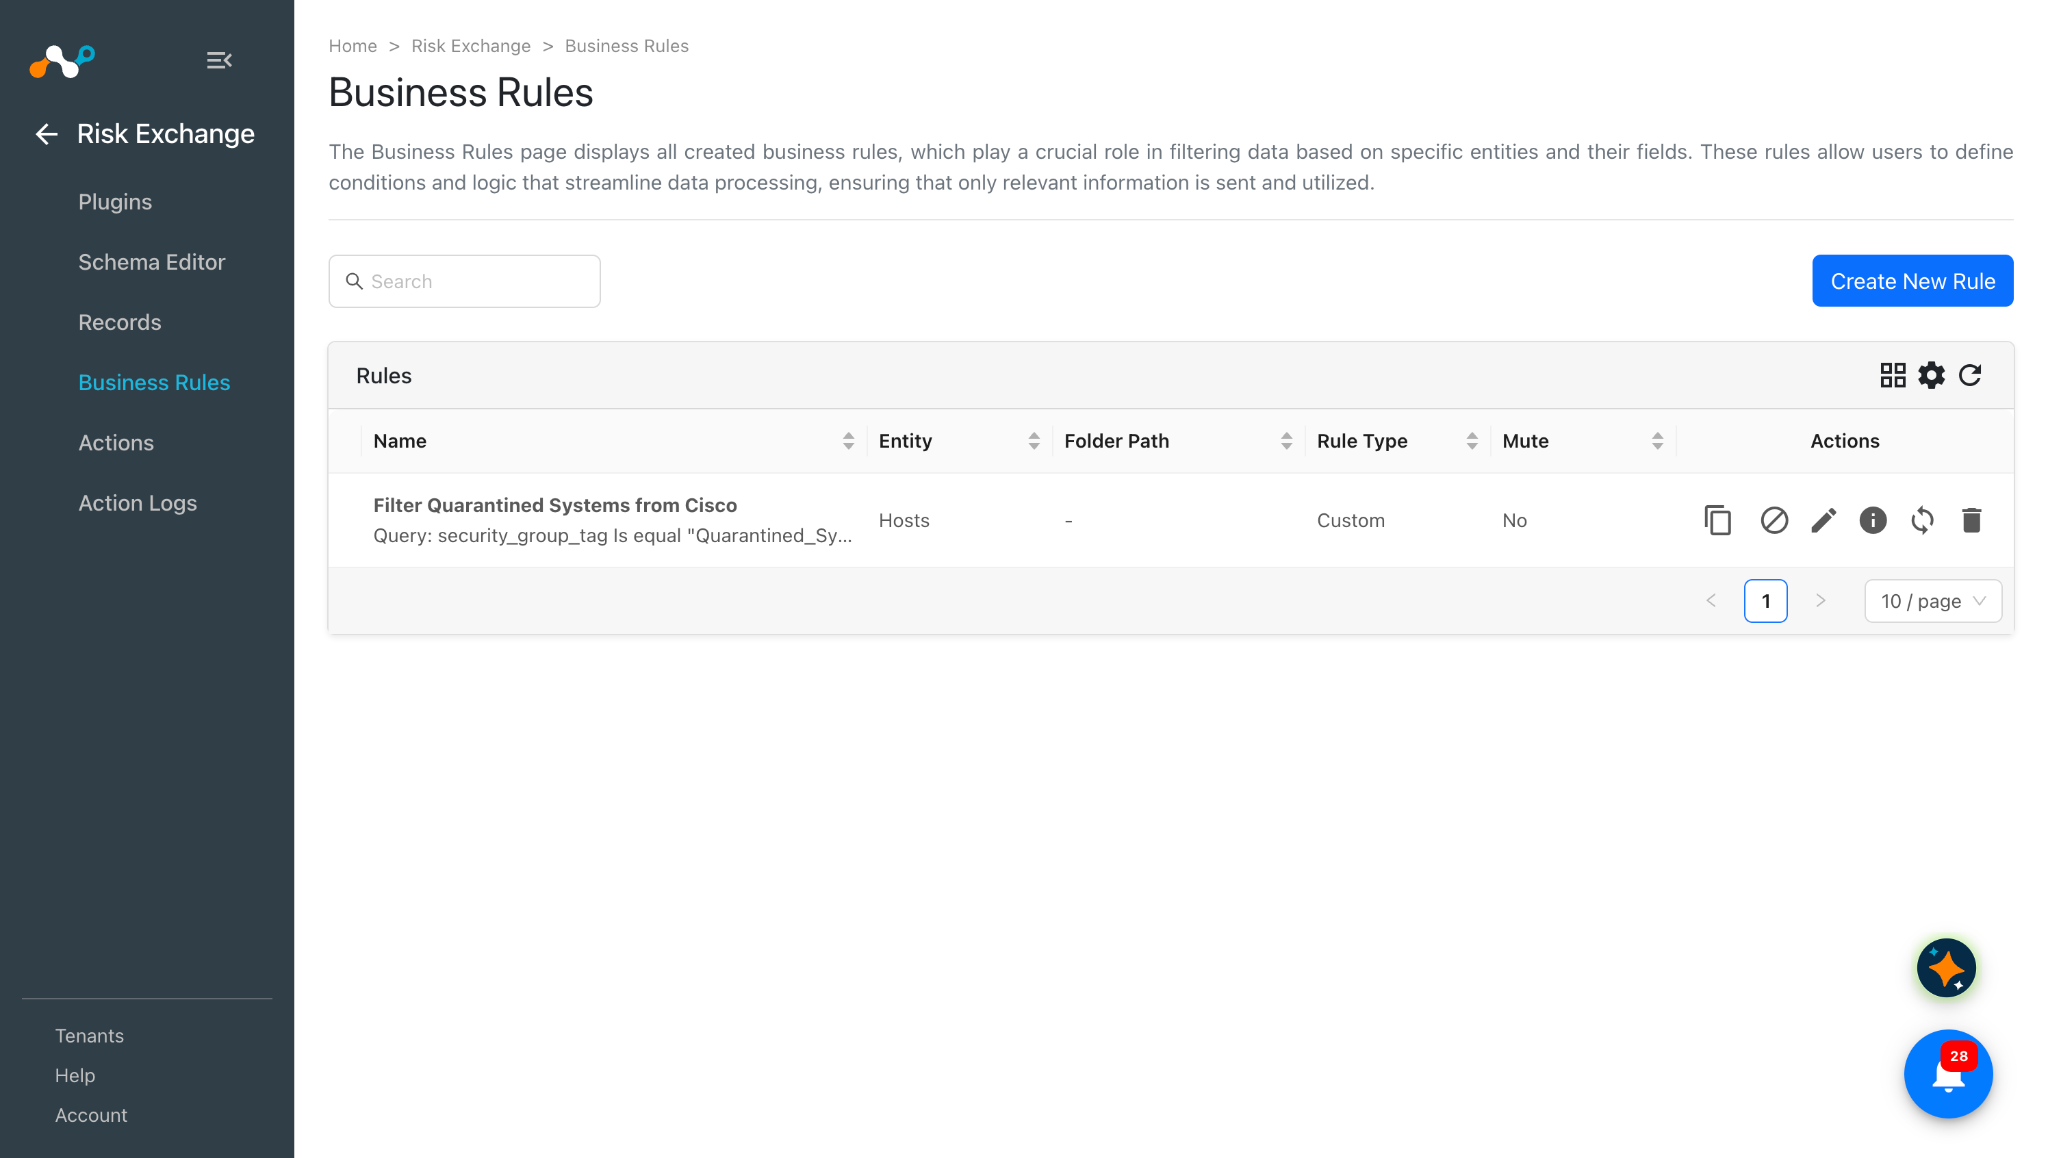
Enter a Rule Name. Select the Entity for the Fields configured for the Cisco ISE plugin, and configure the query based on your requirements.
-
Here is an example filters the data fetched from the plugin. Click Save.
Configure Risk Exchange Actions for Cisco ISE
The Cisco ISE plugin supports the following action type:
- No Action: No action will be performed for this action. You can generate UBA alerts in Ticket Orchestrator by using this action, and enabling the Generate Alerts toggle.
No Action
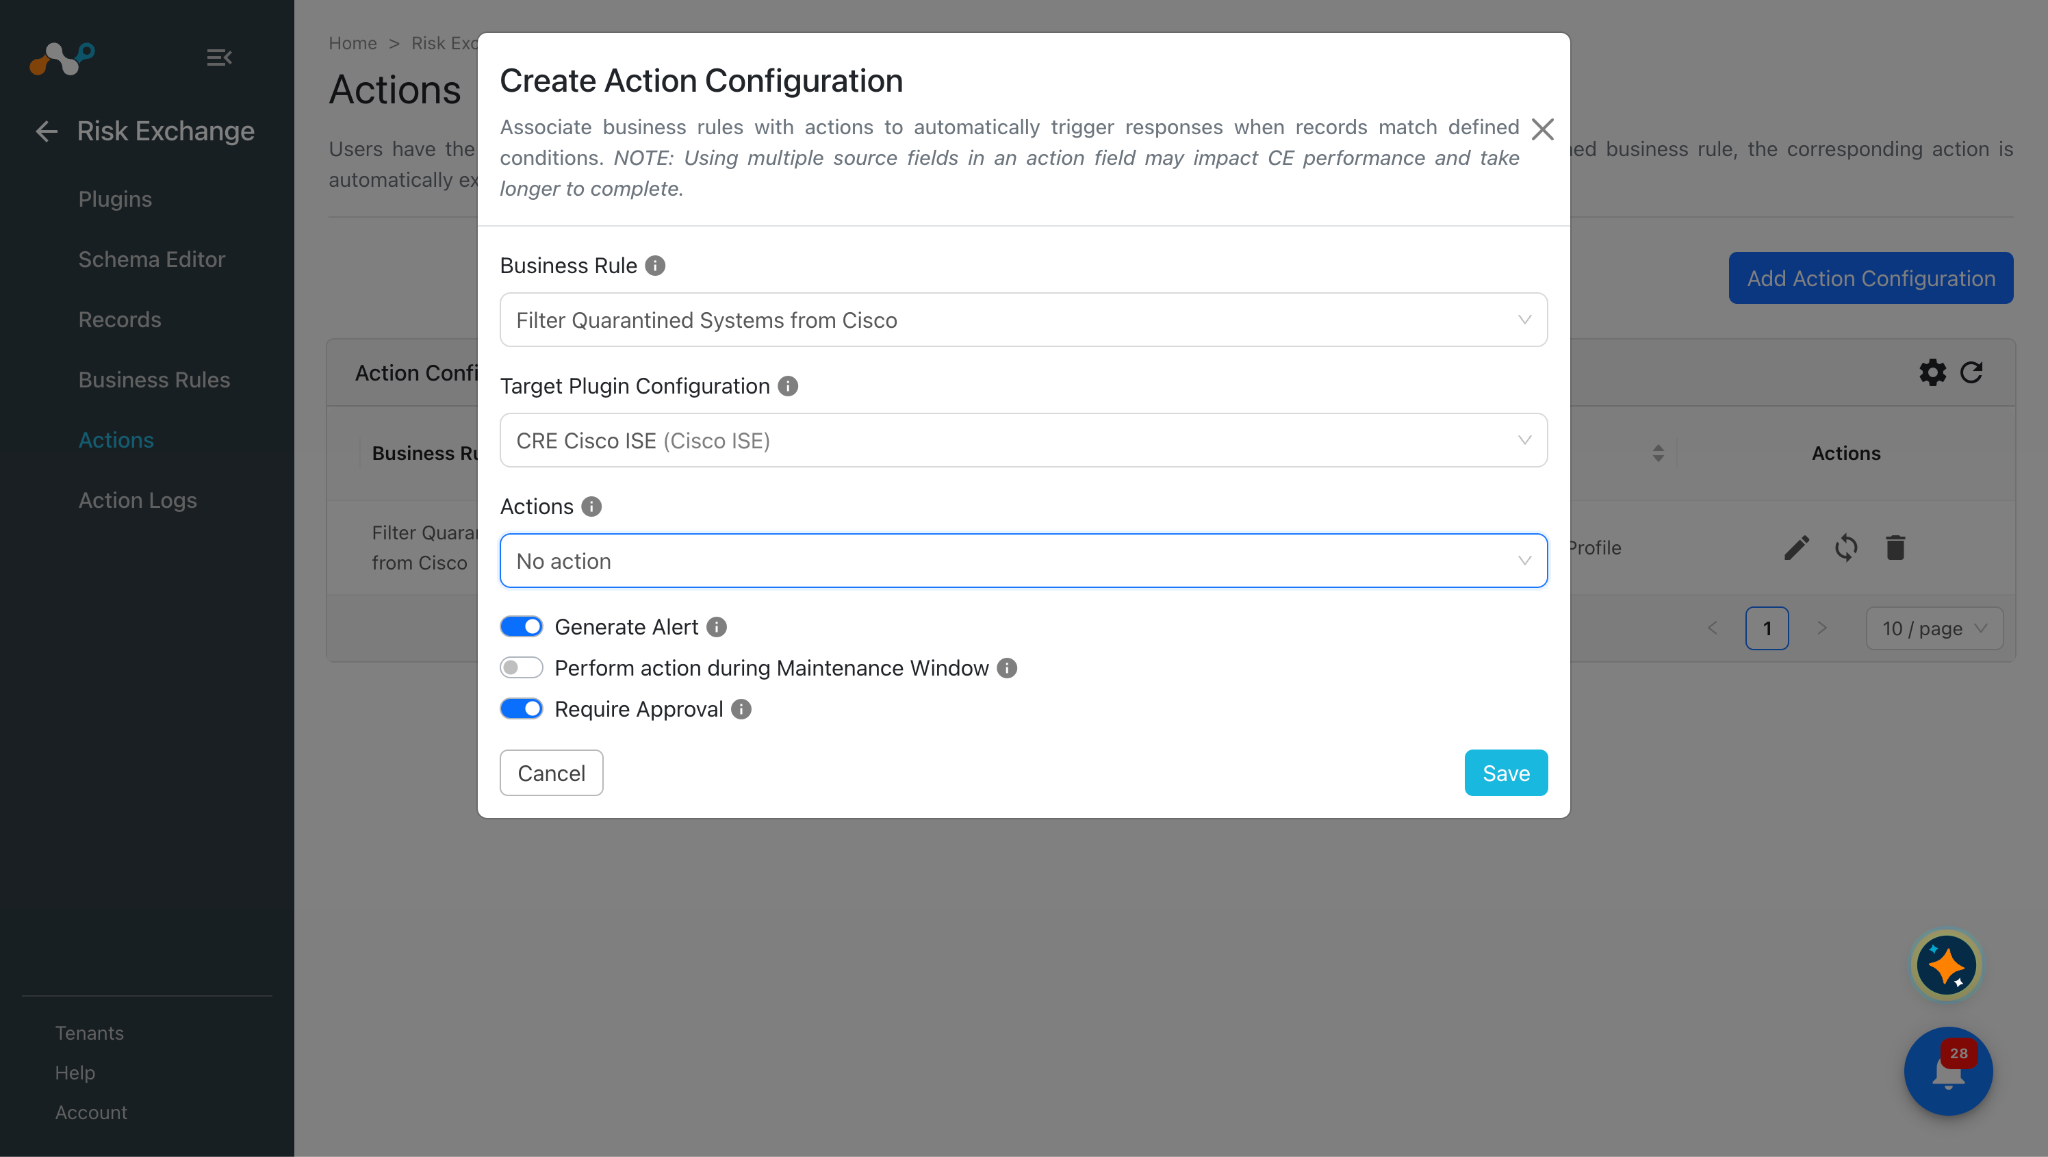
- In Risk Exchange, go to Actions and click Add Action Configuration.
- Select the required Business Rule, Configuration, and Action from their respective dropdowns.
- Enable the Require Approval toggle if Approval is needed before performing action on the pulled records.
- Click Save.
Validate the Cisco ISE Plugin
Validate in Cloud Exchange
To validate the pulling:
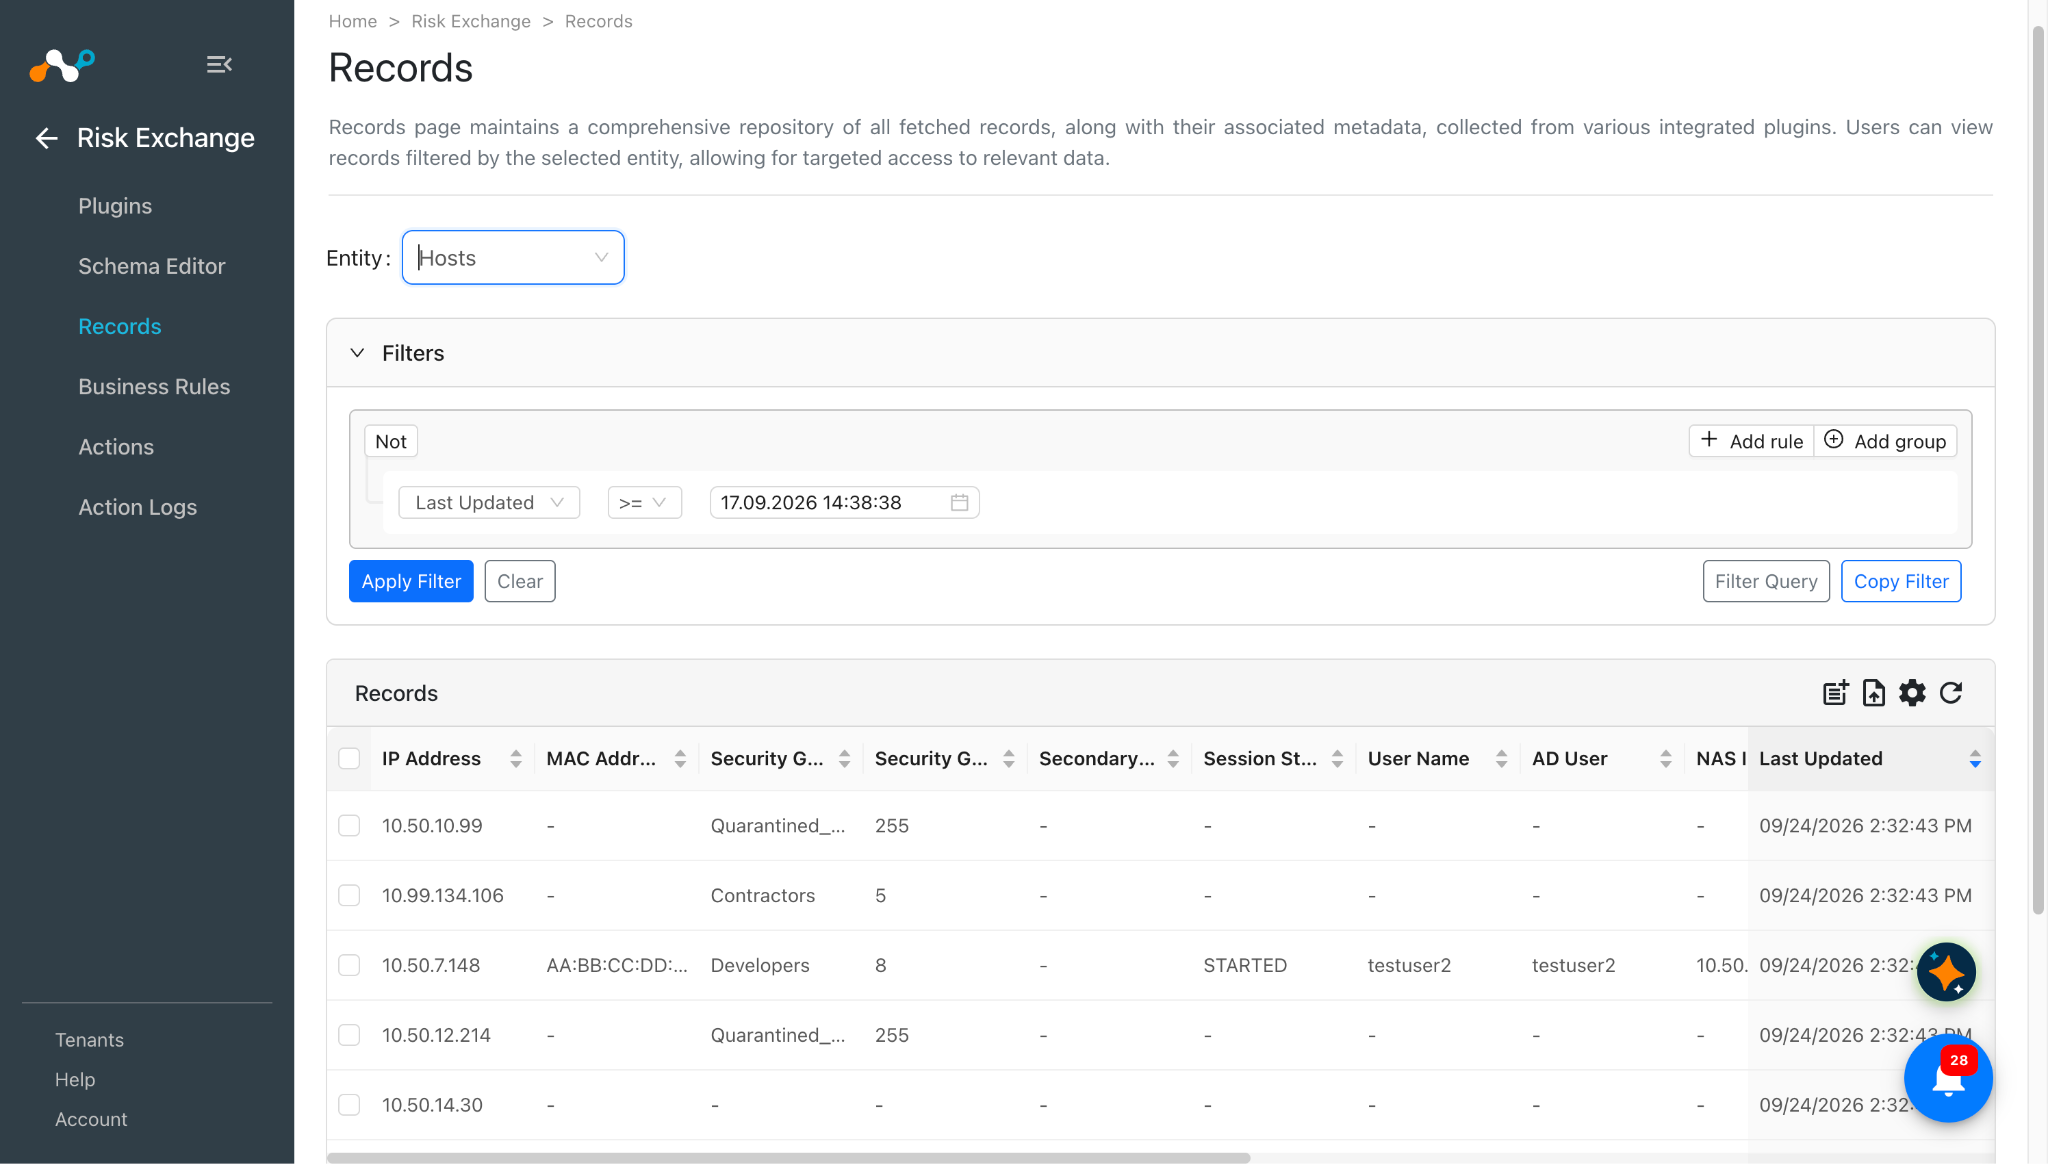
In Risk Exchange, go to Records. Select the Entity that was selected while configuring the field mapping to view the pulled records.
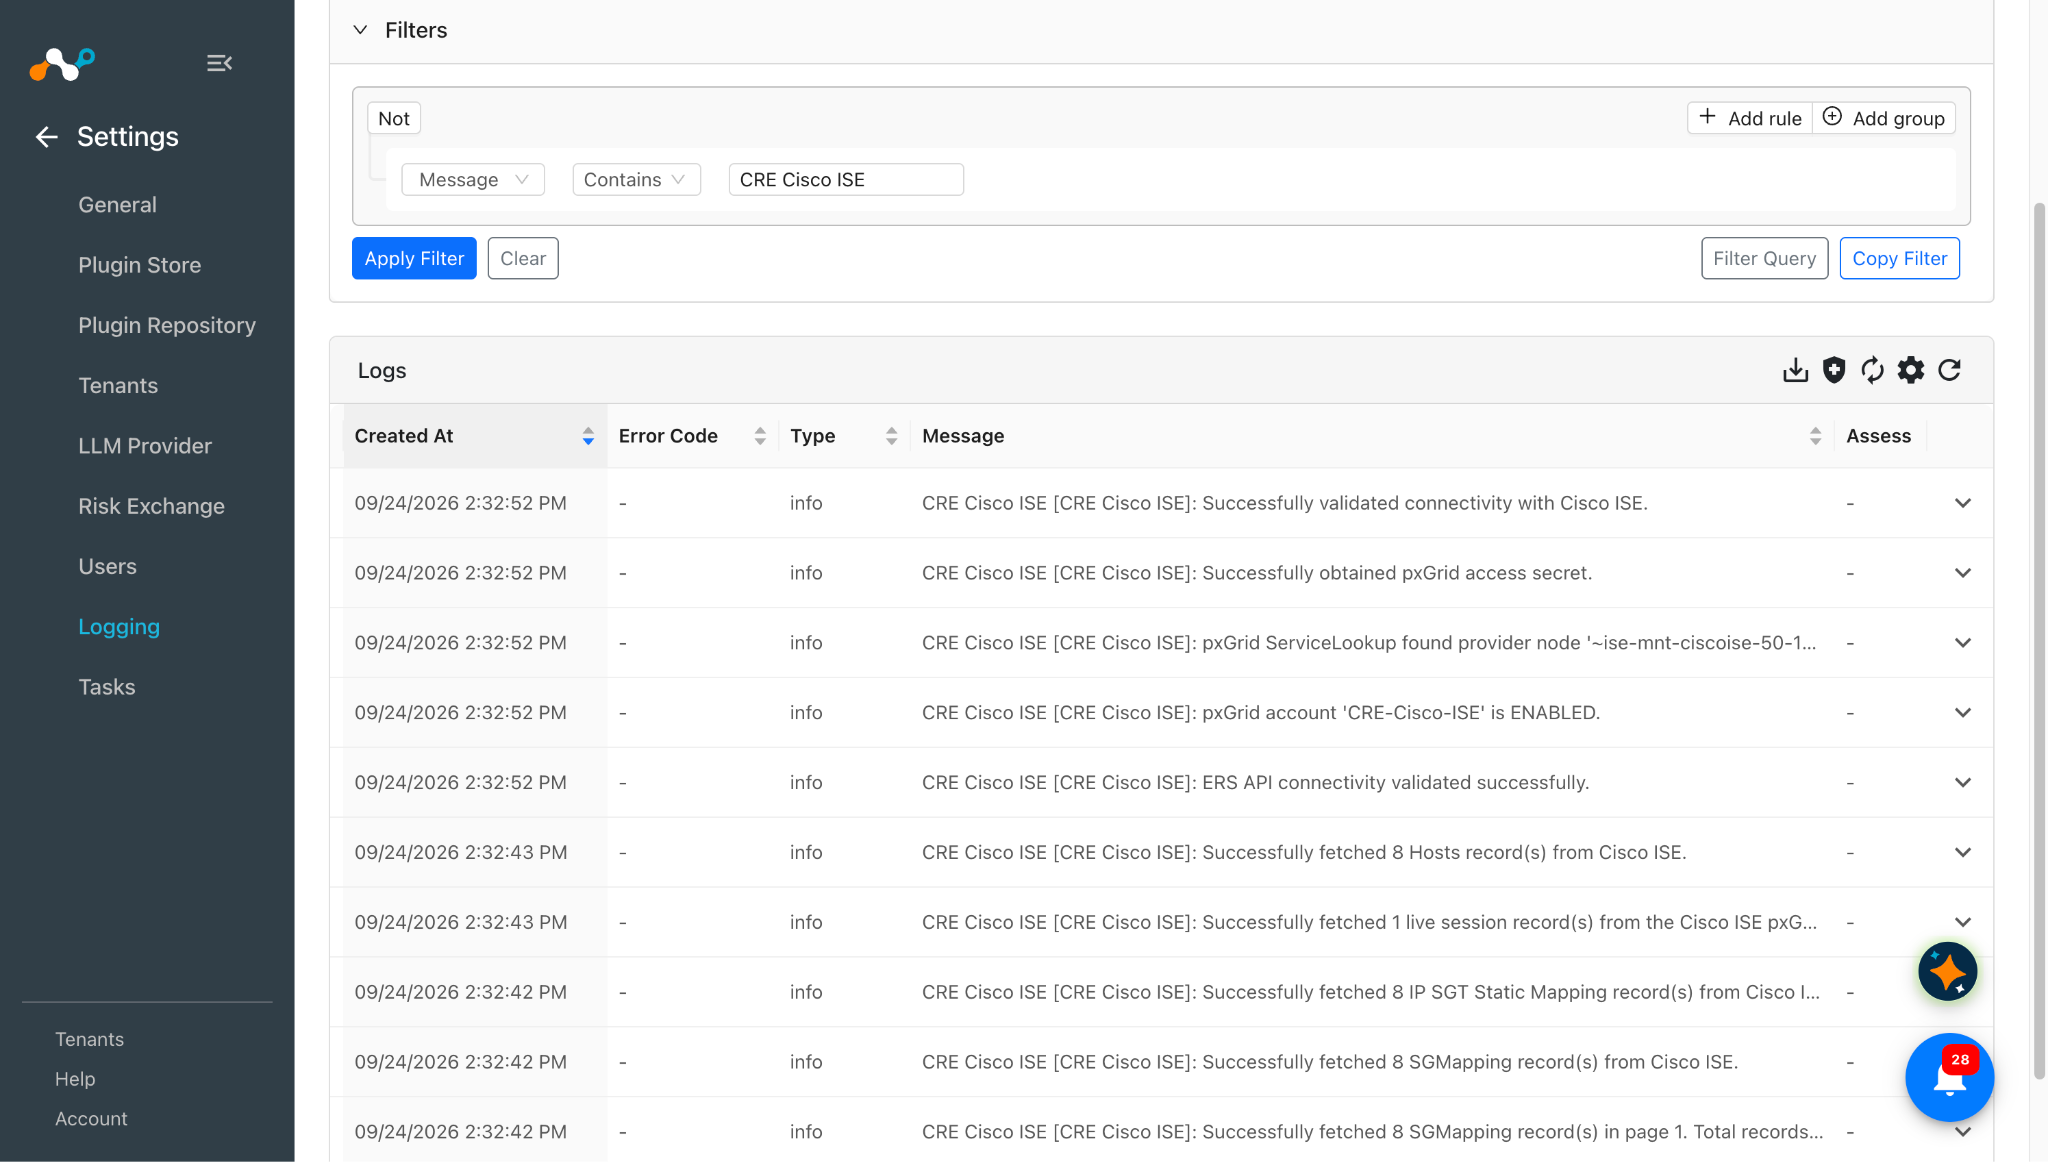
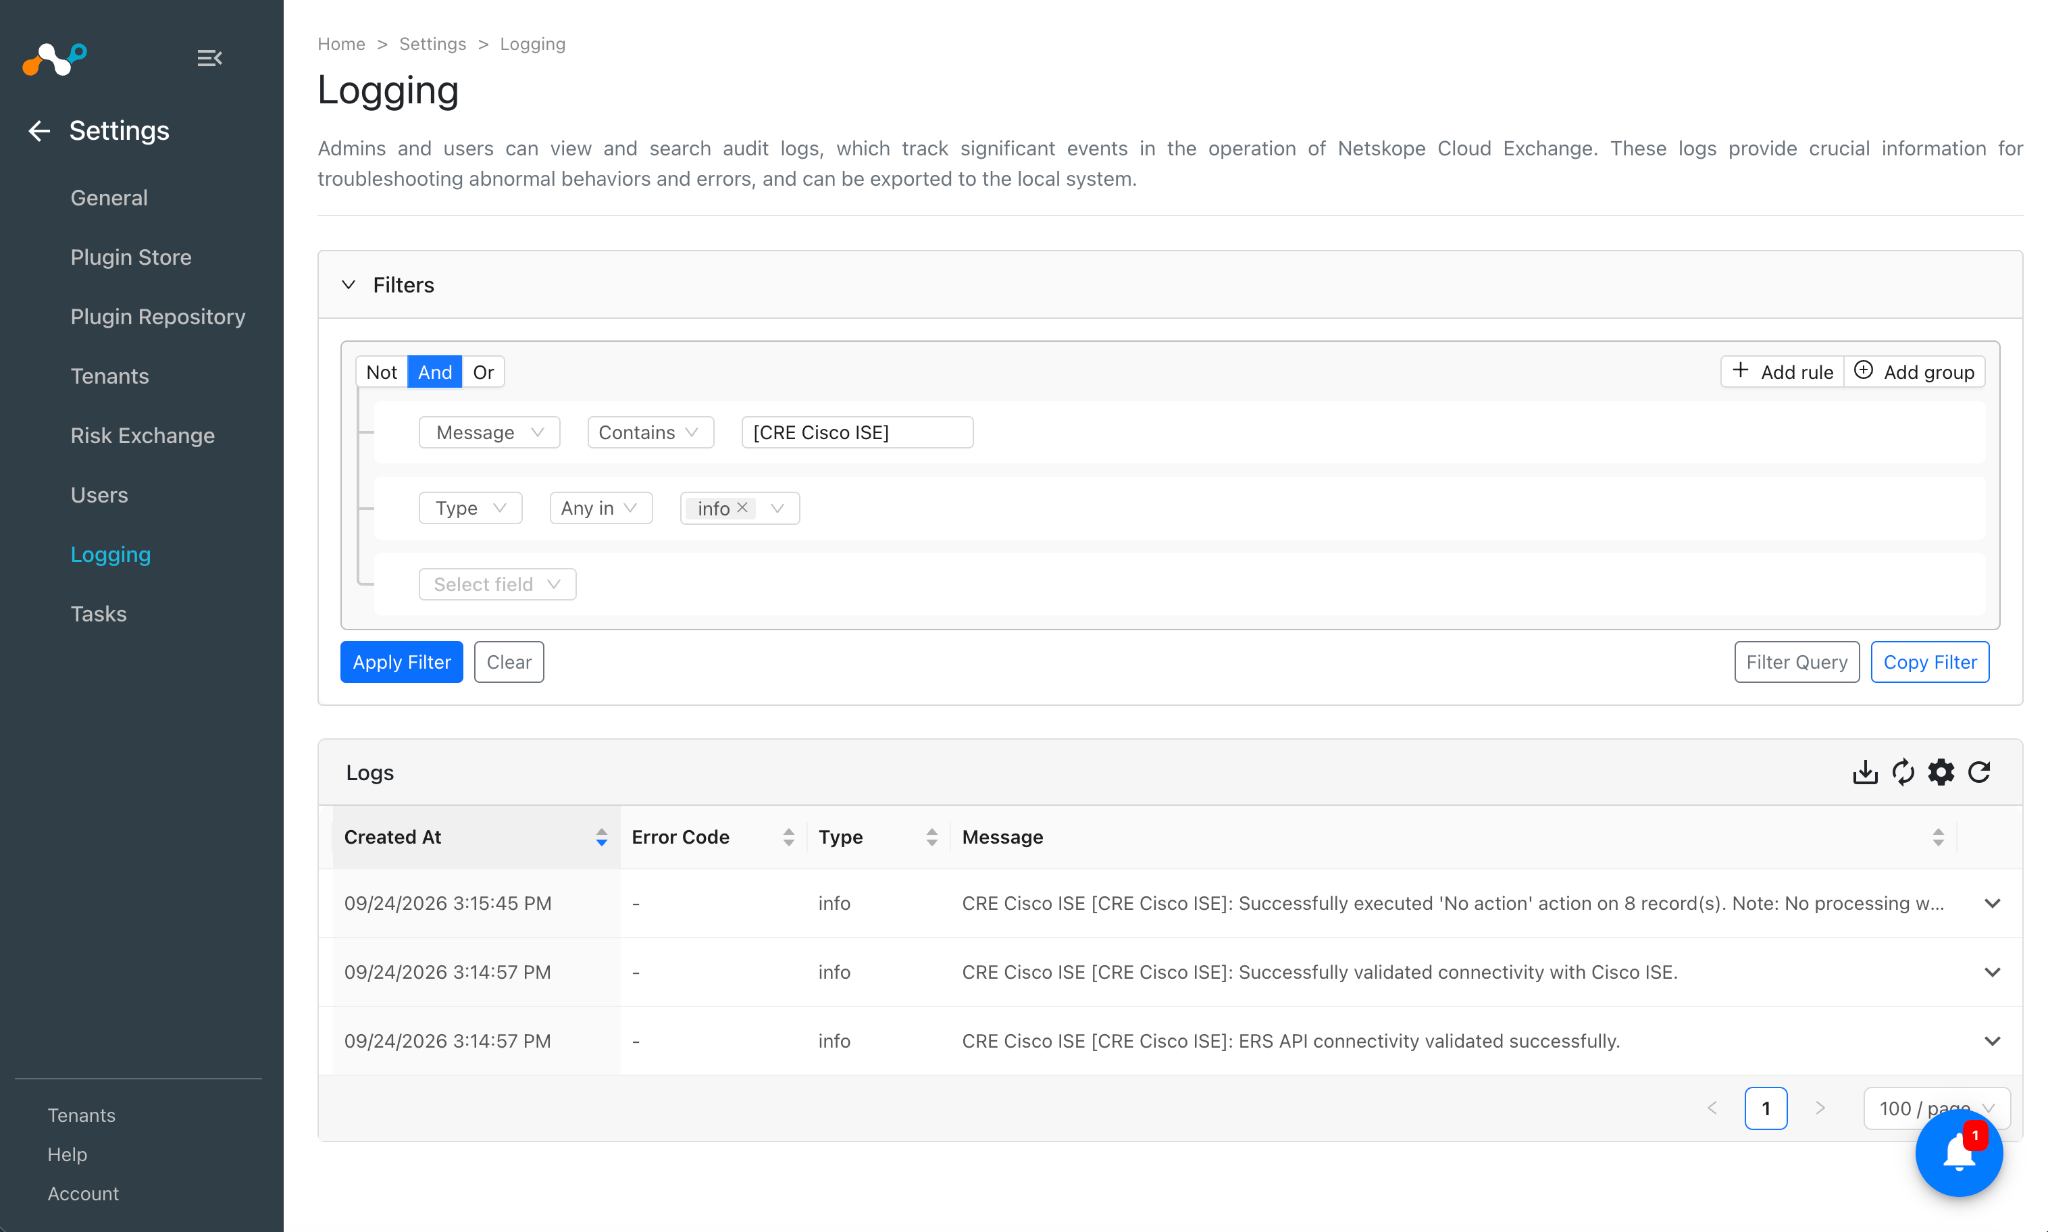
To verify the logs related to pulled records. Go to the Settings > Logging and apply the filter with plugin name or plugin configuration name.
Action Validation
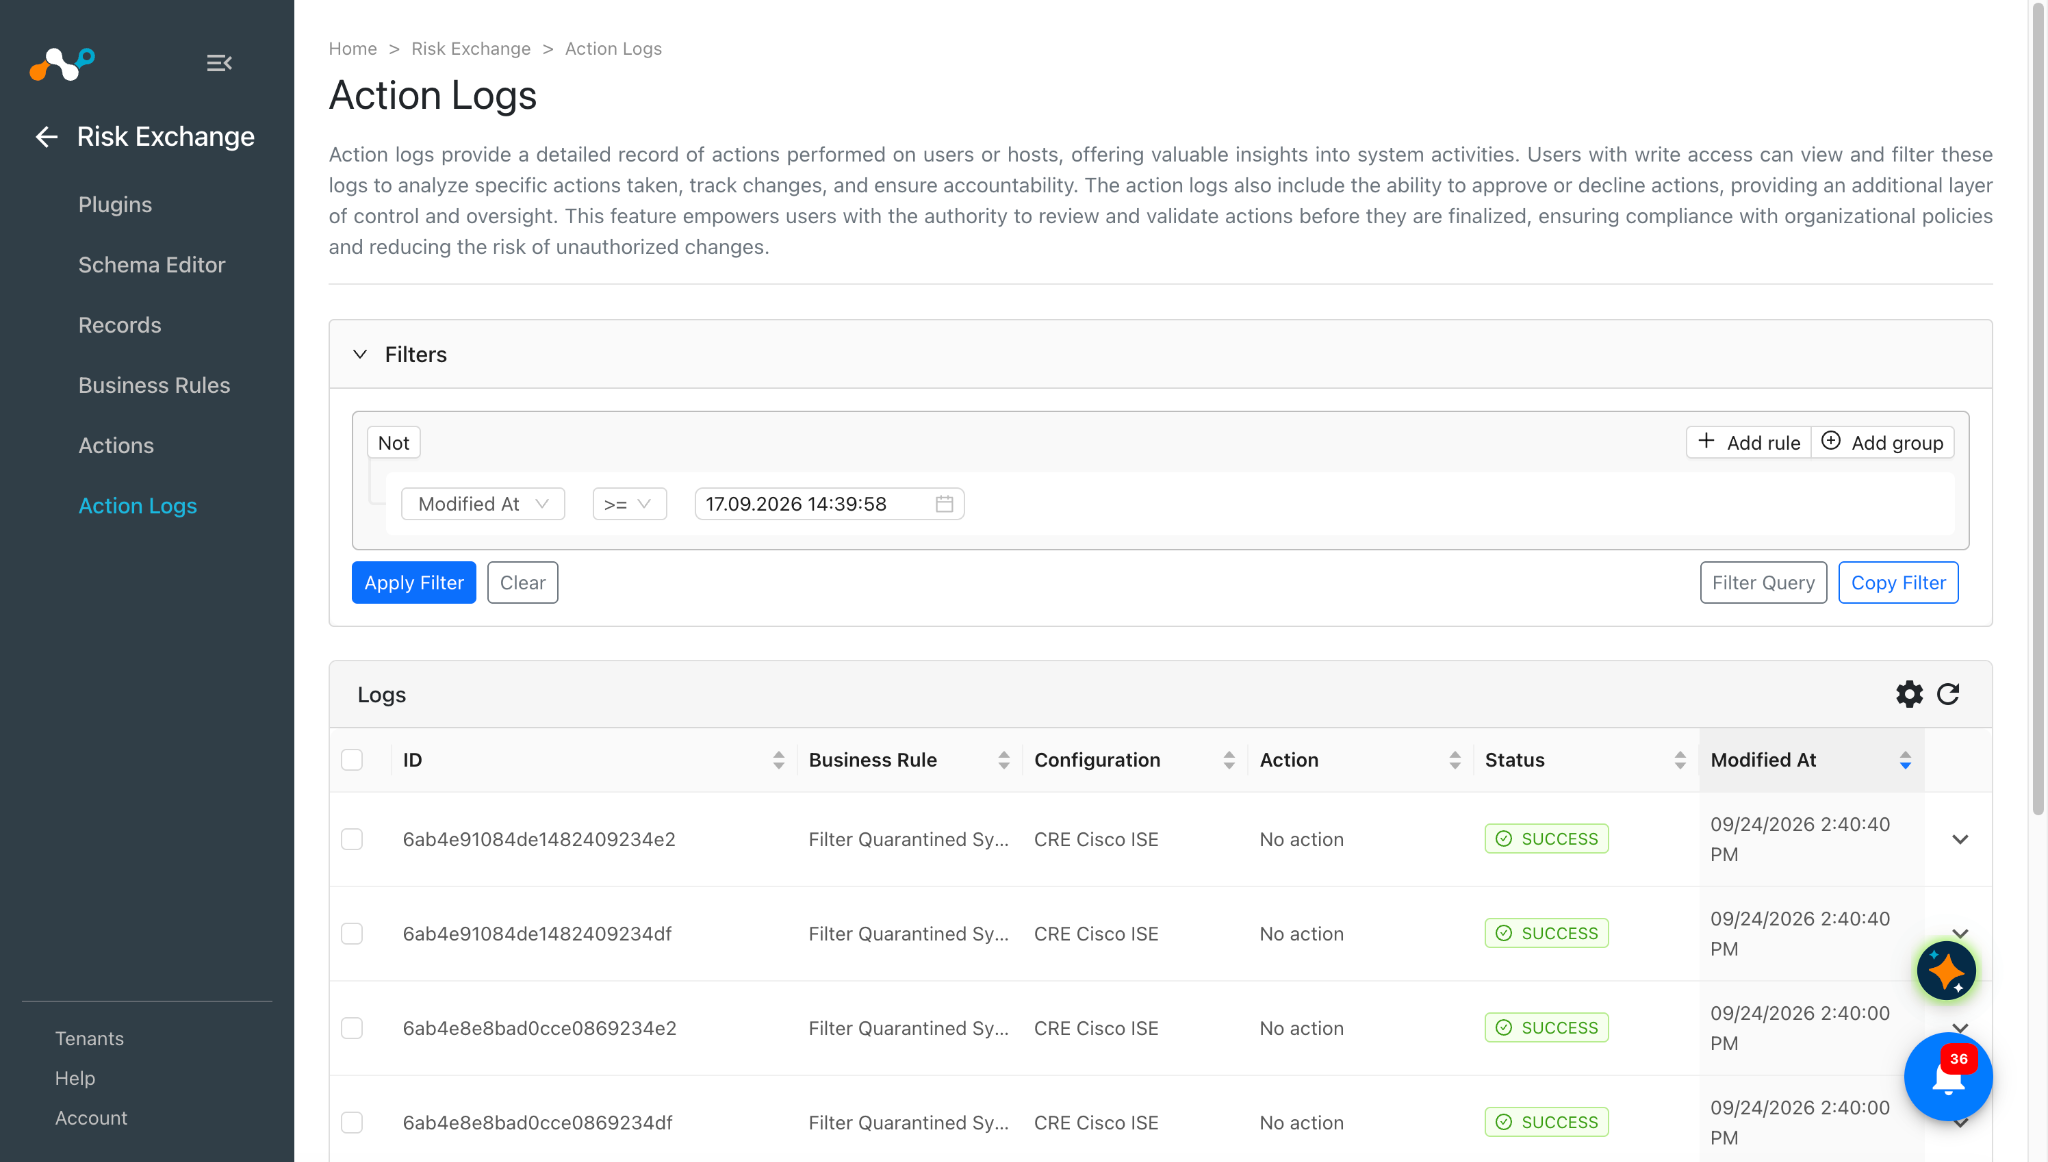
Logs for performed No action:
When a pulled record matches one of the configured business rules, the configured action will be performed on the record. This can be seen at Risk Exchange > Action Logs.
Validate in Cisco ISE
To view the available records on Cisco ISE, log in to your Cisco ISE instance.
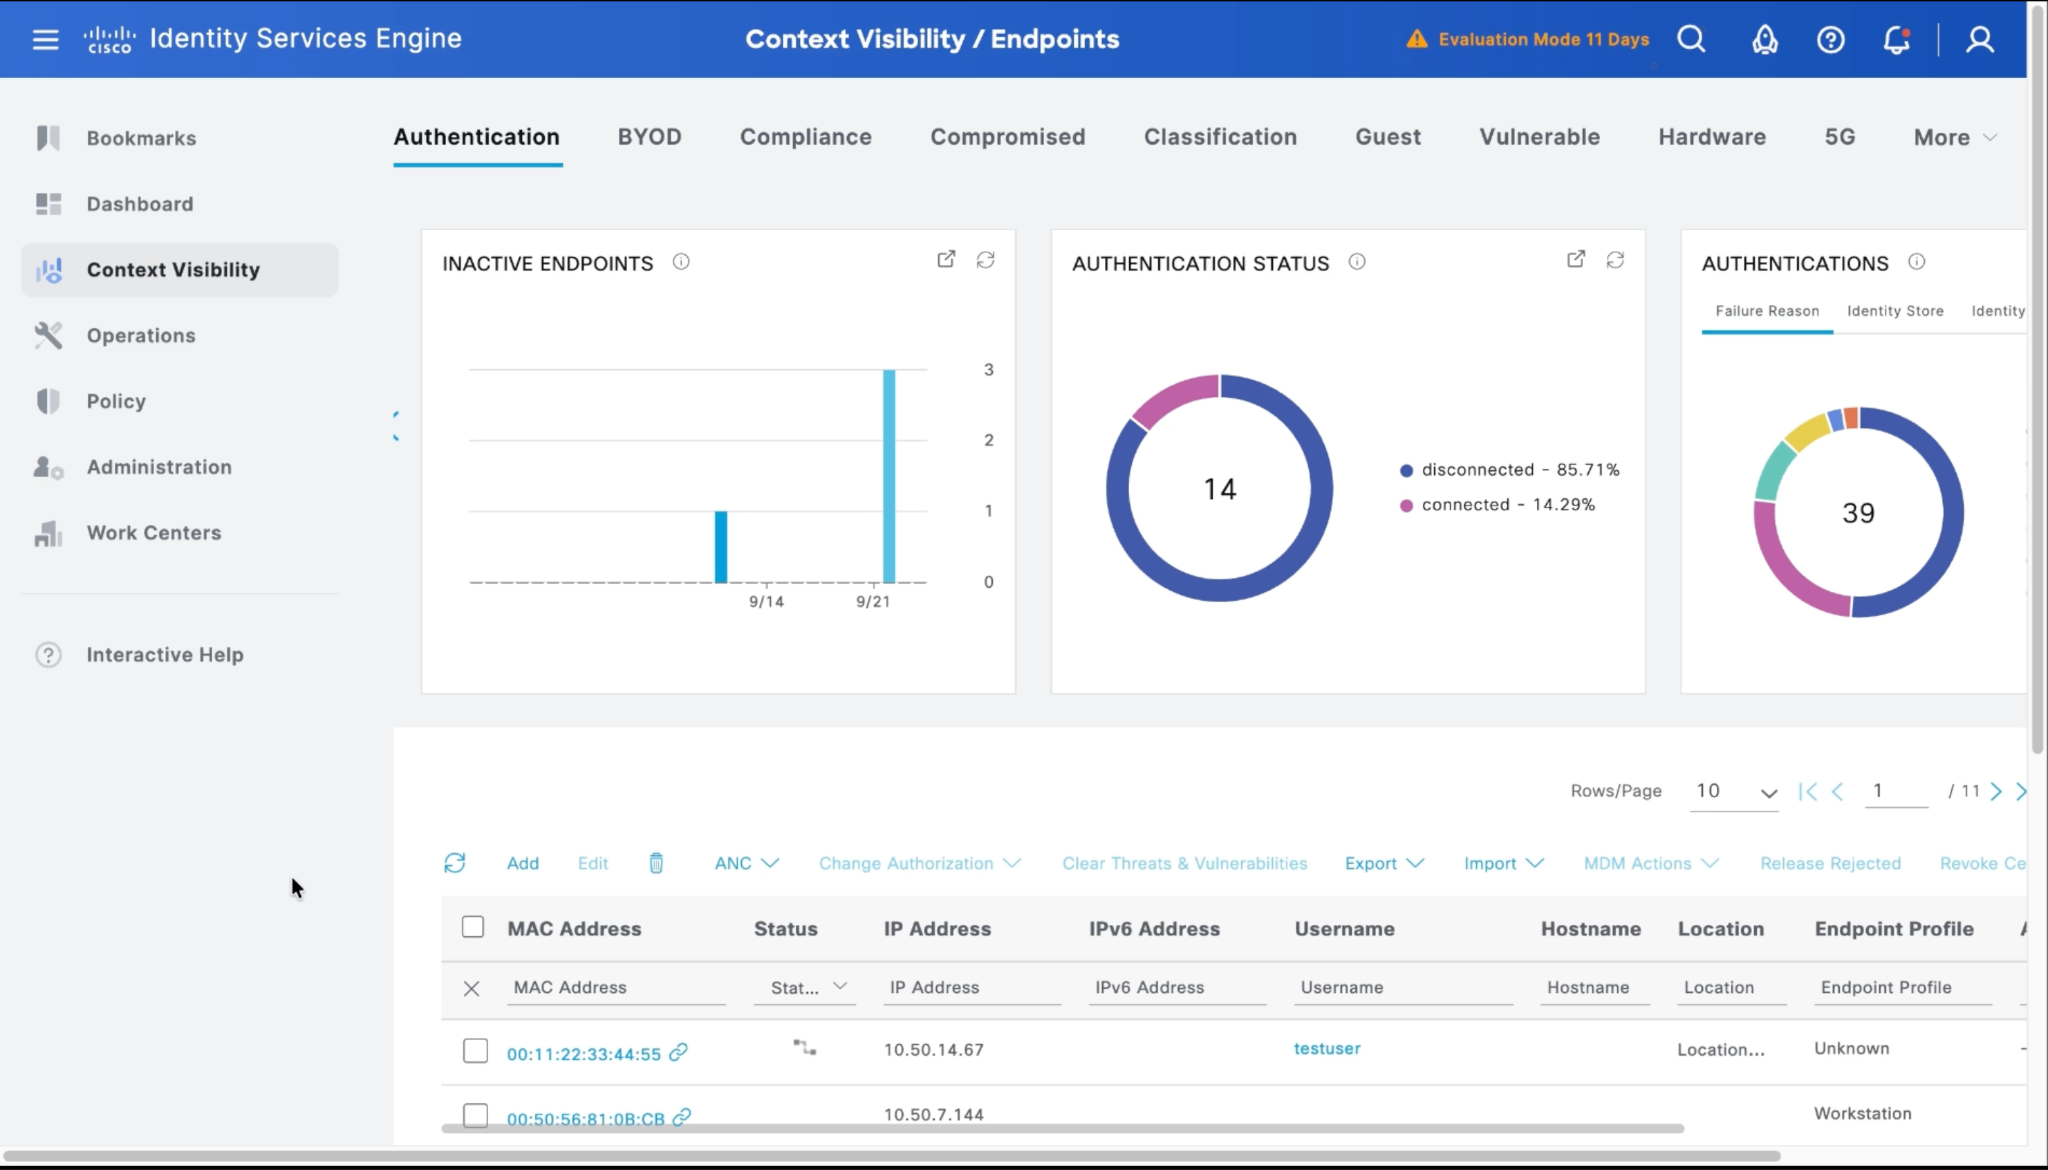
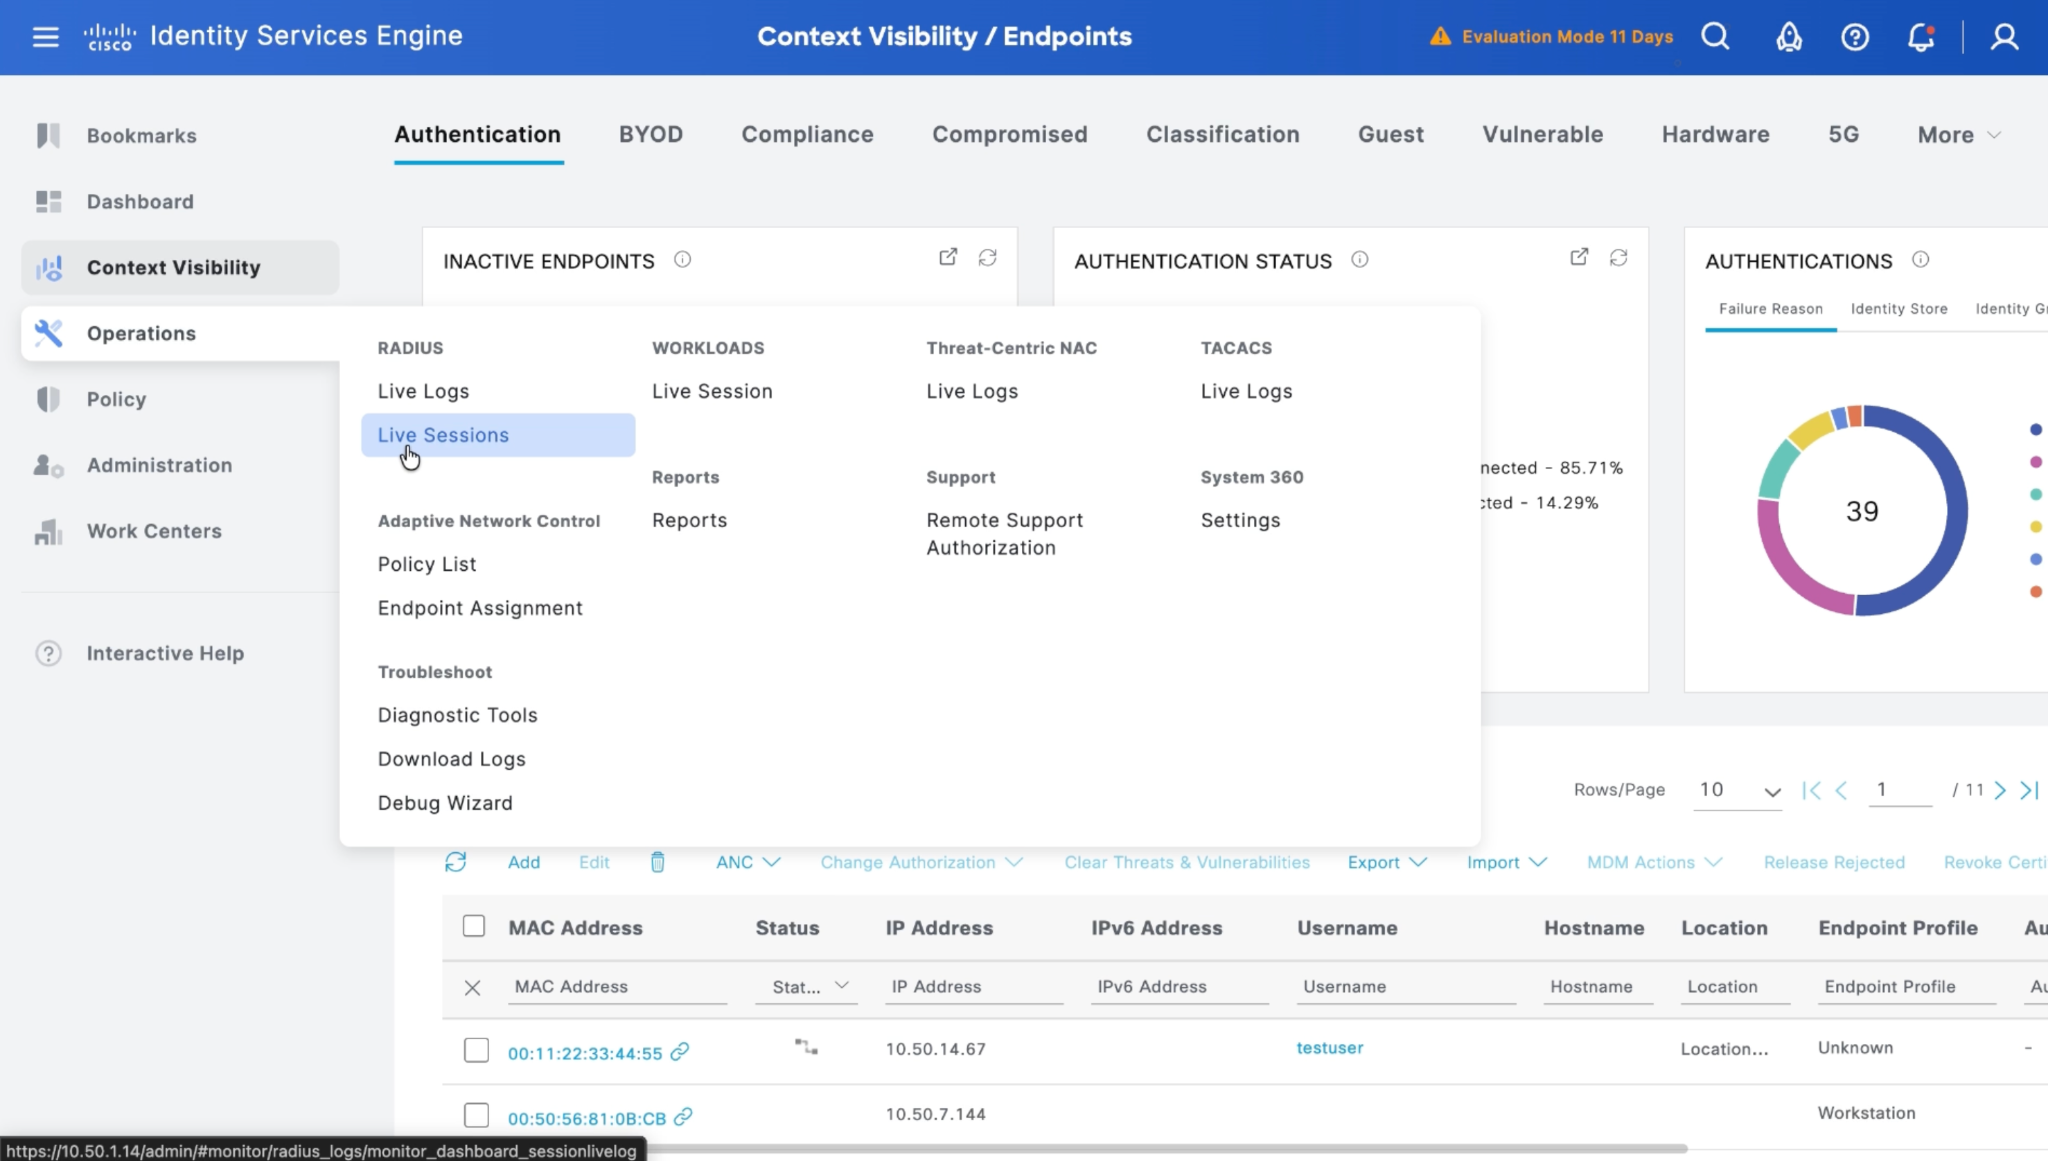
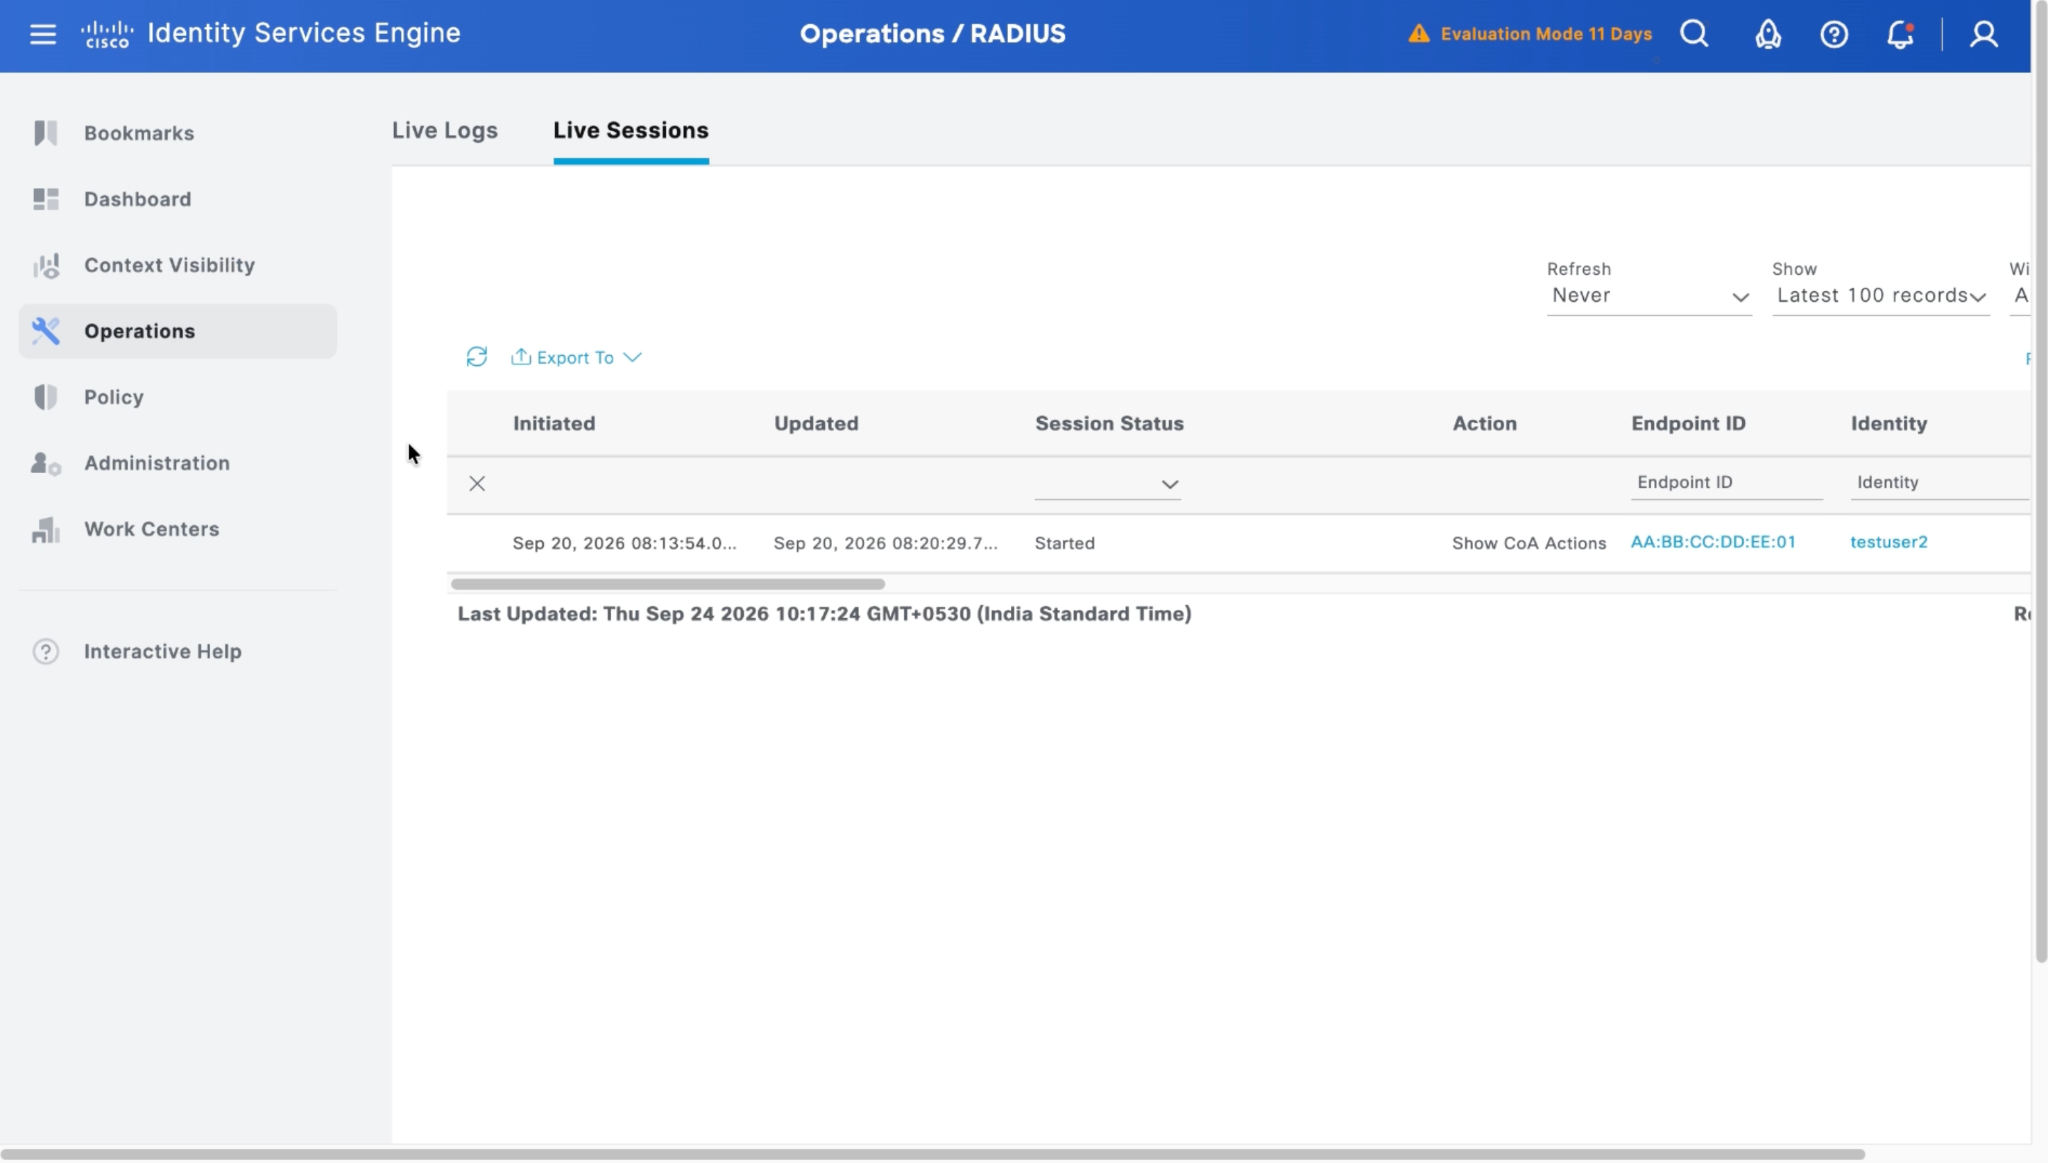
Go to Operations > RADIUS > Live Sessions. This is the page from where the live session records will be pulled to Cloud Exchange.
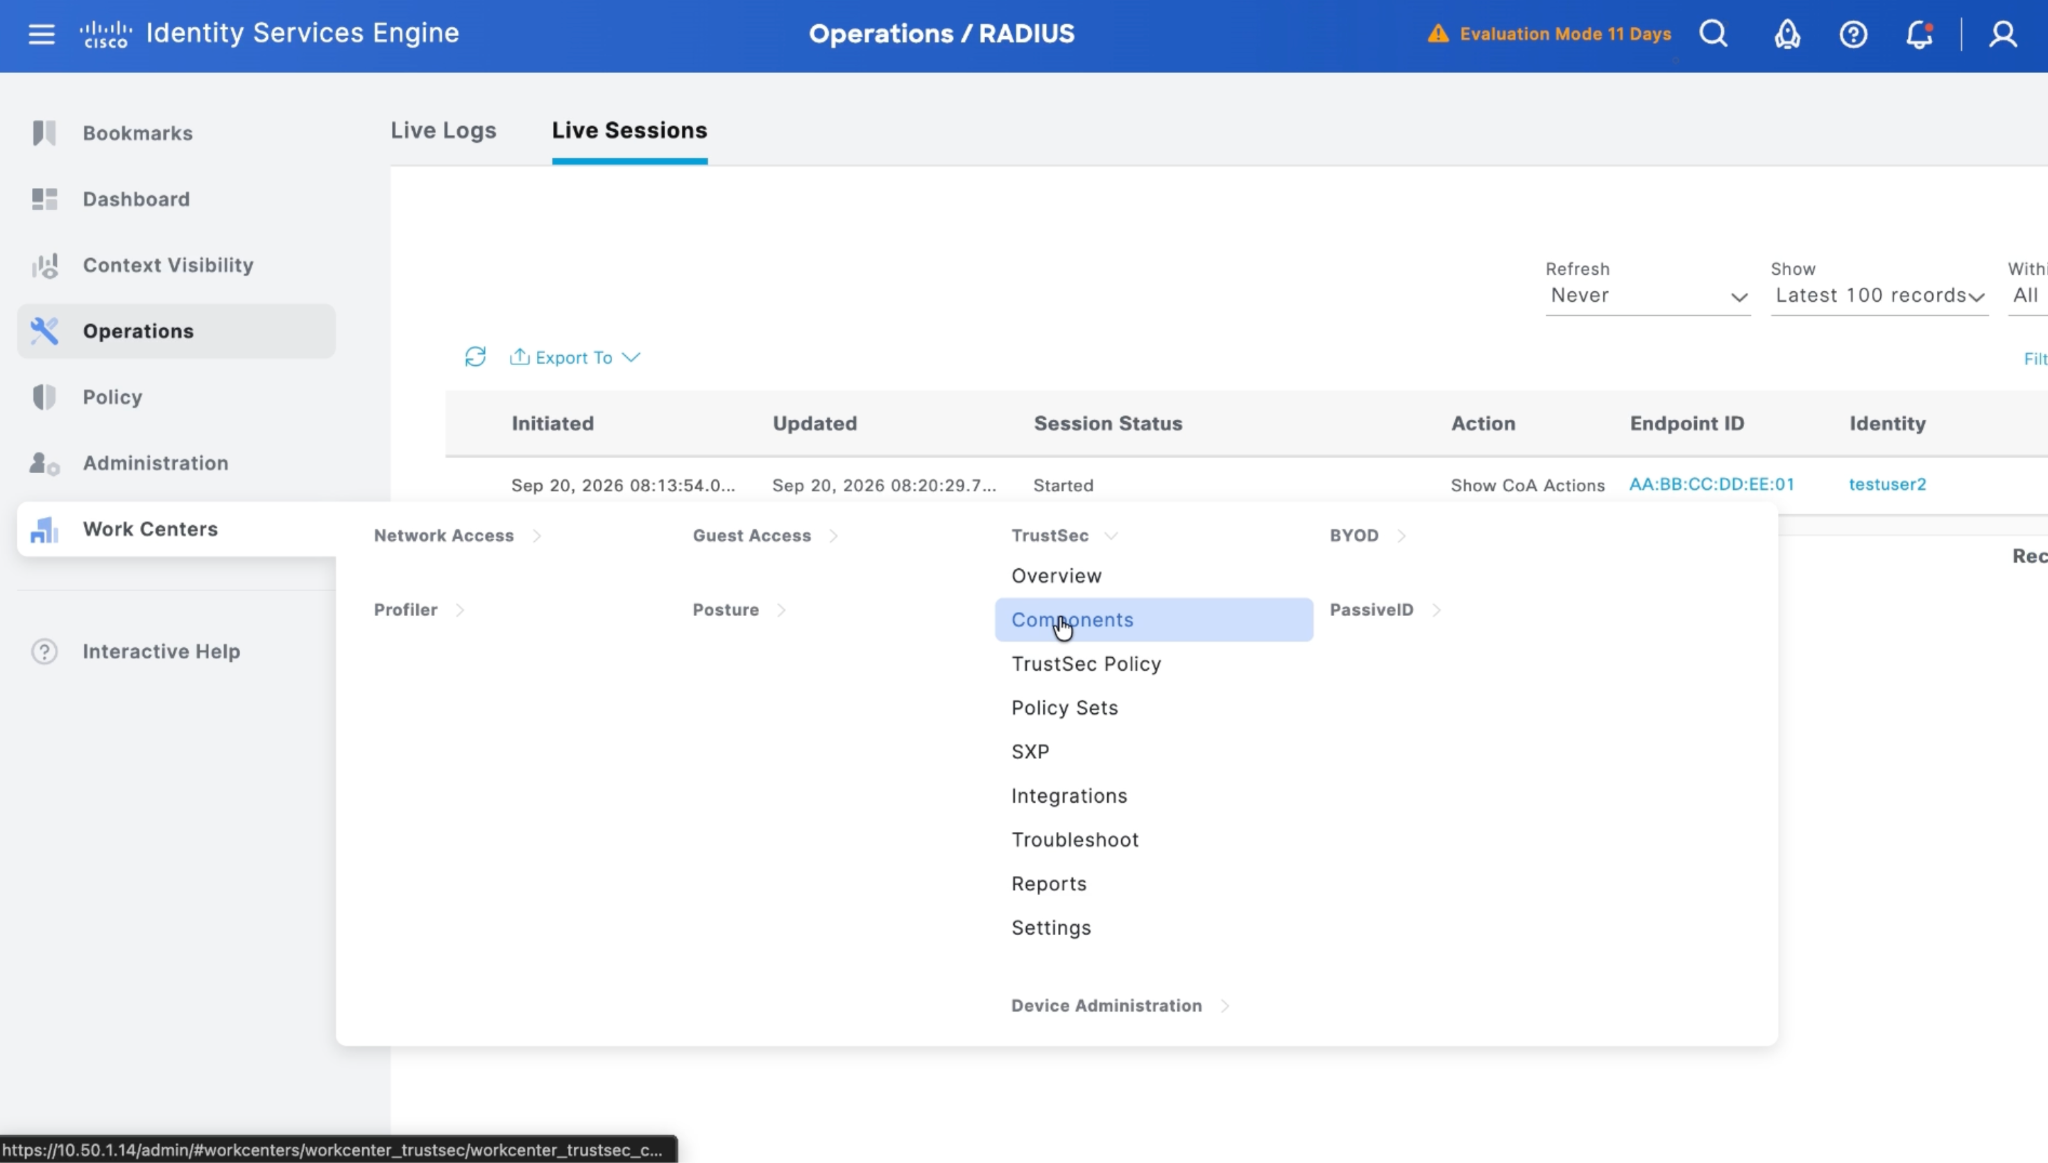
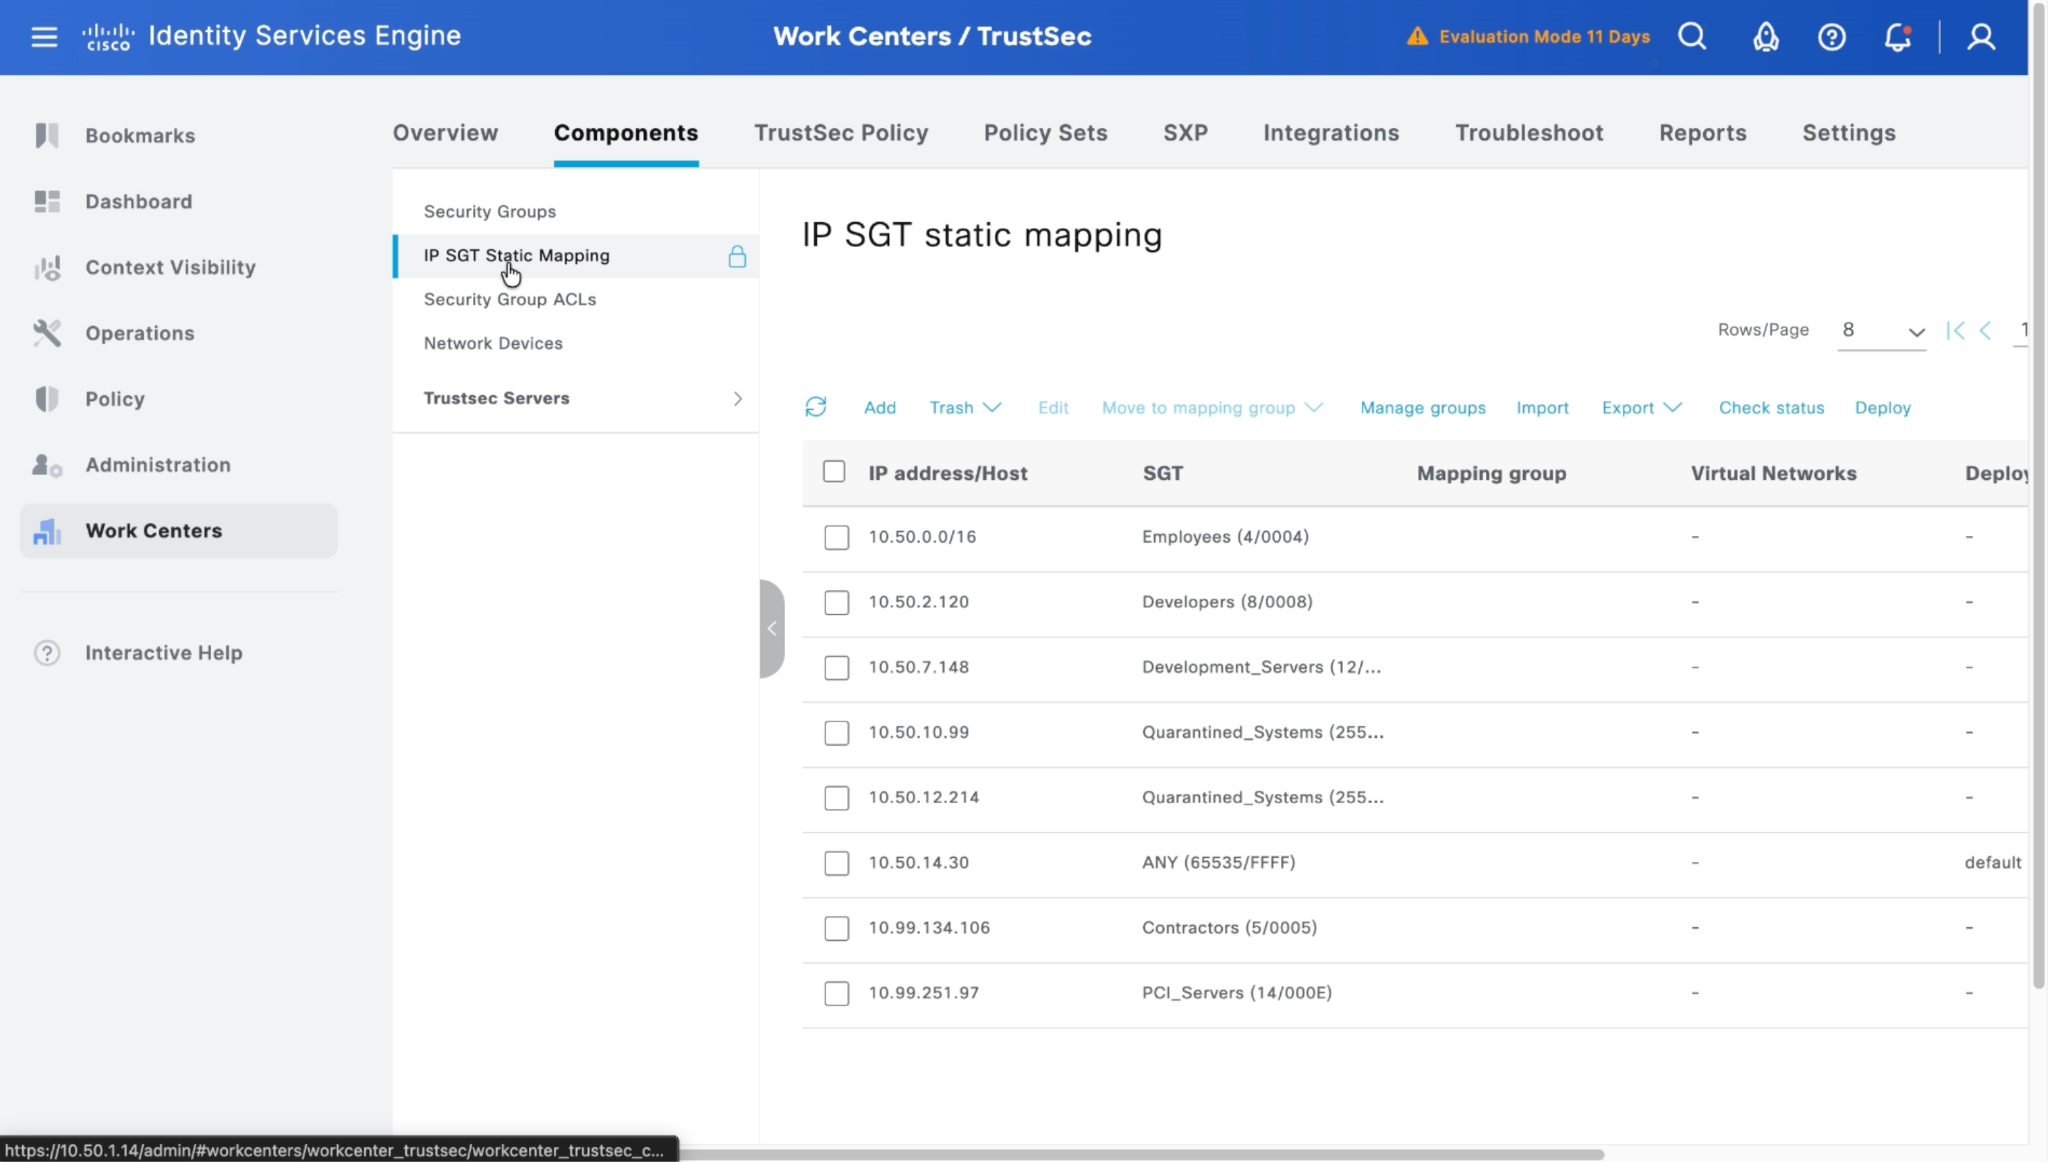
Go to Work Centers > TrustSec > Components > IP SGT Static Mapping. This is the page from there the static IP to SGT mapping data will be pulled to Cloud Exchange.
Troubleshooting the Cisco ISE Plugin
Getting pxGrid node account is Pending admin approval error
A user will get a pxGrid node account Pending admin approval error while editing the plugin configuration if the pxGrid node account is not enabled on Cisco ISE instance.
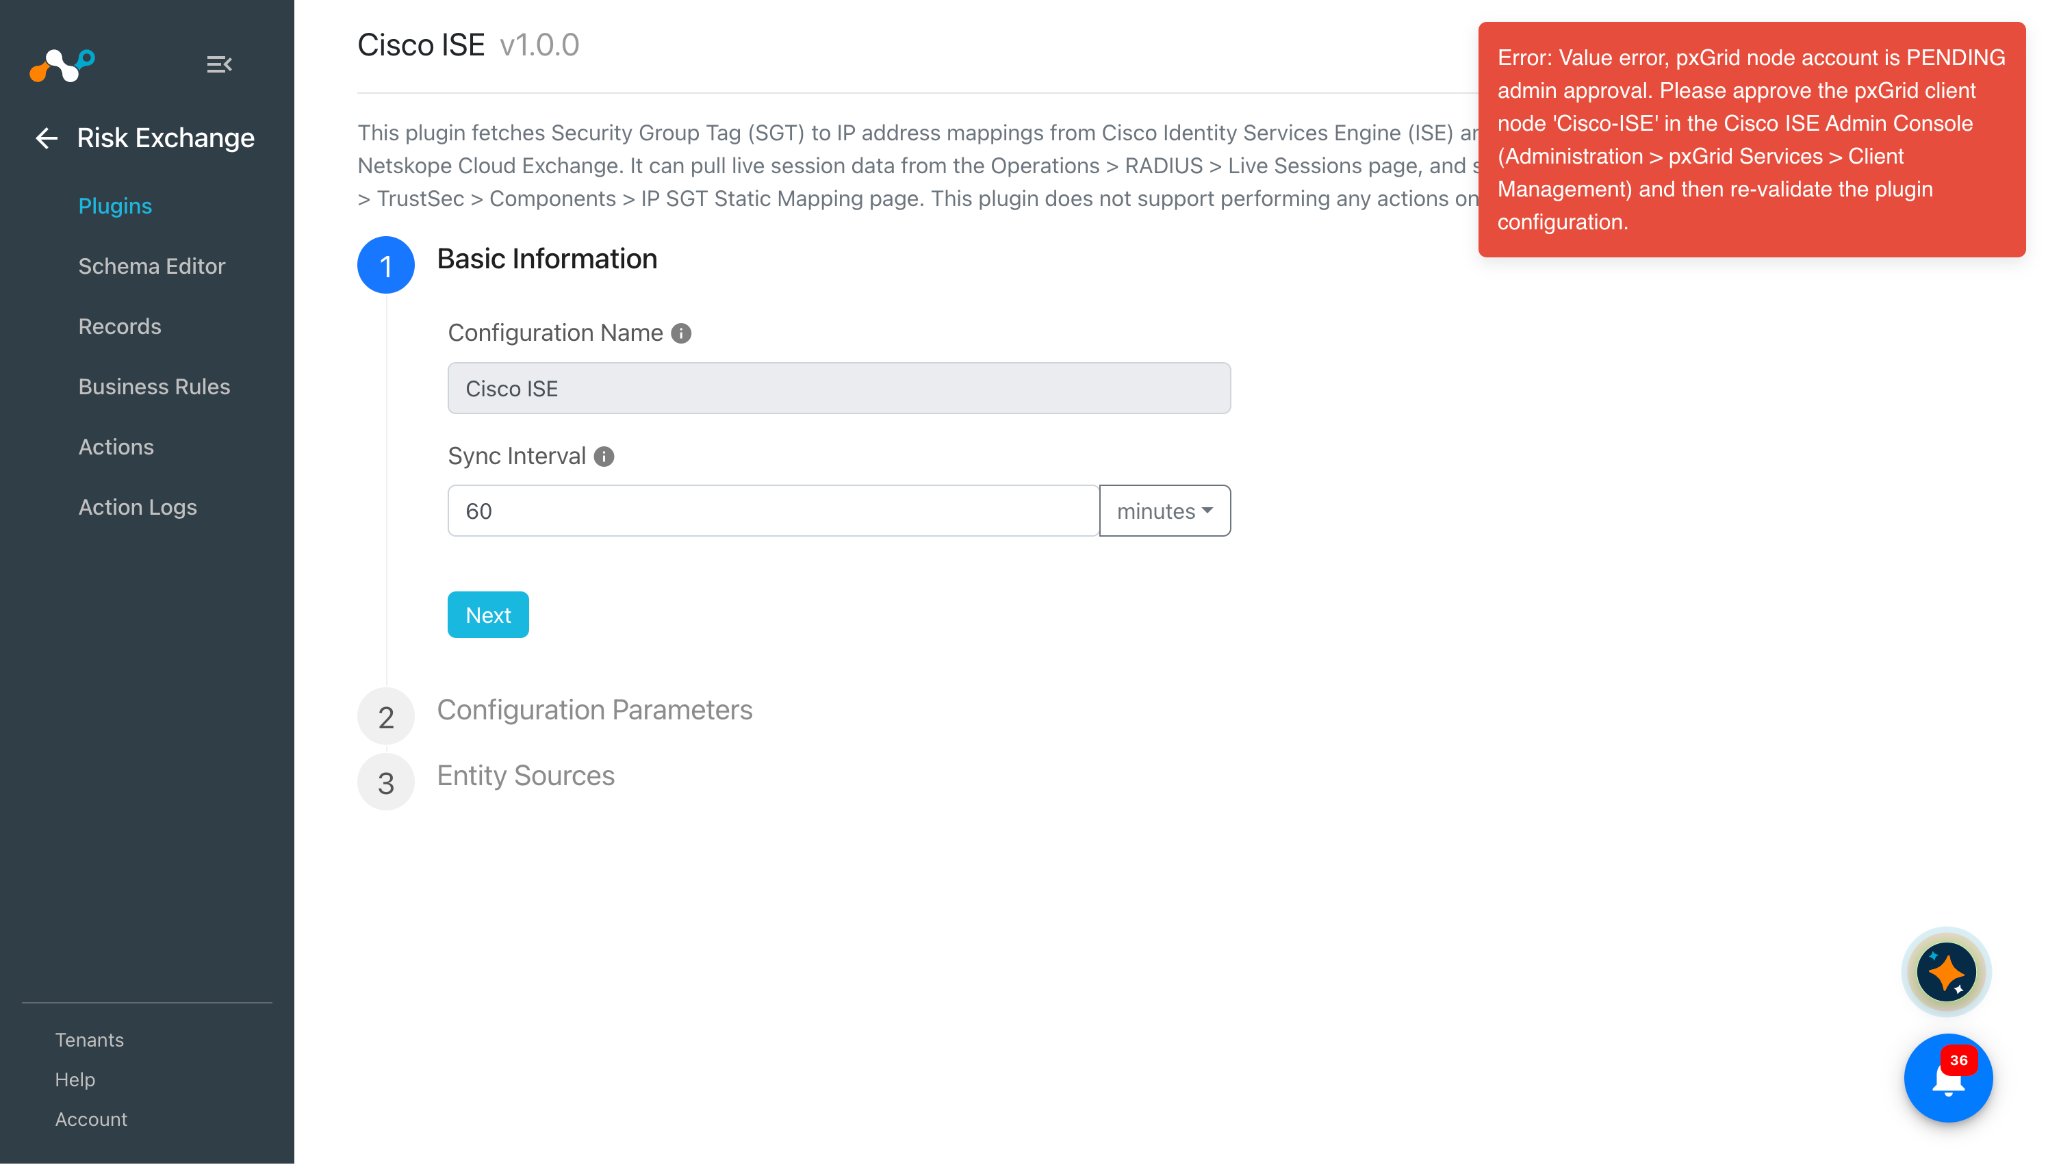
What to do: You need to enable the pxGrid Client for the particular plugin from Administration > pxGrid Services > Client Management. Refer to Approve the pxGrid Clients for the configured plugin.
Unable to pull records in Cloud Exchange
If you are not able to pull the records in Cloud Exchange, it may be due to empty mappings in the plugin configuration, no records present on Cisco ISE platform, or pxGrid client not approved on the Cisco ISE instance.
What to do:
- Verify the plugin configuration has mapped fields. Refer to the Mappings section.
- Verify the records are present on the Cisco ISE platform. Refer to the Validate in Cisco ISE section.
- Verify that the pxGrid client for the particular configured plugin is approved on the Cisco ISE instance. Refer to the approve the pxGrid Clients for the configured plugin section.
Getting Unable to establish connection with Cisco ISE platform error
If you are unable to establish connection with Cisco ISE platform error while configuring the plugin with on-premises Cisco ISE setup, it may be due to missing known hosts in the docker-compose.yml file for Cloud Exchange.
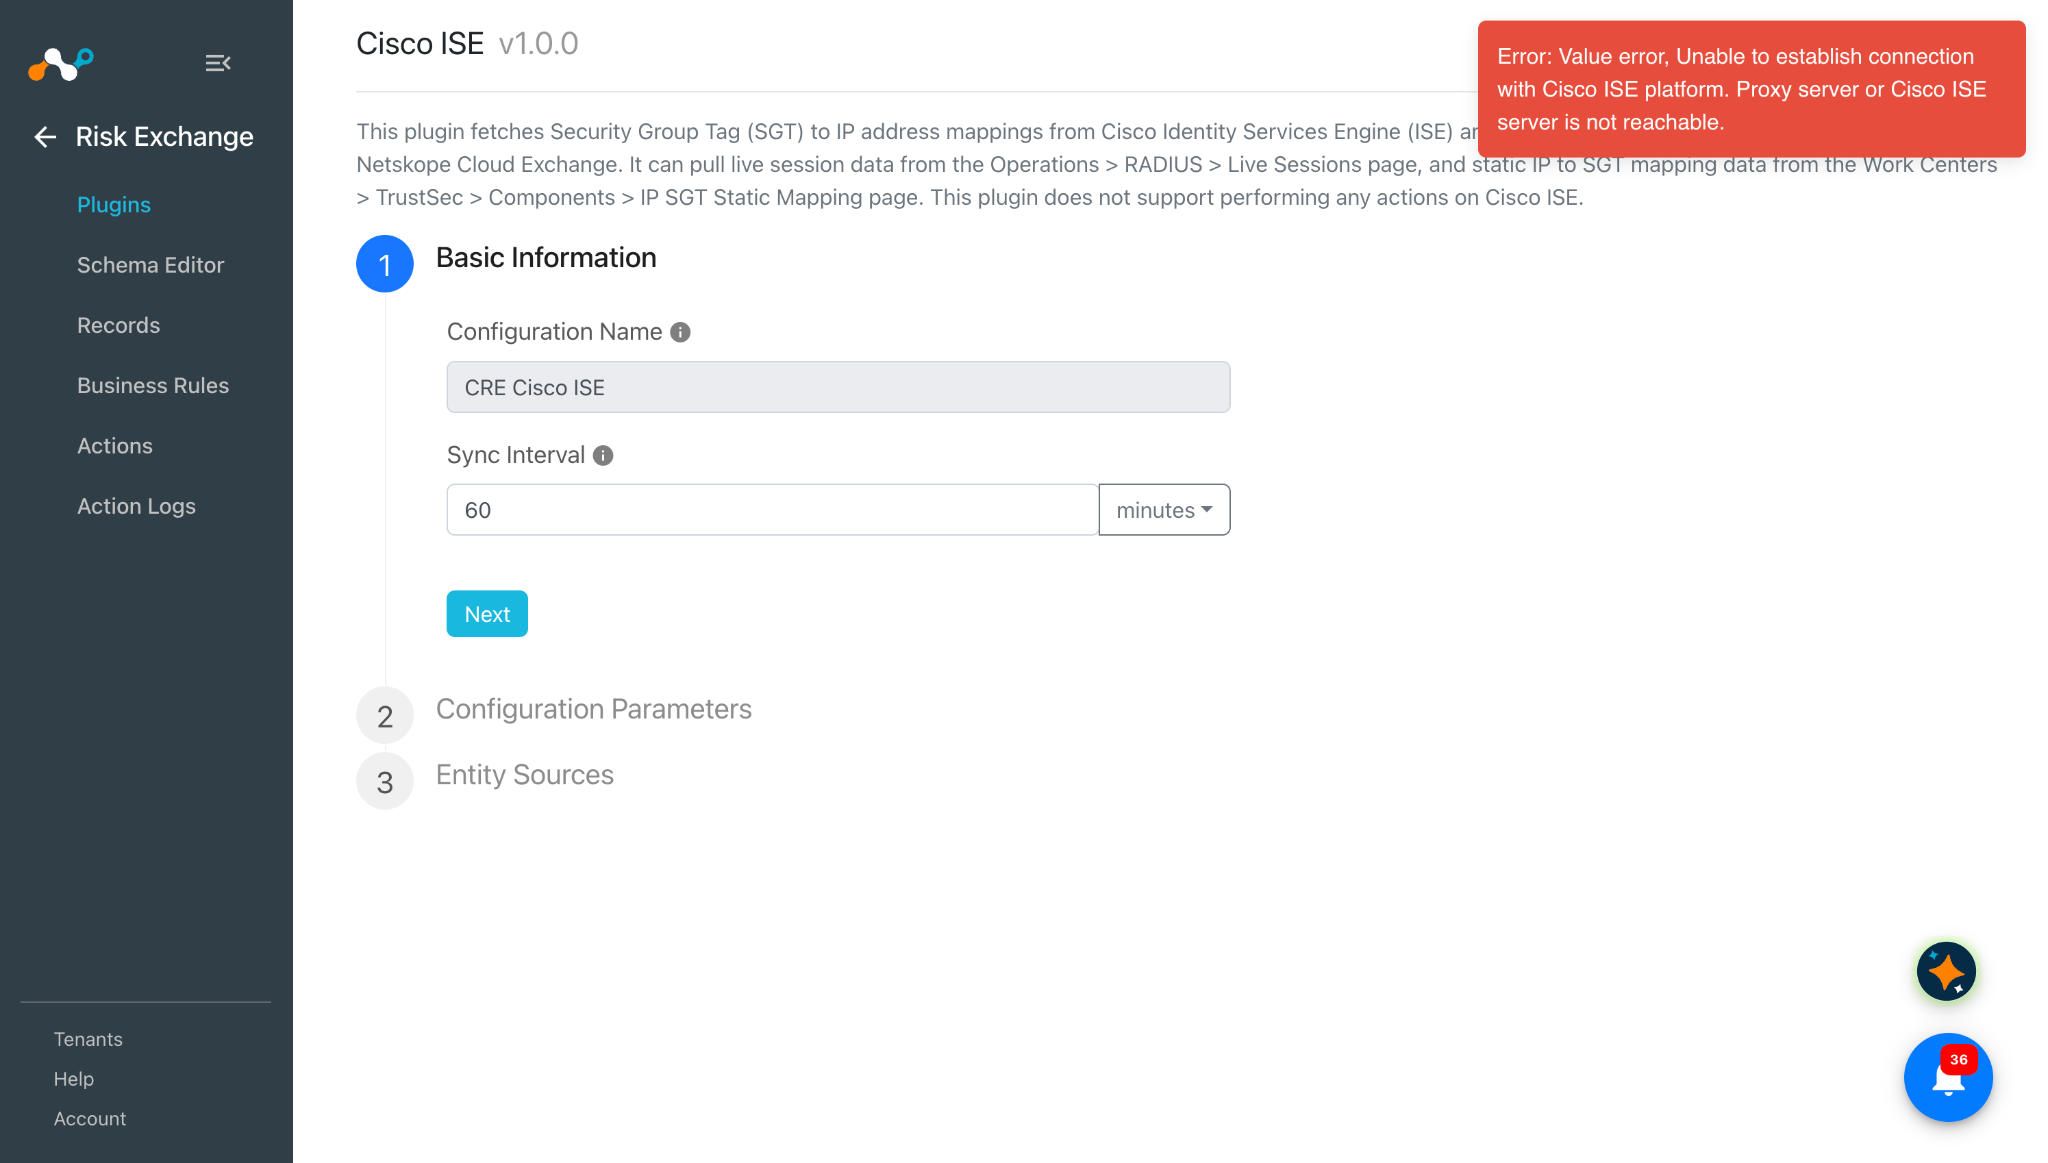
What to do:
- SSH to the VM where your Cloud Exchange is installed.
- Stop the running Cloud Exchange instance.
- Edit the docker-compose.yml file, and add the extra hosts section under core section.
Format:extra_hosts: - "<FQDN>:<IP>"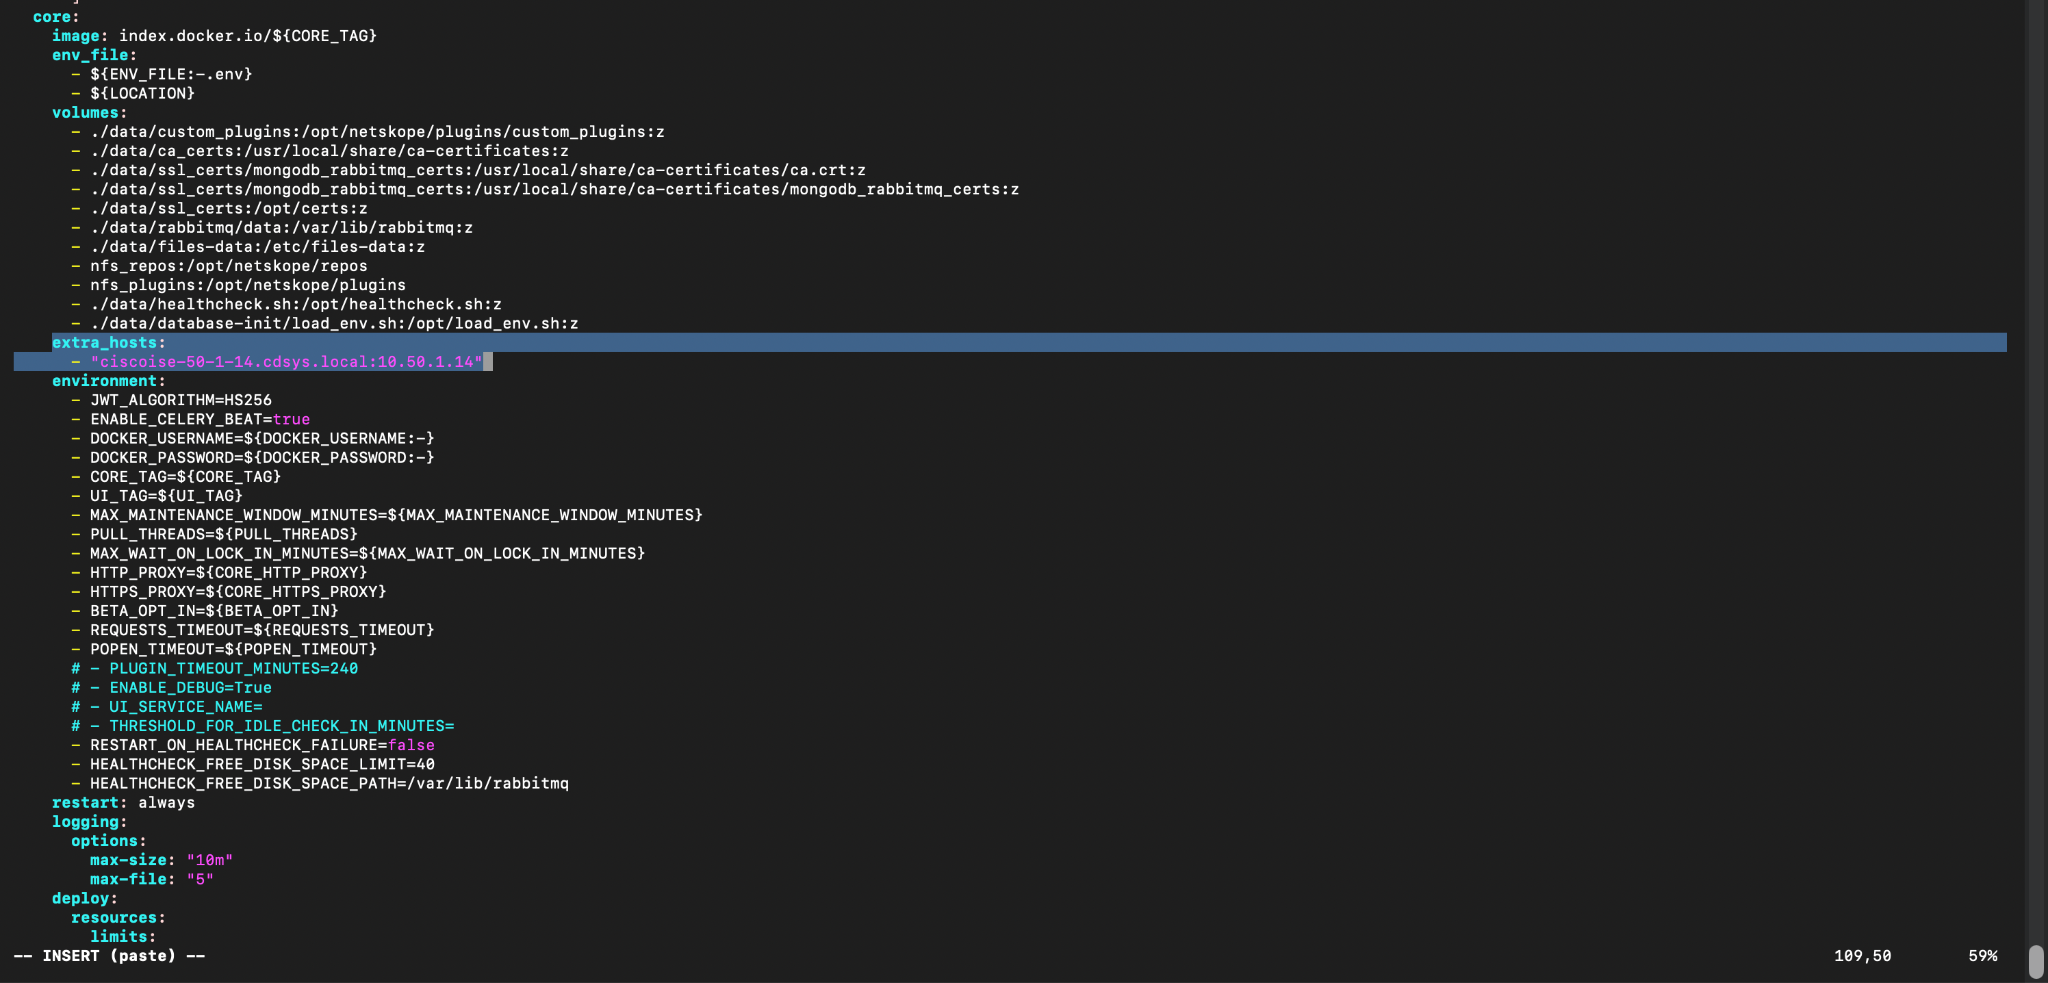
- Start Cloud Exchange and configure the plugin.
Getting SLError(SSLCertVerificationError(1, ‘[SSL: CERTIFICATE_VERIFY_FAILED] certificate verify failed error
You may encounter SLError(SSLCertVerificationError(1, ‘[SSL: CERTIFICATE_VERIFY_FAILED] certificate verify failed error while configuring the plugin with ‘Use System Default SSL Validation’. It may be due to certificates not present under data/ca_certs/ folder of Cloud Exchange.
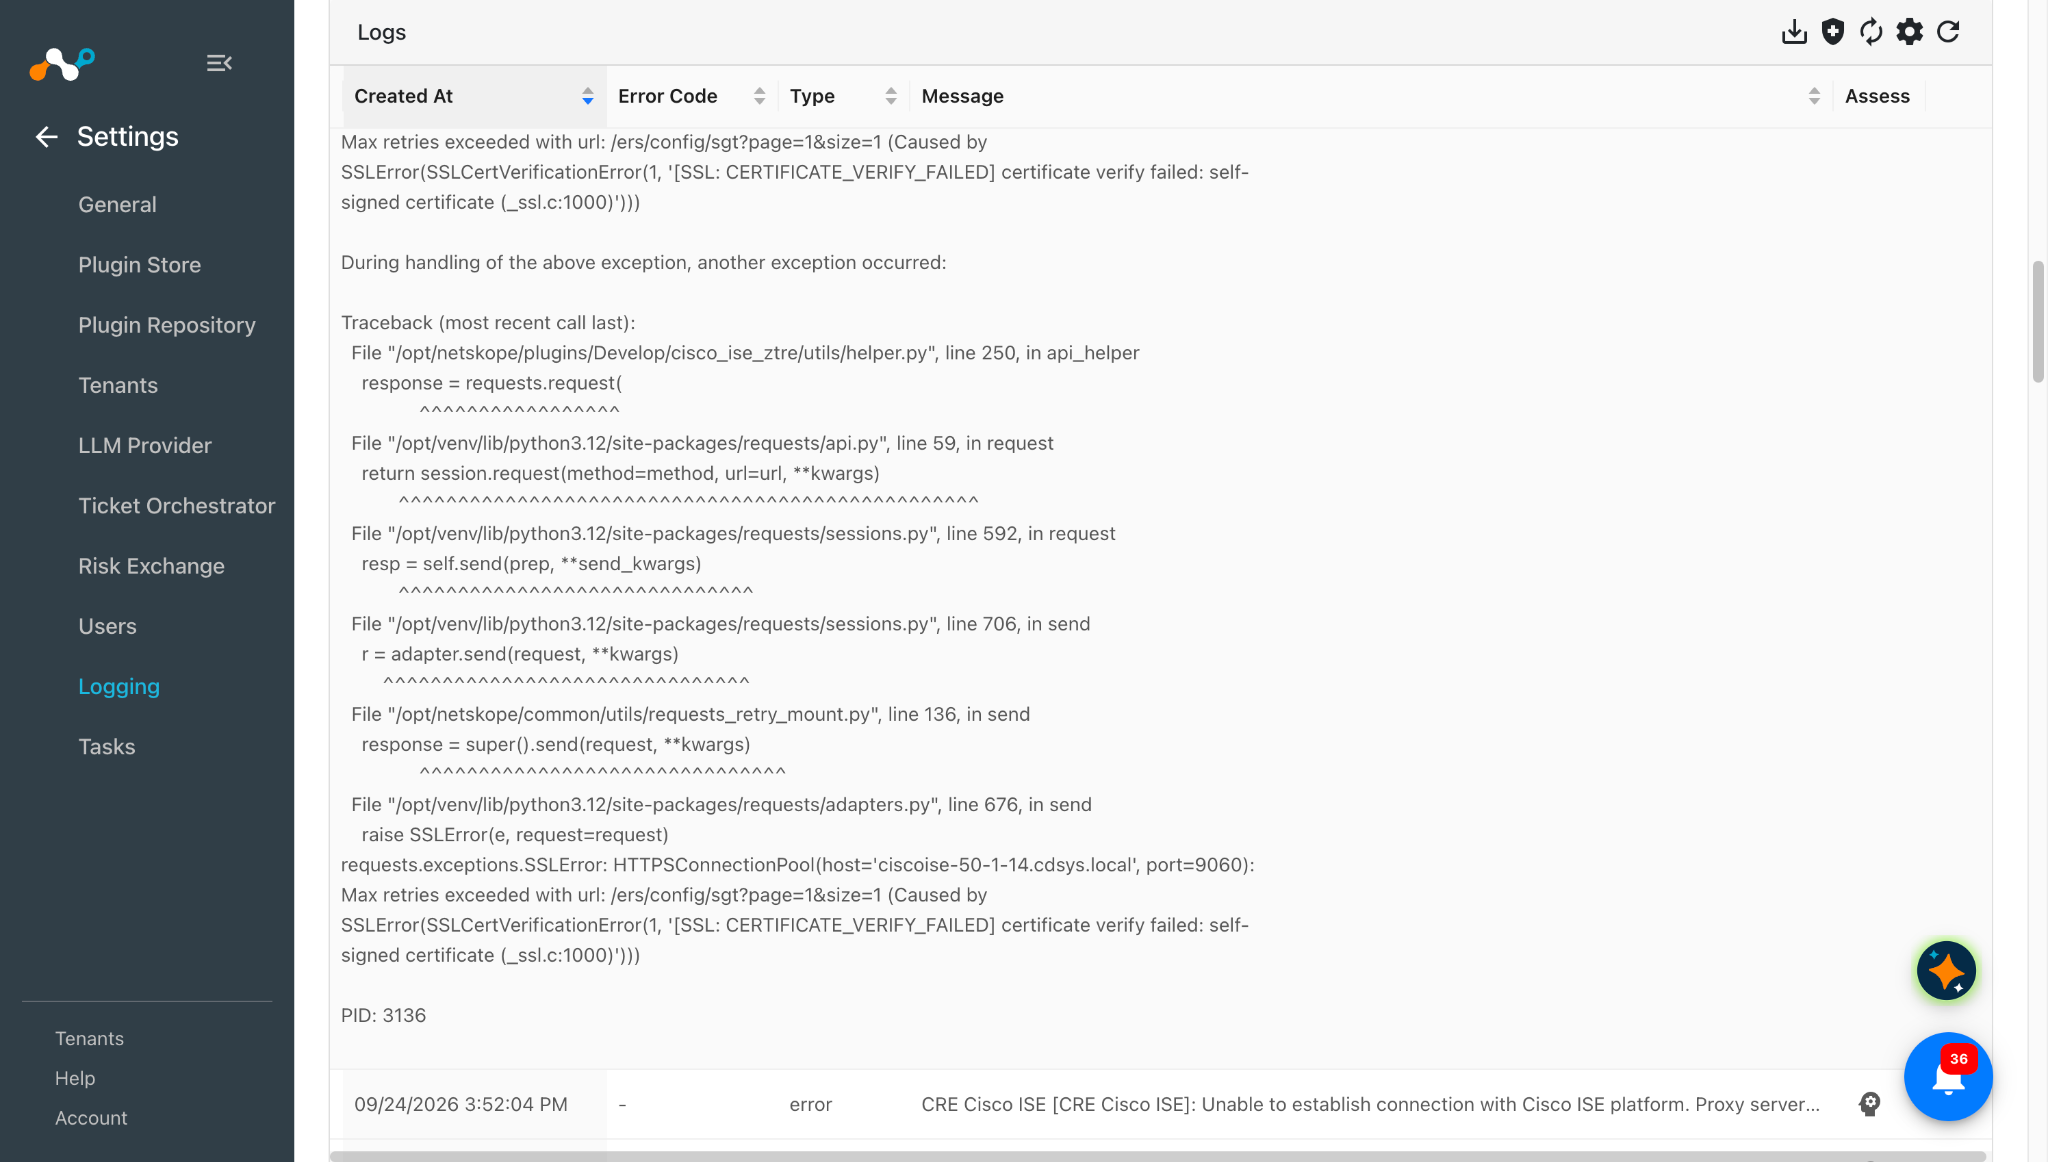
What to do:
- Log in to your Cisco ISE instance.
- Go to Administration > System > Certificates > Certificate Management > System Certificates in the ISE Admin Console, find the certificate in the table whose Used By column shows Admin, and export it.
- Go to Administration > System > Certificates > Certificate Authority > Certificate Authority Certificates, find the certificate in the table whose name is like
Certificate Services Root CA - <ISE hostname>, and export it. - Add both the certificates to the data/ca_certs/ folder of Cloud Exchange as shown below, and restart your Cloud Exchange instance. In the below image, CertificateServicesRootCAC.crt and Defaultselfsignedservercerti.crt are the 2 certificates exported from Cisco ISE.

Unauthorized Access or Forbidden Access
If the plugin reports Unauthorized Access during a pull or while configuring the plugin, it could be due to one of these reasons:
- The ERS Username or ERS Password configured in the plugin is incorrect.
- The ERS user account password has changed or expired.
- The ERS user does not have required permissions.
What to do:
- Verify the ERS Username and ERS Password in the plugin configuration match the credentials of the ERS user account on Cisco ISE.
- Verify the user has required permissions or not. Refer to Permissions and Configuration on the Cisco ISE platform sections.
- Re-run Test Connectivity to confirm access is restored.
Known Behavior
- If the pxGrid Client for a particular plugin configuration is deleted on CISCO instance, then you need to configure a new plugin.
- If the Cisco ISE plugin is deleted from your Cloud Exchange instance, then the pxGrid Client associated with that plugin will not be deleted. It needs to be deleted manually.
- When the same IP address is reported by both Live Sessions and IP SGT Static Mapping, the Live Sessions record fully replaces the IP SGT Static Mapping record. This reflects the more current, live state of the endpoint.
- IP SGT Static Mapping records do not populate the following fields: MAC Address, Session State, NAS IP Address, User Name, AD User, Authorization Profiles, Last Seen, or MDM posture fields (MDM Compliant, MDM Disk Encrypted, MDM Jail Broken, MDM Pin Locked). These fields are set to None for all IP SGT Static Mapping records.
- While pulling data from the IP SGT Static Mapping page, the ERS API returns IP addresses in CIDR notation (e.g. 10.50.2.120/32). If an IP address carries a /32 prefix, the plugin strips it before use, so that if the same bare IP address is also reported by Live Sessions, the two records merge into a single Hosts record instead of appearing as two separate entries. Any other prefix length (like /24) is left as-is, since it denotes an actual subnet rather than a single host.