

This article explains how to configure Single-Sign-On (SSO) for the Netskope Cloud Exchange (CE) platform, specifically for Okta. This allows you to manage administrator access to CE from within your existing Identity Provider (IdP) rather than configuring administrators within the platform manually.
Cloud Exchange is different from the standard Netskope tenant you would have access to as a customer and facilitates the exchange of information between your various security and operations platforms.
Watch a Video
Click play to watch a video.
Copy the Cloud Exchange SSO Information
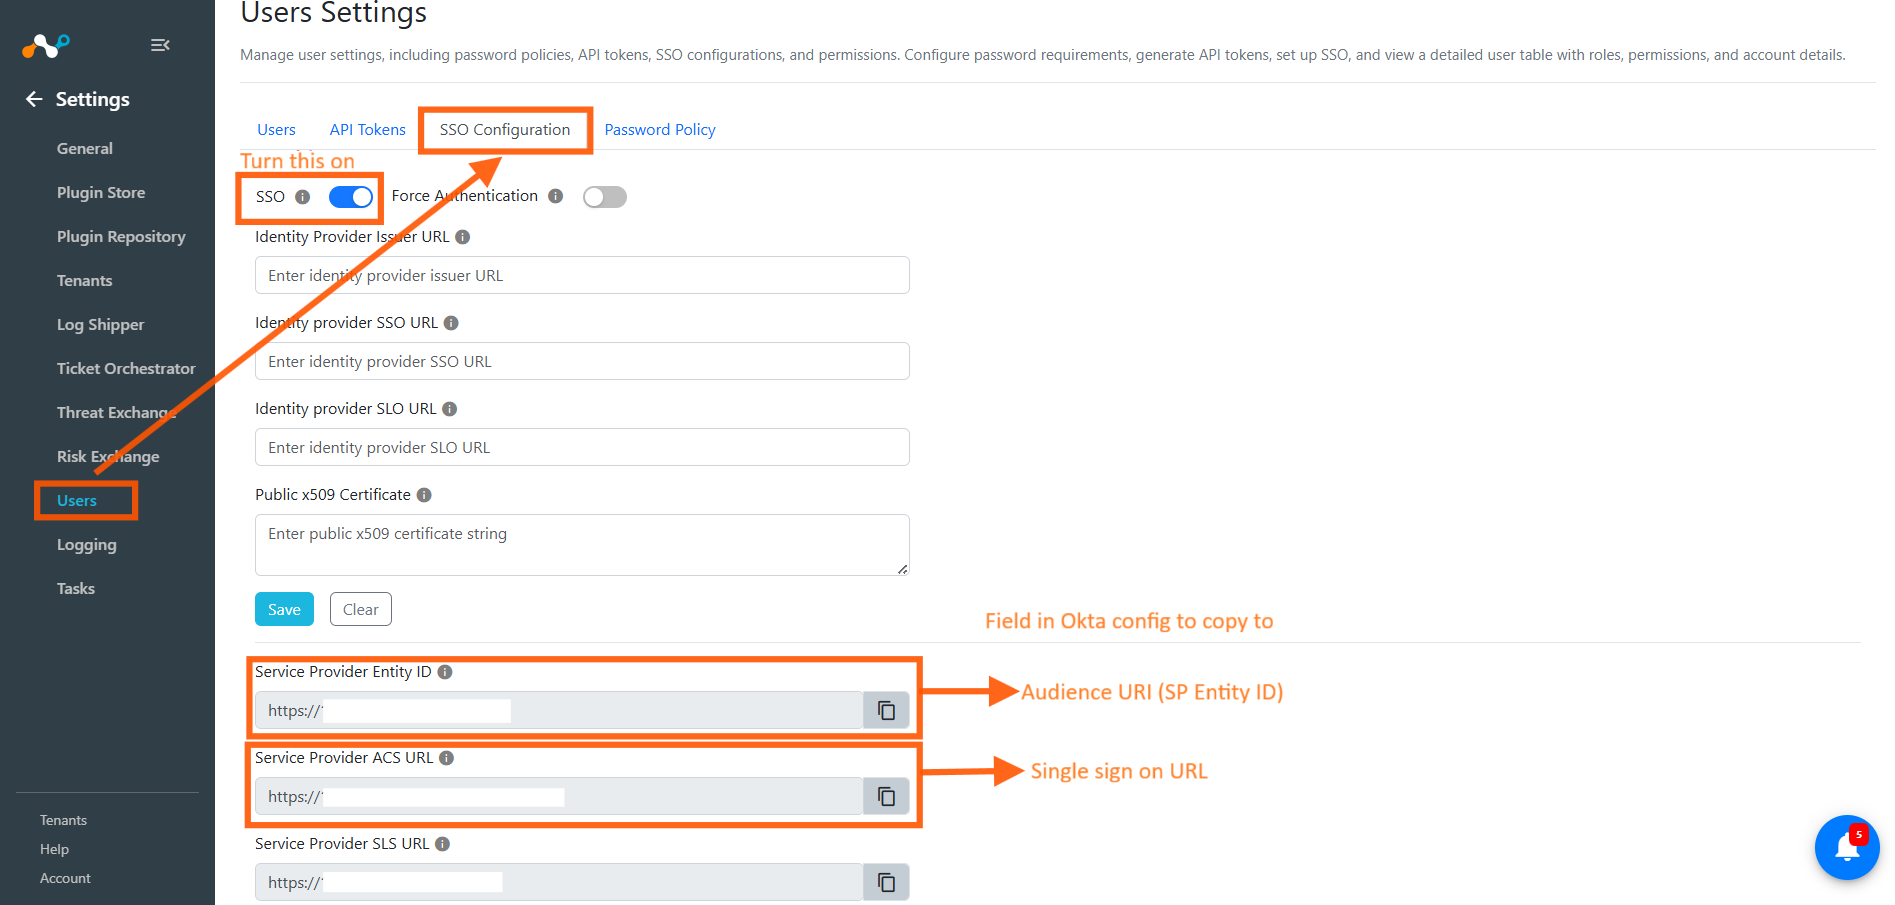
Log in to Cloud Exchange using the admin (super administrator) user and go to Settings > Users (this settings area will only be visible to the admin user).
Select the SSO Configuration tab and toggle the SSO toggle ON (make sure you save this configuration). Copy the Service Provider Entity ID and Service Provider ACS URL fields. The image below shows which URL should be used for which configuration field in Okta.
Configure an Okta SAML Integration
Go back to your Okta console and configure these settings.
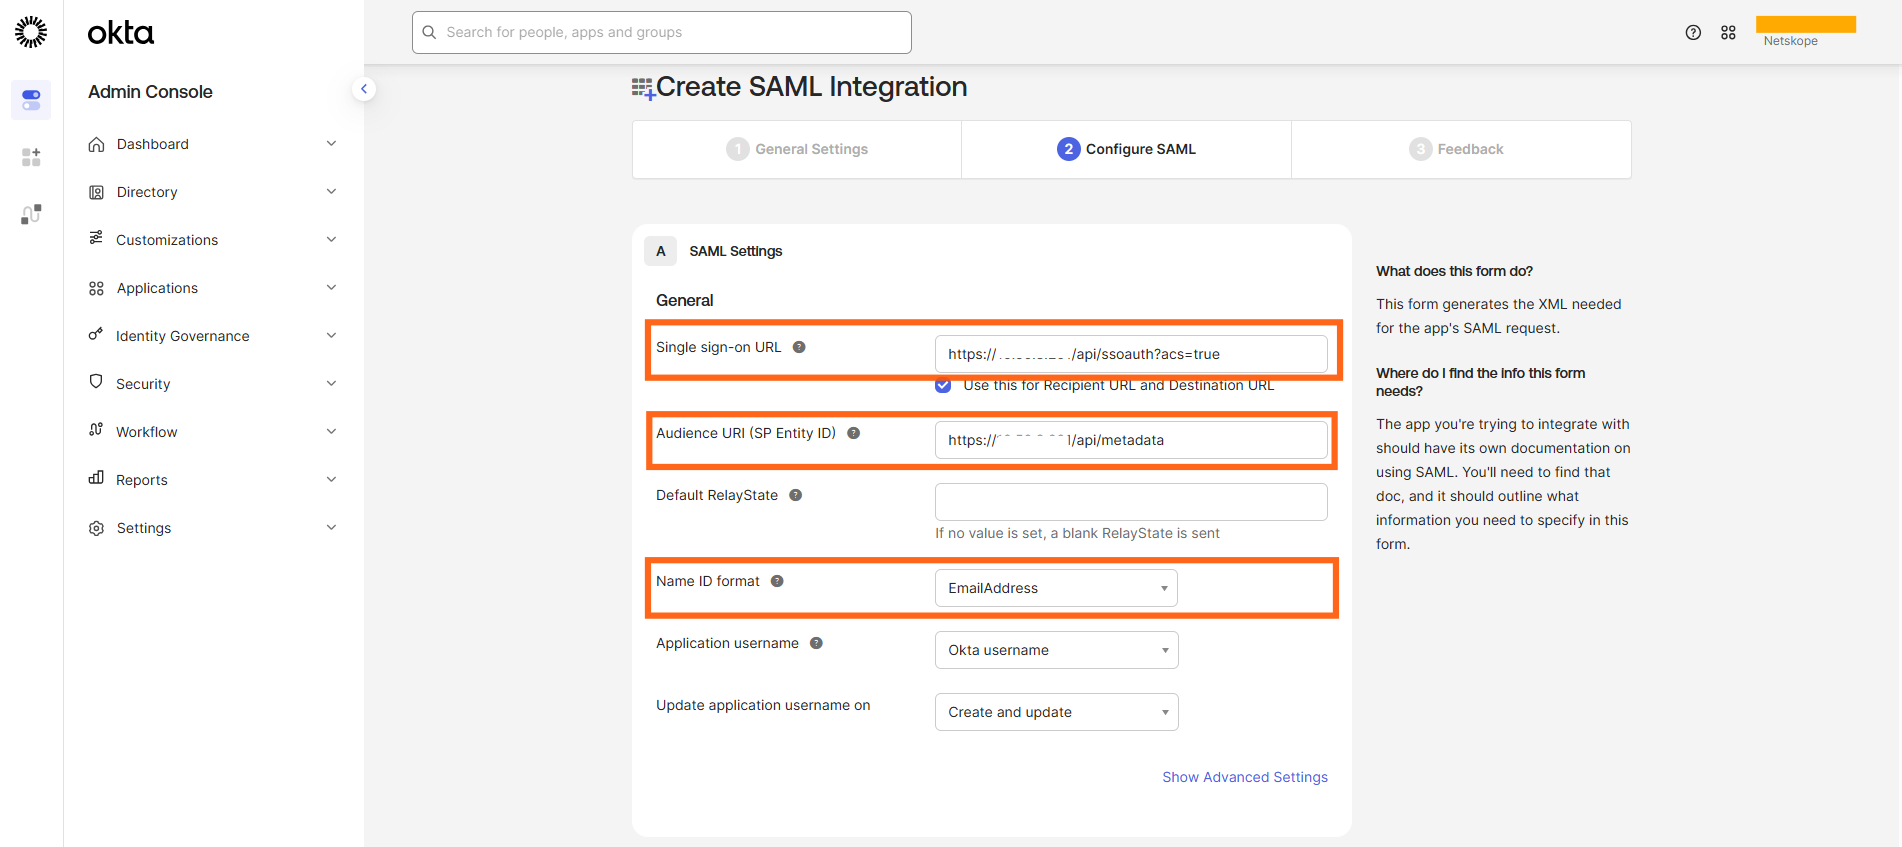
For the first two Service Provider URL fields in the Cloud Exchange SSO configuration, paste the corresponding URL into the appropriate field in Okta. Refer the table below for mapping:
| Service Provider Entity ID | Audience URL (SP Entity ID) |
| Service Provider ACS URL | Single sign-on URL |
| Service Provider SLS URL | N/A – Not used |
Set the Name ID Format
Ensure you change the Name ID Format in Okta from Unspecified to EmailAddress.
Finish the SAML Configuration
When you are done, scroll to the bottom of the page and click Next. Check the box This is an internal app that we have created and click Finish.
On the next page, click View SAML Setup Instructions inside the yellow box under the Sign On tab.
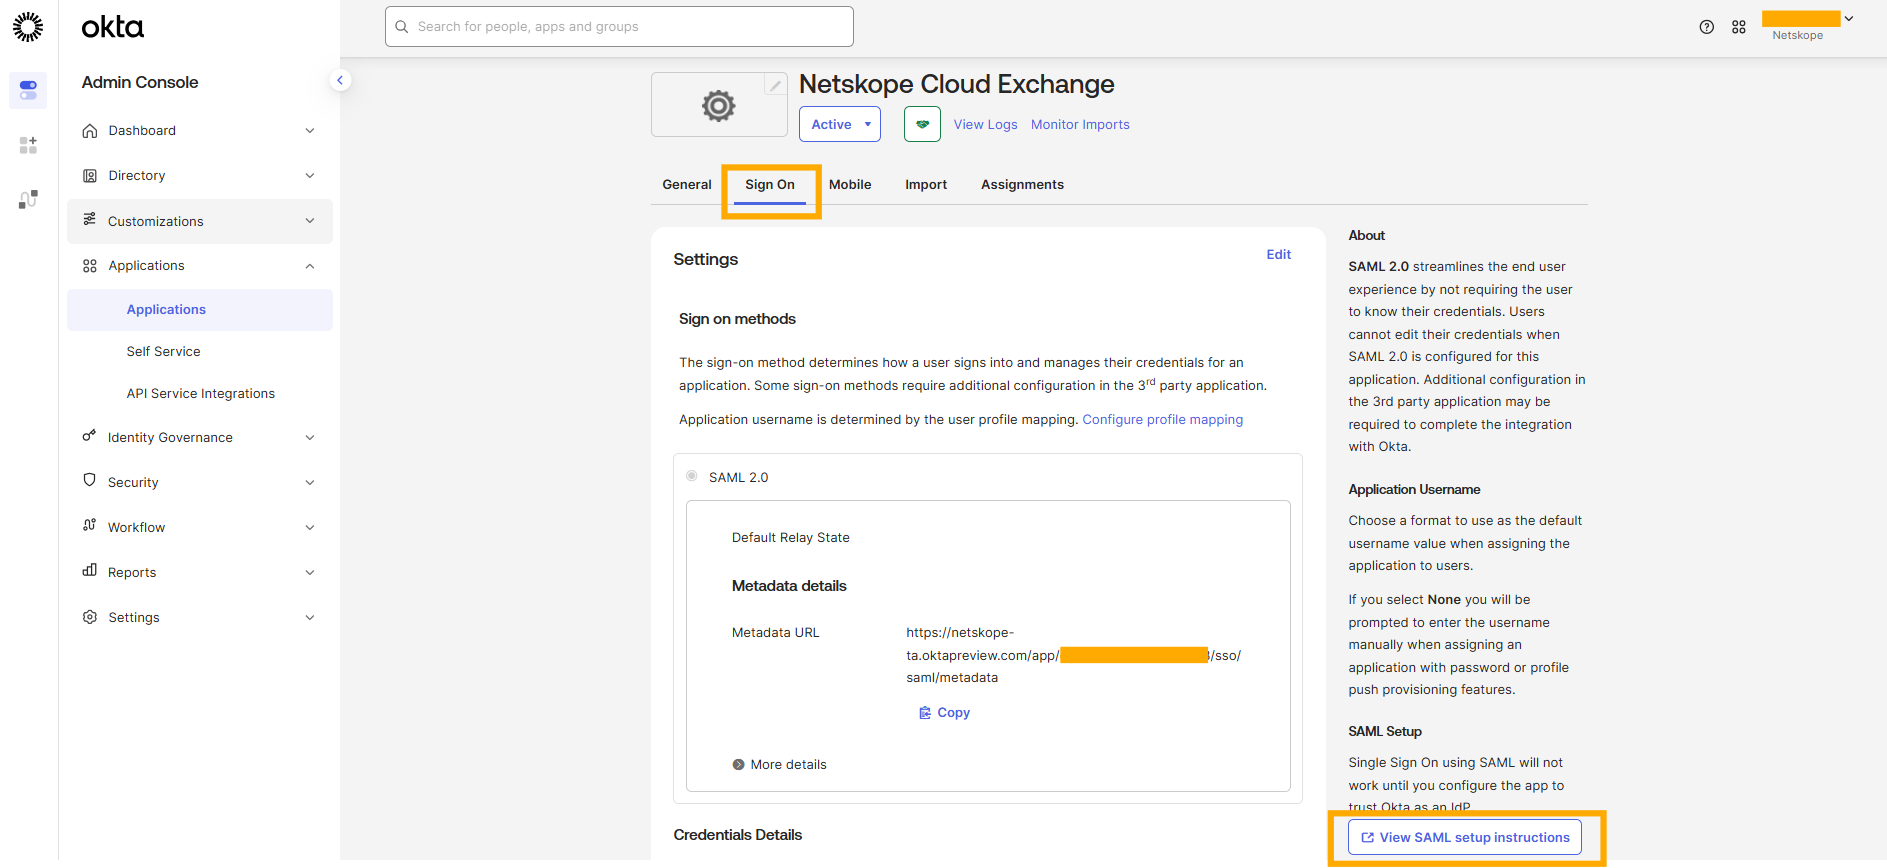
A new tab opens containing the IdP SSO URL, IdP Issuer, and certificate that you need to copy to later enter into the Cloud Exchange console.
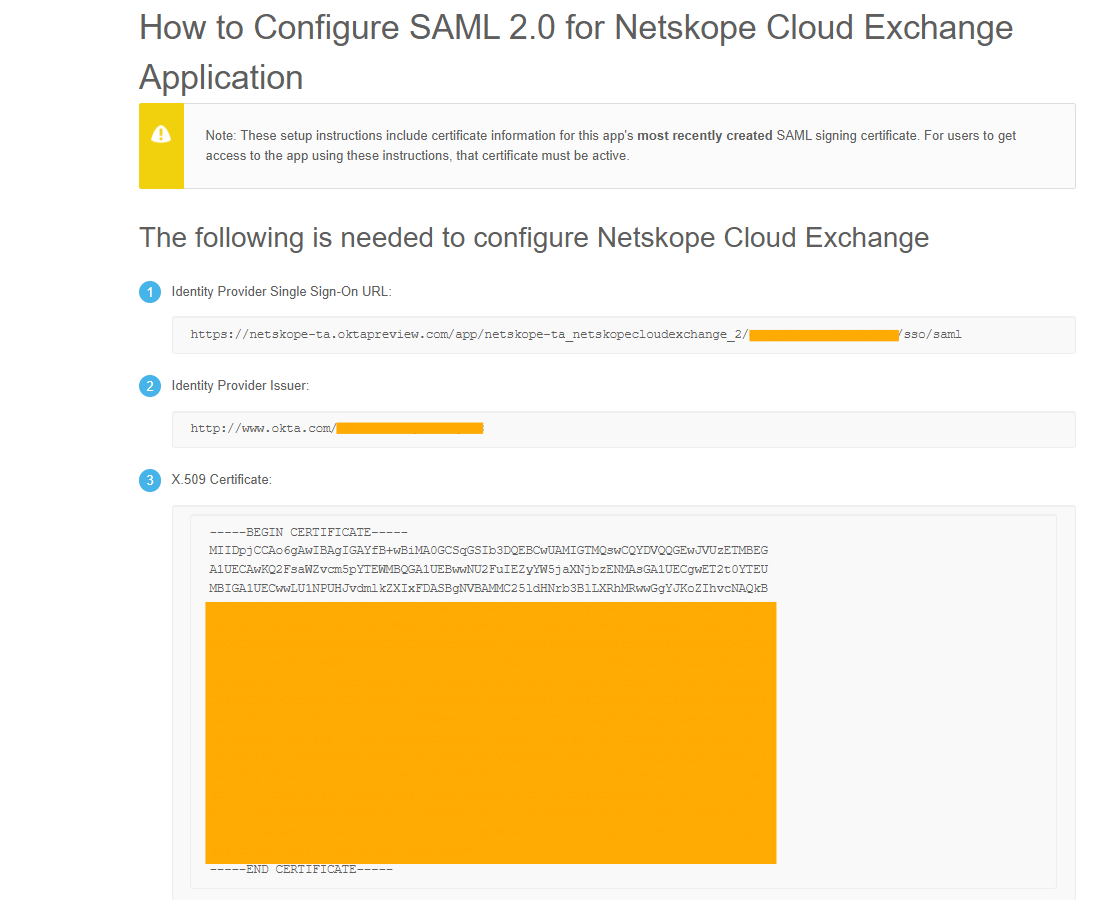
Leave this tab open for now as we still have some configuration left to do in Okta.
Add Additional Attributes
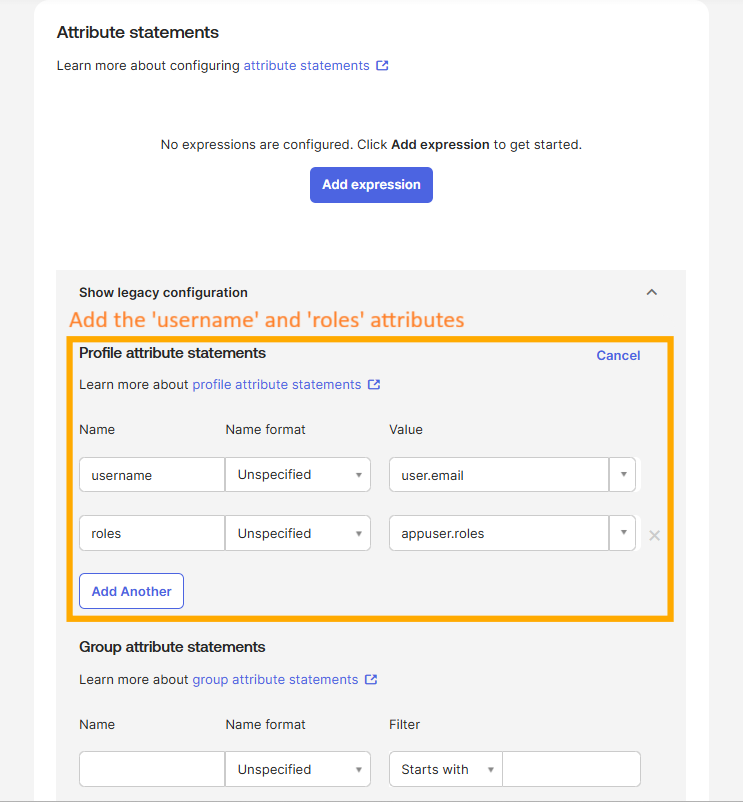
Go to Sign On, and under the Attribute Statements section, click Show legacy configuration, then select Edit for Profile attribute statements.
Add two additional attribute statements to the Okta configuration:
- username: Set the value to user.email.
- roles: Set the value to appuser.roles (you’ll need to type this manually, as it won’t appear in the dropdown list)
 |
Create the Roles Attribute in Okta
Users can be assigned Read/Write or just Read access to the Cloud Exchange UI based on one of three roles assigned to them: Admin (read/write access), Read-Only, and Custom admin. You need to create the roles attribute in Okta so that it can be used and assigned to the groups of IT admins who will use Cloud Exchange.
- Go to Directory > Profile Editor from the left panel and select the Netskope Cloud Exchange User profile.
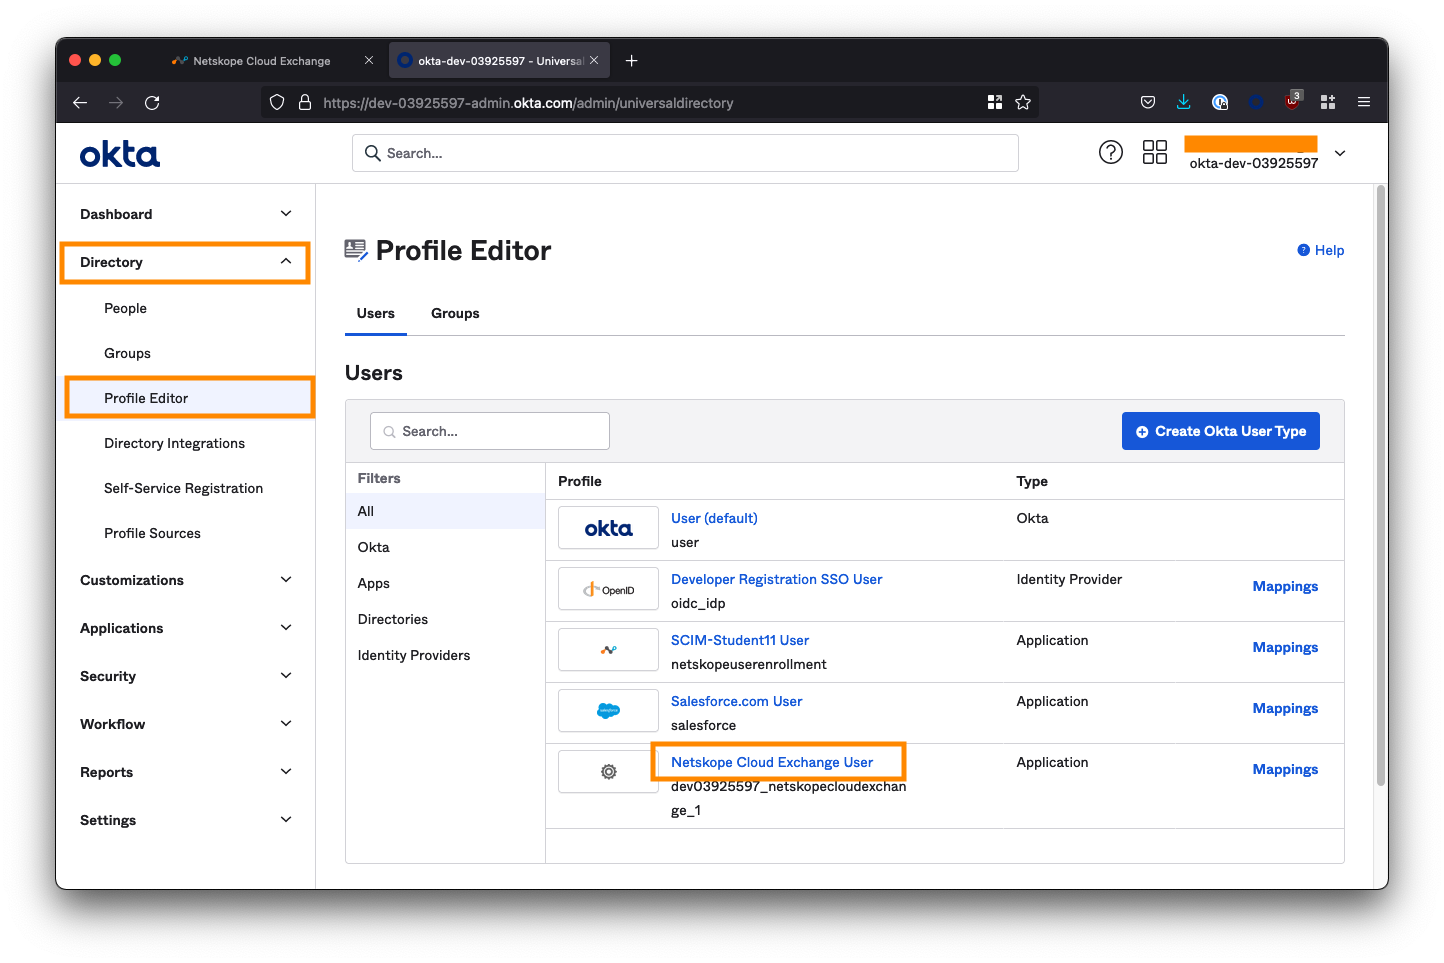
Here you’ll see the username attribute added when you completed the SAML configuration, but the roles attribute is nowhere to be found, so we need to create it manually.
- Click Add Attribute.

- For Data type, select string.
- For Display name, enter Roles.
- For Variable name, enter roles (This is case-sensitive).
- For Description, enter Netskope Cloud Exchange Admin Roles.
- Enable the Attribute Required and Group options.
- Click Save.

Configure User Groups for Cloud Exchange Access
In your Okta console, create two groups: One for the users that will have read/write access to CE, and another for users that will have read-only access.
Go to Directory > Groups from the left panel and select Add Group.

Create the Read-Only and Admin Groups
Create two groups called Netskope CE Read-Only and Netskope CE Admin.

Assign People to the Read-Only Role
Click the Netskope Cloud Exchange Read-Only group you created from the group list to edit the group.
Under the People tab, click Assign People, and assign the users who will have read-only access to the CE platform. When finished, click Save.
 |
Select the Applications tab and click Assign applications.
 |
Assign the Netskope Cloud Exchange application.
You will then be prompted to specify a role. Enter netskope-ce-read
WARNING: You must enter this exactly or SSO will fail! This is case-sensitive.
 |
Select Save and Go Back to complete the configuration of the read-only groupî
Assign People to the Admin Role
Click the Netskope CE Admin group you created from the group list to edit the groupî
Repeat the steps above except this time select the people who will have read/write access to the CE platform. When finished, click Save.
When prompted to specify a role, enter netskope-ce-write;netskope-ce-read.
WARNING: You must enter this exactly or SSO will fail! It is case sensitiveî
 |
Select Save and Go Back to complete the configuration of the Admin group.
Finish the SSO Configuration in Cloud Exchange
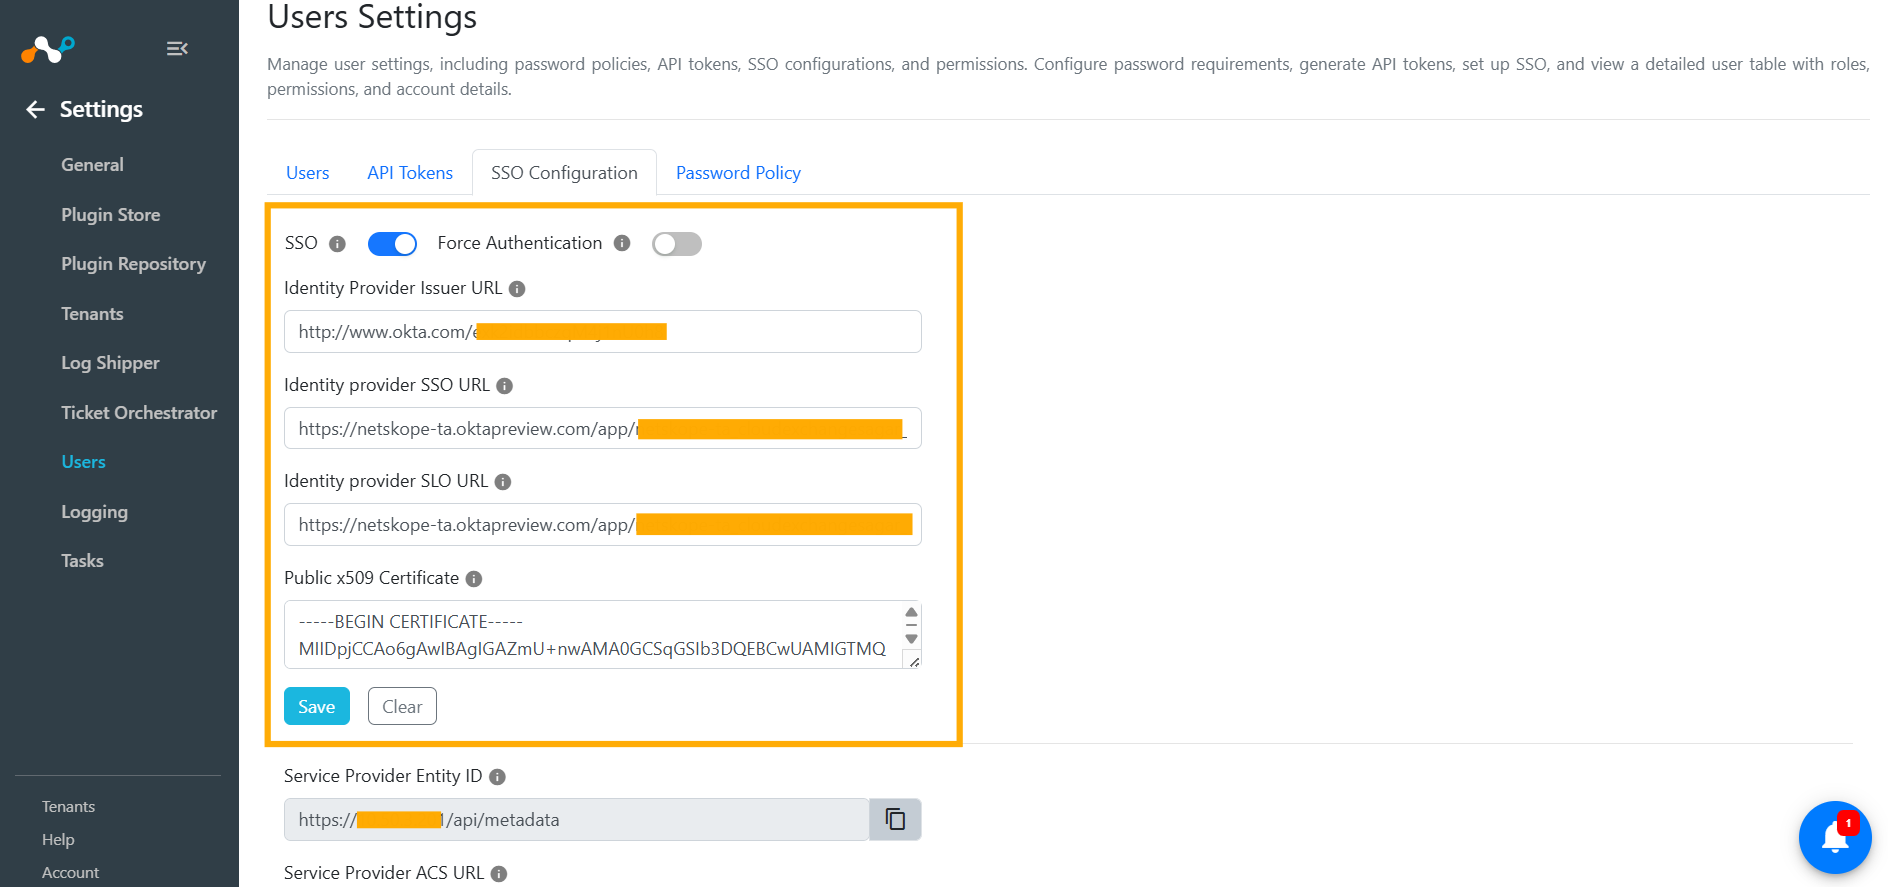
Return to the SSO Configuration section of the Cloud Exchange UI (Settings > Users > SSO Configuration). Here you enter the details from the Setup Instructions that you opened (in a separate tab) previously).
For these fields in the Cloud Exchange SSO configuration, paste the corresponding information from the Okta Setup Instructions. See the table below for mapping:
| Cloud Exchange Field | Okta Setup Instructions Field |
|---|---|
| Identity Provider Issuer URL | Identity Provider Issuer |
| Identity provider SSO URL | Identity Provider Single Sign-On URL |
| Cloud Exchange Field | Okta Setup Instructions Field |
|---|---|
| Identity provider SLO URL | Identity Provider Single Sign-On URL |
| Public Certificate | Certificate |
The SLO URL field is not needed, but cannot be blank. Copy the same URL used for the Identity provider SSO URL for this field.
 |
Click Save.
Testing the SSO Configuration
Open a new Incognito window (to avoid any potential issues with caching) and point your browser to the URL of your Cloud Exchange deployment.
If you enabled the SSO checkbox as instructed at the beginning of this guide, you will two options when reaching Cloud Exchange:
- Log in with SSO.
Option 2 is used for local login (the default admin user, or any user manually added to the user list in Cloud Exchange).

- Select Login with SSO. You should be redirected to Okta to sign in.

Upon entering your user credentials you should be authenticated and redirected to the Cloud Exchange interface. In the example below, the Ben user was assigned to the Netskope CE Read-Only group, so almost all of the Settings menu is hidden.

Troubleshooting SSO for Cloud Exchange with Okta
If you are having issues signing in, first look at which platform is giving you an error: Okta or Cloud Exchange? If the error you are presented with is from Okta, then the issue is likely with your config on the Okta side. Double-check your URLs and/or whether the user you are attempting to sign in as is assigned to either the Netskope CE Read-Only or Netskope CE Admin groups.
If you are getting an error from Cloud Exchange, then you have likely messed up the URLs entered into either CE or Okta, and not added the custom username and roles attributes, or not typed the name of the role correctly (ie: netskope-ce-read and netskope-ce- write;netskope-ce-read).
If you get the error {“detail”:”Method Not Allowed”}, check that the URLs copied into both Okta and Cloud Exchange are correct and in the right place.
If you get the error {“detail”:”Could not authenticate. username/roles attribute not set.”}, then check that you have added the username and roles claims in the SAML configî

If you pass SSO fine, but receive a red Error while fetching data message in CE, then there is a problem with the role you have assigned to the user. Ensure you entered netskope-ce-write;netskope-ce-read as the attribute for the Admin group (Netskope CE Admin) and netskope-ce-read as the attribute for the Read-Only role (Netskope CE Read-Only)
Additionally, check that you have assigned one of these groups to your impacted user: You may also get this error if anything else has been entered into the role field apart from the above two accepted strings
