Cloud Explicit Proxy is an access method that allows you to steer traffic to Netskope using a PAC file if you’re unable to use Netskope Client, IPSec, or GRE access methods. However, Cloud Explicit Proxy has a few limitations:
-
Users must enter the tenant name in the login page to access any destination.
-
Admins must import another certificate authority (CA) for Cloud Explicit Proxy roaming (off-premises) users.
-
It uses a surrogate cookie to identify a user, which causes issues with SSL DND policies and certificate pinned applications.
-
It uses non-standard port 8081, which must be opened in your firewalls.
Cloud Explicit Proxy HTTPS is a new access method that overcomes the above limitations. It encloses traditional Cloud Explicit Proxy interactions in an outer TLS tunnel between your endpoint and the Netskope proxy endpoint. Cloud Explicit Proxy HTTPS uses mTLS between your endpoint (e.g., browser) and the Netskope proxy service, which helps identify the tenant and the user. The usage of mTLS for authentication also removes the need for cookie surrogate and supports SSL Do Not Decrypt (DND) policies as well as Certificate Pinned Apps using SSL DND.
Netskope tenants use a unique URL to connect (e.g.,
eproxy-.goskope.com). Netskope extracts this URL from the SNI and uses it to identify which tenant to use for authenticating the user. Because of this, you don’t need to rely on Source IP allowlisting and prompt the user for the tenant name as required with traditional Cloud Explicit Proxy.
Prerequisites
Before configuring Cloud Explicit Proxy HTTPS, you must:
-
Provision users and groups using SCIM or Directory Importer.
-
Obtain a certificate authority (CA) that can issue client certificates.
-
Upload the CA certificate to the tenant using the
/services/authentication/mtlsAPI endpoint. -
Ensure the client certificate contains the user’s email in the Common Name (CN) or emailAddress in the certificate Subject.
-
Use the Device Management tools to distribute the Netskope Tenant CA, Your own CA, Client Certificate, and Key to your user’s devices.
-
Ensure you have an accessible web server to host the PAC file for remote users.
-
Ensure you use port 443 and go to Settings > Security Cloud Platform > Explicit Proxy so you can get the eproxy URL for your tenant. For example, it should look similar to
eproxy-<Tenant Name>.goskope.com.You can also use
eproxy2-<Tenant Name>.goskope.comfor CEP HTTPS configurations to improve the end-user experience for admins who must seamlessly switch between different types of client certificates. -
Netskope uses SNI to identify the tenant.
-
Disable Netskope Client or create a steering exception for
eproxy-.goskope.com.
Configuring Cloud Explicit Proxy HTTPS
To configure Cloud Explicit Proxy HTTPS, admins must use REST API to enable it for their tenant and upload their CA certificate to authenticate the endpoint. Then, admins can use the access method in their Real-Time Protection policies and SSL Decryption policies in the Netskope UI as well as monitor events in Skope IT.
Sample PAC File
To make use of a secure web proxy, you must configure Google Chrome to use a proxy auto-config file, which specifies the HTTPS proxy type. Following is a sample PAC file:
function FindProxyForURL(url, host) {
    // Define an array of hosts that should bypass proxy
    var exclusions = [
        "*.goskope.com",
        "windowsupdate.microsoft.com",
        "download.microsoft.com",
        "*.windowsupdate.microsoft.com",
        "*.update.microsoft.com",
        "*.windowsupdate.com",
        "*.download.windowsupdate.com",
        "*.delivery.mp.microsoft.com"
    ];
    // Define an array of hosts that should use the proxy
    // Used to include hosts which are contained within a wildcard exclusion
    var inclusions = [
    ];
    // Use proxy by default
    var useProxy = true;
    // Work out which proxy type to use
    if (isPlainHostName(host)) {
        useProxy = false;
    } else {
        // Don't proxy local IP addresses (RFC1918) and Bogon
        if (isInNet(host, "10.0.0.0", "255.0.0.0") || isInNet(host, "100.64.0.0", "255.192.0.0") ||
            isInNet(host, "127.0.0.0", "255.0.0.0") || isInNet(host, "169.254.0.0", "255.255.0.0") ||
            isInNet(host, "172.16.0.0", "255.240.0.0") || isInNet(host, "192.0.0.0", "255.255.255.0") ||
            isInNet(host, "192.0.2.0", "255.255.255.0") || isInNet(host, "192.168.0.0", "255.255.0.0") ||
            isInNet(host, "198.18.0.0", "255.254.0.0") || isInNet(host, "198.51.100.0", "255.255.255.0") ||
            isInNet(host, "203.0.113.0", "255.255.255.0") || isInNet(host, "224.0.0.0", "240.0.0.0") ||
            isInNet(host, "240.0.0.0", "240.0.0.0")) {
            useProxy = false;
        }
        // Iterate through the list of exclusions and don't use the proxy if there is a match
        for (var i = 0; i < exclusions.length; i++) {
            if (shExpMatch(host, exclusions[i])) {
                useProxy = false;
            }
        }
        // Iterate through the list of inclusions and use the proxy if there is a match
        for (var i = 0; i < inclusions.length; i++) {
            if (shExpMatch(host, inclusions[i])) {
                useProxy = true;
            }
        }
    }
    // Return the proxy setting
    if (useProxy) {
        return "HTTPS eproxy-<Tenant Name>.goskope.com:443";
    } else {
        return "DIRECT";
    }
}
Replace the <Tenant Name> with your Netskope tenant account name.
Enabling the Cloud Explicit Proxy HTTPS Access Method
Following are the REST APIs for /api/v2/steering/cloudexplicityproxy/https in the Netskope Swagger API Documentation:

You can verify the status of Cloud Explicit Proxy HTTPS using the above GET request.
If Cloud Explicit Proxy HTTPS is disabled, you can enable it using the PUT request with a payload/body of:
{
  "enabled": true
}
Uploading Your Central Authority Certificate
You must upload the Central Authority (CA) certificate to the Netskope tenant using the following REST APIs for /api/v2/services/authentication/mtls:
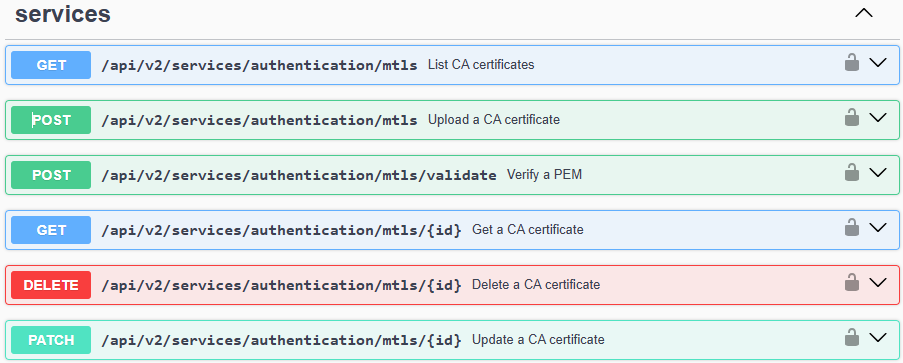
Your endpoint (e.g., browser or device) must use a certificate signed by the same CA.
Formatting the PEM File
A PEM file must start with -----BEGIN CERTIFICATE----- and then a series of Base64 encoded data across multiple new lines ending with -----END CERTIFICATE-----. For example:
-----BEGIN CERTIFICATE-----
MIIEJjCCAw6gAwIBAgIIHT5EHasPlRYwDQYJKoZIhvcNAQELBQAwZjEcMBoGA1UE
AxMTTmV0c2tvcGUgQ0VQIFRMUyBDQTELMAkGA1UEBhMCQVUxEzARBgNVBAgTClF1
ZWVuc2xhbmQxETAPBgNVBAcTCEJyaXNiYW5lMREwDwYDVQQKEwhOZXRza29wZTAe
Fw0yNDExMjMwMzIzNDZaFw0zNDExMjEwMzIzNDZaMGYxHDAaBgNVBAMTE05ldHNr
b3BlIENFUCBUTFMgQ0ExCzAJBgNVBAYTAkFVMRMwEQYDVQQIEwpRdWVlbnNsYW5k
MREwDwYDVQQHEwhCcmlzYmFuZTERMA8GA1UEChMITmV0c2tvcGUwggEiMA0GCSqG
SIb3DQEBAQUAA4IBDwAwggEKAoIBAQDJ8zXZEXOMCIfUIm6IfKHcquM+H/HvAsNn
OfMvsMLo0+u79M9zuqR4W7Jqec6hsHlE/jKfKBbTwqmZHBLpX6kiU54YMlAo4KId
3p0imqbM4/nBLkFZ2D00/35uGy4dzZGR+GRU9TXRXKmZfSUmGQZbO9OceEF3YTMc
bH+Y2zZC+aGBXVG1qVqPP5ZYHnXTW1ukBGvpQQzu7+3G2b0t6dK3+ixw34NupuHF
EzjstI9g/6JupEBY+o5fpks0yPksGeYrEa58Qd3snJu91WF3Sm7m8GV2v8cxSXDx
XK2jr1SwLZ/MrLpstIm6pIg8yyDkniFocEko3HTU6Iq1Vdh0aOZDAgMBAAGjgdcw
gdQwHQYDVR0OBBYEFLphwgCCGUhjmFp4OjorgjzDxrDPMIGXBgNVHSMEgY8wgYyA
FLphwgCCGUhjmFp4OjorgjzDxrDPoWqkaDBmMRwwGgYDVQQDExNOZXRza29wZSBD
RVAgVExTIENBMQswCQYDVQQGEwJBVTETMBEGA1UECBMKUXVlZW5zbGFuZDERMA8G
A1UEBxMIQnJpc2JhbmUxETAPBgNVBAoTCE5ldHNrb3BlgggdPkQdqw+VFjAMBgNV
HRMEBTADAQH/MAsGA1UdDwQEAwIBBjANBgkqhkiG9w0BAQsFAAOCAQEAFWlZrfVQ
aBYyISQP2Wso8047/2fmu+f6bH+DUTPqfOK174808VETv0NXVCbKjb0JBvSPTTES
sZ2QdazPb9LmIk1pxRW6soLR8Al5tpGGJLP8wgQH/so2LJvKE+FlTcC5E3KemiT6
RbX73r7Hh+BDT5q2SqgP6TrVWnqv+qBnamYon6/gpvQuviu5ARKxdE/SIXxbZNiF
oXTnlbWRABlN6X+1ejy1JhWb26jBeYaKGoeiFUrU2kCUnBvE1NqP1+jgdo8Lq5jI
oMBU4hvyiUHjBqVro3ehpkcQm7q4tJkGURtimk/RdRglyTKAAYOzV8HOM9vfxVkY
rqweLB/r6aOy/A==
-----END CERTIFICATE-----
To upload a PEM file using the /services/authentication/mtls API endpoint, you must reformat the PEM file into the JSON format (a single line with new-line characters \n added).
You can use jq to do this for you:
jq -sR . <Your_PEM_File>
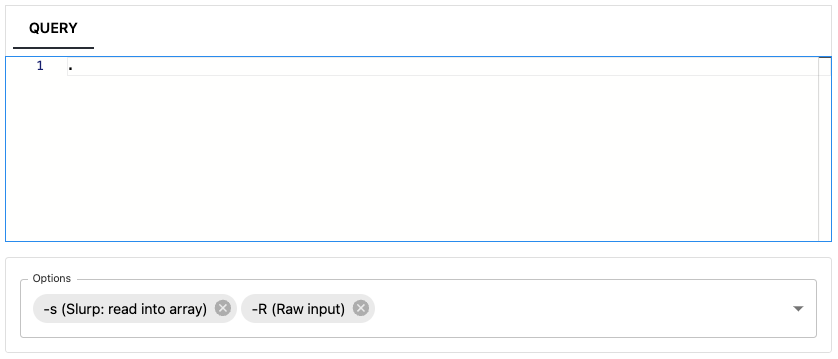
If you don’t have jq installed, you can use The JQ Playground online:
-
Set the QUERY to full stop.
-
Under Options, choose -s (Slurp: read into array) and -R (Raw input).
-
Under JSON, copy and paste the PEM file contents.
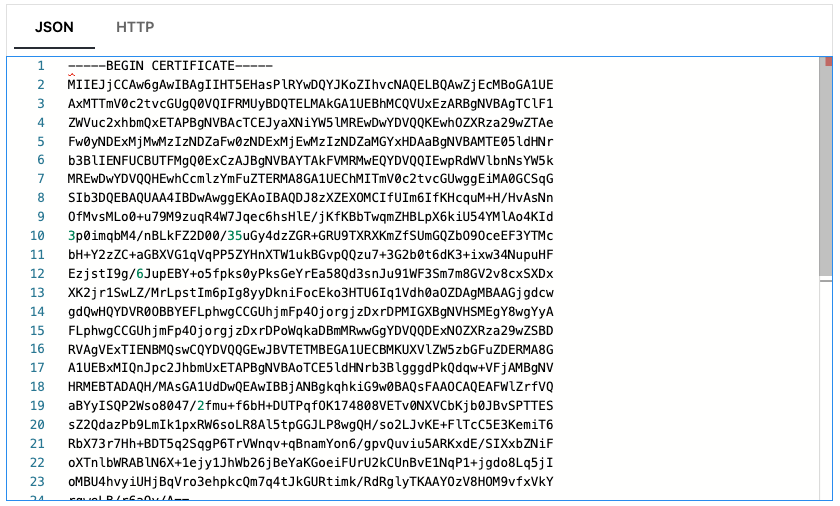
After reformatting in the JSON format with a single line with the new-line
\ncharacters inserted, your PEM file should look similar to this:-----BEGIN CERTIFICATE-----\nMIIEJjCCAw6gAwIBAgIIHT5EHasPlRYwDQYJKoZIhvcNAQELBQAwZjEcMBoGA1UE\nAxMTTmV0c2tvcGUgQ0VQIFRMUyBDQTELMAkGA1UEBhMCQVUxEzARBgNVBAgTClF1\nZWVuc2xhbmQxETAPBgNVBAcTCEJyaXNiYW5lMREwDwYDVQQKEwhOZXRza29wZTAe\nFw0yNDExMjMwMzIzNDZaFw0zNDExMjEwMzIzNDZaMGYxHDAaBgNVBAMTE05ldHNr\nb3BlIENFUCBUTFMgQ0ExCzAJBgNVBAYTAkFVMRMwEQYDVQQIEwpRdWVlbnNsYW5k\nMREwDwYDVQQHEwhCcmlzYmFuZTERMA8GA1UEChMITmV0c2tvcGUwggEiMA0GCSqG\nSIb3DQEBAQUAA4IBDwAwggEKAoIBAQDJ8zXZEXOMCIfUIm6IfKHcquM+H/HvAsNn\nOfMvsMLo0+u79M9zuqR4W7Jqec6hsHlE/jKfKBbTwqmZHBLpX6kiU54YMlAo4KId\n3p0imqbM4/nBLkFZ2D00/35uGy4dzZGR+GRU9TXRXKmZfSUmGQZbO9OceEF3YTMc\nbH+Y2zZC+aGBXVG1qVqPP5ZYHnXTW1ukBGvpQQzu7+3G2b0t6dK3+ixw34NupuHF\nEzjstI9g/6JupEBY+o5fpks0yPksGeYrEa58Qd3snJu91WF3Sm7m8GV2v8cxSXDx\nXK2jr1SwLZ/MrLpstIm6pIg8yyDkniFocEko3HTU6Iq1Vdh0aOZDAgMBAAGjgdcw\ngdQwHQYDVR0OBBYEFLphwgCCGUhjmFp4OjorgjzDxrDPMIGXBgNVHSMEgY8wgYyA\nFLphwgCCGUhjmFp4OjorgjzDxrDPoWqkaDBmMRwwGgYDVQQDExNOZXRza29wZSBD\nRVAgVExTIENBMQswCQYDVQQGEwJBVTETMBEGA1UECBMKUXVlZW5zbGFuZDERMA8G\nA1UEBxMIQnJpc2JhbmUxETAPBgNVBAoTCE5ldHNrb3BlgggdPkQdqw+VFjAMBgNV\nHRMEBTADAQH/MAsGA1UdDwQEAwIBBjANBgkqhkiG9w0BAQsFAAOCAQEAFWlZrfVQ\naBYyISQP2Wso8047/2fmu+f6bH+DUTPqfOK174808VETv0NXVCbKjb0JBvSPTTES\nsZ2QdazPb9LmIk1pxRW6soLR8Al5tpGGJLP8wgQH/so2LJvKE+FlTcC5E3KemiT6\nRbX73r7Hh+BDT5q2SqgP6TrVWnqv+qBnamYon6/gpvQuviu5ARKxdE/SIXxbZNiF\noXTnlbWRABlN6X+1ejy1JhWb26jBeYaKGoeiFUrU2kCUnBvE1NqP1+jgdo8Lq5jI\noMBU4hvyiUHjBqVro3ehpkcQm7q4tJkGURtimk/RdRglyTKAAYOzV8HOM9vfxVkY\nrqweLB/r6aOy/A==\n-----END CERTIFICATE-----
Uploading/Adding a New CA
To upload/add the new CA, you must format for the body of the POST as follows:
{
	"name": "Netskope CEP TLS CA",
	"description": "Netskope CEP TLS CA",
	"pem": "-----BEGIN CERTIFICATE-----\nMIIEJjCCAw6gAwIBAgIIHT5EHasPlRYwDQYJKoZIhvcNAQELBQAwZjEcMBoGA1UE\nAxMTTmV0c2tvcGUgQ0VQIFRMUyBDQTELMAkGA1UEBhMCQVUxEzARBgNVBAgTClF1\nZWVuc2xhbmQxETAPBgNVBAcTCEJyaXNiYW5lMREwDwYDVQQKEwhOZXRza29wZTAe\nFw0yNDExMjMwMzIzNDZaFw0zNDExMjEwMzIzNDZaMGYxHDAaBgNVBAMTE05ldHNr\nb3BlIENFUCBUTFMgQ0ExCzAJBgNVBAYTAkFVMRMwEQYDVQQIEwpRdWVlbnNsYW5k\nMREwDwYDVQQHEwhCcmlzYmFuZTERMA8GA1UEChMITmV0c2tvcGUwggEiMA0GCSqG\nSIb3DQEBAQUAA4IBDwAwggEKAoIBAQDJ8zXZEXOMCIfUIm6IfKHcquM+H/HvAsNn\nOfMvsMLo0+u79M9zuqR4W7Jqec6hsHlE/jKfKBbTwqmZHBLpX6kiU54YMlAo4KId\n3p0imqbM4/nBLkFZ2D00/35uGy4dzZGR+GRU9TXRXKmZfSUmGQZbO9OceEF3YTMc\nbH+Y2zZC+aGBXVG1qVqPP5ZYHnXTW1ukBGvpQQzu7+3G2b0t6dK3+ixw34NupuHF\nEzjstI9g/6JupEBY+o5fpks0yPksGeYrEa58Qd3snJu91WF3Sm7m8GV2v8cxSXDx\nXK2jr1SwLZ/MrLpstIm6pIg8yyDkniFocEko3HTU6Iq1Vdh0aOZDAgMBAAGjgdcw\ngdQwHQYDVR0OBBYEFLphwgCCGUhjmFp4OjorgjzDxrDPMIGXBgNVHSMEgY8wgYyA\nFLphwgCCGUhjmFp4OjorgjzDxrDPoWqkaDBmMRwwGgYDVQQDExNOZXRza29wZSBD\nRVAgVExTIENBMQswCQYDVQQGEwJBVTETMBEGA1UECBMKUXVlZW5zbGFuZDERMA8G\nA1UEBxMIQnJpc2JhbmUxETAPBgNVBAoTCE5ldHNrb3BlgggdPkQdqw+VFjAMBgNV\nHRMEBTADAQH/MAsGA1UdDwQEAwIBBjANBgkqhkiG9w0BAQsFAAOCAQEAFWlZrfVQ\naBYyISQP2Wso8047/2fmu+f6bH+DUTPqfOK174808VETv0NXVCbKjb0JBvSPTTES\nsZ2QdazPb9LmIk1pxRW6soLR8Al5tpGGJLP8wgQH/so2LJvKE+FlTcC5E3KemiT6\nRbX73r7Hh+BDT5q2SqgP6TrVWnqv+qBnamYon6/gpvQuviu5ARKxdE/SIXxbZNiF\noXTnlbWRABlN6X+1ejy1JhWb26jBeYaKGoeiFUrU2kCUnBvE1NqP1+jgdo8Lq5jI\noMBU4hvyiUHjBqVro3ehpkcQm7q4tJkGURtimk/RdRglyTKAAYOzV8HOM9vfxVkY\nrqweLB/r6aOy/A==\n-----END CERTIFICATE-----",
	"user_attribute": "commonName",
	"enabled": true,
	"check_revocation": false
}
-
name: Enter a name for the CA.
-
description: Enter a description for the CA.
-
pem: Enter the contents of the reformatted single-line PEM file.
-
user_attribute: The Certificate Subject parameter where the email (user@example.com) has been added. Netskope recommends using
commonName, but you can also useemailAddress. -
enabled: Enter
trueorfalse. -
check_revocation: Enter
falsebecause this field isn’t currently supported in Beta.
If successful, you will see a similar response:
{
    "id": "4",
    "name": "Netskope CEP TLS CA",
    "description": "Netskope CEP TLS CA",
    "user_attribute": "commonName",
    "enabled": true,
    "check_revocation": false,
    "create_by": "Postman",
    "create_time": "2024-11-28T04:42:35.573383872Z",
    "modify_by": "Postman",
    "modify_time": "2024-11-28T04:42:35.573383872Z",
    "pem": "-----BEGIN CERTIFICATE-----\nMIIEJjCCAw6gAwIBAgIIHT5EHasPlRYwDQYJKoZIhvcNAQELBQAwZjEcMBoGA1UE\nAxMTTmV0c2tvcGUgQ0VQIFRMUyBDQTELMAkGA1UEBhMCQVUxEzARBgNVBAgTClF1\nZWVuc2xhbmQxETAPBgNVBAcTCEJyaXNiYW5lMREwDwYDVQQKEwhOZXRza29wZTAe\nFw0yNDExMjMwMzIzNDZaFw0zNDExMjEwMzIzNDZaMGYxHDAaBgNVBAMTE05ldHNr\nb3BlIENFUCBUTFMgQ0ExCzAJBgNVBAYTAkFVMRMwEQYDVQQIEwpRdWVlbnNsYW5k\nMREwDwYDVQQHEwhCcmlzYmFuZTERMA8GA1UEChMITmV0c2tvcGUwggEiMA0GCSqG\nSIb3DQEBAQUAA4IBDwAwggEKAoIBAQDJ8zXZEXOMCIfUIm6IfKHcquM+H/HvAsNn\nOfMvsMLo0+u79M9zuqR4W7Jqec6hsHlE/jKfKBbTwqmZHBLpX6kiU54YMlAo4KId\n3p0imqbM4/nBLkFZ2D00/35uGy4dzZGR+GRU9TXRXKmZfSUmGQZbO9OceEF3YTMc\nbH+Y2zZC+aGBXVG1qVqPP5ZYHnXTW1ukBGvpQQzu7+3G2b0t6dK3+ixw34NupuHF\nEzjstI9g/6JupEBY+o5fpks0yPksGeYrEa58Qd3snJu91WF3Sm7m8GV2v8cxSXDx\nXK2jr1SwLZ/MrLpstIm6pIg8yyDkniFocEko3HTU6Iq1Vdh0aOZDAgMBAAGjgdcw\ngdQwHQYDVR0OBBYEFLphwgCCGUhjmFp4OjorgjzDxrDPMIGXBgNVHSMEgY8wgYyA\nFLphwgCCGUhjmFp4OjorgjzDxrDPoWqkaDBmMRwwGgYDVQQDExNOZXRza29wZSBD\nRVAgVExTIENBMQswCQYDVQQGEwJBVTETMBEGA1UECBMKUXVlZW5zbGFuZDERMA8G\nA1UEBxMIQnJpc2JhbmUxETAPBgNVBAoTCE5ldHNrb3BlgggdPkQdqw+VFjAMBgNV\nHRMEBTADAQH/MAsGA1UdDwQEAwIBBjANBgkqhkiG9w0BAQsFAAOCAQEAFWlZrfVQ\naBYyISQP2Wso8047/2fmu+f6bH+DUTPqfOK174808VETv0NXVCbKjb0JBvSPTTES\nsZ2QdazPb9LmIk1pxRW6soLR8Al5tpGGJLP8wgQH/so2LJvKE+FlTcC5E3KemiT6\nRbX73r7Hh+BDT5q2SqgP6TrVWnqv+qBnamYon6/gpvQuviu5ARKxdE/SIXxbZNiF\noXTnlbWRABlN6X+1ejy1JhWb26jBeYaKGoeiFUrU2kCUnBvE1NqP1+jgdo8Lq5jI\noMBU4hvyiUHjBqVro3ehpkcQm7q4tJkGURtimk/RdRglyTKAAYOzV8HOM9vfxVkY\nrqweLB/r6aOy/A==\n-----END CERTIFICATE-----",
    "cert_info": {
        "subject": {
            "common_name": "Netskope CEP TLS CA",
            "organization": [
                "Netskope"
            ],
            "organizational_unit": null,
            "country": [
                "AU"
            ],
            "locality": [
                "Brisbane"
            ],
            "province": [
                "Queensland"
            ],
            "street_address": null,
            "postal_code": null,
            "serial_number": ""
        },
        "issuer": {
            "common_name": "Netskope CEP TLS CA",
            "organization": [
                "Netskope"
            ],
            "organizational_unit": null,
            "country": [
                "AU"
            ],
            "locality": [
                "Brisbane"
            ],
            "province": [
                "Queensland"
            ],
            "street_address": null,
            "postal_code": null,
            "serial_number": ""
        },
        "public_key": {
            "algorithm": "RSA",
            "fingerprint": "378d7fee5fd886a720b63088304380c1e373fc690ff253715965563fc849d1a0"
        },
        "expire_time": "2034-11-21T03:23:46Z",
        "extensions": {
            "crl": "",
            "ocsp": ""
        }
    }
}
Using Cloud Explicit Proxy HTTPS in SSL Decryption Policies
To use Cloud Explicit Proxy HTTPS as an access method for your SSL Decryption policy:
-
Go to Policies > SSL Decryption.
-
Click Add Policy.
-
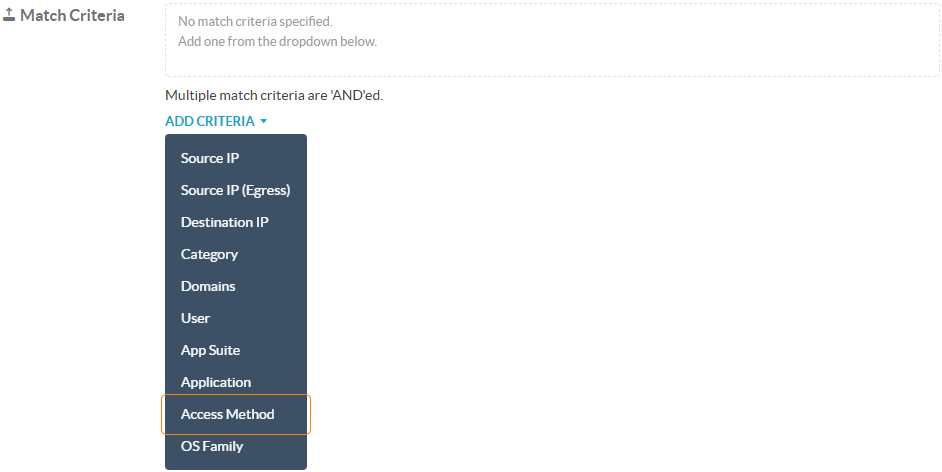
On the New SSL Decryption Policy page, for Match Criteria, click Add Criteria and then Access Method.
-
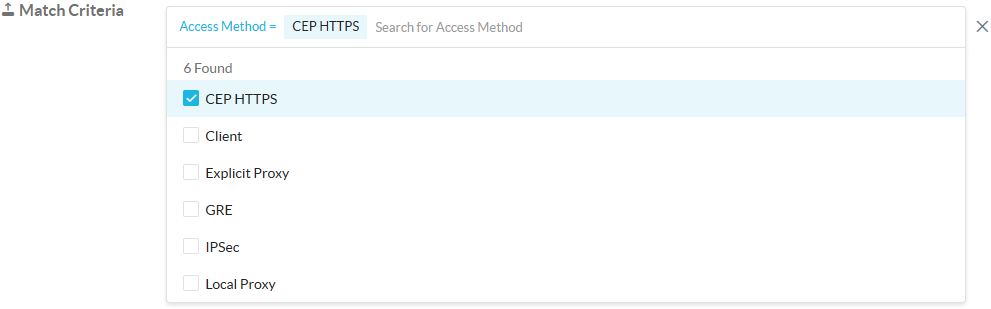
Set the Access Method to CEP HTTPS.
-
Configure the rest of the fields accordingly. To learn more: Add a Policy for SSL Decryption.
Using Cloud Explicit Proxy HTTPS in Real-Time Protection Policies
To use Cloud Explicit Proxy HTTPS as an access method for your Real-Time Protection policy:
-
Go to Policies > Real-time Protection.
-
Click New Policy, and then choose which type of policy you want to create.
-
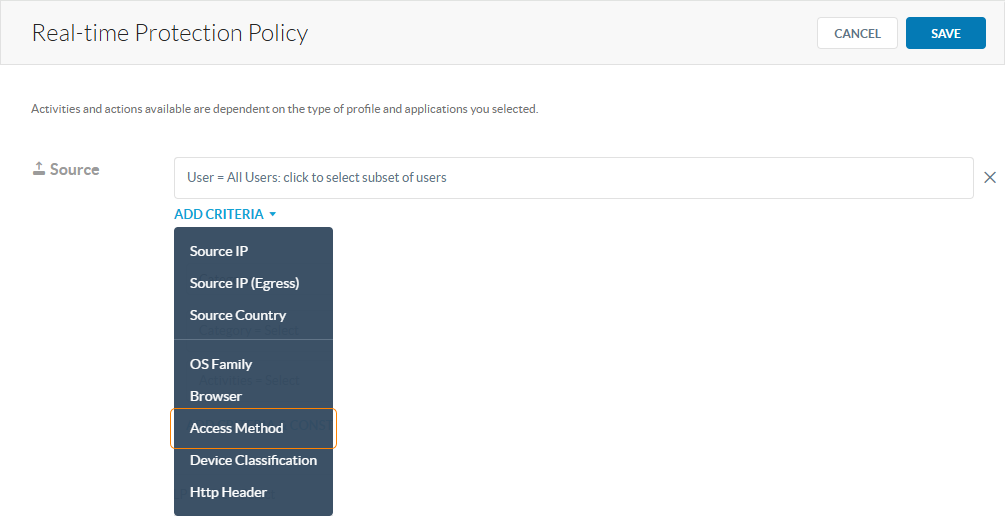
On the Real-time Protection Policy page, for Source, click Add Criteria and then Access Method.
-
Set the Access Method to CEP HTTPS.

-
Configure the rest of the fields accordingly. To learn more: Real-time Protection Policies.
Monitoring Cloud Explicit Proxy HTTPS Events in Skope IT
To see Cloud Explicit Proxy HTTPS events in Skope IT:
-
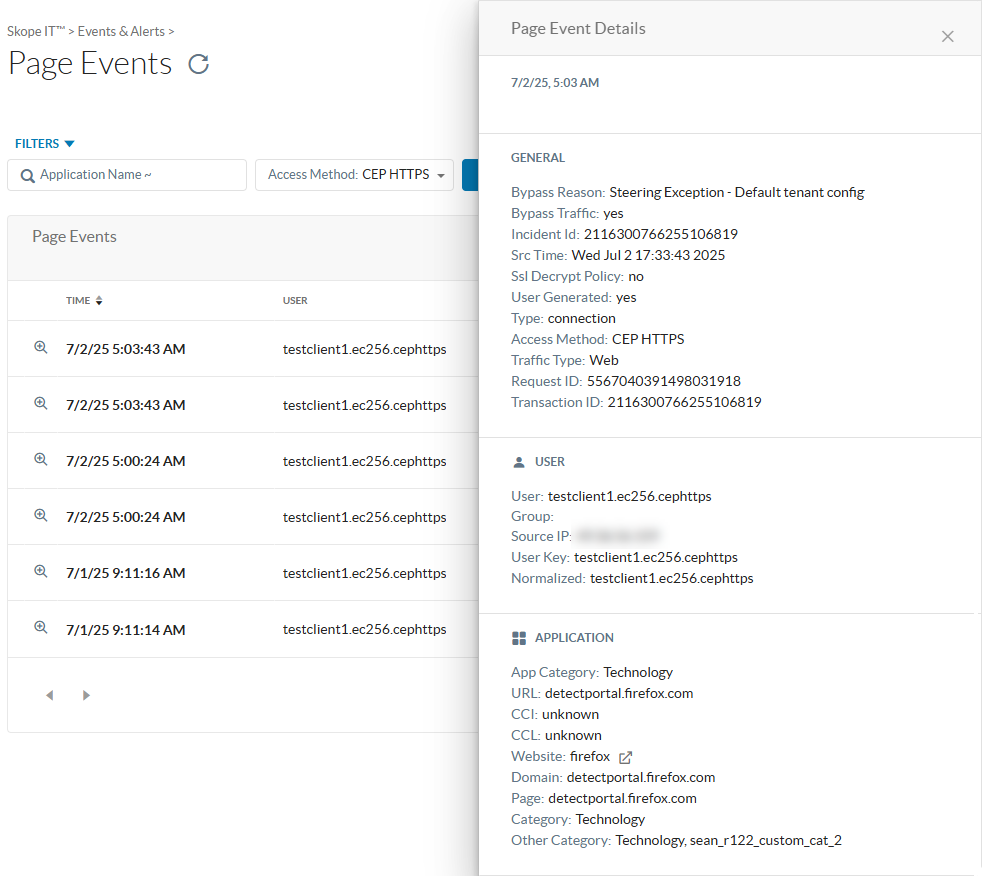
Go to Skope IT > Page Events.
-
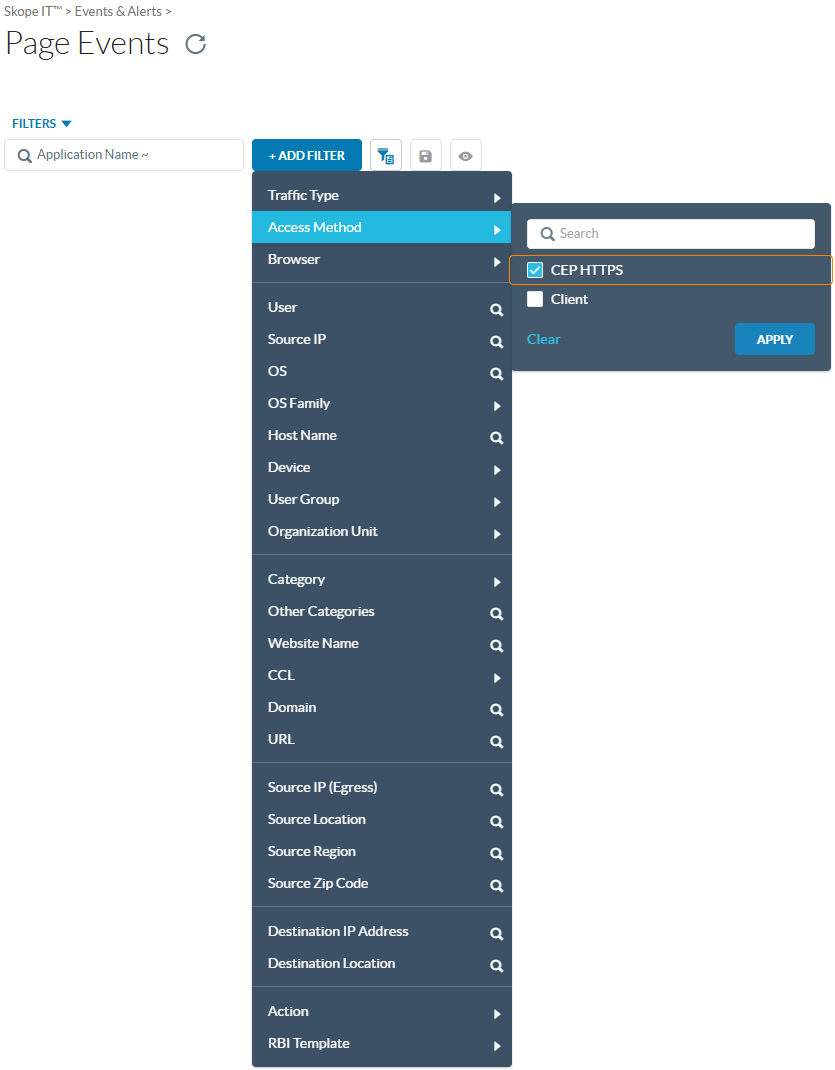
Click +Add Filter, and go to Access Method and then select CEP HTTPS to see all the related page events.
-
Click View Details to see more information about the event.