

Directory Importer connects to all the domain controllers (DC) selected in the Select Domains dialog box if the selected Directory Service is Active Directory; otherwise, Directory Importer connects to the LDAP server configured and periodically fetches users and groups information to post that info to your tenant instance in the Netskope cloud. Administrators can leverage user and group membership information to define access control policies and perform administrative tasks, such as sending Netskope Client installation invitations for inline deployment.
– If accounts have been Disabled but not deleted in Active Directory, it can also be deleted from the Netskope tenant; if required (optional feature, please contact support to get this enabled).
To watch a video about how you can use email identifiers to import users, click play.
When the Netskope Adapters open, the first tab displayed is for Directory Importer.

Active Directory v1 and v2 settings are distributed into the following sections:
Service Type Settings
Userinfo URL
The URL to synchronize user info with the Netskope cloud. This URL can be obtained from Settings > Tools > Directory Tools in the Netskope tenant UI.
Due to the behavior of the new encrypted format, the UserInfo URL field in Netskope Adaptors Configuration Utility appears blank if the encrypted file cannot be decrypted. This is typically caused by password expiration or configuration file replacement. In such cases, you will need to manually re-enter the value.
Directory Settings
Directory Settings includes the following options:
Directory Service
Includes the following options:
Active Directory
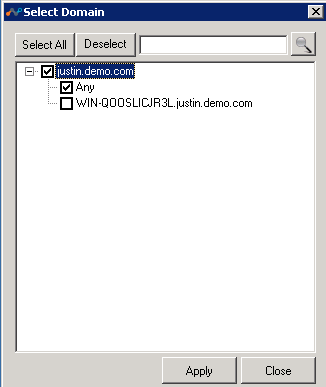
Directory Importer automatically detects all of the domains in the forest and starts fetching information. The Select Domain button opens this dialog box so you can select any domains you want to include.
Active Directory V2 (AD v2)
While Active Directory queries all data from the domain forest, it may adversely affect query performance. The AD v2 option improves query performance by querying only the changed users or groups from all the domains.

The use of AD v2 is dependent on the following:
-
LDAP Server Capability: 1.2.840.113556.1.4.417(LDAP_SERVER_SHOW_DELETED_OID) ([MS-ADTS]: LDAP_SERVER_SHOW_DELETED_OID ).
-
uSNChanged (USN-Changed attribute – Win32 apps ) attribute.
-
AD Importer service account credentials: Requires admin privileges with the following access:
-
Read permission to all the OUs where the users or groups reside.
-
Read access to the deleted objects.
-
-
Adding read permission of “Deleted Objects“ for specific users:
-
Login to any domain controller in the domain with a user account that is a member of the domain admins group.
-
Go to Start > Run and type cmd.
-
Type the following command:
dsacls <deleted_object_dn> /takeownershipwhere,deleted_object_dnis the distinguished name of the deleted directory object.For example:
dsacls “CN=Deleted Objects,DC=gng,DC=local” /takeownership -
Type the following command to grant permission to view objects in the Deleted Objects container to a user or a group:
dsacls <deleted_object_dn> /G <user_or_group>:<Permissions>
where,deleted_object_dnis the distinguished name of the deleted directory object anduser_or_groupis the user or group for whom the permission applies, and Permissions is the permission to grant.
-
-
Run this command for each domain in the forest before configuring the user for service command.
AD Importer Process Overview
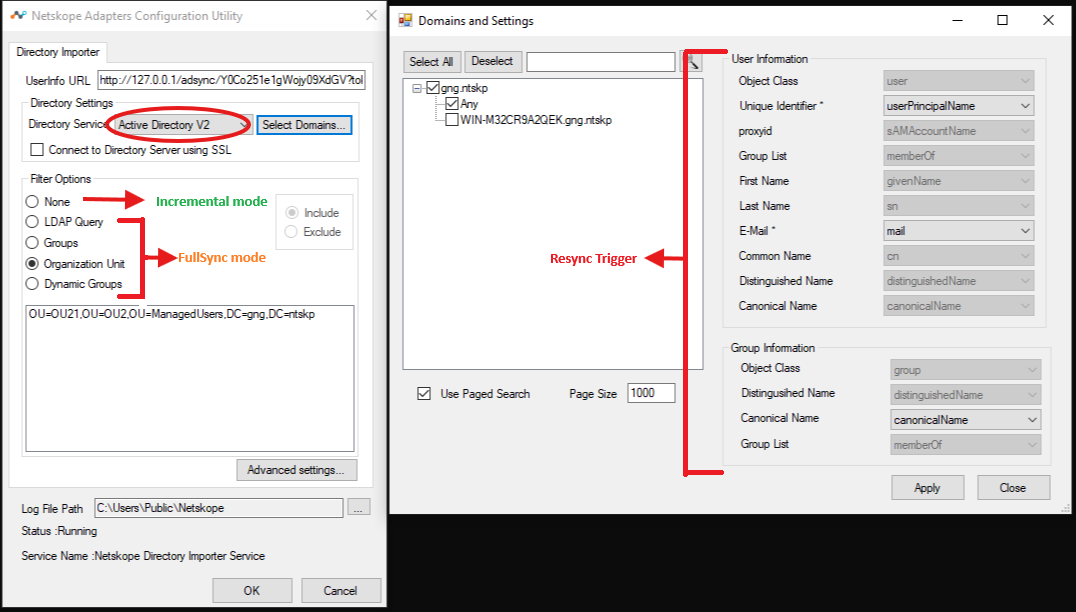
ADImporterV2 consists of a new design to query ActiveDirectory that runs in the following modes:
-
Incremental Mode: This is the most optimized for performance where it uses incremental query. Hence it gets only the modified object from the AD.
When: ADImporter is configured Active Directory V2 with None filter.
The AD importer now verifies the invocationID and logs in case of any InvocationID verification failure. Active Directory v2 relies on uSNChanged value in an incremental mode to get the modified object from Active Directory. Refer to Example Code to Retrieve Changes Using USNChanged, to understand the InvocationID before using the uSNChanged value in the query. -
FullSync mode: It is not possible to use incremental query in Filters configuration, because the data set received is filtered and not receive the object that goes out of scope. In order to calculate the delta locally, use the FullSync mode.
When to use: ADImporter is configured Active Directory V2 with other than None filter.
-
Resync Mode: If there is a change in the attribute mapping, the datastore schema changes. This needs migration of all users and groups to a new schema.
When: ADImporter is configured Active Directory V2 and there is a change in attribute mapping or secureUPN value change.
Other Directory Services
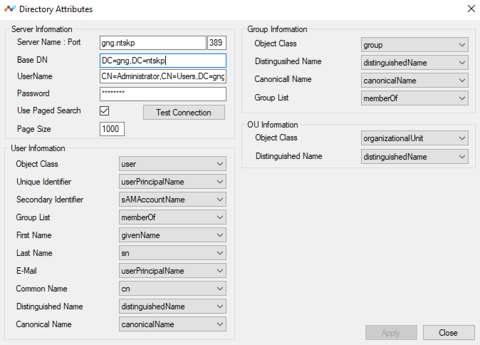
Directory Importer connects to the LDAP server specified in the Directory Attributes dialog box, and then starts fetching all the user and group information. Click Set Attributes to open this dialog.
-
Server Name: Port Host name or IP Address and Port number of the LDAP directory server.
-
Base DN: Directory root from which the Directory Importer starts the search for users.
-
Username: The username for the account with rights to read data from the directory server.
-
Password: The password for the username account entered above.
-
Use Paged Search: Enables a paged search if the directory server supports it.
-
Page Size: The page size to be used for search.
-
Test Connection: After all of the above information is entered, click this button to test the connection and validate the username. On successful, validation, Directory Importer would try to fill User Information, Group Information and OU Information with the class names and attribute names found in the directory schema.
-
User Information, Group Information and OU Information: The class and attribute names required by Directory Importer to read user information by directory server. If the equivalent attribute names differ in other directory servers from that of Active Directory, you can select the appropriate value from the dropdown lists. When you hover the cursor over an attribute names, the meaning of the attribute is displayed in a popup message.
Filter Settings
Filter Options
Filter Options includes the following:
None
No filtering is applied while searching for users (Include & Exclude options are disabled when you select this option). All the users and their groups in the selected scope are uploaded to your tenant instance in the Netskope cloud.
LDAP Query
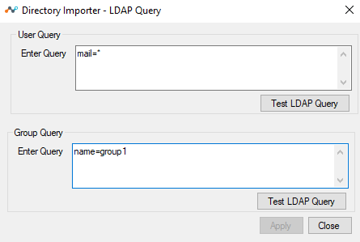
Select LDAP Query to open this dialog box, which enables filtering on LDAP queries. After enteing a query, click Test LDAP Query to ensure it works.
To configure:
-
Enter the user and group queries in the respective boxes.
-
Click Apply and close the window.
-
Click OK on the main window.
Groups
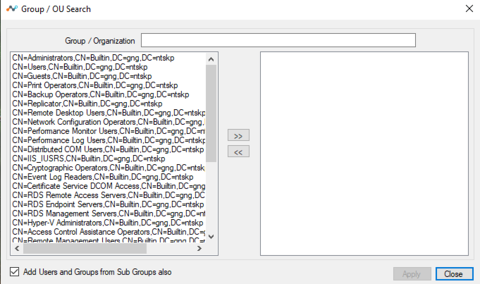
Select Groups to open this dialog box, which contains the names of the directory groups. Select the Groups from which you need to import users and groups. If you want to import users and groups from member groups as well(nested lookup), select the check box Add users and groups from Sub Groups also. Press Apply then press Close.
– Active Directory V2 mode now supports importing only a subset of users and groups from domains which are members of specific groups.
– Include, Exclude options in filter options are grayed out as only Include option is supported in Active Directory V2 mode.
Organization Unit (OU)
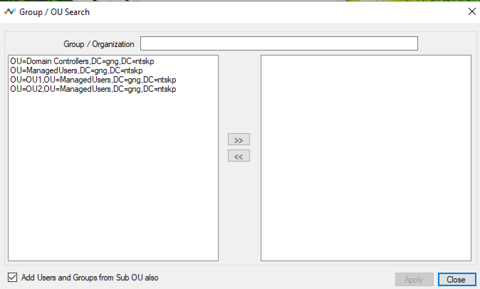
Select Organization Group to open this dialog box, which contains the names of OUs. Select the OUs from which you want to import users and groups. If you want to import users and groups from sub OUs as well, select the checkbox Add Users and Groups from Sub OU also. Press Apply then press Close.
– Include, Exclude options in filter options are grayed out as only Include option is supported in Active Directory V2 mode.
Dynamic Groups
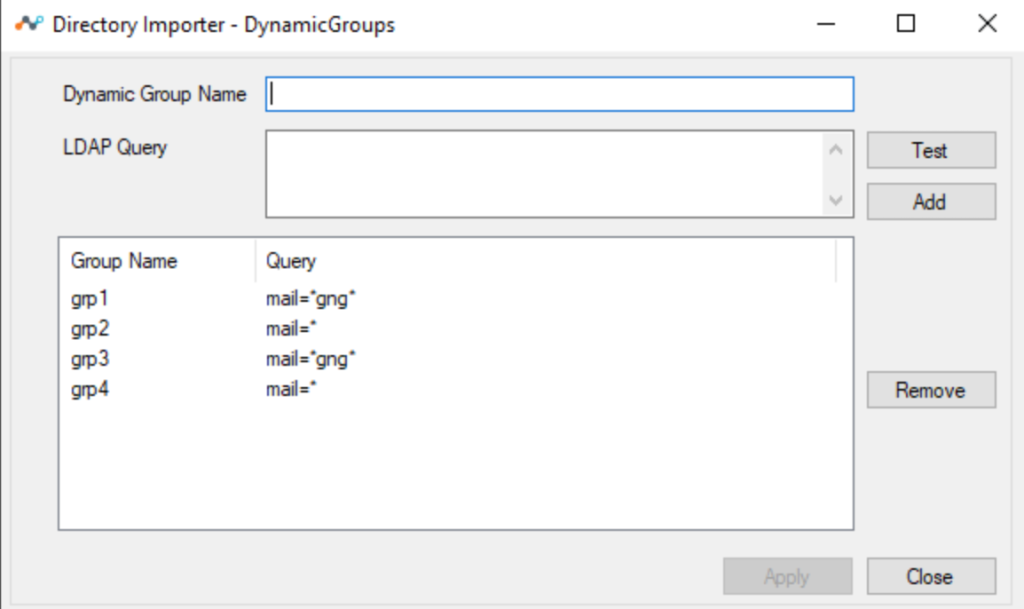
Select Dynamic Groups to open this dialog box, which has the options to specify an LDAP query to create a dynamic groups.
To configure:
-
Select Dynamic Groups in the filter option.
-
Enter the dynamic group name and the corresponding LDAP member user query in the designated boxes.
-
Click Add.
-
Once all groups are added, click Apply and click OK in the main window.

Include
When selected, users that are part of the selected Groups or Domains are exported.
Exclude
When selected, users that are part of the Groups or Organizational Unit other than the ones in the filter are exported.
Domain and Attribute Mapping
Select Domains
Configure the domains that need to be imported. Also choose the specific DC to connect in a domain.
In Active Directory V2 only Unique Identifier, E-mail, and Canonical Name can be modified. All other mapping is fixed as it supports only Active Directory. Click Select Domains to view the options as displayed in the following image:
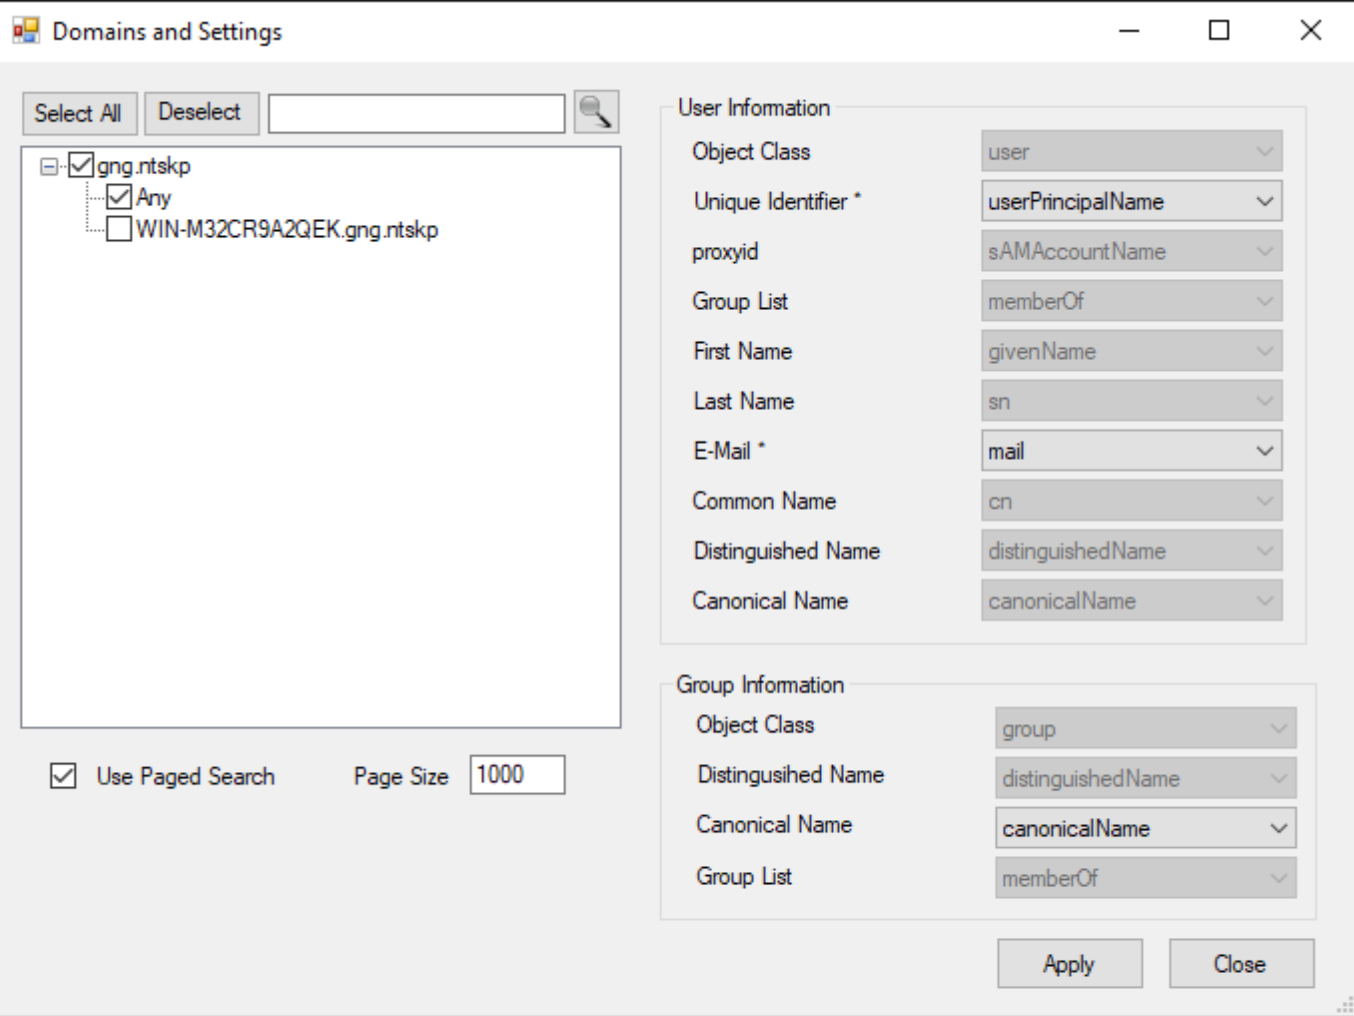
Active Directory V2 mode now allows pagination for LDAP requests using the Page Size option.
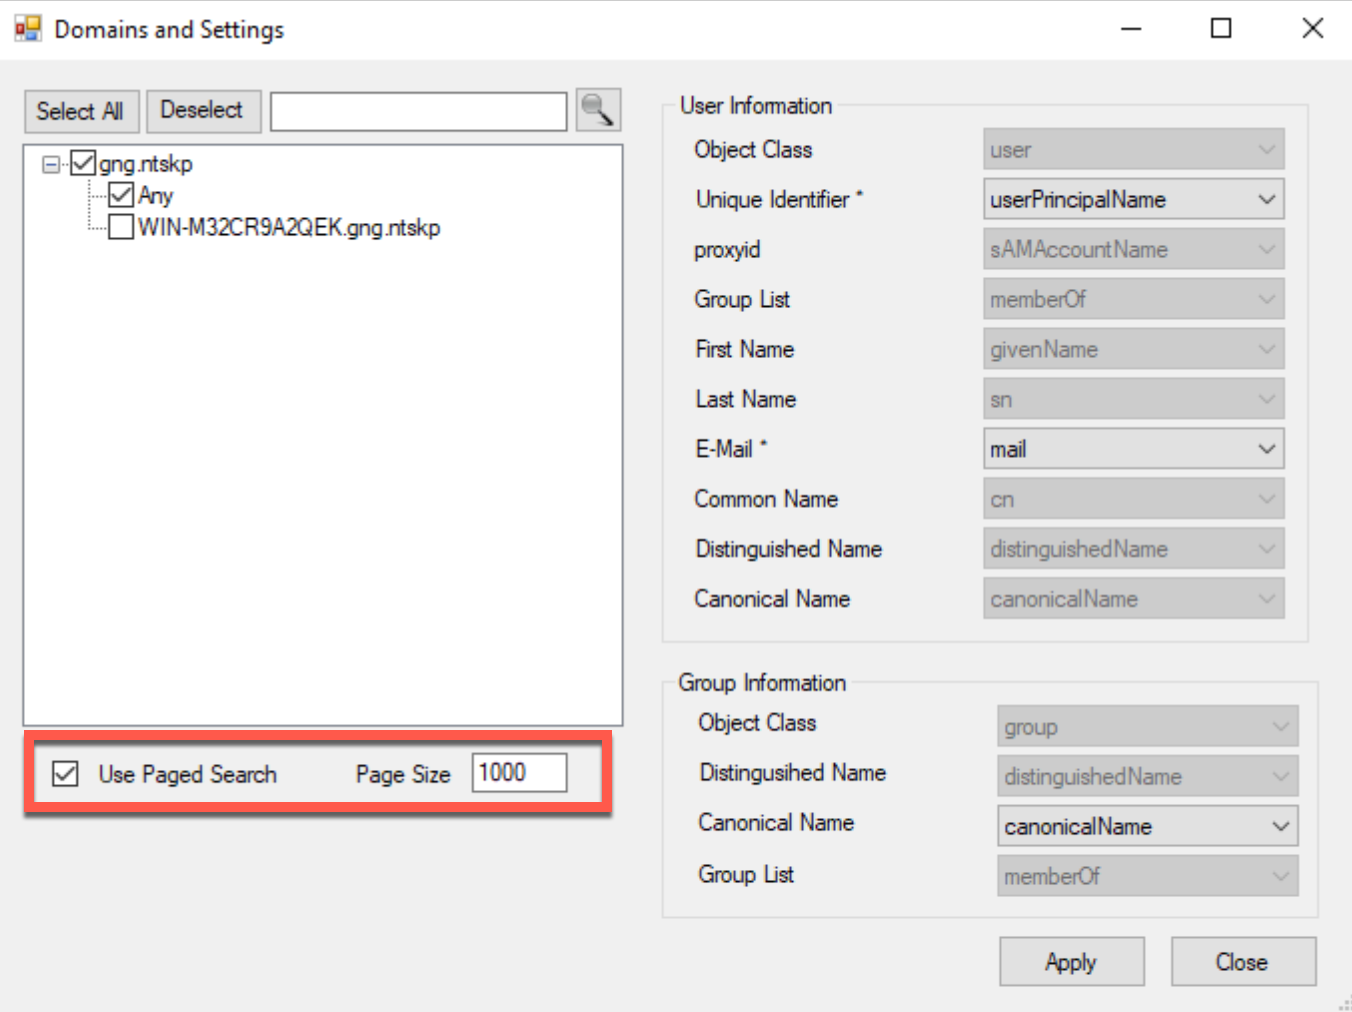
By default, pagination is enabled with a page size of 1000. You can change this setting on the Select Domain > Domains and Settings page of Active Directory V2. To adjust the page size:
-
Enable Used Page Search.
-
Enter the desired value in the Page Size field.
-
Click Apply and close the Select Domains page.
-
Click OK on the main page to apply the changes.
Connect to Directory Server using SSL
When selected, Directory Importer uses LDAP to connect to a directory server, and communications between Directory Importer and other servers are encrypted.
Advanced Settings
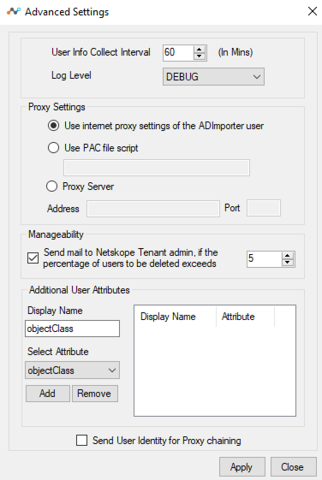
This includes the following options:
-
User Info Collect Interval: Enter the interval in minutes that the user details are exported to your tenant instance in the Netskope cloud.
-
Log Level: Select the granularity and detail level of logs written to the files specified in the Log File Path location. Log levels represents the severity of the message. There are four different log levels, ERROR, WARNING, INFO and DEBUG.
-
Proxy Settings: Use when an explicit proxy is present in the Directory Importer to Netskope cloud traffic flow.
By default, Directory Importer uses the proxy settings for the user for which the Directory Importer service is installed to communicate with the Netskope Cloud. Alternatively, you can define a proxy setting to be used for Directory Importer that communicates with the Netskope cloud.
-
Use Internet proxy settings of the Directory Importer user: Uses the proxy settings defined for the user account for which Directory Importer service is installed.
-
Use PAC file script: Uses the proxy settings defined by the PAC file from the URL entered here.
-
Proxy Server: Uses the explicit proxy server address and port number entered here.
-
-
Manageability: Stops AD Importer synchronization and sends the tenant admin a notification if the percentage of users deleted exceeds the number specified.
When enabled, ADImporter sync aborts if it detects a value greater than the configured value. It also notifies the primary tenant admin through an email. The admin must take manual action to continue the synchronization.
-
If an intended user performs the delete action, the admin can increase the delete percentage above the actual delete percentage or temporarily disable this feature. Once the sync is complete,revert the configuration.
-
If an unintended user deletes, troubleshoot the issue before taking further action.
-
-
Additional User Attributes: When Directory Importer contacts an AD or LDAP Server, in addition to getting the standard user information, it also reads the custom attributes added here. Like other information, added, modified, or deleted custom attributes are also sent periodically to the provisioner.
-
Send User Identity for Proxy Chaining: Select when the Netskope proxy chaining feature is used to steer traffic from the enterprise Bluecoat proxy to Netskope.
Log File Path
Shows the system location where the Directory Importer sends corresponding Netskope logs.
Status
Shows the status of the selected component.
Service Name
Shows the name of the active Directory Importer.
Active Directory V2 Settings
V2 specific settings are available in the file: C:\Users\Public\Netskope\DirectoryImporter_ADv2\config_controls_v2.json.
This file consists of the following fields:
-
flags: This is to control the behavior of ADImporterV2 code. For example to refresh the memberships in the store.
The value is always set to 0.
-
0x1: Membership reconcile
-
0x2: Override incremental query with full query(FullSync mode). This is required during OU rename or any other discrepancy between AD and datastore_v2.json where it needs to be refreshed.
-
0x4: Stale membership reconcile
-
-
log_settings: This field provides granular control logging in V2.
INITIALIZE  = 0x1
DISCOVERY   = 0x2
QUERY       = 0x4
LDAP_ENTRY  = 0x8
MEMBERSHIP  = 0x10
POSTPROCESS = 0x20
DUMPSTORE   = 0x40
RESYNC      = 0x80
-
user_filter: This configuration is to add the additional constraint to the LDAP filter to restrict the scope of the search. For example, by default ADImporterV2 uses (objectClass=user) for users. To restrict it to only users and exclude computer accounts, use the following value:
"user_filter": "(samAccountType=805306368)". -
group_filter: This configuration is to add the additional constraint to the LDAP filter to restrict the scope of the search. For example: by default ADImporterV2 uses (objectClass=group) for groups. To restrict it to only security groups We can use the following value
"group_filter": "(groupType:1.2.840.113556.1.4.803:=2147483648)". -
MAX_REQUEST_SIZE: This is to configure the max size of each user or group request.
Best Practices For Active Directory Migration from V1 to V2
You can migrate to V2 just by configuring ADImporter Directory Service to Active Directory V2. This triggers a Full Resync(it sends an update request for all the users and groups) for the first time, then it will do a delta sync for the consecutive iteration.
Use the following steps as best practice while migrating from V1 to V2:
-
Prepare: Review the existing V1 configuration and confirm if it aligns with V2 supported configuration.
-
In case if the existing configuration is Other Directory Services, ensure the following conditions are met:
-
Its an Active Directory environment, Other LDAP like OpenLDAP and googleLDAP are not supported.
-
V2 only supports custom mapping Unique Identifier and E-mail for user and Canonical Name for group. If any other attribute is mapped to custom values, it might get changed to default.
-
-
Ensure existing configuration is not using secureUPN feature to hash the UPN value.
-
V2 mode use the folder C:\Users\Public\Netskope\DirectoryImporter_ADv2. Check the following with respect to this path:
-
Service account consists of enough privilege to create this path and create files inside that folder.
-
The drive contains enough storage to create datastore_v2.json and the other files.
-
-
If you are planning to use incremental query, ensure service account consists of read privilege on “Deleted Objects“ partition of AD.
Incremental query is used only for None filter Options, which boosts the performance of the sync. For the other filter, you may not see any visible benefits.
-
-
Change: Once step 1 is completed, use the following steps to migrate to V2.
-
Backup the configuration C:\Program Files\Netskope\NSAdapters\ADImporter\nsADImporterConfig.json.
-
Open Netskope Adaptors Configuration Utility application, and select Directory Importer.
-
Select Active Directory V2 from the drop down for Directory Service.
-
Click Select Domains and review the attribute mapping and domains selected, and other configs. Then Apply changes and Close.
In case Apply is disabled, make some dummy change like deselecting and selecting a domain; Apply will be activated.
-
Click Advanced and review the changes and Close. If anything modified, click Apply and Close.
-
Click OK to save the config and restart the service. If you want to discard the changes to configuration you can press Cancel to discard all the changes to config.
-
-
Verify: Verify if everything works fine by checking the following:
-
Verify if C:\Users\Public\Netskope\DirectoryImporter_ADv2 is created.
-
Verify the logs for any errors.
-
-
Rollback: If you notice any issues in the preceeding steps, you can revert with the following steps:
This rollback is only applicable if the V2 sync fails.-
Ensure that Netskope Adaptors Configuration Utility is not opened, then restore the config file which is backed up in step 2a.
-
Check if C:\Users\Public\Netskope\adimporter\datastore.json is not present and C:\Users\Public\Netskope\DirectoryImporter_ADv2\resync_datastore.json is present, then move C:\Users\Public\Netskope\DirectoryImporter_ADv2\resync_datastore.json to C:\Users\Public\Netskope\adimporter\datastore.json
-
Open Netskope Adaptors Configuration Utility and review the config aligned with old config and press OK to restart the service.
-
If you want to rollback after few successful sync by V2, there may be stale users/groups.
-