

To configure Microsoft 365 Teams Commercial & GCC High for the Next Generation API Data Protection, follow the instructions below.
Prerequisites
Before configuring Microsoft 365 Teams for the Next Generation API Data Protection, review the prerequisite.
-
Review the Microsoft Office 365 Teams licenses here.
-
Netskope does not support Microsoft 365 apps if your Microsoft tenant is under migration from one data center to another. Wait for the Microsoft tenant migration to complete before you grant access to Netskope. To learn more about Microsoft tenant migration, see:
-
A global administrator account is required for the Azure portal configuration. Any Azure user can grant access to Netskope.
-
You must turn on audit logging in Microsoft 365 admin center. To enable audit logging, follow the steps below:
-
Log in to https://purview.microsoft.com/. On the left navigation, click Solutions > Audit.
If auditing is not turned on for your organization, a banner is displayed prompting you to start recording user and admin activity.

-
Click the Start recording user and admin activity banner.
It may take up to 60 minutes for the change to take effect. After enabling, the first application event contents can take up to 12 hours to show up in Skope IT.
-
-
If you have guest or external users in your SaaS environment belonging to domains considered internal, you must set the appropriate internal domains for Netskope to classify exposure accurately. To set up internal domains, follow this article.
Configure Netskope to Access your Microsoft 365 Teams Account
To integrate Microsoft 365 Teams with Netskope and enable secure visibility and control, you must configure an application in the Azure admin portal. Follow these steps to complete the setup:
1. Register an Application in the Azure Admin Portal
Registering an application in the Azure admin portal allows Netskope to securely connect to your Microsoft 365 Teams environment. This app acts as a trusted identity that facilitates controlled API access to Teams data through Microsoft Graph.
-
Log in to portal.azure.com as a global administrator.
-
Search resource groups and click Resource groups service.
-
Click + Create.
-
Under Subscription, select your preferred subscription.
-
Enter a resource group name.
-
You can set the Region as per your choice or keep it unchanged.
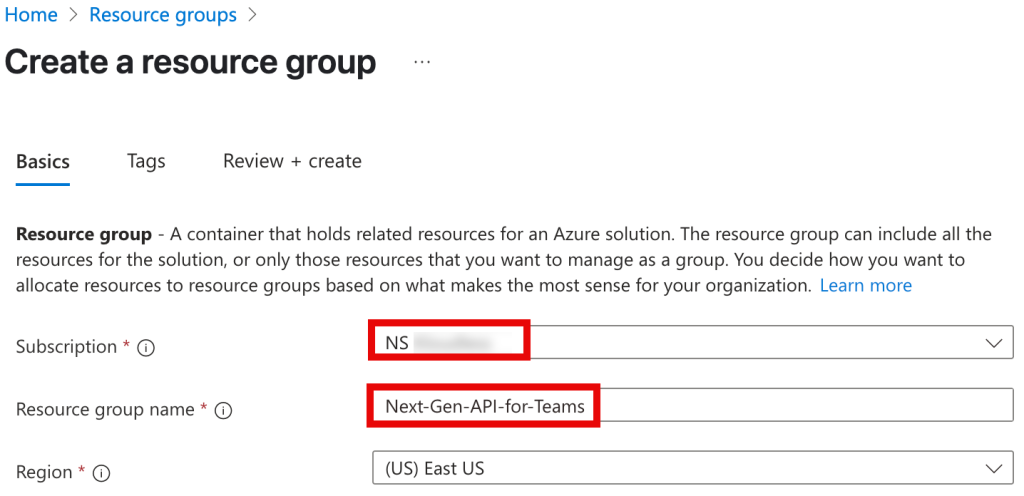
-
Click Review + Create and Create.
-
Search Microsoft Entra ID and click Microsoft Entra ID service.
-
On the left pane, navigate to Manage > App registrations.
-
Click + New registration and enter the following details:
-
Enter the name of the application.
-
Under Supported account types, select Multiple Entra ID tenants > Allow all tenants. Your application will only access your organization’s data; however, enabling multi-tenant access is required to retrieve audit logs. Learn more: Configure your application properties in Microsoft Entra ID.

Leave the rest of the fields unchanged.
-
-
Click Register.
-
Make a note of the Application (client) ID and Directory (tenant) ID. You’ll need these during the instance setup in your Netskope tenant.
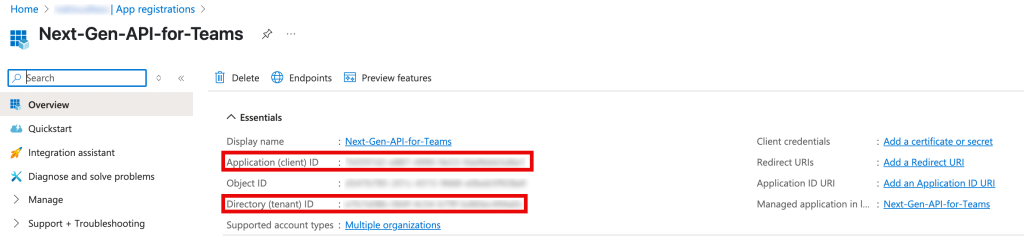


Next, add Microsoft Graph API permissions to the newly created application.
2. Add Microsoft API Permissions to the Application
Granting the right Microsoft API permissions ensures Netskope can read Teams metadata and user directory details necessary for visibility and control.
-
While you are on the app registration page of the newly registered application, on the left pane, navigate to Manage > API permissions and click + Add a permission.
-
Click the Microsoft Graph tile followed by Application permissions.
-
Add the following Microsoft Graph API permissions (on the Azure portal, search by claim value):
Permissions required by Netskope Claim Value Description Purpose Trade-off if not allowed Manage apps that this app creates or owns Application.ReadWrite.OwnedBy Allows the app to create other applications, and fully manage those applications (read, update, update application secrets and delete), without a signed-in user. It cannot update any apps that it is not an owner of. Allows Netskope to read the metadata of the app and add a new certificate to it. Cannot automatically rotate the certificate which is required to get access tokens. Read the members of all channels ChannelMember.Read.All Read the members of all channels, without a signed-in user. Allows Netskope to read the members of all channels. Limits the ability to calculate channel exposures and enforce data protection policies. Read all channel messages ChannelMessage.Read.All Allows the app to read all channel messages in Microsoft Teams Allows Netskope to read all messages in all channels. Cannot offer comprehensive search capabilities, message auditing, or any features dependent on accessing message content. Flag channel messages for violating policy ChannelMessage.UpdatePolicyViolation.All Allows the app to update Microsoft Teams channel messages by patching a set of Data Loss Prevention (DLP) policy violation properties to handle the output of DLP processing. Allows Netskope to update channel messages by patching a set of Data Loss Prevention (DLP) policy violation properties. Limits the ability to enforce DLP policies and ensure compliance in channel communications. Read the names, descriptions, and settings of all channels ChannelSettings.Read.All Read all channel names, channel descriptions, and channel settings, without a signed-in user. Allows Netskope to read the settings of all channels. Cannot display or access channel details and affects exposure calculations. Read all chat messages Chat.Read.All Allows the app to read all 1-to-1 or group chat messages in Microsoft Teams. Allows Netskope to read all chat messages. Cannot offer comprehensive search capabilities, message auditing, or any features dependent on accessing message content. Flag chat messages for violating policy Chat.UpdatePolicyViolation.All Allows the app to update Microsoft Teams 1-to-1 or group chat messages by patching a set of Data Loss Prevention (DLP) policy violation properties to handle the output of DLP processing. Allows Netskope to update 1-to-1 or group chat messages by patching a set of Data Loss Prevention (DLP) policy violation properties. Limits the ability to enforce DLP policies and ensure compliance in chat communications. Read the members of all chats ChatMember.Read.All Read the members of all chats, without a signed-in user. Allows Netskope to read the members of all chats. Limits the ability to calculate chat exposures and enforce data protection policies. Read domains Domain.Read.All Allows the app to read all domain properties without a signed-in user. Allows Netskope to read the domain properties. Required for sign-in workflows. Read all groups Group.Read.All Allows the app to read group properties and memberships, and read conversations for all groups, without a signed-in user. Allows Netskope to read all group memberships and properties. Cannot display or access group details and affects exposure calculations. Read and write items in all site collections Sites.ReadWrite.All Allows the application to create, read, update, and delete documents and list items in all site collections without a signed-in user. Allows Netskope to receive and process permission changes required for core capabilities such as sharing detection, exposure computation and subsequent policy-processing. Without this permission, the Microsoft Graph API would return errors whenever a folder permission changes. These errors cause significant delays in detecting changes and impact next generation platforms’ efficacy in tracking exposure changes for folders/files in out-of-band. Read the members of all teams TeamMember.Read.All Read the members of all teams, without a signed-in user. Allows Netskope to read the members of all teams. Limits the ability to calculate team exposures and enforce data protection policies. Read installed Teams apps for all chats TeamsAppInstallation.ReadForChat.All Allows the app to read the Teams apps that are installed in any chat, without a signed-in user. Does not give the ability to read application-specific settings. Allows Netskope to read the Teams apps that are installed in any chat. Cannot provide the details of 3rd-party apps installed in the Microsoft Teams apps catalog. Read installed Teams apps for all teams TeamsAppInstallation.ReadForTeam.All Allows the app to read the Teams apps that are installed in any team, without a signed-in user. Does not give the ability to read application-specific settings. Allows Netskope to read the Teams apps that are installed in any team. Cannot provide the details of 3rd-party apps installed in the Microsoft Teams apps catalog. Read installed Teams apps for all users TeamsAppInstallation.ReadForUser.All Allows the app to read the Teams apps that are installed for any user, without a signed-in user. Does not give the ability to read application-specific settings. Allows Netskope to read the Teams apps that are installed for any user. Cannot provide the details of 3rd-party apps installed in the Microsoft Teams apps catalog. Read all users’ full profiles User.Read.All Allows the application to read user profiles in your organization’s directory. Allows Netskope to read user profile data in the configured Teams instance. Cannot obtain user profile information and affects subsequent user exposure computations. -
Click Add Permissions.
Next, add Office 365 Management APIs permission.
-
Click + Add a permission, then click the Office 365 Management APIs tile followed by Application permissions.
-
Add ActivityFeed.Read.
Permissions required by Netskope Claim Value Description Purpose Trade-off if not alllowed Read activity data for your organization ActivityFeed.Read Allows the application to retrieve information about user, administrator, system, and policy actions and events from Office 365 and Microsoft Entra ID activity logs via the Office 365 Management Activity API. Allows Netskope to retrieve audit logs and events from Office 365 and Entra ID activity logs. Cannot provide visibility via Skope IT application events and other UEBA capabilities. -
Click Add Permissions.
Next, you should delete the User.Read permission.
-
On the API permissions home page, locate User.Read permission under Microsoft Graph.
-
Click the ellipses (…) followed by Remove permission.
-
While on the API permissions page, click Grant consent for <your organization name>.
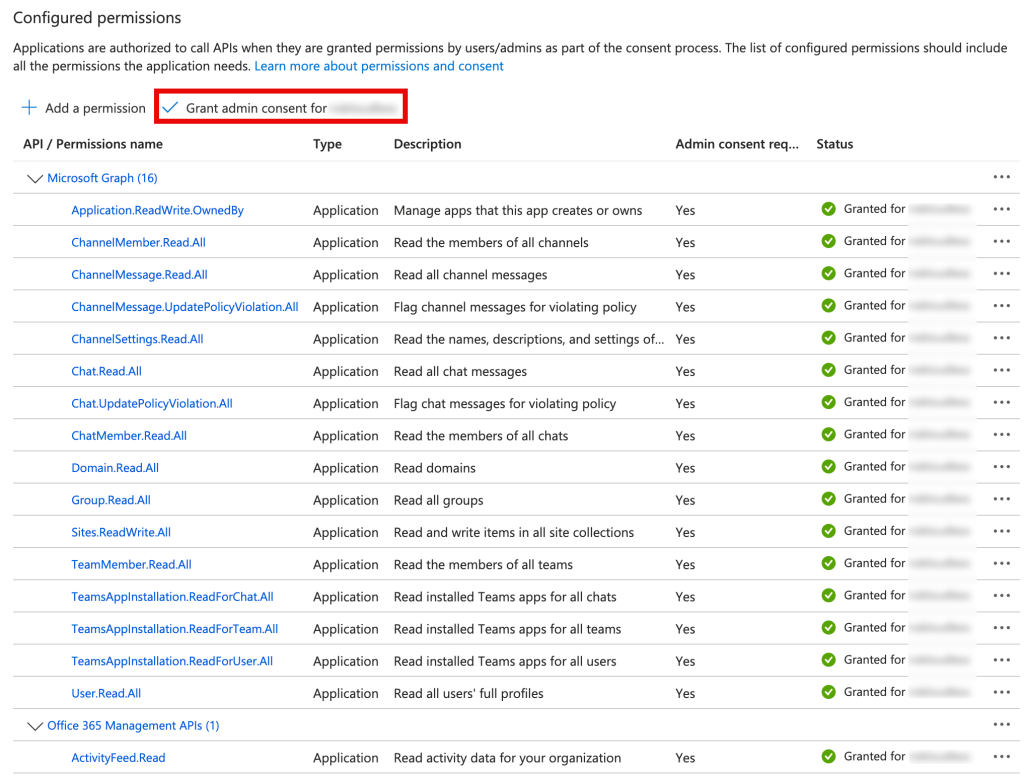

Next, configure Azure key vault.
3. Configure Azure Key Vault
Azure Key Vault securely stores the certificate and private key required for the registered application’s authentication. Setting it up ensures that sensitive credentials are protected and can be easily managed through Azure’s access control policies.
3.1 Create a Key Vault
The key vault serves as a secure repository for storing certificates, keys, and secrets. Creating a dedicated key vault ensures your application credentials are isolated and protected.
-
Search key vaults and click Key vaults service.
-
Click + Create. Enter the following details:
Basic tab:
-
Subscription: Select the same subscription you selected when registering the application.
-
Resource group: Select the resource group you created in Register an Application in the Azure Admin Portal.
-
Key vault name: Enter the name of the key vault.
You can keep the rest of the fields unchanged. Next, move to the Networking tab. Enter the following details:
-
Ensure Enable public access is checked.
-
Under Public Access, select Allow access from: All networks.
You will configure the firewall rules later to allow access only from Netskope.
-
-
Click Review + Create and Create.
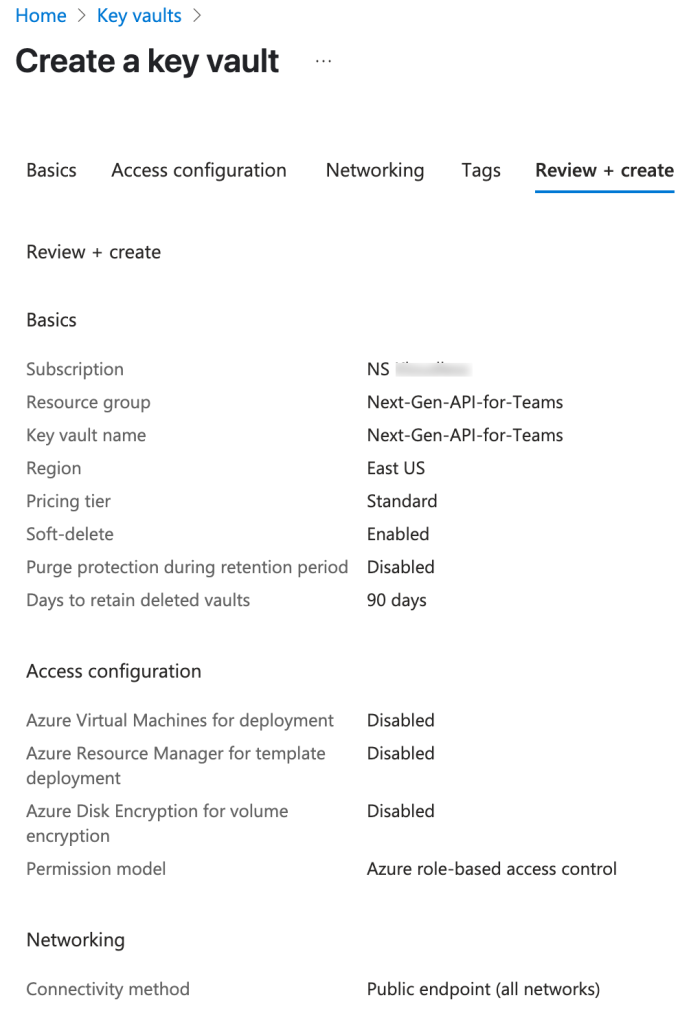
-
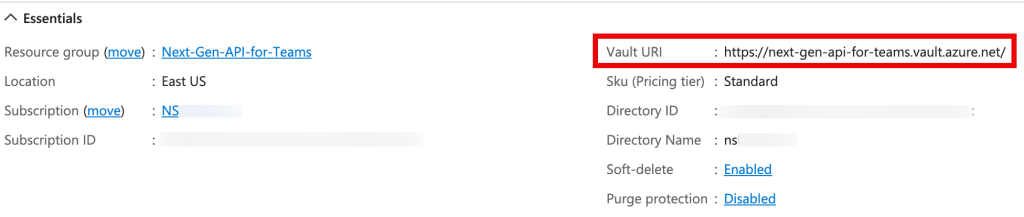
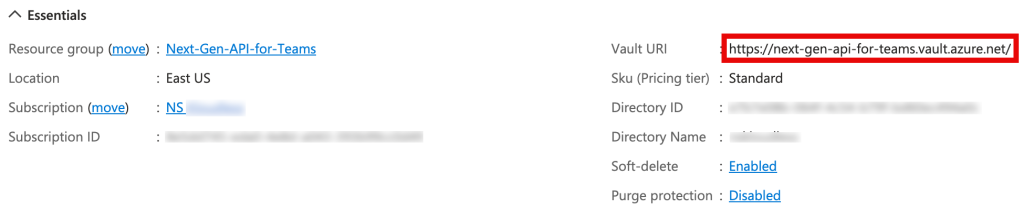
Navigate to the home page of the newly created vault. Under the Overview page, make a note of the Vault URI value. You’ll need this during the instance setup in your Netskope tenant.


Next, configure key vault access controls.
3.2 Configure Key Vault Access Controls
To allow certificate management and integration with the registered application, you must assign appropriate roles to the required identities.
-
On Key vaults page, identify the newly created key vault and click it.
-
On the left pane, click Access control (IAM).
Set up roles for the login user (add role to generate new certificate)
-
Click + Add > Add role assignment.
-
Under Job function roles, search Key Vault Administrator, click it, and click Next.
-
Click + Select members.
-
Under Select members, search the currently logged in user (in this case the global administrator user), select it and click click Select.
-
Click Review + assign twice.
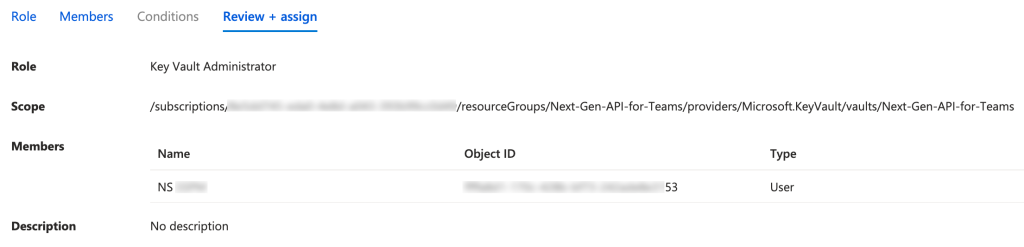
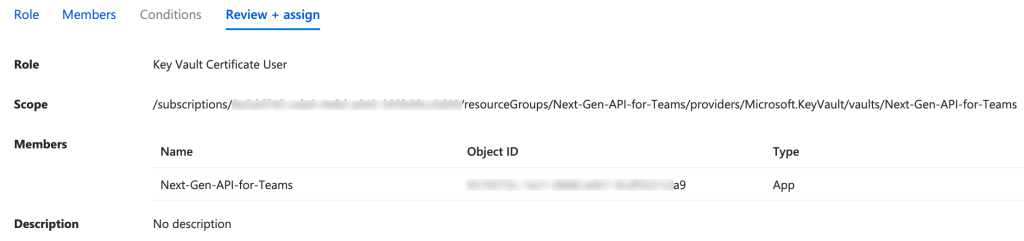
Next, set up roles for the application (add role for application to access key vault)
-
Click + Add > Add role assignment.
-
Under Job function roles, search Key Vault Certificate User, click it, and click Next.
-
Click + Select members.
-
Under Select members, search the the newly registered application by name, select it and click Select.
-
Click Review + assign twice.
-
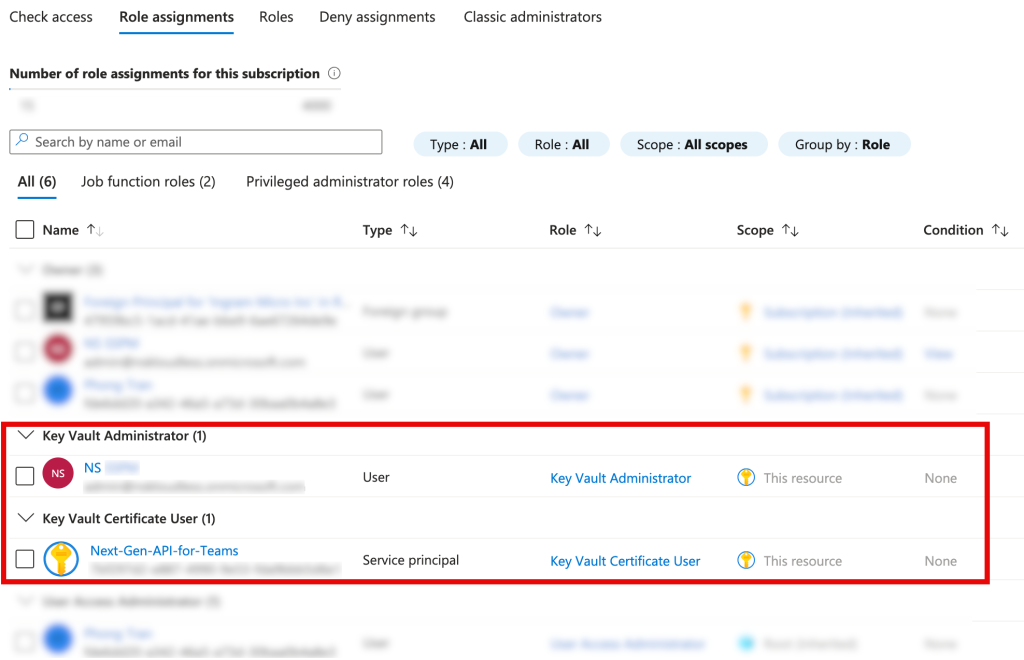
Under the Role assignment tab, you should see the following two entries:


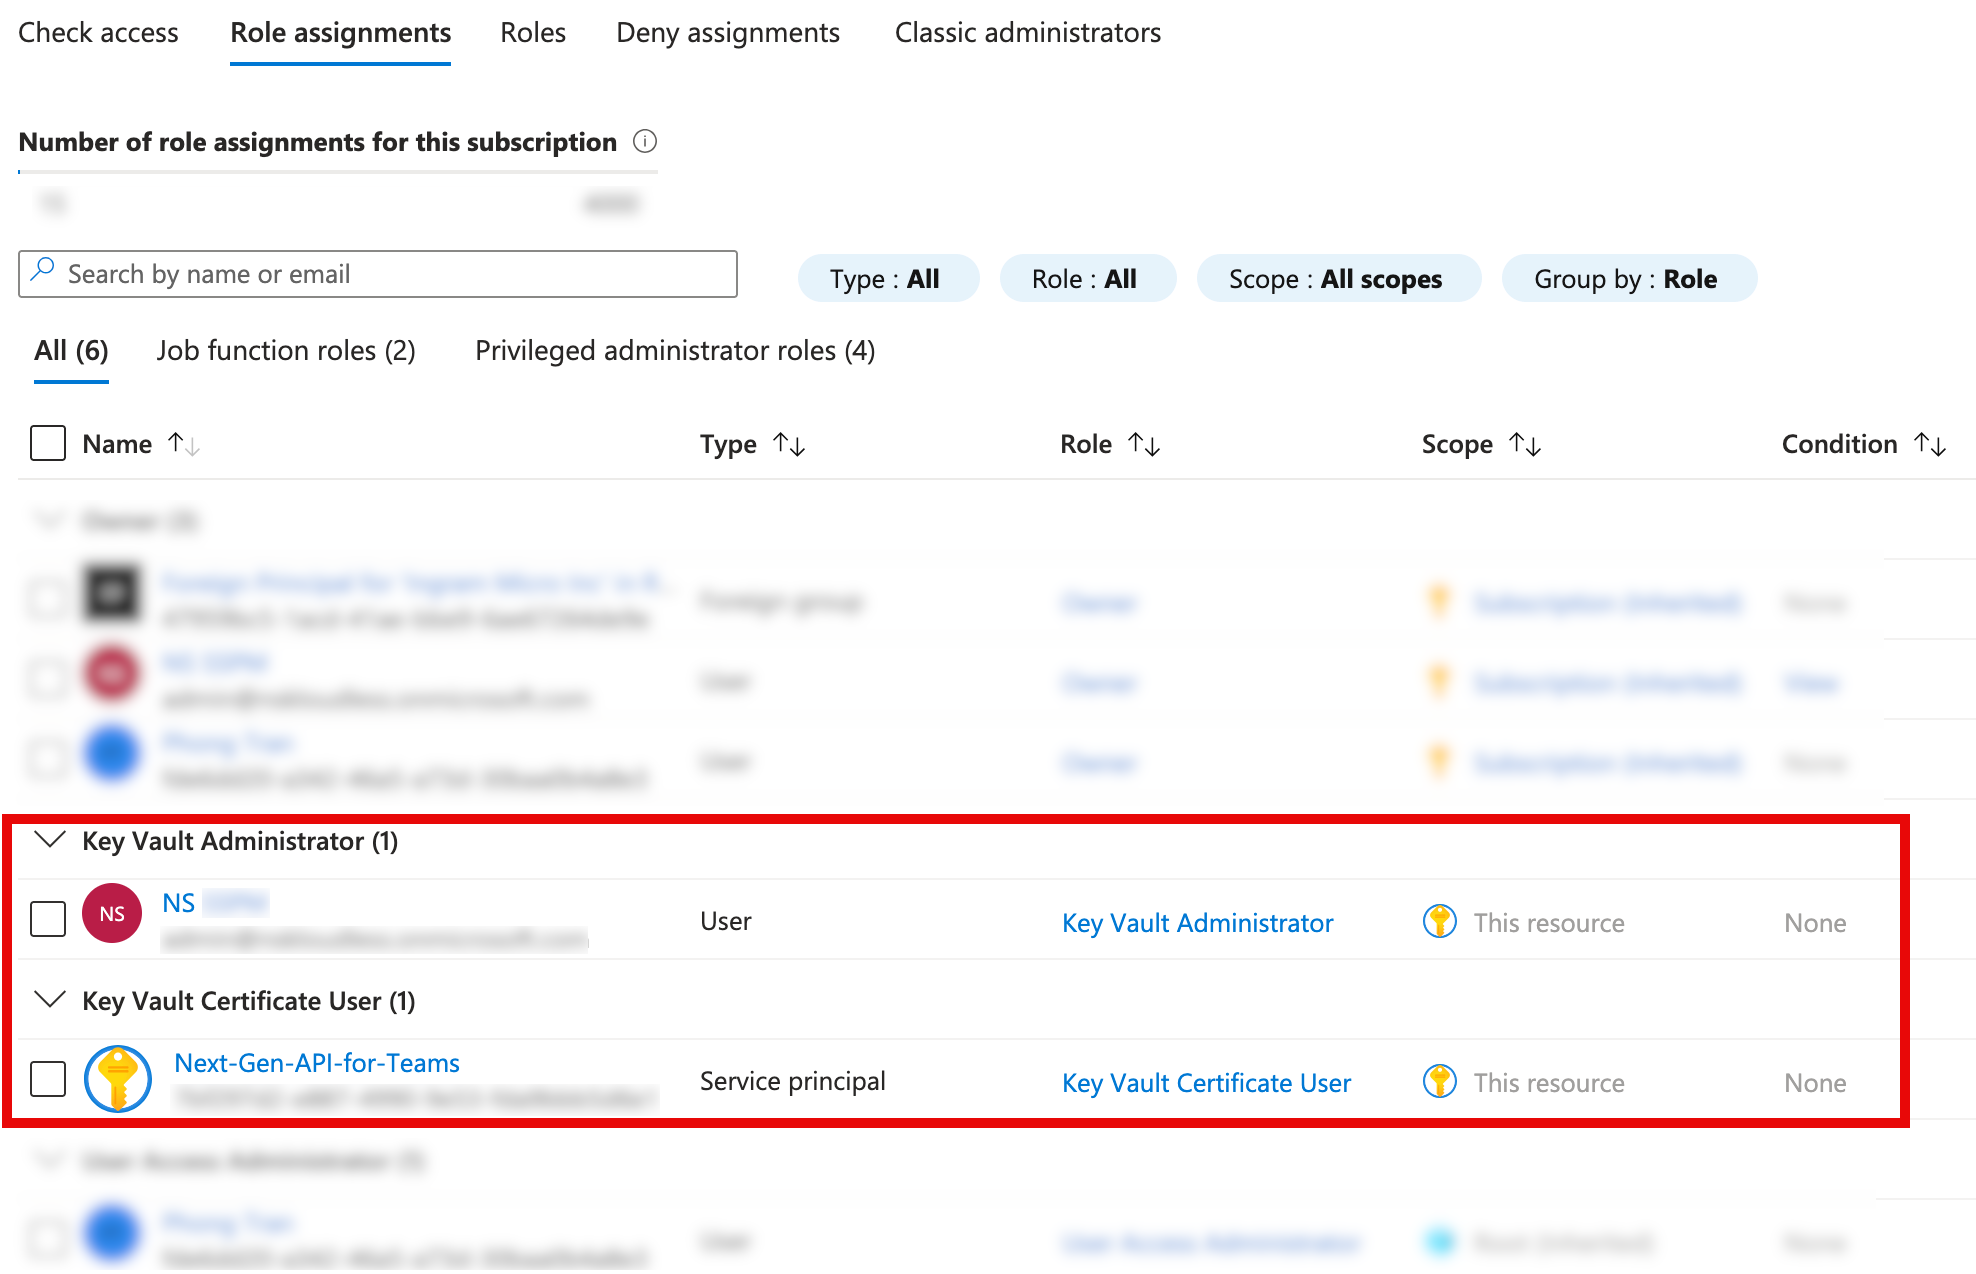
Next, create a certificate.
3.3 Create a Certificate
Generating a certificate within the key vault allows secure, password-less authentication between the newly created application and Microsoft APIs. The certificate must meet Netskope’s integration requirements.
-
On Key vaults page, identify the newly created key vault and click it.
-
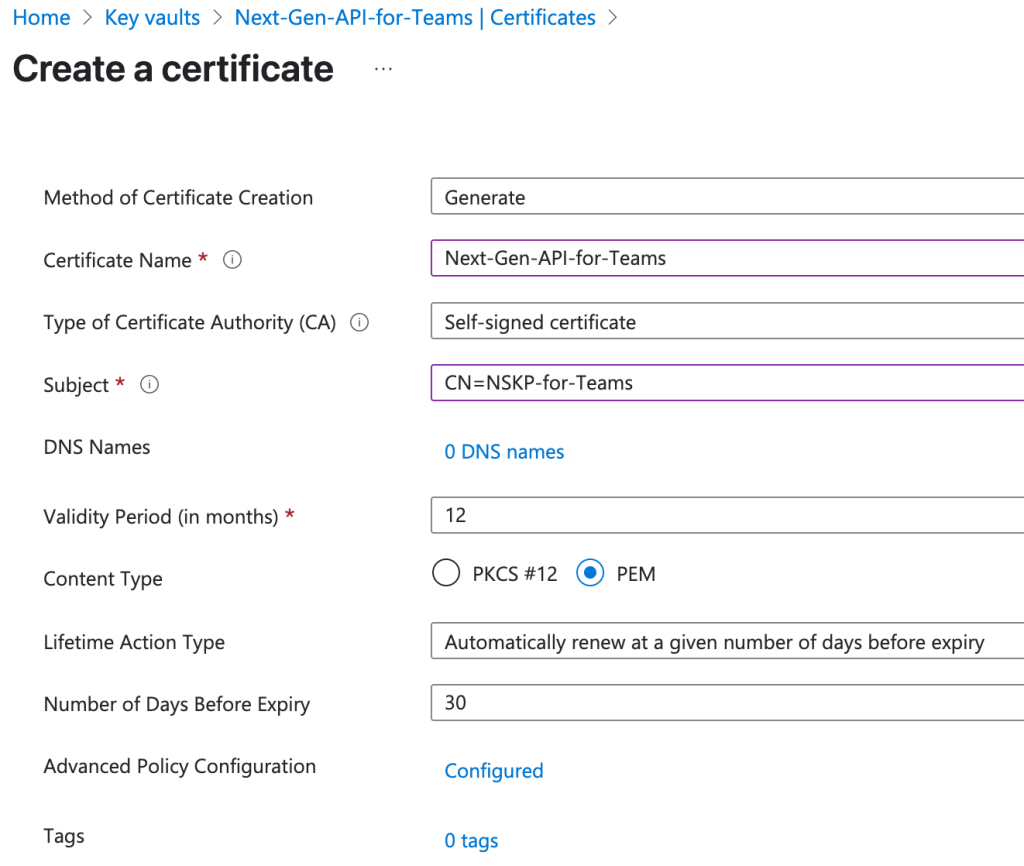
On the left pane, navigate to Objects > Certificates, and then click + Generate/Import.
Ensure that the Method of certificate Creation is set to Generate.
-
Certificate Name: Enter a name of the certificate.
-
Type of Certificate Authority (CA): Netskope recommends selecting Certificate issued by an integrated CA if you have an integrated CA. If not, you can proceed with a Self-signed certificate.
-
Subject: Enter subject in CN={} format.
Example: CN=NSKP-for-Teams
-
Keep the Validity Period (in months) to default.
-
Content Type: Select PEM.
-
Lifetime Action Type: Select Automatically renew at a given number of days before expiry.
-
Keep the Number of Days Before Expiry to default.
-
Advanced Policy Configuration: Click Not configured and set the Reuse Key on Renewal to Yes. Set the Key Size of your choice. Keep the rest of the fields to default and click OK.
-
Click Create.
-
Make a note of the certificate name and thumbprint. You’ll need this during the instance setup in your Netskope tenant.
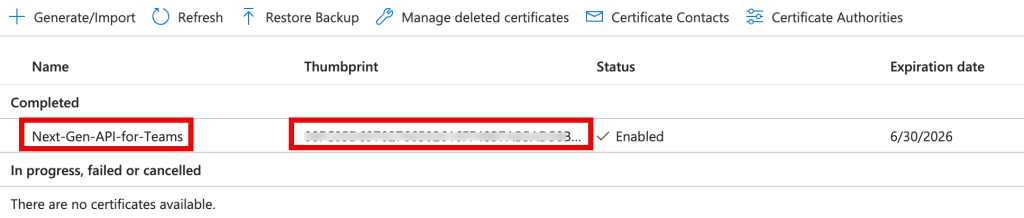


Next, download the certificate and private key.
3.4 Download the Certificate and Private Key
Export the certificate and private key in a supported format (such as .cer, .pem) for use in the Netskope integration. Be sure to store the file securely, as it will be required during the final connection step.
-
On the newly created certificate page, click the certificate. Then click the Current Version.
-
Click Download in CER format & Download in PFX/PEM format and save them on your local device.
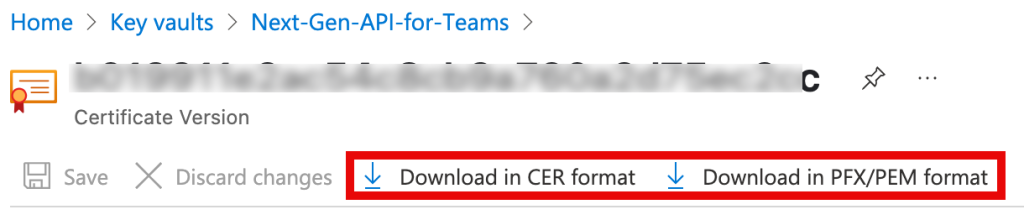

Next, upload the certificate to the registered application.
4. Upload the Certificate to the Registered Application
Associating the certificate with the application enables it to use secure, certificate-based authentication when connecting to Microsoft services.
-
Search Microsoft Entra ID and click Microsoft Entra ID service.
-
On the left pane, navigate to Manage > App registrations.
-
Under All applications, locate your newly created application.
-
On the left pane, navigate to Manage > Certificates & secrets and click the Certificates tab.
-
Click Upload certificate, upload the .cer file you recently download from the previous step, and click Add.


Next, set up firewall for key vault.
5. Set Up Firewall for Key Vault
To allow Netskope to access the certificate stored in your Azure Key Vault, you must configure firewall rules to permit access only from the Netskope tenant’s management plane IP addresses (in CIDR format). This enhances security by restricting access to trusted sources.
-
On Key vaults page, identify the newly created key vault and click it.
-
On the left pane, navigate to Settings > Networking.
-
Under Firewalls and virtual networks, select Allow access from: Allow public access from specific virtual networks and IP addresses.
-
Under Firewall, click + Add your client IP addresses.
-
Enter the IP address of the management plane of your Netskope tenant in CIDR format. To know the IP address, click here. Then, go to the Management Plane List for Allowlisting section.
The link is behind a log in page. If you do not have access, talk to your Netskope sales representative or support.
You can also add the IP range of your corporate VPN to ensure that logged-in users can access the certificate page. Once the firewall is configured, the rules apply not only to applications but also to authenticated users.
Next, connect Microsoft 365 Teams to Netskope.
6. Connect Microsoft 365 Teams to Netskope
Using the app credentials and certificate details, you complete the integration by linking your Microsoft 365 Teams instance to Netskope for secure, continuous monitoring.
-
Log in to the Netskope tenant UI and go to Settings > Configure App Access > Next Gen > CASB API.
-
Under Apps, select Microsoft Teams and click Setup CASB API Instance.
The Setup Instance window opens.
-
Under Office 365 Environment, select Commercial or GCC High.
GCC High is designed for U.S. federal, state, and local government customers. -
Under Tenant ID and Client ID, enter your Azure’s directory (tenant) ID and application (client) ID. This can be found on the Azure portal’s overview page of the newly registered application. Look for the Directory (tenant) ID and Application (client) ID fields.
-
Under Vault URI, enter your Azure’s key vault URI. This can be found on the Azure portal’s overview page of the newly created key vault. Look for the Vault URI field.
-
Under Certificate name and Certificate Thumbprint, enter the name and thumbprint of the newly created certificate. The certificate name and thumbprint can be found on the Azure portal’s Key Vault > {newly created key vault} > Objects > Certificates.
-
Under Private key, enter the private key value from the .pem file you downloaded earlier. You can open the private key file (.pem) downloaded from the Azure’s key vault certificate page on a text editor.
– The file contains both the private key and certificate. Select only the private key.
– When copying, include the header (-----BEGIN PRIVATE KEY-----) and footer (-----END PRIVATE KEY-----) lines.
– Paste the private key into the input field. Line breaks will automatically be converted to spaces—this is expected behavior. -
Under Administrator Email, enter the email address of the user who will receive an email notification when a policy violation or event triggers. This step is optional.
-
Under Instance Name, enter a name of the SaaS app instance. This step is optional and if left blank, Netskope will determine the name of the app instance post grant.
-
Click Grant Access.
You will see the successful result page. Click Close.

Refresh your browser, and you should see a green check icon next to the instance name.
Post grant, you can either delete or downgrade the global administrator account. To know more: Delete or Downgrade the Global Administrator Account.
Next, you can view the Next Generation API Data Protection Inventory page to get deep insights on various entities on your Microsoft 365 MS Teams account. For more information on the Inventory page, see Next Generation API Data Protection Inventory.
You can receive audit events and standard user behavior analytic alerts in Skope IT. To know more: Next Generation API Data Protection Skope IT Events.
Next, you should configure a Next Generation API Data Protection policy. To do so, see Next Generation API Data Protection Policy Wizard.
Unsupported Conversation Members
Next Generation API Data Protection does not currently support the following Microsoft 365 Teams conversation members:
-
azureCommunicationServicesUserConversationMember: Represents an Azure Communication Services user in a chat. -
skypeForBusinessUserConversationMember: Represents a Skype for Business user in a chat. -
skypeUserConversationMember: Represents a Skype (consumer) user in a chat.
The users listed above are not displayed on the API-enabled Protection > SAAS (NEXT GEN) > Inventory page and are excluded from exposure calculations.