

This guide illustrates how to configure IPSec tunnels between Netskope and the Cisco Catalyst SD-WAN Manager running the Cisco IOS XE version 17.09.04a. To learn more about the steps in Cisco, see the Cisco Catalyst SD-WAN Documentation.
Prerequisites
Before configuring IPSec, review the Netskope guidelines.
Creating IPSec Tunnels in Netskope
To create the IPSec VPN tunnels for the Cisco Catalyst SD-WAN Manager in the Netskope UI, see Creating an IPSec Site.
Creating IPSec Tunnels in Cisco Catalyst SD-WAN
To create the IPSec VPN tunnels in the Cisco Catalyst SD-WAN Manager:
-
Log in to Cisco Catalyst SD-WAN.
-
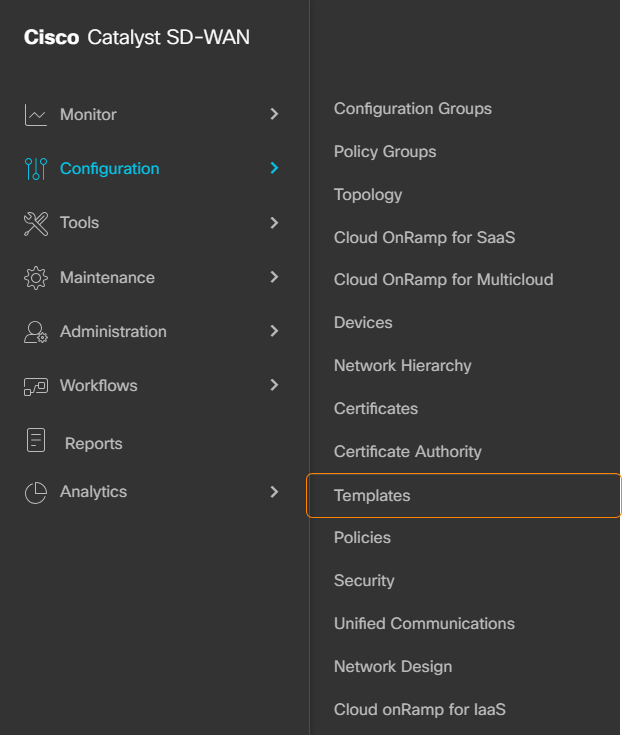
Go to Configuration > Templates.
-
Click Feature Templates.

-
Click Add Template.

-
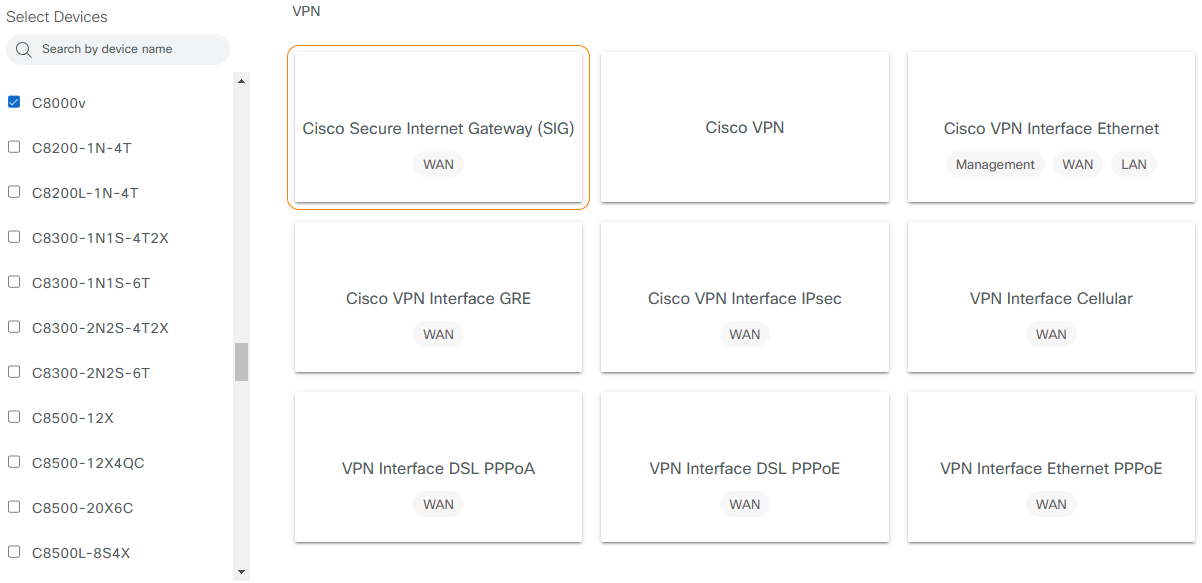
Select a device and choose the Cisco Secure Internet gateway (SIG) VPN.
-
Under Cisco Secure Internet Gateway (SIG):
-
Device Type: Displays the device type you previously selected.
-
Template Name: Enter a unique name for the tunnel template.
-
Description: Enter comments or notes for the tunnel template.
-
SIG Provider: Choose Generic.

-
-
Under Configuration, click Add Tunnel.

-
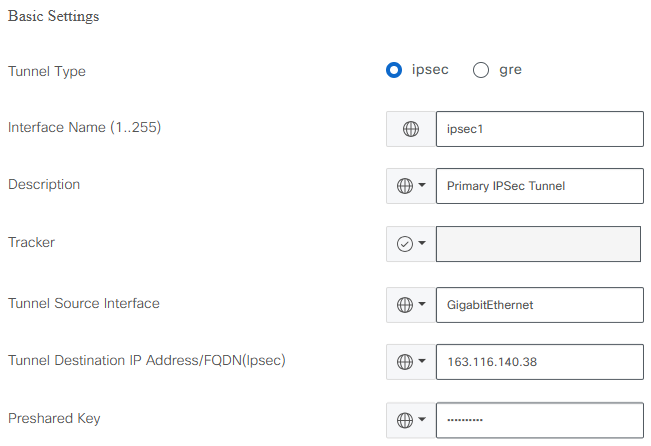
In Basic Settings:
-
Tunnel Type: Choose ipsec.
-
Interface Name: Enter a name for the IPSec tunnel interface.
-
Description: Enter comments or notes for the IPSec tunnel.
-
Tracker: Leave blank.
-
Tunnel Source Interface: Select or enter the IP address of the WAN interface that’s initiating the IPSec tunnel.
-
Tunnel Destination IP Address/FQDN(Ipsec): Enter the IPSec Gateway IP address of the primary Netskope POP you copied in the Netskope UI. In this example, it’s
163.116.140.38. -
Preshared Key: Enter the pre-shared key you entered in the Netskope UI.
-
-
Under Advanced Settings, in General:
-
Shutdown: Leave as No.
-
TCP MSS: Leave blank.
-
IP MTU: Ensure it’s
1400. -
DPD Interval: Ensure it’s
20seconds. -
DPD Retries: Ensure it’s
5retries.
-
-
In IKE:
-
IKE Rekey Interval (seconds): Leave as
14400seconds. -
IKE Cipher Suite: Leave as AES 256 CBC SHA1.
-
IKE Diffie-Hellman Group: Leave as 16 4096-bit modulus.
-
IKE ID for local End point: Enter the source identity you entered in the Netskope UI.
-
IKE ID for Remote End point: Enter the IPSec Gateway IP address of the primary Netskope POP you copied in the Netskope UI. In this example, it’s
163.116.140.38.
-
-
In IPSec:
-
IPsec Rekey Interval (seconds): Leave as
3600. -
IPsec Replay Window: Leave as
512. -
IPsec Cipher Suite: Choose AES 256 CBC SHA1.
-
Perfect Forward Secrecy: Leave as Group-16 4096-bit modulus.

-
-
Click Add.
-
Repeat steps #7 – #12 to create the backup IPSec tunnel. Use the same values except for the following fields:
-
Interface Name: Enter a unique name for the backup tunnel interface.
-
Tunnel Destination IP Address/FQDN(Ipsec): Enter the IPSec Gateway IP addresses of the failover Netskope POP you copied in the Netskope UI.
-
IKE ID for Remote End point: Enter the IPSec Gateway IP addresses of the failover Netskope POP you copied in the Netskope UI.
-
-
Under High Availability:
-
Active: Choose the primary IPSec tunnel interface name you created earlier. In this example, it’s ipsec1.
-
Active Weight: Enter a weight value for the primary IPSec tunnel. In this example, it’s 255.
-
Backup: Choose the primary IPSec tunnel interface name you created earlier. In this example, it’s ipsec2.
-
Backup Weight: Enter a weight value for the backup IPSec tunnel. In this example, it’s 255.

-
-
Click Save.
-
Click Device Templates.

-
Choose
 next to the Cisco Catalyst SD-WAN device you want to attach the configured feature template to.
 -
Click Edit.

-
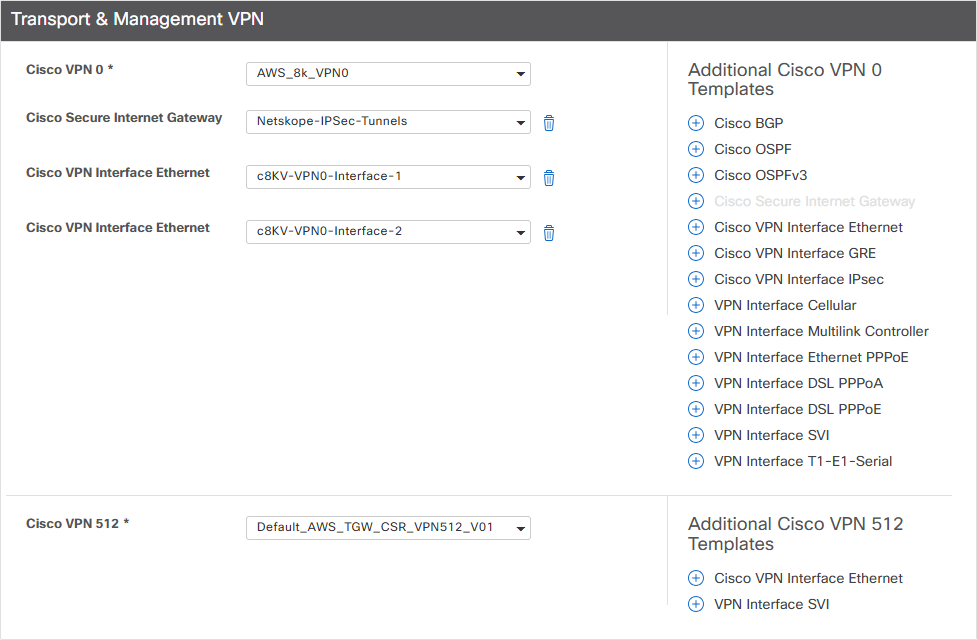
Under Transport & Management VPN, for Cisco Secure Internet Gateway, choose the name of the feature template you configured above. In this example, it’s Netskope-IPSec-Tunnels.
-
Click Update.
Routing Traffic Using CLI Add-On Templates
To create a CLI add-on template and specify the type of traffic to go through the IPSec tunnels:
-
Go to Configuration > Templates.
-
Click Feature Templates.
-
Click Add Template.
-
Select a device and choose Cli Add-On Template.

-
Under Cli Add-On Template:
-
Device Type: Displays the device type you previously selected.
-
Template Name: Enter a unique name for the tunnel template.
-
Description: Enter comments or notes for the IPSec tunnel.
-
CLI CONFIGURATION: Enter additional CLI commands for routing traffic through your IPSec tunnel. For example:
-
If you need traffic from same source IP to hit the same IPSec tunnel, enter the following command:
!
ip cef load-sharing algorithm src-only
!
-
If you need service-side tunnel, enter the following commands:
!
interface Tunnel100001
  vrf forwarding 1
!
Ensure you update the IPSec tunnel interface according to your CLI configuration.
-

-
-
Click Save.
-
Click Device Templates.
-
Choose
next to the Cisco Catalyst SD-WAN device you want to attach the configured feature template to. -
Click Edit.
-
Under Additional Templates, for CLI Add-On Template, choose the name of the feature template you configured above. In this example, it’s IPSec-Source-IP-Based-ECMP-And-Service-Side-Tunnel.

-
Click Update.
Adding a Route Policy
You must add a route policy to specify the traffic you want to send traffic through the IPSec tunnel.
Verifying the IPSec Tunnel Status
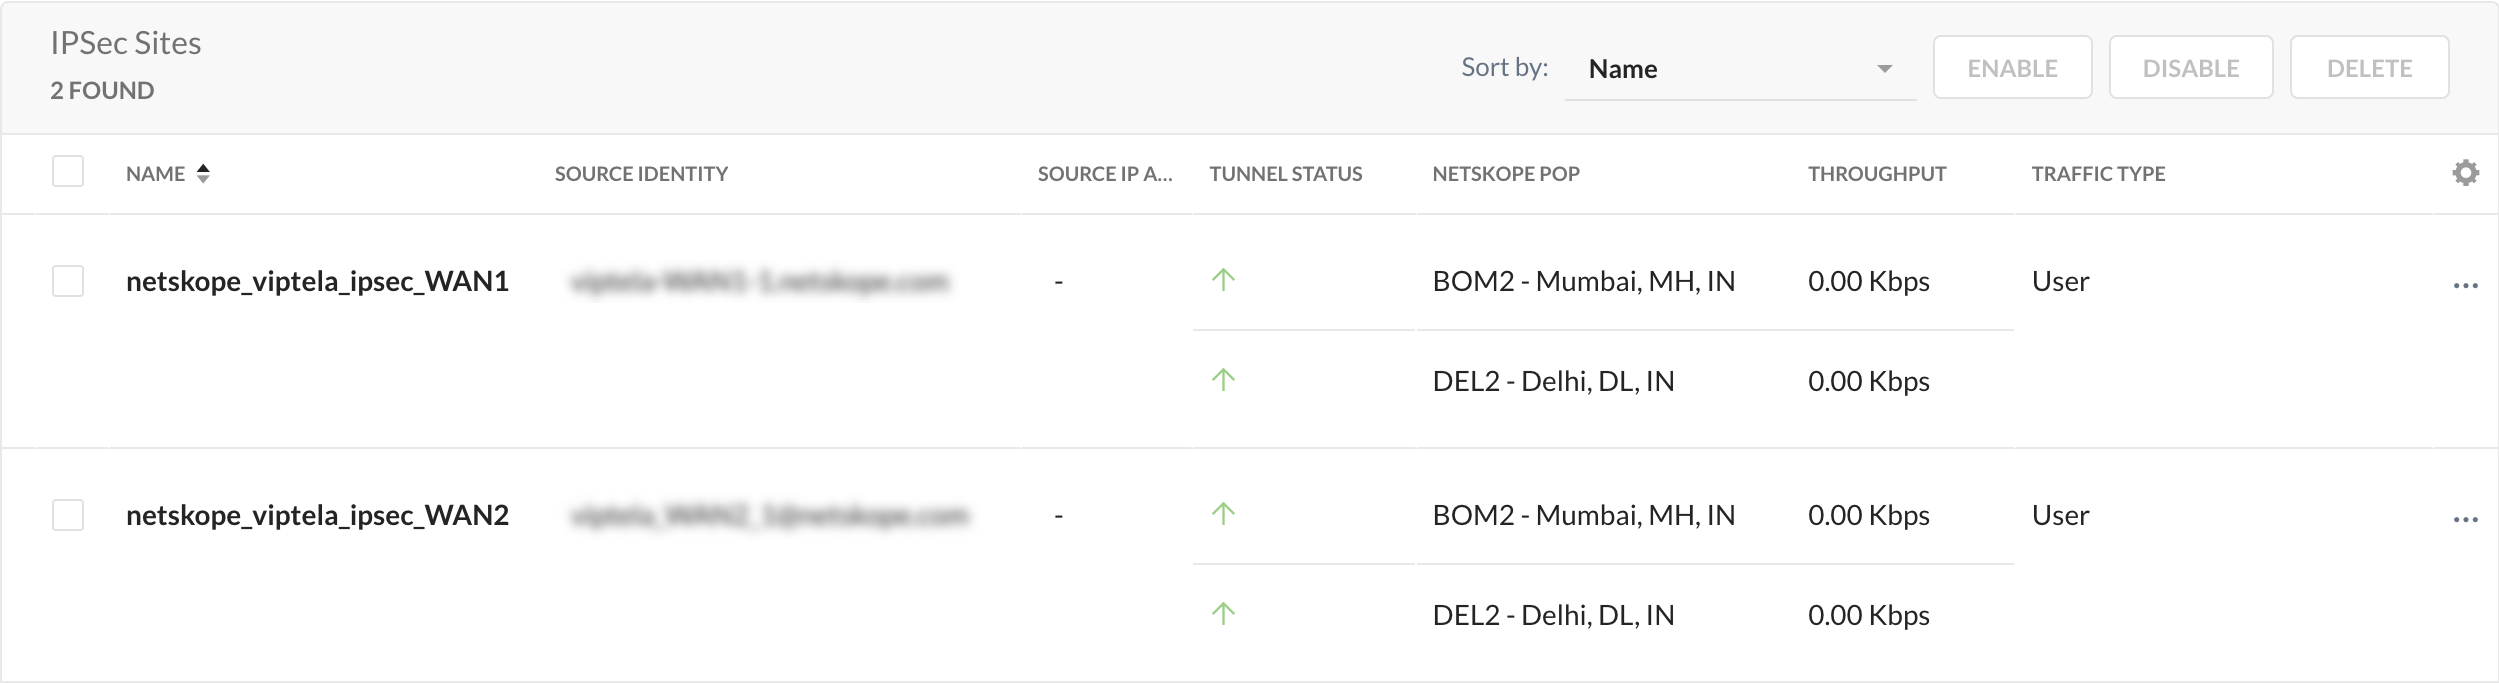
To verify the IPSec tunnel status in Netskope, go to Settings > Security Cloud Platform > IPSec. You can see the primary and backup sites display an  status.
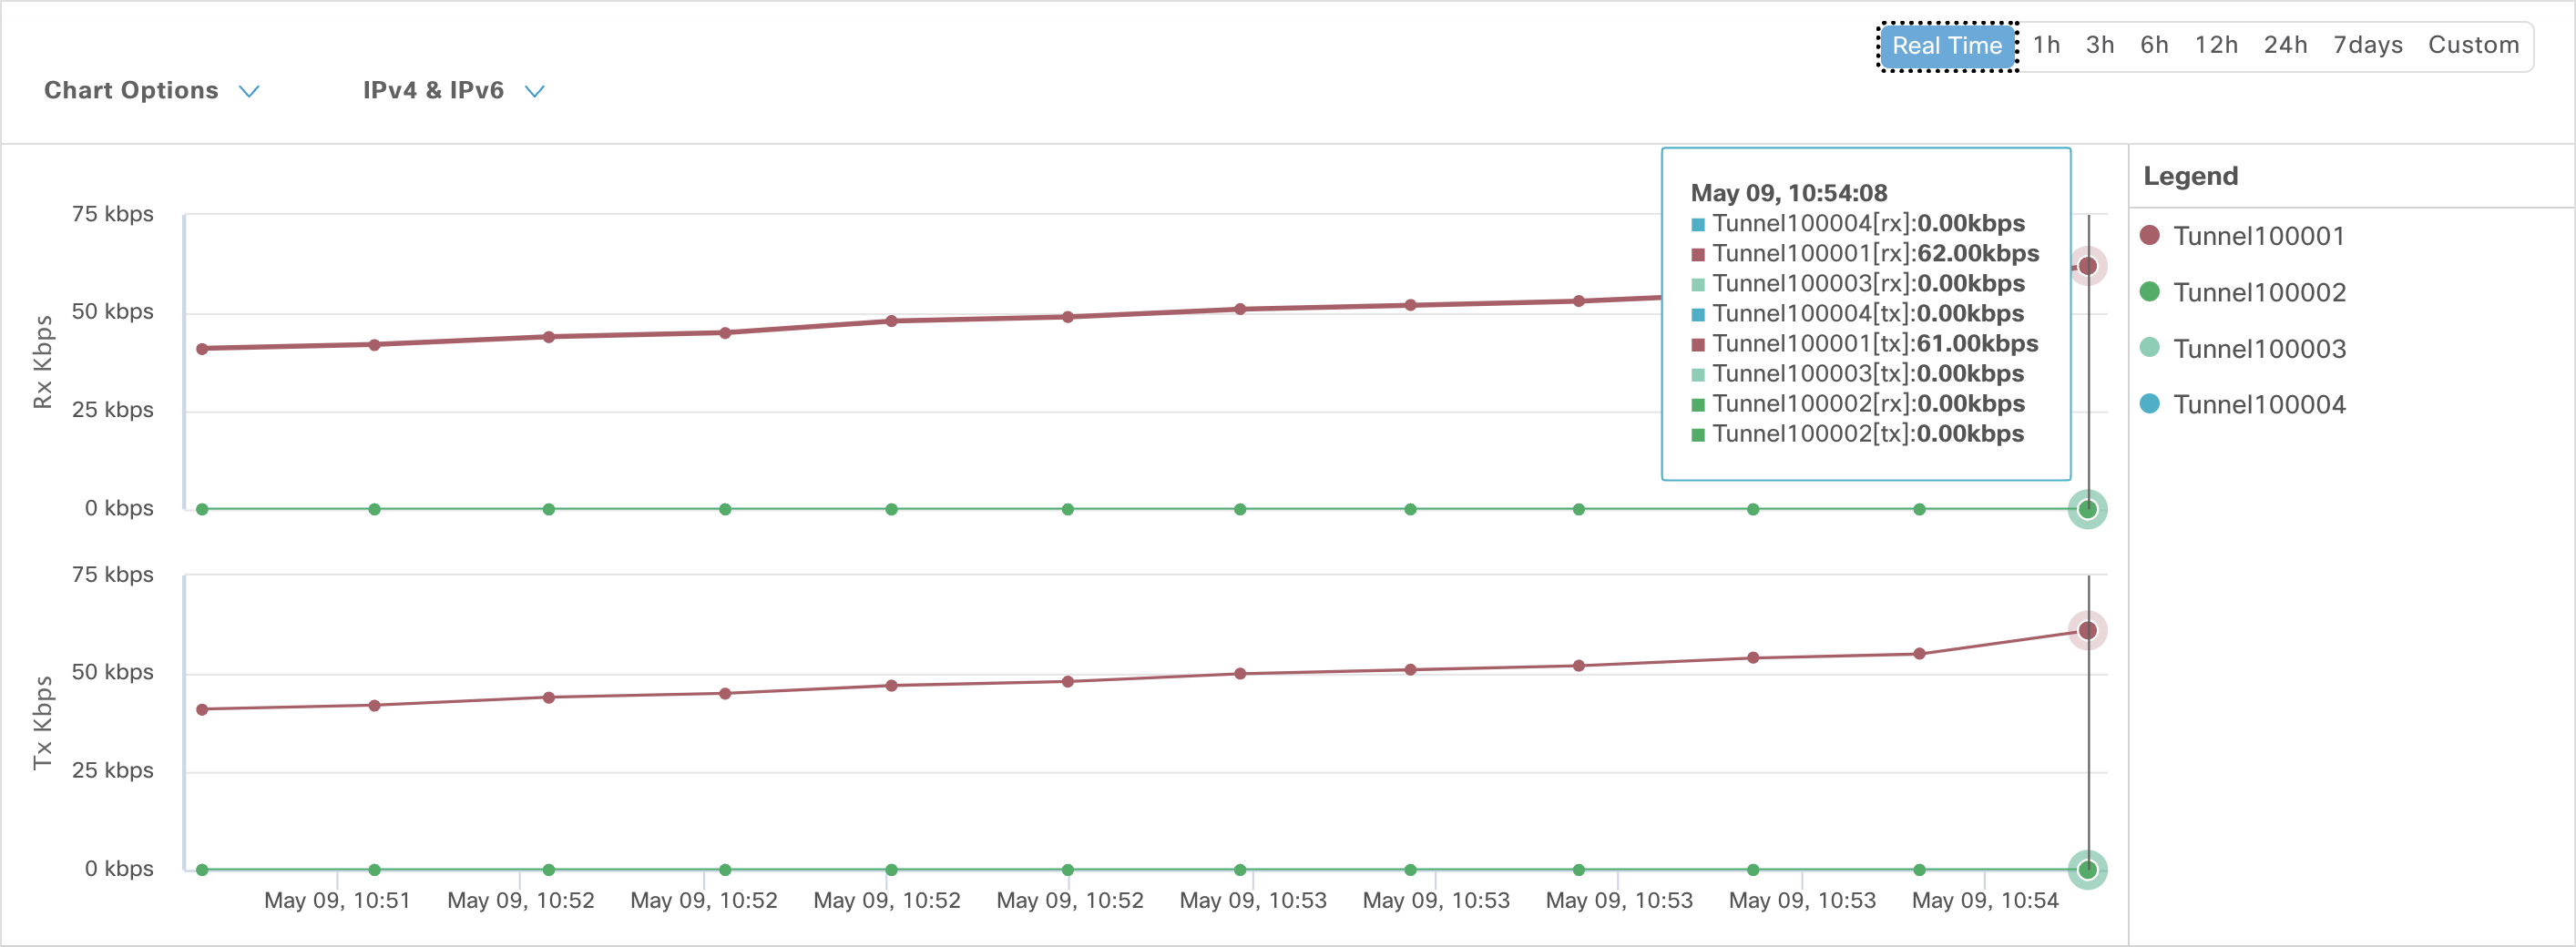
To verify the IPSec tunnel status in Cisco Catalyst SD-WAN Manager, go to [Configuration > Tunnels]. You can see the primary and backup tunnels display as active.
Troubleshooting
On the Cisco Catalyst SD-WAN device, you can troubleshoot using the following CLI commands:
show running-config
show crypto ikev2 sa
show crypto ipsec sa