

The installation instructions describe how to integrate your Salesforce account with Netskope. To configure Salesforce for SaaS Security Posture Management, you need to authorize Netskope as a web application client to access your Salesforce account.
Step 1 : Configure Salesforce API Access
There are two modes in Salesforce, Lightning mode and Classic mode. Netskope suggests you switch to the lightning mode to follow this procedure. To switch to the Lightning Experience UI, log in to login.salesforce.com and on the top-right of the home page, click the User menu drop-down list and select Switch to Lightning Experience.
To authorize Netskope as a web application client to access your Salesforce instance, you should create a custom profile on the Salesforce portal.
-
Log in to login.salesforce.com.
-
In the left navigation bar, go to Administration > Users > Profiles.

-
Clone a
Minimum Access - Salesforceuser profile. Ensure that the user profile has an active “Salesforce” license. In this example, click Clone beside the Minimum Access – Salesforce. -
On the Clone Profile page, enter a profile name and make sure the User License shows Salesforce. When finished, click Save.

-
After creating the custom profile, click Edit to modify the custom profile.
You must directly assign the permissions to the profile. Do not add the permissions through permission sets. -
Scroll down to the Administrative Permissions section of the custom profile.
Keep the default permissions as it is and enable the following permissions:
-
API Enabled
-
Modify Metadata Through Metadata API Functions
-
View All Users
-
View all Profiles
-
Manage Sharing
-
Manage Users
-
Customize Application
-
Manage Connected Apps
-
Approve Uninstalled Connected App
-
Create and Set Up Experiences
Scroll down to the General User Permissions section.
Keep the default permissions as it is and enable the following permission:
-
View Real-Time Event Monitoring Data
When finished, click Save.
Enable Digital Experiences setting to allow the users to create, view and have access to Network (Sites in Digital Experience) data. Follow steps to enable Digital Experiences:
– From Setup, enter Digital Experiences in the Quick Find box.
– Select Digital Experiences | Settings.
– Select Enable Digital Experiences.
– Save. -
-
In the left navigation bar, go to Administration > Users > Users.

-
Click Edit to modify an existing user, or New User to define a new user.
-
In the User Edit > General Information section, set the User License as Salesforce.
-
In the User Edit > General Information section, set the Profile created in step 4.

-
In the User Edit > General Information section, enable Salesforce CRM Content User. This allows the user to view the CRM content files and is required to list and take actions on the Salesforce CRM Content or Library files.

-
When finished, click Save.


– Log in to login.salesforce.com.
– In the left navigation bar, go to Settings > Security > Network Access.
– Click New beside Trusted IP Ranges.
– In the Trusted IP Range Edit page, specify the Start IP Address and End IP Address.
– Click Save.
To get a pool of Netskope public IP addresses, Refer Netskope SSPM gateway IP addresses for Salesforce Allowlisting.
Step 2 : Configure Salesforce Instance in Netskope UI
To authorize Netskope to access your Salesforce instance:
-
Log in to the Netskope tenant UI and go to Settings > Configure App Access > Next Gen > Security Posture.
-
Select the Salesforce icon, and then click Setup Security Posture Instance.
-
The Setup Instance window opens. Enter the following details:
-
Site Domain – Enter the full domain name for your Salesforce account – for example: sample.my.salesforce.com.
-
Administrator Email – Enter the email address of the Salesforce user that will grant access to SaaS Security Posture Management.
The email address during instance setup should match the one provided during grant of access. -
Security Scan Interval – Select the required scan interval.
-
(Optional) Instance Name – Enter the name of the SaaS app instance. This step is optional and if left blank, Netskope will determine the name of the app instance post grant.
-
-
Click Grant Access. You will be prompted to log in with your admin username and password and then click Allow.
-
When the configuration results page opens, click Close.
-
Refresh your browser, and you will see the instance.
Step 3 : Netskope SSPM OAuth Refresh Token Policy
Once you have successfully granted access, the Salesforce administrator should ensure that the Refresh Token Policy is configured. To do so:
-
Log in to login.salesforce.com.
-
On the top right, click Setup > Setup.
-
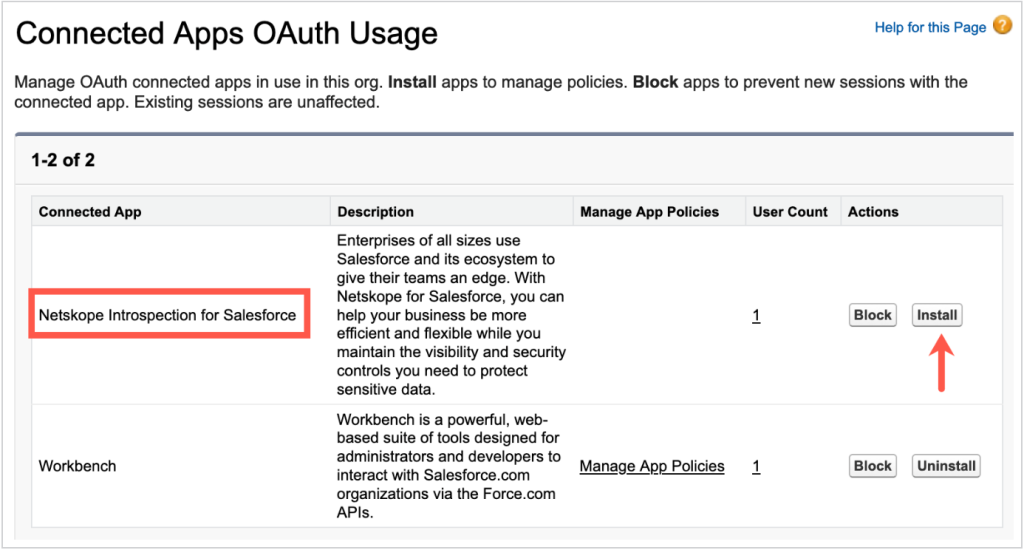
On the left navigation pane, go to PLATFORM TOOLS > Apps > Connected Apps > Connected Apps OAuth Usage.
-
Beside the Netskope Introspection for Salesforce app, click Install.
-
A new window opens, click Install.
-
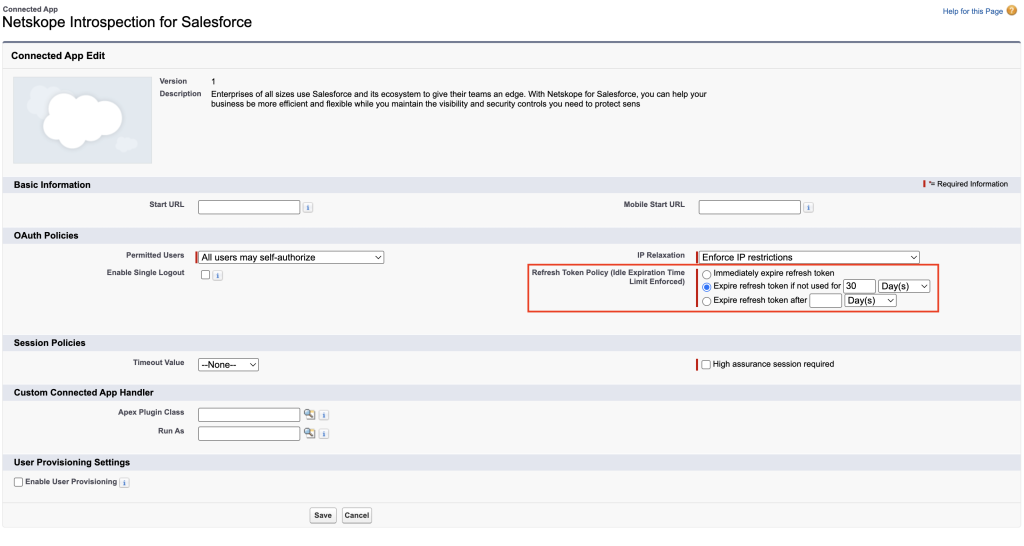
On the Netskope Introspection for Salesforce Connected app page, click Edit Policies.
-
Under OAuth Policies, set Refresh Token Policy to Expire refresh token if not used for 30 days.
-
Click Save.


Step 4 : Failure Due To Login IP Range
The access may fail due to Enforced IP restrictions as shown in below screenshot and additionally may also fail if the Salesforce username has any Login IP Ranges configured in Salesforce. Log in to your Salesforce account and verify if the user profile associated with the username has Login IP Ranges configured.

Netskope recommends allowing a pool of Netskope public IP addresses in Salesforce. This will ensure events and notifications are exchanged between Salesforce and SaaS Security Posture Management without any restrictions. To allow the IP addresses:
- Log in to login.salesforce.com.
- In the left navigation bar, go to Settings > Security > Network Access.
- Click New beside Trusted IP Ranges.
- In the Trusted IP Range Edit page, specify the Start IP Address and End IP Address.
- Click Save.
- To get a pool of Netskope public IP addresses, Refer Netskope SSPM gateway IP addresses for Salesforce Allowlisting.
Steps:
– Log in to
login.salesforce.com.– Navigate to Settings > Session Settings.
– Unselect Lock sessions to the IP address from which they originated.
– Click Save.