

To configure ServiceNow for the Next Generation API Data Protection, follow the instructions below.
Prerequisite
Before configuring ServiceNow for the Next Generation API Data Protection, review the prerequisites.
-
A ServiceNow account running a minimum version of San Diego.
-
An admin user who has write permission to the Application Registry table.
(Optional) Configure Authentication Scope and REST API Authentication Scope
If your ServiceNow account is running Xanadu or a later version and want to enable more granular API access control through authentication scopes or REST API authentication scopes, start by creating an authentication scope. Follow the steps below to get started.
-
Follow this article to enable REST API Auth Scope.
-
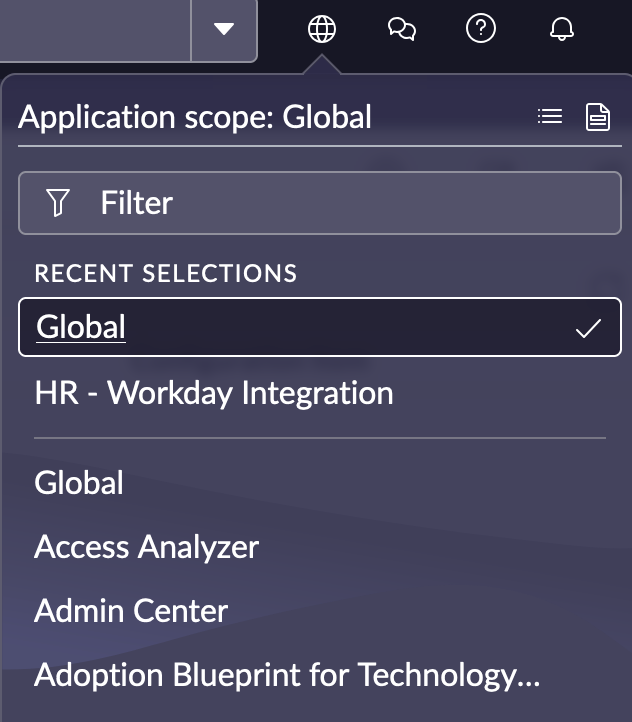
Ensure that you set the application scope to Global.
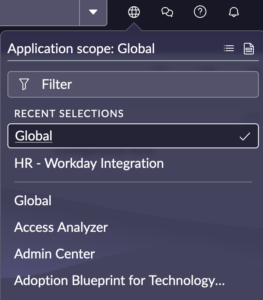
-
Navigate to All, under the filter edit box, type sys_auth_scope.list and press the Enter key. Then click on the Authentication Scopes page, click New.
-
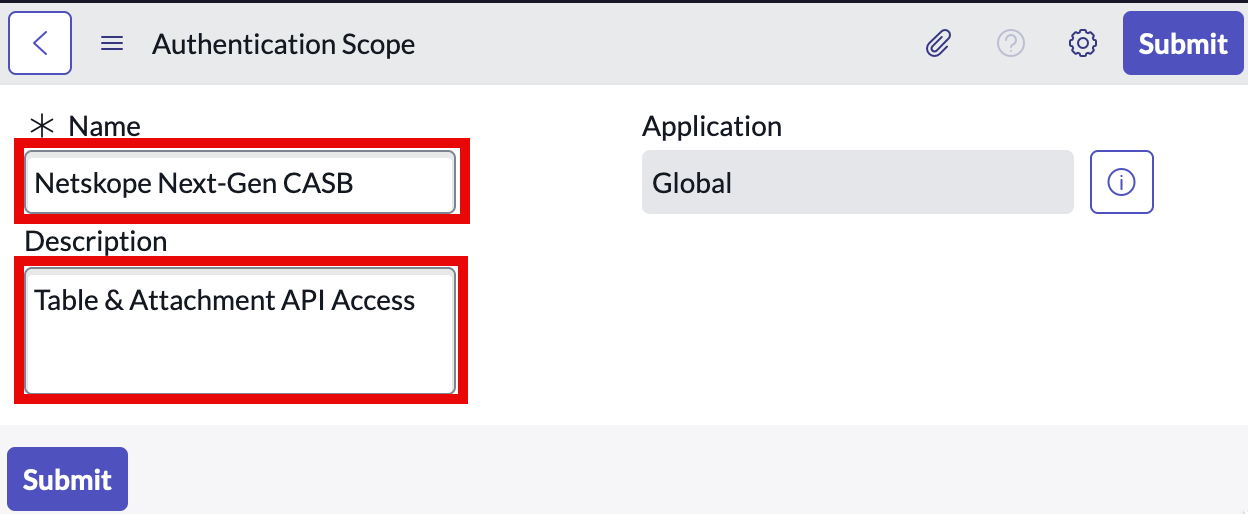
Under the Authentication Scope page, enter the name and description of your choice, and click Submit.
Ensure Application is set to Global.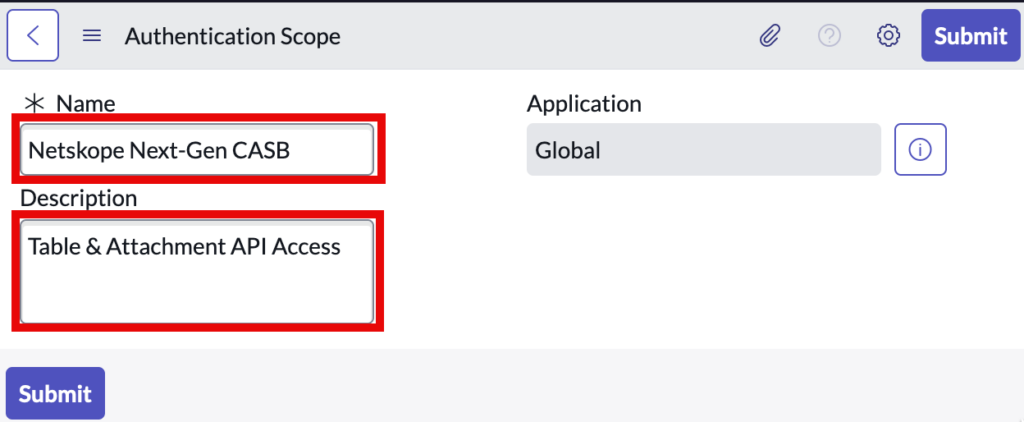
-
Navigate to All > System Web Service > API Auth Scopes > REST API Auth Scope. On this page, you should create two new API records – one for table and the other for attachment. Click New.
-
Enter the following details:
-
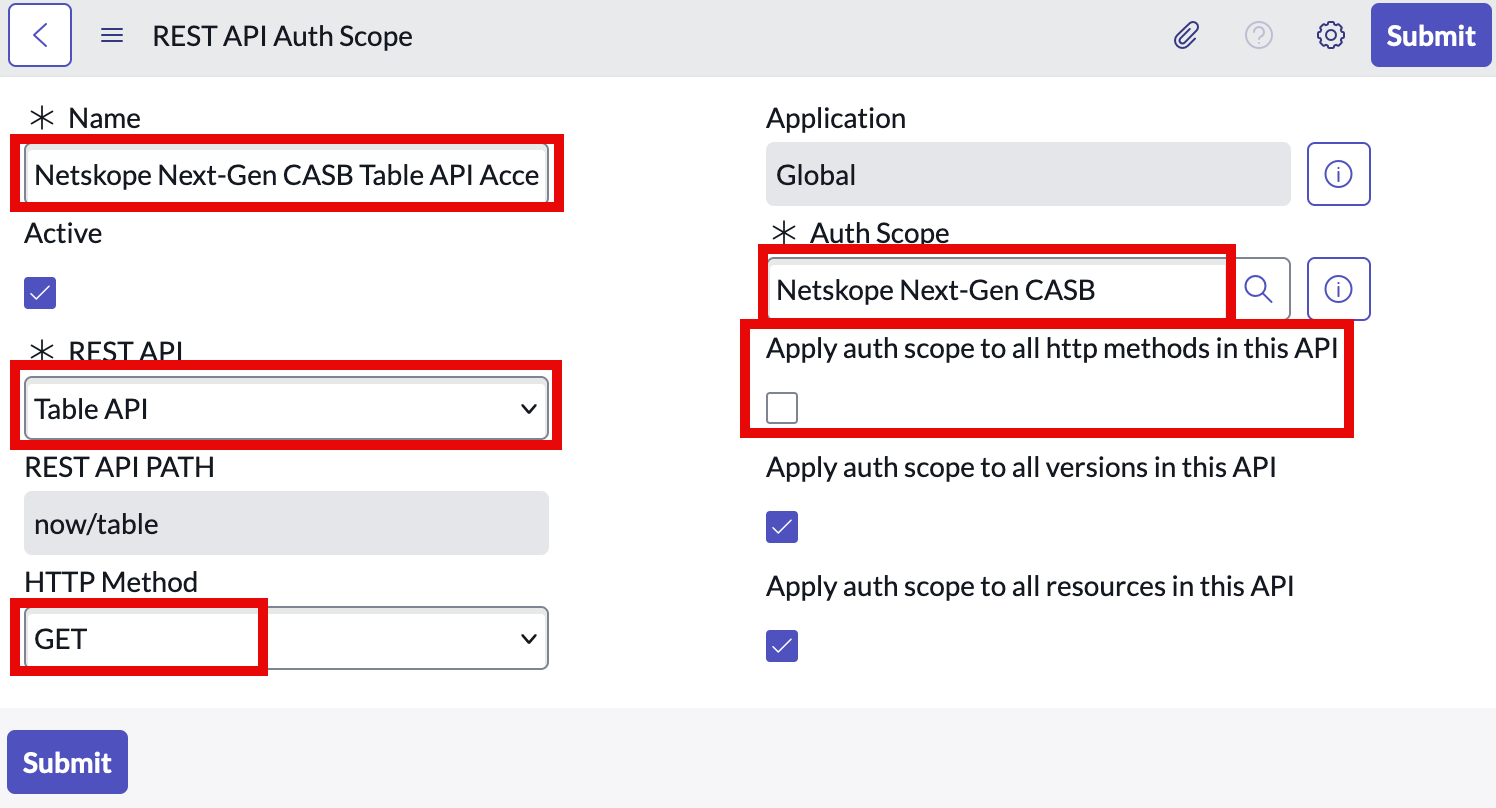
Name: Name of the REST API Auth Scope
-
REST API: Select Table API from the drop-down.
-
Ensure Application is set to Global.
-
Auth Scope: Select the newly created authentication scope from step 4.
-
Uncheck Apply auth scope to all http methods in this API.
-
Ensure HTTP Method is set to GET.
Keep the rest of the fields unchanged.
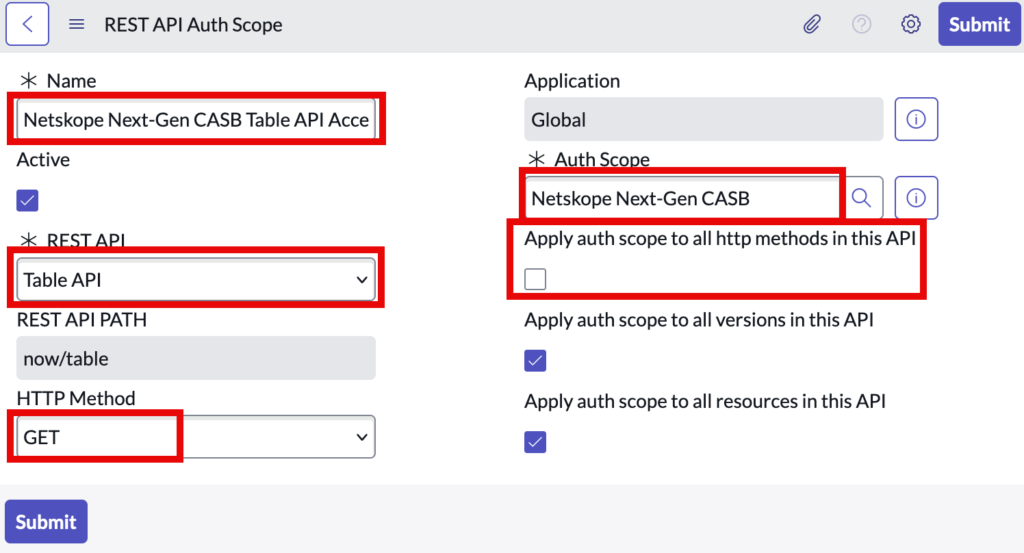
-
-
Click Submit.
-
Create another new record and enter the following details:
-
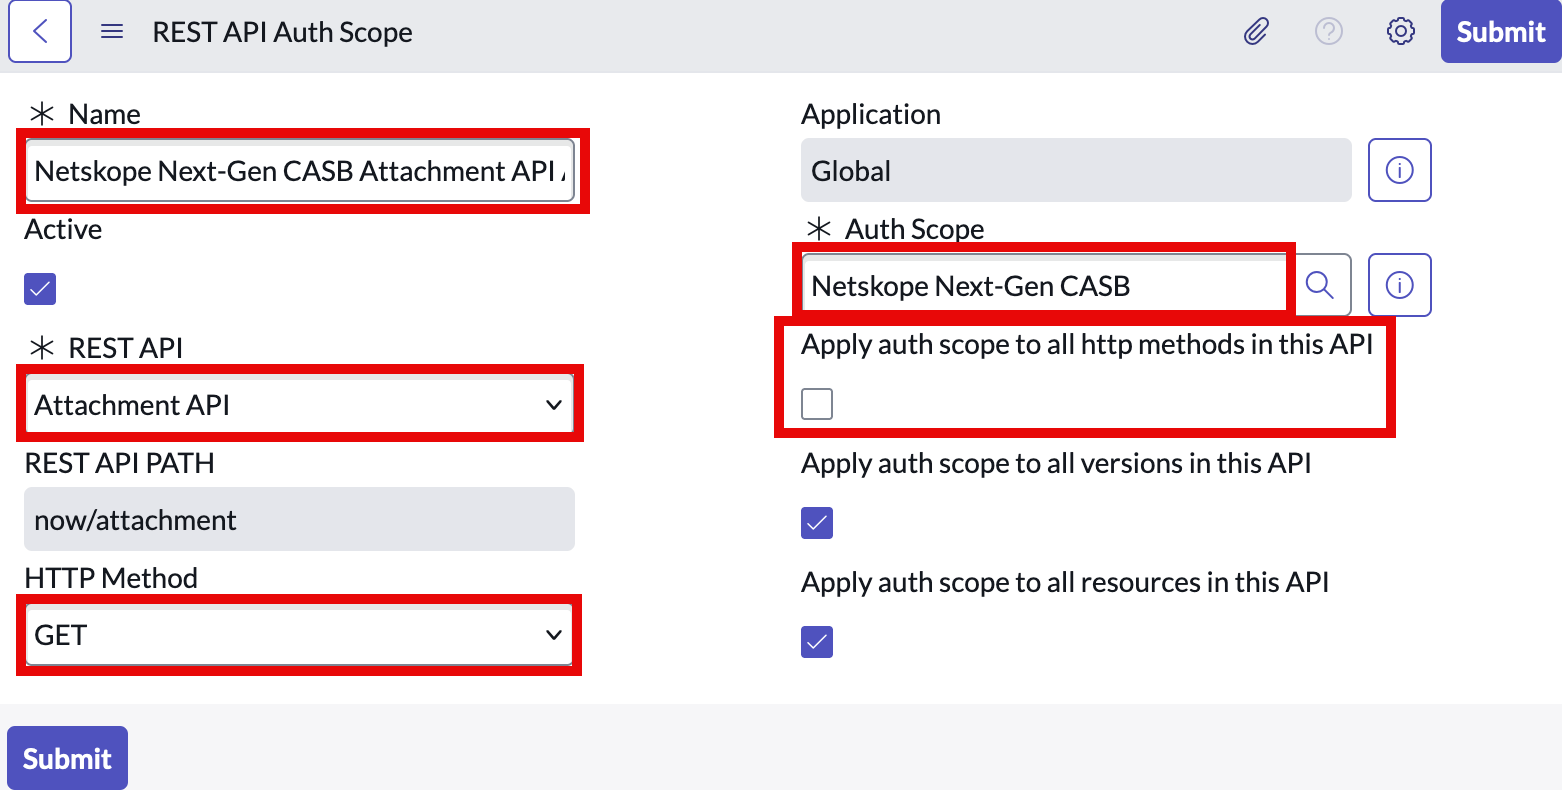
Name: Name of the REST API Auth Scope
-
REST API: Select Attachment API from the drop-down.
-
Ensure Application is set to Global.
-
Auth Scope: Select the newly created authentication scope from step 4.
-
Uncheck Apply auth scope to all http methods in this API.
-
Ensure HTTP Method is set to GET.
Keep the rest of the fields unchanged.
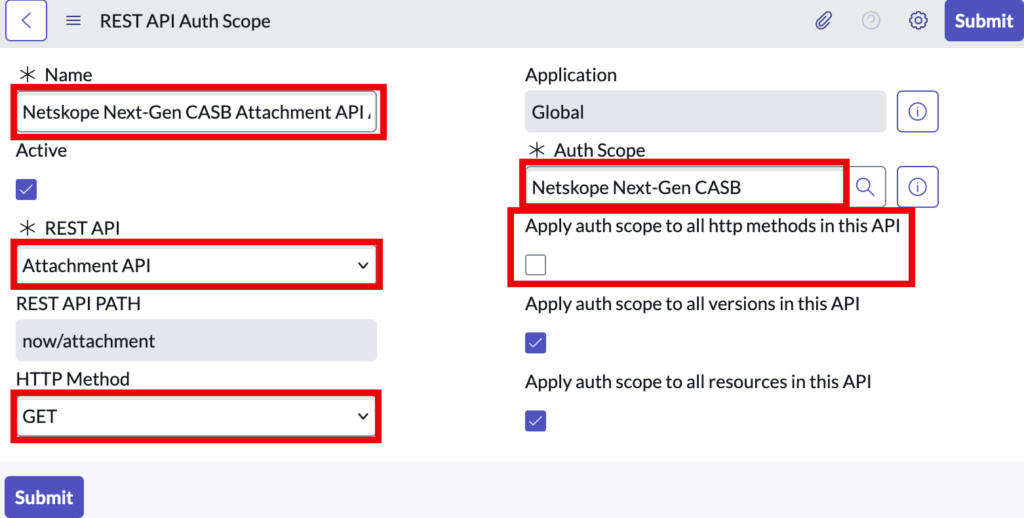
-
-
Click Submit.
Configure ServiceNow API Access
In this procedure, you’ll create a new application in your ServiceNow account that enables Netskope to securely access the necessary data through the API.
-
Log in to your ServiceNow account as an admin user.
-
Navigate to All > System OAuth > Application Registry and click New.

-
Click Create an OAuth API endpoint for external clients.

-
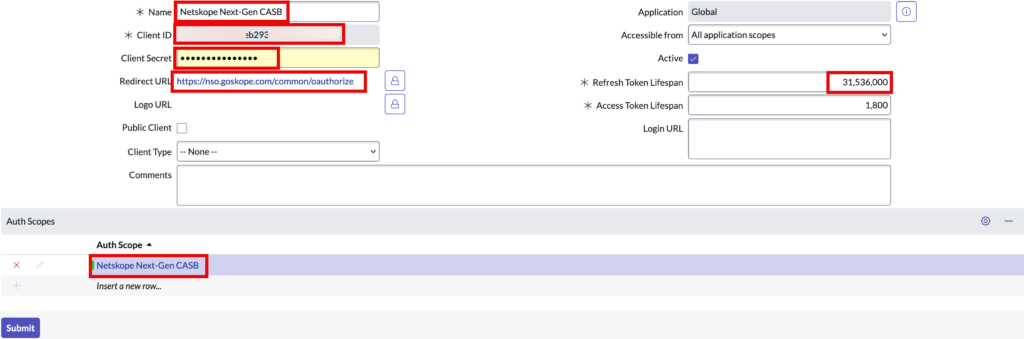
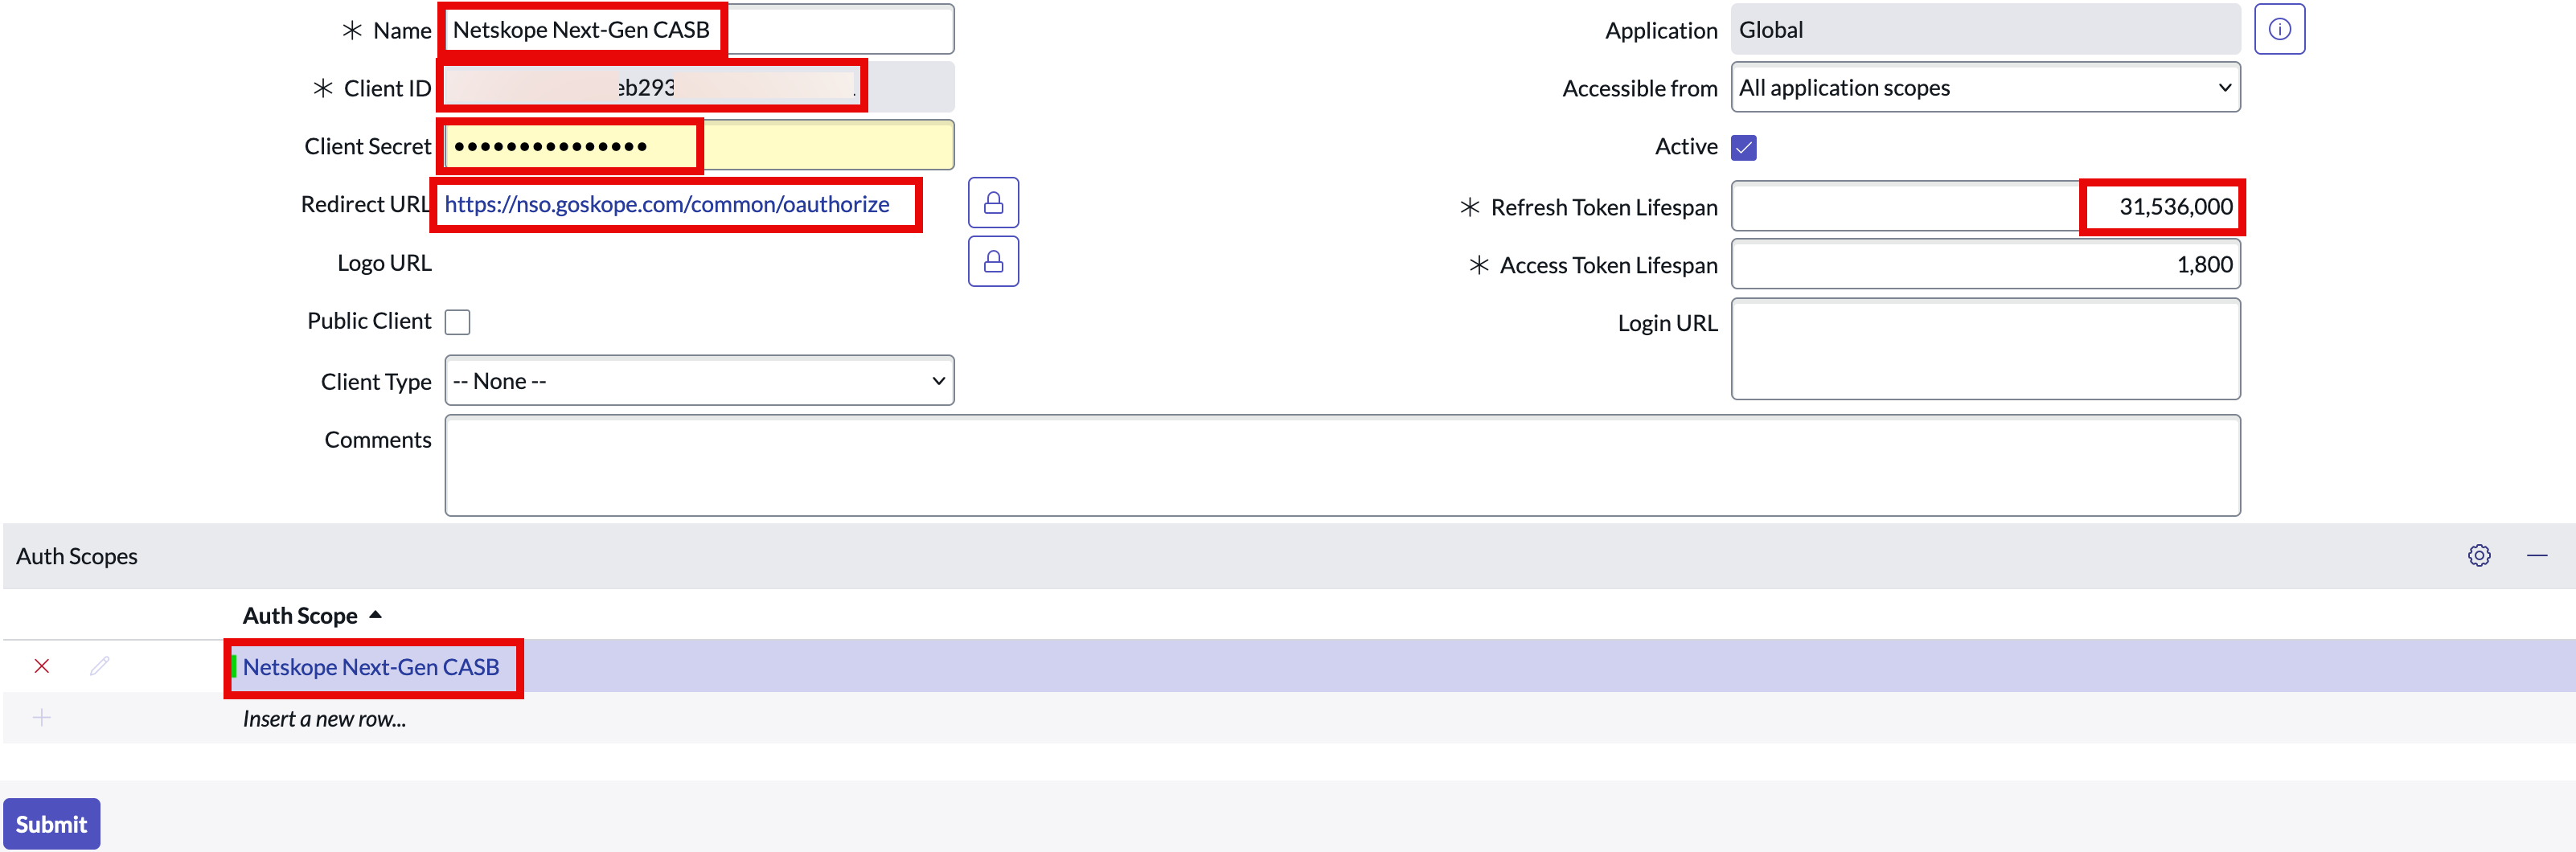
In the new form, enter the following details:
-
Name: An identifiable name, e.g.
Netskope Next-Gen CASB -
Client Secret: Generate a secure secret which contains no special characters other than
~!@#$%^&*()_+`-=[]\{}|,./<>?;':".Note down the client ID and secret; you will need these to create the ServiceNow instance in the Netskope UI. -
Redirect URL:
https://nso.goskope.com/common/oauthorize– If you are connecting a US FedRAMP account, enter this redirect URL:https://nso.govskope.us/common/oauthorize
– If you are connecting a Canada Federal PBMM account, enter this redirect URL:https://nso.govskope.ca/common/oauthorize -
Refresh Token Lifespan:
31,536,000The default value of the refresh token lifespan is 86,400 seconds (approx. 100 days). After that, the token will not be valid, and data will not be accessible. Netskope recommends to enter a minimum value of 31,536,000 seconds (approx. 1 year) to ensure accessibility. Once the refresh token expires, the app instance in Netskope UI will be shown as inactive. You should re-grant the ServiceNow app instance in the Netskope UI.
One way to prevent refresh token from ever expiring is to create a Business Rule to update theToken record expiry in the Manage Token (oauth_credential)table. See community post here. -
Under Auth Scope, select the newly created authentication scope.
Select the authentication scope only if you have configured authentication scope and REST API authentication scope. If not, leave this setting blank.
Keep the rest of the fields unchanged.
-
-
When finished, click Submit.


Create a Dedicated User for Netskope
While this step is optional, Netskope strongly recommends to create or use a dedicated user and role for the Next Generation API Data Protection integration. A dedicated user can help improve access control and assist in managing the Netskope app’s API request quota. If you already have a dedicated user and role set up for Netskope, you can skip the following procedure.
-
Navigate to All > Organization > Users and click New.

-
In the new form, enter the necessary user details and click Submit.
-
Navigate to All > User Administration > User Roles and click New.

-
Grant the user you created with the
adminrole admin, or a dedicated role with the read permission to the below mentioned tables.


Enable ServiceNow Table Permission
If you authenticate using a user with the admin role, no additional Access Control List (ACL) changes are typically required because the default admin role includes read access to all tables that Netskope monitors. During onboarding, Next Generation API Data Protection verifies access to all required and custom tables. If your organization has customized the admin role, review the tables below to ensure the user has read access. Otherwise, onboarding fails and identifies the specific tables that are inaccessible.
Next Generation API Data Protection now supports out-of-the-box (core) and custom tables. They are:
-
Basic Configuration Item
-
Catalog Task
-
Change Phase
-
Change Request
-
Change Task
-
Feature Task
-
Group Approval
-
IMAC (Install Move and Change)
-
Incident
-
Incident Task
-
KB Submission
-
Knowledge
-
Problem
-
Problem Task
-
Release Phase
-
Request
-
Request Item
-
SC Item Option
-
SC Multi Row Question Answer
-
Task
-
Ticket
-
Variable Ownership
-
Any custom table
For Netskope to scan through the tables listed above, an additional permission is required for API Data Protection to successfully make API calls to ServiceNow. Repeat the following steps for each table above.
-
Log in to your ServiceNow account as an admin user.
-
On the left navigation, search the term System Definition and click Tables.

-
Search each table by either Label or Name. Click on the desired table.
-
Under Application Access, select the Allow access to this table via web services and the can read checkbox.

-
Click Update.
-
Ensure that the dedicated user mentioned earlier has read permission for the all the out-of-the-box and custom tables. For more details, refer to the ACL documentation.


Set Access Permission for System Tables
There are a few more system tables that are necessary for Netskope to scan and successfully make API calls to ServiceNow. Follow the same procedure as above for the following system tables too.
| Table | Usage |
|---|---|
sys_db_object | Access records from the Tables table. |
ua_custom_table_inventory | Access records from the Custom Tables table.This table is used to discover and validate the custom tables registered in your tenant. Read access is recommended. If the table is unavailable or unreadable, onboarding still completes; however, Netskope does not discover or scan custom tables registered in the tenant. |
sys_user | Access records from the Custom Tables table. |
sys_user_has_role | Accesses the User Role table to determine which users have an assigned role. This table is required for accurate billable user calculation. If read access is not granted, onboarding can complete, but all active users are counted as billable (role-less requesters cannot be excluded). This corrects significant over-counting of billable users. |
sys_attachment | Access records from the Attachment metadata table. This is necessary for attachment content monitoring. |
sys_attachment_doc | Access records from the Attachment content table. This is necessary for attachment content monitoring. |
Configure Netskope to Access your ServiceNow Account
To authorize Netskope to access your ServiceNow instance, follow the steps below:
-
Log in to the Netskope tenant UI and go to Settings > Configure App Access > Next Gen > CASB API.
-
Under Apps, select ServiceNow and click Setup CASB API Instance.
The Setup Instance window opens.
-
Enter the following details:
-
Enter the Client ID and secret from the Configure ServiceNow API Access.
-
Enter the site domain of the ServiceNow account instance.
If your ServiceNow login URL is https://my_instance.service-now.com/, then enter my_instance.service-now.com as the domain name. -
Under Instance Name, enter a name of the SaaS app instance. This step is optional and if left blank, Netskope will determine the name of the app instance post grant.
-
-
Click Grant Access. You will be prompted to log in using your admin username and password that you created in an earlier procedure, and then click Sign In. When the configuration results page opens, click Close.
Refresh your browser and you will see a green check icon next to the instance name.
Onboarding Validation
During onboarding, Next Generation API Data Protection verifies access to all required tables before completing the ServiceNow connection. Next Generation API Data Protection validates that:
-
All default tables listed above exist in your ServiceNow instance (
sys_db_object). -
The dedicated user has read access to each required table.
-
Any custom tables registered in
ua_custom_table_inventoryare accessible to the same user.
If any validation check fails, onboarding stops and the Netskope tenant UI identifies the specific tables that caused the failure. Resolve the access or configuration issue in ServiceNow, and then retry onboarding. For more information, see the Troubleshoot Onboarding Errors section.
Next, you can view the Next Generation API Data Protection Inventory page to get deep insights on various entities on your ServiceNow account. For more information on the Inventory page, see Next Generation API Data Protection Inventory.
You can receive audit events and standard user behavior analytic alerts in Skope IT. To know more: Next Generation API Data Protection Skope IT Events.
Next, you should configure a Next Generation API Data Protection policy. To do so, see Next Generation API Data Protection Policy Wizard.
Troubleshoot Onboarding Errors
If onboarding fails, the Netskope tenant UI displays an error that identifies the ServiceNow tables requiring attention. Refer to the following errors for guidance.
-
Error 1
Required ServiceNow tables are not configured in the tenant: <table list>One or more default tables required by Next Generation API Data Protection are missing from your ServiceNow instance. This typically occurs when the tenant is running a release earlier than San Diego, or when a ServiceNow plugin that provides the tables (for example, ITSM or Knowledge) has been uninstalled. Verify that the required tables exist under System Definition > Tables, and then retry onboarding.
-
Error 2
The User used during authentication does not have read access to the following ServiceNow tables: <table list>The default tables exist, but the dedicated user does not have read access to the listed tables. Review the Enable ServiceNow Table Permissions section above for each affected table, and confirm that Allow access to this table via web services and Can read are enabled. Also verify that the user’s role has read access in the table ACL.
-
Error 3
The User used during authentication does not have read access to the following ServiceNow custom tables: <table list>The dedicated user can read
ua_custom_table_inventoryand discover the registered custom tables, but does not have read access to the tables themselves. Apply the same web service and ACL configuration described in the Enable ServiceNow Table Permissions section above to each listed custom table.
If multiple errors apply, Netskope reports them together so you can correct all of them in one pass.