

Overview
Netskope DSPM supports scanning AWS RDS MariaDB Data Stores. Follow these instructions to set up your AWS RDS MariaDB database and configure its connection to Netskope DSPM.
Authenticate Data Store
There are two methods for authenticating RDS and Aurora data stores: Snapshots or Service Account.
Using Snapshots
Snapshots are quicker and simpler, spinning up a secure copy of the data store for Netskope DSPM to scan without needing to create a Service Account. This copy exists only within your Netskope DSPM instance, and Netskope DSPM does not store any associated data. It’s encrypted and then immediately spun down, so there are no lingering data copies.
The following features are not supported when authenticating via Snapshot:
- Privilege Analysis
- Data-in-use monitoring
- Database selection
- Sample data collection
Ensure you’ve enabled Data Store Snapshots access during AWS Infrastructure onboarding. For already onboarded accounts, make sure the IAM policy used for DSPM includes the permissions required for Data Store Snapshots Access (note that this also requires the permissions from Feature 3: Unmanaged Data Stores). Depending on whether you onboarded an AWS Organization or an individual AWS account, you can find these granular permissions in the Onboard AWS Infrastructure Manually article under:
- Instructions > Onboard an AWS Organization > Step 3 (Optional): Create the Custom IAM Policy > Feature 4: Authorize Data Store Snapshots Access
- Instructions > Onboard an Individual AWS Account > Step 3 (Optional): Create the Custom IAM Policy > Feature 4: Authorize Data Store Snapshots Access
Once connected, data classification in the data store runs via Snapshot, which appears on the Data Store Inventory page as a small layered square note icon to the right of the hyperlinked data store name. You can later edit the data store and turn off Snapshots, at which point a Service Account will be required to authenticate the data store.
Using a Netskope DSPM Service Account
Authenticating the data store via service account requires additional configuration steps within AWS and may involve additional administrative support, as outlined below. Service account authentication enables access to all supported capabilities within Netskope DSPM.
Begin by configuring an AWS RDS MariaDB service account, which will be dedicated to Netskope DSPM’s use.
-
As an administrator, log into your AWS RDS MariaDB database using these AWS instructions.
-
Create the Netskope DSPM-specific RDS MariaDB user by executing the following commands in order:
Command Outcome Notes CREATE USER 'dasera_user'@'%' IDENTIFIED BY 'dasera_password';Creates the Netskope DSPM-specific user. Substitute dasera_useranddasera_passwordwith your own preferred values.
Note:@'%'creates a user which supports remote connection. As an alternative, substitute it with@'#.#.#.#'to allow a specific IP address.GRANT SELECT ON *.* TO 'dasera_user'@'%';Grants to the Netskope DSPM-specific user the required permissions which power capabilities within the Netskope DSPM platform. Substitute dasera_userwith the value used above.
Note:*.*means “on all schemas, in all tables in those schemas”, and it applies to future tables and schemas as well.
Retrieve Connection Information
DSPM will require additional information to communicate with your AWS RDS MariaDB database. Please follow the steps below to identify the connection values for later use within Netskope DSPM.
- Click this link to log into your AWS RDS Console, which will navigate you to the RDS service.
- Under Amazon RDS in the left-hand menu, navigate to Databases.
- For the database you wish Netskope DSPM to scan, click its link in the DB Identifier column.
- In the Connectivity & Security section, make note of the following values from your console:
| Highlight Color | Corresponding Netskope DSPM Value | Example |
|---|---|---|
| Red (Endpoint) | Data Store Endpoint |  |
| Yellow (Port) | Data Store Endpoint |  |
Connect Your Data Store
Step 1: Provide Credentials
Follow these steps to configure the connection:
-
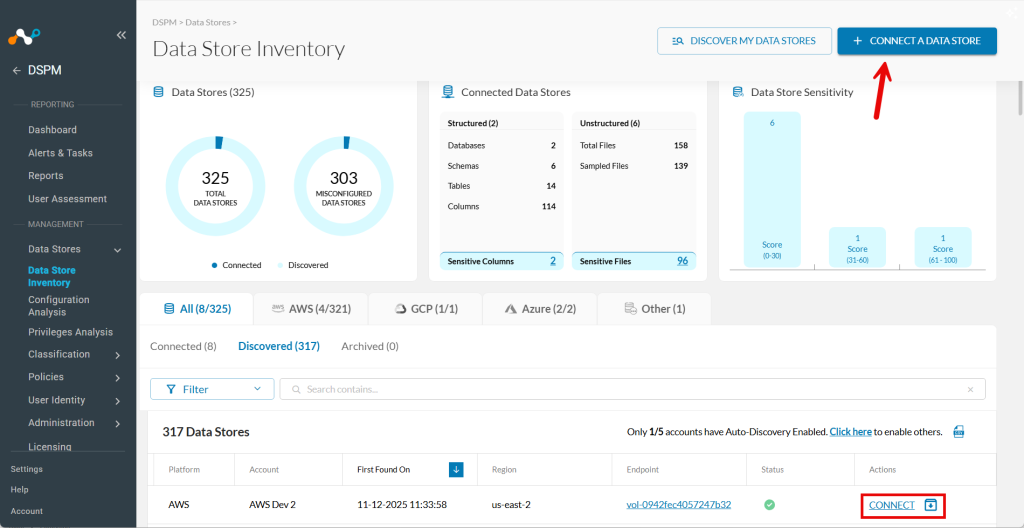
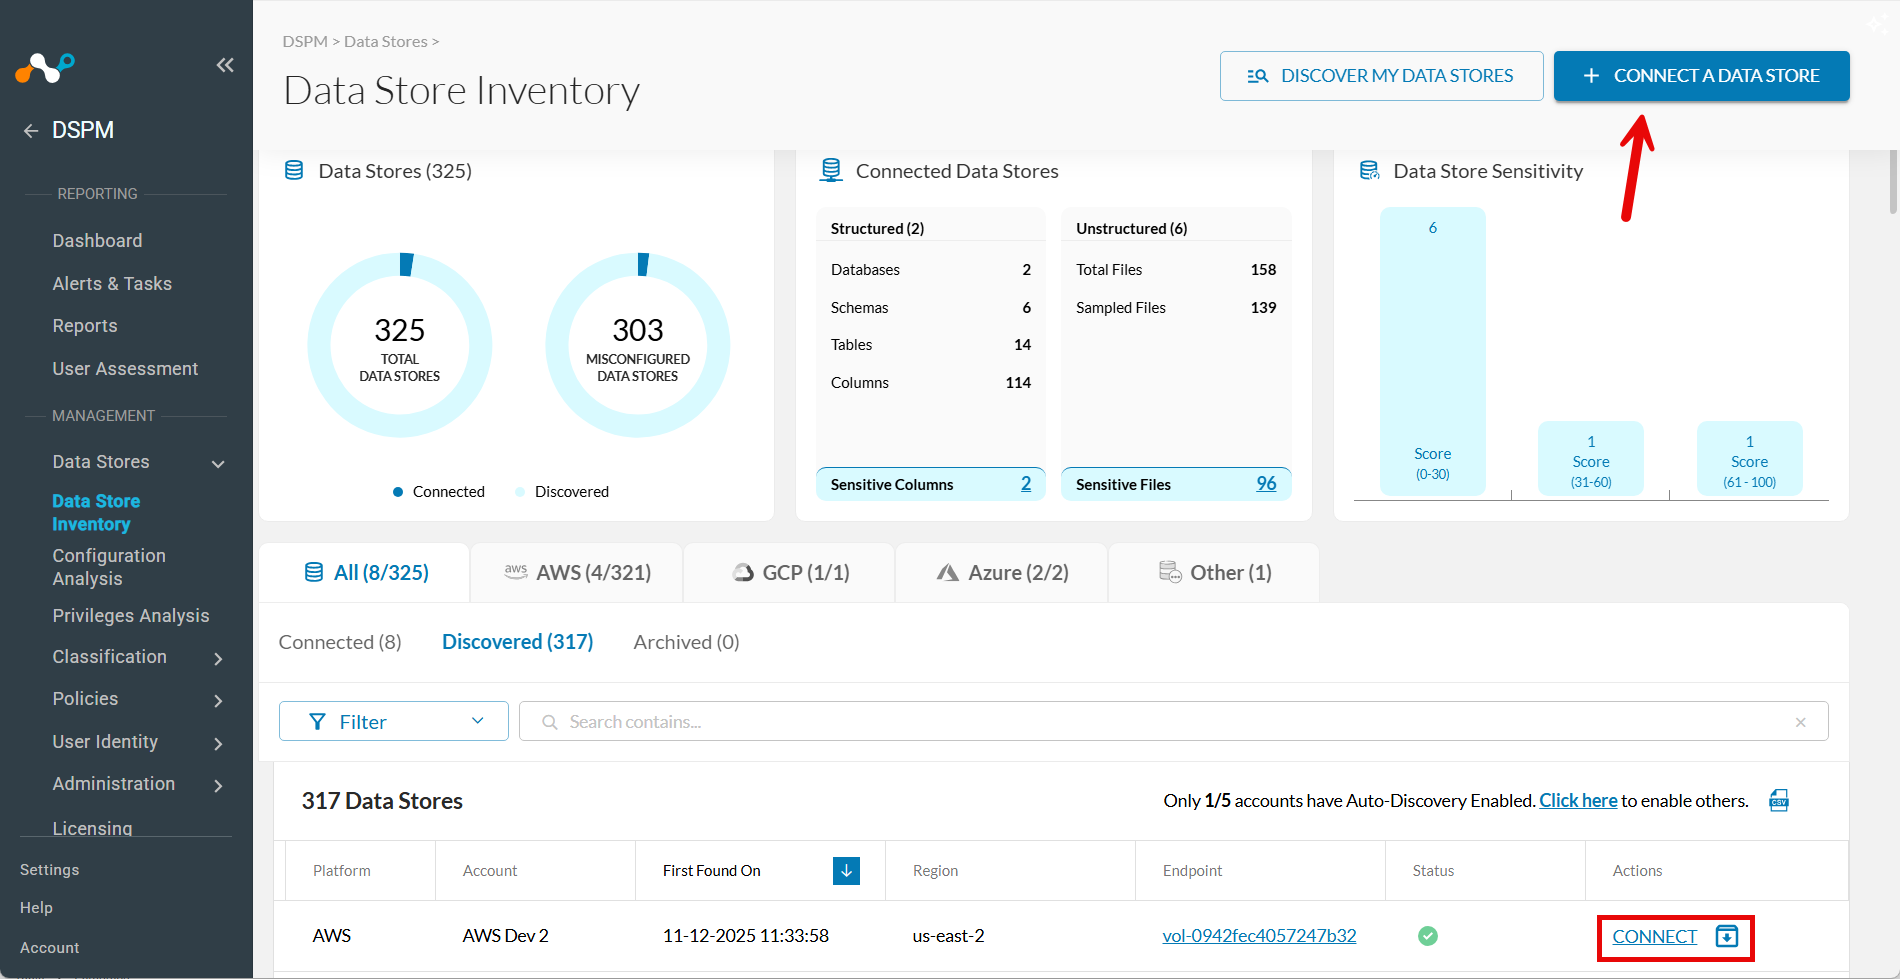
Go to Data Stores > Data Store Inventory.
-
Click CONNECT A DATA STORE in the upper right.
Tip: Alternatively, if the data store was already found by auto-discovery, go to the Discovered tab and click Connect in the Actions column.
-
In the Connect a Data Store window, click the data store icon you wish to connect.
-
In the Provide Credentials section, complete the following fields:
| Field | Value |
|---|---|
| Select AWS Account | Select one of the AWS Accounts defined within the Infrastructure Section screen. The field defaults if there is just one AWS account configured. |
| Data Store Identifier | Friendly name to describe this Data Store. Your value is displayed in other Netskope DSPM screens such as Policy Management and Classification Management. |
| Data Store Endpoint | Enter the corresponding value from the Retrieve Connection Information step above (e.g., endpoint:port). |
| Database Username (If Service Account) | Enter the corresponding value from the Using a Netskope DSPM Service Account step above. |
| Password (If Service Account) | Enter the corresponding value from the Using a Netskope DSPM Service Account step above. |
| Scan Frequency | Controls how often your Data Store is reviewed for changes; Netskope DSPM’s recommended frequency is defaulted, which you can override (if desired). |
| Sidecar Pool | If you will use sidecars to monitor this data store, select a sidecar pool with network visibility to said data store. This field is displayed when there is at least one defined sidecar pool. To learn more, please visit our Sidecar Administration article. |
Step 2: Scanning Infrastructure
- Click Next.
- When the Select Capabilities tab appears, complete the following fields:
- Assign a Data Owner (Optional): Select one or more users responsible for this data store.
- Which databases should Netskope DSPM scan?: Select the specific data stores and schemas to monitor, if applicable.
- Features: Select the features you want to enable.
| Capability | Supported for AWS RDS MariaDB via Service Account? | Supported for AWS RDS MariaDB via Snapshots? |
|---|---|---|
| Discovery | Yes (always-on) | Yes |
| Privilege Analysis | Yes | No |
| Classification | Yes | Yes |
| Shadow Data Analysis | Yes | No |
| Data-In-Use Monitoring | Yes | No |
| Automation | Yes (always-on) | Yes |
Step 3: Review and Save
- Click Save.
- When the Review tab appears, the system validates your configuration. If there are any issues, follow the on-screen instructions to fix them.
- Click Save to finalize the connection.