

Overview
This guide provides instructions to connect your on-premises NetApp ONTAP storage systems to the Netskope DSPM platform for scanning unstructured data via the CIFS/SMB protocol.
After you connect NetApp ONTAP to DSPM:
- A Netskope DSPM sidecar uses CIFS/SMB to access your NetApp file shares.
- A local DLP appliance performs content inspection using your DLP Profiles and Rules.
- Netskope DSPM surfaces findings (sensitive data, access risks, misconfigurations) in dashboards and Activity Logs.
Prerequisites:
Before connecting the data store, ensure the following requirements are met:
- NetApp ONTAP system: A running NetApp ONTAP cluster with CIFS/SMB enabled on the target Storage Virtual Machine (SVM), and at least one existing CIFS/SMB share that you want Netskope DSPM to scan.
- Access and administration: Administrative access to your NetApp ONTAP system (cluster admin or delegated SVM admin) so that you can:
- Create local CIFS users for Netskope DSPM.
- Manage share permissions to provide read‑only access for the DSPM service account.
- Verify CIFS/SMB service status and active sessions when troubleshooting connectivity.
- Connectivity: Network connectivity between a Netskope DSPM sidecar and the NetApp ONTAP data LIF over TCP port 445 (SMB). Firewalls and any other security controls must be configured to allow this traffic between the sidecar network and the NetApp data LIF.
- Sidecar and DLP On Demand:
- A DSPM sidecar pool registered in your Netskope DSPM tenant.
- A DLP appliance deployed and tethered to your tenant, as described in the DLP appliance Configuration guide.
Prepare NetApp ONTAP for DSPM
To allow Netskope DSPM to access your NetApp ONTAP file shares, create a dedicated service account with read-only permissions and validate basic access.
Step 1: Create a Local CIFS User
-
Connect to your NetApp ONTAP cluster via SSH:
ssh admin@<cluster-management-ip>
-
Create a local user on the SVM for DSPM access:
vserver cifs users-and-groups local-user create \
  -vserver <svm_name> \
  -user-name <username> \
  -full-name "Netskope DSPM Service Account"
-
When prompted, enter and confirm a strong password for this user.
-
Verify that the user was created:
vserver cifs users-and-groups local-user show -vserver <svm_name>
Step 2: Grant Read-Only Access to the Share
-
Grant the service account read-only access to the CIFS share that you want DSPM to scan:
vserver cifs share access-control create \
  -vserver <svm_name> \
  -share <share_name> \
  -user-or-group "<username>" \
  -permission Read
-
Verify the permissions:
vserver cifs share access-control show \
  -vserver <svm_name> \
  -share <share_name>
Validate Connectivity from the Sidecar Network
To reduce connectivity issues when you connect the data store in DSPM, test SMB access from a host in the same network as your DSPM sidecar (or directly from the sidecar host, if appropriate). This validates both network path and DNS from the sidecar’s perspective.
- SSH into your sidecar instance or a nearby test host with SMB client tools.
- Run the following command:
smbclient //<data-lif-ip>/<share_name> -U <username> - Confirm that you can successfully authenticate and list the contents of the share.
Check NetApp ONTAP CIFS Status
If you encounter connectivity issues, verify the CIFS/SMB service status and network configuration on NetApp ONTAP:
# Verify CIFS is running on the SVM
vserver cifs show

# Check active CIFS sessions
vserver cifs session show

# Verify network interfaces that handle CIFS data traffic
network interface show -data-protocol cifs
Confirm that CIFS is enabled and running on the SVM associated with your share, and that the Data LIFs for CIFS are online and reachable from the sidecar network.
Connect NetApp ONTAP in Netskope DSPM
Step 1: Provide Credentials
Follow these steps to configure the connection:
-
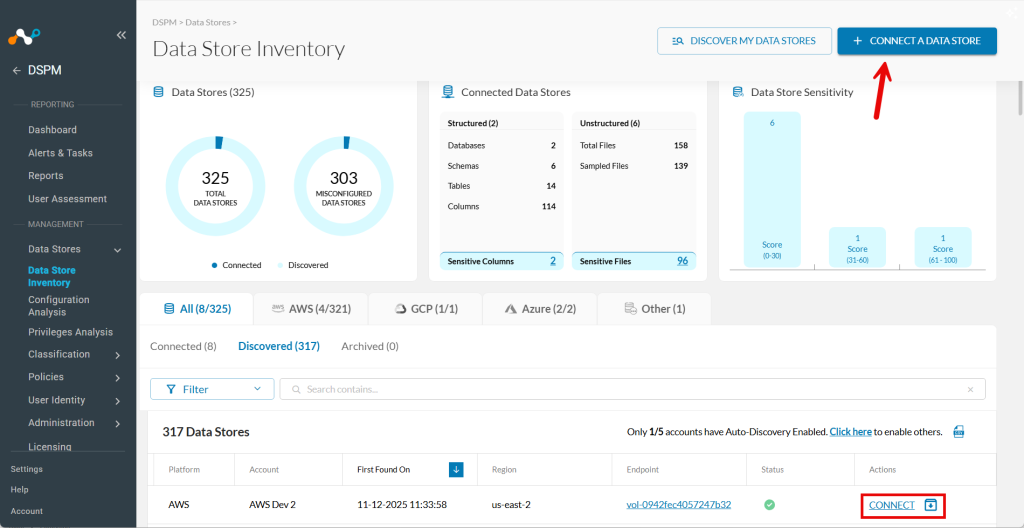
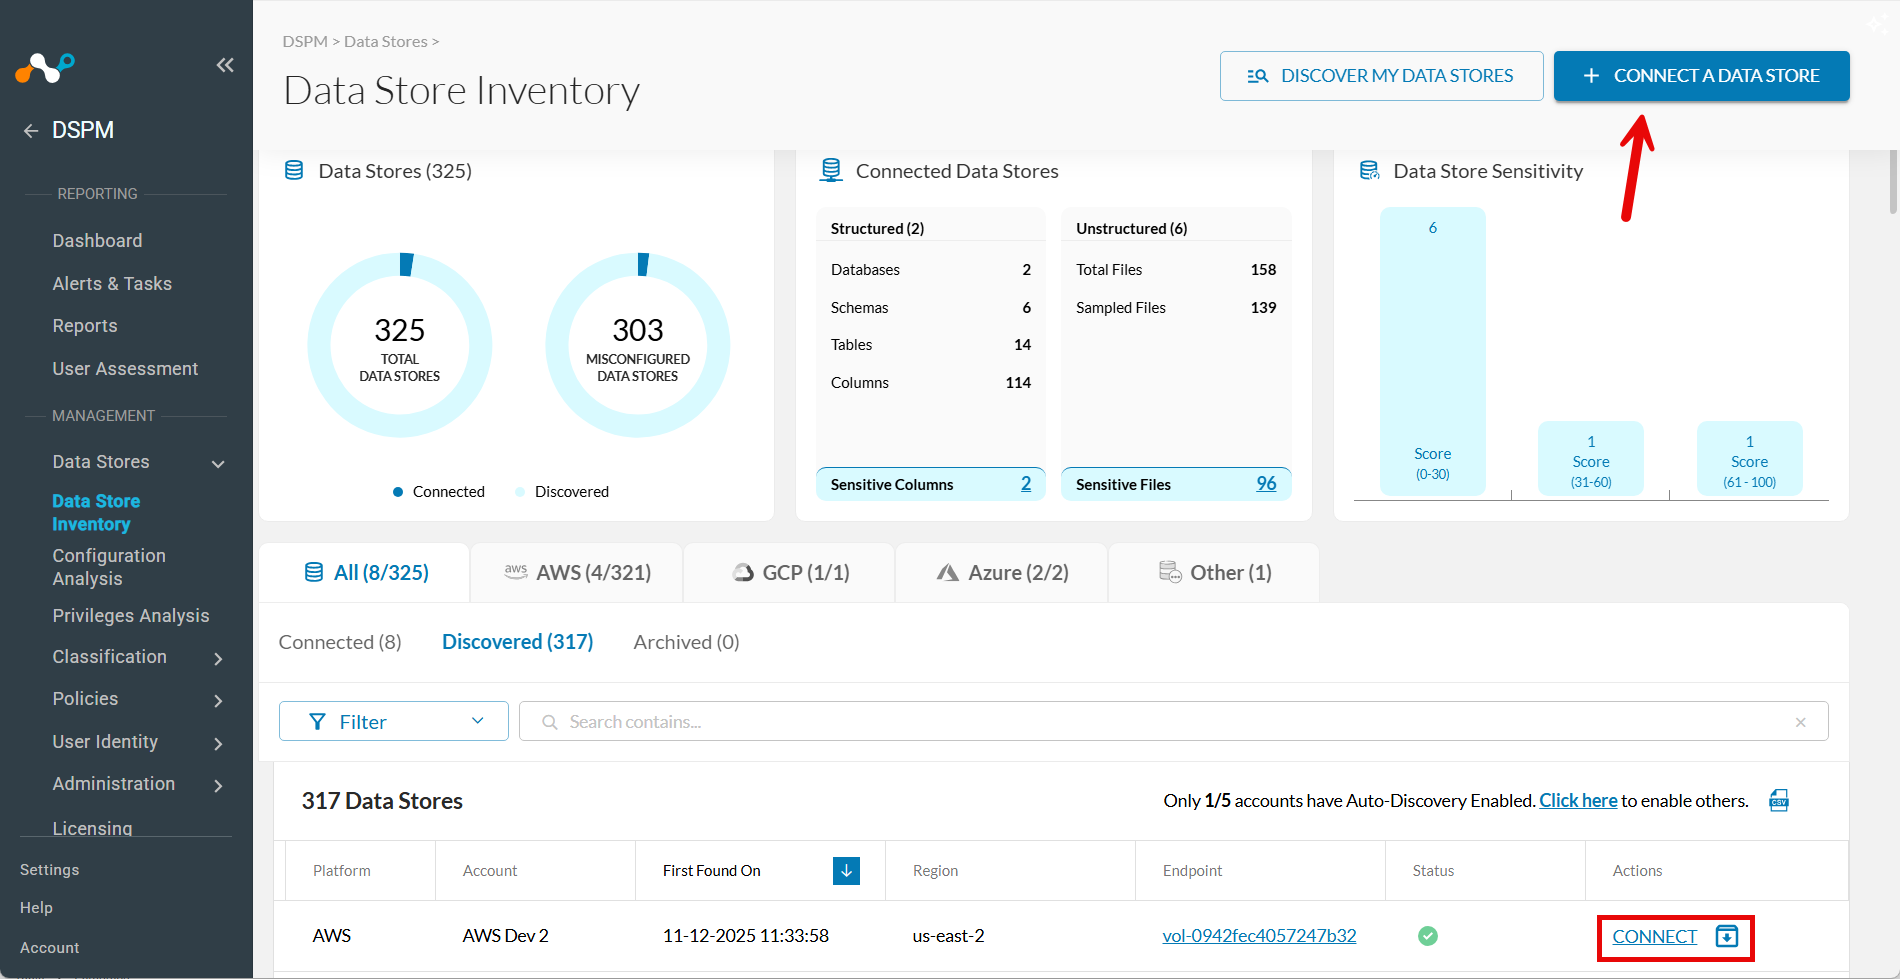
Go to Data Stores > Data Store Inventory.
-
Click CONNECT A DATA STORE in the upper right.
Tip: Alternatively, if the data store was already found by auto-discovery, go to the Discovered tab and click Connect in the Actions column.
-
In the Connect a Data Store window, click the data store icon you wish to connect.
-
In the Provide Credentials section, complete the following fields:
| Field | Value |
|---|---|
| Data Store Identifier | Friendly name for this NetApp ONTAP data store (for example, ONTAP-Finance-Share). |
| Data Store Endpoint | IP address or hostname of the NetApp ONTAP data LIF used to access the CIFS share. |
| Mount Point | Name of the CIFS share to scan (for example, finance_data). |
| Sidecar Pool | Sidecar Pool that has network connectivity to your on‑prem NetApp ONTAP system. |
| Username | Local CIFS username created in Step 1 (for example, netskope_user). |
| Password | Password for the service account used by Netskope DSPM to access the share. |
Step 2: Scanning Infrastructure
- Click Next.
- When the Select Capabilities tab appears, complete the following fields:
- Assign a Data Owner (Optional): Select one or more users responsible for this data store.
- Which databases should Netskope DSPM scan?: Select the specific data stores and schemas to monitor, if applicable.
- Features: Select the features you want to enable.
| Feature | Supported for NetApp? |
|---|---|
| Discovery | No |
| Privilege Analysis | No |
| Shadow Data Analysis | No |
| Classification | Yes |
| Data In-Use Monitoring | No |
| Automation | Yes (Always On) |
Enabling Classification triggers file scanning based on your defined sampling rate. The following classification limits apply when using Advanced Scan. When Smart Scan is selected, file selection is automated by the clustering algorithm and these manual limits do not apply. For more details, see Data Store Smart Scan.
- Scan Limits: DSPM processes a maximum of 100,000 files per scan, regardless of the sampling rate. If you choose 100%, the system scans files in batches of 100,000 across subsequent scans until all files are covered. A maximum of 1,000,000 files will be scanned per data store.
- File Size Exclusions: The scanner skips files larger than 128 MB.
- Incremental Scanning: To optimize performance, DSPM only rescans files that have been modified since the last scan.
- File Type Filtering: You can optionally use a regular expression to restrict sampling to specific file types.
Step 3: Review and Save
- Click Save.
- When the Review tab appears, the system validates your configuration. If there are any issues, follow the on-screen instructions to fix them.
- Click Save to finalize the connection.
Validate the Connection and Scans
After connecting the NetApp ONTAP data store:
- In Data Stores > Data Store Inventory, locate the new NetApp ONTAP entry.
- Confirm that its status indicates a healthy connection (no authentication or connectivity errors).
- Trigger a discovery or on-demand scan from the data store details page, if not started automatically.
- After the scan completes, verify that:
- The data store shows recent scan activity.
- Sensitive data findings appear in your DSPM dashboards.
- Related events are visible under Administration > Activity Logs in the appropriate System Activity entries.
Troubleshooting
Use the following list to resolve common connection errors:
- Authentication failed: Verify that the username and password are correct. For workgroup mode, use the local CIFS username you created in ONTAP (for example,
netskope_user). - Network unreachable: Ensure the sidecar can reach the NetApp data LIF IP on port 445. Check firewalls, security groups, and routing between the sidecar network and NetApp.
- Share not found: Verify the share name is correct using
vserver cifs share show -vserver <svm_name>on the NetApp ONTAP CLI. - Access denied: Confirm the service account has Read permissions on the share using
vserver cifs share access-control show -vserver <svm_name> -share <share_name>.