

Overview
This guide explains how to connect your Snowflake data warehouse to the Netskope DSPM platform. The process involves creating a dedicated service account within Snowflake with the necessary permissions, and then using that account’s credentials to establish the connection in the Netskope console.
Setup and Connection
This section provides the end-to-end procedure for connecting your database. The process is divided into two main steps: creating a service account in your Snowflake environment, and then connecting the data store in the Netskope UI.
Step 1: Create a Service Account in Snowflake
Before connecting to DSPM, you must create a dedicated service account in Snowflake. This allows DSPM to access query logs and scan data. You can do this manually, which is the recommended method for most users, or by using the provided Python script.
ACCOUNTADMIN privileges in Snowflake.Method 1: Manual Setup in Snowflake UI (Recommended)
This method involves creating the service account user and role directly in Snowflake.
- Log in to your Snowflake account as a user with the
ACCOUNTADMINrole. - Create a new, dedicated role for Netskope DSPM (e.g.,
NETSKOPE_DSPM_ROLE). - Grant this role the necessary privileges. This must include
USAGEon all warehouses and databases that are in scope for DSPM scanning, andSELECTon all tables within those databases. - Create a new, dedicated user for Netskope DSPM (e.g.,
NETSKOPE_DSPM_USER) with a secure password. - Assign the new role to the new user and set it as the user’s default role.
Method 2: Automated Setup via Python Script
This method uses a provided Python script to automate the creation and configuration of the service account.
Prerequisites
Before running the script, ensure you meet the following requirements:
- You have your Snowflake account identifier. For more details on account identifiers, see the Snowflake Documentation.
- You have the credentials (username, password, role, warehouse) for a Snowflake user with the ACCOUNTADMIN role. The script will prompt you for these.
- You have Python (version 3 or higher) installed locally.
- You have the Snowflake python connector installed.
Run the Setup Script
-
Open your command line interface (CLI) or terminal.
-
Download the automation script by running the following command:
wget https://dasera-release.s3.us-west-2.amazonaws.com/snowflake_setup.py -
Navigate to the directory where the script was downloaded.
-
Run the script with the command:
python snowflake_setup.py -
When prompted by the script, enter the following parameters:
The Snowflake Python connector automatically appends.snowflakecomputing.comto your account identifier. You must enter only the identifier.
✅ CORRECT Examples:xy12345.us-east-1mycompany-prodab12345.us-west-2.aws
❌ INCORRECT Examples:xy12345.us-east-1.snowflakecomputing.com(includes domain)https://mycompany-prod.snowflakecomputing.com(full URL)Script Parameters
Parameter Description Snowflake Account Enter only your Snowflake account identifier (see the Warning note above). Username Provide the username for the Snowflake account administrator (the user with the ACCOUNTADMIN role). Password Provide the password for the Snowflake account administrator. Admin role Enter ACCOUNTADMIN. This is the only role that can access and grant privileges to the necessary SNOWFLAKE tables.Admin warehouse Enter the name of a warehouse the admin user has access to. The script will grant usage and monitor privileges to the databases in this warehouse. Username to create for Netskope DSPM user Enter a username for the new service account (e.g., NETSKOPE_DSPM_USER).Role to create for Netskope DSPM user Enter a role name for the new service account (e.g., NETSKOPE_DSPM_ROLE).Password for Netskope DSPM user Create and enter a secure password for the new service account. Warehouse for Netskope DSPM user to use Provide the name of the default warehouse for the new service account.
Understanding Snowflake Database Types
The setup process automatically detects and handles different types of Snowflake databases. Understanding these types helps you know what to expect during setup:
| Database Type | Description | Privilege Grant Method |
|---|---|---|
| Standard Database | Databases created directly in your Snowflake account | GRANT USAGE, MONITOR + schema/table grants |
| Imported/Shared Database | Databases shared from other Snowflake accounts via Data Sharing | GRANT IMPORTED PRIVILEGES |
| Application Database | Databases from Snowflake Native Apps | GRANT IMPORTED PRIVILEGES |
| Personal Database | User-specific databases | Automatically skipped (cannot grant to roles) |
Special Cases
- SNOWFLAKE System Database: The
SNOWFLAKEdatabase is a shared system database that provides account usage and metadata. It always requiresGRANT IMPORTED PRIVILEGESand is essential for DSPM monitoring capabilities.
Automated Detection
The setup scripts automatically:
- Identify the type of each database in your account.
- Apply the correct privilege grants based on database type.
- Skip personal databases (which can only be granted to individual users).
- Provide clear output showing what privileges were granted to each database.
Step 2: Connect the Data Store
Finally, use the credentials for the service account you created in Step 1 to connect the data store in the Netskope console.
Step 1: Provide Credentials
Follow these steps to configure the connection:
-
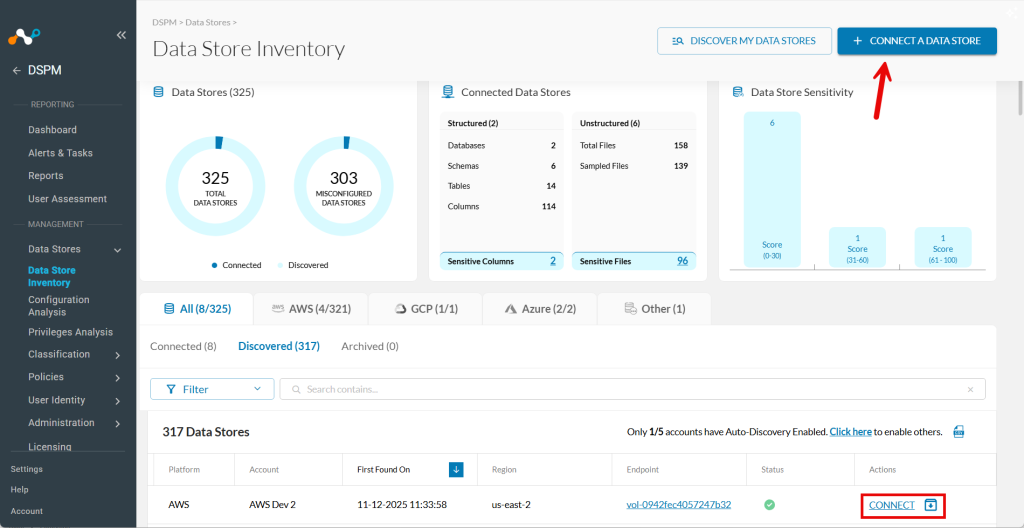
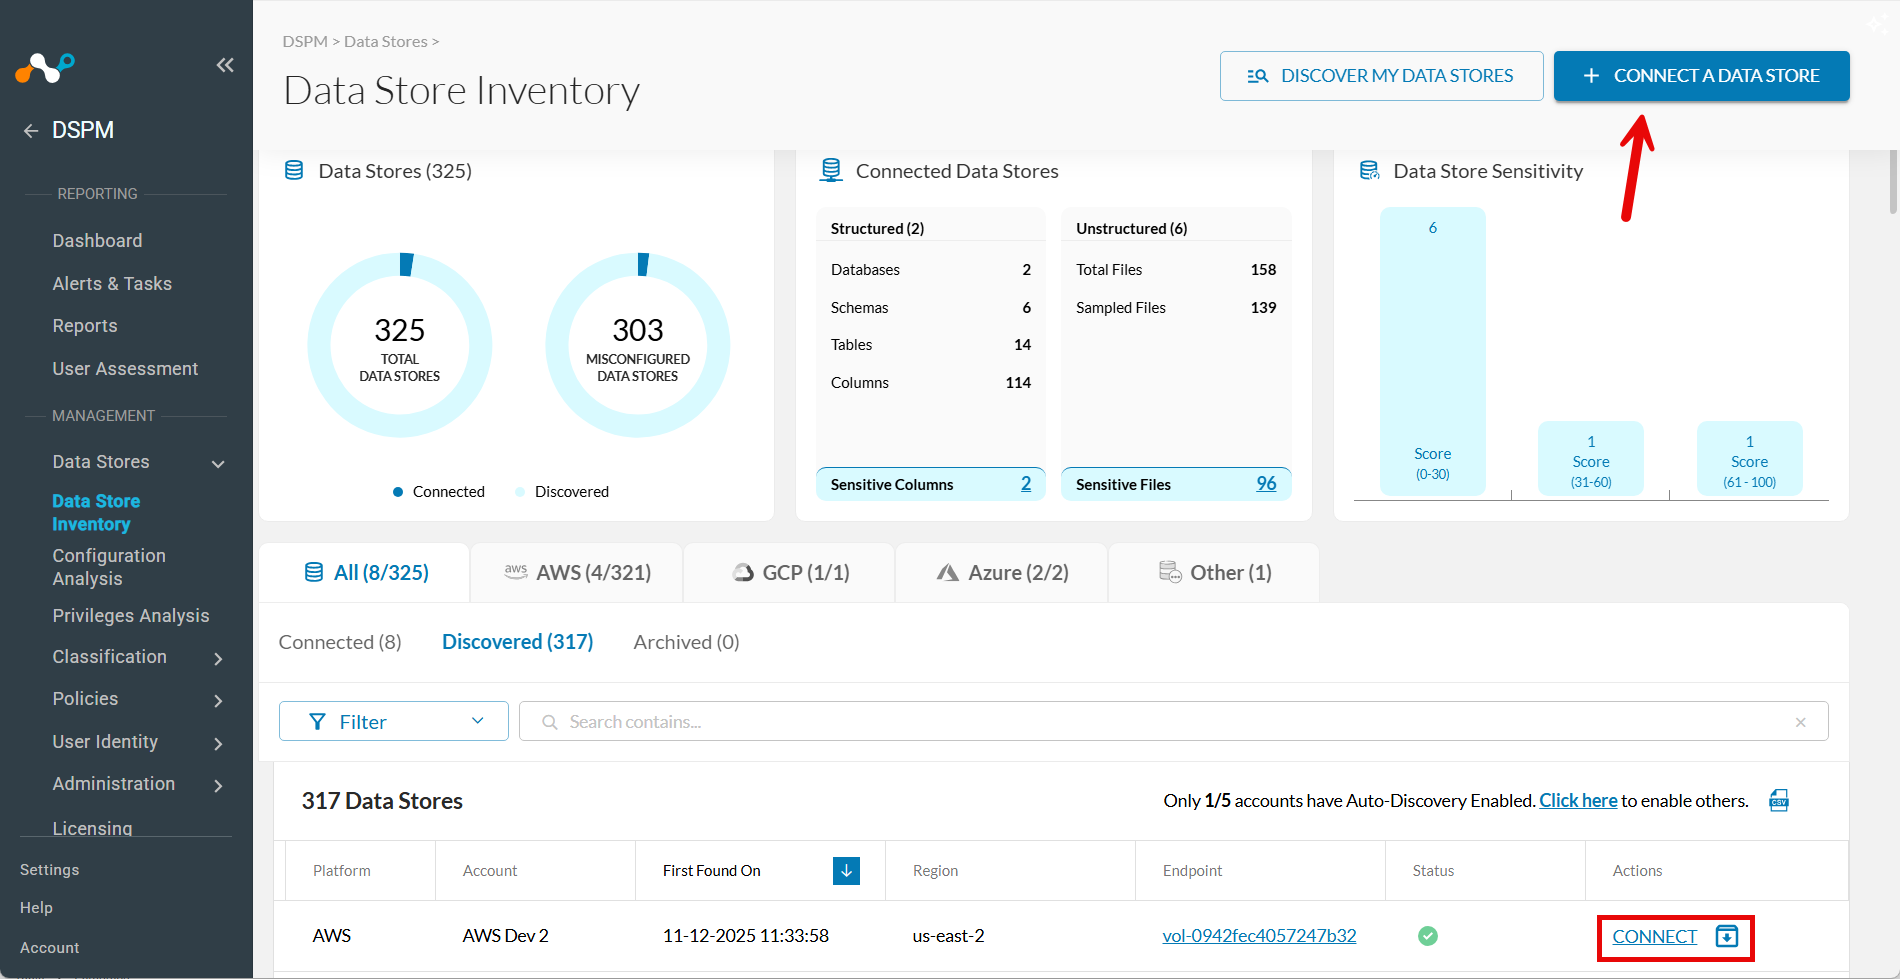
Go to Data Stores > Data Store Inventory.
-
Click CONNECT A DATA STORE in the upper right.
Tip: Alternatively, if the data store was already found by auto-discovery, go to the Discovered tab and click Connect in the Actions column.
-
In the Connect a Data Store window, click the data store icon you wish to connect.
-
In the Provide Credentials section, complete the following fields:
| Field | Value |
|---|---|
| Data Store Identifier | Enter a friendly name for this data store. |
| Data Store Endpoint | Enter your Snowflake Account URL ( < account_identifier > .snowflakecomputing.com). |
| Authentication Method | Select your preferred authentication method: Username / Password or AWS Secrets Manager. |
| Secret ARN | (If using AWS Secrets Manager) Enter the Secret ARN obtained from AWS Secrets Manager. |
| Database Username | Enter the username for the DSPM service account you created in Step 1.(If using Username / Password) Enter the username for the DSPM service account you created in Step 1. |
| Password | (If using Username / Password) Enter the password for the DSPM service account you created in Step 1. |
| Scan Frequency | Select how often DSPM reviews the data store for changes. |
| Sidecar Pool | If you use sidecars to monitor this data store, select a sidecar pool with network visibility to it. To learn more, visit our Sidecar Administration article. |
Step 2: Scanning Infrastructure
- Click Next.
- When the Select Capabilities tab appears, complete the following fields:
- Assign a Data Owner (Optional): Select one or more users responsible for this data store.
- Which databases should Netskope DSPM scan?: Select the specific data stores and schemas to monitor, if applicable.
- Features: Select the features you want to enable.
| Capability | Supported for Snowflake |
|---|---|
| Discovery | Yes (always-on) |
| Privilege Analysis | Yes |
| Shadow Data Analysis | Yes |
| Classification | Yes Note: Select the Ingest Snowflake tags checkbox to import existing Snowflake schema and object tags. To learn more, see our Data Tags article.) |
| Data In-Use Monitoring | Yes |
| Automation | Yes (always-on) |
Step 3: Review and Save
- Click Save.
- When the Review tab appears, the system validates your configuration. If there are any issues, follow the on-screen instructions to fix them.
- Click Save to finalize the connection.
Common Setup Issues
If you encounter errors during the setup or connection process, refer to the scenarios below.
-
Account Identifier Errors
- Symptom: Connection fails with account identifier error.
- Solution: Use only the account identifier (for example,
xy12345.us-east-1), not the full URL. Remove.snowflakecomputing.comandhttps://if present.
-
Imported Database Access Issues
- Symptom: Script reports “Could not grant IMPORTED PRIVILEGES on [database]”.
- Cause: The ACCOUNTADMIN role may not have rights to shared databases from external providers.
- Solution:
- Verify the database is shared with your account.
- Contact the data provider to ensure proper sharing permissions.
- Some shared databases may require separate authorization.
-
Personal Database Warnings
- Symptom: Script shows “Skipping [database] (Type: PERSONAL DATABASE)”.
- Explanation: This is expected behavior. Personal databases are user-specific and cannot be granted to roles. DSPM will not scan these databases.
-
Missing Databases in DSPM
-
Symptom: Some databases do not appear in DSPM after connection.
-
Check:
-
Verify the database type with:
SELECT DATABASE_NAME, TYPE
FROM SNOWFLAKE.INFORMATION_SCHEMA.DATABASES
WHERE DATABASE_NAME = 'your_database_name';
-
Confirm the correct privilege grants were applied based on database type.
-
Ensure the service account role has access to the warehouse where the database resides.
-
-
-
Privilege Grant Failures During Setup
- Symptom: Warnings appear when applying database privileges.
- Common Causes:
- Application databases that have not been fully installed.
- Shared databases pending approval.
- Databases where ACCOUNTADMIN does not have rights to grant.
- Action: Review the warning messages. Many warnings are informational and do not prevent DSPM from functioning on accessible databases.