

Overview
Use the Policy Engine to define rules that detect risks, misconfigurations, and specific data patterns in your environment. You can create policies from scratch using the no-code editor.
To begin, navigate to the Policy Engine page and click Create a New Policy in the top right corner. The policy editor opens.
Step 1: Basic Information
Configure the fundamental settings for your policy.

- Select Policy Type: Choose the type of risk or event you want to detect.
- Data Store Discovered: Alerts when new Data Stores are found in accounts with Auto-Discovery enabled.
- Classification: Alerts when specific data content matches business-defined conditions. These policies are evaluated at the object level (file or column), depending on whether you scope them by File Name (unstructured data) or Column Name (structured data).
- Data Access: Alerts when specific permissions or access to a dataset are detected for a user.
- Data Store Posture: Alerts based on Data Store metadata, such as tags or contained entity data types.
- Data Exfiltration: Alerts when a query produces or returns sensitive data.
- Privacy Violation: Alerts when a query targets an individual’s sensitive data.
- Data Modified: Alerts when specific fields are modified by a query.
- Name: Enter a unique, descriptive name for the policy.
- Description: (Optional) Provide details about the policy’s intent.
- Severity: Specify the alert severity level (Low, Medium, High, or Critical) triggered by this policy.
- Categories: (Optional) Assign the policy to one or more categories for better organization. To manage categories, see Understand DSPM Policy Categories.
Step 2: Policy Conditions
Use this section to build the business logic. You can combine metadata signals using AND/OR operators to create complex rules.

Available Metadata Signals
You can build conditions based on the following categories:
- Employee: Individual names, tags, cost centers, departments, divisions, or managers (managed in the Employee Directory).
- Data: Specific datasets, entity data types, data tags, and sensitivity levels.
- Data Store: Name, sensitivity, tags (applied to the store or contained within), platform, region, service, contained rule & profile names, entity data types, and file/field counts (both regular and sensitive).
- Misconfiguration: Encryption status, backup status, and public accessibility.
- Query: Day of week, time of day, and number of rows produced.
Building Logic Groups
- Add Condition: Click the + button next to the AND/OR operator and select New Condition.
- Add Group: Click the + button and select New Group to create nested logic.
- Toggle Operators: Click AND or OR to change how conditions interact.
Example Logic:
(Employee Risk Tag = Medium AND Rows Produced > 10,000) OR (Employee Risk Tag = High AND Rows Produced > 1,000)
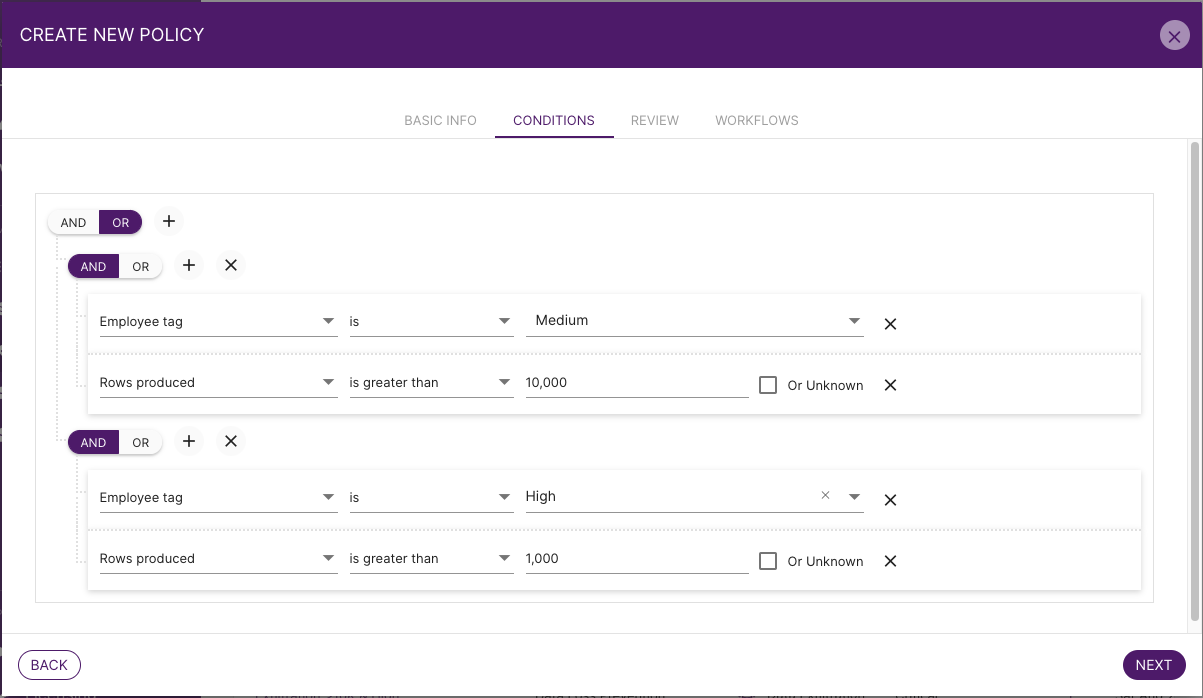
Specifics for Classification Policies
Classification policies function differently than other policy types because they evaluate individual objects (files or columns).
- Scope Requirement: You must include a specific scope condition.
- Use File Name to evaluate unstructured data (e.g., files in S3).
- Use Column Name to evaluate structured data (e.g., SQL tables).
- Restriction: You cannot combine File Name and Column Name conditions in the same policy.
- Object-Level Alerting: Unlike other policies that alert per Data Store, Classification policies now generate Alerts per object instead of Tasks. Each alert includes a count of sensitive objects detected (either the total count or the change/delta from the previous scan).
Note: Other policy types (such as Data Store Discovered, Data Access, Data Store Posture, Data Exfiltration, Privacy Violation, and Data Modified) continue to be evaluated and alerted on a per data store basis, rather than per individual file or column.
Specifics for Query Policies (Rows Produced)
When using “Number of rows produced” as a condition, note that some data stores do not return this count, or it may be unknown due to caching. You should handle this uncertainty:
- Option A: Check the Or Unknown box next to the row count condition.
- Option B: Create a separate condition to target “Rows produced is unknown”.
Step 3: Test Policy (Simulation)
Before saving, you can simulate the policy against existing logs to verify its accuracy.

- Click the TEST POLICY button.
- Review the results to see which historical violations would have triggered this policy.
- Adjust your conditions if necessary.
Note: The simulation is limited to 1,000 results and may take several minutes depending on data volume. You can close the window and return later; the policy creation process will not be interrupted.
Step 4: Workflows
Define who gets notified when the policy is triggered.

- Select the checkbox next to an existing Workflow.
- (Optional) Click the workflow name to review its configuration details.
- If you need a new notification channel, click the Create New Workflow icon in the top right.
Once configured, click Save to activate your policy.