

Netskope Data Loss Prevention (DLP) Fingerprinting allows you to identify and protect sensitive data based on exact matches or similarity to predefined content. There are two primary methods for generating and utilizing fingerprints:
Uploading Files Directly via the Netskope UI: The Netskope cloud generates the fingerprints (hashes) from the files you upload.
Generating Hashes on a Virtual Appliance (VA): You generate the fingerprints (hashes) on your on-premises Virtual Appliance, and only the hashes are uploaded to the Netskope cloud. Original files never leave your environment.
Method 1: Upload Files Directly via the Netskope UI
This method allows you to upload your sensitive files directly to the Netskope tenant. Netskope’s backend will then process these files and generate the necessary hashes for fingerprinting based on your similarity match configuration.
-
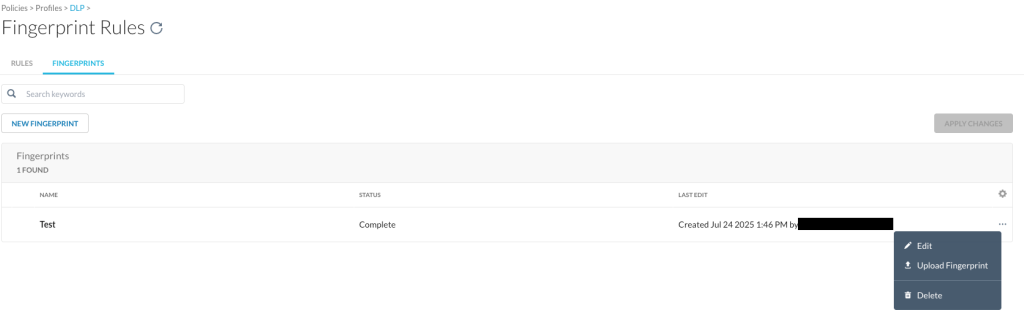
Navigate to Fingerprint Rules:
- Go to Policies > Profiles > DLP.
- Click on the Fingerprints tab.
- You will see a list of existing fingerprints (if any).
-
Initiate Fingerprint Upload:
- You can either click NEW FINGERPRINT to create a new fingerprint entry or, for an existing fingerprint entry, click the three dots (
...) next to its name and select Upload Fingerprint. - Follow the on-screen prompts to select and upload your sensitive files. Netskope will then process these files to generate the fingerprint hashes.
- You can either click NEW FINGERPRINT to create a new fingerprint entry or, for an existing fingerprint entry, click the three dots (
-
Create a New Fingerprint Rule (for Policy Enforcement):
Original sensitive files are uploaded to and processed by the Netskope cloud for hash generation.- After the fingerprint processing is complete (you can check its status on the FINGERPRINTS tab), navigate back to the
RULEStab or directly to Policies > Profiles > DLP > Rules. - Hover over Edit Rules, and then click Rules.
- Click New Fingerprint Rule.
- Under Settings, select the fingerprint you created previously (from the files you uploaded) and then click Next.
- Set the threshold level, which determines how much of the sensitive content in the archive needs to match files being scanned for policy violations. The recommended default value is 85%. Click Next.
- Enter a name for this fingerprint rule and click Save.
- Click Apply Changes, add a brief description, and then click Apply.
- When creating a DLP profile, the fingerprint rule can be selected on the Rule or Classification screen of the DLP Profiles workflow.
- After the fingerprint processing is complete (you can check its status on the FINGERPRINTS tab), navigate back to the

Method 2: Generate Hash on a Virtual Appliance (VM) and Upload Only the Hash
This method is ideal when you have strict requirements to keep sensitive data within your on-premises environment. You use a Netskope Virtual Appliance (VA) to generate the file hashes locally, and only these hashes (not the original files) are then securely uploaded to your Netskope tenant.
-
Prepare your Fingerprint File:
- Ensure your sensitive file for fingerprinting is ready on a system that can access your Virtual Appliance.
-
Transfer the Fingerprint File to the Virtual Appliance:
- Use the
scpcommand with thenstransferaccount to securely transfer your fingerprint file to the VA.
- Use the
-
Command (Bash):
scp <fingerprint_file> nstransfer@<virtual_appliance_host>:/home/nstransfer/pdd_data- Replace
<fingerprint_file>with the path to your sensitive file.
- Replace
<virtual_appliance_host>with the hostname or IP address of your Virtual Appliance. - Note: The location of the
pdd_datadirectory varies between user accounts. When using thenstransferaccount to copy the file to the appliance, the location is/home/nstransfer/pdd_data.
- Replace
-
Log in to the Virtual Appliance (as
nsadmin):- After the file is successfully transferred, log in to the appliance using the
nsadminaccount. - Note: When logged in as
nsadmin, thepdd_datadirectory is located at/var/ns/docker/mounts/lclw/mountpoint/nslogs/user/pdd_data
- After the file is successfully transferred, log in to the appliance using the
-
Generate Fingerprint Hash and Upload to Netskope Cloud:
- At the Netskope
shellprompt on the VA, run the following command to generate the fingerprint hash from the transferred file and upload it to the Netskope cloud:
- At the Netskope
-
Command (Bash):
request dlpfingerprint generate classification <fingerprint-classification> path /var/ns/docker/mounts/lclw/mountpoint/nslogs/user/pdd_data/upload/<file-name>- Replace
<fingerprint-classification>with a unique name for your fingerprint classification. - Replace
<file-name>with the exact name of the file you transferred to the VA (e.g.,my_sensitive_doc.pdf).
The command will return a confirmation message such as:
- Process with pid 15642 for generating fingerprint has started
Please use
<request dlpfingerprint status>command for checking statusIf your file name contains special characters, you may need to use / or
" "to escape them in the argument. Refer to “List of special characters to be escaped in command line argument” for more details. - Replace
-
Check the Status of the Upload (Optional but Recommended):
To monitor the progress of the hash generation and upload, use the command:
request dlpfingerprint status
The command will return messages indicating completion, such as:
- Uploaded classification journal file
- Uploaded md5 classification journal file
- Uploaded fingerprint keys journal file
- Fingerprint generation complete (1/1)
Create a New Fingerprint Rule (for Policy Enforcement)
- Go to Policies > Profiles > DLP, hover over Edit Rules, and then click Rules.
- Click New Fingerprint Rule. Under Settings, select the fingerprint you created previously, and then click Next.
- Set the threshold level, which determines how much of the sensitive content in the archive needs to match files being scanned for policy violations. The recommended default value is 85%. Click Next.
- Enter a name for this fingerprint rule and click Save.
- Click Apply Changes, add a brief description, and then click Apply.
- When creating a DLP profile, the fingerprint rule can be selected on the Rule or Classification screen of the DLP Profiles workflow.
List of Special Characters to be Escaped in a Command Line Argument
When providing file names with special characters in a command line argument, you may need to use / or " " to escape the characters. The following table provides the list of special characters.
| Character | Unicode | Name |
|---|---|---|
` | U+0060 (Grave Accent) | Backtick |
~ | U+007E | Tilde |
! | U+0021 | Exclamation mark |
# | U+0023 Number sign | Hash |
$ | U+0024 | Dollar sign |
& | U+0026 | Ampersand |
* | U+002A | Asterisk |
( | U+0028 | Left Parenthesis |
) | U+0029 | Right Parenthesis |
| U+0009 | Tab | |
{ | U+007B Left Curly Bracket | Left brace |
[ | U+005B | Left Square Bracket |
| | U+007C Vertical Line | Vertical bar |
| U+005C Reverse Solidus | Backslash |
; | U+003B | Semicolon |
' | U+0027 Apostrophe | Single quote |
" | U+0022 Quotation Mark | Double quote |
â© | U+000A Line Feed | Newline |
< | U+003C | Less than |
> | U+003E | Greater than |
? | U+003F | Question mark |
| U+0020 | Space |