

The default steering configuration (Default tenant config) applies to all users in your organization. However, if some users in your organization require a different configuration, you can create a custom steering configuration for those specific OUs or user groups. Netskope also provides options that bring more flexibility while creating Steering Configuration.
Creating Steering Configuration From Version 124.0.0
This section describes the steps to create a steering configuration for the selected OUs/ User Groups.
To create a custom Steering Configuration:
-
Go to Settings > Security Cloud Platform > Steering Configuration.
-
Click New Configuration.
Or, click … and click Edit Configuration to choose one of the existing steering configurations.
-
In the New Configuration window, enter a name for the steering configuration. It cannot exceed 40 characters.
-
Click the Match Criteria tab. With version 124.0.0, you can use the enhanced Match Criteria functionality to differentiate steering profiles using the following options:
-
User Group/ OU: With version 124.0.0, Netskope added the ability to select multiple User Groups/OUs while configuring Steering profiles. The multi-selection option provides flexibility in configuring the steering profiles per group of users identified by their group, OU, or a custom user attribute (LDAP attribute) to define what application or traffic needs to be steered or bypassed.
-
OS Family: With version 124.0.0, you can differentiate steering profiles based on different operating systems (Windows, MacOS, Linux, Android, and iOS). This option provides flexibility in configuring steering profiles by choosing the OS type as the match criteria.
-
Device Tags: With version 134.0.5, you can use these device tags to associate the steering policies to a device. You can add up to five device tags from the options provided in the dropdown and at least one tag must match to enforce steering. This list displays all device tags created in Manage Tags.
The maximum number of steering policies supported using the new Match Criteria associated with the selected User group/OU and OS Family is 100.
Netskope Client checks for all the choices made in the three criteria and if it matches, applies the steering configuration to that device.
-
-
Click the Traffic Steering tab. This option allows you to configure your steering profile using the following options:
-
Enable Dynamic Steering: Enable Netskope Client to use On-premises detection and determine if the user’s device is On-premises or Off-premises. If enabled, the On-Premises and Off-Premises settings appear.
– After enabling dynamic steering, Netskope recommends to avoid disabling dynamic steering since it provides better flexibility in terms of choosing the traffic mode and bypass options. Continuous toggling of dynamic steering can lead to the loss of exceptions in the steering configuration.
– When you clone a steering configuration with Dynamic Steering disabled and enable it during the cloning process, the system populates exceptions only in either the On-Premises or Off-Premises section, rather than both. To apply exceptions to both environments, first clone the profile with Dynamic Steering disabled, save it, and then enable Dynamic Steering as a subsequent modification. -
On-Premises Detection Profile: Select up to three on-premises configurations created in this section.
-
Specify the match criteria for this steering configuration: You can steer traffic for Netskope Client through the On or Off-prem configurations in the drop-down menu. Choose one of the following steering options for On-Prem and Off-Prem:
-
Cloud Apps Only: Only steer specific cloud applications to the Netskope cloud for deep analysis. You can create exceptions and allow special accommodations for custom applications.
-
Web Traffic: Steer all web traffic (HTTP and HTTPS) to the Netskope cloud for deep analysis. You can create exceptions for traffic that have personal or private content. You must have a SWG/NG SWG license to select this option.
-
All traffic: Steer all HTTP(S) and non-HTTP(S) to the Netskope cloud for deep analysis. You must have the Cloud Firewall license to select this option.
Non-HTTP (s) TCP Cloud Firewall traffic is bypassed at Netskope Client even when configured to Bypass at Netskope Cloud. -
None: The Client does not establish any tunnel and continues to monitor On-Prem status change. The Client establishes a tunnel if the On-Prem status changes and a tunnel is needed for the new traffic steering mode.
-
-
Bypass exception traffic at: Choose one of the following:
-
Client – Traffic bypass on the local device.
-
Netskope Cloud – Traffic bypasses the firewall.
-
-
DNS traffic: Select to steer DNS traffic to the Netskope cloud for deep analysis. This option is only available for Web Traffic and All Traffic types as well as Off-Premises configurations. You must have the Cloud Firewall and DNS licenses to select this option.
-
Private App Segments: Steer Private App Segments for On-Premises and Off-Premises configurations. You can steer:
-
All Private App Segments: Choose if the Netskope Client must steer or not steer when other steering modes are present, like GRE, IPSec, and Explicit Proxy.
-
Specific Private App Segments: Steer specific Private App Segments. For example, if your existing VPN is active and allows access to all on-prem apps in your private data center, you can deselect those apps and only select apps hosted in AWS, Azure, or GCP. This allows your existing VPN to provide access to on-prem apps, but Netskope Private Access can access apps in the public cloud.
-
None: Disables the private access in the Client.
Go to App Definitions to select the private apps you want to steer with this configuration.
Click the Private App Segments tab, click
for the private app, click Select Steering Config, and then choose a steering config for the app. Click Save.
-
-
In presence of other steering methods: Netskope Client will Steer/Not Steer private apps in presence of other steering methods. Choose one of the following options:
-
Steer: Netskope Client steers NPA traffic over GRE/IPsec tunnel.
-
Not Steer: Netskope Client disables automatically if it detects other steering methods such as IPSec, GRE, or Explicit Proxy in the network.
-
-
Status: Enable or disable the steering configuration. Netskope recommends disabling until you configure the steered items and exceptions.
-
-
Click the Non-Standard Ports tab:
-
Steer non-standard ports: Allows the Netskope Client to steer web traffic (HTTP/HTTPS) on any port. Enter the ports or domains to steer. Click + New to add multiple ports. Click More to see the following options:
-
Enter the Ports or Domain/IP address to steer.
-
Click + New to add multiple ports.
-
Click More to see the following options:
-
Import from CSV: Import a CSV file containing the ports and domains you want to steer.
-
Download Sample CSV: Download a sample CSV template to use to add multiple ports or domains and import the CSV file.
-
Delete All: Delete all listed ports.
-
-
-
The port number appears in the Domain, Page, and App columns on the Skope IT Page Events page.
If FQDN is configured in the Steer non-standard port setting, and the server is accessed over IP address; Netskope Client treats this request as non-web traffic since Netskope Client does not maintain FQDN to IP address mapping. To avoid this, specify both FQDN and IP address in the Non-Standard Web Port setting. -
-
Click the Fail Close tab: Fail Close blocks all traffic when Internet Security tunnel to Netskope is not established. Domain-based, IP-based, and Cert-pinned exceptions will be applied, but category-based exceptions will be blocked.
– Starting with version 136.0.0, Netskope moved Fail Close setting to Steering Configuration > Fail Close from Client Configuration > Tunnel Settings on the webUI.
– This is a Beta feature. Contact Netskope Support team or your Sales Representative to enable this feature for your tenant.
– Supported OS: Windows
– To enable Fail Close for macOS and iOS devices, the administrator must use Client Configuration.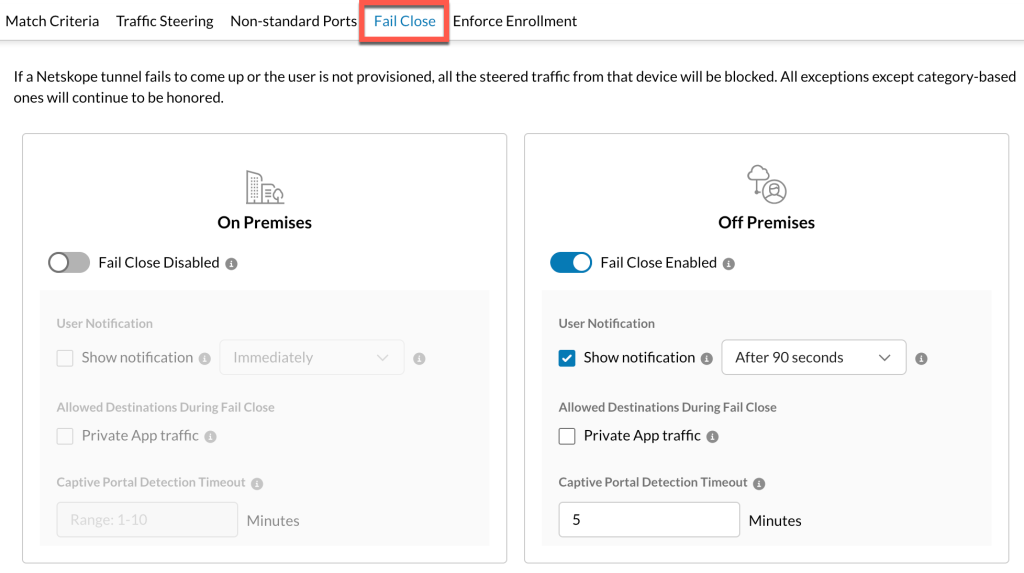
In a multi-user environment, Fail-Close blocks all traffic for a non-provisioned user; only if at least one user has enrolled successfully to the multi-user device and mapped to a Client Configuration with the Fail-Close option enabled.
If a Netskope Internet Services tunnel fails to come up, Netskope recommends that you block the steered traffic from that device.With Client version 136.0.0, Netskope enhanced Fail Close functionality that allows administrators to enable or disable Fail-Close settings based on whether a user is on or off-premises. Previously, Fail-Close was a global setting that could not be differentiated by location.
The Netskope Client bypasses RFC-1918 IP addresses/subnets by default when in Fail-Close mode. More broadly, Netskope Client does not tunnel RFC-1918 address ranges/subnets in either on-premises or off-premises mode.
– Reach out to Netskope Support to enable “Block Private IP address in Fail Close”. This is supported from Netskope Client version 130.0.0.
– Remove the steering exception for Local IP address range in Destination Location from all Steering Configurations to be used with Fail-Close.
This configuration does not apply to the Private Access traffic. It is applicable only for Internet Security.With Fail Close enabled, you can:
-
Show Notification: A fail-close notification is displayed instantly when Internet Security tunnel to Netskope is not established. You can also set the time interval in seconds to delay the display of notification. For example, when users move from one network to another, generally it takes some time for the machine to get connected to the Wi-Fi. This transition can disconnect the Internet Security tunnel and result in a Fail Close notification. With the Show Notification option, administrator can configure a timer to delay the Fail Close notification pop-up and provide enough time for the user to connect back to the Wi-Fi.

-
Private App Traffic: Use this option to allow private access traffic while fail close is enabled.
-
Captive Portal Detection Timeout (Minutes): A captive portal is a web page displayed, whenever a user tries to access the network where captive portal is enabled, to let the users authenticate prior to accessing the network. For example, if you are trying to connect to the free Wi-Fi or hotspot in an airport or restaurant where captive portals are enabled, you need to complete a set of actions to access the network.
This option enables the administrator to define captive portal grace period. If the tunnel is disconnected or cannot be established and fail close is enabled, this triggers captive portal detection. If Netskope Client is detecting or detects a captive portal, it does not enforce fail close for the configured duration to enable captive portal detection to complete. If captive portal is not detected after the detection completes, it enforces fail close again. This supports Windows OS native captive portal detection and allows user to perform captive portal authentication.
Netskope Client performs captive portal detection on Windows and macOS platforms. Admin can enter a value between 1-10 (minutes) in the Captive Portal Detection Timeout input box.

-
-
Click the Enforce Enrollment tab: Use this tab to enforce Netskope Client enrollment for end-users.
-
Steering Profile ID: The ID is automatically generated. The administrator can copy the steering profile ID and pass it as an argument during Netskope Client installation.
-
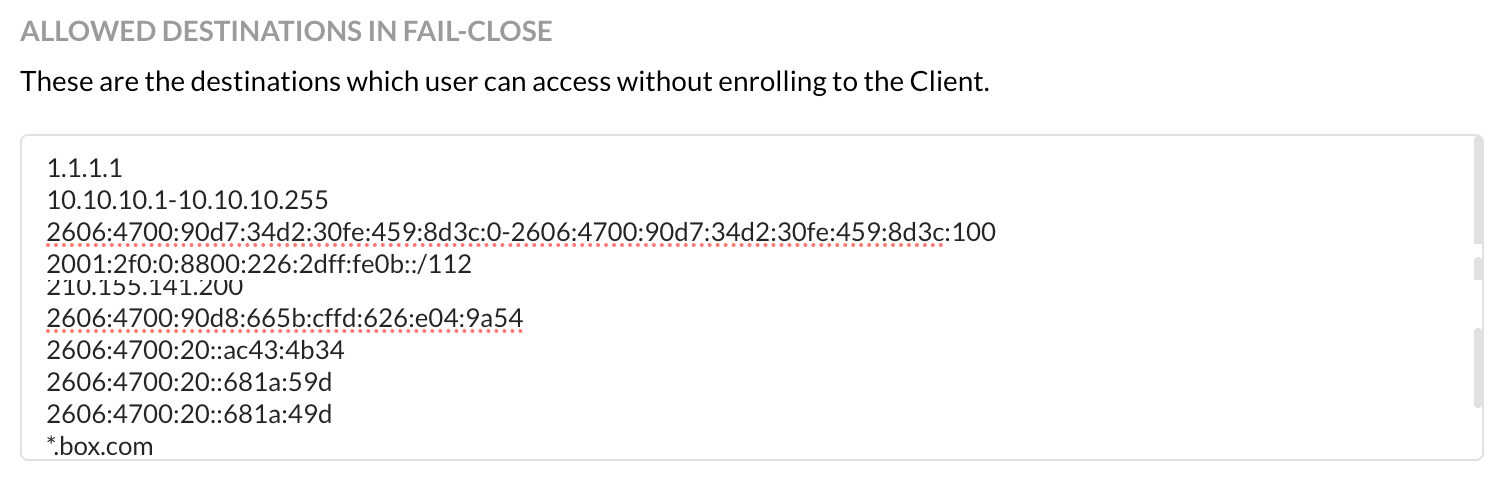
Allowed destinations without enrollment: The configured destinations are allowed to go DIRECT on TCP ports 80 and 443 when the user is not enrolled to Netskope Client. All other traffic on TCP ports 80 and 443 are blocked until user enrolls to Netskope Client.
-
FQDN
-
Wildcard
-
IPv4 address
-
IPv4 subnet
-
IPv4 range
-
IPv6 address
-
IPv6 subnet
-
IPv6 range
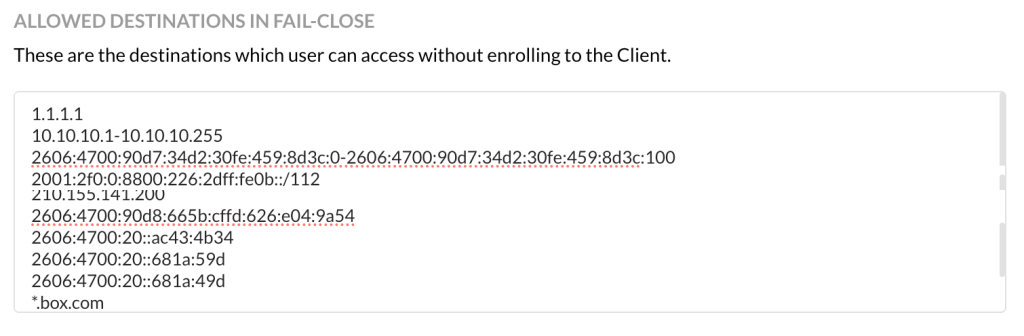 Do not support short-hand notations in IPv6 range. For example,
1234:5678:9abc:def1:2345:6789:abcd::-1234:5678:9abc:def1:2345:6789:abcd:100
Instead, use the following format:1234:5678:9abc:def1:2345:6789:abcd:0-1234:5678:9abc:def1:2345:6789:abcd:100 -
-
Message: Enter the message that gets displayed in the pop-up reminder for end-users who are yet to complete the Client enrollment process. You can add up to 1024 characters in the Message text-box.
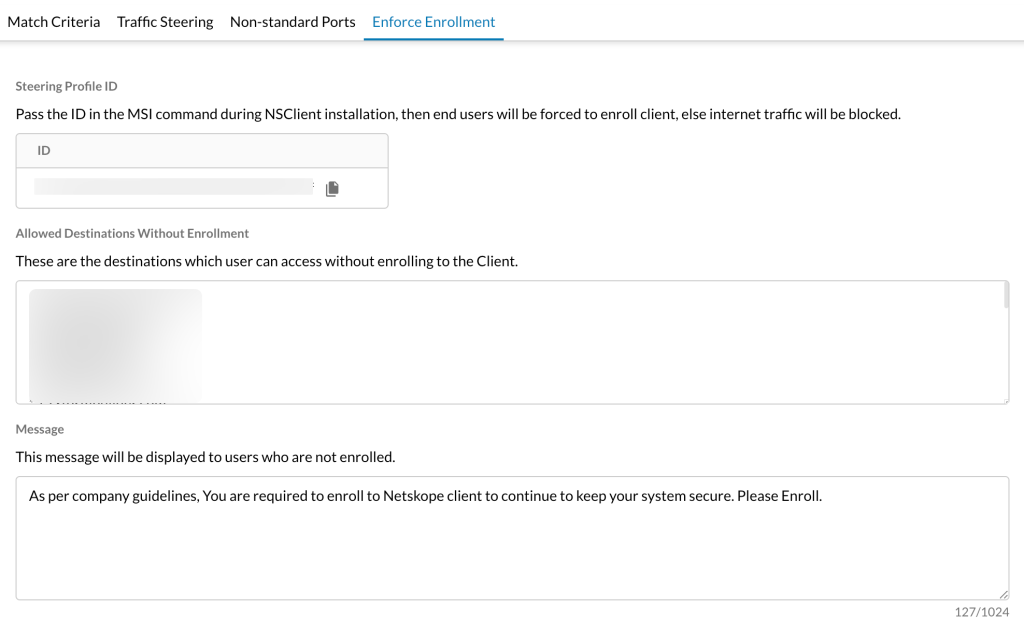
Admins can also add their company logo in the notification message. To customize company logo, use Templates under Settings > Tools in the webUI. -
-
Click Save.
-
Add steered items (i.e., applications).
-
Add steering exceptions.
-
Review the steering error settings.
-
Click
for your custom steering configuration and then Enable, Disable, or Edit Configuration.



Creating Steering Configuration Prior To Version 124.0.0
This section describes the various options available to create a steering configuration.
To create a custom steering configuration:
-
Go to Settings > Security Cloud Platform > Steering Configuration.
-
Click New Configuration, or click
and choose Edit Configuration to select one of the existing steering configurations you want to enable dynamic steering.
-
In the New Configuration window, enter a name for the steering configuration. It cannot exceed 40 characters.
-
Name: Enter a name for the steering configuration. It can’t exceed 40 characters.
-
User Group/ OU: Choose whether all custom traffic steering configurations must apply to Organizational Units (OUs) or user groups. This option only appears when you create your first custom steering configuration.
-
-
Click the Traffic Steering tab: This option allows you to configure your steering profile using the following options.
-
Enable Dynamic Steering: You can steer traffic for Netskope Client through the On- or Off-prem configurations in the drop-down menu. You can choose one of the following steering options for On-Premises and Off-Premises:
-
-
Cloud Apps Only: Only steer specific cloud applications to the Netskope cloud for deep analysis. You can create exceptions and allow special accommodations for custom applications.
-
Web Traffic: Steer all web traffic (HTTP and HTTPS) to the Netskope cloud for deep analysis. You can create exceptions for traffic that have personal or private content. You must have a SWG/NG SWG license to select this option.
-
All traffic: Steer all HTTP(S) and non-HTTP(S) to the Netskope cloud for deep analysis. You must have the Cloud Firewall license to select this option.
Non-HTTP (s) TCP Cloud Firewall traffic is bypassed at Netskope Client even when configured to Bypass at Netskope Cloud. -
None: The Client does not establish any tunnel and continues to monitor On-Prem status change. The Client establishes a tunnel if the On-Prem status changes and a tunnel is needed for the new traffic steering mode.
When configuring, note the following:
-
You can only use dynamic steering for the OUs and user groups configured in your Netskope Client configuration.
-
To use dynamic steering, ensure you enable On-Premises Detection for your Netskope Client configuration.
You can steer traffic for Netskope Client through the On-Premises or Off-premises configurations in the drop-down menu
-
-
-
Bypass exception traffic at Netskope Client or Netskope Cloud. If you choose:
-
Client: Traffic bypass on the local device.
-
Netskope Cloud: Traffic bypasses the firewall.
-
-
DNS traffic: Select to steer DNS traffic to the Netskope cloud for deep analysis. This option is only available for Web Traffic and All Traffic types as well as Off-Premises configurations. You must have the Cloud Firewall and DNS licenses to select this option.
-
Private App Segments: Steer Private App Segments for On-Premises and Off-Premises configurations. You can steer:
-
All Private App Segments: Choose if the Netskope Client must steer or not steer when other steering modes are present, like GRE, IPSec, and Explicit Proxy.
-
Specific Private App Segments: Steer specific Private App Segments. For example, if your existing VPN is active and allows access to all on-prem apps in your private data center, you can deselect those apps and only select apps hosted in AWS, Azure, or GCP. This allows your existing VPN to provide access to on-prem apps, but Netskope Private Access can access apps in the public cloud.
-
-
Status: Enable or disable the steering configuration. Netskope recommends disabling until you configure the steered items and exceptions.
-
-
Click the Non-Standard Ports tab.
-
Select Steer non-standard ports. This allows Netskope Client to steer web traffic (HTTP/HTTPS) on any port. Enter the ports or domains to steer. Click + New to add multiple ports. Click More to see the following options:
-
Enter the Ports or Domain/IP address to steer.
-
Click + New to add multiple ports.
-
Click More to see the following options:
-
Import from CSV: Import a CSV file containing the ports and domains you want to steer.
-
Download Sample CSV: Download a sample CSV template to use to add multiple ports or domains and import the CSV file.
-
Delete All: Delete all listed ports.
-
The port number appears in the Domain, Page, and App columns on the Skope IT Page Events page.
If FQDN is configured in the Steer non-standard port setting, and the server is accessed over IP address; Netskope Client treats this request as non-web traffic since Netskope Client does not maintain FQDN to IP address mapping. To avoid this, specify both FQDN and IP address in the Non-Standard Web Port setting. -
-
Click Save.