

Netskope supports Intune on-demand and per-app VPN for iOS devices. This can provide users with access to corporate applications, data, and resources while keeping your sensitive information secure.
– Assign Per-App VPN to individual iOS apps. A Per-App VPN profile can co-exist with an On-Demand VPN profile simultaneously. Applications you configure for the Per-App VPN profile takes precedence over the On-Demand VPN profile and steers the application traffic to Netskope.
Prerequisites
Before you configure Intune:
-
In the Netskope UI, go to Settings > Manage > Certificates > Signing CA. Download the Netskope Root certificate.
– This bundle includes three certificates: Regional, Intermediate, and nsrootCA. Since Intune can only ingest a single certificate per profile, these must be separated into three individual certificates, and then three corresponding certificate profiles must be created in Intune.
– The Netskope Root certificate is in .pem format. Convert it to .cer or .crt format before importing. To convert certificates from .pem to .cer, run the following command in a terminal:openssl x509 -inform PEM -in <filename.pem> -outform DER -out <filename.cer> -
Locate and save Organization ID token from Settings > Security Cloud Platform > Netskope Client > MDM Distribution.
-
Locate and save Secure Enrollment tokens from Settings > Security Cloud Platform > Netskope Client > MDM Distribution.
-
Ensure user accounts provisioned within the MDM/EMM platform match with those provisioned with the Netskope tenant.
Create a Trusted Netskope Root Certificate Profile
You need to download the Netskope Root certificate from the Netskope UI to complete these steps. To get the certificate, go to Settings >Manage >Certificates >Signing CA.
To create a trusted Netskope certificate profile:
-
In the Intune UI proceed to Devices > iOS/iPadOS > Configuration profiles.
-
Click Profile > Create Profile. Enter and select these parameters:

-
Name: Enter a unique name.
-
Platform: iOS.
-
Profile type: Trusted certificate.
-
-
In the Trusted Certificate panel, provide a name in the Basics tab and click Next.
-
In the Configurations settings tab, upload the Netskope Root certificate.
-
Review your settings, and click Create.
-
Create another configuration profile and repeat the same steps to upload Netskope intermediate certificate.
Deployment Procedure
Perform the instructions in the following sections to deploy Netskope Client using Intune.
Enroll Netskope iOS Client in MS Intune
-
Go to Apps > iOS/iPadOS apps.
-
Click + Add.
-
Select iOS store app from the App type drop-down menu.
 Purchase Netskope Client through the respective tools if your organization is leveraging Apple Business Manager or Apple School Manager. The Netskope Client shows up in the list of applications available for deployment after the tokens are synchronized.
 -
Click Select.
-
From App Information, click Search the App Store and select Netskope Client app to add the application.

-
Click Select. The App Information section displays more information on the UI. No additional configuration is required here.

-
Click Next.
-
Assign the application to devices or users. Click Next to continue.

-
Click Create to complete creating the application.

Zero Touch Enrollment with On-demand VPN Configuration
To configure:
-
Go to Devices > iOS/iPadOS > Configuration > Create New Policy.
-
Select Profile Type as Templates and Template name as Custom.

-
Click Create.
-
In Basics, enter a descriptive name for the profile. For example, iOS Zero Touch On-Demand.
-
Click Next.
-
In Configuration settings:
-
Enter a descriptive name in Custom configuration profile name.
-
Save the following XML content and make the required changes.
-
After updating the XML file with your tenant specific details upload the file under the Configuration profile file.
<?xml version="1.0" encoding="UTF-8"?>
<!DOCTYPE plist PUBLIC "-//Apple//DTD PLIST 1.0//EN" "http://www.apple.com/DTDs/PropertyList-1.0.dtd">
<plist version="1.0">
<dict>
   <key>PayloadContent</key>
   <array>
       <dict>
           <key>IPv4</key>
           <dict>
               <key>OverridePrimary</key>
               <integer>1</integer>
           </dict>
           <key>PayloadDescription</key>
           <string>Configures VPN settings</string>
           <key>PayloadDisplayName</key>
           <string>VPN</string>
           <key>PayloadIdentifier</key>
           <string>com.apple.vpn.managed.BB54E90D-B34E-4C96-97B3-EBC608E10C7C</string>
           <key>PayloadType</key>
           <string>com.apple.vpn.managed</string>
           <key>PayloadUUID</key>
           <string>BB54E90D-B34E-4C96-97B3-EBC608E10C7C</string>
           <key>PayloadVersion</key>
           <integer>1</integer>
           <key>Proxies</key>
           <dict>
               <key>HTTPEnable</key>
               <integer>0</integer>
               <key>HTTPSEnable</key>
               <integer>0</integer>
           </dict>
           <key>UserDefinedName</key>
           <string>Netskope VPN</string>
           <key>VPN</key>
           <dict>
               <key>AuthenticationMethod</key>
               <string>Password</string>
               <key>IncludeAllNetworks</key>
               <integer>0</integer>
                <key>OnDemandUserOverrideDisabled</key>
                <true/>
               <key>OnDemandEnabled</key>
               <integer>1</integer>
               <key>OnDemandRules</key>
               <array>
                 <dict>
                 <key>Action</key>
                 <string>Connect</string>
                 </dict>
               </array>
               <key>RemoteAddress</key>
               <string>gateway-<tenant-URL></string>
           </dict>
           <key>VPNSubType</key>
           <string>com.netskope.Netskope</string>
           <key>VPNType</key>
           <string>VPN</string>
           <key>VendorConfig</key>
           <dict>
               <key>AddonHost</key>
               <string>addon-<tenant-URL></string>
               <key>OrgKey</key>
               <string><your organization ID></string>
               <key>UserEmail</key>
               <string>{{mail}}</string>
               <key>enrollauthtoken</key>
               <string><Secure Enrollment Auth token></string>
  <key>enrollencryptiontoken</key>
               <string><Secure Enrollment Encryption token></string>
           </dict>
       </dict>
   </array>
   <key>PayloadDisplayName</key>
   <string>Netskope VPN</string>
   <key>PayloadIdentifier</key>
   <string>MacBook-Air</string>
   <key>PayloadRemovalDisallowed</key>
   <false/>
   <key>PayloadType</key>
   <string>Configuration</string>
   <key>PayloadUUID</key>
   <string>64A21995-FBDA-4824-8DA9-1789F40E4869</string>
   <key>PayloadVersion</key>
   <integer>1</integer>
</dict>
</plist>
You can also add {{userprincipalname}} as the string value instead of {{mail}}. Replace the following parameters with values according to your tenant:
– Line #52: gateway-<tenant-URL>
– Line #61: addon-<tenant-URL>
– Line #63: <organization ID>
– Line #67: <Secure Enrollment Auth token>
– Line #69: <Secure Enrollment Encryption token>
-
-
Assign the appropriate user/device groups.
-
Click Next.
-
Review the configuration.
-
Click Create.

Netskope client is capable of enrolling silently without any user action when enrollment data is supplied through XML using a Configuration Profile. Currently Intune does not support variables such as {{mail}} in key:value pairs of VPN profiles. Hence App Configuration is used as a primary enrollment data.
Setup for Per-App VPN Configuration
-
Go to Apps > App Configuration Policies to add the required policies to Unified Netskope Client.
-
Click +Add and select Managed Devices.
-
In the Basics section of the Create app configuration policy page, enter the following details and click Next:
-
Name: Give a name to the policy.
-
Platform: Select iOS/iPadOS.
-
Targeted App: Select Netskope Client.
-
-
In the Settings section of the Create app configuration policy page, select the Use configuration designer option from the Configuration settings format dropdown menu.
-
Provide the required Key-Value pairs to complete the Netskope Client enrollment process:
-
UserEmail: {{mail}}
If UPN is being synced to Netskope from AD, use the key:value pair – UserEmail: {{userPrincipalName}}.
-
AddonHost: <addon-hostname>. For example, addon-<tenant-URL>.
-
OrgKey: <Organization Key>
-
enrollauthtoken: < Authentication Token>
-
enrollencryptiontoken: <Encryption Token>
Use keys <enrollauthtoken> and <enrollencryptiontoken> only if you have enabled Secure Enrollment in your tenant.
–enrollauthtokenspecifies the Enforce authentication of Netskope Client Enrollment token (mandatory).
–enrollencryptiontokenspecifies the Enforce encryption of initial configuration of Netskope client token(optional).
-
-
In the Assignments section of the Create app configuration policy page, select groups from the Assign to dropdown menu to which the policy is applied and click Next.

-
In the Review + create section of the Create app configuration policy page, review the configuration and click Create.
Create VPN Profile
Once the Netskope Client is installed, it attempts to create an On-Demand VPN profile on the mobile device that results in the additional user prompt. In order to suppress user prompts as well as customize VPN profile settings (such as create Per-App instead of On-Demand), it is recommended to create and push VPN profile with Intune. To learn more, view Create Profile.
-
Go to Devices > iOS/iPadOS policies > Configuration Profiles > Create Profile.
-
Select Profile Type as Templates and Template name as VPN.
-
Click Create.
-
In Basics, enter a descriptive name for the profile and click Next.
-
In Configuration settings, choose the Connection Type as Custom VPN.
-
Once you select the connection type, do the following:
-
Under Base VPN and provide the following:
-
Connection name
-
VPN server address: gateway-<tenant-URL>
-
Authentication method: Username and Password
-
VPN identifier: com.netskope.Netskope
Enter the following in the key-value pair section according to your requirement:
Key Value Description SingleSignOn True - TerminateOnSleepThreshold - Recommended value range: 20-75 seconds.
- Value: 0 (default) means existing legacy behavior (no sleep/wake handling).
Netskope Client to check the sleep time after it wakes up from the sleep mode without any network activity. If the value is above the specified value in seconds, it gets terminated immediately. ForceDisabledSteering True If deployment requires NPA only traffic steering.
OnDemandConnectionsHoldTimeout
Numeric value in seconds. For example, 20To define timeout to control the iOS On-demand connections hold feature. This numeric value in the VPN profile can hold the connection for a longer time until it establishes the tunnel successfully and handles traffic. Netskope recommends using values that are large enough to cover normal connection time. 
Key-value pairs for Netskope Client enrollment using IDP in iOS devices (Optional)
The following four key-value pairs are optional and you can use them only if you need to perform user enrollment using IDP.
Key Value Description IDPMode - Embedded, or
- Scheme
Enter the mode to specify the browser support to be enabled during Client installation. Mode is a string with values and you can add one of the following values in the script.
- Embedded: Default value and opens the existing mini-browser (Applies only for NPA reauthentication).
- Scheme: Uses default browser.
IDPpreferEphemeral - True, or
- False
If you set the value to:
- True: It means it requests an ephemeral (private) browser window from the default browser.
- False: It means it requests a regular (non-private) browser window from the default browser.
IDPTenant <tenant-name> If the tenant URL is acme.eu.goskope.com, tenant value is acme. IDPDomain <domain-name> If the tenant URL is acme.eu.goskope.com, then domain is eu.goskope.com. IDPScope all This string applies only to Netskope Private Access (NPA) re-authentication. Set the value of IDScope to NPA to use an external browser for NPA re-auth only. This is useful while using a non-IDP enrollment method.
Note: Use this option for the enablement of default browser for NPA re-authentication

Custom Device Identity Key-Value Pairs for iOS
Netskope Client for iOS previously generated its own opaque UUID as a device identifier and hostname; always reported serial number as “N/A” (Apple platform limitation). This resulted in a challenge for the IT and security administrators to match a device in the Netskope Web UI to a known asset in their MDM or help desk system thereby slowing down incident response and device auditing. Use the following optional VPN profile keys that MDM can populate at profile-push time:
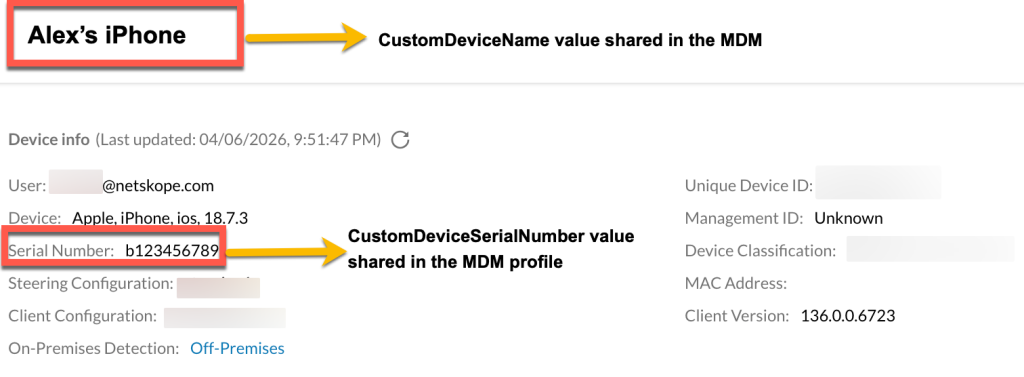
Key Value Description CustomDeviceSerialNumber Provide an asset serial number. If not defined, the system displays it as “"N/A" in the webUI.
Use this variable to send serial number of the device:{{SerialNumber}}
CustomDeviceSerialNumber is a dynamic value. It takes the current value in the MDM VPN profile on each connection. CustomDeviceName Provide a human-readable device name.
Use this variable to send device name:{{DeviceName}}CustomDeviceName is a dynamic value. It takes the current value in the MDM VPN profile on each connection. For example, consider the following device key-value pairs added for iOS:
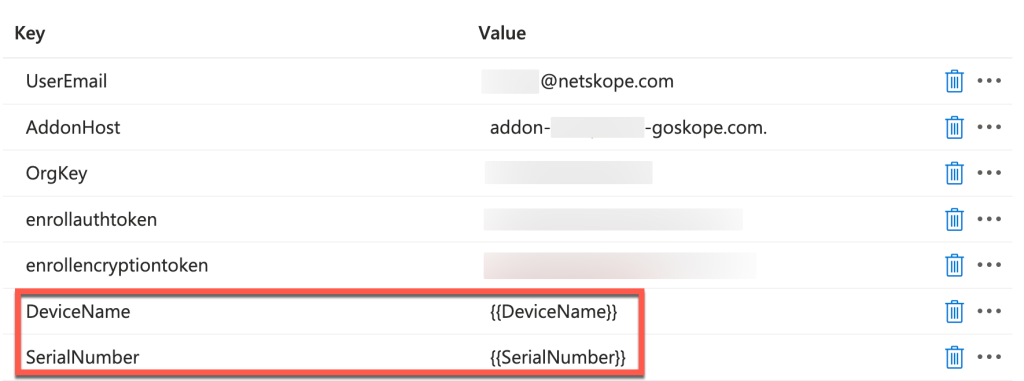
The Devices webUI displays the Device Name and Serial Number according to the values added in the MDM profile.
-
-
Under Automatic VPN, choose the following VPN type:
-
Per-App VPN
-
Specify Provider as Type packet-tunnel.
-
Specify associated domains, Safari URLs, and excluded domains if necessary.

-
-
-
Assign the appropriate user/device groups and click Next.
-
Review the configuration and click Create
-


Associating the Per-App VPN profile with the Apps
Associate the Per-App VPN profile with the applications to steer through the VPN connection.
-
In the MEM admin console, go to Apps > All apps , select one of the apps listed there, and then click Properties.

-
In the app Properties page, click Edit for Assignments.

-
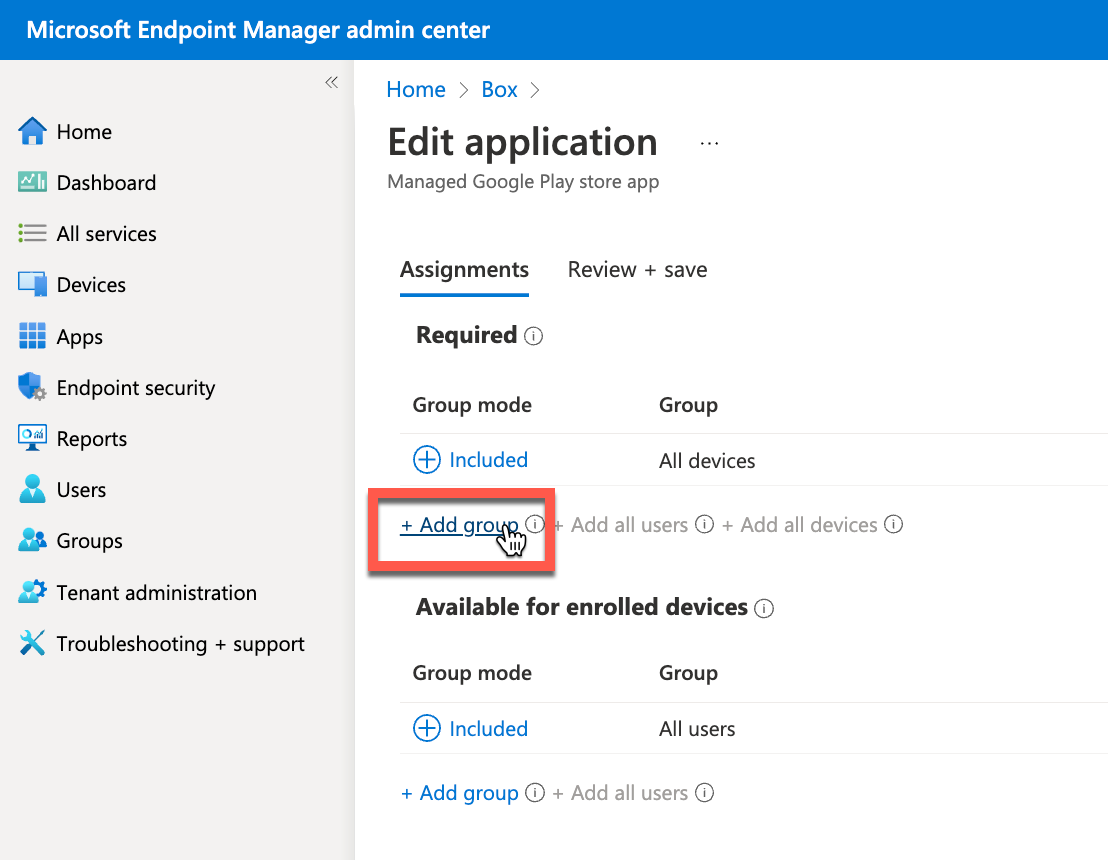
In the Required section, click Add Group. Search and choose one or more groups, and then click Select.
-
Click VPN and select appropriate Per-App VPN configuration from the dropdown menu.

