

Jamf Pro is an enterprise mobility management tool that is used for the endpoint management of Apple iOS and macOS devices. This article provides instructions to install the Netskope Client on iOS devices using Jamf Pro.
Prerequisites
- Administrators must possess proficient working knowledge of Jamf Pro.
- Administrators must review Netskope Client Client Enrollment Methods to understand the Client User Enrollment methods available for their environment.
- Import users into the Netskope tenant – see Provisioning Users for Netskope Client.
- Download Netskope Root and Tenant Certificates and ensure the certificates are available when needed.
- See Deploy Netskope Client via IdP when using IDP as the method of user enrollment.
- Jamf must have a pre-existing user (email) to device mapping.
Supported Platforms and Enrollment Methods
This article outlines the Netskope Client deployment instructions for the following user enrollment methods and supported platforms. User enrollment methods not documented here are not supported at this time.
| Enrollment Methods | Single User | Multi-user |
| PLIST | Y | N |
Configuration Profile Setup
The core configuration for Client installation is managed through Jamf Configuration Profiles. The following sections provide a detailed overview of how to configure these profiles effectively.
-
In the Jamf console, go to Devices > Configuration Profiles > New.
-
Under Options > General.
-
Enter the display name. For example, Netskope Client Configuration Profile.
-
Choose the following:
-
Category: None
-
Level: Computer Level
-
Distribution Method: Install Automatically
-
-
-
Click Save.

-
Click Scope.
-
Click Targets, then select the specific user(s) or device(s) to assign the configuration profile.
-
Click Save.
On-Demand VPN Configuration Profile
The following steps explain how to configure a Configuration Profile for an On‑Demand VPN deployment.
-
In the Jamf console, go to Devices > Configuration Profiles > select required Configuration Profile
-
Go to Options > VPN.
-
Click Configure.
-
To configure On-Demand VPN:
-
Enter the Connection Name. For example, Netskope VPN.
-
From the options displayed in the VPN Type dropdown, select VPN.
-
From the options displayed under Connection Type, select Custom SSL.
-
Enter com.netskope.Netskope in the Identifier field.
The second Netskope in com.netskope.Netskope is case-sensitive and ‘ N’ must be in uppercase. -
Enter gateway-<tenant-URL> in the Server field.
Replace <tenant-name> in the tenant URL with your tenant name. -
To enable zero-touch deployment, provide the following key-value pair in Custom Data:
-
OrgKey: <Your organization ID in the tenant>
-
AddonHost: addon-<tenant-URL>.
-
UserEmail: $EMAIL
-
enrollauthtoken: <Secure Enrollment authentication token>
-
enrollencryptiontoken: <secure enrollment encryption token> (if enabled)
– To get the OrgKey, you can log into the Netskope tenant > Settings > Security Cloud Platform > Netskope Client > MDM Distribution. Here, go to Deployment Resources for iOS and copy the Organization ID from the Create VPN Configuration.
– Ensure to provide the same email address as added in your tenant.
– The $EMAIL variable for UserEmail is case sensitive and should be all uppercase
-
-
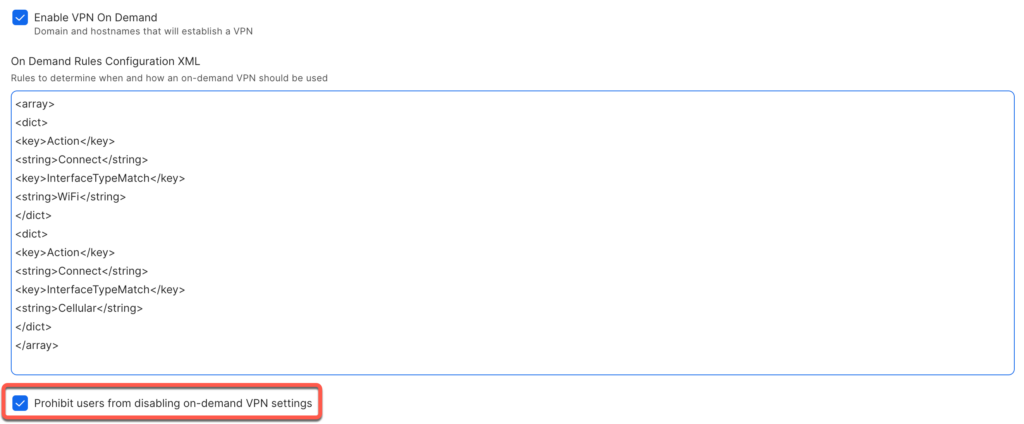
Click the checkbox to select the option Enable VPN On Demand.
-
Provide On Demand Rules Configuration XML.
<array>
<dict>
<key>Action</key>
<string>Connect</string>
<key>InterfaceTypeMatch</key>
<string>WiFi</string>
</dict>
<dict>
<key>Action</key>
<string>Connect</string>
<key>InterfaceTypeMatch</key>
<string>Cellular</string>
</dict>
</array>
Disabling VPN in iOS settings terminates the extension (this is iOS design), but it is reactivated by iOS automatically on network activity if OnDemandRules are configured. -
Click the checkbox to select the option Prohibit users from disabling on-demand VPN settings.
-
-
Click Save.
Per-App VPN Configuration Profile
The following steps explain how to configure a Configuration Profile for a Per-App VPN deployment
-
In the Jamf console, go to Devices > Configuration Profiles > select required Configuration Profile.
-
Go to Options > VPN.
-
Click Configure.
-
To configure Per-App VPN:
-
Enter the Connection Name. For example, Netskope VPN.
-
From the options displayed in the VPN Type dropdown, select Per-app VPN.
-
Select the checkbox for Automatically start Per-App VPN connection.
-
Under Safari Domains, you can add those domains that are allowed to use this per-app VPN in the Safari app.
This configuration is not applicable to any other browser. -
From the options displayed under Per-App VPN Connection Type, select Custom SSL.
-
Enter com.netskope.Netskope in the Identifier field.
The second Netskope in com.netskope.Netskope is case-sensitive and ‘ N’ must be in uppercase. -
Enter gateway-<tenant-URL> in the Server field.
Replace <tenant-name> in the tenant URL with your tenant name. -
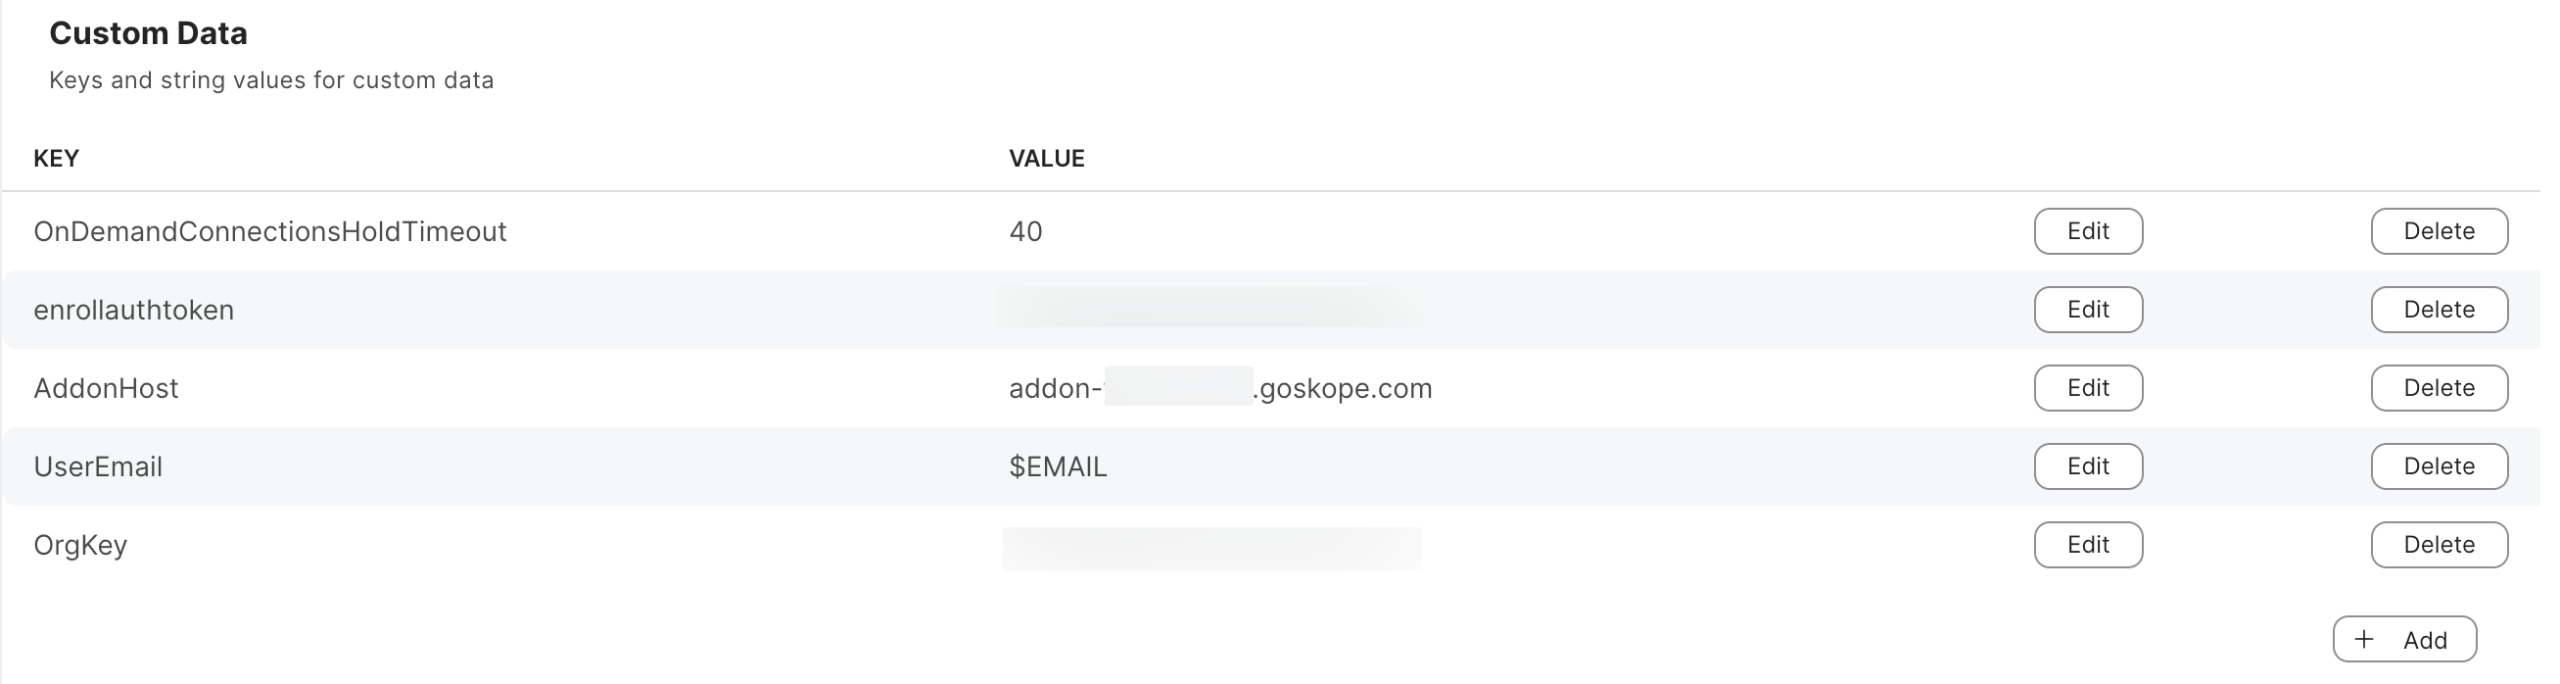
To enable zero-touch deployment, provide the following key-value pair in Custom Data:
-
OrgKey: <Your organization ID in the tenant>
-
AddonHost: addon-<tenant-URL>
-
UserEmail: $EMAIL
-
enrollauthtoken: <Secure Enrollment authentication token>
-
enrollencryptiontoken: <secure enrollment encryption token> (if enabled)
-
OnDemandConnectionsHoldTimeout: <numeric value in seconds>
This numeric value in the VPN profile can hold the connection for a longer time until it establishes the tunnel successfully and handles traffic. Netskope recommends using values that are large enough to cover normal connection time.
To know your OrgKey, AddonHost, enrollauth, and enrollencryption tokens, view Netskope Deployment Parameters.

-
-
From the options displayed under User Authentication, select Certificate.
-
From the options displayed under Provide Type, select Packet-tunnel.
For more details on Per-App VPN, refer Configuring Per-App in Jamf Pro.
-
-
Click Save.
Push Netskope Root and Tenant Certificates via Jamf
Provide additional trust to end users by pushing certificates during client installation. Before you can push the root and tenant certificates, ensure that you do the following:
- Download root and tenant certificates from Netskope Certificates page.
- Login to Netskope tenant admin console with admin credentials.Go to Settings > Manage > Certificates > SIGNING CA. The certificate download options are displayed in the Certificate Setup section.
- Convert the downloaded certificates to .cer format by renaming the .pem files to .cer.
Perform the following steps to add certificates to Jamf:
-
In the Jamf console, go to Computers > Configuration Profiles > select required Configuration Profile
-
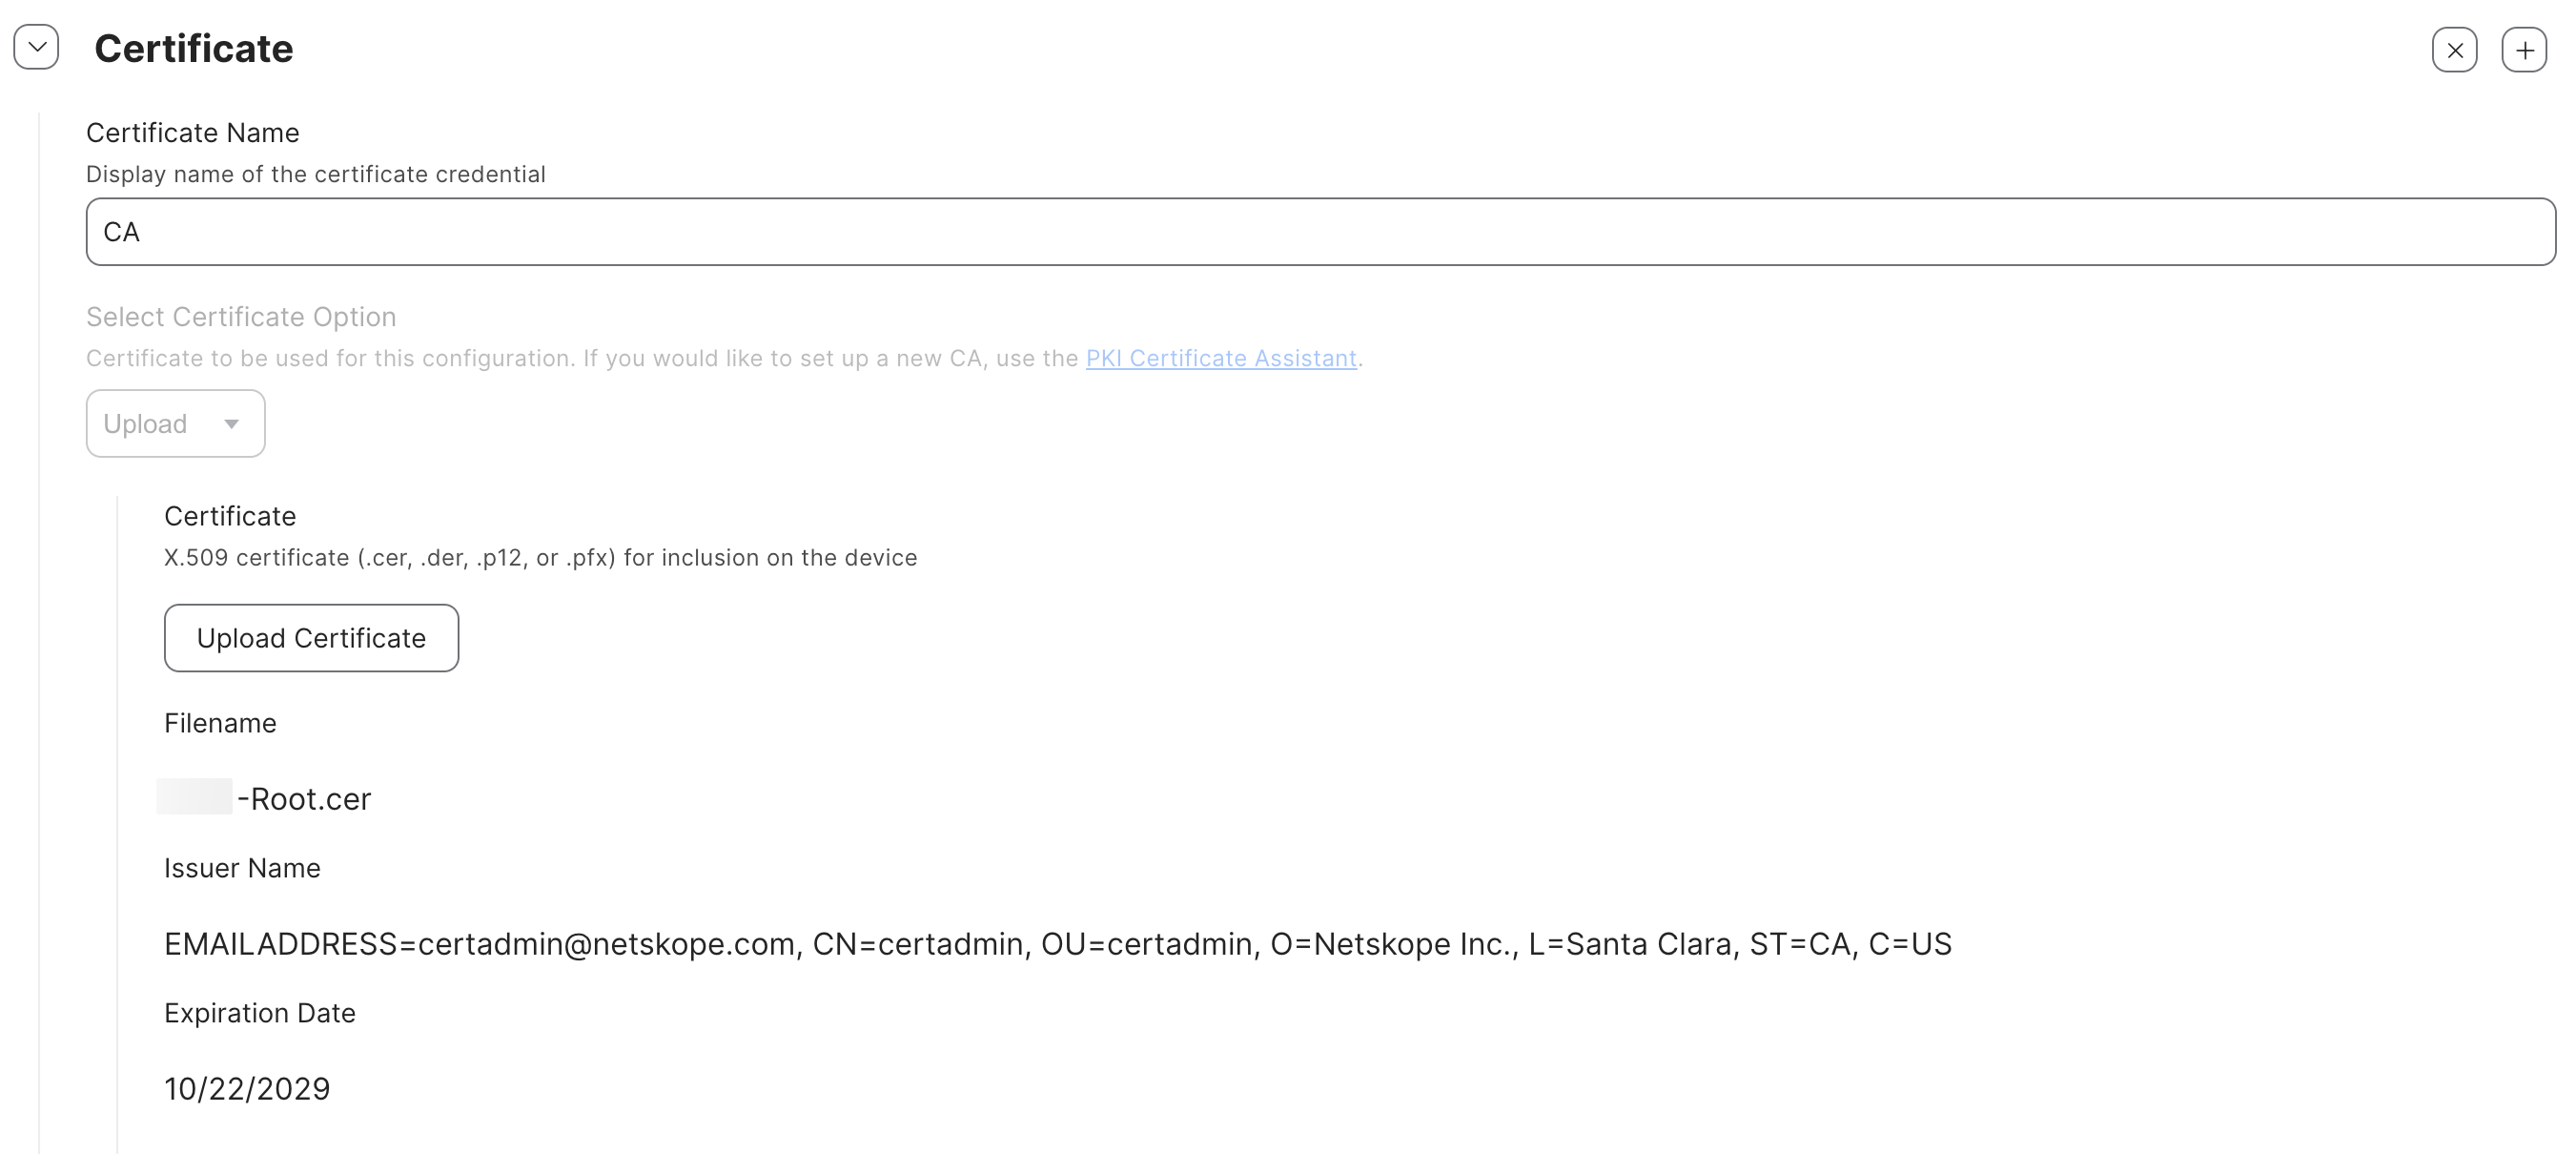
Go to Options > Certificate.
-
Click Configure or Edit.
-
Enter a name for the certificates.
-
Select Upload to upload the converted root and tenant certificates.
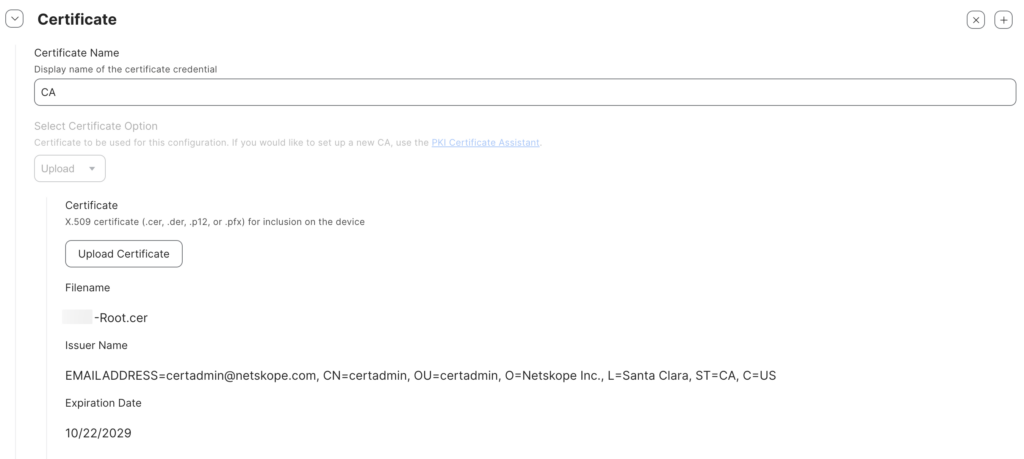 To add a certificate click the “+” icon.
 -
In the Scope tab, select the target computers.
-
Click Save.
Mobile Device Apps Setup
Configure a Mobile Device Apps definition to assign the Netkope Client application to specific user(s) or device(s).
-
Go to Devices > Content Management > Mobile Device Apps.
-
Click New to create a new app.
-
Choose one of the following App Type options:
-
App store app or apps purchased in volume.
-
In-house app
This document goes with the option “App store app or apps purchased in volume”.
-
-
Click Next.
-
In the Search or Upload section, search for Netskope Client app and select the app store country origin.
Do not select Per-App VPN for the Netskope Client app. -
Click Next.
-
In the Add App section, click Add to select Netskope Client app.
-
It navigates to the New Mobile Device App screen.
-
Under the General tab, enter the Display Name.
-
Select iOS as the category to add the app to.
-
Click the Scope tab in Mobile Device Apps.
-
Click Targets, then select the specific user(s) or device(s) to assign the configuration profile.

-
Click Save.
-
The Mobile Device App screen displays the newly added app.
-
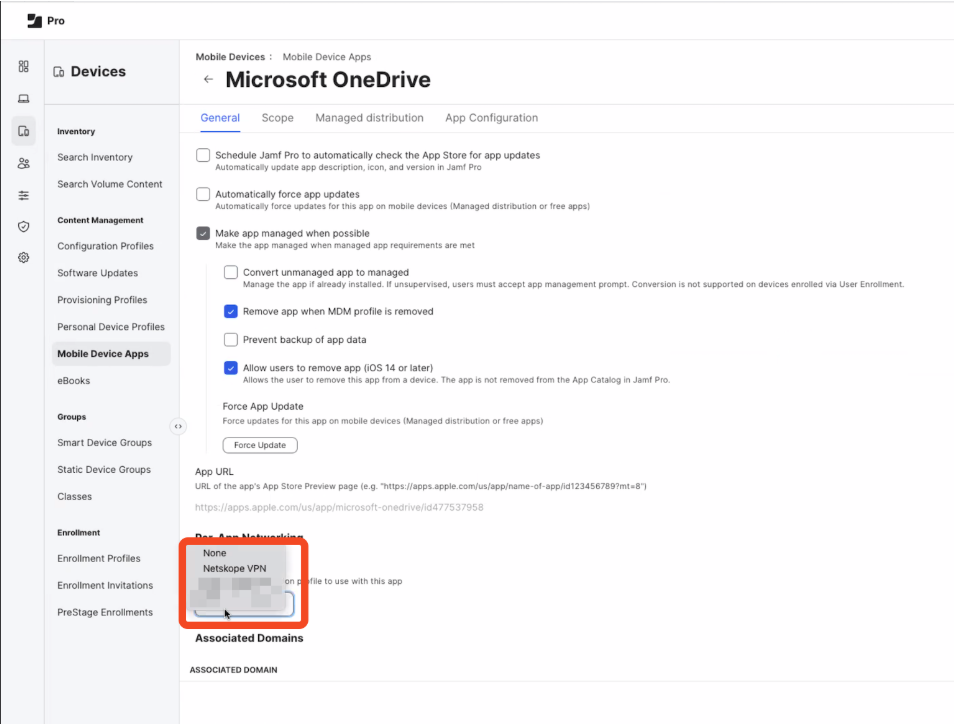
If Per App VPN configuration was selected, other mobile Apps should be associated with respective Per App VPN Profile.
-
Go to Devices > Content Management > Mobile Device Apps.
-
Select the required App and click Edit.
-
Go to Per-App Networking and select the required VPN profile in Per App VPN dropdown.
-
Click Save.
-
