

This section describes the steps to deploy the Netskope Client app in a macOS device using Jamf School.
Prerequisites
-
Administrators must possess proficient working knowledge of Jamf School.
-
Administrators must review Netskope Client Enrollment Methods to understand the Client User Enrollment methods available for their environment.
-
Users must be imported into the Netskope tenant – see Provisioning Users for Netskope Client
-
Download Netskope Root and Tenant Certificates and ensure the certificates are available when needed.
-
Download the Netskope package for macOS from Netskope Support.
-
See Deploy Netskope Client via IdP when using IDP as the method of user enrollment.
-
Download the latest JAMF scripts (JAMFScripts.zip) from the Netskope Support portal. This downloads a file JAMFScript_v22_Nov2024 that contains two files:
-
jamfuninstall.sh
-
nsclientconfig.sh – Use this file while adding script.
-
-
For a PLIST user enrollment method:
-
Jamf must have a pre-existing user (email) to device mapping.
-
Download the CustomEmailConfig.mobileconfig file from the Netskope Support portal.
-
-
In Jamf School, enable the Scripting option under Organization > Settings > Modules to allow you to add the required scripts.
Supported Platforms and Enrollment Methods
This article outlines Netskope Client deployment instructions for the following user enrollment methods and support platforms. User enrollment methods not documented here are not supported at this time.
| Enrollment Methods | Single User | Multi-user |
|---|---|---|
| IDP | Y | Y |
| PLIST | Y | N |
Profile Setup
Jamf Profiles manage the core configuration for Client installation. The following sections provide a detailed overview of how to configure these profiles effectively.
Create Profile
Creating profiles is useful as it can help define and configure the system settings such as VPN, Restrictions, and so on for your device. Always create a profile before you start configuring the profile settings. For more information, view Profiles.
You can either create a new profile or add the following to an existing profile. To create a new configuration profile:
-
Log into JAMF School.

-
Go to Profiles.
-
Click +Create Profile.
-
In Platform, select the following:
-
Select the Platform as macOS
-
Select the Enrollment Type.
-
Click Next.
-
-
In Details, perform the following:
-
Enter the profile name.
-
Enter the description for the profile.
-
-
Click Next.
-
In Time Filter, select the checkbox to configure the time at which you want to apply the profile to the devices.
-
Click Finish.
After creating the profile, it navigates to the page where you can set up the profile details such as Certificates, System Extensions, and so on. Refer to the following sections to learn more about adding different attributes in your profile.

Pre-Approve Network Extension
The Netskope Client on macOS installs a network extension that requires administrator approval to function. The following configuration pre-approves the network extension and suppresses end-user notifications requesting approval.
To configure system extensions in Jamf School:
-
In the Jamf School console, go to Profiles.
-
Select and open the required Profile.
-
Click Scope.
-
Click + to add the desired group.
-
Click Save.
-
-
Click System Extensions.
-
Click Configure and perform the following:
-
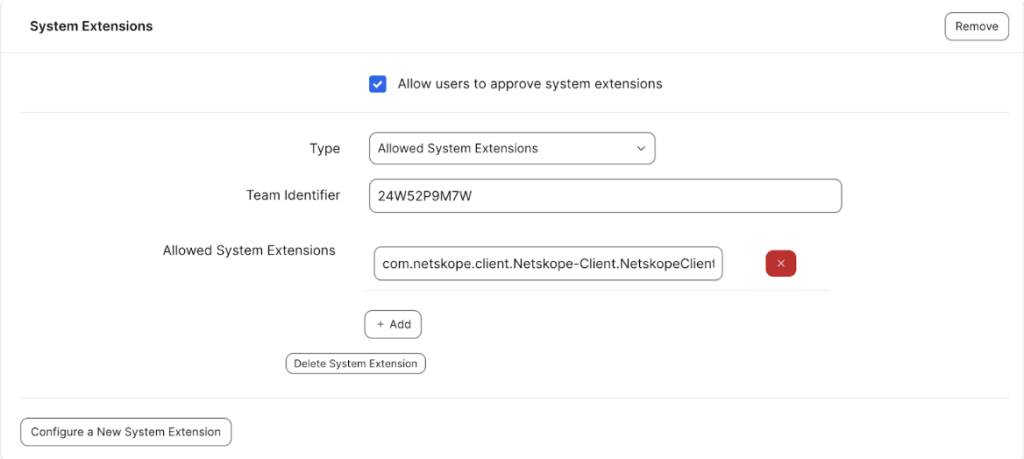
Select the checkbox to enable Allow users to approve system extensions.
-
Select Type as Allowed System Extensions.
-
Enter 24W52P9M7W in Team Identifier.
-
Click +Add and enter com.netskope.client.Netskope-Client.NetskopeClientMacAppProxy
in Allowed System Extensions.
-
-
Click Save.

Pre-Approve Full Disk Access Permission For macOS 14 (Sonoma) and Later
The Netskope Client on macOS requires Full Disk Access permissions for various foundational functionalities. The following configuration pre-approves these permissions and suppresses end-user notifications requesting approval.
To configure full disk access permission in Jamf School:
-
In the Jamf School console, go to Profiles.
-
Select and open the required Profile.
-
Click Scope.
-
Click + to add the desired group.
-
Click Save.
-
-
Click Security & Privacy.
-
Click Configure and perform the following:
-
Click the Privacy tab.
-
Scroll to System Policy All Files.
-
Click Add new.
-
Click Select Application.
-
Enter the following:
-
Enter the Name.
-
Enter com.netskope.client.Netskope-Client.NetskopeClientMacAppProxy in Identifier.
-
Select Bundle ID for Identifier Type.
-
-
Enter the following anchor apple generic and identifier in Code Requirement.
"com.netskope.client.Netskope-Client.NetskopeClientMacAppProxy" and (certificate leaf[field.1.2.840.113635.100.6.1.9] /* exists */ or certificate 1[field.1.2.840.113635.100.6.2.6] /* exists */ and certificate leaf[field.1.2.840.113635.100.6.1.13] /* exists */ and certificate leaf[subject.OU] = "24W52P9M7W")
-
-
Click Save.
Pre-Approve VPN Popup for App Proxy
The Netskope Client on macOS installs a network extension that triggers updates to the device’s Network settings. The following configuration pre-approves these updates and suppresses end-user notifications requesting approval.
To configure:
-
In the Jamf School console, go to Profiles.
-
Select and open the required Profile.
-
Click Scope.
-
Click + to add the desired group.
-
Click Save.
-
-
Click VPN.
-
Click Configure and perform the following:
-
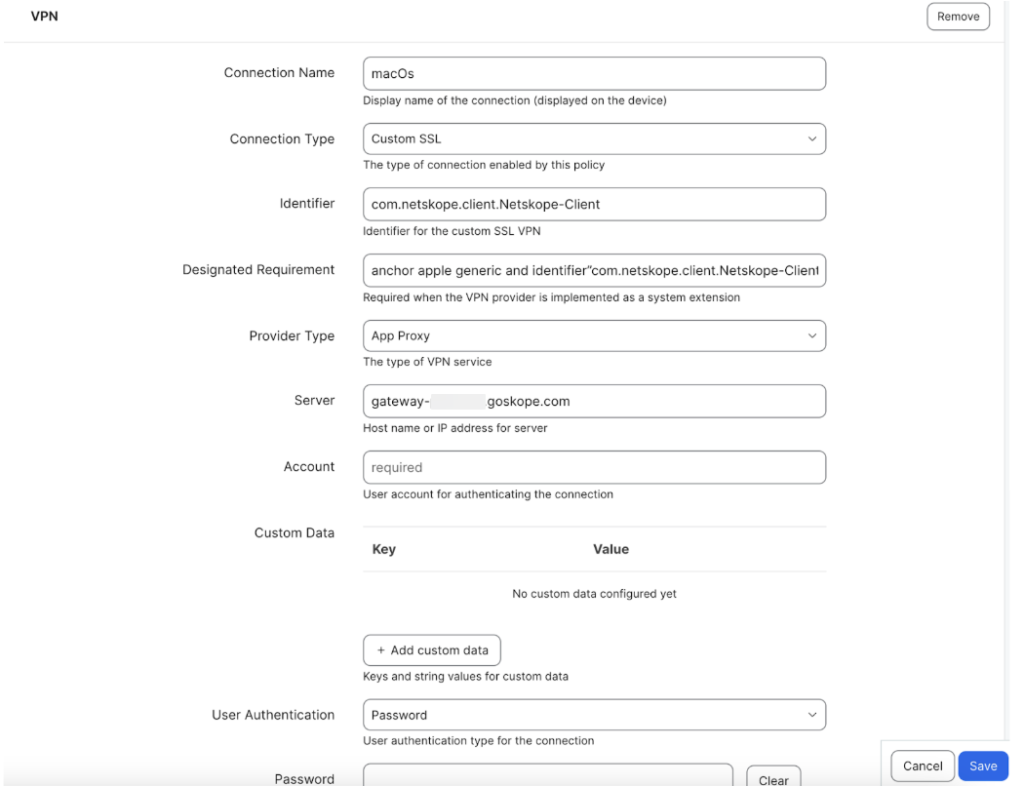
Enter any name in Connection Name.
-
Select Custom SSL in Connection Type.
-
Enter com.netskope.client.Netskope-Client in Identifier.
-
In Designated Requirement, enter the following:
anchor apple generic and identifier”com.netskope.client.Netskope-Client” and (certificateleaf[field.1.2.840.113635.100.6.1.9] /* exists */ or certificate1[field.1.2.840.113635.100.6.2.6] /* exists */ and certificateleaf[field.1.2.840.113635.100.6.1.13] /* exists */ and certificateleaf[subject.OU] = “24W52P9M7W”)
-
Select App-Proxy in Provider Type.
-
Enter the Netskope Gateway URL for the tenant in Server:
gateway-<tenant_hostname>.goskope.com
-
-
Click Save.

Restrict App Proxy Removal
Netskope recommends adding optional deployment parameter Restrict App Proxy Removal to manage user permissions regarding System Extensions in macOS 15 (Sequoia) and above. These controls prevent the removal of the specified system extension by the user.
To restrict app proxy removal:
-
In the Jamf School console, go to Profiles.
-
Select and open the required Profile.
-
Click Scope.
-
Click + to add the desired group.
-
Click Save.
-
-
Click Restrictions.
-
Click Configure and perform the following:
-
Under Preferences, select Restrict items in System Preferences.
-
Select items (Network in this case)
-
-
Click Save.

Push Netskope Root and Tenant Certificates Through Jamf School
Provide additional trust to end users by pushing Netskope certificates during Client installation. Before pushing the root and tenant certificates, ensure that you do the following:
-
Download root and tenant certificates from Netskope Certificates page.
-
Login to Netskope tenant admin console with admin credentials.
-
Go to Settings > Manage > Certificates > SIGNING CA. The certificate download options are displayed in the Certificate Setup section.
-
-
Convert the downloaded certificates to .cer format by renaming the .pem files to .cer.
Perform the following steps to add certificates to Jamf School:
-
In the Jamf School console, go to Profiles.
-
Select and open the required Profile.
-
Click Scope.
-
Click + to add the desired group.
-
Click Save.
-
-
Click Certificates.
-
In Select your file, click Choose File and upload the root certificate.
-
Click Upload Certificate.
-
Repeat the same steps to upload the Netskope Intermediate certificate.
-
-
Click Save.
Create Custom Profile for PLIST
Use this section only if you are deploying using PLIST.
-
Go to Profiles.
-
Click +Create Profile.
-
Click Upload Custom Profile.
-
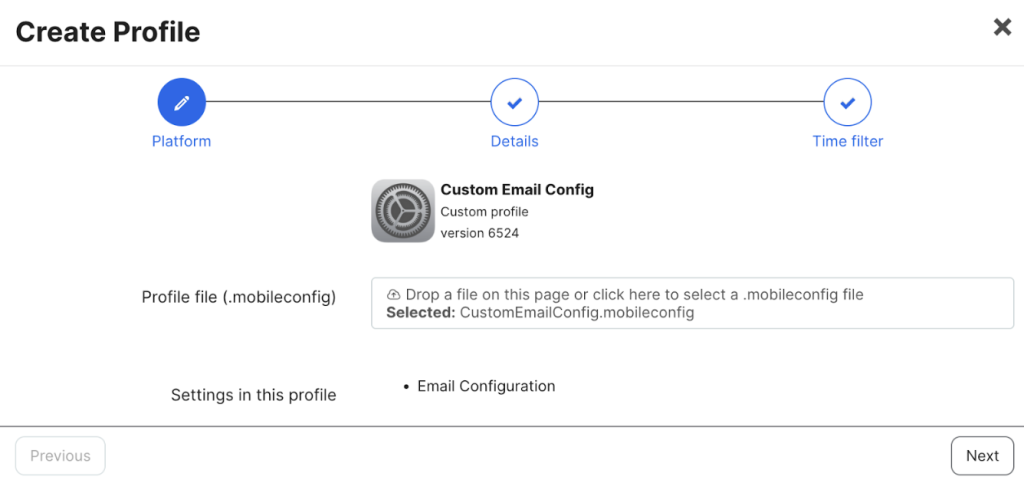
Upload the .mobileconfig file (check prerequisites to download the file) in Profile file.
The webUI now displays Email Configuration in Settings in this profile.
-
Click Next.
-
Enter Profile Name and Description.
-
Click Next.
-
Enable Use time filter and select the time and day according to the requirement.
-
Click Finish.
Click the created profile and map the respected device group.

Configure Script and Installation Parameters
In this section, add scripts in Jamf School that later helps in user enrollment based on the chosen enrollment method. Use the following enrollment methods of your choice and proceed with the deployment. For more information, view Scripts.
Copy and paste the shell script from the file nsclientconfig.sh downloaded from the Netskope Support Portal. For more information, view Prerequisites.
| User Enrollment Method | Configuration Parameter |
|---|---|
| IDP Single-User mode | To add a new script using IDP Single-User mode:
Get your Encryption token from Settings > Security Cloud Platform > MDM Distribution > Secure Enrollment. |
| IDP Multi-User mode | To add a new script using IDP Multi-User mode:
Get your Encryption token from Settings > Security Cloud Platform > MDM Distribution > Secure Enrollment. |
| PLIST | To add a new script using PLIST:
If Secure Enrollment is enabled, append the authentication and encryption enrollment parameters and tokens: Get your Authentication token and Encryption token from Settings > Security Cloud Platform > MDM Distribution > Secure Enrollment. |
Create an App
You can use the In-House macOS Package option to upload the macOS package to Jamf School.
To create an app:
-
Go to Apps > Inventory.
-
Click + Add App.
-
Select Add In-House macOS Package.
-
In Add In-House macOS package, click to select the Netskope macOS .pkg file downloaded from Netskope Support.
-
Click Close.
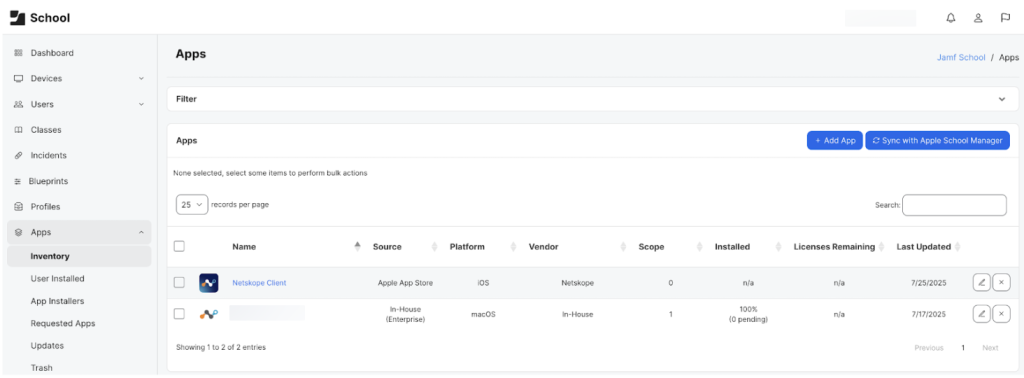
The Apps section displays the uploaded application details.
-
Click the edit icon to add the respective device groups to this application.

Create Device Group
Use Device Groups to classify your devices according to their attributes. For more information, view Device Groups.
To create a device group:
-
Log in to JAMF School.
-
Go to Devices > Device Groups.
-
In the Groups page, click +Add Group.
-
In Add device group, perform the following:
-
Enter the name for the device group.
-
Enter the description for the device group.
-
Select Static Group or Smart Group.
This document proceeds with the Static Group option.
-
In Options, configure the desired requirements.
-
Click Next.
-
In Profiles, select the profile that you want to add to the smart group for automatic or on-demand installation. Click Automatic/On-Demand tabs to select.
-
Click Next.
-
In Apps, select the devices on which you want to install applications automatically or on-demand. Click Automatic/On-Demand tabs to select.
-
Click Next.
-
In Documents, select the documents from the list for automatic or on-demand installation.
-
Click Next.
-
In Members, select the devices that you want to add to this device group.
-
-
Click Finish.
The Groups page displays the created device group details.
Verifying Client Installation
Check the installation logs on the user’s machine in the /var/log/install.log folder. If the user configuration download script fails and the Netskope client installer is executed, the installer will exit and display the “Configuration file missing, aborting installation! error” message.
Check Netskope Client Installation Status
-
To verify the status of each device, go to Computer > Policies and click on the policy you created.
-
Click the Logs button at the bottom to view the log files for each device and then click the Show button.
Confirming the Netskope Client Extension Approval
To confirm that the Netskope Client extension has been approved and the client is running, run the following command in your macOS terminal window:
systemextensionsctl list
The output should look like this:
% systemextensionsctl list
1 extension(s)
--- com.apple.system_extension.network_extension
enabled active teamID bundleID (version) name [state]
* * 24W52P9M7W com.netskope.client.Netskope-Client.NetskopeClientMacAppProxy (85.2.0.269/1)
NetskopeClientMacAppProxy [activated enabled]
Additionally, inspect the system preferences and Network UI to confirm that Netskope Client extension is active.
Uninstalling Netskope Client
See Uninstalling the Netskope Client for instructions on uninstalling the Netskope Client.