

Overview
The DSPM Single Appliance bundles both the sidecar and DLP services into one virtual machine. This unified model simplifies deployment by reducing the process to a single image, a single CLI command, and a single License Key.
This is the standard deployment path for most customers. After deployment, the appliance auto-registers with your Netskope tenant and automatically creates its sidecar pool. No manual pool creation, token management, or DLP appliance linking is required.
- For large-scale scanning scenarios that require deploying the DLP appliance and sidecars separately as an advanced deployment, see DSPM Sidecar Administration Overview and Deploy the DLP Appliance for DSPM.
- For an overview of how the appliance fits into the DSPM architecture, see DSPM Architecture. For firewall and egress requirements, see Firewall Settings for DSPM-Hosted Instances.
Prerequisites
Before deploying the Single Appliance, ensure you meet the following requirements.
-
Network Planning:
The Single Appliance requires outbound HTTPS (port 443) connectivity to the Netskope control plane. Ensure the appliance can reach:
- Your tenant hostname:
<tenant>.goskope.com(replace<tenant>with your actual tenant name) config-<tenant>.goskope.comcallhome-<tenant>.goskope.com- The applicable gateway domains and Netskope IPs
- Your tenant hostname:
-
Networking Considerations:
-
Ensure that Netskope IPs and Amazon S3 (e.g.,
*.s3-us-west-1.amazonaws.com) are allowlisted. Iftenant.goskope.comis your tenant hostname, also allow IPs forconfig-tenant.goskope.comandcallhome-tenant.goskope.com. -
You must also allowlist the following gateway domains:
dlpappliancegw.sv5.goskope.com
dlpappliancegw.bom3.goskope.com
dlpappliancegw.am2.goskope.com
dlpappliancegw.sjc1.goskope.com
dlpappliancegw.fr4.goskope.com
dlpappliancegw.ruh1.goskope.com
dlpappliancegw.mel2.goskope.com
dlpappliancegw.sjc2.goskope.com
dlpappliancegw.zur2.goskope.com
dlpappliancegw.lon3.goskope.com
dlpappliancegw.sin2.goskope.com
dlpappliancegw.dfw3.goskope.com
dlpappliancegw.fra2.goskope.com
– If you use DRM with DLP, allowlist Microsoft AIP endpoints.
– All integrating services must reach the appliance over HTTPS (TCP 443).
– SSL interception of traffic from the DLP appliance is not recommended. If you use a proxy, import the respective certificates.
– Deploying multiple DLP appliances behind a network load balancer is not supported for asynchronous request scenarios.
For the complete list of egress and port requirements, see Firewall Settings for DSPM-Hosted Instances.
-
-
Appliance Sizing:
Unless recommended otherwise, deploy a Medium-sized appliance. The Small size is intended only for proof-of-concept testing.
AWS GCP Azure VM (ESXi/Hyper-V/KVM) Concurrent Requests Min Disk Small c5ad.4xlarge n2-standard-16 Standard-F16s_v2 16 cores / 32 GB 480 rps (burst 576) 351 GB Medium c5ad.8xlarge n2-standard-32 Standard-F32s_v2 32 cores / 64 GB 1280 rps (burst 1536) 351 GB Large c5ad.16xlarge n2-standard-64 Standard-F64fs_v2 64 cores / 128 GB 2880 rps (burst 3456) 351 GB In AWS regions where c5ad is unavailable, use c5a. To ensure optimal performance, use SSDs for all instances. ESXi does not support dynamic resizing after creation.
If you deploy an incorrectly-sized appliance, the Single Appliance doesn’t support scaling resources up or down. You must redeploy at the correct size.
Deployment Process
The following steps outline the end-to-end process to retrieve the License Key, download the appliance image, and connect it to your DSPM environment.
Step 1: Retrieve the License Key
The appliance setup uses the License Key to validate your DLP entitlement. The Netskope console generates it automatically.
- Log in to the Netskope console.
- Navigate to DSPM > Administration > Sidecar.
- Copy the License Key value displayed on this screen.
Step 2: Download the Single Appliance Image
The download method depends on your target deployment platform. Use the wizard in the DSPM UI to assign or download the image.
-
Go to DSPM > Administration > Sidecar.
-
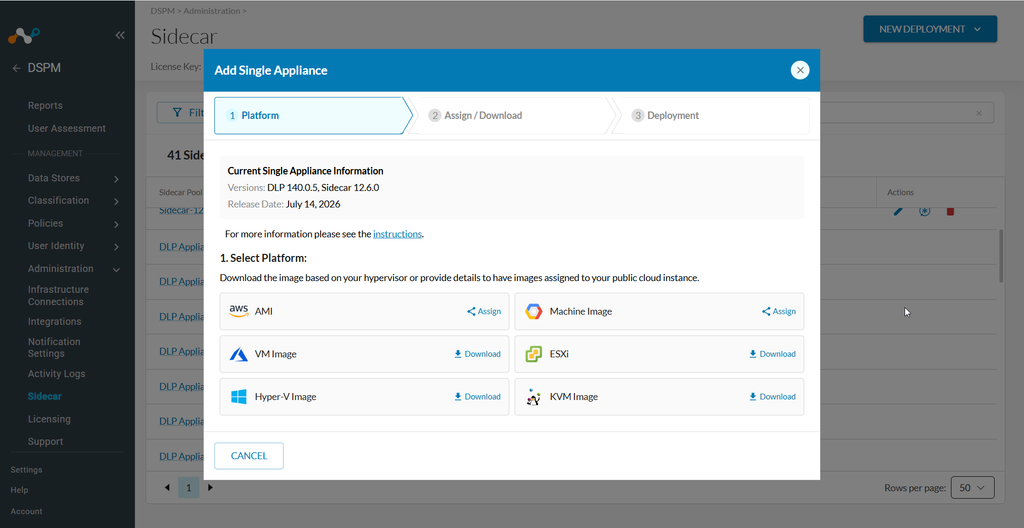
Click New Deployment > Standard Deployment. The wizard opens with three steps: Platform > Assign / Download > Deployment.
- Note: Current Single Appliance Information displays at the top of the wizard, including DLP Version, Sidecar Version, Image Size, and Release Date.
-
Select your target platform. The wizard adapts based on your selection:
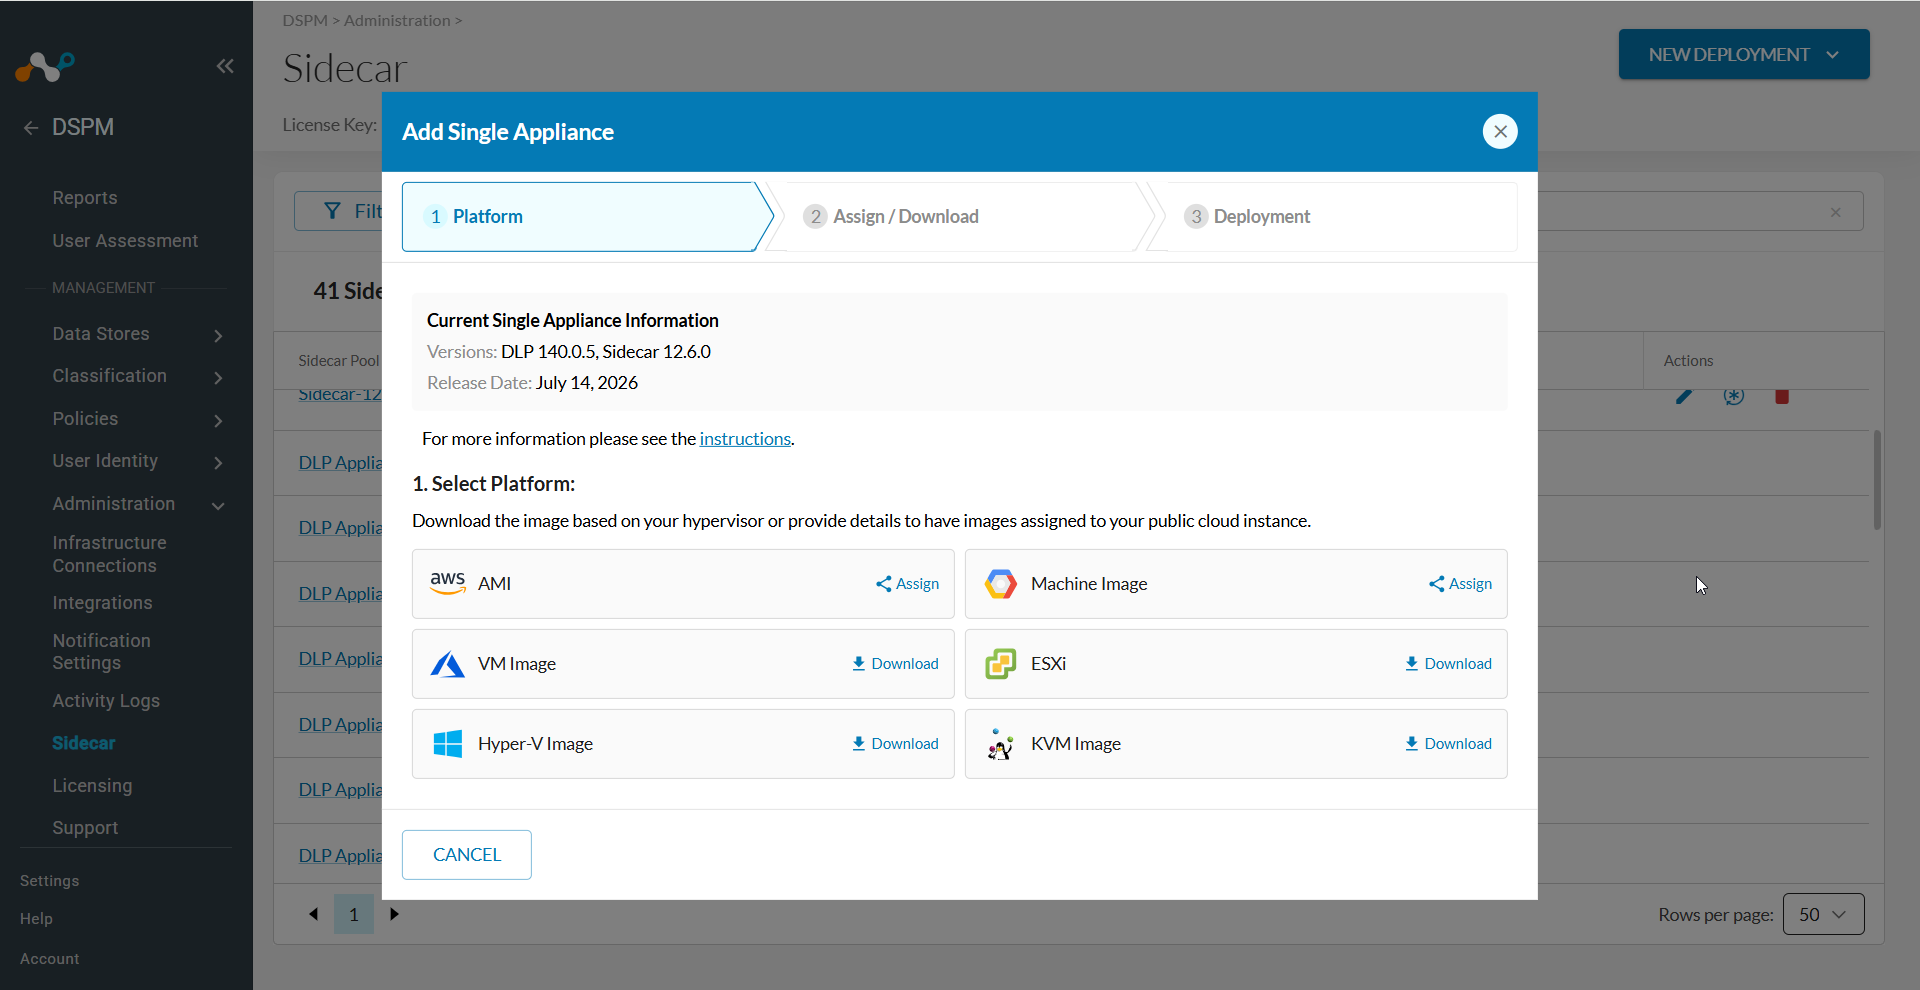
For AWS (AMI):
- Select AMI.
- Click Assign.
- Enter your Account ID and select the Region.
- Click Submit.
For Azure (VM Image):
- Select VM Image.
- Click Download.
- Copy the SHA-1 hash for verification.
- Download the image file.
For ESXi:
- Select ESXi.
- Click Download.
- Copy the SHA-1 hash for verification.
- Download the
.ovafile.
For GCP (Machine Image):
- Select Machine Image.
- Click Assign.
- Enter your Account ID and select the Region.
- Click Submit.
For Hyper-V:
- Select Hyper-V Image.
- Click Download.
- Copy the SHA-1 hash for verification.
- Download the image file.
For KVM:
- Select KVM Image.
- Click Download.
- Copy the SHA-1 hash for verification.
- Download the QCOW2 image file.
Step 3: Deploy the Single Appliance
Follow the instructions below for your chosen platform to create the virtual machine instance using the image you assigned or downloaded in Step 2.
AWS:
- Go to the EC2 console and click Launch Instance.
- Under AMI, find the Single Appliance image in My AMIs > Shared with me.
- Set the Instance Type per the sizing table in Prerequisites.
- Set Storage to a minimum of 351 GB using gp3.
- No SSH key-pair is required. Configure networking and security groups as appropriate. The appliance should not be publicly accessible.
- Select proceed with no key-pair and launch the instance.
Azure:
During deployment, Azure may display an “OS Provisioning Timed Out” notification. This is expected and you can safely ignore it. Verify the instance state shows “Running” to confirm readiness.
- Extract the VHD from the downloaded file:
tar -xvf {downloaded_vhd_tar_file} -C {path} - Create a Storage Account under your Resource Group.
- Create a Container under the Storage Account.
- On the Storage Account page, go to Security + Networking > Shared access signature.
- Enable all permissions, set Start Time 24h before now and End Time 24h after now.
- Click Generate SAS and connection string and copy the SAS token.
- Install AzCopy if not already installed.
- Note: Use AzCopy to upload. Uploading large files via the Azure Portal is unreliable and may result in file corruption.
- Upload the VHD:
azcopy copy "{local_path}.vhd" "https://{account_name}.blob.core.windows.net/{container_name}/{vhd_name}.vhd?{SAS_TOKEN}" --blob-type PageBlob
To deploy manually:
- Go to Images in Azure.
- Choose your subscription > Set OS Type: Linux > Select your VHD from storage > Set Account Type: Premium SSD > Set Encryption: Platform managed.
- Click Review + create.
- Create an instance from the image. Select a minimum of 351 GB Premium SSD disk.
- Configure networking and create the VM.
To deploy using Terraform:
- Download the Terraform script package: singleApplianceFromImage.zip, or copy the following URL into your browser window:
https://netskope-dspm-release.s3.us-west-2.amazonaws.com/azure/terraform/singleApplianceFromImage.zip - Navigate to the directory created from the extraction (for example,
cd singleApplianceFromImage). - Run the following command from that directory to initiate your Terraform environment:
terraform init
If your initialization is successful, the message “Terraform has been successfully initialized!” appears. - Run the following command to validate your prerequisite configuration details:
terraform plan - When prompted, enter the following variables:
| Parameter | Value |
|---|---|
subscription_id | Target Azure Subscription ID where the single appliance will be deployed |
resource_group_name | Name of the existing Resource Group where the single appliance will be deployed |
image_id | Resource ID of the single appliance image (managed Image or Shared Image Gallery version) to deploy the VM from |
subnet_id | Resource ID of the existing subnet where to attach the single appliance’s network interface |
network_security_group_id | Resource ID of the Network Security Group to associate with the single appliance’s network interface |
- Run the following command from the deployment directory to initiate the Terraform installation:
terraform apply - The script executes and performs the following actions:
- Prompts you for input. Provide the configuration details in sequence as listed in the table above.
- Checks for errors. If an error occurs, follow the on-screen instructions to correct and resume.
- Prompts you to confirm before executing. Type
yesto confirm. - Creates an instance named
Netskope-DSPM-Single-Applianceusing theStandard_F32s_v2instance type and a 351 GB volume.
vSphere (ESXi):
Download the .ova image to your local system before uploading to vSphere (vSphere does not support direct URL imports when the URL exceeds its maximum supported length).
- Right-click a host, cluster, or datacenter and select Deploy OVF Template.
- Select Local file > Upload files, choose your
.ovafile, click Next. - Enter a VM name, select deployment location, click Next.
- Select compute resource, click Next.
- Review details and accept license agreements, click Next.
- Select datastore and virtual disk format (e.g., Thin Provision), click Next.
- Map source networks to destination network ports, click Next.
- Customize template settings if applicable, click Next.
- Review summary, optionally check Power on after deployment, click Finish.
GCP
To deploy manually:
- Go to Compute Engine > VM Instances and click Create Instance.
- In Machine Configuration, provide a name and select N2 under General Purpose.
- In Machine Type, select per the sizing table in Prerequisites.
- In OS and Storage, click Change, select the Single Appliance image shared to your project, and set size to 351 GB minimum.
- Configure networking and security groups as appropriate, then click Create.
The instance will be ready after approximately 30 minutes.
To deploy using Terraform:
- Download the Terraform script package: singleApplianceFromImage.zip, or copy the following URL into your browser window:
https://netskope-dspm-release.s3.us-west-2.amazonaws.com/gcp/terraform/singleApplianceFromImage.zip - Extract the package and navigate to the directory (for example,
cd singleApplianceFromImage). - Run the following command from that directory to initiate your Terraform environment:
terraform init
If your initialization is successful, the message “Terraform has been successfully initialized!” appears. - Run the following command to validate that you have all prerequisite configuration details available for the installation:
terraform plan - When prompted, enter the following variables:
| Parameter | Value |
|---|---|
project_id | GCP project ID where the single appliance will be deployed |
source_image | Name of the single appliance image from project ns-prod-eng-dlp-image |
subnetwork | Name of the existing subnetwork where to attach the single appliance. The parent VPC network is inferred from this. |
- Run the following command from the deployment directory to initiate the Terraform installation:
terraform apply - The script executes and performs the following actions:
- Prompts you for input. Provide the configuration details in sequence as listed in the table above.
- Checks for errors. If an error occurs, follow the on-screen instructions to correct and resume.
- Prompts you to confirm before executing. Type
yesto confirm. - Creates an instance named
netskope-dspm-single-applianceusing then2-standard-32instance type and a 351 GB volume.
Hyper-V:
- Open Hyper-V Manager.
- In the Actions pane, click Import Virtual Machine.
- Click Next, then Browse to the top-level folder of the exported VM files. Click Select Folder > Next.
- Select the VM from the list, click Next.
- Choose Register the virtual machine in-place (use the existing unique ID).
- Review and click Finish.
- Before starting the instance, right-click the VM > Settings > Network Adapter and select the appropriate network switch.
- Start the VM from the Actions pane or by right-clicking > Start.
KVM:
- Create a template directory and extract:
mkdir single-appliance-templatetar -xvf single-appliance.tar - Extract the QCOW2 disk image:
tar -xzvf netskope-single-appliance-kvm-qcow2-*.qcow2.tar.gz -C /home/ubuntu/single-appliance-template/ - Deploy using
virt-install:sudo virt-install --name single-appliance --ram 65536 --vcpus 32 --os-variant ubuntu24.04 --disk path=/home/ubuntu/single-appliance-template/<image_file>.qcow2,size=452 --import --network default --check path_in_use=off - When
virt-installconnects the console, press CTRL+C to exit. The boot process continues in the background. - Verify VM status:
sudo virsh list --all - Check network:
sudo virsh net-list - Find IP address:
sudo virsh net-dhcp-leases default - Connect via SSH:
sudo ssh nsadmin@{IP}
Step 4: Connect and Tether the Appliance
Once you create the instance, connect it to Netskope so it can download the required configuration and profiles.
-
SSH into the instance as
nsadminwith the default passwordnsappliance:ssh nsadmin@<instance_ip>
-
Select the appliance persona. On first login, the appliance displays a persona selection wizard. Select DSPM to configure the appliance as a Single Appliance (DLP + sidecar combined).
This selection appears only once and can’t be changed after confirmation. The alternative option, DLP, configures the appliance as a standalone DLP appliance for use with separate sidecars.Wait for the initialization to complete. After you select DSPM, the appliance installs the sidecar components.
-
Change the default password immediately:
nsappliance> auth change-password
-
Configure DNS (if DNS is not provided via DHCP):
nsappliance> configure
nsappliance(config)> set dns primary x.x.x.x
nsappliance(config)> set dns secondary x.x.x.x
nsappliance(config)> save
nsappliance(config)> exit
-
If you need to configure the network interface manually instead of using DHCP:
nsappliance> configure
nsappliance(config)> set interface v4 dhcp enable false
nsappliance(config)> set interface v4 static enable true
nsappliance(config)> set interface v4 static ip x.x.x.x
nsappliance(config)> set interface v4 static gw x.x.x.x
nsappliance(config)> set interface v4 static netmask x.x.x.x
nsappliance(config)> set dns primary x.x.x.x
nsappliance(config)> set dns secondary x.x.x.x
nsappliance(config)> save
nsappliance(config)> exit
-
To revert to automatic DHCP configuration:
nsappliance> configure
nsappliance(config)> set interface v4 dhcp enable true
nsappliance(config)> set dns primary x.x.x.x
nsappliance(config)> set dns secondary x.x.x.x
nsappliance(config)> save
nsappliance(config)> exit
Ensure that DNS resolution works on the appliance before proceeding.
-
-
Ensure you have a REST API v1 token. If you already have one, skip to the next step. To generate a token, go to Settings > Tools > Rest API v1 and click Generate New Token.
-
Apply the License Key you retrieved in Step 1:
nsappliance> configure
nsappliance(config)# set system licensekey <license-key>
nsappliance(config)# save
nsappliance(config)# exit
-
Verify tethering status. The value
callhome_reachablemust betrue, andtenant-urlandserialshould be populated:nsappliance> status tethering
The value forcallhome_reachablemust betrue, andtenant-urlandserialshould populate -
Return to the DSPM UI wizard (Step 3: Deployment), confirm the License Key matches the one you applied, and click Done.
After successful tethering, the appliance completes initialization and begins processing requests. Initialization time may be shorter on on-premises platforms such as ESXi. A sidecar pool is automatically created and appears in DSPM > Administration > Sidecar. For details on managing your sidecar pool, see DSPM Sidecar Administration Overview.
Step 5: Configure a Proxy (Optional)
If your organization routes outbound traffic through a proxy, configure it using the appliance CLI.
-
Configure the proxy details:
nsappliance> configure
nsappliance(config)# set management-plane upstream-proxy-server hostname 10.10.10.10
nsappliance(config)# set management-plane upstream-proxy-server port 8000
nsappliance(config)# set management-plane upstream-proxy-server username <USERNAME>
nsappliance(config)# set management-plane upstream-proxy-server password <PASSWORD>
nsappliance(config)# set management-plane upstream-proxy-server trusted-ca
-
Copy and paste your single PEM-formatted server CA certificate (no keys).
-
Press
Ctrl-Dwhen done. -
Save and restart:
nsappliance(config)# save
nsappliance(config)# exit
nsappliance> restart dlpaas all
-
Configure the trusted CA:
nsappliance> configure
nsappliance(config)# set management-plane upstream-proxy-server trusted-ca
-
Copy and paste your single PEM-formatted server CA certificate (no keys).
<PASTE PEM Formatted CA CHAIN>
-
Press
Ctrl-Dwhen done.<Press Ctrl-D>
-
Save and restart:
nsappliance(config)# save
nsappliance(config)# exit
nsappliance> restart dlpaas all
Step 6: Configure the Upgrade Schedule
After deployment, configure the automatic upgrade schedule for your Single Appliance.
- Go to DSPM > Administration > Sidecar.
- Click the auto-generated pool name.
- In the pool details panel, click the Upgrade tab.
- Click Edit Schedule.
- Choose when to apply upgrades after release (Within the first week after release, Within the second week after release, or Within the third week after release).
- Select the day of the week and start time (in the appliance’s local timezone).
- Click Save Schedule.
If you encounter issues during or after deployment, see Troubleshooting DSPM with DLP.