

Overview
The Netskope DSPM application (also known as Netskope One DSPM) requires seamless connectivity to scan your data stores. However, as per common security practices, businesses tend to deny proper firewall egress between their internal networks & external applications. Such limitations impact the operational use of Netskope DSPM and reduce the full return value of your subscription.
To overcome this, Netskope DSPM provides a flexible collection architecture consisting of one or many sidecars you deploy alongside your data stores. These sidecars collect necessary metadata and transfer it to the Netskope DSPM application. Within this central management console, you can take action on insights from across all data stores regardless of where they are hosted.
Prerequisites
DLP Appliance Connectivity: Sidecars require connectivity to a local DLP appliance to perform classification activities using your DLP Profiles and Rules. Before deploying the sidecar, ensure the following:
- A DLP appliance has been deployed and is accessible within the same network where the sidecar will be installed (or in directly connected networks, to avoid additional peering or complex routing).
- The sidecar and DLP appliance must be able to communicate via HTTPS (port 443).
- You have generated or obtained the required REST API v1 Key and License Key.
Architecture
Netskope DSPM uses a flexible architecture where you deploy one or more sidecars alongside your main application. These sidecars connect directly to your data stores to collect samples, which a local DLP appliance then scans. Afterward, the sidecars upload the classification results back to the Netskope DSPM application.
A single sidecar can efficiently scan multiple data stores within its installed environment. Although you typically deploy one sidecar per isolated network (such as a VPC or VNet), you can install multiple sidecars to achieve higher scalability and redundancy. In these highly available setups, the Netskope DSPM application automatically load-balances scan operations across all healthy sidecars within a given pool.
The following diagram illustrates the relationship between Netskope DSPM resources and your environment:

For more information on Azure Container Instances, please visit the Microsoft Azure knowledge base.
Configure Outbound Egress
Since Netskope hosts and manages the Netskope DSPM application, you must update your firewall or security group settings to allow outbound egress. Configure your allowlist on port 443 using the following group.
-
Required for Core Connectivity: Add these addresses to ensure the sidecar can communicate with the DSPM platform. Substitute
[TENANT]with your actual tenant name:Address [TENANT].goskope.comsidecar-[tenant].goskope.comnetskope-dspm-release.s3.us-west-2.amazonaws.com995750983908.dkr.ecr.us-west-2.amazonaws.com
Configure Sidecar Pool
To set up the relationship between your sidecars and Netskope DSPM-hosted tenant, you will provide the sidecars with unique authentication tokens generated within our Sidecar Administration UI.
-
Log in to the Netskope DSPM application.
-
Go to the Administration > Sidecar menu.
-
Click Add Sidecar Pool.
-
On the Details tab, complete the following field:
Field Value Name Any friendly value to describe the sidecar pool. -
Click Save.
-
Click Copy at the bottom of the Sidecar Authentication Token modal to save the generated token to your clipboard.

-
Click the X button to exit the modal.
Since you haven’t yet associated this token with a sidecar, the sidecar pool will appear only when you click the Show Inactive Sidecars icon in the upper right, with empty Version, Status, and DLP Status columns for now.
Setting up the Azure Configuration
-
Copy the following URL in your browser window to download the requisite Azure Resource Manager (ARM) template:
https://netskope-dspm-release.s3.us-west-2.amazonaws.com/NetskopeDSPM-SidecarOnACI-ARM-dlp.json
-
For the account where you will configure the custom template, log in to the Azure console.
-
Using the search box, and go to Deploy a Custom Template.

-
Click on Build your own template in the editor.

-
Click Load file, then select Netskope DSPM’s custom sidecar template JSON file.
-
The template JSON file’s content will now be displayed. Click Save at the bottom of the page.

-
Under Project details, enter the following values:
Field Value Subscription Pre-populated Resource Group Any value -
Under Instance details, enter the following values:
Field Value NetskopeDSPMHostName Your tenant URL minus the protocol.
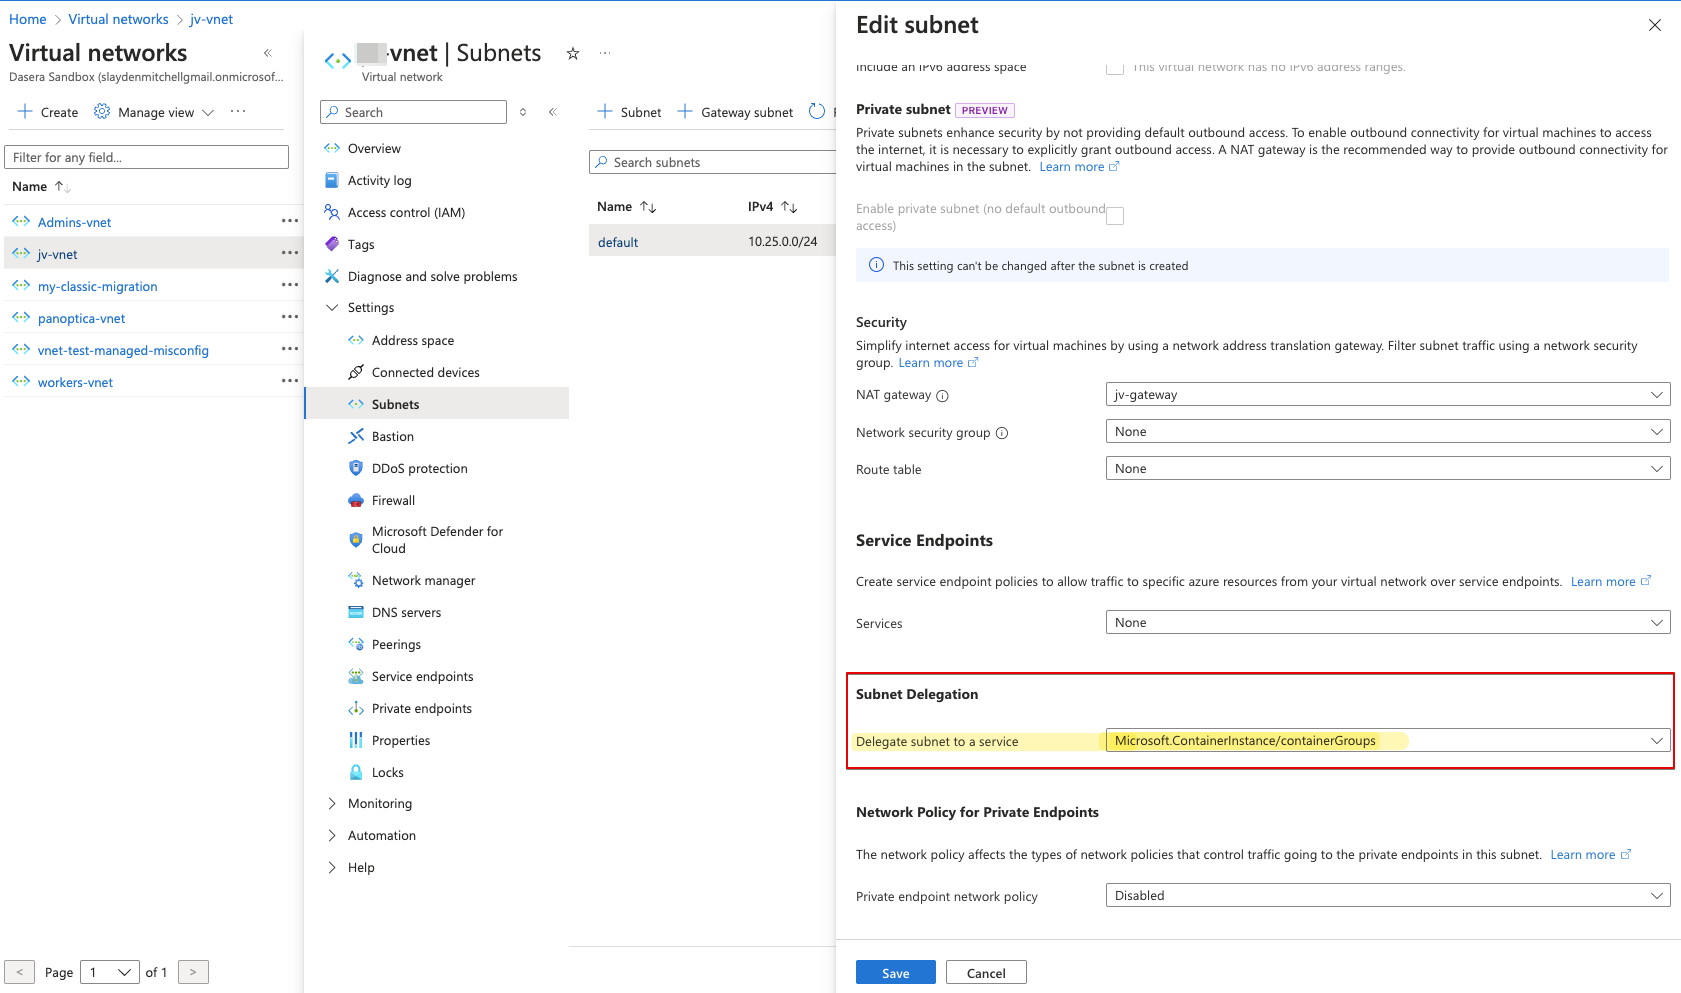
For example, if your tenant is accessed usinghttps://example.goskope.com, your value will beexample.goskope.com.sidecarPoolToken An existing sidecar token, or a new one generated in the Register Sidecar Pool section above. vnetName View your Azure virtual networks within the selected resource group. The Vnet name appears on the left column titled Name. For example, example-virtual-networkin the example below.subnetName Usually default. If there are multiple virtual networks/subnets, make sure you are inputting relevant names. Subnet Delegation field must be enabled with a delegation to container groups, as pictured below.
-
Click Review + create.
-
You’ll see a validation screen with the information you entered above.
-
Click Create.
-
You’ll see your deployment in progress. This may take several minutes to complete.
-
Once complete, you can expand the Deployment details section, then click the Resource name to see details of the sidecar container instances.

-
In the left-hand menu, go to Settings > Containers to view details about the container group:
-
One container for the Netskope DSPM sidecar.
-
One container for the classification engine.
-
-
Click the Logs tab to view more detail on how sidecars are authenticating, running, and scanning your data stores.


Validate Sidecar Connection
When deploying sidecar, you’ll need to ensure that the sidecar has the ability to reach your tenant. Take the following steps to verify the connectivity from the sidecar.
- Log in to the Netskope DSPM application.
- Go to Administration > Sidecar.
- For the sidecar(s) in question, validate that:
- The Version column is populated.
- The Status indicator is green.
- The DLP Status column shows a healthy connection to your DLP appliance.
It may take a few minutes for newly-running sidecars to communicate with the Netskope DSPM application.

Configure for an SSL Proxy Environment (Optional)
If your organization routes outbound traffic through an SSL proxy, you must perform the following steps to allow your sidecar to communicate with the Netskope DSPM platform.
-
Use an SSH client to connect to the sidecar’s IP address
-
In the Helm chart folder, open the
values.yamlfile. -
Add an entry at the bottom of the file for the
httpsProxyvalue, for example:httpsProxy: https://192.168.1.17
-
Redeploy the Helm chart
When deployment is complete, your sidecar should immediately begin communicating via the designated proxy.
Next Steps: Link Sidecar to DLP Appliance
After deployment, you must link your newly deployed sidecar to a DLP appliance to enable data classification.
For detailed instructions, see Link a DLP Appliance to a Sidecar Pool.