

The Devices page focuses on monitoring the Client’s status of all the devices in your tenant. You can export your entire device list to CSV file. To open the Devices page, go to Settings > Security Cloud Platform > Netskope Client > Devices.
Devices Prior to Version 134.0.0
This section focus on the Devices webUI features available from the Netskope Client prior to version 134.0.0.
Enable and Disable Device(s)
To enable or disable the Netskope client, or collect logs from a device, click the checkbox next to the hostname and click Enable or Disable. These buttons remain grayed out until you select a hostname.

Logs can only be collected from individual devices, but you can enable and disable the Netskope Client on multiple devices at one time.
Search Functionality
You can use the Search functionality to look for a specific device added in the tenant. To search for a device, enter the username in the search field. The search is not case-sensitive and you can get search results that are Like ~ or Equal = to the text entered in the text box.
 |
Filters
The Devices page displays information based on the selected filter.
Default Filter
You can click FILTERS above the Search text box to select the default filter. The filters are either created by you or shared with you. The following are the default filters:
- All Devices: Displays all devices within your tenant where the Netskope client is installed.
- New Devices: Displays all devices with Netskope Client added within the last 24 hours. You can change the filter to search using options from the Last Event Time dropdown menu. For example, Last 7 days, Last 30 days, and so on.
- Anonymous Devices: Displays devices where the the user has not logged after installing the Netskope client.
- Disabled Devices: Displays devices where the Netskope client is disabled. Devices can end up in this state when an admin has taken through the admin console, or when an end user (if allowed) has client from the device.
- Uninstalled Devices: Displays devices where the Netskope Client is uninstalled.
- Installation Failure: Displays devices where the Netskope Client installation failed.
 |
Custom Filter
To use custom filters, click +Add Filter and select a filter. Enter text in the search field to display devices on the Devices webUI.

The following table refers to the filters that you can use to refine your search results:
| Filter Option | Description |
|---|---|
| Client Install Time | The time taken to install the client in a device. |
| Client Version | You can view devices tagged to a specific version. |
| Client Status | Filter devices according to the current client status. |
| Internet Security Status | Display devices with respect to the internet security status such as Enabled, Disabled, Errored, Fail Closed, and Backed Off. |
| Private Apps Access Status | Display devices with respect to the private app access status such as Enabled, Disabled, and Errored. |
| Endpoint DLP Status | Display devices with respect to the private app access status such as Enabled, Disabled, and Paused. |
| Last Event | Display those devices where the client last event posted was installed, enabled, or disabled by the admin or user. |
| Last Event Actor | Displays those devices where the events are created by user, admin, or system. |
| Last Event Service | Displays devices where the event service is either Internet Security or Private Apps Access. |
| User Source | Displays devices where the users are sourced from AD or local. |
| User Group | Displays devices where the users added in that device is also a part of the listed user groups. |
| User OU | Displays devices based on the organizational units. |
| Show Pre-logon Users | Displays devices where the Pre-logon users options are added or not. |
| Device Classification | Displays devices according to their status like managed, unmanaged, unknown, not configured. |
| Device OS Platform | Displays devices according to the operating system. |
Device Information
The following lists the various components to display the Device information on this page:
 |
- Hostname
Note
For Android and iOS devices, the device serial number is displayed as NA.
- Device Classification
- OS platform
- Make
- Model
- Unique Device ID
- Management ID
- Serial Number
- User (displays user email address)
- User GroupOU
- Client Installation Time
- Client Version
- Client Status
- Internet Security Status
- Private Apps Access Status
- Endpoint DLP Status
- Last Event Service
- Last Event
- Last Event Actor
- Last Event Time

Additional Information
- If the device includes more than one user:
- The Users column displays the total number of users.
- The Internet Security Status, Private Apps Access Status columns displays Multiple Statuses and Last Event displays Multiple Events.

- Click the hostname to select the user from the list of users added to that device.
View Device Details
To view the details of an individual device, select the hostname or click the ellipsis(…) and select View Details to open the device details page.

After you click View Details, it navigates to another page that displays device, and Client information. To view event history, group membership, or organization unit information, click the appropriate tab.
-
Device: Displays various user and device information such as:
-
User: The email address of the enrolled user.
-
Device: Displays the device information such as model and operating system of the selected device.
-
Device Classification: Displays whether the device is managed or unmanaged.
-
MAC address: Displays MAC addresses of the physical network interfaces that the device currently uses. This list can contain more than one MAC address. Only tenants with Client version 112.0.0 or above can see this option on the webUI.
-
Client Version: The version of the Netskope Client that is associated with the selected device.
-
Unique Device ID: Displays the Unique Device ID associated with the selected device.
-
Serial Number: Displays the serial number of the selected device.
-
Steering Configuration: Displays the Steering Configuration configured for the user. Only tenants with Client version 112.0.0 or above can see this option on the webUI.
For tenants with Netskope Client version prior to version 112.0.0, Steering Configuration and MAC Address fields display empty fields. -
-
Services: Displays the Client services available for the selected hostname and the associated status available.
If Endpoint DLP is enabled, you can pause or resume the service from the detail view. The default pause time is 30 minutes.


-
Event History: Displays various events that are posted by the Client For example, Tunnel Up, Tunnel Down, Client uninstallation failure, Network Change, and so on. For more details, view Client Status. At the same time, the Event column also displays the reason as to why a specific event occurred for specific events. For example, tunnel down can occur due to the change in traffic mode or user deprovisioned.
-
Tunnel Down Event Details: The following event details are displayed on the webUI whenever the tunnel is down in the following scenarios:
The following events are applicable across all devices supported by Netskope Client.Event Event Details Tunnel Down - Traffic mode changed: During this process, the tunnel disconnects and reconnects when the traffic mode changes from one mode to another.
- Interop proxy changed: If the admin updates the Interoperate with Proxy configuration in Client Configuration, the tunnel disconnects to connect to the correct proxy and then reconnects.
- User Deprovisioned: When the user is removed from the tenant.
- On-Prem Status Changed: When the user is moved from On-Premises to Off-Premises or vice-versa.
- Tunnel Protocol Changed: If the admin updates the Enable DTLS option in Client Configuration, the tunnel goes down while it disconnects and reconnects.
- Re-configured User: When the user email or username gets updated, Netskope Client config gets updated and the tunnel goes down.
Tunnel Down Due to Error - Detected Dead Peer: Netskope Client detects when the tunnel connection to the gateway is not responding and disconnects the tunnel.
- Ping timeout: Netskope checks if the tunnel is disconnected due to some reasons and cannot send any ping frames to Netskope Gateway. In such scenarios, Netskope Client sends Ping Timeout events.
- Missing Gateway Configuration: Netskope Client sends this event when there is no valid gateway configuration.
- Failed Tunnel Establishment Due to Network Error: Netskope Client sends this event when the initial tunnel establishment fails.
- Tunnel Down Due to SSL Error: Netskope Client sends this event when the SSL socket is closed and it fails to establish a connection with the tunnel.

- Traffic mode changed: During this process, the tunnel disconnects and reconnects when the traffic mode changes from one mode to another.
-
Client Upgrade or Uninstallation Failure: To know more about the events displayed in the event of a Client or Uninstallation failure in a Windows device, view Netskope Client for Windows.
-

-
Group Membership: Displays the group information from the DC.
-
Organization Unit: Displays the OU that the user belongs to.
Device Count
The total number of devices count is calculated using:
- Device entry count (by Unique Device ID and User)
- Unique device count (by Unique Device ID)
In the following screenshot, for example, the Devices page consists of 22 Device and the User pairing and out of that there are 13 Unique Device ID.

Using another example to elaborate this scenario:
- User A and User B are accessing Device 1.
- User C is accessing Device 2 and Device 3.
The Devices page displays the total number of devices count as follows: 4 Devices+User Entries (3 Devices). In this example, the Devices page consists of:
- Four entries of Device and User pairing (Device 1and User A, Device 1 and User B, Device 2 and User C, and Device 3 and User C).
- Three Devices(Device 1, Device 2, and Device 3).
- Three Unique Device IDs( One Unique Device ID for devices assigned to Device 1, and two different IDs for Device 2 and Device 3).
Unique Device Identifier
Netskope Client creates a Unique Device Identifier at the time of enrollment. Prior to the version 105.0.0, the Unique Device ID was created based on the hostname and a few other parameters. As the hostname is no longer maintained unique in the organizations, with 105.0.0, Netskope Client is enhanced to use the hardware parameters such as Windows GUID for creating Unique Device ID.
Previously, whenever there were devices with the same hostname, it shared the same Unique Device ID. From version 105.0.0, different Unique Device IDs are assigned to each device and no two devices share the same ID. With the new Unique Device ID, whenever the administrator tries to query based on the Client Data, the value for nsdeviceuid in the response returned by the host differs from the value displayed with the old Device ID.
For example, in the following screenshot:
- Only one user(Andy) is tagged to DESKTOP-RPR6OU.
- Two users(Cathy and Bob) are tagged to Windows10-Desktop.
- Three users(Dan, Ed, and Frank) are tagged to Windows11-Image0303.

In this example, devices with the same hostname share the same unique device ID.
The Netskope Client now identifies devices based on the hardware parameters such as GUID and separate entries are displayed for each user and device on the Devices webUI. The devices now display different unique device identifiers even if they share the same hostname.

With the new approach, Cathy and Bob will have separate entries for their devices with different unique device identifiers on the webUI. Similarly, Dan, Ed, and Frank will have separate entries for their devices with different unique device IDs.
– Whenever you import a large number of virtual machines (VM), always carry out the action using Import as a Copy method. Otherwise, the VMs will have hostnames with the same Device ID pointing to the same Client Status record.
Google Advertising ID (GAID) for Android devices
Starting with version 133.0.0, the Devices web UI now includes the Google Advertising ID (GAID) for Android devices, displayed in the Serial Number and Unique Device ID fields. This enhancement improves the correlation of device details between your Mobile Device Management (MDM) system and the Netskope Devices page. Consequently, a new entry is created for each Android device, featuring GAID in addition to the Serial Number and Unique Device ID.
Client Enrollment ID Changes for Android Devices
-
New Client Enrollment: Netskope now use the Google Advertising ID (GAID) for new Client enrollments.
-
Existing Tenants: Existing tenants continues to use the current Netskope-specific ID Android ID.
-
Transitioning to GAID (Existing Devices): To switch from using the Android ID to the GAID, administrators must Uninstall and reinstall the Netskope Client to version 133.0.0 or higher.
If the Netskope Client is not re-installed and the device upgrades to version 133.0.0, the Devices webUI continues to use the existing Netskope-specific ID, not the GAID.
Manage Client
The admin can control the user access to enable or disable the Client. The admin can select one of the following options:
- Enable Traffic Steering – The admin enables Client for the selected device and restricts the user from disabling the Client.
- Disable Traffic Steering – The admin disables Client for the selected device and restricts the user from enabling the Client.
Hide Devices
Use this functionality to hide those devices that no longer generate events or remain inactive for a specific number of days configured on the Devices page. You can hide old devices that do not generate any events due to reasons such as user removal and so on for the configured number of days. This does not affect older versions of Netskope Client as they might still be generating events.
To hide a device(s):
-
Click the settings icon on the Devices webUI.

-
This displays another window Preferences where you can enable the Hide functionality and add the number of days.

-
Toggle the Hide devices option to enable this functionality.
-
In the text box, enter the number of days to filter the devices that no longer generate any events.
-
Click Save.


Collect Logs
The admin can request Netskope client log bundle using the Collect Log option. After the Netskope Client receives the bundle request, it collects the log bundle and uploads it in the Cloud storage services.
Supported OS: Windows, macOS, and Android.
To collect logs:
-
Locate and select the target device.
-
Click the ellipsis (…) and select Collect Logs to initiate the log collection process.
-
After completing the log collection process, the tenant admin receives an email notification with the link to download the log.
Prerequisite: If you have firewall policies in your public cloud storage, then add https://storage.googleapis.com/ns-nsclient_logs-* to firewall allowlist.
By default (without feature enabled), the Client continues to store logs to AWS.
Export Device Information
To export the contents in the Device UI to a CSV file, select the hostnames and click Export. The details displayed in the exported file depends on the options that you choose on the Export webUI.

Client Status
The following table lists the various Client statuses: Internet Service, Private Apps service, and Endpoint DLP according to their meaning. The status of a Client is:
-
Enabled: When any of the services are enabled.
-
Disabled: When all services are disabled.
You can also query client status via the Get Client Data REST API.
Internet Security Service Status
| Event Code | Event | Actor | Status | Meaning |
|---|---|---|---|---|
| 0 | Installed | System | Disabled | Via email invitation, distribution tool (i.e. SCCM, Altiris, JAMF etc) |
| 1 | Tunnel Up | System | Enabled | ‘Auto’ enabled just after install, upgrade or later |
| 2 | Tunnel Down | System | Disabled | disabled – default startup state of client i.e. after installation/upgrade/restart |
| 3 | Tunnel down due to secure forwarder | System | Backed Off | ‘Auto’ disabled due to Netskope Secure Forwarder found |
| 4 | Tunnel down due to config error | System | Errored | ‘Auto’ disabled due to config errors/missing config |
| 5 | Tunnel down due to error | System | Disabled | ‘Auto’ disabled due to (any other) error |
| 6 | User Disabled | User | Disabled | User disabled the client from the system tray |
| 7 | User Enabled | User | Enabled | User enabled the client from the system tray |
| 8 | Admin Disabled | Admin | Disabled | Tenant admin disabled the client from the webUI |
| 8 | Admin Disabled (This event is available only for tenants with Dynamic Steering) | Admin | Backed Off | Tenant admin disabled the Client from the webUI. Whenever the admin selects None steering option, the Netskope Client disables only traffic steering and sends “Admin Disabled” event to the Device info. |
| 9 | Admin Enabled | Admin | Enabled | Tenant admin enabled the client from the webUI |
| 10 | Uninstalled | System | Uninstalled | Uninstalled by end user, admin, SCCM admin etc |
| 11 | Installation Failure | System | Disabled | Installation failed |
| 12 | Tunnel down due to GRE | System | Backed Off | ‘Auto’ Disabled due to GRE |
| 13 | Tunnel down due to Data Plane on-premises | System | Backed Off | ‘Auto’ Disabled due to on-premises DP |
| 14 | Change in network | System | Disabled | ‘Auto’ disabled due to change in network |
| 15 | System shutdown Note: In macOS, Sleep event is displayed as System shutdown | System | Disabled | ‘Auto’ disabled due to system restart/ power down |
| 16 | System powerup Note: In macOS, Wakeup event is displayed as System powerup | System | Disabled/Enabled | ‘Auto’ Tunnel status will be as per actual status |
| 17 | Tunnel down due to IPSec | System | Backed Off | ‘Auto’ Disabled due to IPSec |
| 18 | Enrolled | User | Disabled | User enrolled using IdP mode through the Netskope Client webUI |
| 19 | Unenrolled | User | Disabled | User unenrolled |
| 20 | Enrollment Token Error | System | Errored | Displayed when an invalid enrollment authentication token is used |
| 21 | Tunnel down due to error in Modern Standby mode | System | Disabled | Auto’ disabled due to device in modern standby mode (AOAC) |
| 22 | Device Posture Change | System | Managed | Whenever the Client is in compliance with the device classification rules configured for an OS platform, the Managed status is displayed in the Device Posture Change event. |
| 22 | Device Posture Change | System | Unmanaged | Whenever the Client is not in compliance with the device classification rules configured for an OS platform, the Unmanaged status is displayed in the Device Posture Change event. |
| 22 | Device Posture Change | System | Unknown | The Client sends Unknown status before the Client downloads the device classification rules. |
| 25 | Uninstallation Failure | System | Disabled | Disabled Failed to uninstall the Client |
| 26 | Upgraded | System | Disabled | Client upgraded successfully |
| 27 | Upgrade Failure | System | Disabled | Client failed to upgrade |
| 28 | Rollback Success | System | Enabled | Rolled back to client version ‘x’ |
| 29 | Rollback Failure | System | Enabled | Failed to rollback to client version ‘x’ |
| 30 | CA Installation Failure | System | Enabled | CA installation failed. This event is posted when the first attempt fails. Consecutive installation failures are not posted onto the webUI until the CA installation succeeds. Once the CA installation succeeds, it resets the status. |
| 31 | CA Installation Change | System | Disabled/Enabled | CA rotation is detected and new CAs are installed to the system store. When the CA rotation is detected (the new downloaded CA is different from the existing CA and the subject name is the same), Netskope Client posts the “CA Installation Change” event for cert rotation monitoring. |
| 32 | CA Installation Success | System | Enabled | Successful CA installation after the failed CA installation attempts. No CA Installation Success event is posted on the webUI when there are no failed attempts. |
| 33 | Tunnel down due to on-premises status change | System | Disabled | ‘Auto’ disabled due to on-premises status change |
| 37 | Tunnel down due to Express Connect | System | Backed off | ‘Auto’ Disabled due to Express Connect (Direct Peering) |

– If the CA rotation is detected and CA installation in the system store fails, the Netskope Client falls back to the older CA and user cert.
Private Access Apps Status
| Event | Actor | Status | Meaning |
|---|---|---|---|
| Disabled | System | Disabled | NPA is not available for the customer. NPA status code is 0. |
| Disabled | System | Disabled | NPA is available for the tenant but tunnel is not yet established. It should be transient state. NPA status code is 0. |
| Disabled | System | Disabled | NPA is available, but not enabled from the tenant UI. NPA status code is 0. |
| Enabled | System | Enabled | NPA tunnel is connected. NPA status code is 2. |
| Disabled | System | Disabled | User disables the NPA Client. NPA status code is 0. |
| Disabled | System | Disabled | Admin disables the NPA Client from the tenant UI. NPA status code is 0. |
| Errored | System | Disabled | NPA tunnel is disconnected due to error. NPA status code is 11. |
Endpoint DLP Status
If Endpoint DLP is enabled, you can click View Details to see Endpoint DLP Service Details.

There are two Endpoint DLP statuses:
-
Config Status: The configuration state for the endpoint, which comes from the Client configurations applying to the endpoint. It displays Enabled or Disabled indicating if the endpoint should have Endpoint DLP enabled or not based on the Client configurations.
-
Service Status: The reported status of the Endpoint DLP software on the endpoint. This is the same status displayed in the Services table above, which is reported by epdlp.exe (Windows) on the endpoint. You can see one of the following states:
-
Enabled: The service is running, communicating correctly, and working properly.
-
Disabled: The service is not running.
-
Paused: The service is paused by clicking Pause Service. This action lasts for 30 minutes.
-
Device Control Error/Device Control Disabled: The driver for USB Device Control is unable to load correctly. This status might appear for machines that are turned off.
-
System Reboot Required: The endpoint needs a reboot so the USB device control functions properly. This occurs when the system has a non-resettable USB controller and an Endpoint DLP upgrade occurs. The new driver can’t be loaded until the reboot occurs.
-

Devices From Version 134.0.0
This section focus on the Devices webUI features available from the Netskope Client version 134.0.0.
Enable and Disable Netskope Client Services
You can enable or disable Netskope Client services such as All Client Services and Internet Security services for one or more devices. Select one or more hostnames and select the options from dropdown or from the ellipsis (…) for each hostname.

Logs can only be collected from individual devices, but you can enable and disable the Netskope Client services on multiple devices at one time.
Search Functionality
You can use the Search functionality to look for a specific device added in the tenant. To search for a device, enter the username in the search field. The search is not case-sensitive and you can get search results that are Like ~ or Equal = to the text entered in the text box.

Filters
The Devices page displays information based on the selected filter.
Add Filter
To use custom filters, click Add Filter and select a filter. Enter text in the search field to display devices on the Devices webUI. The following table refers to the filters that you can use to refine your search results:
| Filter Option | Description |
|---|---|
| Client Install Time | The time taken to install the client in a device. |
| Client Version | You can view devices tagged to a specific version. |
| Client Status | Filter devices according to the current client status. |
| Internet Security Status | Display devices with respect to the internet security status such as Enabled, Disabled, Errored, Fail Closed, and Backed Off. |
| Private Apps Access Status | Display devices with respect to the private app access status such as Enabled, Disabled, and Errored. |
| Endpoint DLP Status | Display devices with respect to the private app access status such as Enabled, Disabled, and Paused. |
| Last Event | Display those devices where the client last event posted was installed, enabled, or disabled by the admin or user. |
| Last Event Actor | Displays those devices where the events are created by user, admin, or system. |
| Last Event Service | Displays devices where the event service is either Internet Security or Private Apps Access. |
| User Added Time | Displays the time when the user was added to Netskope tenant. |
| User Source | Displays devices where the users are sourced from AD or local. |
| User Group | Displays devices where the users added in that device is also a part of the listed user groups. |
| User OU | Displays devices based on the organizational units. |
| Show VDI Users | Choose Yes or No to display VDI Users. |
| Show Pre-logon Users | Displays devices where the Pre-logon users options are added or not. |
| Device Classification | Displays devices according to their status like managed, unmanaged, unknown, not configured. |
| Device OS Platform | Displays devices according to the operating system. |
| Hostname | Displays list of devices that are detected to be On or off premises. |
| Device Tag | Displays the list of available device tags. |
Saved Filters
After adding the filters, click Save As to save those filters. Click Saved Filters to view filters saved by you or shared with you.
Manage Tags
Tag is a logical name one can assign to a device or a group of devices. These tags can be used as part of Steering configuration or Device Classification rules as a match parameters. This facilitates to apply a separate steering policy to a group of devices based on tag or assign a separate real-time policy by leveraging device classification rules.
Assigning device tags enables administrators to define steering policies per device groups and makes it a convenient way to manage devices. To manage device groups in the Netskope tenant, admins can use device tags to identify managed devices that can receive a different steering profile.
The Device details webUI also displays the tags associated with each individual device, making it easier to manage and identify them. Furthermore, the administrators can add up to five distinct tags and apply them across two other key areas: Steering Configuration and Device Classification, providing enhanced flexibility and control over device management.
Supported OS: Windows, macOS, Linux, Android, iOS
Manage Tags Through WebUI
To create a device tag:
-
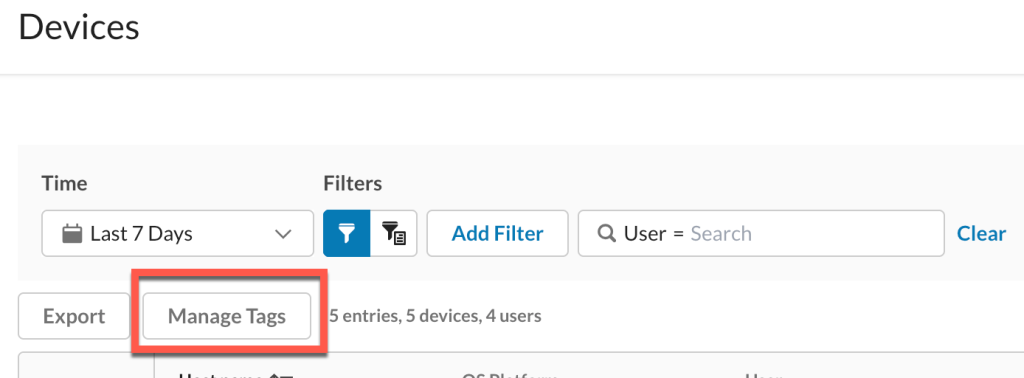
In Devices, click Manage Tags.
-
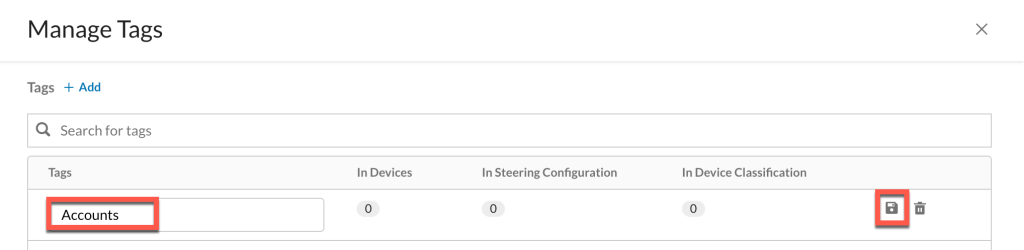
In Manage Tags, click +Add.
-
Add the tag name and click the save icon.


To apply device tags to a device:
-
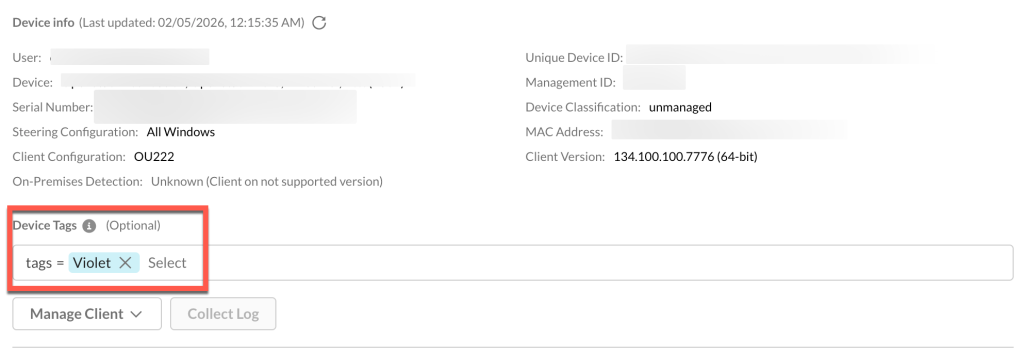
Click the ellipsis (…) and select View Detail.

-
In the device detail page of the selected device, add up to five tags in the Device Tags section.

Bulk Actions Using Tags
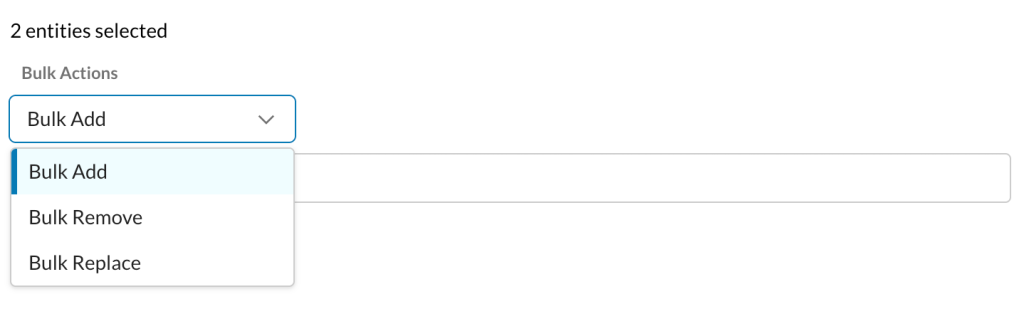
Use the Edit Tags option to perform bulk addition, removal, or replacement of tags assigned to multiple devices simultaneously. To do bulk action:
-
Select one or more hostnames from the Devices webUI.
-
Select the dropdown that displays the number of hostnames selected.
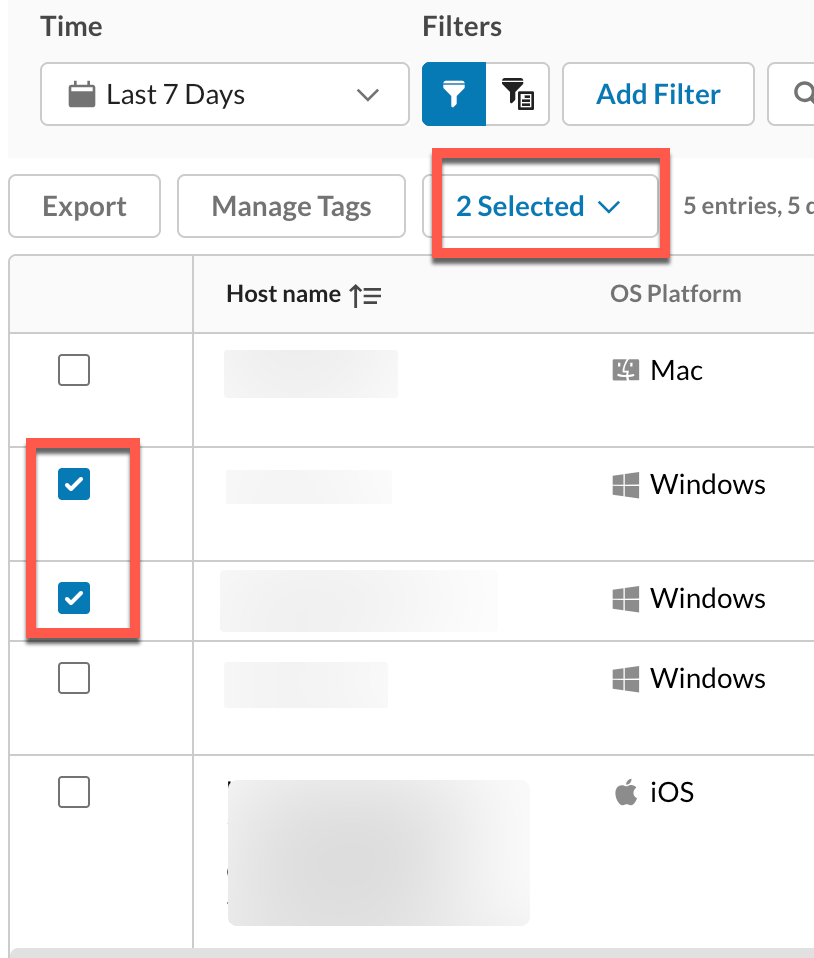 The administrator can select upto 100 devices simultaneously.
 -
Select Edit Tags.
-
In Edit Tags, choose one of the following bulk action:
-
Bulk Addition
If the assignment cannot be completed for even one device due to existing tags or other reasons, the bulk assignment will fail for all selected devices. -
Bulk Removal
-
Bulk Replace
-
-
Select the device tags.
-
Click Save.

Install Tags Using MSIEXEC
Along with the webUI option, the administrators can also consider other methods to apply tags to a device while installing Netskope Client:
-
Use
INSTTAGparameter in the MSIEXEC command while installing Netskope Client. For example:msiexec /i STAgent.msi HOST=addon-<tenant-name> TOKEN=<Organization ID> INSTTAG=Tag 1, Tag 2
The device tags must be defined in the Devices WebUI.To learn more, view Netskope Client for Windows.
-
Use MDM for Windows and iOS. To learn more, view Netskope Client deployment options.
Device Tags in a Multi-User Scenario
Consider a scenario where Netskope Client for Windows is installed on Device 1 in a multi-user environment using the following MSIEXEC command:
msiexec /i STAgent.msi MODE=peruserconfig HOST=addon-<tenant-name> TOKEN=<Organization ID> INSTTAG=Tag 1, Tag 2
This command installs Netskope Client on Device 1 and applies device tags A and B using the parameter “insttag”. Consider the following examples to understand the working of device tags:
-
User 1 enrolls with the device tags A, B. Now, if the administrator adds another device tag C, then the device tags associated with the user 1 remains A,B, and C.
-
User 2 enrolls with the device tags A, B. Now if the administrator decides to replace A, B with D, E; the device tags associated with User 2 remains D, E instead of A, B.
-
User 3 enrolls with the device tags A, B. The administrator decides not to add any additional tags here.
If the administrator now decides to apply another device tag F, this change applies to all tags associated with each user. For example, the tags associated with User 1 are A, B, C, and F.
Limitations
-
In the previous example, if another user, let’s say, User 4 enrolls into Device 1 with tags A, B; the new device tag F is not applied. The administrator must manually append the new tag to the selected user(s). The newly enrolled users might not have the latest device tags applied to that device.
-
In a virtual desktop infrastructure (VDI), if the administrator modifies the tag name after the Netskope Client installation in a Windows device, the users enrolling after does not get the latest tags and fails to enroll with the modified tags.
-
In a multi-user scenario, a device is classified as Managed even when the device classification check is a pass for one of the device tags applied to one of the user.
-
The Netskope Client retains the old device tags even after uninstalling and reinstalling Netskope Client with new tags. The new tags gets appended to the old device tags.
-
Modifying existing tag names in Managed Tags does not update the tag names on assigned devices. This disables the admin from viewing the modified tag names in the Device Tag column under Device page.
-
Device tag behavior upon uninstallation of the NS Client varies by operating system:
- Windows, Linux: When the Netskope Client is uninstalled, device tags are automatically removed. If the Client is re-enrolled with the same user, these tags are not reassigned.
- Android, Chrome, and iOS: Device tags are retained upon uninstallation. If the Client is re-enrolled with the same user, the tags are added back to the device.
Device Information
Click the settings icon  displayed on the devices list table and select Customize Columns to modify the options according to your requirement. The following lists the various components to display the Device information on this page:
- Hostname
- Device Classification
- OS platform
- Make
- Model
- Unique Device ID
- Device Classification
- Management ID
- Serial Number
- MAC Address
- User (displays user email address)
- User Group
- OU
- Client Installation Time
- Client Version
- Client Status
- Pinned to a POP
- Internet Security Status
- Private Apps Access Status
- Endpoint DLP Status
- Last Event Service
- Last Event
- Last Event Actor
- Last Event Time

You can move move the components from Available to Display on table and click Apply.
View Device Details
To view the details of an individual device, select the hostname or click the ellipsis(…) and select View Detail to open the device details page.

After you click View Details, it opens another section in the same window that displays the device info and Client services information. To view event history or user information, click the appropriate tab.
-
Device Info: Displays various user and device information such as:
-
Last Updated: Displays the time when the following device attributes were last accessed and retrieved:
-
User email address
-
Device name
-
Device Classification
-
Client version
-
Serial ID
-
-
User: The email address of the enrolled user.
-
Device: Displays the device information such as model and operating system of the selected device.
-
Device Classification: Displays whether the device is managed or unmanaged.
-
MAC address: Displays MAC addresses of the physical network interfaces that the device currently uses. This list can contain more than one MAC address.
-
Client Version: The version of the Netskope Client that is associated with the selected device.
-
Unique Device ID: Displays the Unique Device ID associated with the selected device.
-
Serial Number: Displays the serial number of the selected device.
-
Steering Configuration: Displays the Steering Configuration configured for the user.
-
Client Configuration: Displays the Client Configuration configured for the user.
-
Management ID: Displays the management ID of the selected device.
-
-
Services: Displays the Client services (Internet Security, Private Application Access, Endpoint Data Loss Prevention) available for the selected hostname along with the following details:

-
Status available for each Client service: Displays if the service is enabled or disabled.
-
One-time Password: Displays the OTP (hidden) if enabled in the Client Configuration.
-
Actions: Provides access to view the Client services details and disable, pause, and restart Client services.
If Endpoint DLP is enabled, you can pause or resume the service from the detail view. The default pause time is 30 minutes.
-
-
Event History: Displays various events that are posted by the Client For example, Tunnel Up, Tunnel Down, Client uninstallation failure, Network Change, and so on. For more details, view Client Status.
-
Tunnel Down Event Details: The following event details are displayed on the webUI whenever the tunnel is down in the following scenarios:
The following events are applicable across all devices supported by Netskope Client.Event Event Details Tunnel Down - Traffic mode changed: During this process, the tunnel disconnects and reconnects when the traffic mode changes from one mode to another.
- Interop proxy changed: If the admin updates the Interoperate with Proxy configuration in Client Configuration, the tunnel disconnects to connect to the correct proxy and then reconnects.
- User Deprovisioned: When the user is removed from the tenant.
- On-Prem Status Changed: When the user is moved from On-Premises to Off-Premises or vice-versa.
- Tunnel Protocol Changed: If the admin updates the Enable DTLS option in Client Configuration, the tunnel goes down while it disconnects and reconnects.
- Re-configured User: When the user email or username gets updated, Netskope Client config gets updated and the tunnel goes down.
Tunnel Down Due to Error - Detected Dead Peer: Netskope Client detects when the tunnel connection to the gateway is not responding and disconnects the tunnel.
- Ping timeout: Netskope checks if the tunnel is disconnected due to some reasons and cannot send any ping frames to Netskope Gateway. In such scenarios, Netskope Client sends Ping Timeout events.
- Missing Gateway Configuration: Netskope Client sends this event when there is no valid gateway configuration.
- Failed Tunnel Establishment Due to Network Error: Netskope Client sends this event when the initial tunnel establishment fails.
- Tunnel Down Due to SSL Error: Netskope Client sends this event when the SSL socket is closed and it fails to establish a connection with the tunnel.
- Traffic mode changed: During this process, the tunnel disconnects and reconnects when the traffic mode changes from one mode to another.
-
Client Upgrade or Uninstallation Failure: To know more about the events displayed in the event of a Client or Uninstallation failure in a Windows device, view Netskope Client for Windows.
-
-
User Information: Displays the group information from the DC and the OU that the user belongs to.

Device Count
The Devices webUI now displays the following:
-
Total device entries
-
Total number of devices
-
Total number of unique users
For example, in the following screenshot, you can find that there are 25 total entries consisting of 25 devices and 16 users.

Unique Device Identifier
Netskope Client creates a Unique Device Identifier at the time of enrollment. This allows Netskope Client to use the hardware parameters such as Windows GUID for creating Unique Device ID. Different Unique Device IDs are assigned to each device and no two devices share the same ID.
– Whenever you import a large number of virtual machines (VM), always carry out the action using Import as a Copy method. Otherwise, the VMs will have hostnames with the same Device ID pointing to the same Client Status record.
Google Advertising ID (GAID) for Android devices
Starting with version 133.0.0, the Devices web UI now includes the Google Advertising ID (GAID) for Android devices, displayed in the Serial Number and Unique Device ID fields. This enhancement improves the correlation of device details between your Mobile Device Management (MDM) system and the Netskope Devices page. Consequently, a new entry is created for each Android device, featuring GAID in addition to the Serial Number and Unique Device ID.
Client Enrollment ID Changes for Android Devices
-
New Client Enrollment: Netskope now use the Google Advertising ID (GAID) for new Client enrollments.
-
Existing Tenants: Existing tenants continues to use the current Netskope-specific ID Android ID.
-
Transitioning to GAID (Existing Devices): To switch from using the Android ID to the GAID, administrators must Uninstall and reinstall the Netskope Client to version 133.0.0 or higher.
If the Netskope Client is not re-installed and the device upgrades to version 133.0.0, the Devices webUI continues to use the existing Netskope-specific ID, not the GAID.
Manage Client
The admin can control the user access to enable or disable All Client Services. The admin can select one of the following options:
-
Enable All Client Service
-
Disable All Client Service
-
Delete
Collect Log
The admin can request Netskope Client log bundle using the Collect Log option. After the Netskope Client receives the bundle request, it collects the log bundle and uploads it in the Cloud storage services.
Supported OS: Windows, macOS, and Android.
You can collect logs using the Collect Log option from the device details page or using the ellipsis option.
To collect logs:
-
Locate and select the target device.
-
Click the ellipsis (…) and select Collect Log to initiate the log collection process.
-
After completing the log collection process, the tenant admin receives an email notification with the link to download the log.
Prerequisite: If you have firewall policies in your public cloud storage, then add https://storage.googleapis.com/ns-nsclient_logs-* to firewall allowlist.
By default (without feature enabled), the Client continues to store logs to AWS.
Delete
Administrators can now delete devices from the webUI using the Delete option. Removing a device also un-enrolls the Netskope Client on the affected user’s machine. This gives a direct, self-service way to keep the device list accurate and to respond quickly when a device must lose access. To learn more, view Soft-removal of Devices.
Supported OS: Windows, macOS
Export Device Information
To export the contents in the Device UI to a CSV file, select the hostnames and click Export. The details displayed in the exported file depends on the options that you choose on the Export webUI.

Client Status
The following table lists the various Client statuses: Internet Service, Private Apps service, and Endpoint DLP according to their meaning. The status of a Client is:
-
Enabled: When any of the services are enabled.
-
Disabled: When all services are disabled.
You can also query client status via the Get Client Data REST API.
Internet Security Service Status
| Event Code | Event | Actor | Status | Meaning |
|---|---|---|---|---|
| 0 | Installed | System | Disabled | Via email invitation, distribution tool (i.e. SCCM, Altiris, JAMF etc) |
| 1 | Tunnel Up | System | Enabled | ‘Auto’ enabled just after install, upgrade or later |
| 2 | Tunnel Down | System | Disabled | disabled – default startup state of client i.e. after installation/upgrade/restart |
| 3 | Tunnel down due to secure forwarder | System | Backed Off | ‘Auto’ disabled due to Netskope Secure Forwarder found |
| 4 | Tunnel down due to config error | System | Errored | ‘Auto’ disabled due to config errors/missing config |
| 5 | Tunnel down due to error | System | Disabled | ‘Auto’ disabled due to (any other) error |
| 6 | User Disabled | User | Disabled | User disabled the client from the system tray |
| 7 | User Enabled | User | Enabled | User enabled the client from the system tray |
| 8 | Admin Disabled | Admin | Disabled | Tenant admin disabled the client from the webUI |
| 8 | Admin Disabled (This event is available only for tenants with Dynamic Steering) | Admin | Backed Off | Tenant admin disabled the Client from the webUI. Whenever the admin selects None steering option, the Netskope Client disables only traffic steering and sends “Admin Disabled” event to the Device info. |
| 9 | Admin Enabled | Admin | Enabled | Tenant admin enabled the client from the webUI |
| 10 | Uninstalled | System | Uninstalled | Uninstalled by end user, admin, SCCM admin etc |
| 11 | Installation Failure | System | Disabled | Installation failed |
| 12 | Tunnel down due to GRE | System | Backed Off | ‘Auto’ Disabled due to GRE |
| 13 | Tunnel down due to Data Plane on-premises | System | Backed Off | ‘Auto’ Disabled due to on-premises DP |
| 14 | Change in network | System | Disabled | ‘Auto’ disabled due to change in network |
| 15 | System shutdown Note: In macOS, Sleep event is displayed as System shutdown | System | Disabled | ‘Auto’ disabled due to system restart/ power down |
| 16 | System powerup Note: In macOS, Wakeup event is displayed as System powerup | System | Disabled/Enabled | ‘Auto’ Tunnel status will be as per actual status |
| 17 | Tunnel down due to IPSec | System | Backed Off | ‘Auto’ Disabled due to IPSec |
| 18 | Enrolled | User | Disabled | User enrolled using IdP mode through the Netskope Client webUI |
| 19 | Unenrolled | User | Disabled | User unenrolled |
| 20 | Enrollment Token Error | System | Errored | Displayed when an invalid enrollment authentication token is used |
| 21 | Tunnel down due to error in Modern Standby mode | System | Disabled | Auto’ disabled due to device in modern standby mode (AOAC) |
| 22 | Device Posture Change | System | Managed | Whenever the Client is in compliance with the device classification rules configured for an OS platform, the Managed status is displayed in the Device Posture Change event. |
| 22 | Device Posture Change | System | Unmanaged | Whenever the Client is not in compliance with the device classification rules configured for an OS platform, the Unmanaged status is displayed in the Device Posture Change event. |
| 22 | Device Posture Change | System | Unknown | The Client sends Unknown status before the Client downloads the device classification rules. |
| 25 | Uninstallation Failure | System | Disabled | Disabled Failed to uninstall the Client |
| 26 | Upgraded | System | Disabled | Client upgraded successfully |
| 27 | Upgrade Failure | System | Disabled | Client failed to upgrade |
| 28 | Rollback Success | System | Enabled | Rolled back to client version ‘x’ |
| 29 | Rollback Failure | System | Enabled | Failed to rollback to client version ‘x’ |
| 30 | CA Installation Failure | System | Enabled | CA installation failed. This event is posted when the first attempt fails. Consecutive installation failures are not posted onto the webUI until the CA installation succeeds. Once the CA installation succeeds, it resets the status. |
| 31 | CA Installation Change | System | Disabled/Enabled | CA rotation is detected and new CAs are installed to the system store. When the CA rotation is detected (the new downloaded CA is different from the existing CA and the subject name is the same), Netskope Client posts the “CA Installation Change” event for cert rotation monitoring. |
| 32 | CA Installation Success | System | Enabled | Successful CA installation after the failed CA installation attempts. No CA Installation Success event is posted on the webUI when there are no failed attempts. |
| 33 | Tunnel down due to on-premises status change | System | Disabled | ‘Auto’ disabled due to on-premises status change |
| 37 | Tunnel down due to Express Connect | System | Backed off | ‘Auto’ Disabled due to Express Connect (Direct Peering) |
– If the CA rotation is detected and CA installation in the system store fails, the Netskope Client falls back to the older CA and user cert.
Private Access Apps Status
| Event | Actor | Status | Meaning |
|---|---|---|---|
| Disabled | System | Disabled | NPA is not available for the customer. NPA status code is 0. |
| Disabled | System | Disabled | NPA is available for the tenant but tunnel is not yet established. It should be transient state. NPA status code is 0. |
| Disabled | System | Disabled | NPA is available, but not enabled from the tenant UI. NPA status code is 0. |
| Enabled | System | Enabled | NPA tunnel is connected. NPA status code is 2. |
| Disabled | System | Disabled | User disables the NPA Client. NPA status code is 0. |
| Disabled | System | Disabled | Admin disables the NPA Client from the tenant UI. NPA status code is 0. |
| Errored | System | Disabled | NPA tunnel is disconnected due to error. NPA status code is 11. |
Endpoint DLP Status
If Endpoint DLP is enabled, you can click View Details to see Endpoint DLP Service Details.
There are two Endpoint DLP statuses:
-
Config Status: The configuration state for the endpoint, which comes from the Client configurations applying to the endpoint. It displays Enabled or Disabled indicating if the endpoint should have Endpoint DLP enabled or not based on the Client configurations.
-
Service Status: The reported status of the Endpoint DLP software on the endpoint. This is the same status displayed in the Services table above, which is reported by epdlp.exe (Windows) on the endpoint. You can see one of the following states:
-
Enabled: The service is running, communicating correctly, and working properly.
-
Disabled: The service is not running.
-
Paused: The service is paused by clicking Pause Service. This action lasts for 30 minutes.
-
Device Control Error/Device Control Disabled: The driver for USB Device Control is unable to load correctly. This status might appear for machines that are turned off.
-
System Reboot Required: The endpoint needs a reboot so the USB device control functions properly. This occurs when the system has a non-resettable USB controller and an Endpoint DLP upgrade occurs. The new driver can’t be loaded until the reboot occurs.
-