

Enable the Forensic Profile
Next, you should enable the forensic profile. To do so, follow the steps below:
-
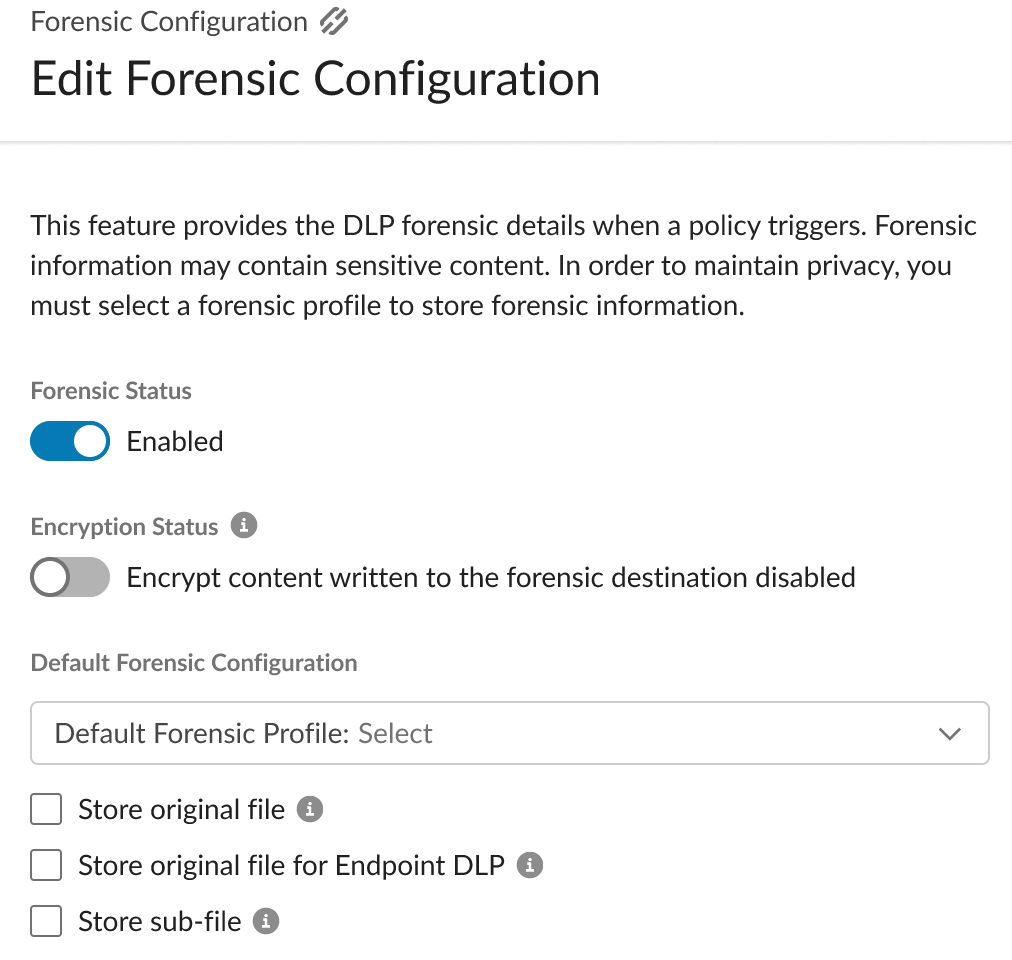
Log in to your Netskope tenant and navigate to Settings > Forensics.

-
Under Configuration, click Edit.
-
Enable the Forensic Status toggle button.
-
(optional) You can select the Encryption checkbox. On doing so, Netskope encrypts the forensic content before uploading it on the forensic destination SaaS/IaaS app. Selecting the encryption checkbox encrypts the original file as well if you have chosen to store original file access on the Edit Forensic Configuration page.
Encrypted forensic content can be viewed only via Netskope tenant UI or Netskope REST APIs. Netskope decrypts the encrypted forensic content and displays it in the Incidents > DLP page. Moreover, if the original file access is enabled, a copy of the incident-generated file will be encrypted and when downloaded from Incidents > DLP page, the file will be decrypted.
To view forensic content using Netskope REST APIs, see REST APIv2. You should use the following REST APIs to view forensic content:- Download forensic content:
/api/v2/incidents/dlpincidents/{id}/forensics - Download original file:
/api/v2/incidents/dlpincidents/{id}/originalfile - Download sub-file:
/api/v2/incidents/dlpincidents/{id}/subfile
- Download forensic content:
-
From the drop-down list, select the forensic profile you created earlier.
-
(optional) Select Store original file to store files associated with DLP incidents in the designated forensic folder. These files will be available for download when viewing the incidents. Enabling this option may require increasing the quota limit for your forensic folder.
-
(optional) Select Store original file for Endpoint DLP to store files associated with Endpoint DLP incidents in the designated forensic folder. These files will be available for download when viewing the incidents. Enabling this option may require increasing the quota limit for your forensic folder.
Store original file for Endpoint DLP is a controlled GA feature. Talk to your Netskope sales representative to learn more. -
(optional) Select Store sub-file – For DLP incidents involving images and other files embedded within documents or archive files, the Incidents page offers the ability to preview the images, view any extracted text, and download both the images and sub-files. Furthermore, the option to download these images and sub-files can be enabled with this checkbox. Enabling this option may require increasing the quota limit for your forensic folder.
Store sub-file is a controlled GA feature. Talk to your Netskope sales representative to learn more.
-
You can either click Save or continue to configure match-criteria forensic profiles.

Match-Criteria Forensic Profiles
Refer this article for detailed information.