

This article describes installing and setting up the Netskope Enterprise Browser (EB) on your iPhone or iPad.
Workflow Overview
Here is a high‑level overview of the process:
- Install the app
- Install Netskope Enterprise Browser via AppStore.
- Configure the Netskope app
- On MDM‑managed devices, the configuration profile will be distributed and automatically generated via the corporate MDM administrator portal.
- For non-MDM devices, enter the license key and profile name, then create the profile.
- Open Netskope Enterprise Browser.
- Enter your Profile/Tenant name and License Key from your invitation email.
- Tap Submit.
- Download the security certificate (one-time action)
- After the profile is created, the configuration screen will appear with an option to download the Netskope Local Proxy CA configuration/profile. Download it immediately.
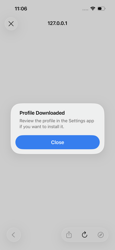
- iOS will display a message indicating that a profile has been downloaded.
- Install the certificate profile
- Go to Settings → tap Profile Downloaded → Install the Netskope Local Proxy CA profile.
- Trust the certificate
- Go to Settings → General → About → Certificate Trust Settings.
- Turn ON full trust for the Netskope certificate.
- Sign in and start browsing
- Use EB to open your usual work sites.
- Sign in via your company’s Single Sign‑On (SSO) when prompted.
- Browse normally, with your organization’s security applied.
Prerequisites
Before you begin, ensure you have:
- Your invitation email for Netskope Enterprise Browser.
- Your License Key (in the invitation email)
- Link to AppStore (in the invitation email)
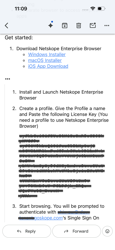
Download the Application (Step 1)
If you haven’t installed it yet, download Netskope Enterprise Browser from the App Store or Search for “Netskope Enterprise Browser” in the App Store and install it.
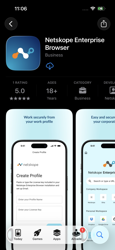
Once the app is installed, you’re ready for the profile creation steps.
Configure the Netskope EB App (Step 2)
- Launch the Netskope EB app from your home screen.
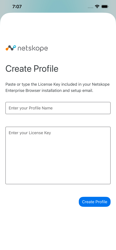
2. Profile Name: Enter the Profile/Tenant name from your email.
3. License Key: copy and paste or carefully type the License Key from your email.
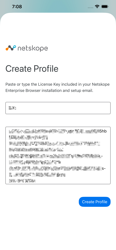
4. Tap Create Profile.
Download the Netskope Security Certificate (One‑Time Step) (Step 3)
This is the one section in which you must move between apps ( “Netskope Enterprise Browser” and iOS “Settings”). This is an iOS requirement.
Get the Certificate File (Step 3.1)
- Look for the Download Config on Waiting for Configuration screen.
- Tap the Download Config Button.
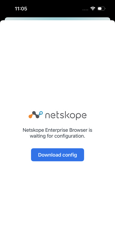
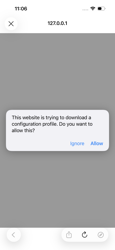
Allow the prompt to download the profile.
Once downloaded, it will show a message indicating that a profile has been downloaded.
Install the Downloaded Certificate (Step 4)
Install the downloaded profile in Settings.
- Open the Settings app on your iPhone or iPad.
- At the top of the main Settings screen, tap Profile Downloaded.
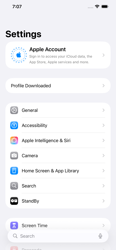
3. Tap the Netskope Local Proxy CA profile.
4. Tap Install in the top‑right corner.
5. Enter your device passcode if asked.
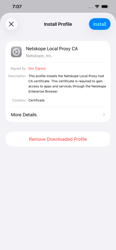
6. Tap Install again to confirm.
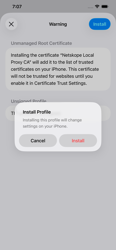
7. Tap Done when the installation completes.
You have now installed the Netskope certificate.
Next, we will tell the device to trust it.
Enable Full Trust for the Certificate (Step 5)
- On your iPhone or iPad, open Settings > General > About.
- Scroll all the way down and tap Certificate Trust Settings.
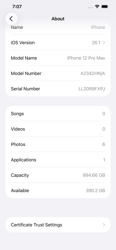
“Certificate Trust Settings” option at the bottom of the About page.
3. Under “Enable full trust for root certificates”, find the entry named Netskope Root CA (or similar) and enable the toggle ON.
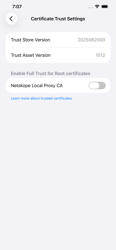
4. Select Continue when the warning pop-up appears.
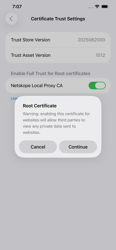
This finishes the certificate part, including the “back and forth” steps.
You will not need to repeat this on this device unless you remove the profile.
Sign In and Start Browsing Safely (Step 6)
- After configuration, you will see the main screen or homepage of Netskope Enterprise Browser.
- In the address bar, type a work‑related site (for example your company portal, Google Workspace, or Microsoft 365) and tap Go.
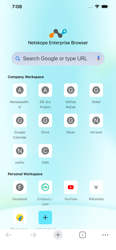
You may be redirected to your company’s Single Sign‑On (SSO) page (for example Okta, Entra ID / Azure AD, etc.).
3. Sign in with your normal work username and password, and complete any multi‑factor authentication (MFA) if requested.
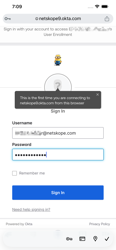
Example SSO sign‑in page or enterprise site displayed inside Netskope EB.
Once you are signed in, you are browsing through Netskope EB with your organization’s security controls in place.
Considerations
Depending on your company’s policies, Netskope EB may behave differently from a normal browser in some cases:
- Some websites may be blocked, and you may see a Netskope block page instead.
- Certain actions, like copying, printing sensitive documents, may be restricted.
- Uploading sensitive data to personal cloud accounts may be blocked or warned.
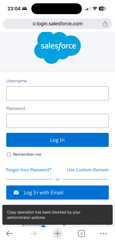
Troubleshooting
If Enterprise Browser Shows this Message, the certificate is not installed or not trusted:
- Is the certificate installed?
- Open Settings > General > VPN & Device Management (or Profiles & Device Management) and confirm there is a Netskope profile installed.
- Is the certificate trusted?
- Go to Settings > General > About > Certificate Trust Settings and verify that the Netskope certificate is toggled ON.
For other installation issues:
- Is the License Key correct?
- Open Netskope Enterprise Browser and verify in its settings (or onboarding screen, if available) that the License Key is exactly the one in your email (no extra spaces).
- Restart the app or device:
- Fully close Netskope EB and open it again.
- If the issue persists, restart your iPhone or iPad.
If you are still having issues, reach out to your support contact.
To help them resolve your issue faster, be sure to include:
- A short description of the problem and what you were trying to do.
- Any error messages you saw.
- Screenshots if possible.
- Your device model, iOS / iPadOS version, and the Netskope EB app version.