

Endpoint DLP Policy
Endpoint DLP provides two types of protection policies: Device Control and Content Control.
Device Control policies provide decisions about access to devices. These decisions can be based on the user, group membership, endpoint device classification, and destination device characteristics such as device type, serial number, manufacturer, or encrypted state. This feature can be used to ensure that only corporate file shares are used, or that access to USB Mass Storage devices is limited to standard company-issued, encrypted devices.
Content Control policies provide security controls based on the content of the data. Content Control policies can use all the same device and user criteria that are used for Device Control policies, but they can also inspect and classify the content of the data and use this information in policy decisions.
Device Constraints
There are multiple methods to convert the format of a file. Modern applications can convert files to many formats even without specifically using PDF print drivers. Thus, Netskope has determined to control only exfiltration printers with DLP policy.
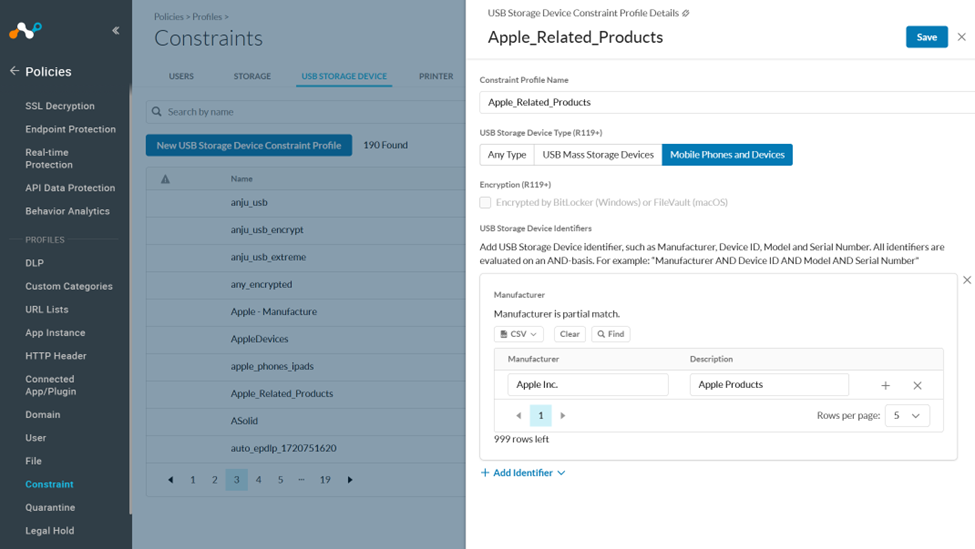
Most destination device types support Device Constraints. Device Constraints are criteria about the destination device such as hardware attributes (Serial Number, Manufacturer, Model) or configuration (Printer Port, Encryption state). Device Constraints can be managed in the Policy>Constraints section of the UI.
You can define Device Control policies that allow users to access only corporate devices. You can leverage device control policies to take action based on the device.
Endpoint DLP Device Control Policies are grouped by RBAC/LBAC-based groups.

All Policy Groups (except for Default) can be modified by Rename, Assign Labels, Move, Enable, Disable, and Delete.

There is also RBACv3 support. For more information, see RBAC v3 Overview.

Creating Endpoint DLP Device Control Policies
-
In the Netskope UI, go to Policies > Endpoint Protection.
-
In the Device Control tab, click New Device Control Policy.
-
On the Endpoint Device Control Policy page:
-
Endpoint Protection: Select any of the following criteria for by the policy:
-
Users: Select the Users, User groups, or Organizational units affected by the policy. Click + Exclusions to select the users, user groups, or organizations you want to exclude from the policy.Device Classification: Choose to apply the policy to managed or unmanaged devices. You also can click to go to the Device Classification page and configure rules.
-
Device Classification: Choose to apply the policy to Managed or Unmanaged devices. You also can click the Settings icon to go to the Device Classification page and configure rules.
-
-
Device: Select
-
USB storage device – To allow or block connected USB device on corporate laptops
-
Printer – To allow or block local/network printers used by endusers
-
Network File Share – To control which network file shares endpoints are allowed to access.
-
Bluetooth File Control – To allow or deny outgoing file transfers over Bluetooth.
-
CD and DVD Drives (Windows) – To allow or deny writes to discs.
-
Any: Select to apply this policy to all devices.
-
Matches: Select the constraint profiles that contain the devices you want to include in the policy. For example, you can select a constraint profile that includes a particular brand of USB devices you want to limit access to. Click “+ Create New” to create a new constraint profile. This policy only applies to devices that match the selected constraint profiles.
-
Does not match: Select the constraint profiles that contain the devices you want to exclude from the policy. For example, you can select a constraint profile that includes all local printer devices. Click + Create New to create a new constraint profile. This policy only applies to devices that don’t match the selected constraint profiles.
For detailed info on Constraint Profiles, see Constraint Profile.
-
-
Action: Select the action to be performed when the policy is triggered.
-
Allow: Select to allow users read and write access to the USB, printer, NFS or Bluetooth File Control.
-
Make Read-Only: Select to only allow users read access to the storage device. This is only available for USB devices.
WPD/phone devices do not support Read-Only policy actions. These devices will be blocked. -
Block: Select to block users from accessing the device.
-
USB Devices can have a notification template displayed to users to explain why their devices are Read-Only.

-
-
Set Policy: Enter a policy name. You can only use alphanumeric characters and symbols such as underscore (_), dash (-), and square brackets ([ ]). You cannot use the greater-than (>) or less-than (<) symbols in policy names. Optionally, You can click + Policy Description to add notes or information and toggle
-
Status: Enable or disable the policy.
-
Creating Endpoint Control Policies
Netskope. This printer is used as part of the print intervention process for converting files to PDF for evaluation. If the Netskope printer is removed, Printer Content Control won’t work.You can define Content Control policies to prevent users from copying or printing sensitive data to sanctioned USB devices, printers, and Bluetooth File Control on Windows. You can leverage content control policies to take action based on the sensitive content in the file or where the file came from (i.e., file origin).

File criteria, such as File Profiles are not applicable for Printer Content Control policies. This includes File Profiles selected as top-level criteria in Endpoint DLP policies and File Profiles embedded inside DLP Profiles. This means that identification of violations in printed documents will only depend on printed content, not the metadata from any file on disk.
Exceptions:
Windows: A few applications have specific integrations to make file filters work. If you print from Microsoft Word or Excel, then file filters can apply so things such as AIP/MIP/Purview Sensitivity Labels can be used for printing enforcement.
macOS: macOS does not support AIP/MIP/Purview Sensitivity labels for Printing policies in any application.
-
In the Netskope UI, go to Policies > Endpoint Protection.
-
Click the Content Control tab.
-
Click New Content Control Policy.
-
On the Endpoint Content Control Policy page:
-
Endpoint Protection: Select any of the following criteria for by the policy:
-
User: Select the users, user groups, or organizational units affected by the policy. Click + Exclusions to select the users, user groups, or organizations you want to exclude from the policy.
-
Device Classification: Choose to apply the policy to managed, unmanaged, or Custom (starting in version 124.0.0) devices. You also can click the Settings icon to go to the Device Classification page and configure rules.
-
-
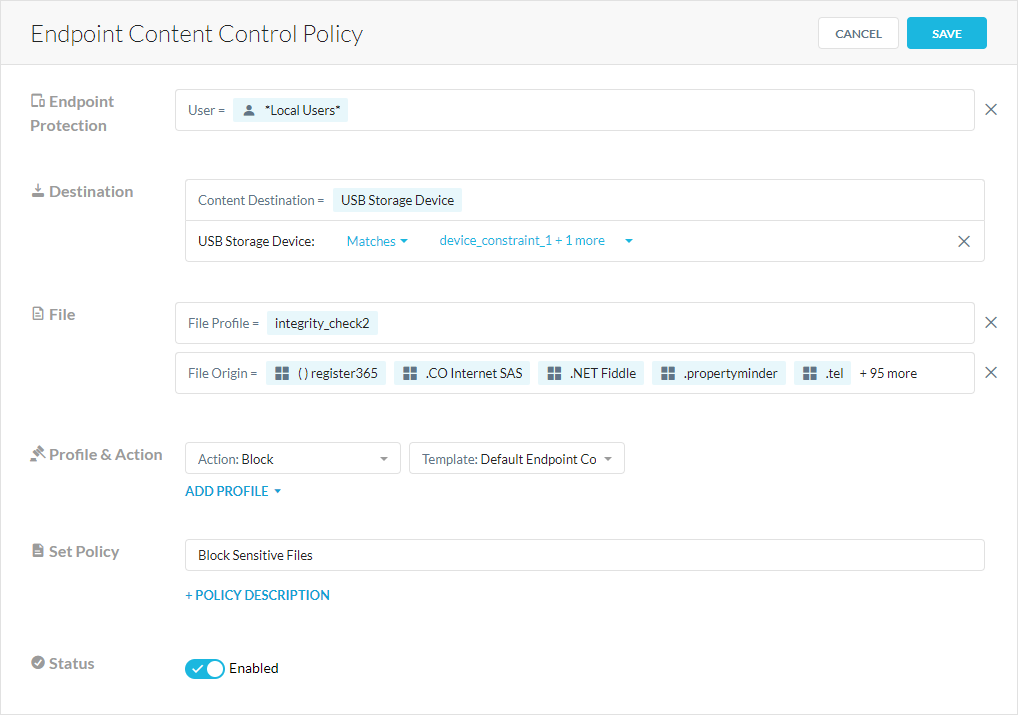
Destination: Select USB Storage Device, Printer (Windows), Bluetooth File Transfer (Windows), Network File Share (Windows), and/or Browser App (Windows, R130+ client required) for the content destination.
For both the devices, admins can select the following conditions:
-
Any: Select to apply this policy to all corporate sanctioned and unsanctioned USB storage devices.
-
Matches: Select the constraint profiles that contain the USB devices you want to include in the policy. For example, you can select a constraint profile that includes encrypted USB devices you want to limit access to. Click + Create New to create a new constraint profile. This policy only applies to devices that match the selected constraint profiles.
-
Does not match: Select the constraint profiles that contain the USB devices you want to exclude from the policy. For example, you can select a constraint profile that includes all local and network printer devices. Click + Create New to create a new constraint profile. This policy only applies to devices that don’t match the selected constraint profiles.
-
-
File: Select the file information for the policy.
-
File Profile: Select the file profiles that define the files you want to allow or block users from copying to a USB storage device or printing. For ex., you can create a file profile which includes text files and/or spreadsheets. Click + to create a new file profile. You also can click the Settings icon to go to the File Profile page.
-
File Origin: Select the predefined or custom applications and application instances that contain files you want to allow or block users from copying to a USB storage device or printing. For example, you can create a file origin with Slack Enterprise or Gmail application instances so that any file downloaded from these apps can be blocked from copying to devices. Under Exceptions, you can select the application instances you want to exclude from this policy. You also can click the Settings icon to go to the App Definition page and configure a custom app.
-
-
Profile & Action: Select the DLP profiles you want to use to inspect files for violations and configure an action for each profile.
-
Allow: Select to allow users to transfer files that have no DLP violations from the USB storage device.
-
Alert: Select to receive alerts about files that are transferred to the USB storage device and contain DLP violations.
-
User Alert: Select to send a default or custom notification message to users when they transfer files with DLP violations to a USB storage device. Click + Create Template to create a notification message that allows them to proceed after they justify their reasons.
-
Block: Select to prevent users from transferring files to the USB storage device, send a default or custom notification message to users when they transfer files with DLP violations. Click + Create Template to create a notification message that teaches them to adhere to your data policy.
-
-
Set Policy: Enter a policy name. You can only use alphanumeric characters and symbols such as underscore (_), dash (-), and square brackets ([ ]). You cannot use the greater-than (>) or less-than (<) symbols in policy names. Optionally, You can click + Policy Description to add notes or information.
-
Status: Enable or disable the policy.
-
-
Click Save and then click Apply Changes.
Configuring the Content Control Policy Settings
You can configure the fallback settings when the Netskope cloud can’t perform content inspection for an endpoint because it’s offline, the file size is too large, or there’s a system error.
To configure the Content Control policy settings:
- In the Netskope UI, go to Policies > Endpoint Protection.
- Click the Content Control tab.
- Click Settings.
- In the Content Control Policy Settings window:
- When endpoint is offline: Allow or block files from being copied to an endpoint device when the device is disconnected from the internet.
- When file size exceeds DLP scan limit: Allow or block files from being copied to an endpoint device when the file size is larger than the DLP scan limit.
- When system error occurs: Allow or block files from being copied to an endpoint device when there is a system error.

- Click Save and then click Apply Changes.
Printer Content Control Notifications when printing from Web Browsers
Users will be notified through popups associated with the Netskope Client when printing.
-
Netskope is gathering the print data associated with the file that will be printed.

-
Netskope is analyzing the gathered data from the previous step.

-
Netskope is allowing the printing of the document. Depending on the size of the document, this popup may stay on the screen for a long time.

-
Netskope is printing the pages in the desired order.

Reporting All Matched DLP Profiles

The DLP engine can now evaluate policies beyond the first matching policy. It will evaluate all possible DLP profiles across policies to get visibility into profiles that match resulting in Alerts and Incidents showing all DLP profiles matched. If the option is enabled, then every DLP profile that can be matched, will be alerted upon.
To enable this:
- In the Netskope UI, go to Policies > Endpoint Protection > Content Control and click Settings.
- Check the Evaluate all DLP profiles checkbox.
Process Exclusion

Processes can be excluded from Endpoint DLP evaluation for certain applications. This is used to exclude Endpoint DLP intervention in certain processes for printing, USB, and network file sharing.
To use this:
- In the Netskope UI, go to Policies > Endpoint Protection > Content Control and click Process Exception.
- Click +ADD
- Fill in the Process Executable Path, Operating System, and Description.
- Click Save.
Browser Application Control

Starting from R130, Browser Application Control is now supported. Policies can be defined about files that browsers read for upload. These policies allow control over what company data users can share over the internet. Every file can be evaluated against a policy when the browser process opens the file for transfer. If the file policy is Blocked, then the file access by the browser will be blocked.
Chrome, Microsoft Edge, and Firefox are supported.
The filter option of ‘Browser Upload’ are now available on the following event/alert pages.
- Endpoint Events – Content Control : ‘Activity’
- Alerts : ‘Endpoint Activity’
MacOS Support on Safari via JAMF
Safari Extensions are installed by default with our Client installer and are visible under Extensions tab under settings, but extensions need to be enabled and managed via MDM.
Safari Extensions via JAMF are delivered via the User channel.
Requirements:
- JAMF Pro or higher
- Blueprints feature enabled (see guide)
Deployment Steps:
-
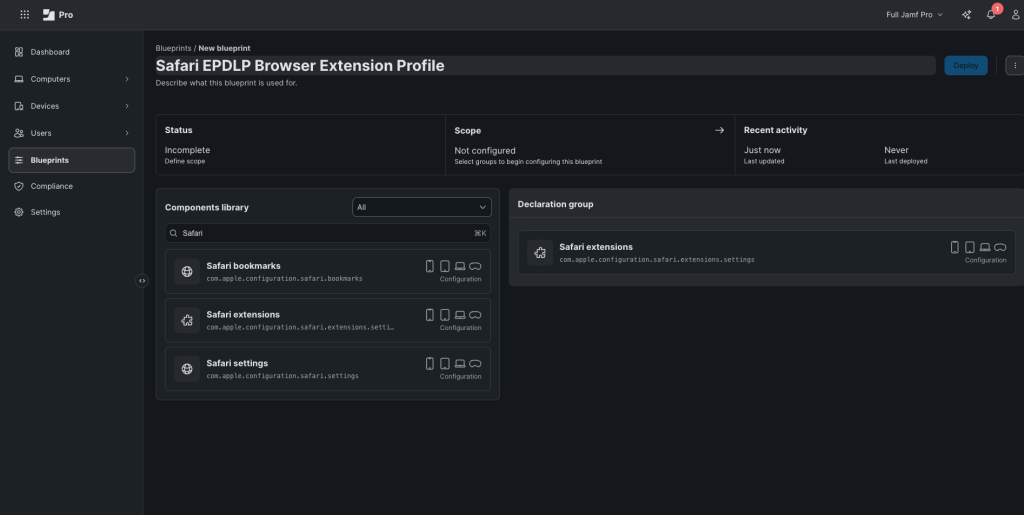
Login to your JAMF account and navigate to Blueprint. Click on Create Blueprints.
-
Under the Component group, search for Safari Extensions and drag and drop the widget under the Declaration group as shown below:
-
Click on the Safari Extension widget and enter the following values:
Extension Identifier:
com.netskope.epdlp.client.NetskopeEpdlpBrowserExtension (24W52P9M7W)Extension State: Always on
Private Browsing State: Always on
Allowed Domains:
*
Note: This will enable the extension for all websites. If you need it for only specified domains, add the appropriate values.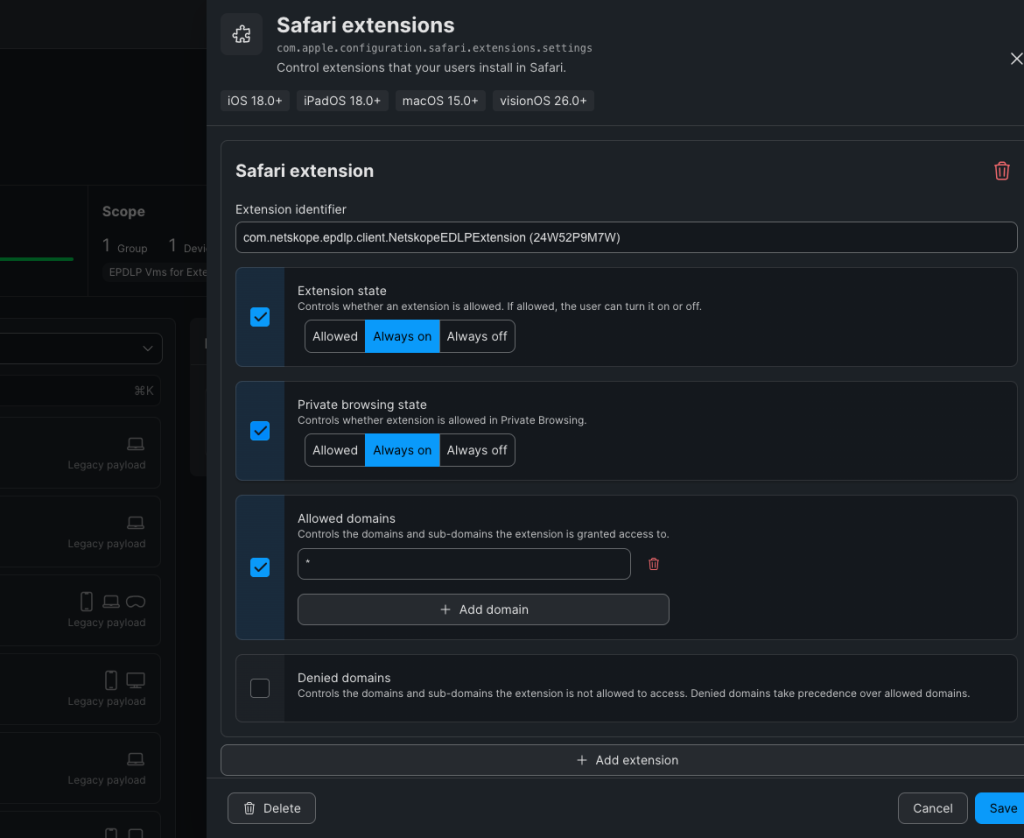
-
Click on Save and Deploy to the devices.
-
Once deployed, blueprint profiles can be checked on the enrolled device under:
Settings > General > Device Management > MDM Profile > User Declarations -
Once blueprint is applied, the Safari Extensions will be enabled on Safari and tamperproof.
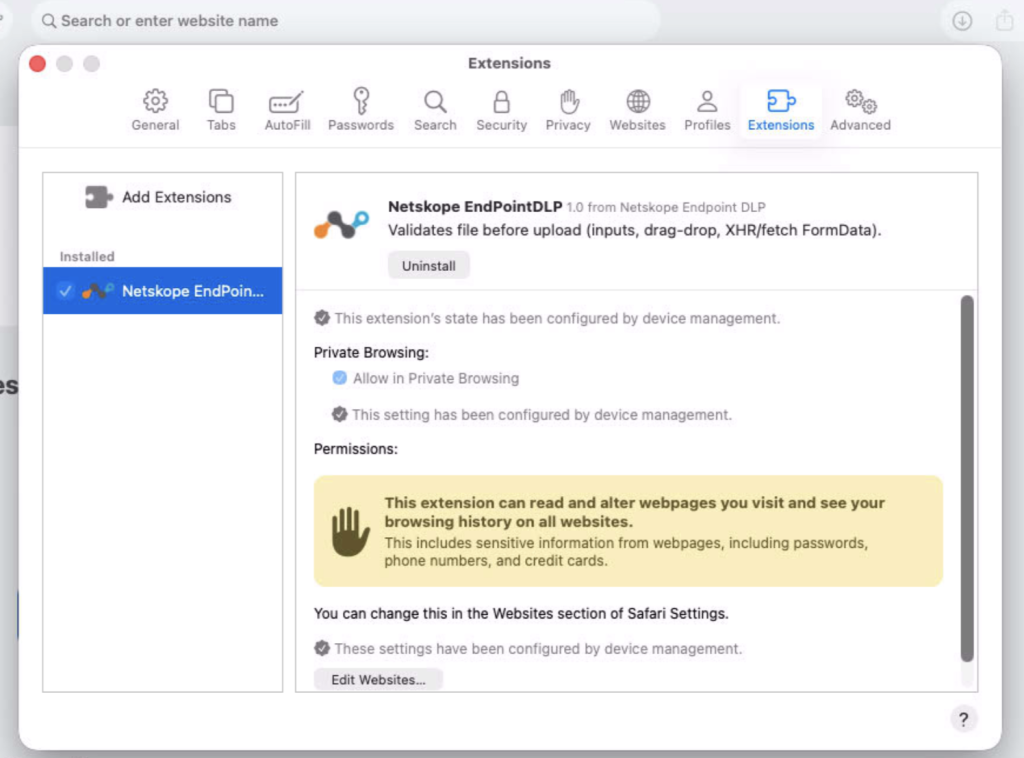


MacOS Support on Chrome via JAMF
Requirements:
- JAMF Pro or higher
- Blueprints feature enabled (see guide)
-
Open Jamf Pro > Computers > Configuration Profiles
-
Create a Configuration profile with External Applications under Application & Custom Settings
-
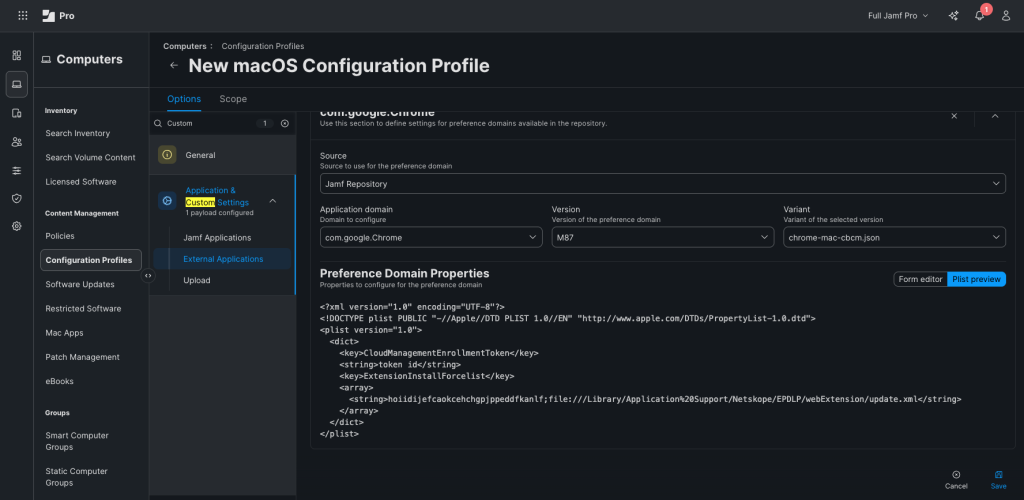
Under External Application, select Source as Jamf Repository
- Application Domain – com.google.Chrome
- Version – M87
- Variant – chrome-mac-cbcm.json
- Cloud Management Enrollment Token obtained from Google Workspaces
- Click on Add/Remove Property, add a Property with name – ExtensionInstallForcelist
- Under ExtensionInstallForceList, select array
- Under Item1, select string
- Enter the value as – hoiidijefcaokcehchgpjppeddfkanlf;file:///Library/Application%20Support/Netskope/EPDLP/webExtension/update.xml
- final plist will be similar to the following image (ensure the token id is the actual value):
-
Add Scope and apply the profile to the devices. Once Profile is available it will be listed under General > Device Management > Profile Name.

-
Relaunch Chrome and check the Extension page, The Netskope EndpointDLP extension is installed and in a managed state.
With this method, Netskope cannot manage the plugin. This can be done only in Google Admin Workspaces.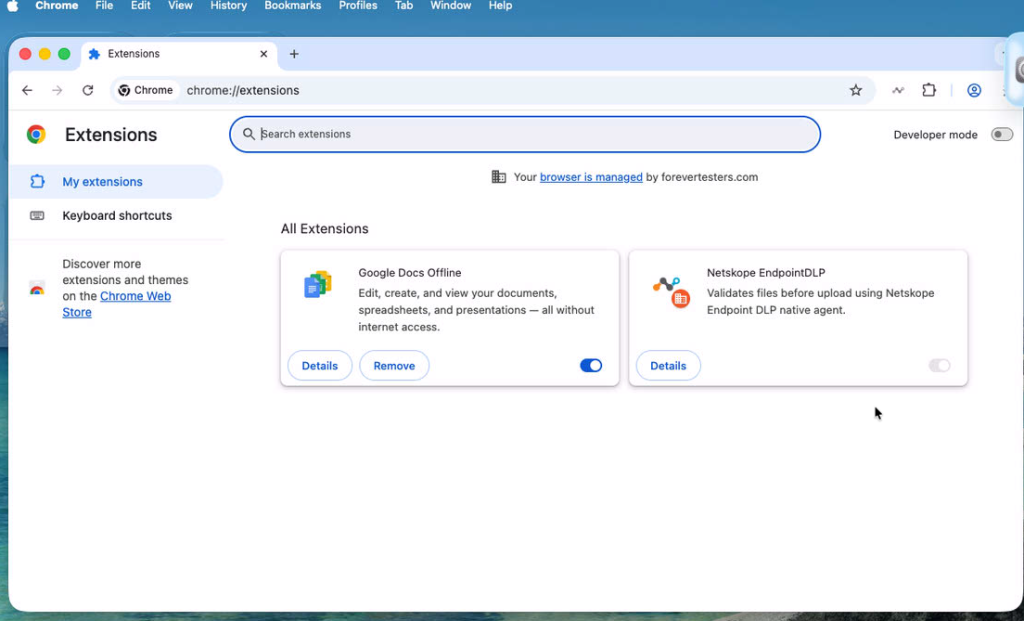


Large File Sampling

Starting from R130 when Large File Sampling is enabled, DLP with inspect the first 128MB of a large file up to 2GB either allow or block the transfer of the file based on the results of the inspection. This works for large files being uploaded by browser to the web (Browser Application Control) or large files being copied to a USB device from a user workstation.