

To initiate the migration to Fingerprint 2.0, please contact us for activation. This step will ensure that existing Fingerprint Rules remain operational, though they will be immutable. Following activation, you may begin recreating fingerprints utilizing the new Fingerprint 2.0 technology by establishing a new Fingerprint Group, as detailed here.
Subsequently, the newly created Fingerprint can be assigned within the DLP Profile.
Once these changes have been implemented and activated, the legacy Fingerprint Rules may be deleted.
Finally, we will proceed with the deactivation of the legacy Fingerprint Rules.

Netskope Data Loss Prevention (DLP) Fingerprinting 2.0 allows you to identify and protect sensitive data based on exact matches or similarity to predefined content. Fingerprinting identifies files based on overall document similarity rather than specific text snippets. Partial matches will not occur in situations where small portions of the document are part of the pre-defined fingerprint. That is, fingerprinting some subtext in the document will not match the whole text.
Enhancements that have come along in Fingerprinting 2.0 are:
- The ability to see the files uploaded to generate the fingerprint group
- Additional support for image-based fingerprinting, contrasting with traditional fingerprinting’s text-based fingerprinting.
- Replacing uploaded files with new content, removing the need to delete the whole fingerprint in 1.0
- Improved detection algorithm reducing false positives
You can upload your sensitive files directly to the Netskope tenant. Netskope’s backend will then process these files and generate the necessary hashes for fingerprinting based on your similarity match configuration.
Fingerprint Groups can also be managed using the API. For more information, see the API documentation inside of your tenant.
Fingerprint Group Creation Methods
Tenant UI
To create a Fingerprint Group:
-
Go to Policies > Profiles > DLP > Fingerprinting > Fingerprint Groups.
-
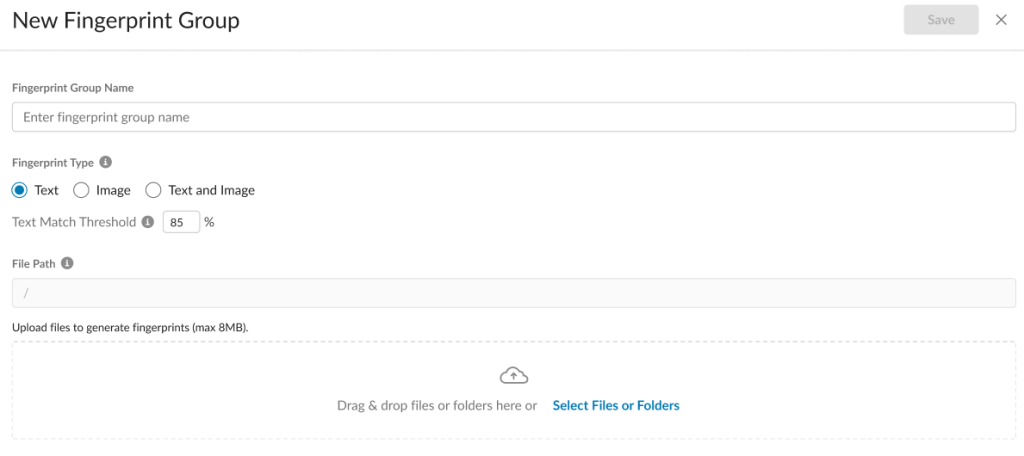
Click New Fingerprint Group.
-
Enter a Fingerprint Group Name.
-
Select between Text, Image, and Text and Image for Fingerprint Type. Files will be evaluated to the corresponding Fingerprint Type. The Fingerprint Type cannot be changed after creation.
-
Drag and drop files or folders to the box or Select Files or Folders to search for them in an Explorer window. When uploading an archive file (e.g.: .zip), if there is a mismatch in the Fingerprint Type and the files in the archive file, the offending files will be ignored and the remaining files will be accepted.
-
Click Save. Your Fingerprint Group will be in a Generating state until it is Complete. Once it is Complete, you can use it in the creation of a DLP Profile. You can click the Refresh icon to see if the Generating state moved to Complete.

Python Script
Package Installation
Installing the TYOC package files is required for manipulating Fingerprint Groups. This page also contains the steps to perform hash generation.
Install the packages in this order:
- keyview.ns
- dlpcicontent.ns
- dlpdata.ns
- dplib.ns
- dlptools.ns
sudo dpkg -i --force-overwrite package_file.deb
Hash Generation
The Fingerprint 2.0 API supports direct uploads of a pre-generated hash.
You can generate the hash on a virtual machine and then upload the hash instead of the real artifacts (original files or images) to Netskope.
The hash generation steps for Source files and Negative Hashes are the same.
If the hash file is greater than 10MB, split the JSON using line breaks into multipart JSON files.
A Python script for splitting the JSON is provided on the Support Portal..
Put all the files to be fingerprinted (or hash-extracted) in a folder, say, “/myFolder” or if you have a zip file, give the zip file name in place of the folder.
/opt/ns/bin/nsdlp/dlp-fingerprint20 -c classification_1 -f /myFolder/ -o ~/temp/fp/output/ -e ~/temp/fp/extract/ -
This will create an output file: ~/temp/fp/output/fingerprint20_211_1.json
API Upload
For a list of detailed steps, see the User Guide on the Support Portal.
From the admin console, go to Settings > Tools > REST API v2.

Single File Upload Example
curl -X POST "https://your-tenant.goskope.com/api/v2/services/dlp/fingerprints/5590549391965102994/hashes" \
-H "Netskope-Api-Token: 38cxxxxxxxxxxeeef2f1" \
-H "x-netskope-user-email: user@example.com" \
-H "Content-Type: multipart/form-data" \
-F "upload=@/path/to/your/hashfile.json"
Method Upload Example
-
Upload First Chunk
curl -X POST " " \https://your-tenant.goskope.com/api/v2/services/dlp/fingerprints/5590549391965102994/hashes?txid=1&ssid=12345&sessionend=false
-H "Netskope-Api-Token: 38c9a700980fb009f9bb8a303eeef2f1" \
-H "x-netskope-trid: 1234567890123456789" \ **to correlate the logs with client requests.
-H "x-netskope-user-email: user@example.com" \
-H "Content-Type: multipart/form-data" \
-F "upload=@/path/to/hashfile_part1.json" -
Upload Second Chunk
curl -X POST " " \https://your-tenant.goskope.com/api/v2/services/dlp/fingerprints/5590549391965102994/hashes?txid=2&ssid=12345&sessionend=false
-H "Netskope-Api-Token: 38c9a700980fb009f9bb8a303eeef2f1" \
-H "x-netskope-trid: 1234567890123456789" \
-H "x-netskope-user-email: user@example.com" \
-H "Content-Type: multipart/form-data" \
-F "upload=@/path/to/hashfile_part2.json" -
Upload Third Chunk
curl -X POST "https://your-tenant.goskope.com/api/v2/services/dlp/fingerprints/5590549391965102994/hashes?txid=3&ssid=12345&sessionend=true" \
-H "Netskope-Api-Token: 38c9a700980fb009f9bb8a303eeef2f1" \
-H "x-netskope-trid: 1234567890123456789" \
-H "x-netskope-user-email: user@example.com" \
Netskope | Copyright 2026, All rights reserved. /15 25
-H "Content-Type: multipart/form-data" \
-F "upload=@/path/to/hashfile_part3.json"
Setting sessionend=true on the last upload triggers processing of all uploaded files in the session.
Uploading Negative Hashes
curl -X POST “https://your-tenant.goskope.com/api/v2/services/dlp/fingerprints/5590549391965102994/hashes?negative=true” \
-H “Netskope-Api-Token: 38c9a700980fb009f9bb8a303eeef2f1” \
-H “x-netskope-user-email: user@example.com” \
-H “Content-Type: multipart/form-data” \
-F “negative_hashes.json=@/path/to/negative_hashes.json”
Fingerprint Group Controls
Edit a Fingerprint Group

You can edit your Fingerprint Group allowing you to change the Threshold or add/remove files to it.
To edit a Fingerprint Group:
-
Go to an existing Fingerprint Group and click … at the right and then click Edit.
-
If you wish to delete files, select the checkbox for the corresponding files and go to # Selected, click the dropdown, and click Delete.

-
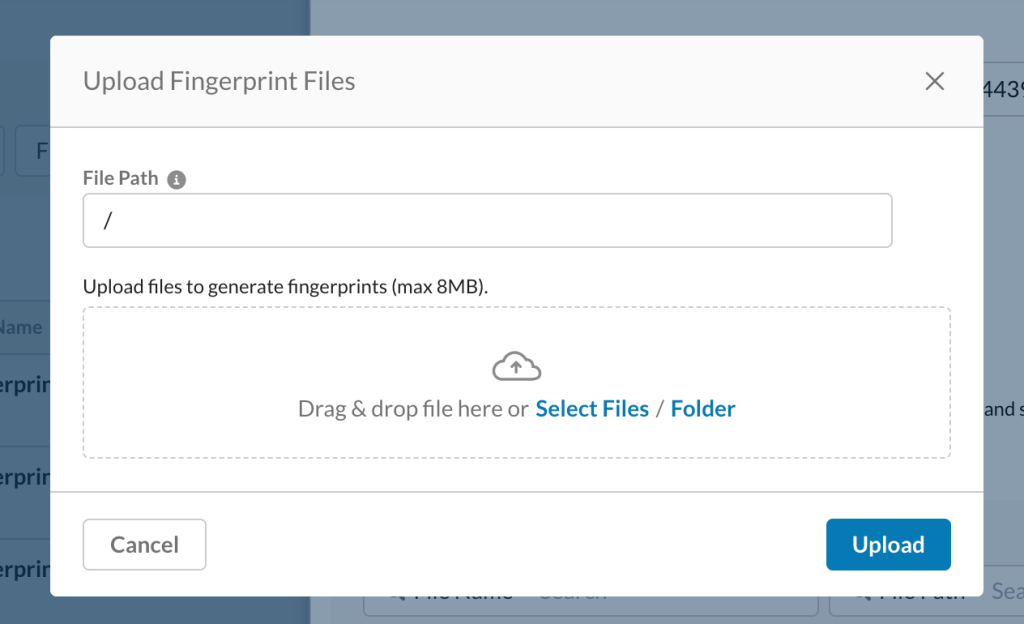
If you wish to add files, click Upload Files and follow the same steps as above.
Reupload & replace



You can also replace an existing file in the the fingerprint group by clicking … next to an existing file and clicking Reupload & replace.

From this window, you can drag & drop a file or click Select File and then click Upload to replace the existing file.

Exclusion List

You can also click View Exclusion List to Upload files for the fingerprint groups’s exclusion list. Adding files to the exclusion list will provide a list of files that will be excluded from a fingerprint match. For a text-based file such as .docx/.pptx, an exact match would be exclude. For an image based file, the exact file and highly similar images (file format conversions or color > black-and-white) will be excluded.
Deleting a Fingerprint Group

You can delete a Fingerprint Group by navigating to the dots at the right and clicking Delete.
Exporting Fingerprints

Clicking the Export button will allow you to export a .csv file containing a list of all the files included within the Fingerprint Group.
Error Logs

Errors may appear when uploading a duplicate file to a Fingerprint Group. You can get more granularity on the error by checking the Error Log.
To download the Error Log, navigate to the dots on a Fingerprint Group, click Edit, and then click Error Log to receive a .csv containing all the errors associated with the Fingerprint Group.
If you receive an error in the Exclusion List, the Error Log button will appear after clicking View Exclusion List.

Incidents

Incidents associated with a Fingerprint Group show a list of Fingerprinting Group Violations.
For more information, see Incidents.
Scaling Considerations
A tenant is allowed to create up to 100 fingerprint groups.
A tenant is allowed to upload up to 10K image files for fingerprinting.
A tenant is allowed to upload 1,000,000 total files for fingerprinting (this includes image based, text based and exclusion files).
Minimum accepted image size is 100×100 pixels.
Minimum text file size is 20 bytes (for better efficacy, Netskope does not encourage fingerprinting a short sentence).
WebUI upload file size limit is 8MB.
API directly upload file size limit is 16MB.
Offline fingerprint generation file size limit is 100MB.
DLP Limitations
When a fingerprint group or custom classifier is used in a DLP profile, WebUI won’t allow the deletion of FP-group/custom-classifier to be deleted. However, user could “accidentally” delete it using API directly. When this happens, DLP profile would refer to an “undefined” FP-group/custom-classifier and during inspection time, DLP would ignore such undefined FP-group/custom-classifier as if they don’t exist at all. User can remove such undefined rules. This loophole currently has not much negative impact on DLP scan but still should be avoided for data integrity.
This issue will be fixed in the upcoming release with Referential Integrity integration.