

General troubleshooting involves checking the Client, Publishers, Private Apps, and policies:
Netskope Client
Is the Netskope Client Connected to NPA?
- Right-click on the Netskope Client icon in the system tray. Private Access should show as enabled.
For Windows

For Mac

- If this shows that Private Access as Disabled, make sure the Steer all Private Apps option is enabled in the Steering Configuration settings for your tenant. Go to Settings > Security Cloud Platform > Steering Configuration.
Tip
If using only the Default tenant configuration, click Edit in the upper right corner.
If you have multiple Steering Configurations, click on the menu icon for the Steering Configuration you are using for NPA.
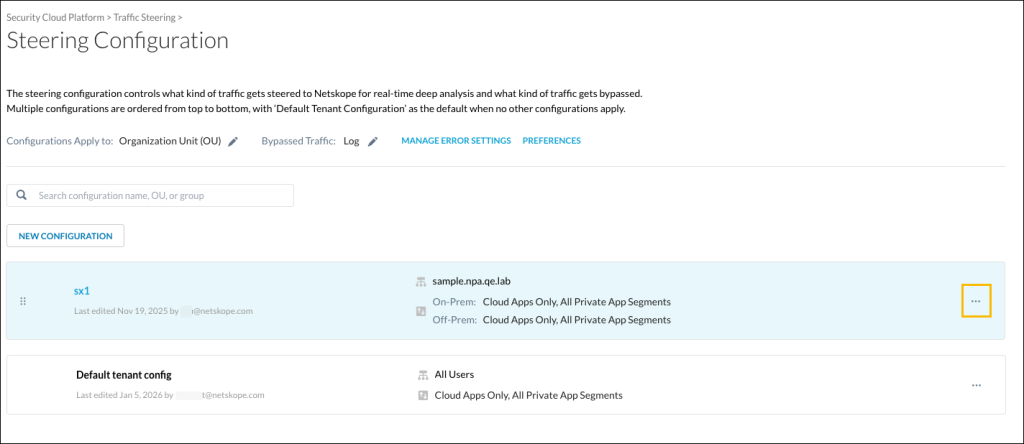
Make sure All Private App Segments is being used to steer traffic and is enabled.

- When finished, click Save.

Has the Netskope Client never Connected to NPA?
If the Client never enables, it could be that the Netskope Client is trying to register/enroll to the closest Netskope POP to enable NPA before the device’s network connection is active. Currently, the Netskope Client does not check again for network status.
Workaround: If you are displaying the Netskope Client icon in the system task bar (Windows) or menu bar (Mac), disable and enable the Netskope client to ensure it’s connected.
Do you Employ 3rd-party SSL/TLS Inspection on your Network?
If Yes, factor that NPA uses its own domain names for connecting to the Netskope Gateway and Stitcher. You will need to bypass the following URLs in order for the Client to connect successfully:
| Component | URL | Port | Notes |
|---|---|---|---|
| Client |
| TCP 443 (HTTPS) UDP 53 (DNS) |
|
| Publisher |
| TCP 443 (HTTPS) UDP 53 (DNS) TCP 80 (HTTP) for |
|
| Client and Publisher | ns-<tenant-ID>.<MP-name>.npa.<tenant-domain>Contact your Netskope SE, TSM, or Support for your tenantid and mp-name and if IP subnets are needed instead of FQDNs. gateway.gslb.<tenant-domain>(Example:
| TCP 443 (HTTPS) | Requires outbound access during enrollment/re-enrollment of NPA for the Client and for registration of the Publisher. Example URL: MP-Name Variables:
Note Requires allowing inbound access only if using a CRL server that is maintained internally within your infrastructure for Prelogon enrollment, or enabling Browser Access. This is not needed for the dataplane traffic. For allowlisting |
Netskope Publisher and Private Apps
How do I Know the User/OU is Authorized for Private Access?
Open up the nsdebuglog.log file and search for the word enroll. You may see more details on why the enrollment process is not working for the user.
Does the Publisher Health Check in the Netskope UI Show that it is Able to Connect to the App?
If the Private App is defined with a list of TCP/UDP ports, then only the first port is checked for connectivity. The status is not dependent upon all defined ports being accessible. This may lead to a false sense that the Publisher can successfully connect to all defined ports successfully.
Can the Publisher Reach the Defined Private App from a Routing/Policy Perspective?
- SSH to the Publisher (username is
ubuntu.) - Choose Option #3 to exit out of menu.
- Enter
su. This will enter you into root. - Enter
apt-get install traceroute -y. - Try to traceroute to the local IP address/domain name of the private application.
Can the Publisher Reach the Defined Private App on ALL Defined Ports?
- SSH to Publisher.
- Enter
su. This will enter you into root. - Enter
apt-get install telnet -y. - Try to telnet to the local IP address/domain name of the private application:
telnet <hostname><port>.
If it connects, everything is good. If it doesn’t then there is a network or host security policy that is blocking the publisher from communicating to the server for the defined port.
Does the OSX Open File Descriptor Limits Need to be Increased?
OSX has a low file descriptor (default) limit of 256, which is problematic if you have heavy network access traffic. First check your current limits, and then create a custom limit to alleviate this limitation.
Find the Default/Current Limits of your System
Run the following Commands to find the soft and hard limit of your system.
- To find the soft limit, run: ulimit -Sn Sample output: % ulimit -Sn 256
- To find the hard limit, run: ulimit -Hn Sample output: % ulimit -Hn unlimited
Set Custom Limits
- Run: sudo touch /Library/LaunchDaemons/limit.maxfiles.plist
- Open the file in your favorite file editor and paste the following data as contents of the file. <?xml version=”1.0″ encoding=”UTF-8″?> <!DOCTYPE plist PUBLIC “-//Apple//DTD PLIST 1.0//EN” “http://www.apple.com/DTDs/PropertyList-1.0.dtd”> <plist version=”1.0″> <dict> <key>Label</key> <string>limit.maxfiles</string> <key>ProgramArguments</key> <array> <string>launchctl</string> <string>limit</string> <string>maxfiles</string> <string>25600</string> <string>100000</string> </array> <key>RunAtLoad</key> <true/> <key>ServiceIPC</key> <false/> </dict> </plist>
- You can replace the limits with your desired values. The hard limit should be lesser than what your system supports, which is the output of
ulimit -Hn. When setting a custom value, OSX currently won’t allow setting the hard limit asunlimited, so you need to set it to some high value. In the example above, the soft limit is25600and the hard limit is100000. - Save the file and reboot the system.
- After the system is rebooted, verify the current limits by running the following commands. To check the soft limit, run: ulimit -Sn Sample output: % ulimit -Sn 256 To check the hard limit, run: ulimit -Hn Sample output: % ulimit -Hn 100000.
Does the Private Application have a Security Group/ACL that is Blocking the IP Address of the Publisher from Accessing It?
This happens when the Publisher is deployed inside of an IaaS environment like AWS. Check the Security Group of the host. All traffic to the defined private application will be seen on the local network as having originated from the Client IP address.
Real-time Protection Policy
Is there a Real-time Protection Policy for the User to Access the Private App?
In the Netskope UI, go to Policies > Real-time Protection and verify that the User/OU authorizes the user for the private application.
Did the Real-time Policy You just Applied go into Effect?
Open the npadebuglog.log file in a text editor. Search for the name of your Private App as defined in the Private App in the Netskope tenant.
For windows: C:UsersPublicnetSkopenpadebuglog.log
For MacOS: /Library/Logs/Netskope/npadebuglog.log
If you can’t find any mention of your Private App name in this file, then you will not be able to connect to the Private App. This may be a result of the user not being authorized for this Private App (check the Real-time Protection policy).
Tenant UI
Are Cross-signed Root Certificates Supported while Configuring Private App Certificates for Custom URLs with NPA Browser Access?
Netskope supports self-signed root certificates. Cross-signed root certificates are not supported in the certificate chain file. If cross-signed root certificates are used, you will see the error No root certificate was found.

By default Let’s Encrypt CA will create a certificate chain using the ISRG Root X1 cross-signed by DST Root CA X3. This is what causes the error.
Workaround
Remove the ISRG Root X1 cross-signed certificate from the certificate chain, which should be at the bottom. Then add the ISRG Root X1 self-signed certificate, which can be downloaded from here.