

This article provides instructions to deploy Netskope Client on Android and Chrome OS devices using Google Workspace.
Using Google endpoint management, you can manage devices in your organization and allow employees to access Google Workspace account from their personal or company-owned devices. At the same time, you can deploy mobile apps and set policies to secure the employee devices. To learn more, view Manage Devices.
Supported OS and Platform
Refer to Netskope Client Supported OS and Platform to understand the supported versions for Android.
Deploy Netskope Client in Android Devices
With Google Workspace, you can configure and deploy Netskope Client for Android devices by adding configuration profiles.
You can configure the tenant name in Apps > Web and mobile apps > Netskope Client > Managed Configurations. Click Add Managed Configuration to create a new configuration.

Add Netskope Client App
Before you select configurations to add in your tenant, download the Netskope Client app to your Google Workspace.
To install Client in an Android device:
-
Log into your Google Workspace account.
-
Go to Apps > Web and mobile apps.
-
Click Add Apps and search for apps. Enter Netskope Client.

-
Point to the Netskope Client app and click Select.
-
Select the users that can install Netskope Client from the managed Google Play store.
-
Click Continue.
-
Configure app options based on the app platform.
-
Click Finish.
-
The Web and mobile apps UI displays the Netskope Client app after you add the app to Workspace.

To learn more about adding an application, view Adding a third-party app.
Add Managed Configurations
After you download the Netskope app, add the desired configurations to include your tenant name.
-
In your Google Workspace account, go to Apps > Web and mobile apps.
-
Click Netskope Client. This opens the app details page for Netskope Client.
-
Click Managed Configurations > Add Managed Configuration.
-
Provide the configuration name and other configuration details. For example,
{
"User Email Address":"<Your Email Address>",
"host":"addon-<tenant-URL>",
"token":"xxxxxxxxxxxxxxxx",
"enrollauthtoken":"xxxxxxxxxxxxxxxxxxxxxxxxxxxxxxxx",
"enrollencryptiontoken":"xxxxxxxxxxxxxxxxxxxxxxxxxxxxxxxx"
}
Refer to Client Deployment Parameters to understand the values that needs to be added.
 Android does not support the “email address” macro and users need to manually authenticate when enrolling as shown in the preceding example. Android supports injecting a specific email address when distributing apps for a specified single user. ChromesOS is able to auto enroll by injecting an email address from MDM.
 -
Click Save.
To learn more about managed configuration, view Android Apps with Managed Configuration.
Deploy Netskope Client in Chrome OS
Using Google admin console, you can manage policies and settings for Chromebooks and devices with ChromeOS. The app configurations can be set on Google Admin Console in JSON format. To learn more, view Manage ChromeOS Devices.
Add Netskope CA Certificate
Before you add certificate in Google Workspace, perform the following to download Root CA certificate:
-
Log into your Netskope tenant.
-
Go to Settings > Manage > Certificates > Signing CA.
-
Click Download Netskope Root Certificate.
To learn more, view Certificates.
After you download the Root CA certificate:
-
Log into your Google Workspace account.
-
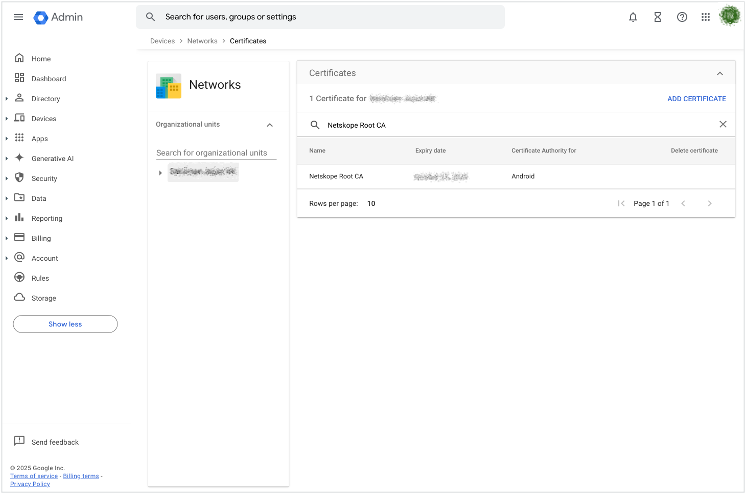
Go to Devices > Networks > Certificates.
-
Click ADD CERTIFICATE and upload the certificate that you downloaded from the Netskope tenant.
-
Click ADD.
Add Netskope Client App
This section enables you to add Netskope Client and configure it in Google Play.
-
Log into your Workspace account.
-
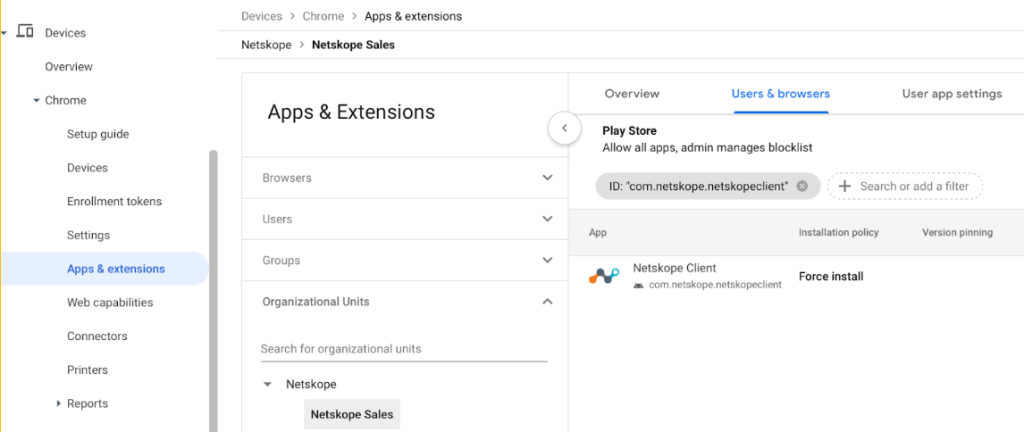
Go to Devices > Chrome > Apps & Extensions > Users & Browsers.
-
Apply Users, Groups, and Organizational Units settings.
-
Click + and find the Netskope Client app from Google Play.
-
Click Select.
-
The Users & Browsers tab displays the Netskope Client app.
To learn more, view Apps & Extensions.
Always-On VPN For Chromebook Devices
Always-On VPN automatically maintains a continuous VPN connection, regardless of device usage or network changes.
Before you begin,
-
Install your preferred VPN on your Chrome devices. To learn more, view Install apps and extensions.
-
Install Netskope Client app. To learn more, view Add Netskope Client App.
-
Select Force Install Netskope Client Client app (without this step, Netskope Client cannot be displayed in Step 4 in the following instructions).
-
To apply these settings to your users, ensure to select the appropriate organizational unit. To create an organizational unit in Google Workspace, view Create Organization Unit.
To enable Always-On VPN, perform the following instructions:
-
Go to Devices > Chrome > Settings.
-
In the Search or add a filter text box, search for Always On.
-
Click Always On under User & Browser settings.
-
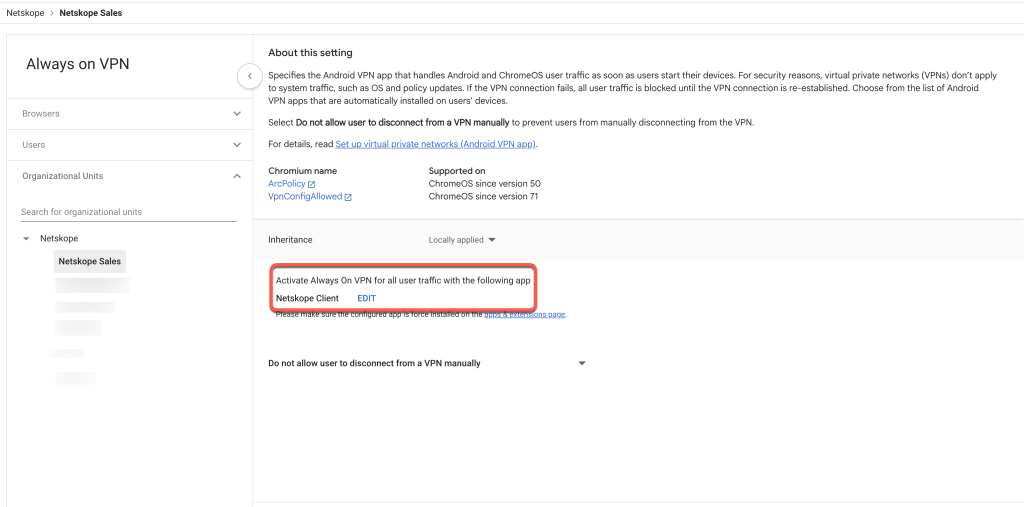
Under Activate Always On VPN for all user traffic with the following app, click Edit to select Netskope Client as Always On VPN.
-
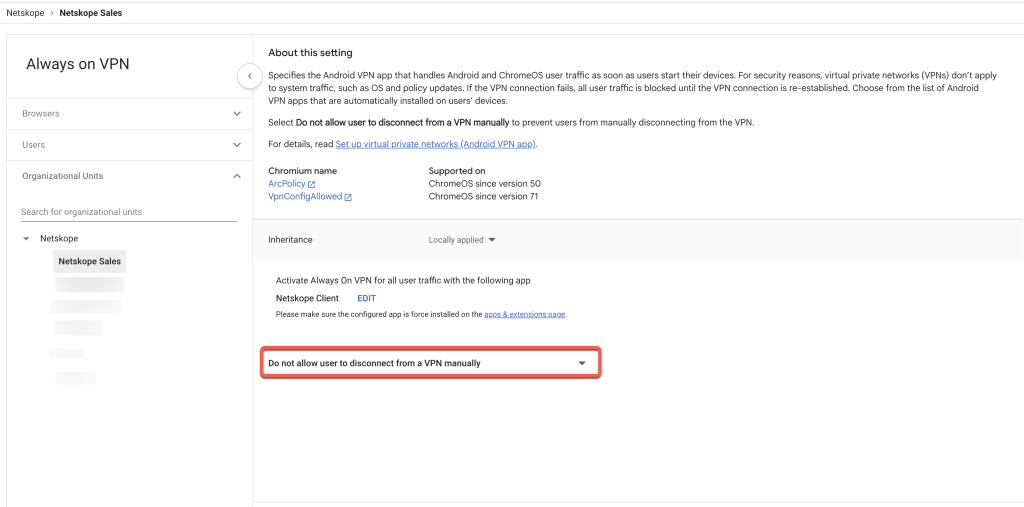
Select Do not allow user to disconnect from a VPN manually from the dropdown options.
-
Click Save.
-
Go back to the Settings section.
-
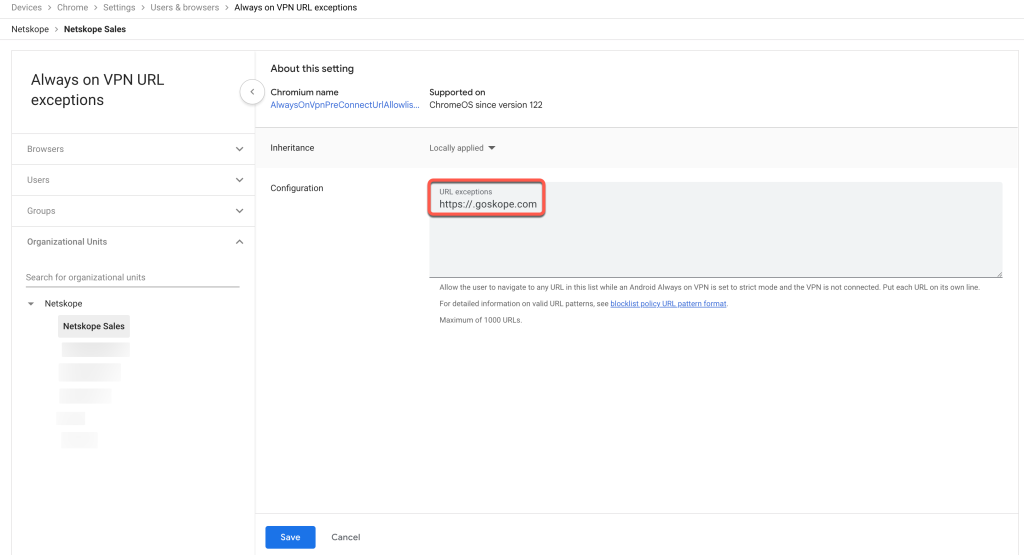
In the Search or add a filter text box, search for Always On VPN URL exceptions.
-
Select Always On VPN URL exceptions.
-
Under About this settings, add https://goskope.com in Configuration.
-
Click Save.
-


Add Managed Configurations
In this section, you can configure certain policies while enabling Netskope Client. Perform the following instructions:
-
In your Google Workspace account, go to Devices > Chrome > Apps & Extensions > Users & Browsers.
-
Click the Netskope Client app. It opens a separate pane on the right side of the screen. Provide the following details:
-
Installation Policy: Choose the policy while installing applications.
-
Managed Configuration, you can use one of the following configurations while provisioning:
{
"User Email Address":"${USER_EMAIL}",
"host":"addon-<tenant-URL>",
"token":"xxxxxxxxxxxxxxxx",
"enrollauthtoken":"xxxxxxxxxxxxxxxxxxxxxxxxxxxxxxxx",
"enrollencryptiontoken":"xxxxxxxxxxxxxxxxxxxxxxxxxxxxxxxx"
}
Refer to Client Deployment Parameters to understand the values that needs to be added.

-

Or
<tenant-name>.<tenant-domain>

To learn more, view Policy for extensions.
IdP Enrollment Workflow in Android and Chrome OS Devices

The following steps illustrate the client deployment and enrollment workflow in Android devices and ChromeOS.
-
Visit the Google Play Store and download Netskope Client.

-
Install Netskope Client. After the installation is complete, a pop-up is displayed to the user to enter the tenant name and select the tenant domain as shared with the user by their respective IT.

-
Click Next to continue with enrollment. User is redirected to their IdP login screen. Authentication status message is displayed in the browser.

-
Once the user enrollment is complete, the Client will initiate configuration download and establish tunnel.

-
After the Client is connected, user can click the mobile menu icon (3 vertical dots in the top right corner of the client) for options to view configuration details.
