

Release Notes
2.0.0
Added
- Added support for ticket types in configuration parameters.
- Added support for mapping custom status fields.
- Added support for dynamic queue mappings based on the ticket type.
- Added resolutions for error logs.
1.0.0
Added
- Initial Release.
This document explains how to configure the HaloITSM v2.0.0 plugin with the Ticket Orchestrator module of the Netskope Cloud Exchange platform. This plugin is used to create tickets on Incident > All incidents on the HaloITSM platform. It also supports updating tickets and syncing their status.
Prerequisites
To complete this configuration, you need:
- Netskope Tenant (or multiple, for example, production and development/test instances).
- A Netskope Cloud Exchange tenant with the Tenant plugin and Ticket Orchestrator plugin already configured.
- A HaloITSM platform account.
- Connectivity to the HaloITSM platform: https://<tenantname>.haloitsm.com/
Plugin Scope
This plugin is used to create tickets on Incident > All incidents on the HaloITSM platform. It also supports updating tickets and syncing their status.
| Supported Alert Types for Tickets | Supported Event Types for Tickets |
|---|---|
| Compromised Credentials, Policy, Malsite, Malware, DLP, Security Assessment, Watchlist, Quarantine, Remediation, UBA, CTEP, Device, Content | Endpoint, Incident |
Mapping
Default Status Mapping
| Netskope CE Status | Value | HaloITSM Status |
|---|---|---|
| New | New | New |
| In Progress | In Progress | In Progress |
| On Hold | On Hold | On Hold |
| Closed | Closed | Closed |
| Deleted | – | (Default will be blank User can create custom status on Jira project to map) |
| Other | – | (Default will be blank User can create custom status on Jira project to map) |
Permissions
The plugin supports two authentication methods as shown here. You can use either one. The required permission for both are mentioned here:
| Authentication Method | Required Checks | Permission |
|---|---|---|
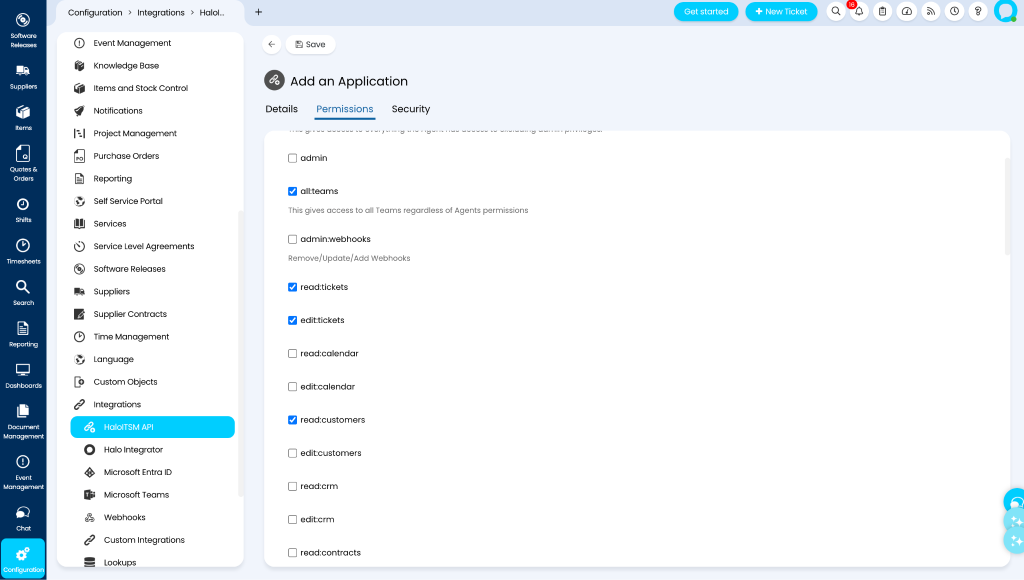
| Username & Password | Check Allow Agent LoginsCheck Allow End User Logins | read:tickets, edit:tickets, read:customers, all:teams |
| Client ID and Secret (Services) | Login Type: Agent | read:tickets, edit:tickets, read:customers, all:teams |
API Details
The plugin utilizes the HaloITSM URL to execute data transmission via a POST request directed at the provided URL.
List of APIs used
| API Endpoint | Method | Use Case |
|---|---|---|
| https://{tenant}.haloitsm.com/auth/token | POST | Generate Auth Token |
| https://{tenant}.haloitsm.com/api/Tickets | POST | Create a Ticket |
| https://{tenant}.haloitsm.com/api/TicketType | GET | Get Ticket Types |
| https://{tenant}.haloitsm.com/api/ticket/{ticket_id} | GET | Get Ticket Details |
| https://{tenant}.haloitsm.com/api/Team | GET | Get Teams |
| https://{tenant}.haloitsm.com/api/Actions | POST | Add Note to a Ticket |
| https://{tenant}.haloitsm.com/api/Status | GET | Get Ticket Statuses |
| https://{tenant}.haloitsm.com/api/Users | GET | Get Users (Assigned Agent) |
API rate limiting is 300 Requests per rolling 5 minute window.
Generate an Auth Token
Endpoint: https://{tenant}.haloitsm.com/auth/token
Method: POST
Data:
| Parameter | Value |
|---|---|
| grant_type | password |
| client_id | client_id |
| username | username |
| password | password |
| scope | all |
Headers:
| Key | Value |
|---|---|
| Content-Type | application/x-www-form-urlencoded |
| Accept | application/json |
Sample Response
{
    "scope": "openid email profile offline_access roles read:tickets edit:tickets all",
    "token_type": "Bearer",
    "access_token": "CfDJ8POGWkxqFLROkzHJBRga06w4J4GVbrS1eqMbBFcdMKAPM6d0Jwh4_itC4LczIyl4m9PXonkWZSf-_r-r-WSxxohaWiY_7bi194Q0X9Ni7q-_0pRKlBqd9HAgM91l***********",
    "expires_in": 32400,
    "refresh_token": "2WRrwD8D30fnTiBOng896VePzfXKYuLYhIwrTVnbyznGJXdg1Vu0wCFlfWK1fOJph_AJoBYTScOkHQHPJal_NotAxJN5chrEqv-UqJXr**************",
    "id_token": "3CT3rLSo6E3urFRo9l4NI8TlviYLNQw36_k_aOAASZKoK-3ZmTKrp5fbjg-v827rih4_NSOAKtI2xmWiDzFU***********"
}
Create a Ticket
Endpoint: https://{tenant}.haloitsm.com/api/Tickets
Method: POST
Request Body
[
    {
        "tickettype_id": 1,
        "summary": "This is an example summary",
        "details": "This is an example details message.",
        "category_1": "Accounts & Access>Active Directory Account>Creation",
        "impact": 1,
        "urgency": 2
    }
]
Headers
| Key | Value |
|---|---|
| Authorization | Bearer <Access_Token> |
| Content-Type | application/json |
Sample Response
HTTP/1.1 201  Created
Content-Type: application/json

{
    "id": 3710,
    "dateoccurred": "2026-05-29T09:31:32.8213202Z",
    "summary": "This is an example summary",
    "details": "This is an example details message.",
    "status_id": 1,
    "tickettype_id": 1,
    "sla_id": 1,
    "sla_name": "Incident SLA",
    "priority_id": 2,
    "priority": {
        "id": "ca8f3c6e-110c-e811-8915-b01041c8667a",
        "slaid": 1,
        "priorityid": 2,
        "name": "High",
        "fixtime": 2.0,
        "fixunits": "H",
        "enterslaexcuse": false,
        "responsetime": 1.0,
        "responseunits": "H",
        "ishidden": false,
        "fixendofday": false,
        "responseendofday": false,
        "colour": "#fe9200",
        "catprompt": -1,
        "workdaysoverride": -1,
        "responsestartofday": false,
        "responsestartofdaytime": "00:00:00",
        "startofday": false,
        "startofdaytime": "00:00:00",
        "setfixtostartdate": false,
        "setfixtotargetdate": false,
        "firstresponsetime": 0.0,
        "firstresponseunits": "H"..................
 }
Get Ticket Details
Endpoint: https://{tenant}.haloitsm.com/api/ticket/{ticket_id}
Method: GET
Headers
| Key | Value |
|---|---|
| Authorization | Bearer <Access_Token> |
| Content-Type | application/json |
Sample Response
HTTP/1.1 200 OK
Content-Type: application/json

{
    "id": 3710,
    "dateoccurred": "2026-05-29T09:31:32.8213202Z",
    "summary": "This is an example summary",
    "details": "This is an example details message.",
    "status_id": 1,
    "tickettype_id": 1,
    "sla_id": 1,
    "sla_name": "Incident SLA",
    "priority_id": 2,
    "priority": {
        "id": "ca8f3c6e-110c-e811-8915-b01041c8667a",
        "slaid": 1,
        "priorityid": 2,
        "name": "High",
        "fixtime": 2.0,
        "fixunits": "H",
        "enterslaexcuse": false,
        "responsetime": 1.0,
        "responseunits": "H",
        "ishidden": false,
        "fixendofday": false,
        "responseendofday": false,
        "colour": "#fe9200",
        "catprompt": -1,
        "workdaysoverride": -1,
        "responsestartofday": false,
        "responsestartofdaytime": "00:00:00",
        "startofday": false,
        "startofdaytime": "00:00:00",
        "setfixtostartdate": false,
        "setfixtotargetdate": false,
        "firstresponsetime": 0.0,
        "firstresponseunits": "H"....................
  },
Get Teams
Endpoint: https://{tenant}.haloitsm.com/api/Team
Method: GET
Headers
| Key | Value |
|---|---|
| Authorization | Bearer <Access_Token> |
| Content-Type | application/json |
Sample Response
HTTP/1.1 200 OK
Content-Type: application/json

[
    {
        "id": 1,
        "guid": "5c481f56-4369-401c-a608-4b1407f63aff",
        "name": "1st Line Support",
        "sequence": 10,
        "forrequests": true,
        "foropps": false,
        "forprojects": true,
        "ticket_count": 0,
        "department_id": 3,
        "department_name": "Crest data systems - IT",
        "inactive": false,
        "override_column_id": 0,
        "teamphotopath": "",
        "hide_agents_in_tree_if_no_tickets": false,
        "use": "team"
    }
]
Get Ticket Type
Endpoint: https://{tenant}.haloitsm.com/api/TicketType
Method: GET
Headers
| Key | Value |
|---|---|
| Authorization | Bearer <Access_Token> |
| Content-Type | application/json |
Sample Response
HTTP/1.1 200 OK
Content-Type: application/json
[
   {
        "id": 1,
        "guid": "c996841d-096e-43a8-bf1b-b50a47cc60a5",
        "name": "Incident",
        "use": "tickets",
        "sequence": 10,
        "default_sla": 1,
        "group_id": 0,
        "group_name": "",
        "jira_issue_type": "",
        "cancreate": true,
        "agentscanselect": true,
        "itilrequesttype": 1,
        "allow_all_clients": true,
        "allowattachments": true,
        "copyattachmentstochild": false,
        "copyattachmentstorelated": false,
        "is_sprint": false,
        "enduserscanselect": true,
        "anonymouscanselect": true,
        "project_type": 0,
        "kanbanstatuschoice": [
            {
                "id": "1",
                "name": "1"
            },
            {
                "id": "2",
                "name": "2"
            },
            {
                "id": "9",
                "name": "9"
            },
            {
                "id": "27",
                "name": "27"
            },
            {
                "id": "28",
                "name": "28"
            }
        ],
        "kanbanstatuschoice_list": "[\"1\",\"2\",\"9\",\"27\",\"28\"]",
        "default_agent": 1,
        "default_team": "1st Line Support",
        "default_priority": 4,
        "visible": true
    },
    {
        "id": 24,
        "guid": "0a2f855b-0bac-4585-8bdf-9c8da6c7844f",
        "name": "Major Incident",
        "use": "tickets",
        "sequence": 10,
        "default_sla": 4,
        "group_id": 0,................
    }
]
Add Note to Ticket
Endpoint: https://{tenant}.haloitsm.com/api/Actions
Method: POST
Headers
| Key | Value |
|---|---|
| Authorization | Bearer <Access_Token> |
| Content-Type | application/json |
Request Body
[
  {
    "ticket_id": 3335,
    "note_html": "Note added successfully.",
    "outcome": "Note"
  }
]
Sample Response
{
    "ticket_id": 8985,
    "id": 8,
    "outcome": "Note",
    "who": "abci",
    "who_type": 1,
    "who_agentid": 3,
    "datetime": "2026-05-29T09:45:30.686529Z",
    "note": "Note added successfully.",
    "replied_to_ticket_id": 0,
    "replied_to_action_id": 0,
    "created_from_ticket_id": 0,
    "created_from_action_id": 0,
    "action_contract_id": -1,
    "action_travel_contract_id": -1,
    "project_id": 8985,
    "customfields": [
        {
            "id": 223,
            "name": "CFAIKBCreationConfirmation",
            "label": "Would you like to create a Knowledge Base Article using AI?",........
}
Get Ticket Status
Endpoint: https://{tenant}.haloitsm.com/api/Status
Method: GET
Parameters
| Key | Value |
|---|---|
| search | In Progress |
Headers
| Key | Value |
|---|---|
| Authorization | Bearer <Access_Token> |
| Content-Type | application/json |
Sample Response
[
    {
        "id": 2,
        "guid": "00931d19-ee9c-4d47-926c-9b154b66df59",
        "name": "In Progress",
        "shortname": "In Progress",
        "type": 0,
        "sequence": 20,
        "colour": "#0f75b1",
        "slaaction": "removehold",
        "showonquickchange": true,
        "timeuntilloffhold": 0.0,
        "statuschangeto": 0,
        "statuschangetofreq": 0.0,
        "useworkinghours": 0,
        "statusemailfreqdays": 0,
        "statusemailid": -1,
        "statusnochangehours": 0.0,
        "nochangehoursrecurring": false,
        "statusnochangehoursmanager": 0,
        "statusnochangehoursmanagerrecurring": false,
        "statusnochangehourssection": 0.0,
        "statusnochangehourssectionrecurring": false,
        "nochangetemplate": -1,
        "includeinloadbalance": true,
        "useworkinghours_statusnochangehours": 0,
        "useworkinghours_statusnochangehourssection": 0,
        "useworkinghours_statusnochangehoursmanager": 0
    }
]
Get Users (Assigned Agent) Details
Endpoint: https://{tenant}.haloitsm.com/api/Users
Method: GET
Parameters
| Key | Value |
|---|---|
| search | abc.gmail.com |
Headers:
| Key | Value |
|---|---|
| Authorization | Bearer <Access_Token> |
| Content-Type | application/json |
Sample Response
{
    "record_count": 1,
    "users": [
        {
            "id": 26,
            "name": "Jenifier",
            "site_id": 18.0,
            "site_id_int": 18,
            "site_name": "Main",
            "client_name": "data",
            "firstname": "Dev",
            "surname": "Vashi",
            "initials": "DV",
            "emailaddress": "abci@gmail.com",
            "phonenumber_preferred": "",
            "sitephonenumber": "",
            "phonenumber": "",
            "telpref": 0,
            "activedirectory_dn": "",
            "onpremise_activedirectory_dn": "",
            "login": "",
            "inactive": false,
            "colour": "#00ceff",
            "isimportantcontact": false,
            "neversendemails": false,
            "priority_id": 0,
            "linked_agent_id": 3,
            "isserviceaccount": false,
            "isimportantcontact2": false,
            "connectwiseid": 0,
            "autotaskid": -1,
            "sitetimezone": "",
            "use": "user",
            "key": 26,
            "table": 4,
            "client_id": 12,
            "overridepdftemplatequote": -1,
            "is_prospect": false,
            "azureoid": "",
            "lastupdate": "2025-11-06T17:30:24.25"
        }
    ]
}
Performance Matrix
This performance reading is collected on a Large CE Stack with these specifications by creating 250 tickets at a time.
| Description | Specification |
|---|---|
| Stack Details | Size: Large RAM: 32 GB CPU: 16 Cores |
| Tickets created on HaloITSM | ~28 per minute |
User Agent
netskope-ce-6.1.0-cto-halo-itsm-v2.0.0
Workflow
- Create an application in HaloITSM.
- Configure the HaloITSM plugin.
- Configure a Business Rule.
- Configure a Queue.
- Validate the plugin.
Watch a Video
Click play to watch a video:
Create a HaloITSM Application
-
Log in to the HaloITSM platform.
-
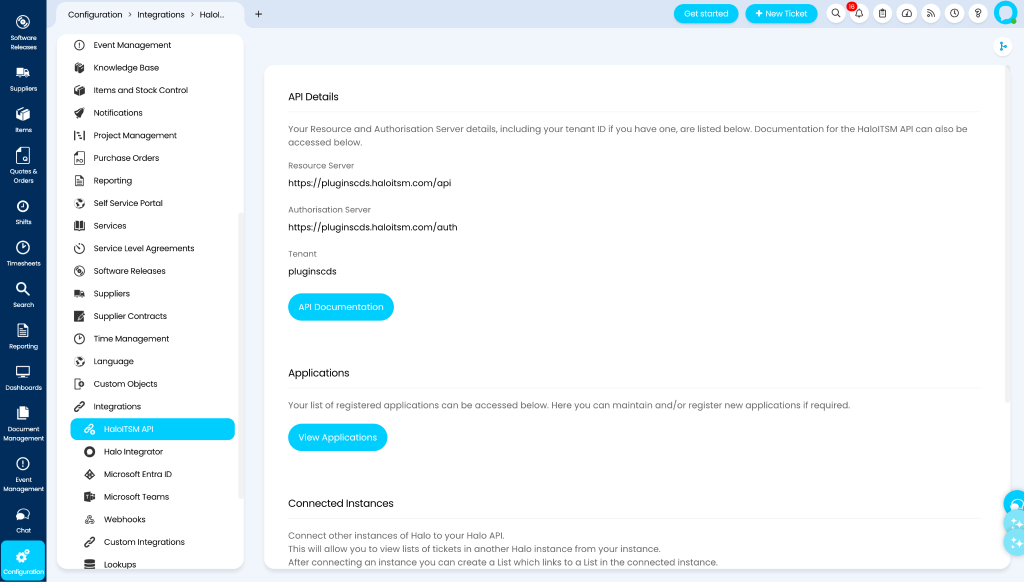
Go to Configuration > Integrations > HaloITSM API. The displayed Tenant will be used while configuring the HaloITSM plugin in Cloud Exchange. Click View Application.
-
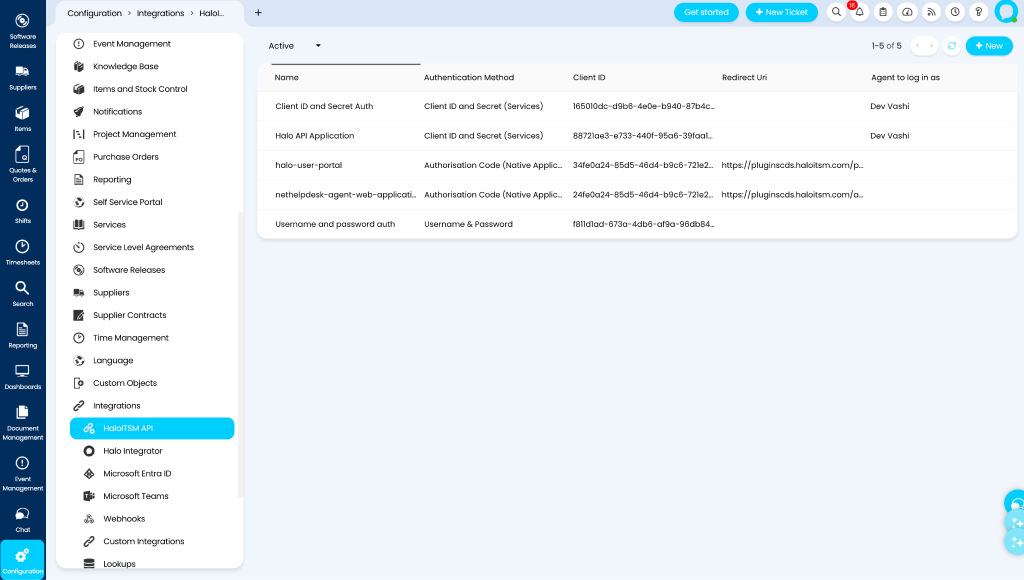
Click New to create a new application.
-
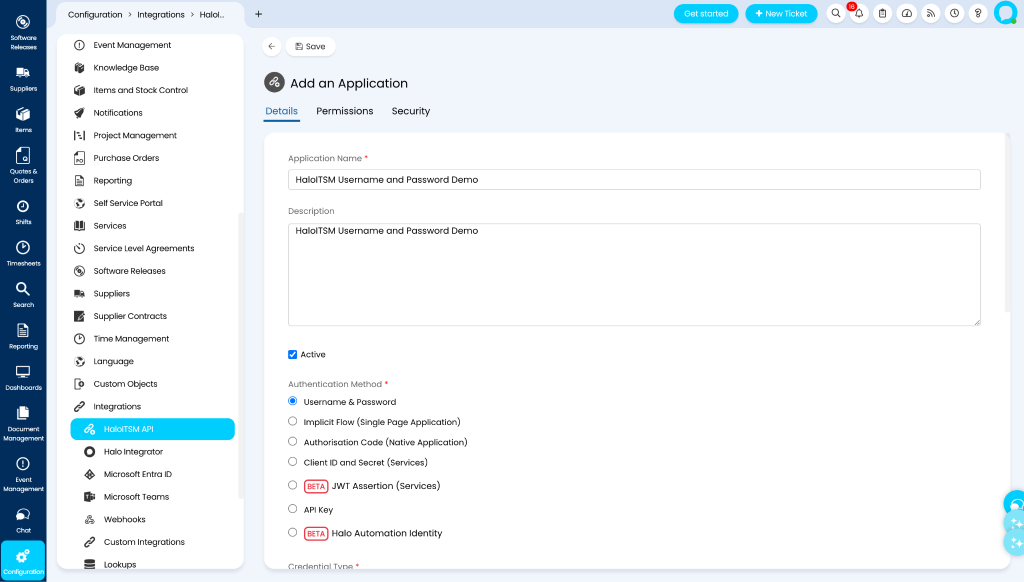
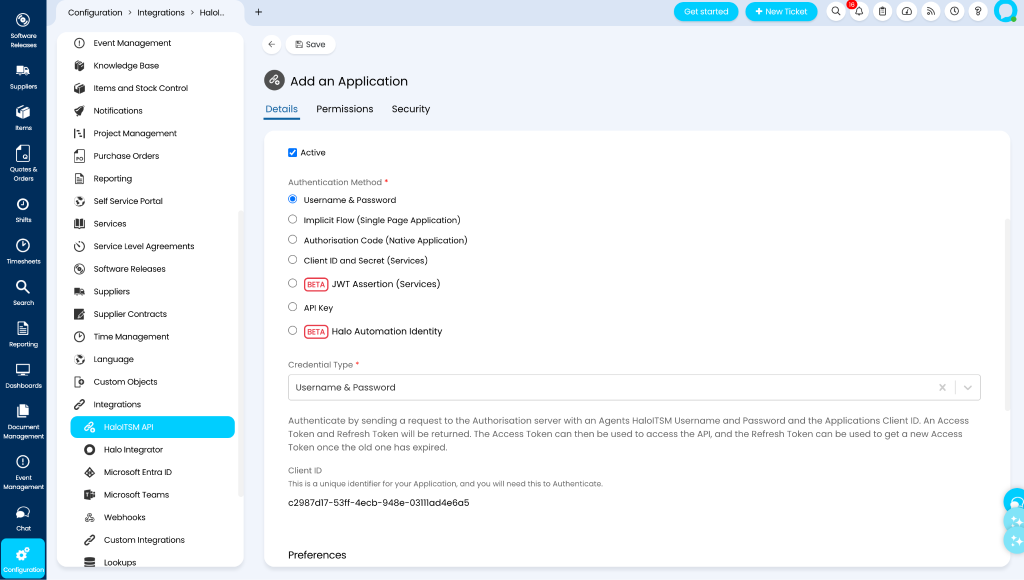
Provide the name of the application, and select either Username & Password or Client ID & Secret (Services) in the Authentication Method. Make sure the checkbox of Active is enabled. The Displayed Client ID will be used while authenticating the HaloITSM plugin in Cloud Exchange.


Authenticate using Username & Password
-
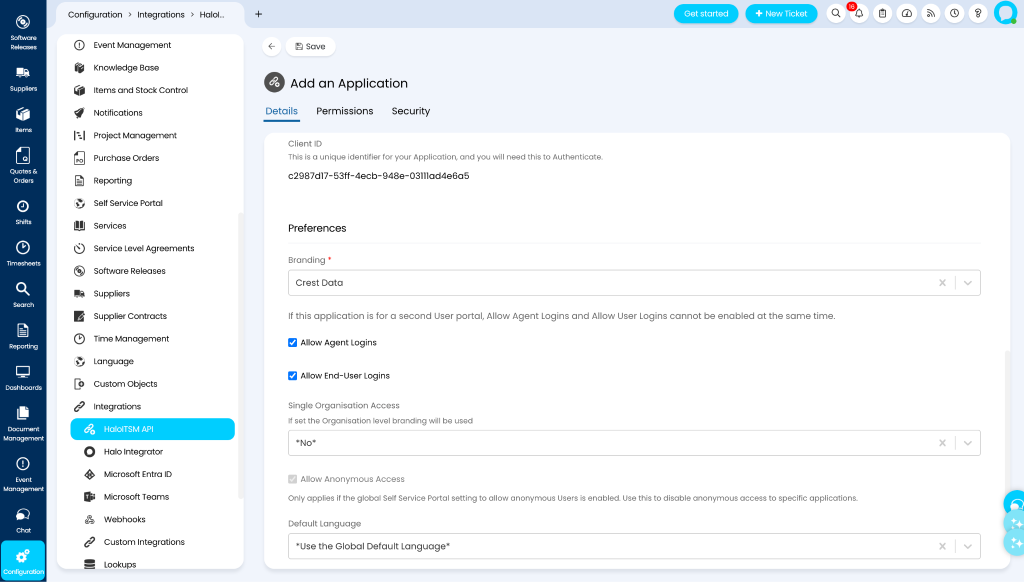
Provide Application Name and Description. Select Username & Password for the Authentication Method.
-
Select the needed branding. Make sure to enable Allow Agent Logins, Allow End-User Logins, and select an option from the Single Client Access dropdown.
-
Go to the Permissions tab. Select the all:teams, read:tickets, edit:tickets, and read:customers permissions, and click Save.
-
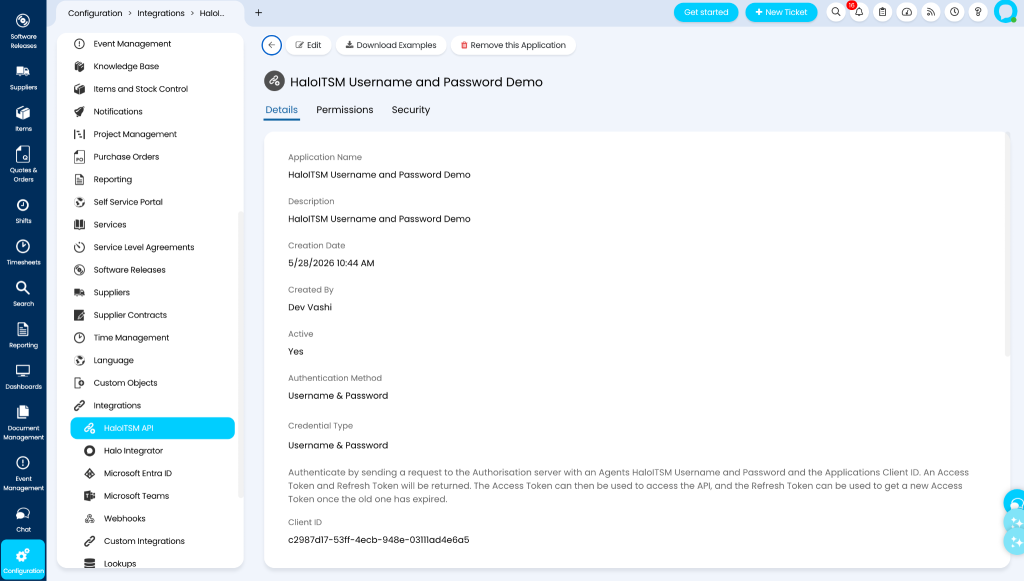
The Application is ready to use with the Username & Password authentication method.


Authenticate using Client ID and Secret (Services)
-
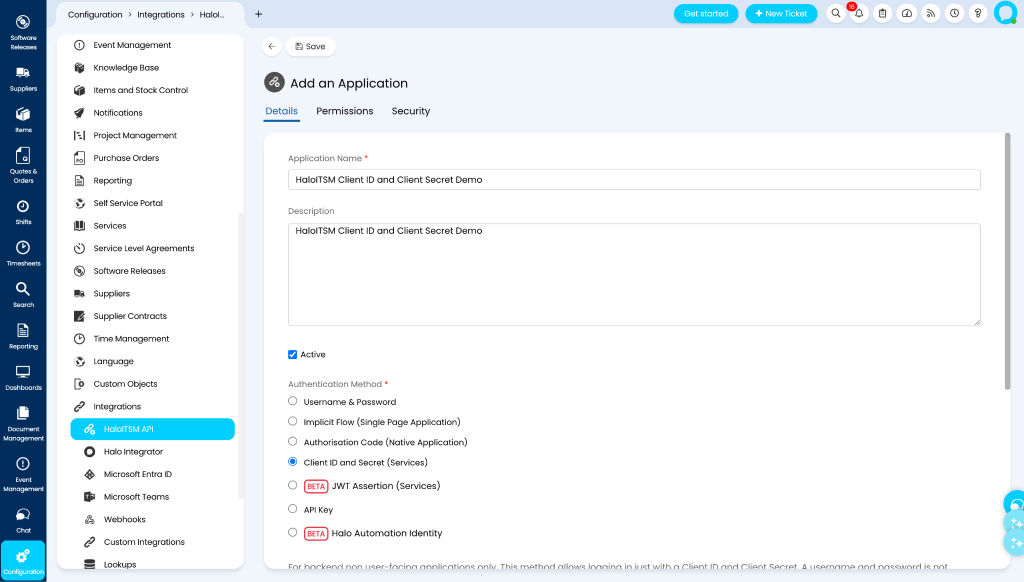
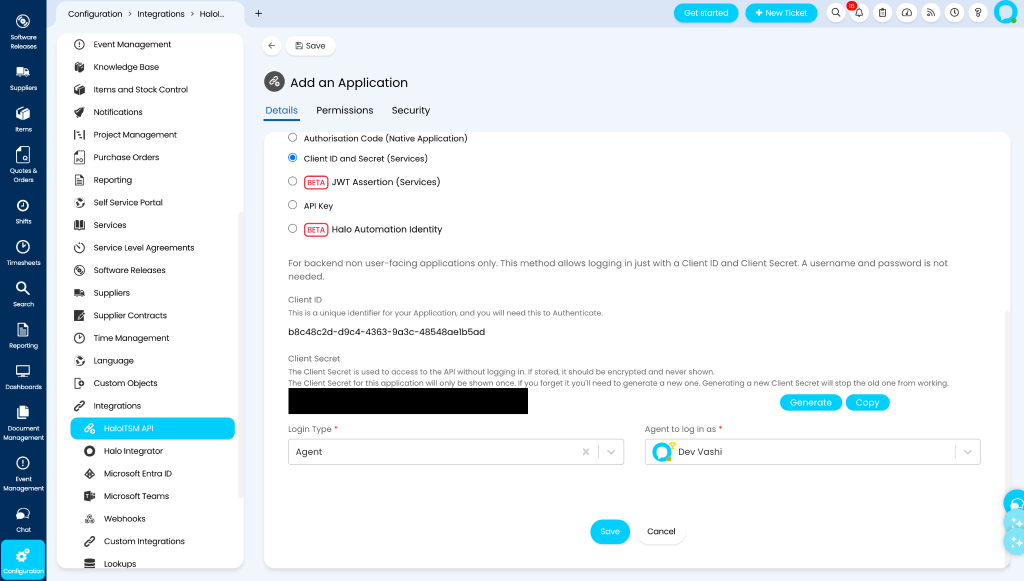
Provide an Application Name and select Client ID and Secret (Services). The Client ID will be used when creating the HaloITSM plugin in Cloud Exchange.
-
Click Generate to create the Client Secret. Copy the Client Secret. This will also be used when configuring the HaloITSM plugin in Cloud Exchange. Make sure to select Agent in the Login Type dropdown, and then select the Agent to log in as field as per your need.
-
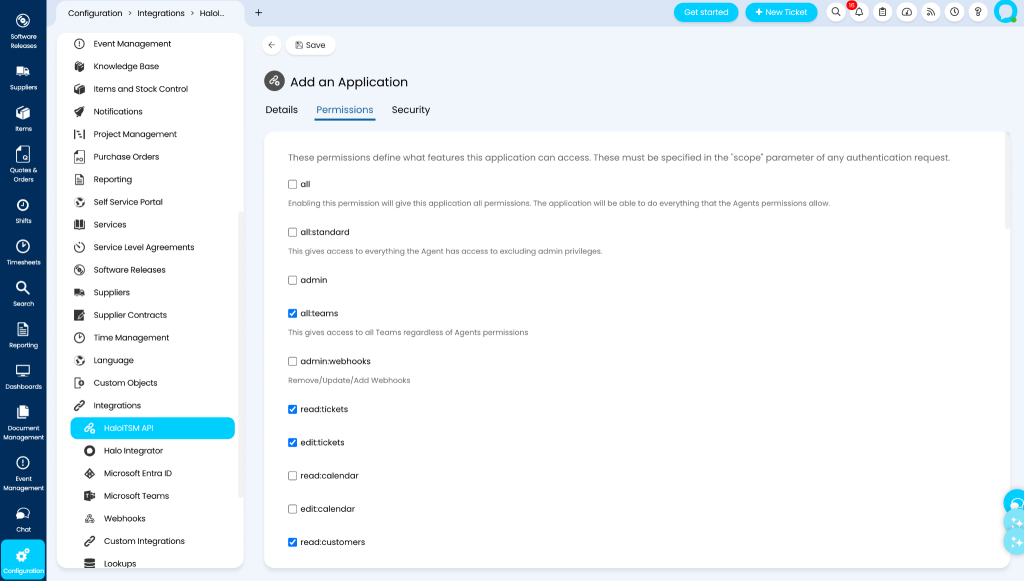
Go to the Permissions tab. Select the all:teams, read:tickets, edit:tickets, and read:customers” permissions, and then click Save.
-
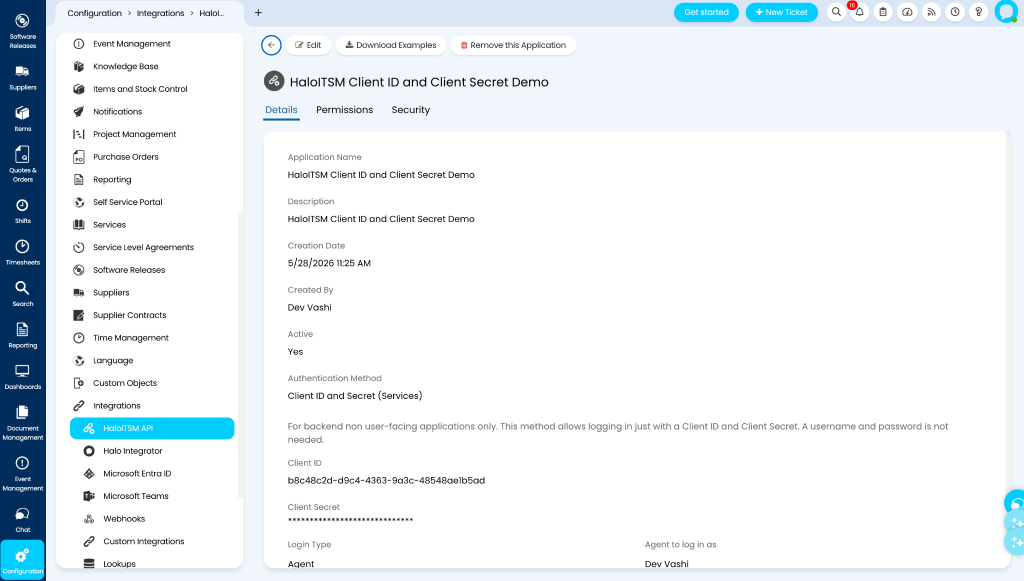
Application is ready to use with the Client ID & Secret (Services) authentication method.


Configure the HaloITSM Plugin
-
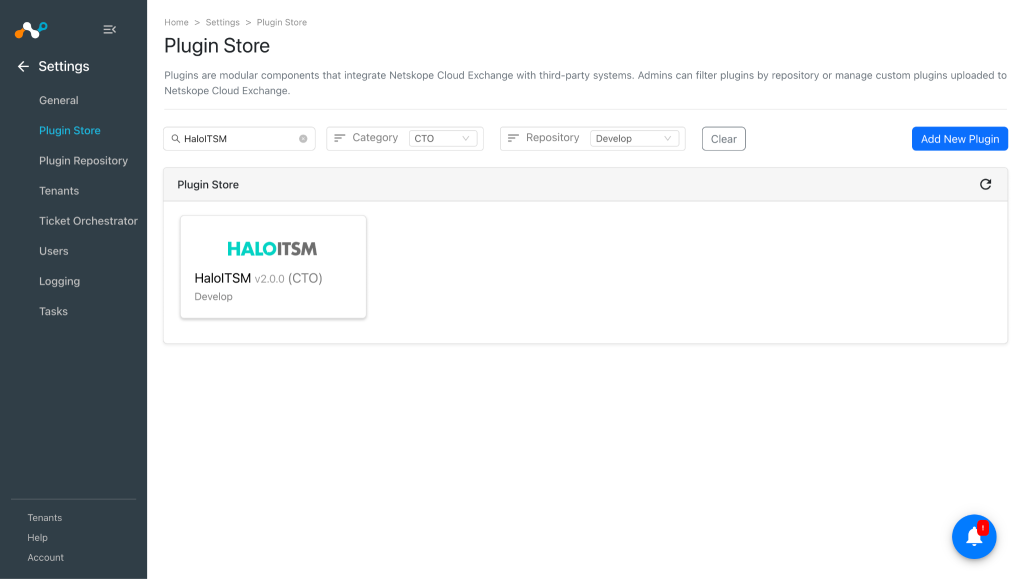
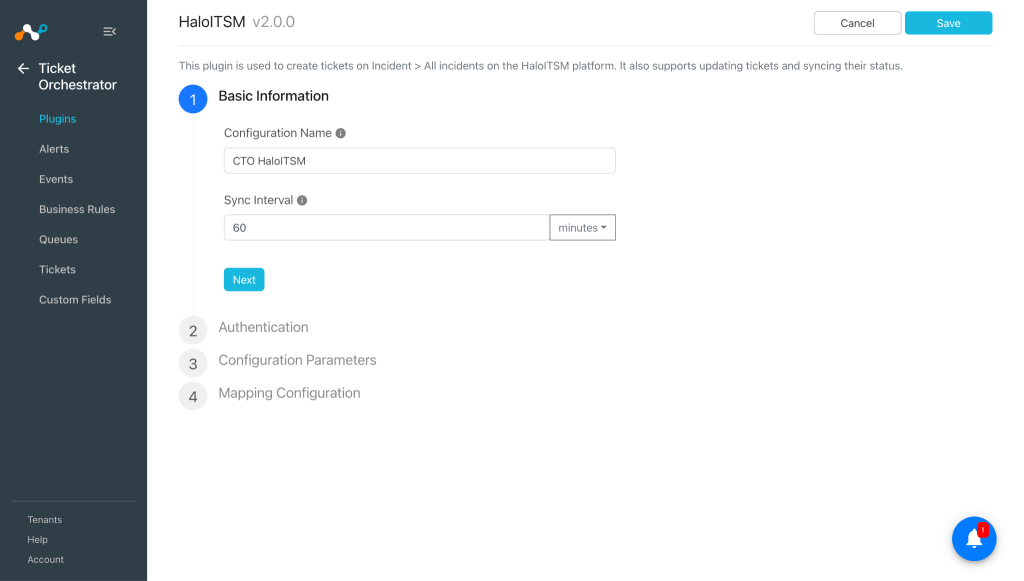
In Cloud Exchange, go to Settings > Plugin Store. Search for and select the HaloITSM v2.0.0 (CTO) plugin.
-
Enter a Configuration Name.
-
Adjust the Sync Interval to the appropriate value.
-
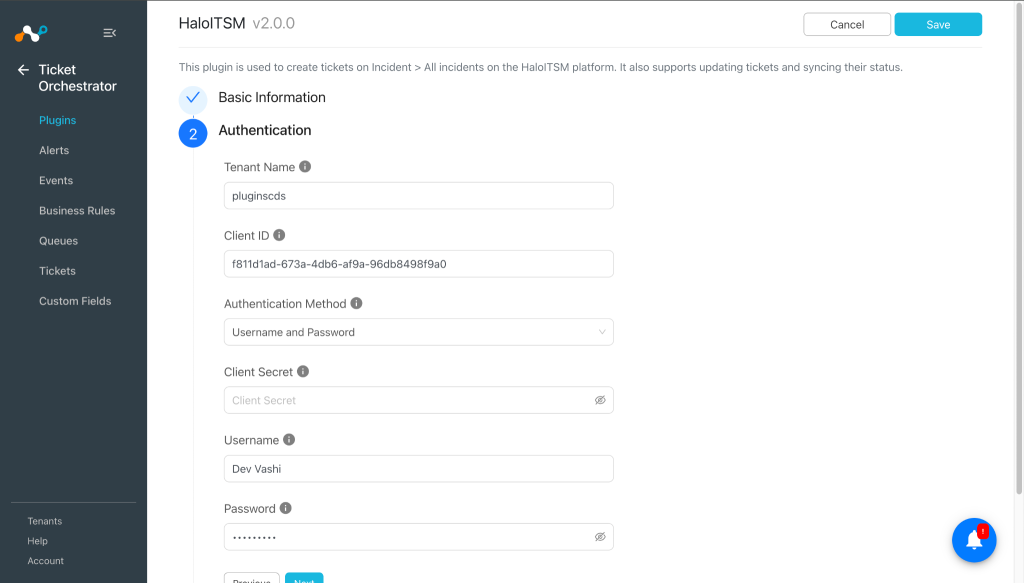
Click Next and provide the Configuration Parameters, depending on the authentication method used:
-
For Username and Password authentication:
- Tenant Name: The subdomain of your HaloITSM instance URL. For example, if your instance URL is https://mycompany.haloitsm.com, the Tenant Name is mycompany.
- Client ID: The Client ID of the OAuth2 application registered in HaloITSM.
- Authentication Method: Select the OAuth2 grant type used to authenticate with HaloITSM. Choose Username and Password to authenticate as a named agent user.
- Username: Only required when the Authentication Method is Username and Password. The username for the HaloITSM agent account used.
- Password: Only required when the Authentication Method is Username and Password. The password for the HaloITSM agent account used.
-
For Client ID and Secret (Services):
- Tenant Name: The subdomain of your HaloITSM instance URL. For example, if your instance URL is https://mycompany.haloitsm.com, the Tenant Name is mycompany.
- Client ID: The Client ID of the OAuth2 application registered in HaloITSM.
- Authentication Method: Select the OAuth2 grant type used to authenticate with HaloITSM.
- Client Secret: The Client Secret obtained previously.
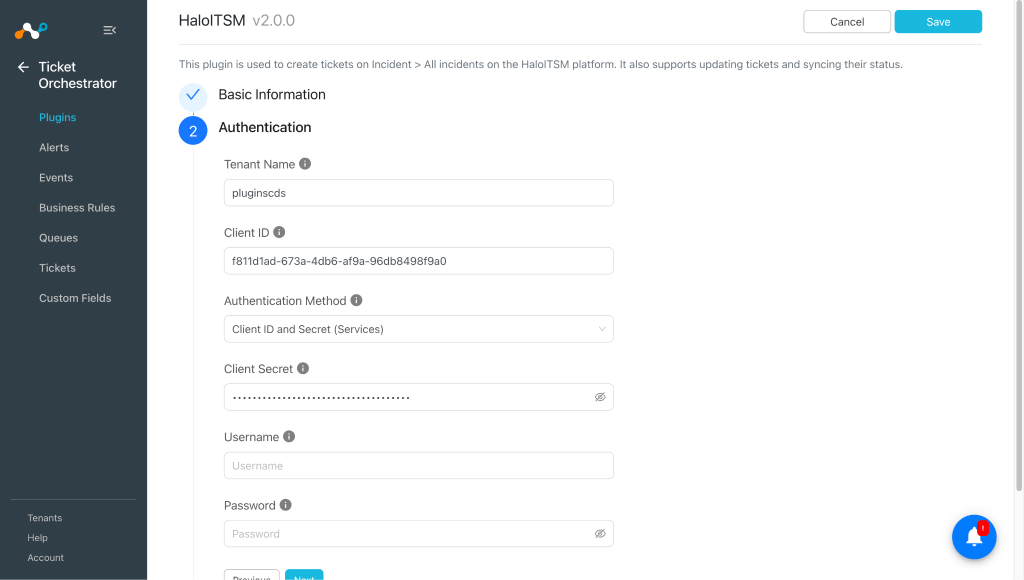
Client ID for both the authentication methods will be different, so you can’t configure the plugin with with both the Client ID of Username and Password authentication and Client Secret of Client ID and Secret (Services) authentication. -
-
Select the ticket type as per your need, and then click Next.
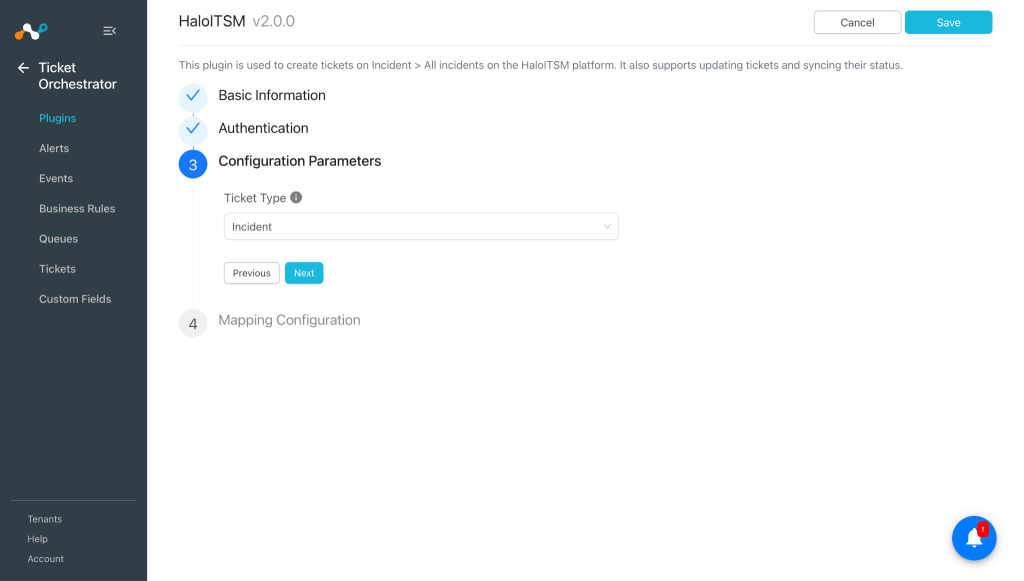 To change the ticket type, the user needs to save the plugin from the Configuration Parameters tab only. If the user updates the ticket type and saves the plugin from Mapping Configuration or Authentication or Basic Information tab then the change will not be reflected.
 -
Map the required status.
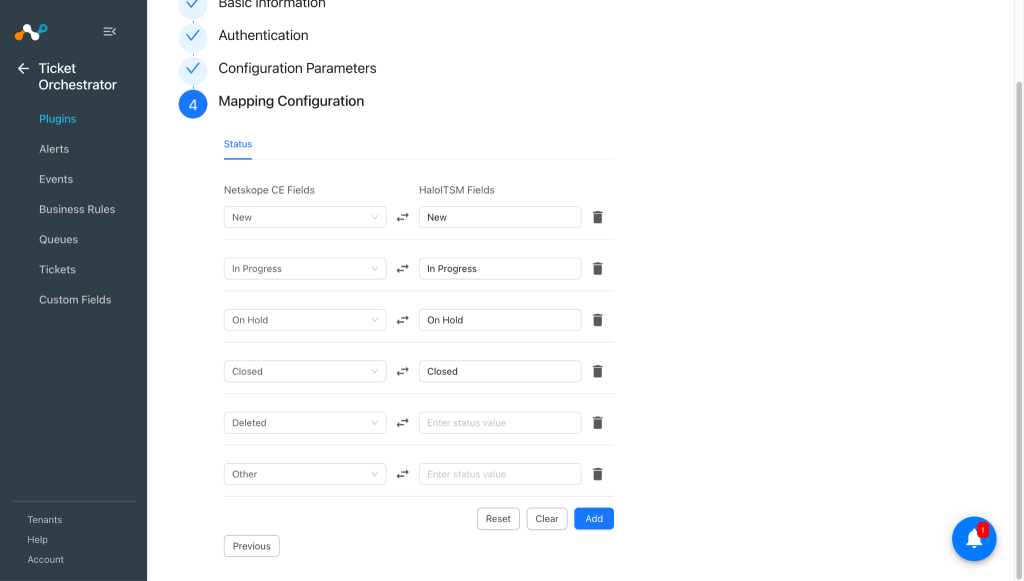
To create a custom status, click Add.
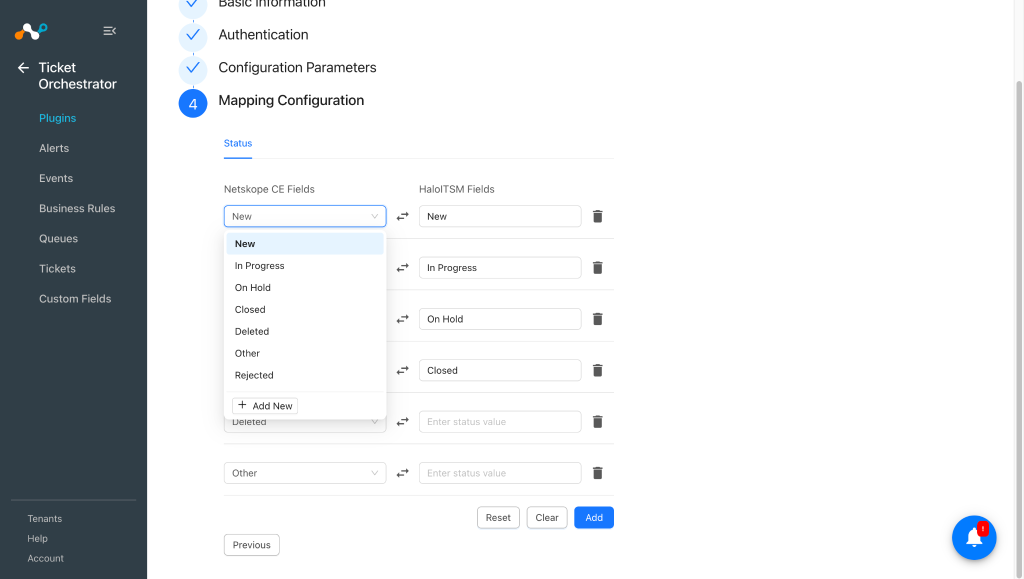
Provide the field name and click Add Field.
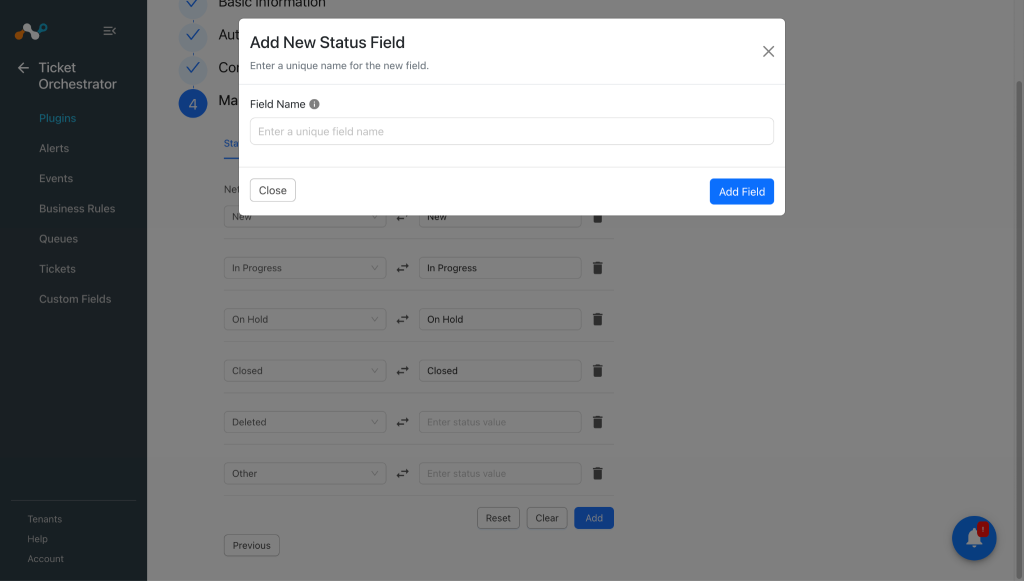
After the new status field is created, you can map it as per your need.
-
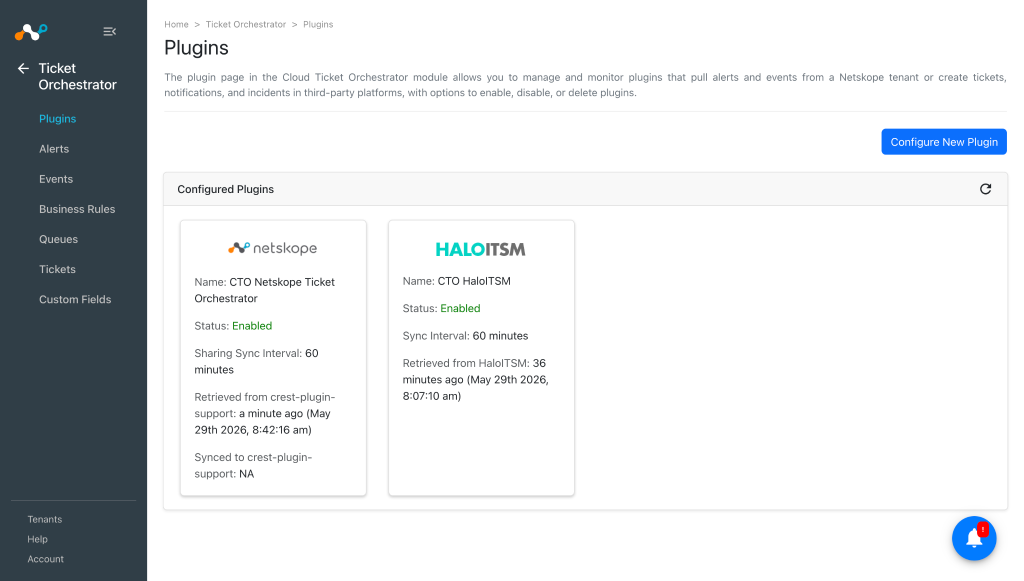
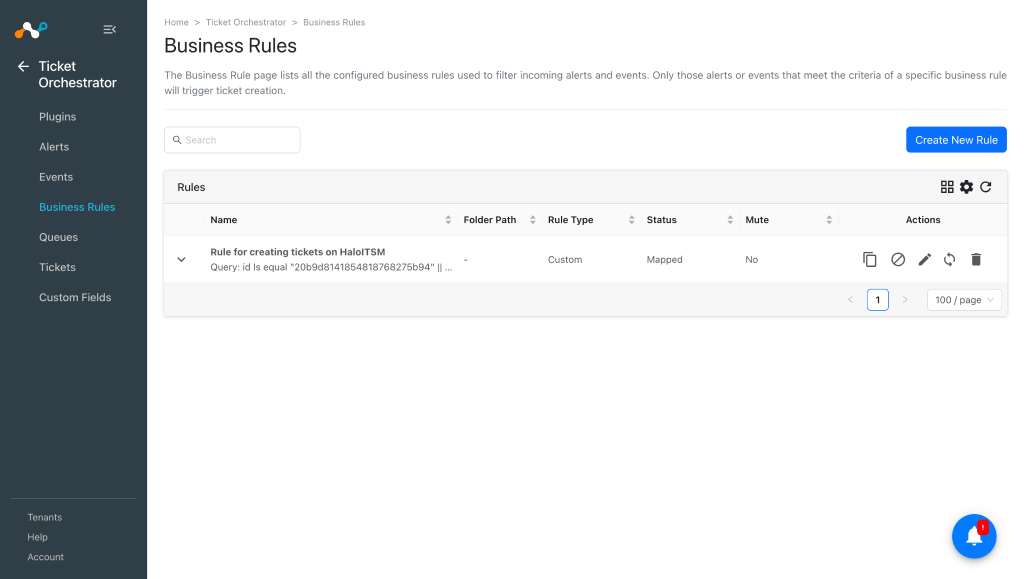
Click Save. The new configuration appears on the Ticket Orchestrator > Plugins page.


Configure a Ticket Orchestrator Business Rule for HaloITSM
Create a business rule based on the filters you need to generate tickets in the HaloITSM platform.
-
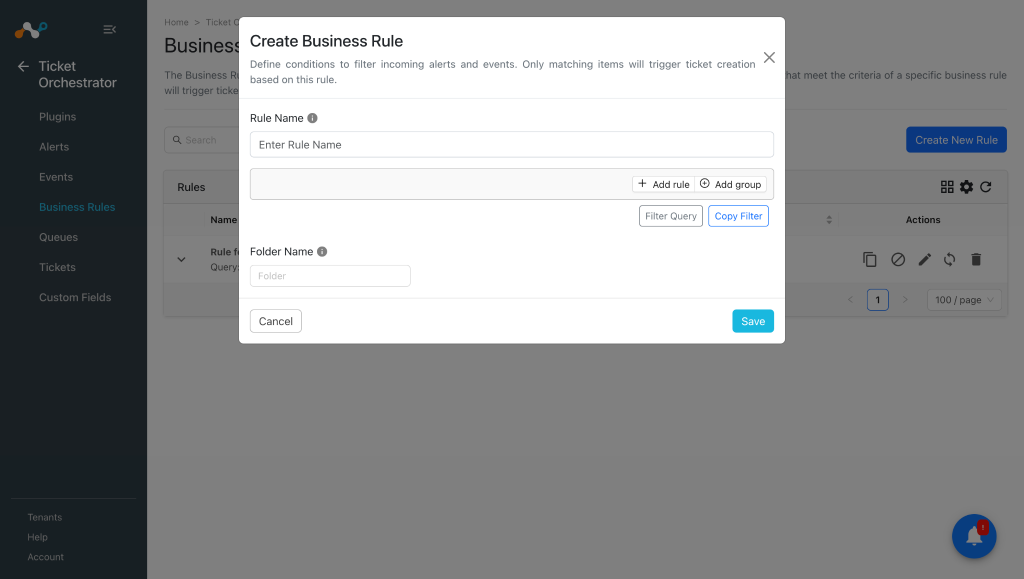
In Ticket Orchestrator, go to Business Rules and click Create New Rule.
-
Enter an appropriate Rule Name and build the appropriate filter query condition on the field(s) for the business rule. You can also type the query manually by pressing the Filter Query button.
-
Click Save.


Configure a Ticket Orchestrator Queue for HaloITSM
-
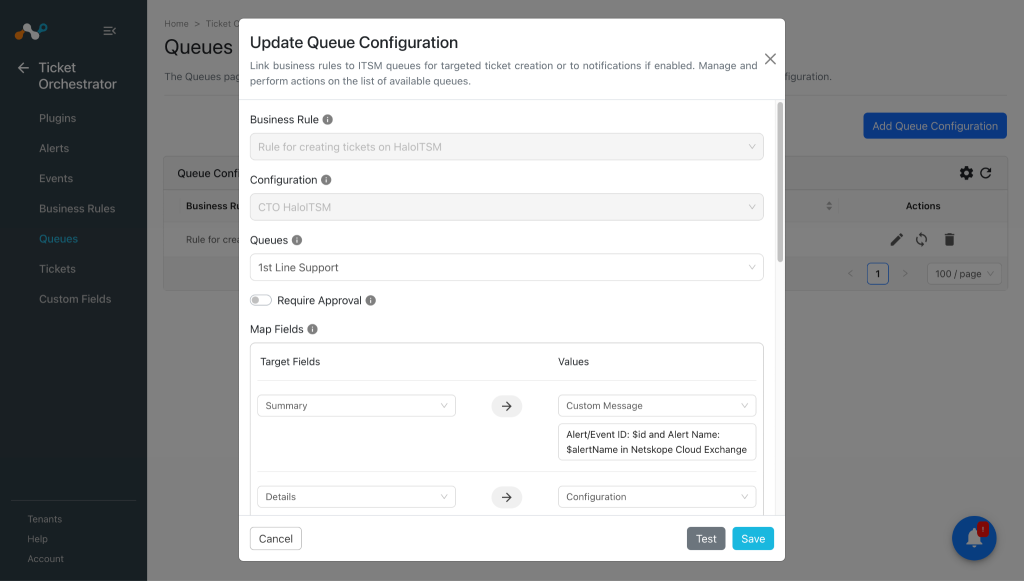
In Ticket Orchestrator, go to Queues and click Add Queue Configuration.
-
Select the previously created Business Rule from the dropdown.
-
Select the plugin Configuration from the dropdown for which the queue is being configured.
-
Select the Queues from the dropdown that will have a team list.
-
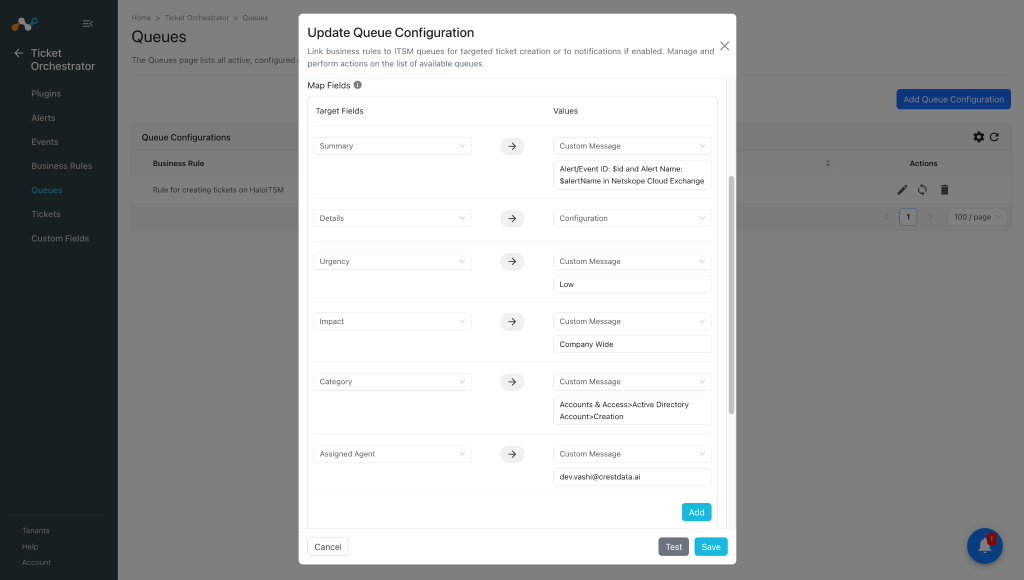
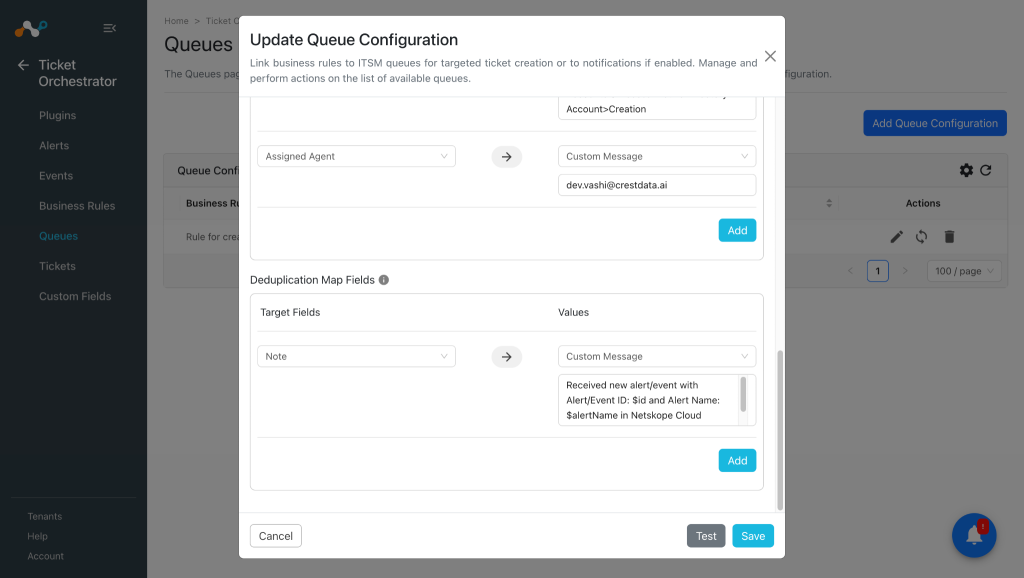
Add/Map appropriate values in the Map Field section. The provided Mappings should be visible in the ticket details created in the HaloITSM platform.
Note
- Different ticket types may have different required fields, so you need to map all the required fields per the selected ticket type in the plugin configuration. For more information related to the list of required fields per ticket type, you can contact the HaloITSM support team.
- For example, Incident ticket type has following required fields:
- Summary
- Details
- Category
- Impact
- Urgency
- By default all ticket types will not have any map fields, so you need to map the fields as per your needs, and make sure the required fields for that particular ticket types are mapped.
-
Click Save.
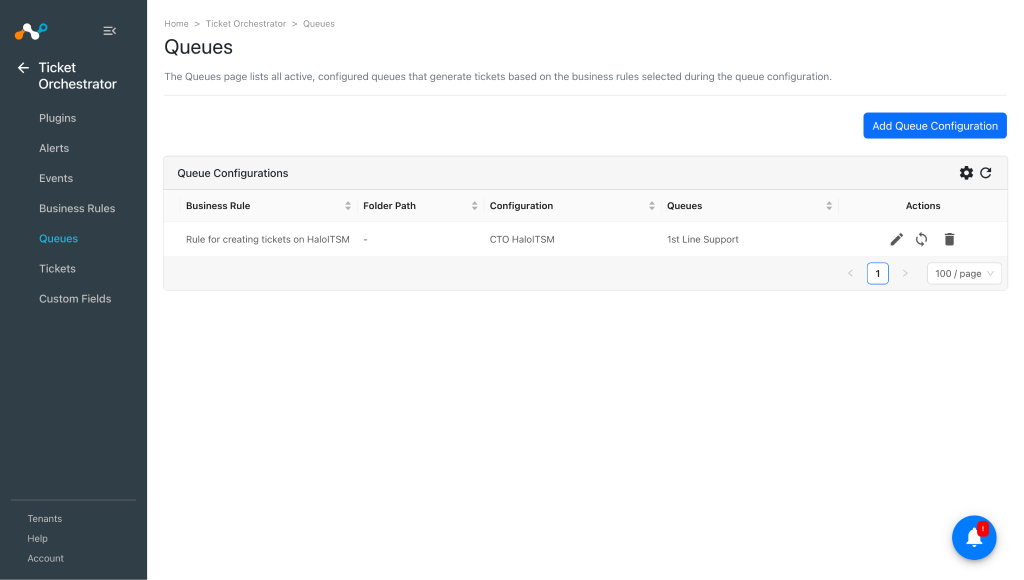
-
Based on the business rule(s), tickets for incoming alerts will be created automatically. To create Tickets for historical alerts, click on
 the button on the configured queue and enter the Time period (in days) and then click Fetch. It’ll show the number of alerts that are eligible for ticket creation. Click Sync to create Tickets data for those alerts.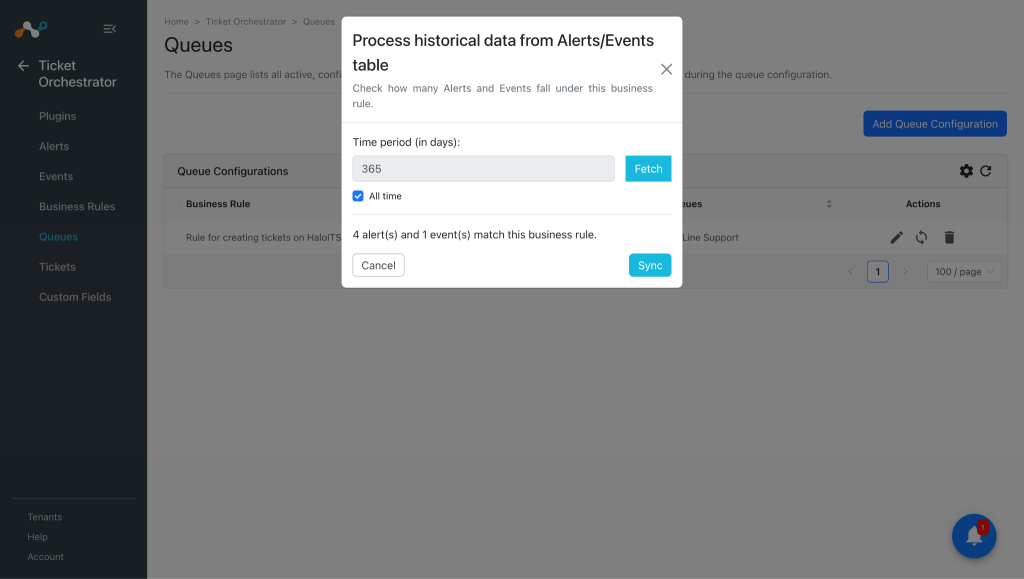


Validate the HaloITSM Plugin
Validate in Cloud Exchange
In order to validate the workflow, you must have Netskope Alerts.
To view the list of tickets created on HaloITSM Platform, go to Tickets in Ticket Orchestrator.

Go to Logging and check the logs for tickets created or updated.


Validate in HaloITSM
Click on the External Link of any ticket to directly go to the newly created Jira ticket. In the HaloITSM platform, go to Incidents, select the team, and search for your ticket.
Incident Event:

Malware alert:

Example of some other ticket types:


Troubleshooting the HaloITSM Plugin
Unable to configure HaloITSM Plugin.
If you are unable to configure HaloITSM Plugin, it might be due to one of these reasons:
- Provided incorrect credentials.
- Provided incorrect Tenant name.
- Provided authentication method other than selected in HaloITSM platform.
What to do:
Check the logs under logging, and make sure there are no errors. If there is an error, then resolve it using one of these fixes:
- Provide correct credentials.
- Provide the correct Tenant name. To check tenant names, refer to create an application section.
- Check the authentication method configured on the HaloITSM platform for a particular application.
Unable to change the ticket type in the plugin configuration
Change in ticket type is not reflected then it may be due to the user editing/updating the plugin configuration from an incorrect tab. For example: If you change the ticket type to Business Task, then click Next and Save the plugin from Mapping Configuration, then the change in ticket type will not be visible.
What to do: Make sure you save the configuration from the Configuration Parameters tab only after changing the ticket type.

Unable to create Tickets on HaloITSM
If you are not able to create tickets on the HaloITSM plugin, it might be due to one reasons:
- Authentication methods have been updated in the HaloITSM platform.
- Proper permissions are not set for the application.
What to do:
Check the logs under logging, and make sure there are no errors. If there is an error, then resolve it using one of these fixes:
- Make sure that the authentication method in the HaloITSM platform and in the plugin is the same.
- Make sure all the needed permissions are set for the application. To check permissions, refer to the Permissions section.
Unable to use the plugin after upgrading from older version
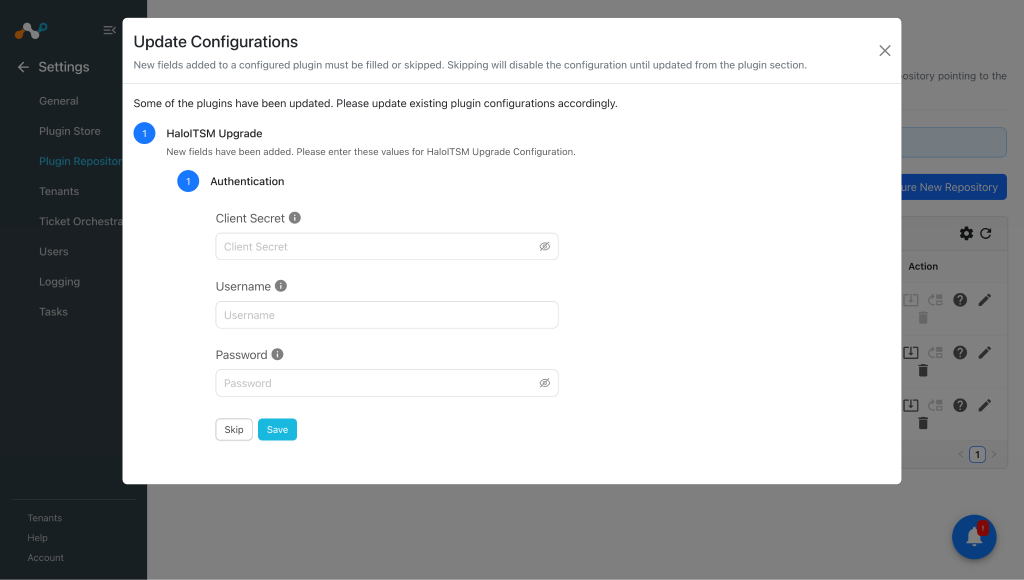
You will not be able to save the plugin while upgrading it due to change in the configuration parameters. Use the skip button while upgrading the plugin.
What to do:
-
While upgrading the plugin, use Skip.
-
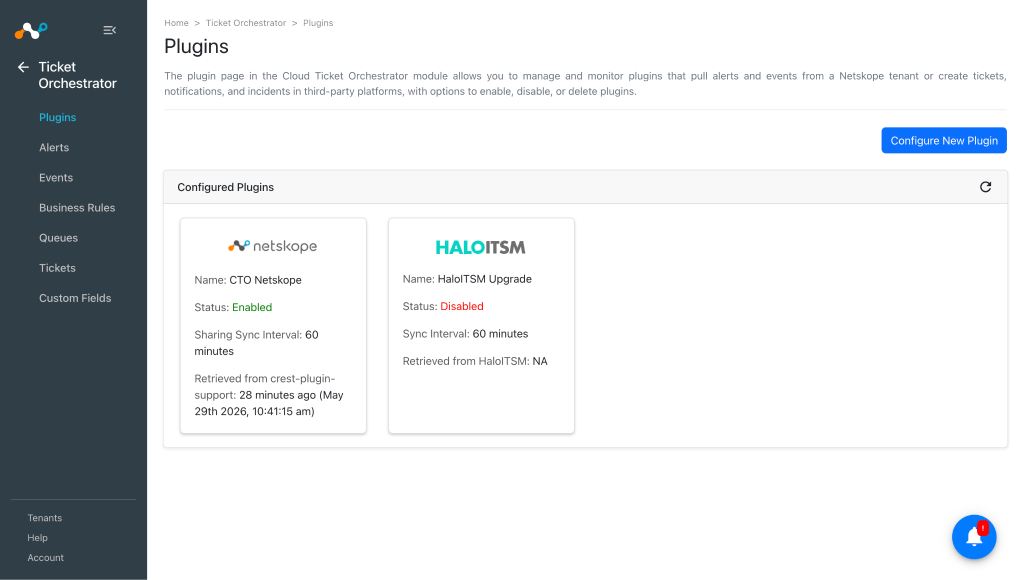
Move to the plugins page and edit the plugin.
-
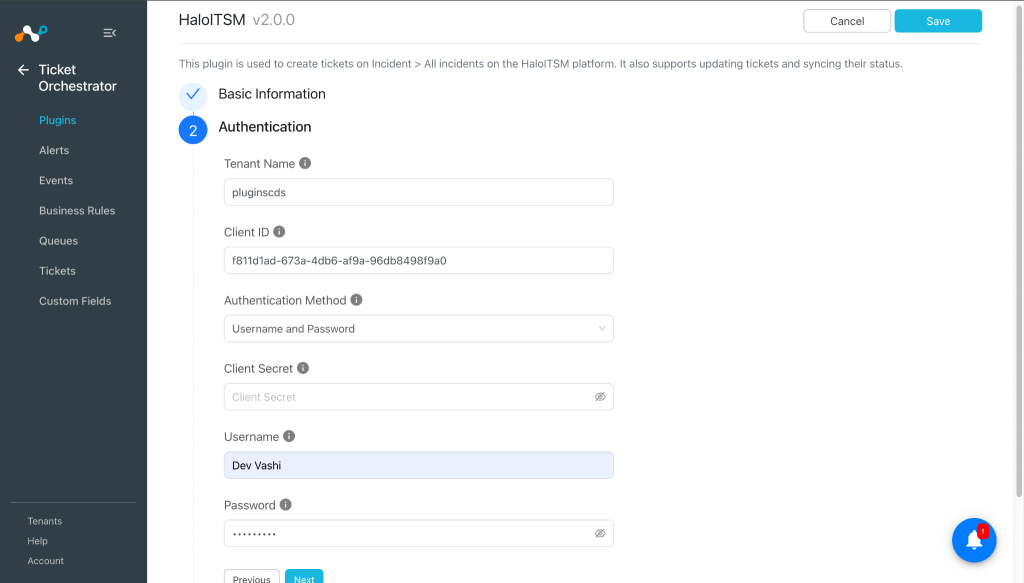
Provide the Authentication details and click Next.
-
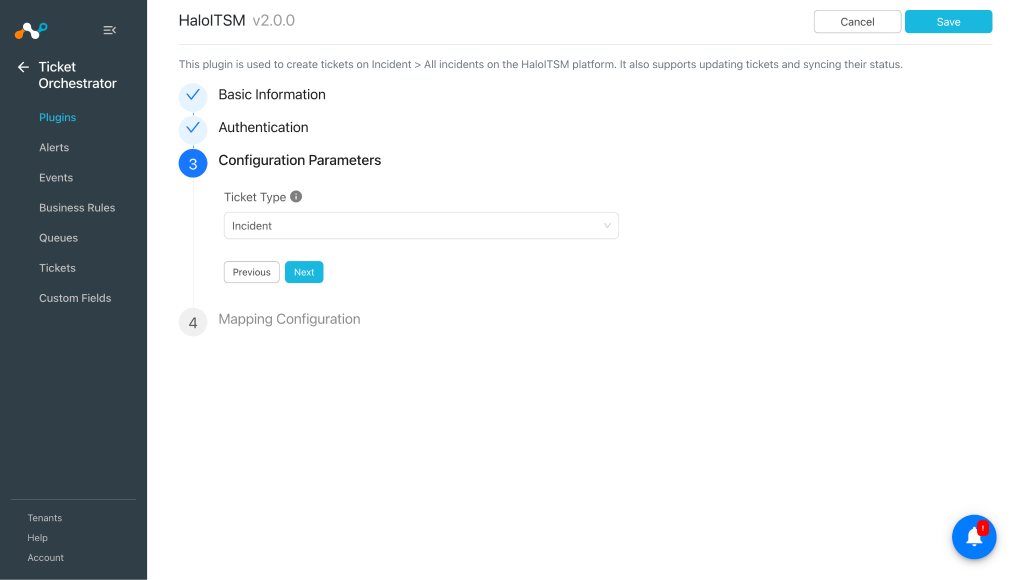
Select the required ticket type and click Save.
-
Enable the plugin.
If you have an already configured queue then you need to reconfigure the queue after upgrading the plugin as the older version of the plugin had some hardcoded map fields.


Created tickets are not assigned
If the created tickets are not assigned then it maybe due to one of these reasons:
- Incorrect mapping in the queue configuration
- Incorrect user email
- User not present under the used team
What to do:
- Verify the mapping in the queue configuration.
- Verify the email address.
- Verify whether the user is present under that particular team.
- Open an already created ticket and check the Team/Assigned Agent field to ckech the members under a particular team.

Plugin not able to sync the status, severity and assignee or create/update ticket with assignee mapped
We have observed that with the minimum permissions, sometimes the plugin was not able to sync the status, severity and assignee.
What to do:
If you encounter such issues, then provide all. Enabling this permission will give this application all permissions. The application will be able to do everything that the Agents permissions allow.
Known Behavior
- It’s been observed that sometimes the tickets are created with incorrect values. For example, when you configure the plugin with ticket type as Incident and execute a queue configuration, it creates tickets with the type Business Task. Similarly, if you have used team as 1st-line support, then it sometimes creates tickets with the team Infrastructure.
- If the Assigned agent is mapped and the agent is not under the selected team, then the created tickets will remain unassigned.
- HaloITSM APIs does not return 401 Unauthorized error for permissions related issues. So if any of the plugin features stops working, then try to update the permissions to all.
- To change the ticket type, you need to save the plugin from the Configuration Parameters tab only. If you update the ticket type and save the plugin from Mapping Configuration or Authentication or Basic Information tab, then the change will not be reflected.
- You will not be able to use the plugin after a plugin upgrade. While upgrading the plugin from the older version, you need to use the Skip button, and then need to manually edit the plugin configuration. Provide the valid credentials and ticket type, then save the plugin and enable it. If you have an already configured the queue, then you need to reconfigure the queue after upgrading the plugin, because the older version of the plugin had some hardcoded map fields.