HTTP headers are used in Real-time Protection policies to match against various fields in the HTTP Request and Response headers. Currently, while configuring a Real-time Protection policy, the list of available attributes are based on the traits of the source web-client (User, OS, Browser) and the destination web-domain (App, Activity, Category).
You can create many combinations of these policy attributes to enforce their security compliance objectives. The HTTP header profile expands the policy framework with an option to specify and evaluate HTTP headers during real-time processing of web traffic. This provides more granular control by making available the option to include HTTP header parameters along with the other existing parameters.
Once an HTTP header profile is created, you can select it from a Real-time Protection policy.
Creating HTTP Header Profiles
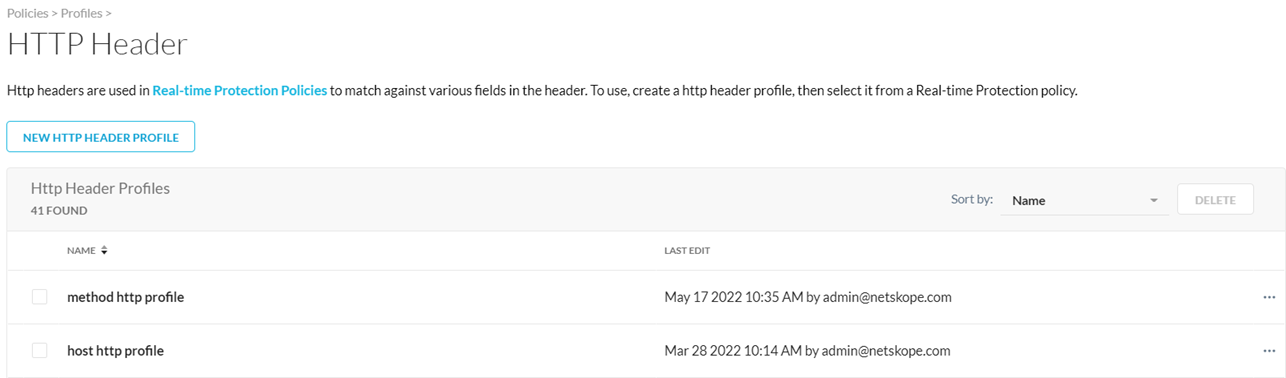
To create an HTTP header profile, navigate to Policies > HTTP Header.
Click the button. The New HTTP Header Profile page opens.
Enter a Name for the HTTP Header profile.
Use the tabs to specify HTTP Header fields that you want to match against. All the header fields are “AND”ed together, and all the values in a single header field are “OR”ed together.
Tip
No wildcard or substring support at this time, exact match only.
The following table lists and describes some examples of the fields available in the Request and Response tabs when creating a new HTTP Header profile. For a full list of available fields, see the Netskope UI.
In the Request tab, the default Request fields are Method and Host. Click the Add Request Fields dropdown to add more fields.
In the Response tab, the default Response field is Content-Type. Click the Add Response Fields dropdown to add more fields.
For certain header fields, you can click + Add to add more attributes to the field.
Field
Attribute Type
Value Example
Accept-Encoding
String Arbiter (exact match)
Case-insensitive
gzip
deflate
Host
String Arbiter (exact match)
Case-insensitive
en.wikipedia.org:8080
en.wikipedia.org
Referer
String Arbiter (exact match)
Case-insensitive
http://en.wikipedia.org/wiki/Main_Page
Method
String Arbiter (exact match)
Case-insensitive
get
post
put
Content-Encoding
String Arbiter (exact match)
Case-insensitive
gzip
Content-Type
String Arbiter (exact match)
Case-insensitive
application/x-www-form-urlencoded
Origin
String
https://www.google.com
Upgrade
String Arbiter (exact match)
Case-insensitive
Example 1 Upgrade: websocket
Example 2 Upgrade: HTTP/2.0, SHTTP/1.3, IRC/6.9, RTA/x11
You can create custom HTTP header fields for your profile, which also allows you to create additional standard HTTP header fields.
Note
Once the extended HTTP headers feature is enabled and you create new fields, this feature can’t be downgraded. All existing HTTP header profiles that you created prior to upgrading will be migrated and continue to work.
To add a custom header field:
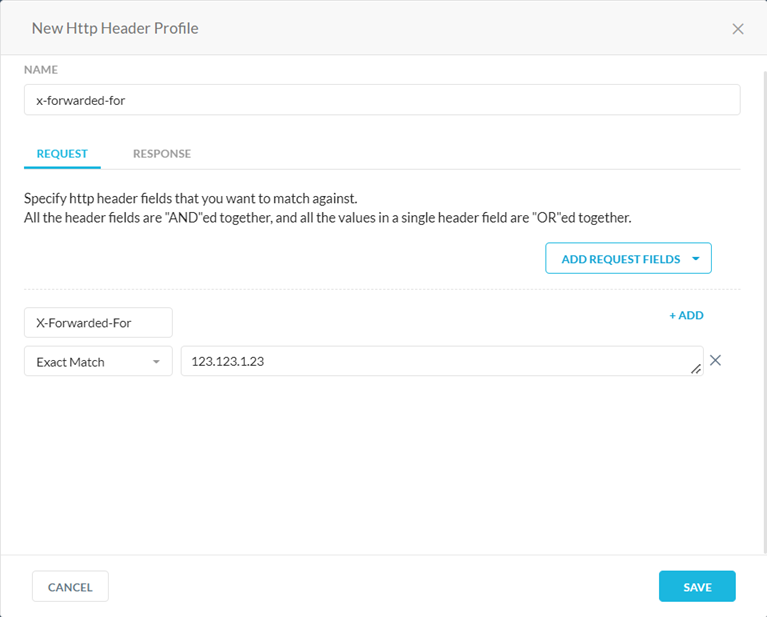
Click Custom from the Add Request Fields or Add Response Fields dropdown. The new custom header field appears.Enter a new name for the header field. The name must be unique and different from the existing default header fields. Select an attribute from the dropdown and enter a value for the custom field. You can configure the following attributes for the field:
Regex: Enter the regular expressions you want to match against. Note that HTTP Header Profiles do not support negation (e.g., zero-width assertions). Ensure that when regex matching is used, regex itself has to match whole string of HTTP header value. For example regex www\.google\.com.+ will not match https://www.google.com/; but will match only www.google.com/.
Exact Match: Enter the values you want to match against, separated by commas.
Numerical: Select an operator and enter the numerical values you want to match against.
Click + Add to add more attributes for the field. You can configure Regex and Exact Match attributes together for your field. However, you can’t add Numerical attributes together with Regex or Exact Match attributes.
You can use HTTP header profiles to block WebDAV traffic. Netskope recommends blocking all WebDAV HTTP methods and headers in your policy.
To block WebDAV traffic:
On the New HTTP Header Profile page, go to the Request tab.
In the Method field, select the methods defined in the WebDAV extension. Available WebDAV HTTP methods include: move, copy, mkcol, propfind, proppatch, lock, and unlock.
(Optional) You can select additional header fields to block WebDAV traffic. Click Add Request Fields and Add Response Fields to select and configure the WebDAV headers. Keep in mind that all the header fields are “AND”ed together, and all the values in a single header field are “OR”ed together. Available WebDAV headers include: DAV, Depth, Destination, If, Lock-Token, and Overwrite.
Click Save to add the HTTP Header profile to the Profiles list.
Using the HTTP Header Page
From the HTTP Header list page:
(Optional) You can sort your HTTP Header profiles by profile names.
Click the ellipses at the end of the profile name to edit or delete an HTTP Header profile.
You can select the checkbox to the left of the profile names to bulk delete profiles.
Adding HTTP Header Profiles to Real-time Protection Policies
You can add any HTTP Header profile to a Real-time Protection policy. Navigate to the Real-time Protection policies list page.
HTTP Header profiles encapsulate different fields of an HTTP Header. Click in the HTTP Header field to add from the list.
If you do not have any existing profiles, you can create one directly from the policy creation page. Click the gear icon to open the HTTP Header Profiles list page in a separate tab.


 button. The New HTTP Header Profile page opens.
 tabs to specify HTTP Header fields that you want to match against. All the header fields are “AND”ed together, and all the values in a single header field are “OR”ed together.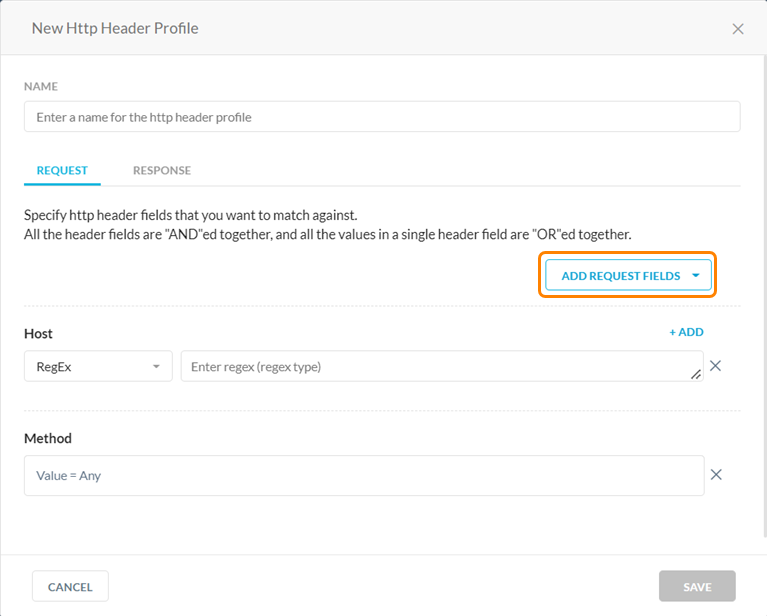


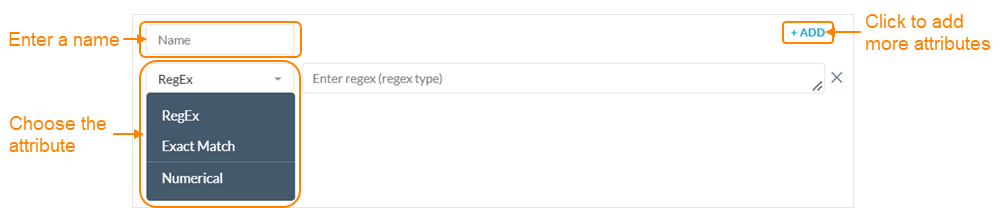 Click + Add to add more attributes for the field. You can configure Regex and Exact Match attributes together for your field. However, you can’t add Numerical attributes together with Regex or Exact Match attributes.