

Release Notes
1.0.2
Added
- Added support for additional fields in Host entity field mappings.
Fixed
- Added resolution for error logs.
- Updated validation checks and refactored code to improve maintainability.
1.0.1
Added
- Updated plugin logo.
1.0.0
Added
- Initial Release.
This document explains how to configure the Illumio v1.0.2 plugin with the Risk Exchange module of the Netskope Cloud Exchange platform. This plugin is used to fetch Hosts from Servers and Endpoints > Workloads in the Illumio platform. This plugin does not support any actions on hosts.
Prerequisites
To configure this plugin, you need:
- A Netskope tenant (or multiple, for example, production and development/test instances).
- A Netskope Cloud Exchange instance with the Tenant plugin and Risk Exchange plugin already configured.
- Illumio platform credentials (PCE URL, PCE Port Number, PCE Organization ID, API Authentication Username, API Secret, Label Scope) for API Authentication.
- Connectivity to the following host: Illumio Platform URL (like https://login.illum.io/login).
Illumio Plugin Support
This plugin is used to fetch Hosts from Servers and Endpoints > Workloads in the Illumio platform. This plugin does not support any actions on hosts.
| Type of Data Pulled | Action |
|---|---|
| Hosts | No Action |
Mappings
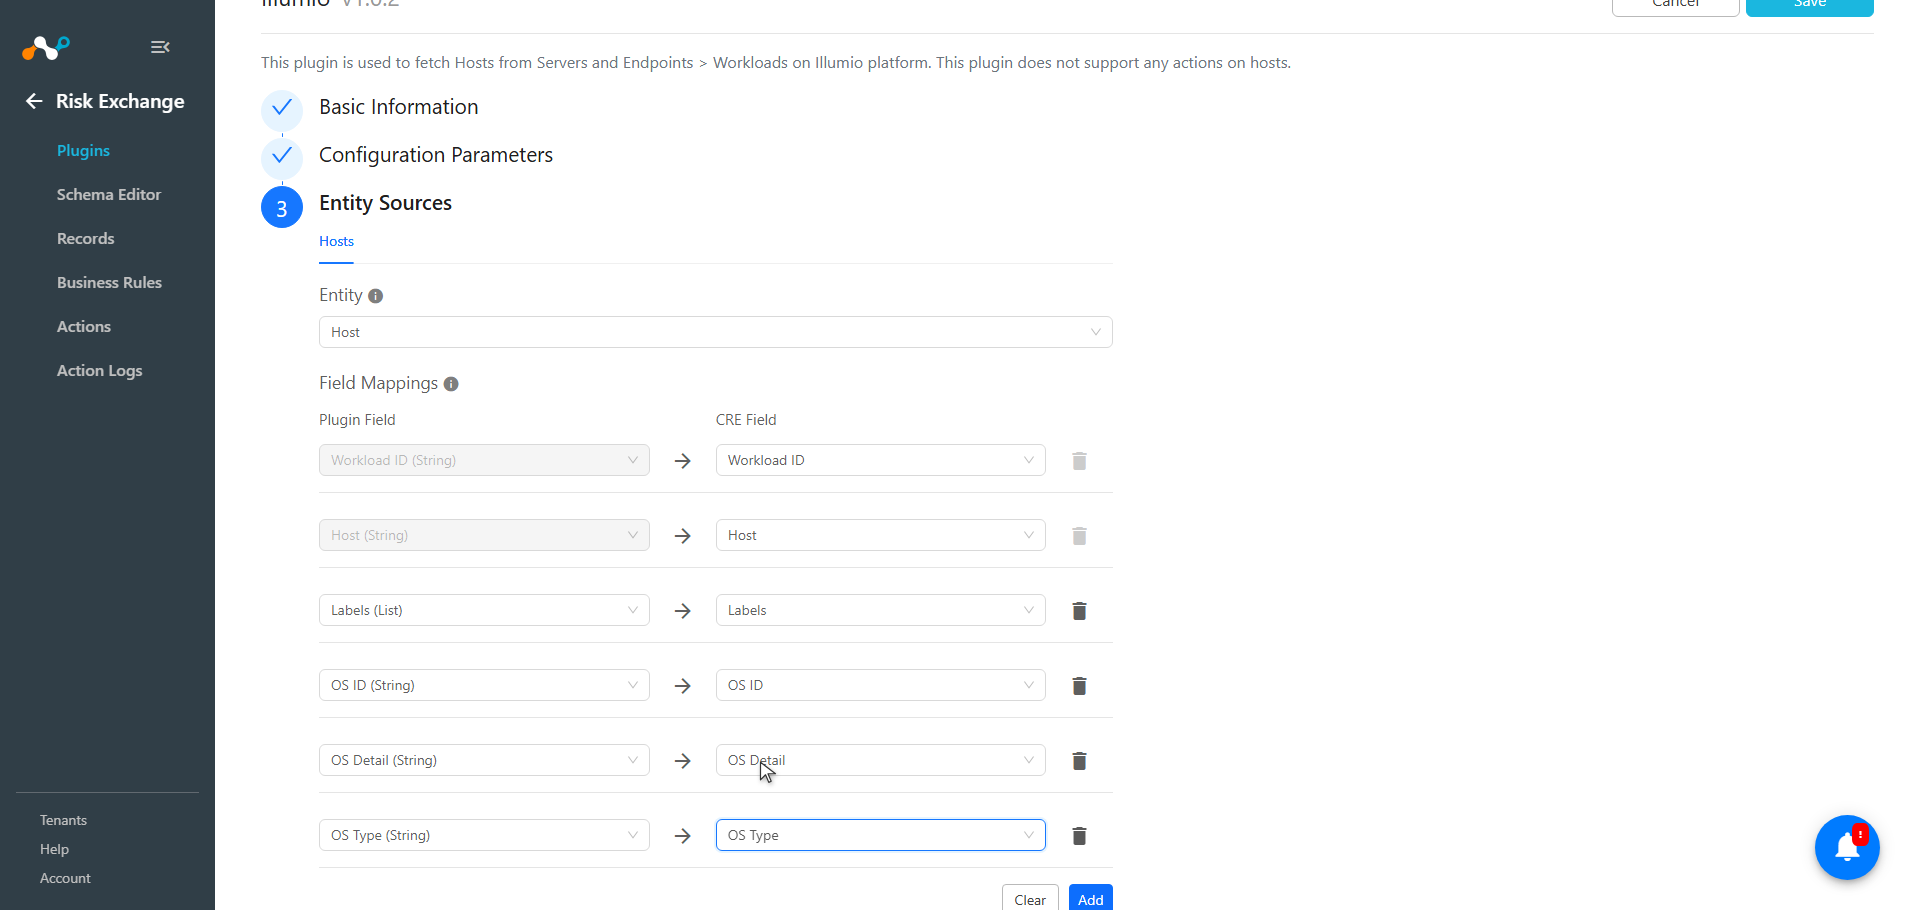
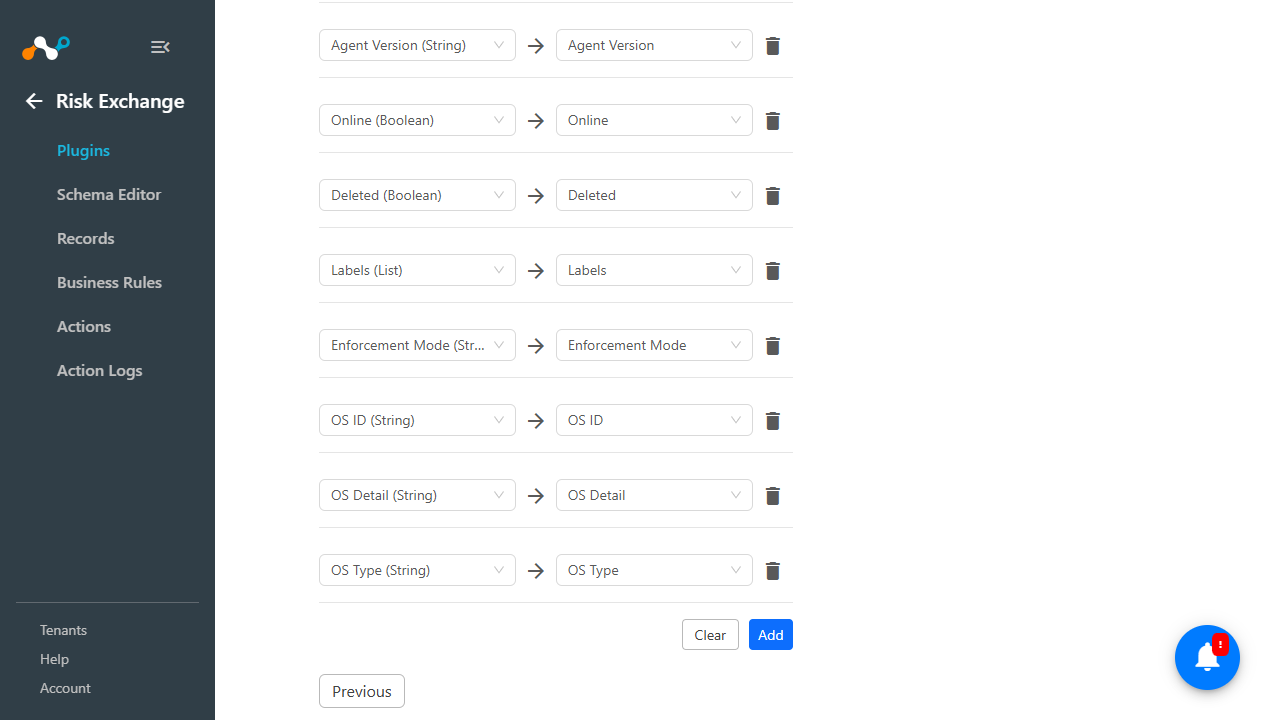
Mappings are used to view the pulled Hosts and their respective details. Fields mapped during plugin configuration will be visible on the Records page after the data is pulled. Here are the suggested mappings to use while configuring the plugin.
Pull Mapping for Hosts
| Plugin Field Label | Expected Data Type | Suggested Field Label | Aggregate Strategy | Example |
|---|---|---|---|---|
| Workload ID | String | Illumio_Workload_ID | Unique | abc123 |
| Host | String | Illumio_Host | Unique | web-prod-01 |
| Public IP | String | Illumio_Public_IP | Overwrite | 203.0.113.10 |
| Agent Mode | String | Illumio_Agent_Mode | Overwrite | idle |
| Agent Status | String | Illumio_Agent_Status | Overwrite | active |
| Agent Version | String | Illumio_Agent_Version | Overwrite | 23.5.10-0 |
| Online | Boolean | Illumio_Online | Overwrite | true |
| Deleted | Boolean | Illumio_Deleted | Overwrite | false |
| Labels | List | Illumio_Labels | Overwrite | [“env:Quarantine”, “loc:ca”] |
| Enforcement Mode | String | Illumio_Enforcement_Mode | Overwrite | visibility_only |
| OS ID | String | Illumio_OS_ID | Overwrite | ubuntu |
| OS Detail | String | Illumio_OS_Detail | Overwrite | Ubuntu 22.04.3 LTS |
| OS Type | String | Illumio_OS_Type | Overwrite | linux |
Permissions
Make sure you have Global Access for all scopes. You can check this by clicking on your profile name from the top right corner in My Roles.
API Details
This plugin uses Python libraries to authenticate with the Illumio API.
Library: illumio (version = ‘1.1.3’)
Create a PCE(PolicyComputeEngine) Object
pce = PolicyComputeEngine(
                url=configuration.get("pce_url", "").strip().strip("/"),
                port=configuration.get("pce_port"),
                org_id=configuration.get("org_id"),
                **kwargs
            )
            pce._session.headers.update(headers)
            pce.set_credentials(configuration.get("api_username").strip(), configuration.get("api_secret"))
            pce.set_tls_settings(verify=self.ssl_validation)
            if self.proxy:
                pce.set_proxies(
                    http_proxy=self.proxy.get('http', ''),
                    https_proxy=self.proxy.get('https', '')
                )
Checks the connection to the PCE
pce.must_connect()
Retrieve Label object HREFs from the PCE
labels = self.pce.labels.get(
                    params={"key": key, "value": value}
                )
Fetch All the workloads matching the Label Scope
workloads = self.pce.workloads.get_async(
                # the labels query param takes a JSON-formatted nested list of
                # label HREFs - each inner list represents a separate scope
                params={
                    'labels': json.dumps(refs),
                    # include label keys/values in the response data
                    'representation': 'workload_labels'
                }
            )
Performance Matrix
Below performance readings are conducted on a Large CE Stack with below-mentioned VM specifications by pulling 500k Hosts from the Illumio plugin.
| Description | Specification |
|---|---|
| Stack details | Size: Large RAM: 32 GB CPU: 16 Cores |
| Time take to store the pulled and updated Hosts records | ~ 20 minutes |
User Agent
netskope-ce-6.1.0-cre-illumio-v1.0.2
Workflow
- Generate the API Authentication Username, Password, and Organization ID.
- Get Labels.
- Configure the Illumio plugin.
- Configure a Business Rule.
- Configure an Action.
- Validate the plugin.
Watch a Video
Click play to watch a video.
Generate the API Authentication Username, Password, and Organization ID
- Log in to the Illumio platform.
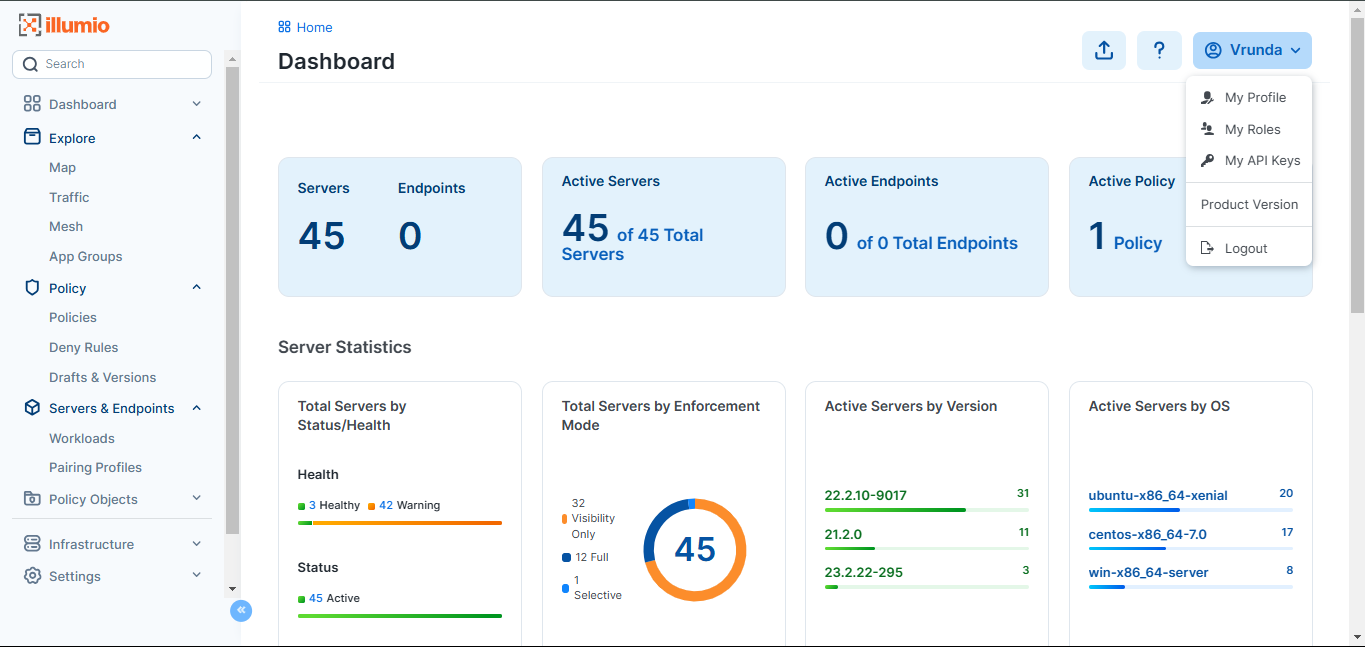
- In the top right corner, select your account name and click My API Keys.
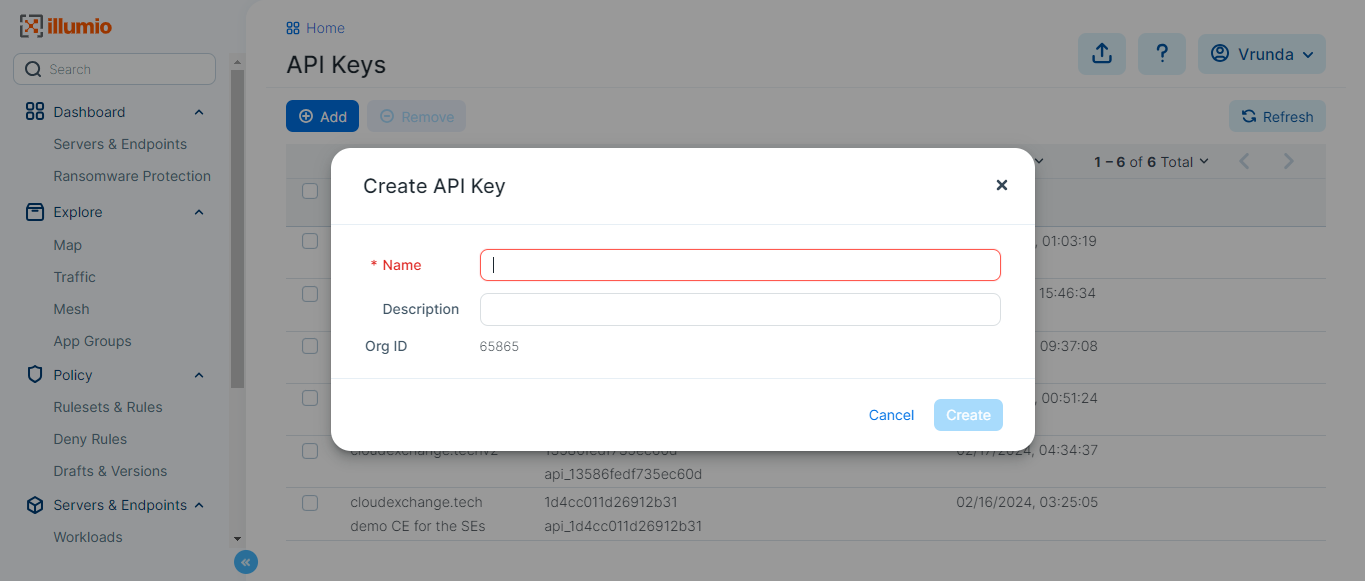
- Click Add. You will see your Org ID. Copy it to use in your plugin. Enter your name and a description for creating an API Authentication Username password, and then click Create.
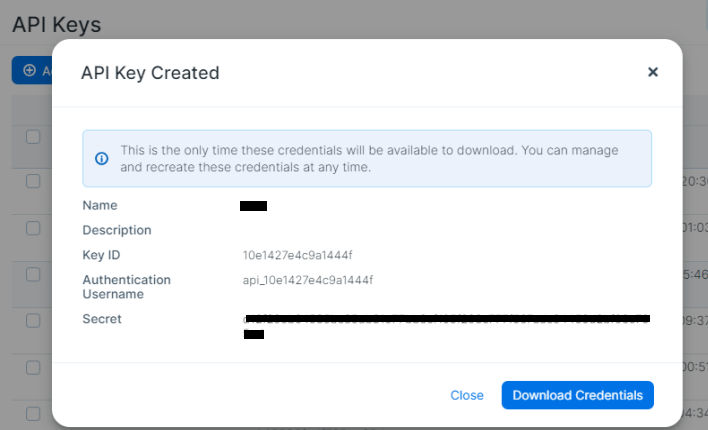
- Save the Authentication Username and Secret value. These will be used to configure the plugin and are only visible this once.
Get Labels
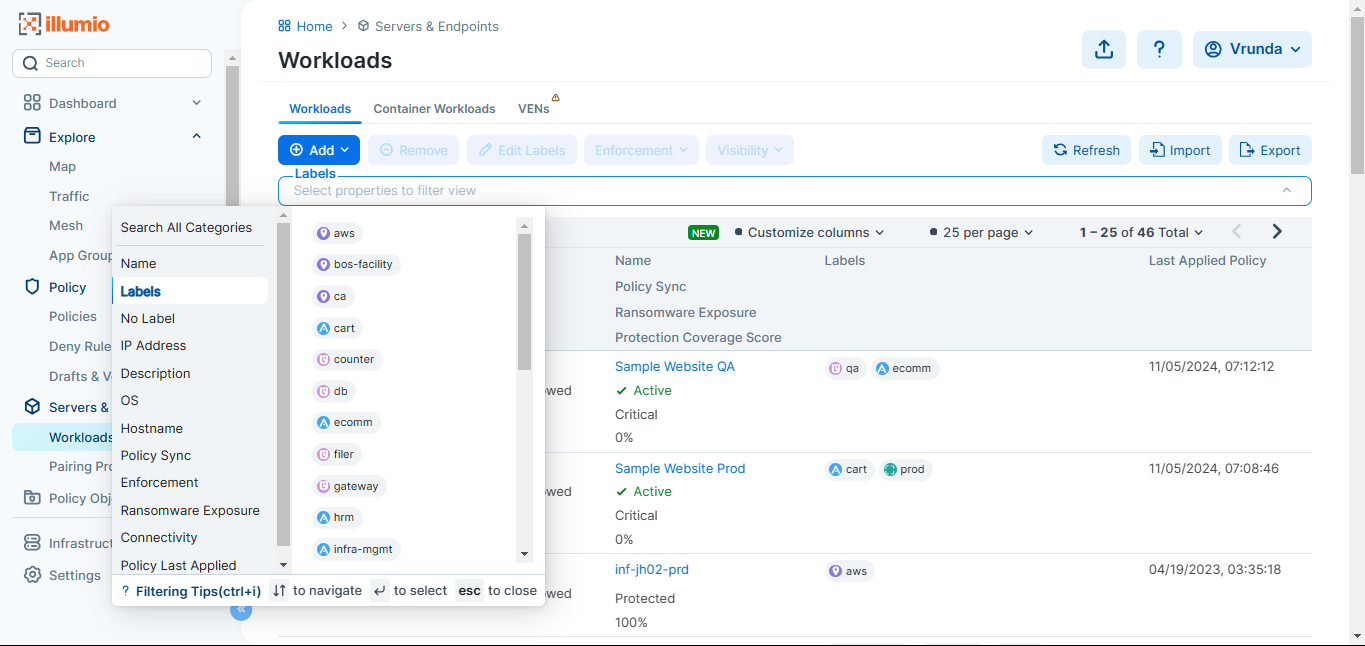
- In Illumio, go to Servers and Endpoints > Workloads.
- Search the Labels available on the search tab. Get the Labels that you want to use in the plugin for pulling data. Hover over the label names to check the type of Label.
Configure the Illumio Plugin
-
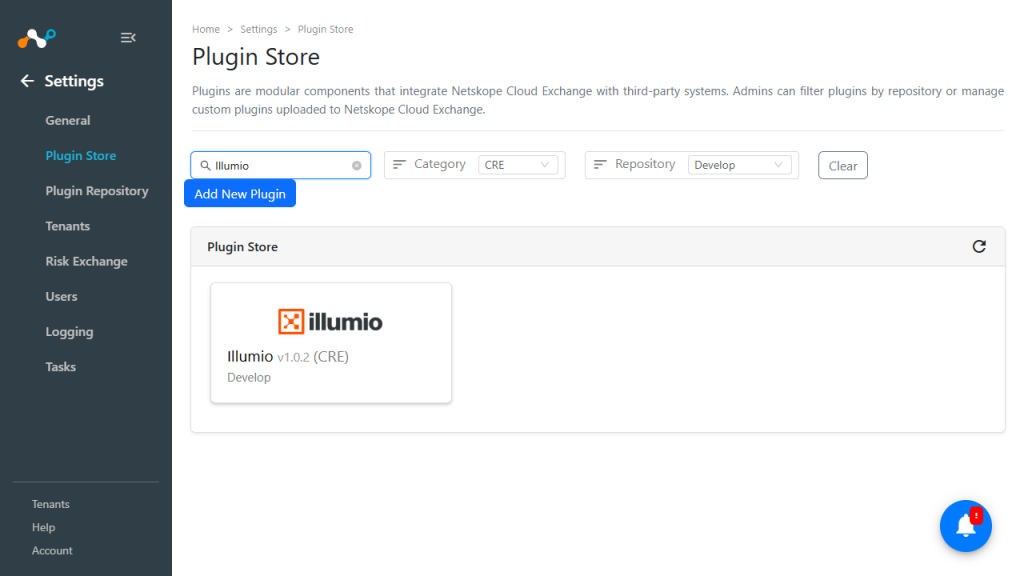
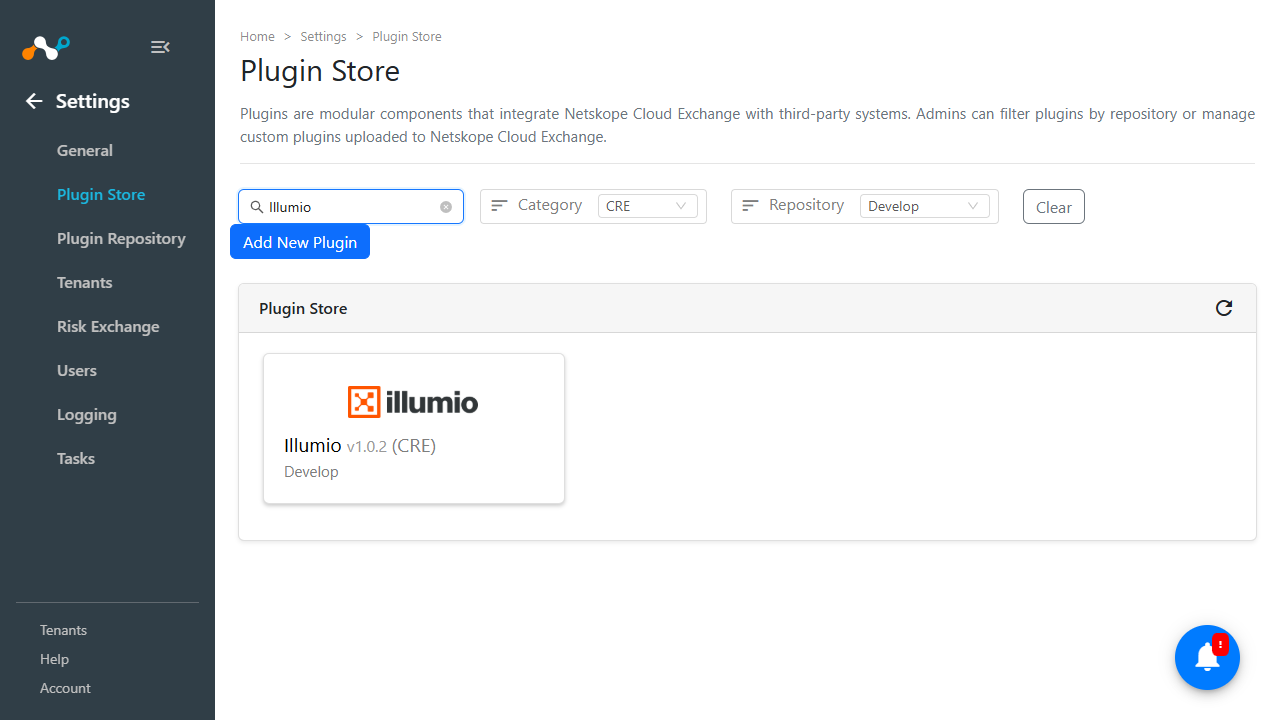
In Cloud Exchange, go to Settings > Plugin Store. Search for and select the Illumio v1.0.2 (CRE) plugin.
-
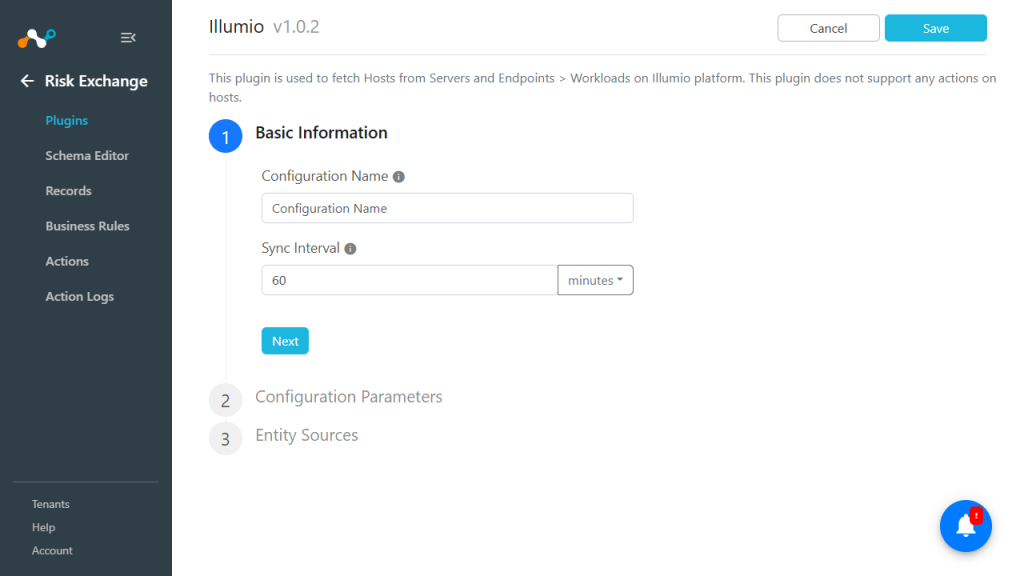
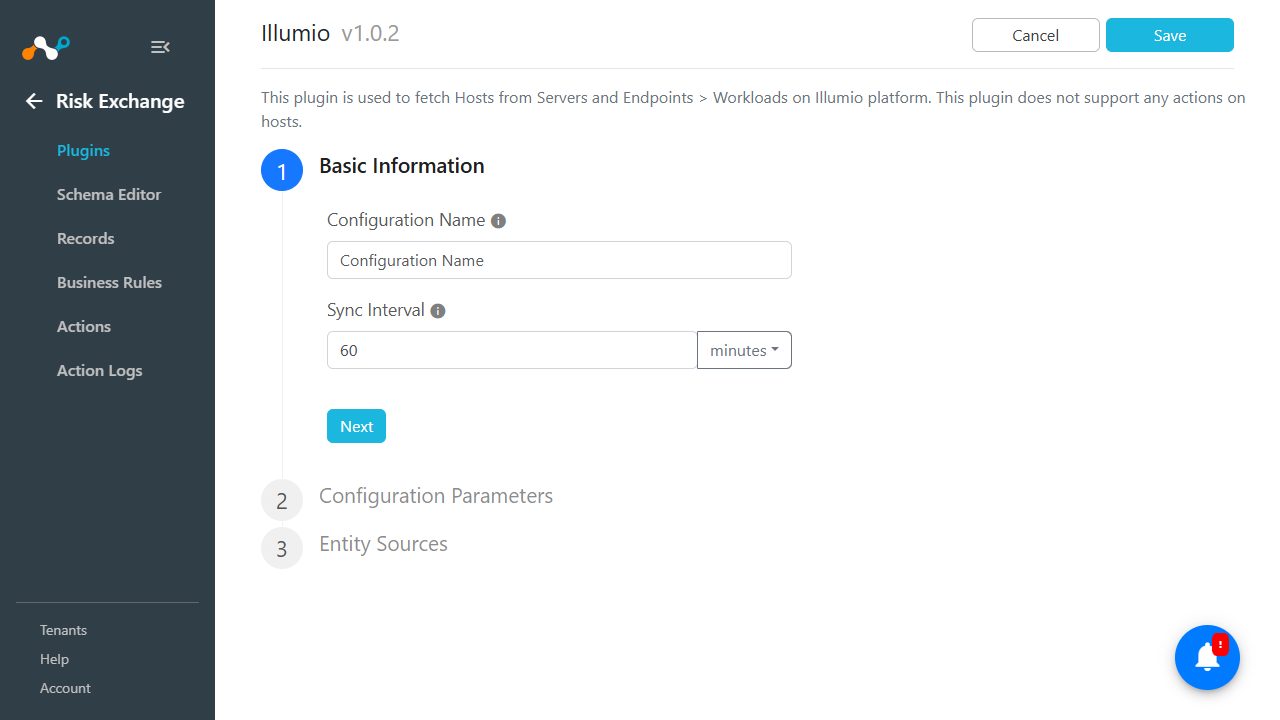
Add a Configuration Name and change the Sync Interval if needed.
-
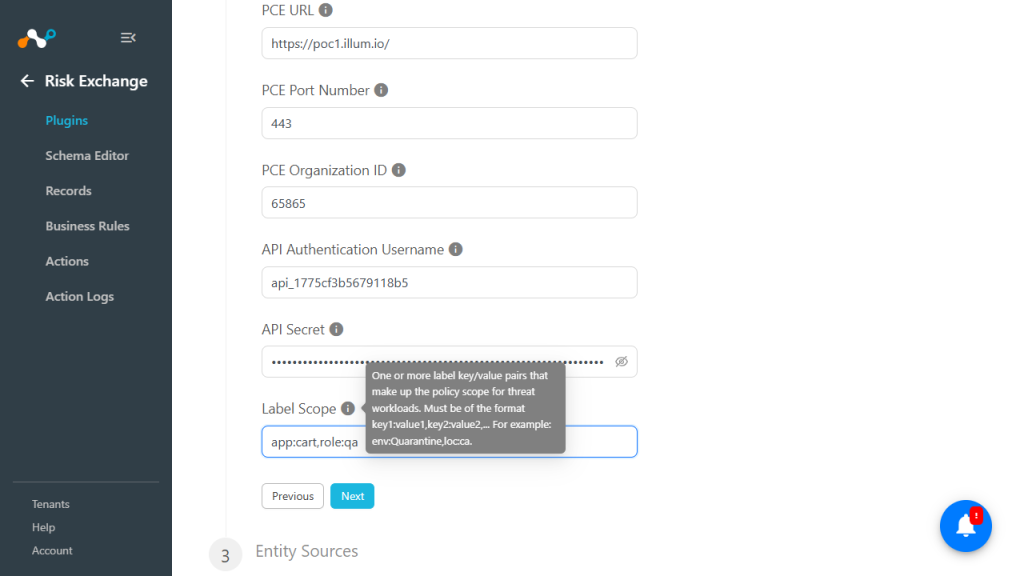
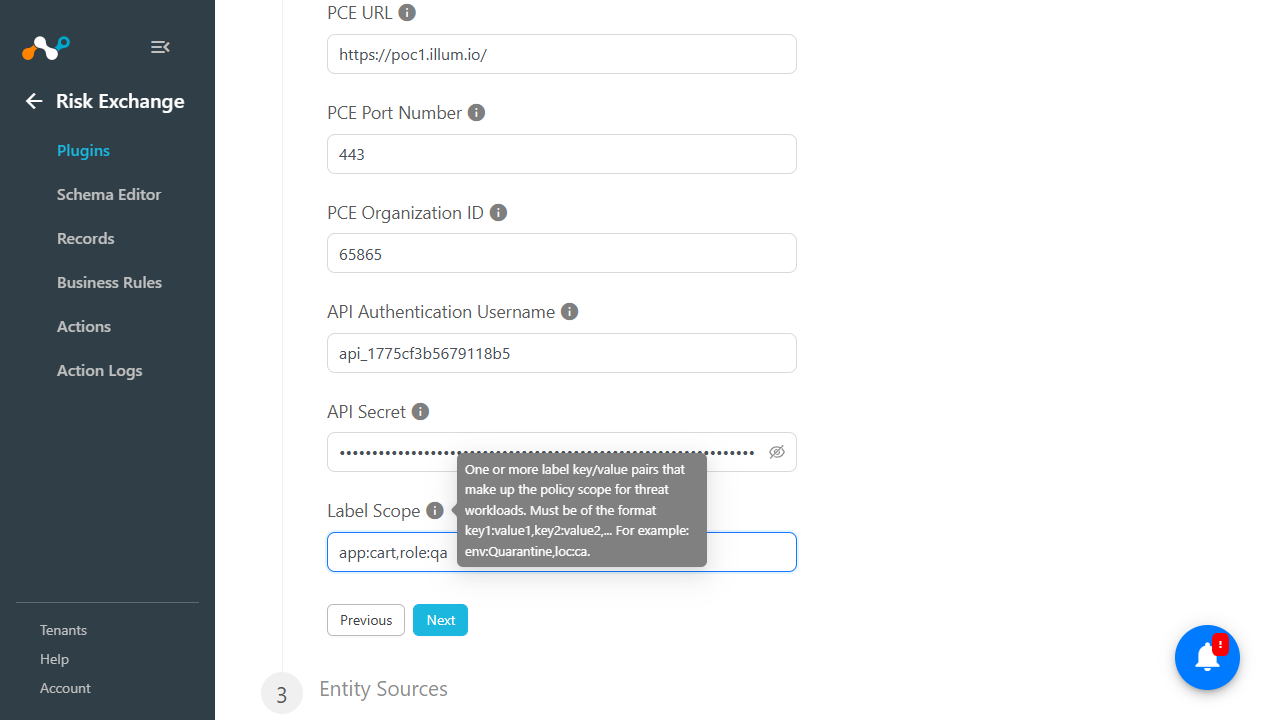
Click Next, and enter the Configuration Parameters:
- PCE URL: Base URL of your Illumio Platform, like https://my.pce.com.
- PCE Port Number: PCE port number, use 443 for SaaS instances.
- PCE Organization ID: Illumio PCE Organization ID from My API Keys.
- API Authentication Username: API Authentication Username generated on the Illumio PCE from My API Keys.
- API Secret: API Secret generated on the Illumio PCE from My API Keys.
- Label Scope: One or more label key/value pairs that make up the policy scope for threat workloads, in the format key1:value1,key2:value2,….
-
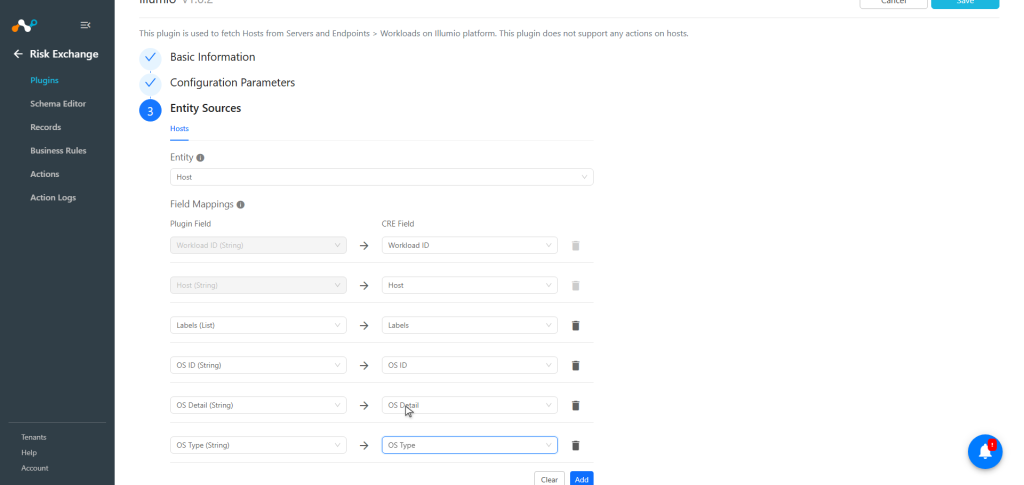
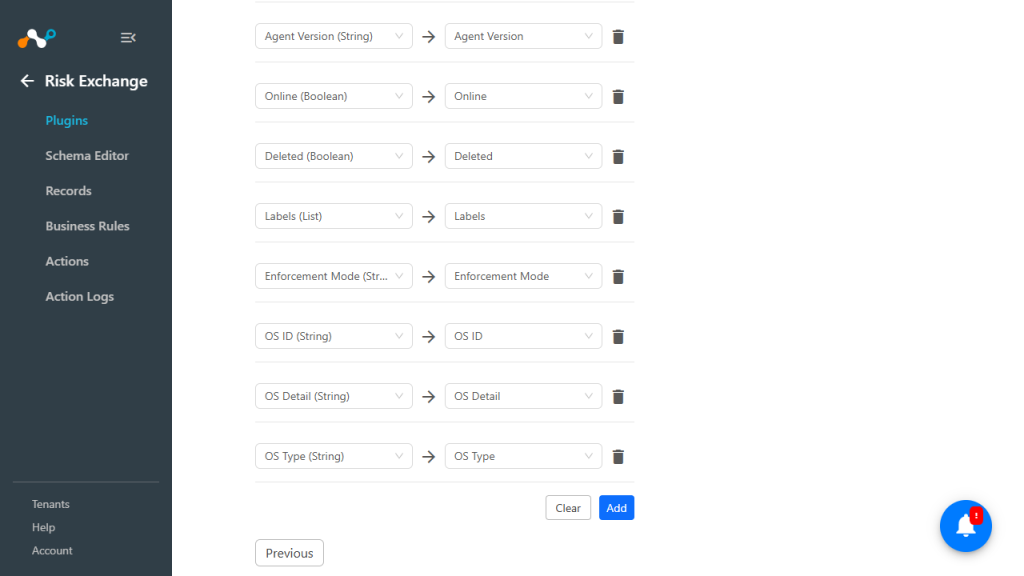
Click Next and select the Entity from the Entity dropdown. The Entity fields can be created with the Schema Editor, or using the + Add Field from the field dropdown. Provide the field mapping. For the suggested mappings, refer to the Mappings section.
-
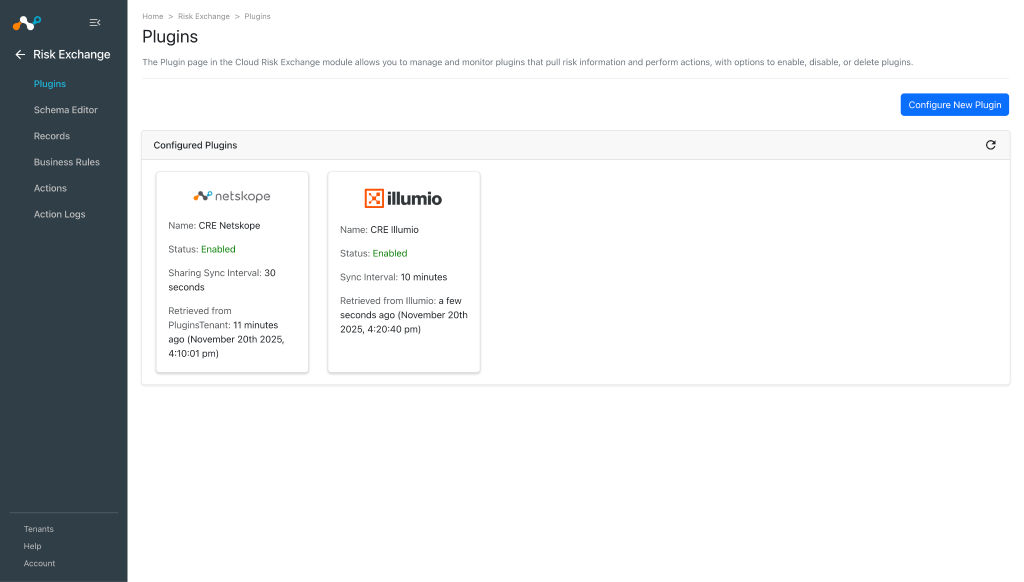
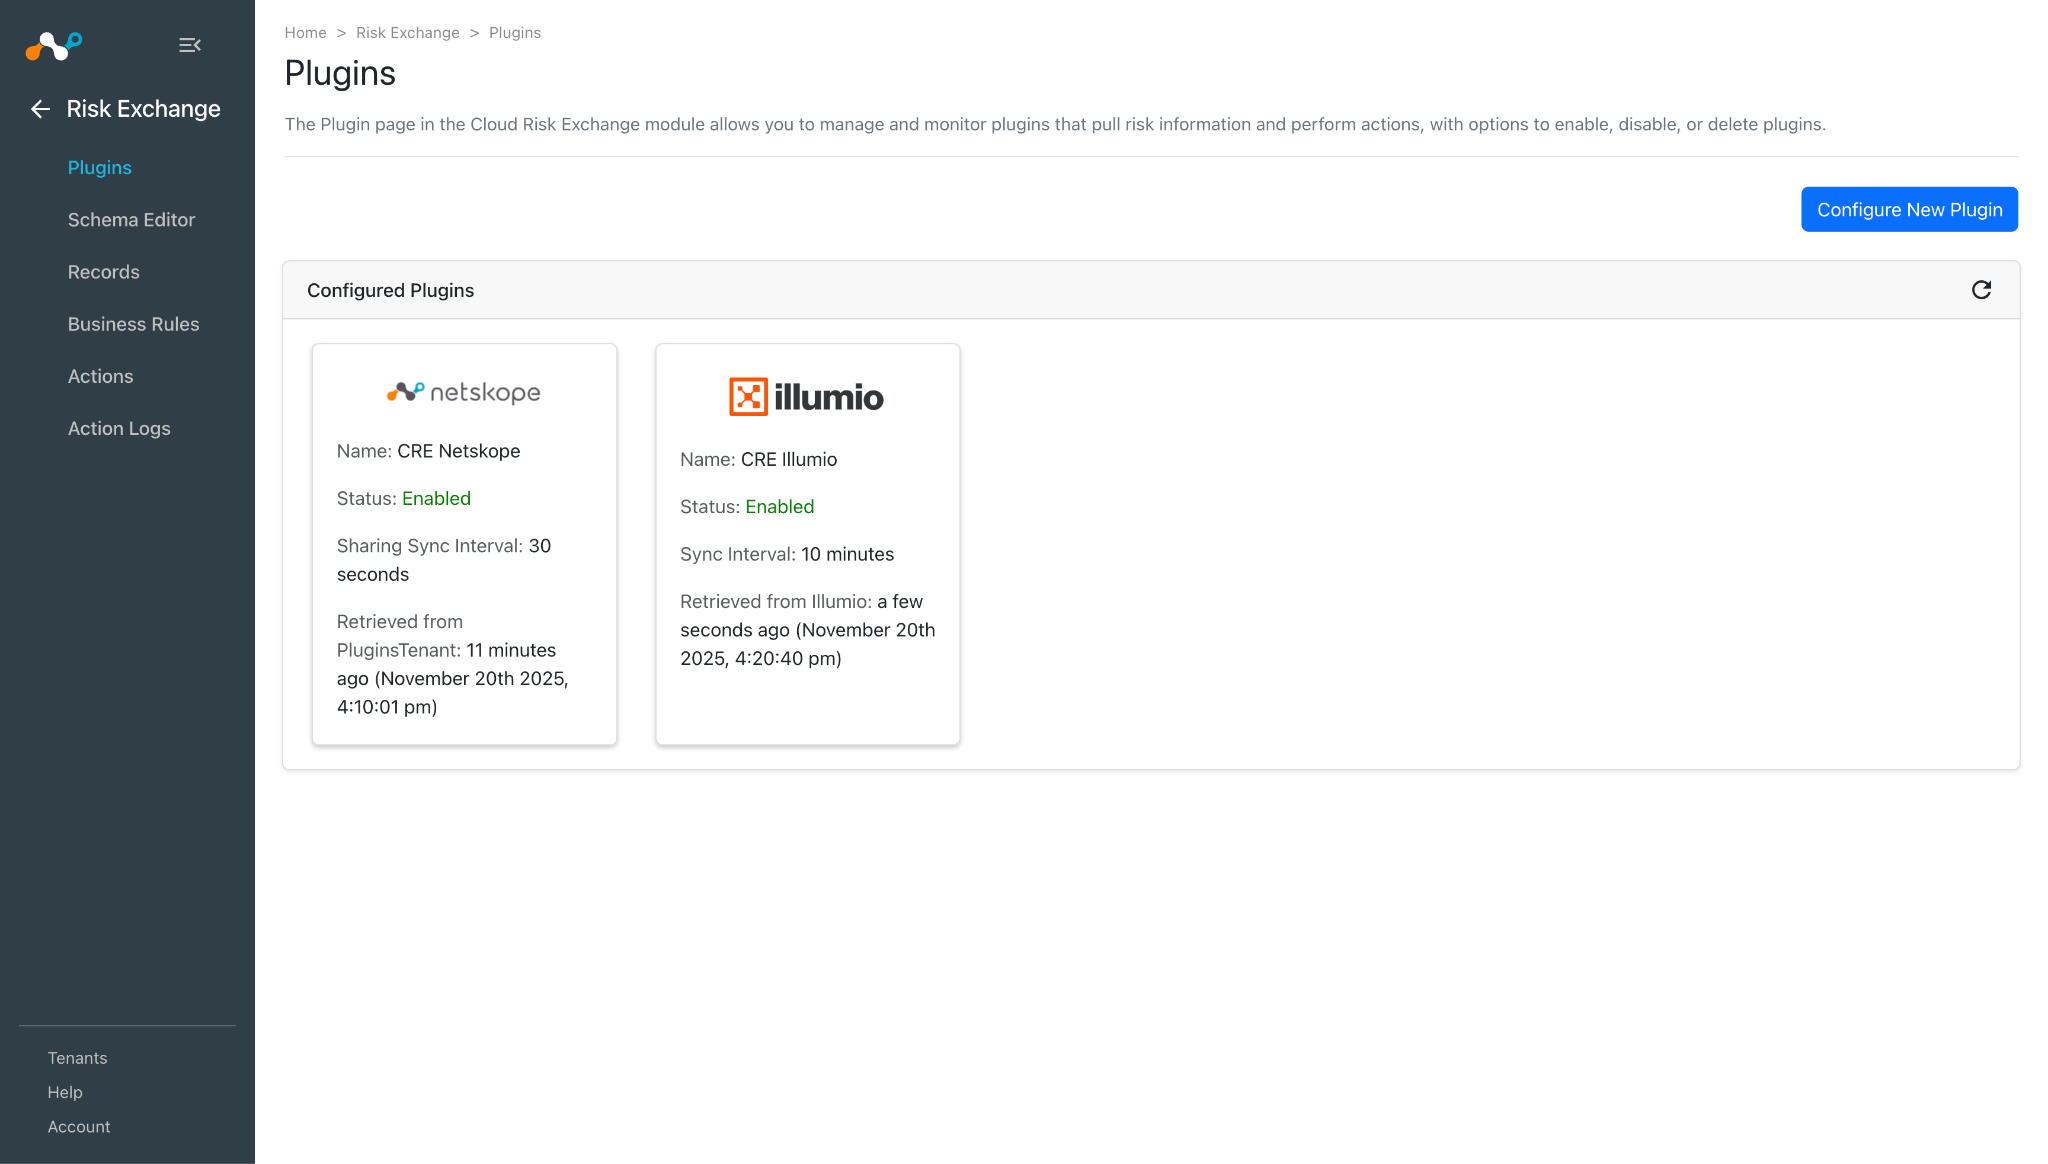
Click Save. The plugin appears on the Plugins page.
Configure a Risk Exchange Business Rule for Illumio
-
In Risk Exchange, go to Business Rules and click Create New Rule.
-
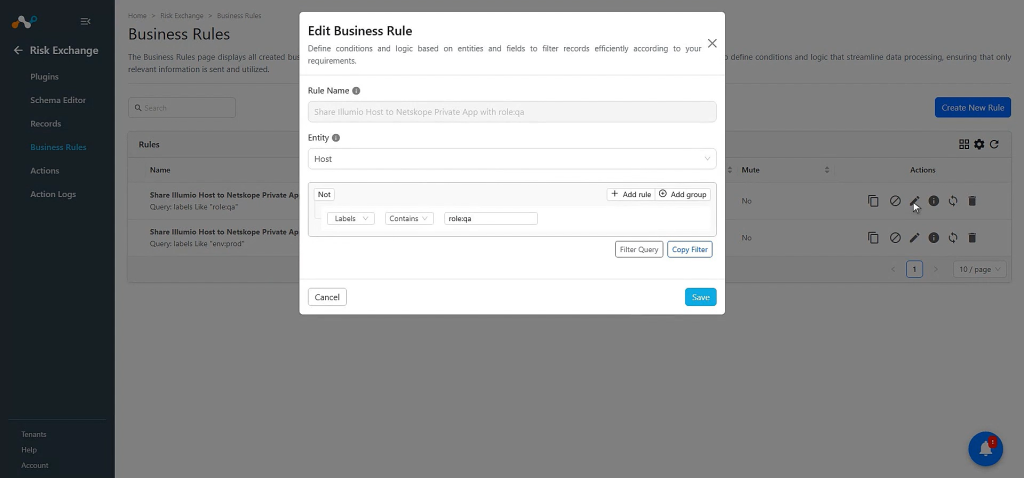
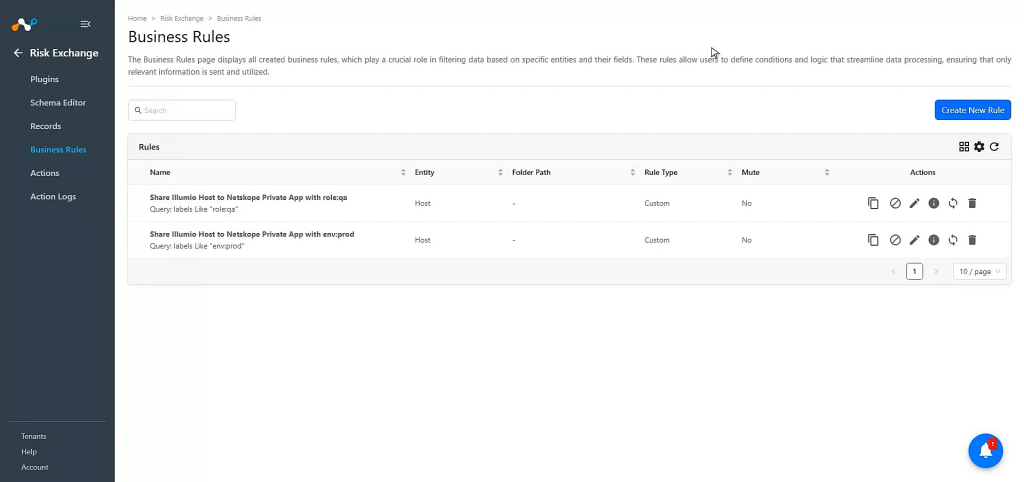
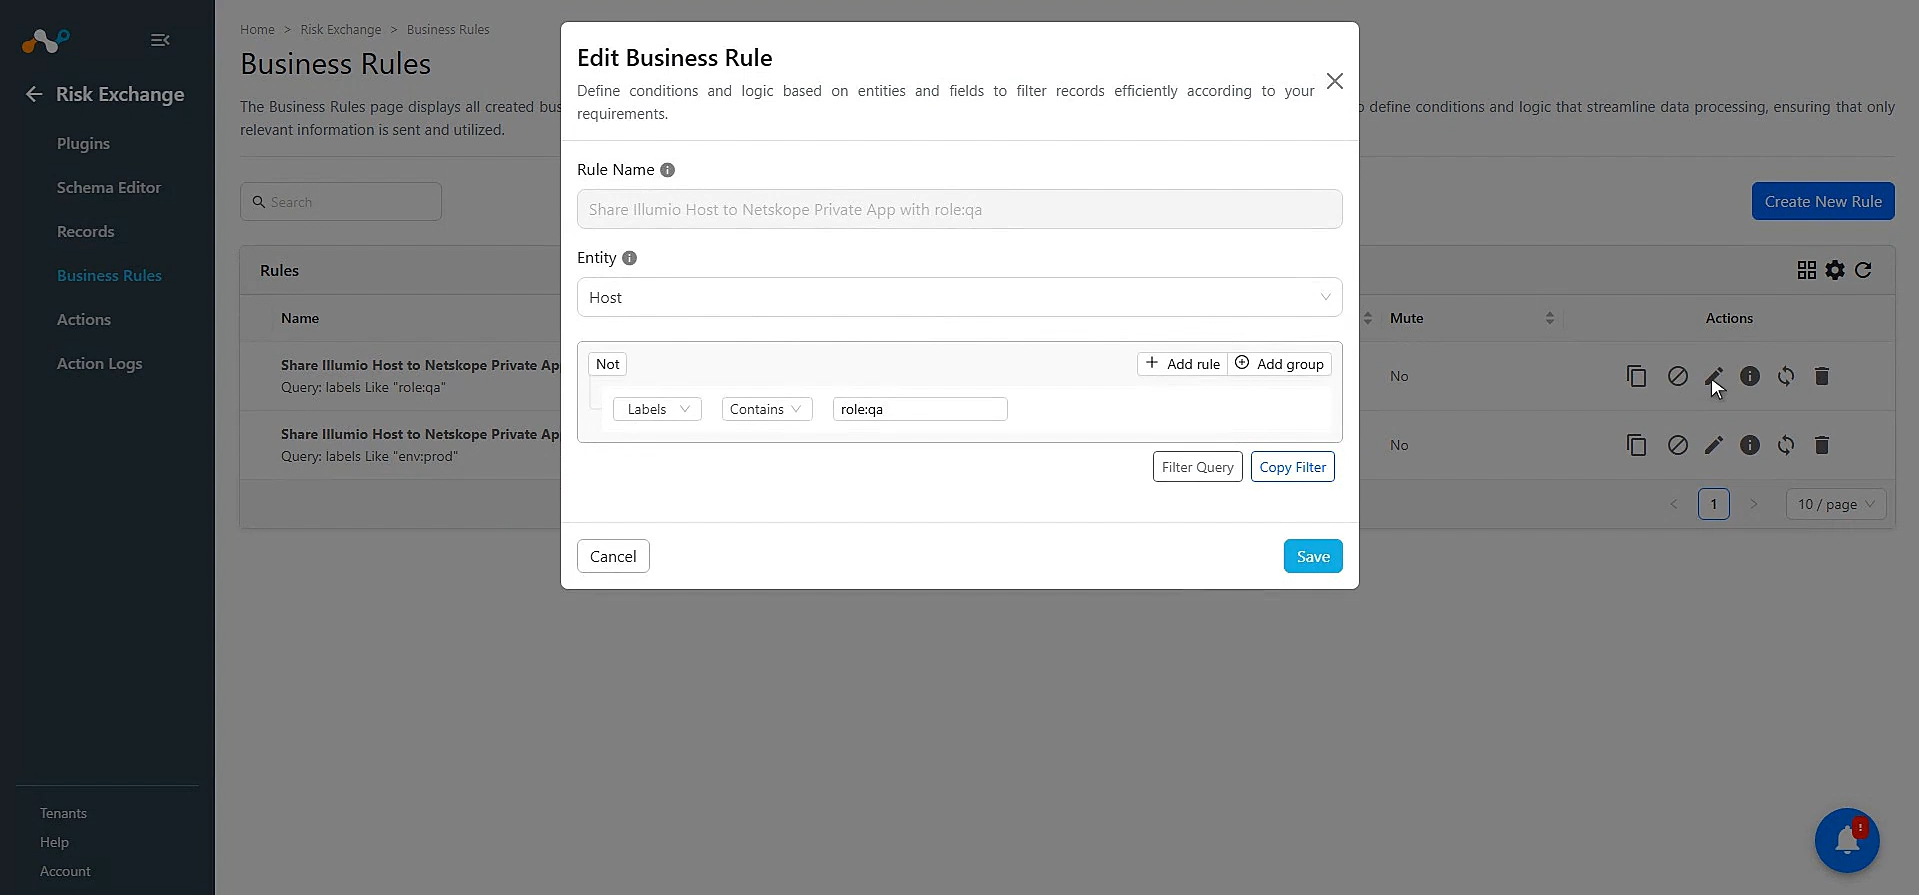
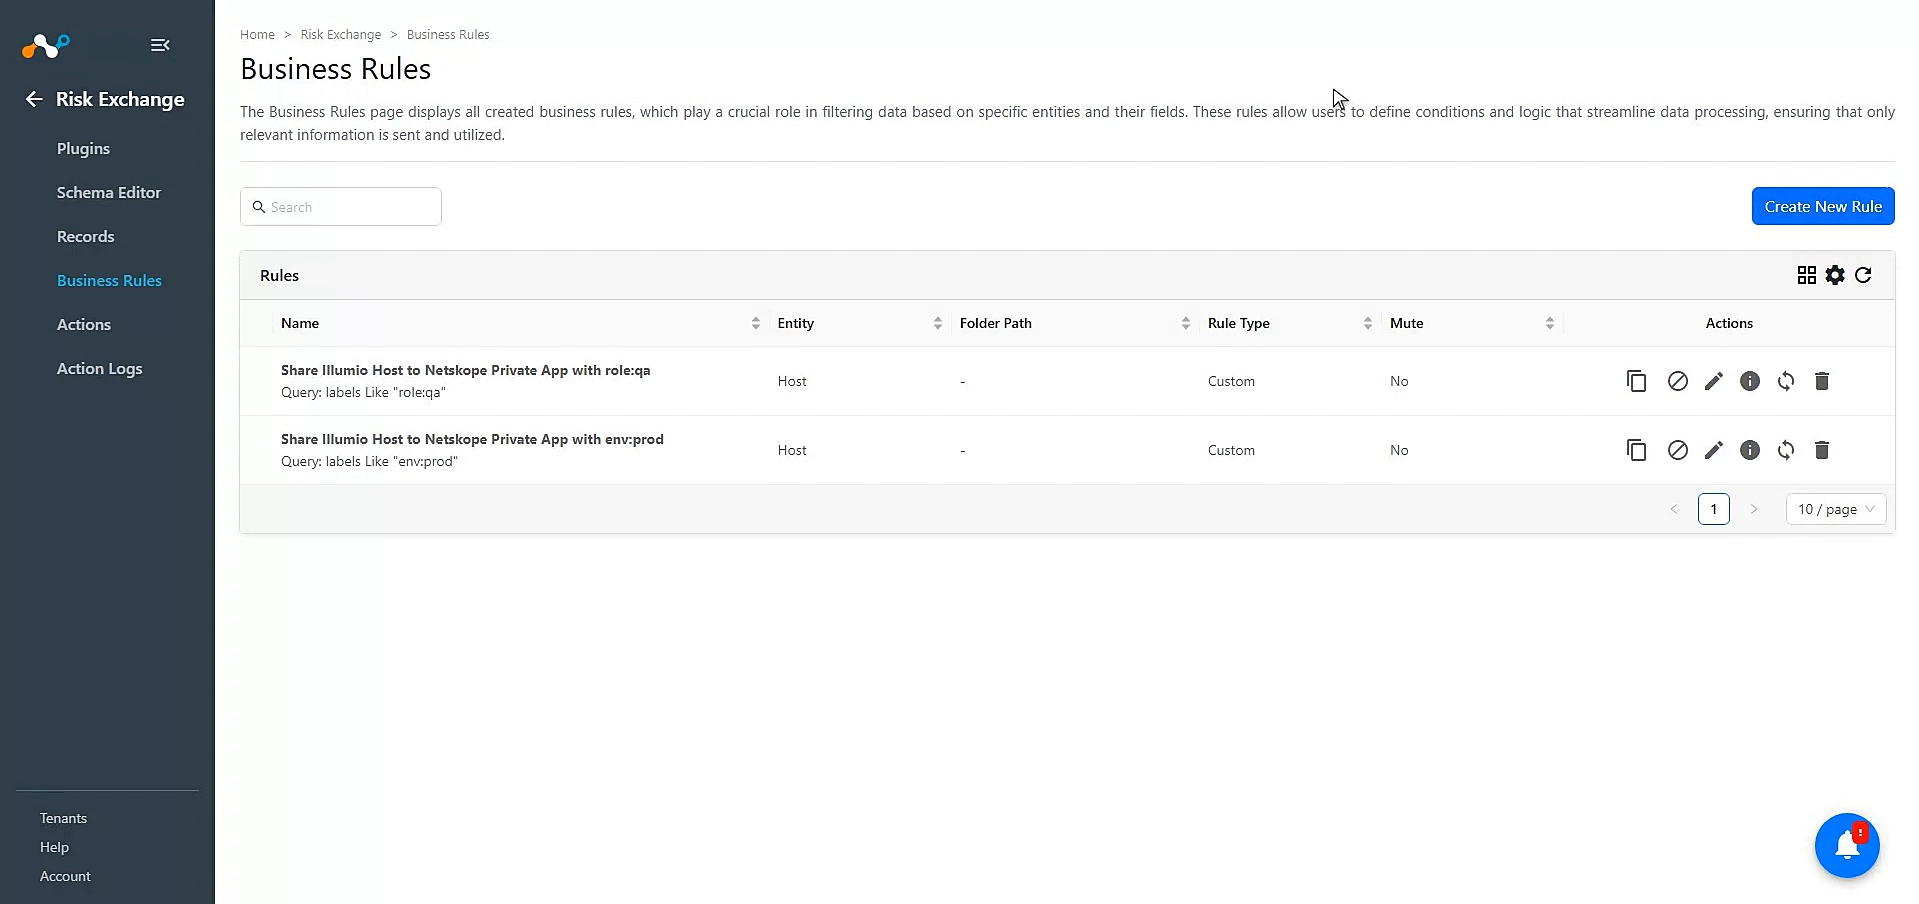
Enter a Rule Name. Select the Entity for the Fields configured for the Illumio plugin, and configure the query based on your requirements. This example filters all the xyz fetched from the Illumio plugin.
-
Click Save.
Configure a Risk Exchange Action for Illumio
The Illumio plugin only supports the following action type:
No Action
No action will be performed for this action. Users can generate UBA alerts in Ticket Orchestrator by using this action and enabling the Generate Alerts toggle in the action.
Note
- You can perform the actions on the hosts pulled from Illumio on the Netskope Tenant. For performing the hosts related actions (Add host to Private App) on Netskope, refer to Risk Exchange plugin guide in order to configure Netskope related actions (such as Add host to Private App) for the host records pulled from Illumio.
- To configure the other actions supported by Netskope, refer to the Risk Exchange plugin guide.
Configure the Action
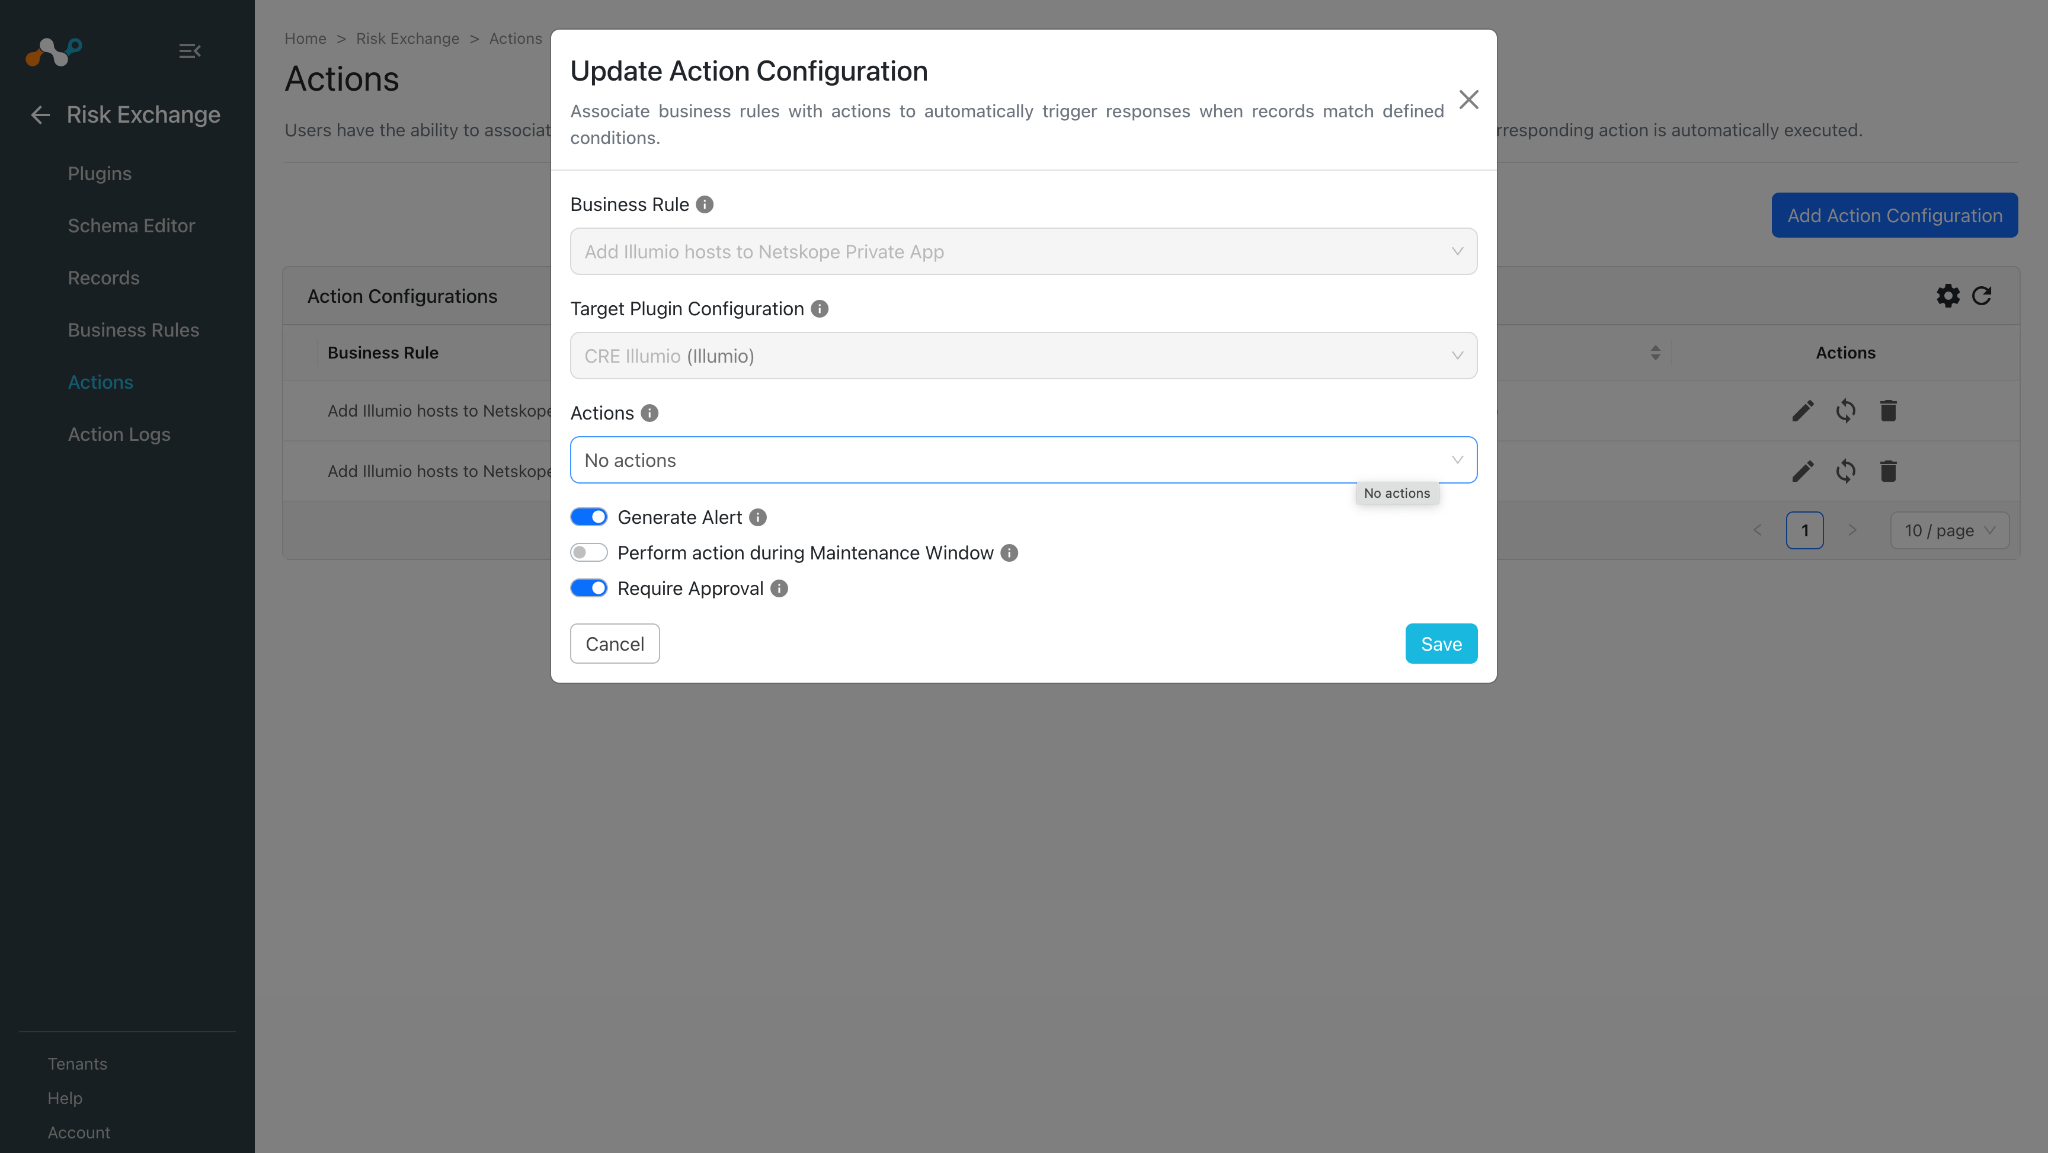
- In Risk Exchange, go to Actions and click Add Action Configuration.
- Select the required Business Rule, Configuration, and Action from their respective dropdowns.
- Enable the Require Approval toggle if Approval is needed before performing action on the Hosts.
- If Require Approval is enabled, then to approve the action, go to Cloud Risk Exchange > Action Logs, select the action to be approved, and then click Approve.
- Click Save.
Validate the Illumio Plugin
Validate in Cloud Exchange
To validate the pulling in Cloud Exchange:
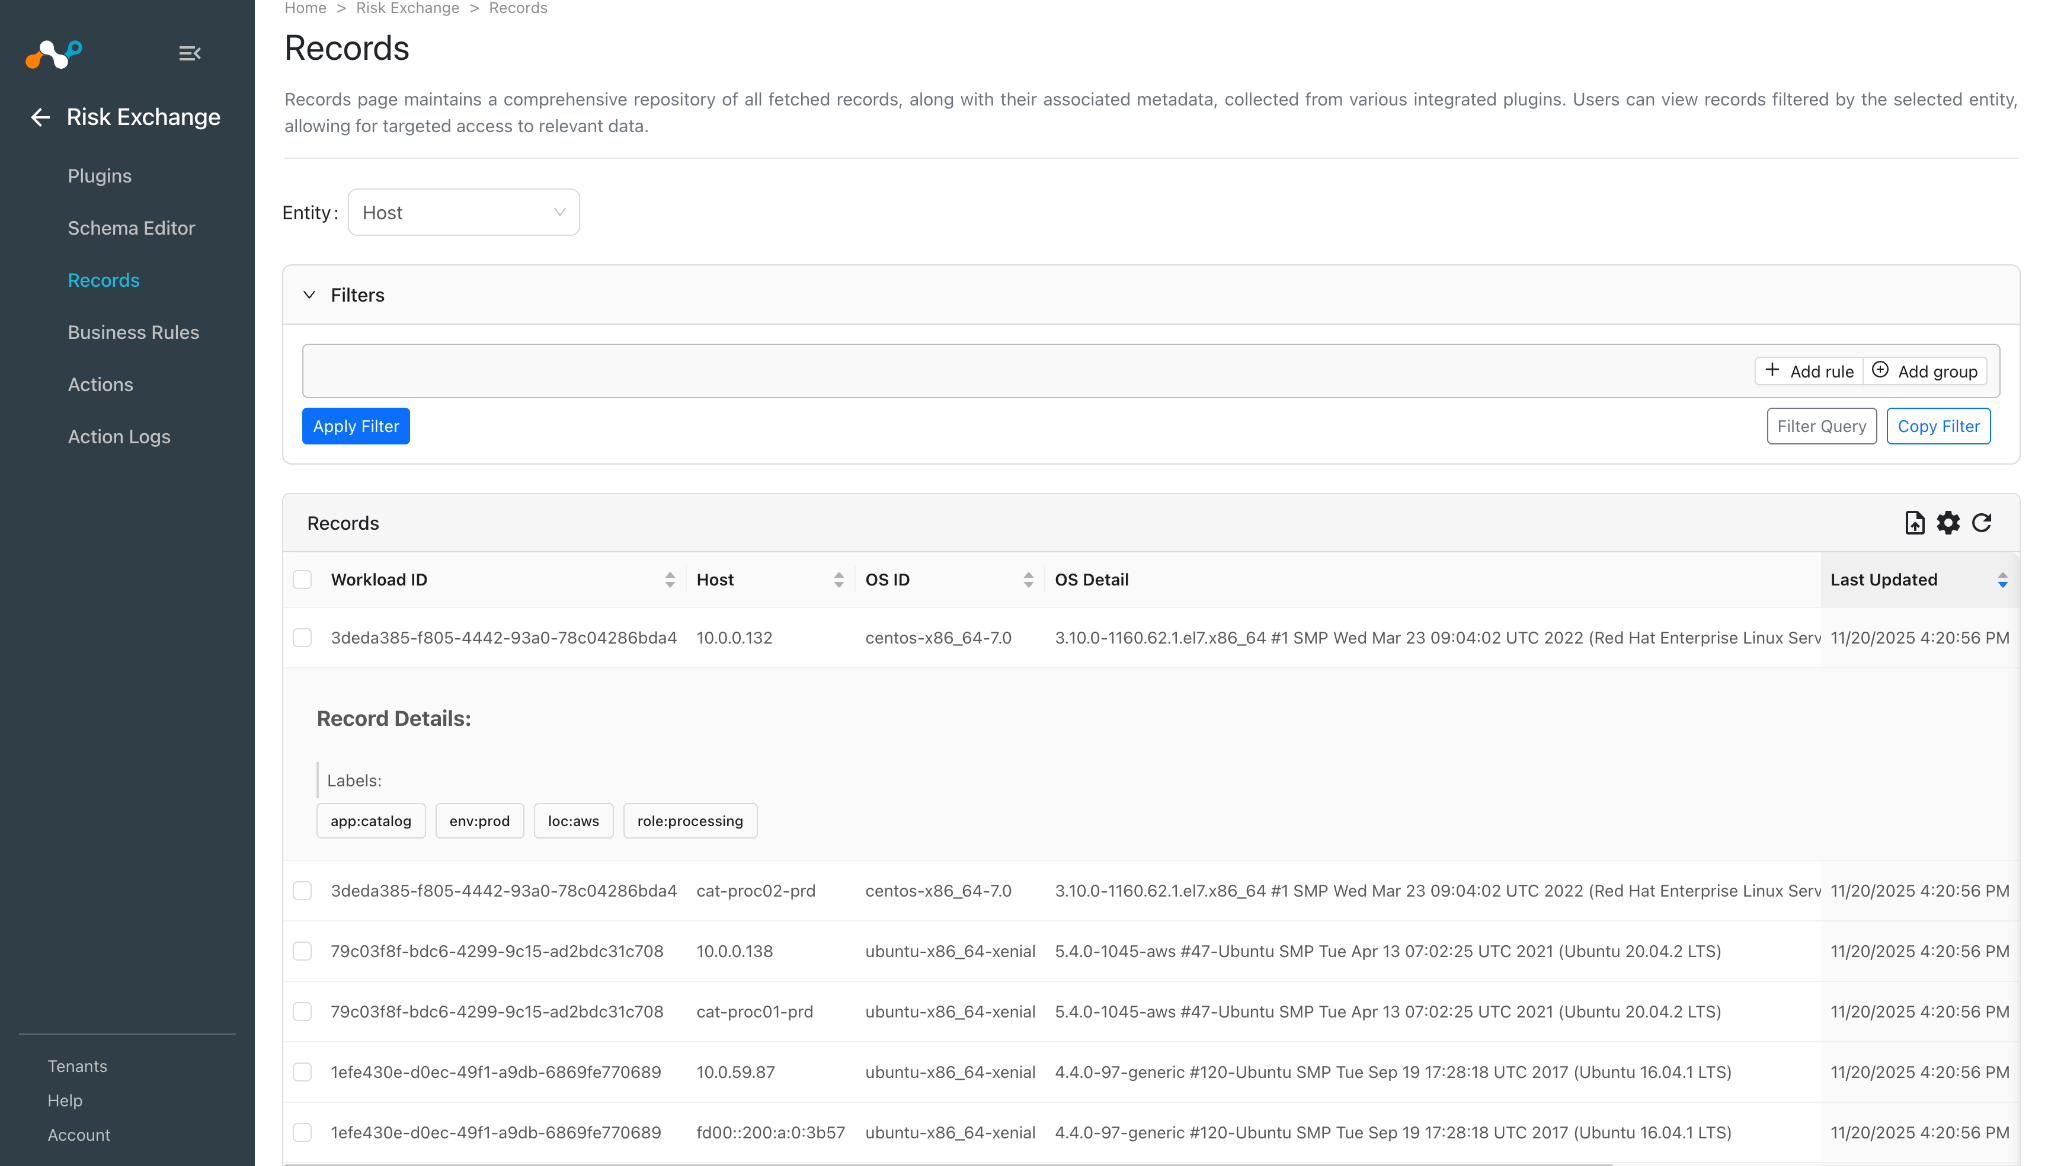
Go to Risk Exchange and click Records. Select the Entity that is selected while configuring the field mapping for Hosts to view the pulled Hosts.
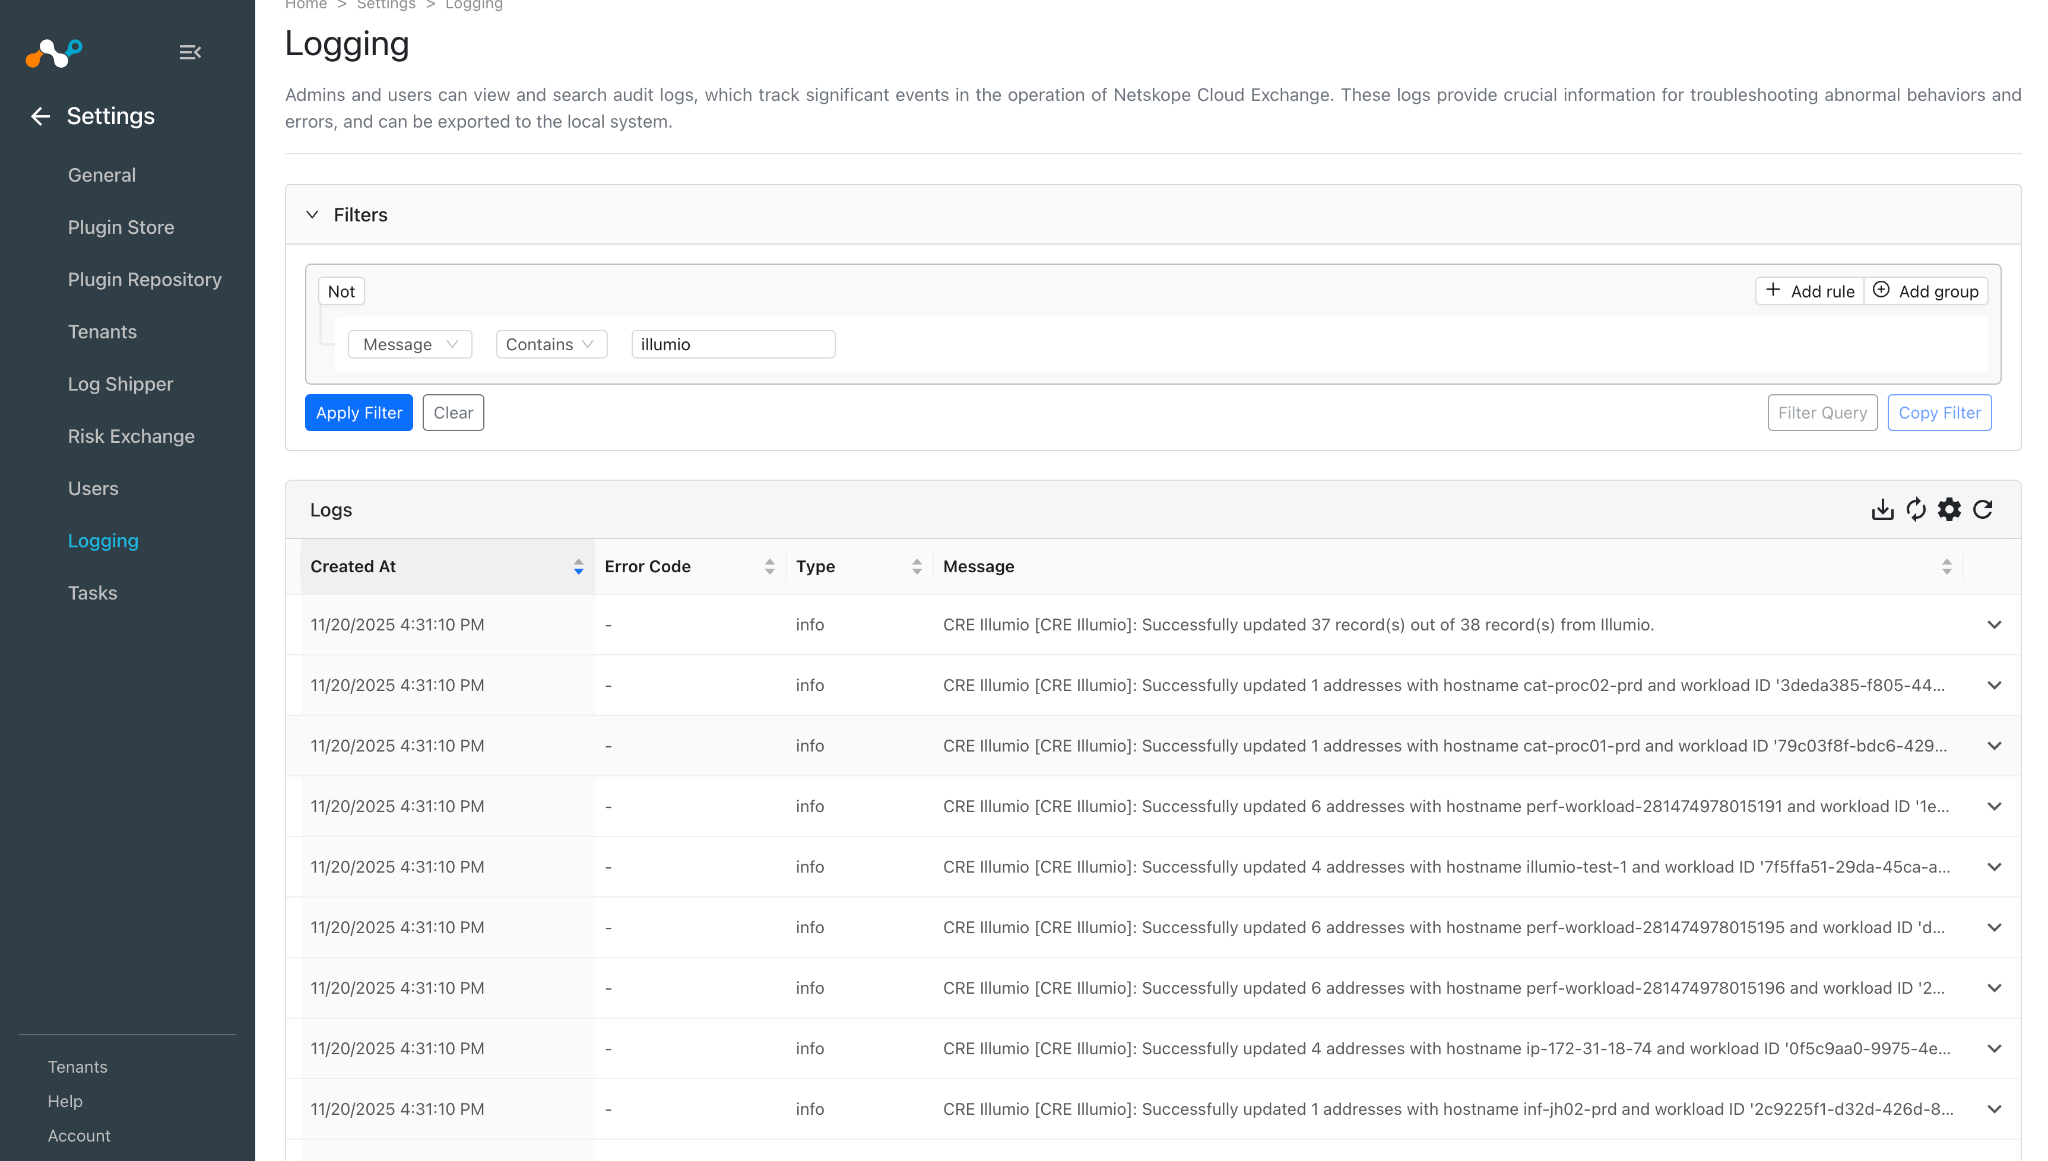
Go to Logging and search for the logs of the plugin.
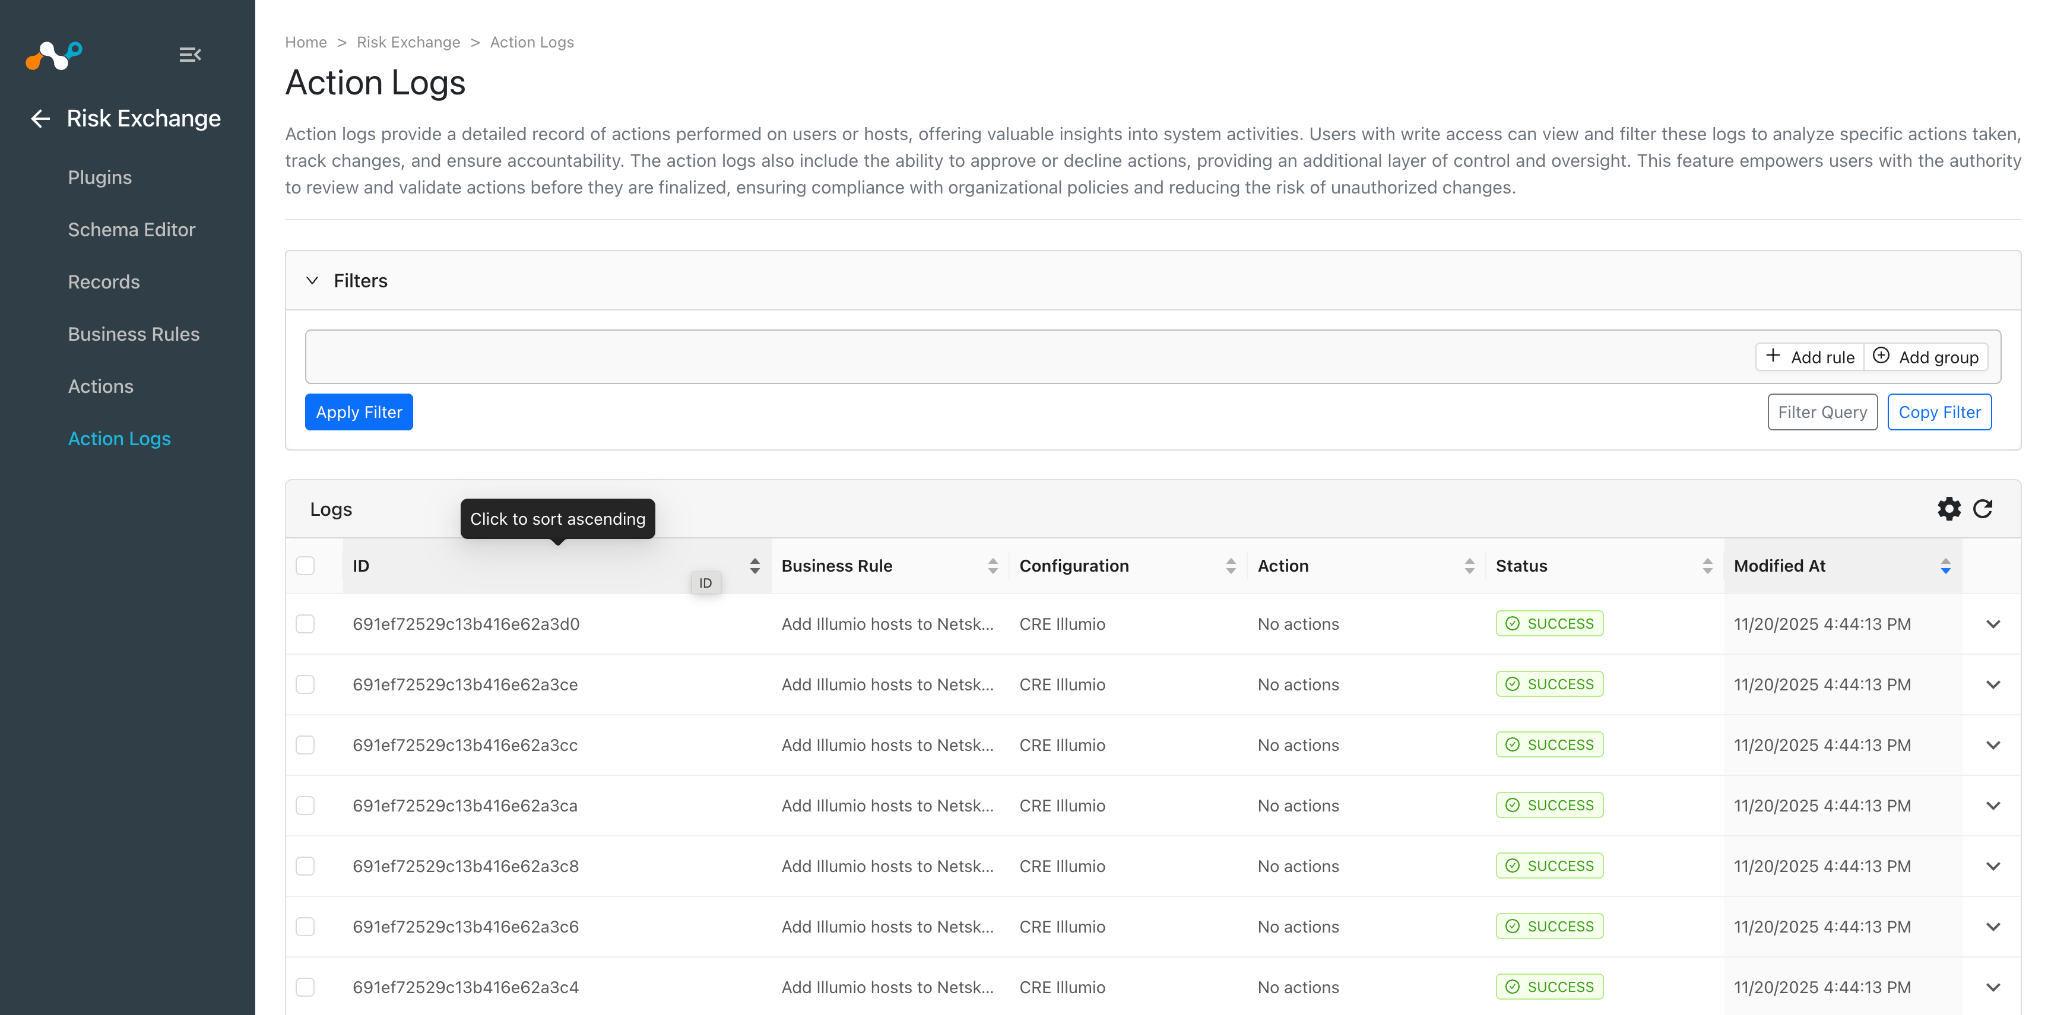
When a user matches one of the configured business rules, the configured action will be performed on the hosts. This can be seen in the Action Logs.
Validate in Illumio
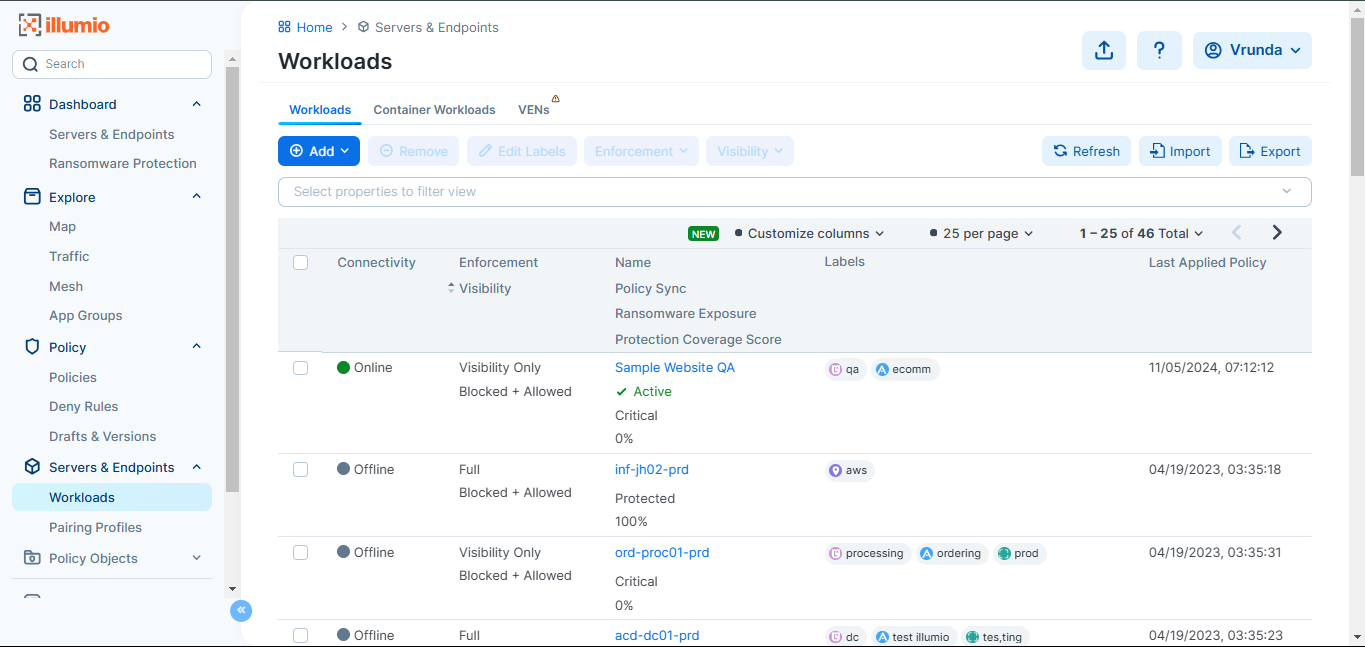
The Hosts are pulled from Servers & Endpoints > Workloads. All the workload hostnames, along with the associated interfaces address, are pulled from the Illumio platform.
Troubleshooting the Illumio Plugin
Unable to configure the CRE Illumio plugin.
If you are receiving the error while configuring the plugin.
CRE Illumio [CRE Illumio]: Invalid format provided for the Label Scope: must be key1:value1,key2:value2...
CRE Illumio [CRE Illumio]: Illumio API Exception occurred while connecting to PCE for validating credentials. Validate the provided configuration parameters. Error: HTTPSConnectionPool(host='poc1.illum', port=443): Max retries exceeded with url: /api/v2/health (Caused by NewConnectionError('<urllib3.connection.HTTPSConnection object at 0x7f6eb920a700>: Failed to establish a new connection: [Errno -2] Name or service not known'))
These errors may be due to one of these reasons:
- API Key and Secret is invalid/deleted.
- PCE URL is invalid.
- Labels provided in CE do not exist on the platform or the format for the label is incorrect.
What to do:
- Check the plugin credentials if the API Key and Secret is valid. If it is valid, check if the credentials that you are using are still available on Illumio.
- Verify the labels added in the configuration, and check if they exist on the Illumio platform.
- Verify the Label format added in the plugin. It is expected that the labels are added in key:value pair format, like loc:ca.
Unable to pull host details in Cloud Exchange
If you are unable to view hosts details on the record table, it could be due to one of these reasons.
- No hosts present on Illumio platform.
- Mapping for all the Illumio fields is not provided while configuring the CRE Illumio plugin.
- Plugin has encountered an error during the plugin lifecycle.
What to do:
- Make sure hosts are present on Illumio platform.
- Make sure to provide the needed mappings while configuring the plugin.
- Make sure that the fields created in an entity are according to the Mapping.
- Check the logs from the plugin on the Logging page to see if there are any errors. If you are receiving a 409 Conflict error, it will be resolved on its own after a while, but make sure the sync interval for the plugin configuration is 10 mins – 60 mins.