

This document explains how to configure the Microsoft Defender for Cloud Apps v2.1.1 plugin with the Log Shipper module of the Netskope Cloud Exchange platform. This plugin enables you to ingest Netskope Events (Page, Application) in CEF format from the Netskope Tenant to Microsoft Defender for Cloud Apps using Cloud Exchange via the Microsoft Defender for Cloud Apps plugin. The plugin doesn’t support ingesting data in JSON format.
Prerequisites
To complete this configuration, you need:
- A Netskope tenant (or multiple, for example, production and development/test instances).
- A Netskope Cloud Exchange tenant with the Tenant plugin and Log Shipper plugin already configured.
- A Microsoft Defender for Cloud Apps instance.
- Connectivity to the following hosts: https://security.microsoft.com and /https://portal.azure.com/
Note
Verify your Microsoft Defender instance permissions are secure and not set up for open public access. Only allow access to your cloud storage instance from your Cloud Exchange Host and any other addresses that needs access.
Microsoft Defender for Cloud Apps Plugin Support
This plugin is used to ingest events of type Application and Page to the Governance log page of the Microsoft Defender platform. This plugin does not support the ingestion of Netskope Alerts and WebTx transactions to the Microsoft Defender platform. The plugin only supports ingesting data in CEF format, sending data in JSON format is not supported.
| Data Type | Support |
|---|---|
| Events |
|
| Alerts | Not supported |
|
Logs |
Not supported |
|
WebTx |
Not supported |
Permissions
These permissions are needed for the plugin to configure the Microsoft Defender for Cloud App plugin.
- Cloud Discovery Global Admin role required to access Microsoft Defender for Cloud App Instance
- Microsoft App Security for OAuth 2.0 (Application context)
- Discovery.manage
- Discovery.read
API Details
List of APIs Used
| API Endpoint | Method | Use Case |
|---|---|---|
| /oauth2/v2.0/token | POST | Generate Token |
| /api/v1/discovery/upload_url/ | GET | Initiate file upload – Cloud Discovery API |
| <initiate_file_upload_response_url> | PUT | Perform file upload – Cloud Discovery API (obtained from “Initiate file upload”) |
| /api/v1/discovery/done_upload/ | POST | Finalize file upload – Cloud Discovery API |
Generate Token
API Endpoint: https://login.microsoftonline.com/<tenant_id>/oauth2/v2.0/token
Method: POST
Headers
| Key | Value |
|---|---|
| User-Agent | netskope-ce-5.0.1-cls-microsoft-defender-for-cloud-apps-v2.1.1 |
| Content-Type | application/x-www-form-urlencoded |
Payload
| Parameter | Value |
|---|---|
| grant_type | client_credentials |
| client_id | client_id |
| client_secret | client_secret |
| scope | 05a65629-4c1b-48c1-a78b-804c4abdd4af/.default |
Sample API Response
{
    "token_type": "Bearer",
    "expires_in": 3599,
    "ext_expires_in": 3599,
    "access_token": "eyJ0eXAiOiJKV1QiLCJhbGciOiJSUzI1NiIsIng1dCI6IlQxU3QtZExUdnlXUmd4Ql82NzZ1OGtyWFMtSSIsImtpZCI6IlQxU3QtZExUdnlXUmd4Ql82NzZ1OGtyWFMtSSJ9.eyJhdWQiOiIwNWE2R1QVRFcTkxSzk5QUFBLiIsInJvbGVzIjpbImRpc2NvdmVyeS5tYW5hZ2UiXSwic3ViIjoiNzljMEHIywny8JmtEONTPUcOahramZDIYLL8JBGvUH5V-ebPIrAOnCZGvwcbYbVZy7joFwmjeIK22Er_4eCVDXDAzAWuF5uD-KFZp7DkZNSR06i7OD-Yo6YiGEzAP5fMW8anHREJDwh0OtkMn5GRf15ccuhBhNlGiT17uPNzAct*************************************5_DsDgVK109p1yVTrGTw"
}
Initiate File Upload
API Endpoint: https://<tenant_id>.<tenant_region>.contoso.com/api/v1/discovery/upload_url/?filename=my_discovery_file.txt&source=GENERIC_CEF
Method: GET
Headers
| Key | Value |
|---|---|
| User-Agent | netskope-ce-5.0.1-cls-microsoft-defender-for-cloud-apps-v2.1.1 |
| Authorization | Bearer <token> |
| Accept | application/json |
Payload
| Parameter | Value |
|---|---|
| source | GENERIC_CEF |
| filename | 140351985108800-ingestion_file.txt |
Sample API Response
{
    "url": "https://prod5usw2console1.blob.core.windows.net/discovery-logs/2023-11/115979866_1701326176744_GENERIC_CEF_140351985108800-ingestion_file.txt?se=2023-12-01T06%3A36%3A16Z&sp=w&sv=2014-02-14&sr=b&sig=7EjuI4qdniikC5ehECtNzjjiaHFQ0FMix5Y1sPDDfhs=",
    "provider": "azure"
}
Perform a File Upload
API Endpoint: https://<initiate_file_upload_response_url>
Method: PUT
Headers
| Key | Value |
|---|---|
| User-Agent | netskope-ce-5.0.1-cls-microsoft-defender-for-cloud-apps-v2.1.1 |
| x-ms-blob-type | BlockBlob |
| Accept | application/json |
Payload
N/A
Sample API Response
Status: 201 created
Finalize a File Upload
API Endpoint: https://<tenant_id>.<tenant_region>.contoso.com/api/v1/discovery/done_upload/
Method: GET
Request Body:
{
"uploadUrl":"",
"inputStreamName":""
}
Headers
| Key | Value |
|---|---|
| User-Agent | netskope-ce-5.0.1-cls-microsoft-defender-for-cloud-apps-v2.1.1 |
| Authorization | Bearer <token> |
| Accept | application/json |
| Content-Type | application/json |
Payload
| Parameter | Value |
|---|---|
| source | GENERIC_CEF |
| filename | 140351985108800-ingestion_file.txt |
Sample API Response
{
    "success": true,
    "inputStreamId": "6166e2d26e047397777e71e8",
    "taskId": "656830c12339fba78191038a"
}
Performance Matrix
This performance reading is conducted on a Large Cloud Exchange Stack with these VM specifications. These readings are added with the consideration that it will ingest around 10K events in 3 seconds to the Microsoft Defender for Cloud Apps platform.
| Description | Specification |
|---|---|
|
Stack Size |
Large CPU: 16 Cores RAM: 32 GB |
|
Events ingested to Microsoft Defender for Cloud Apps SIEM |
200K EPM |
User Agent
netskope-ce-5.0.1-cls-microsoft-defender-for-cloud-apps-v2.1.1
Workflow
- Generate the API Token Legacy method.
- Generate the Client ID, Tenant ID, and Client Secret for OAuth method.
- Create a Data Source.
- Configure the Microsoft Defender for Cloud Apps plugin.
- Add a Log Shipper Business Rules.
- Add a Log Shipper SIEM mappings.
- Validate the plugin.
Watch a Video
Click play to watch a video.
Generate the API Token for the Legacy Method (API Token)
Follow the below steps to generate the API Token. You can also refer to this documentation to generate the token.
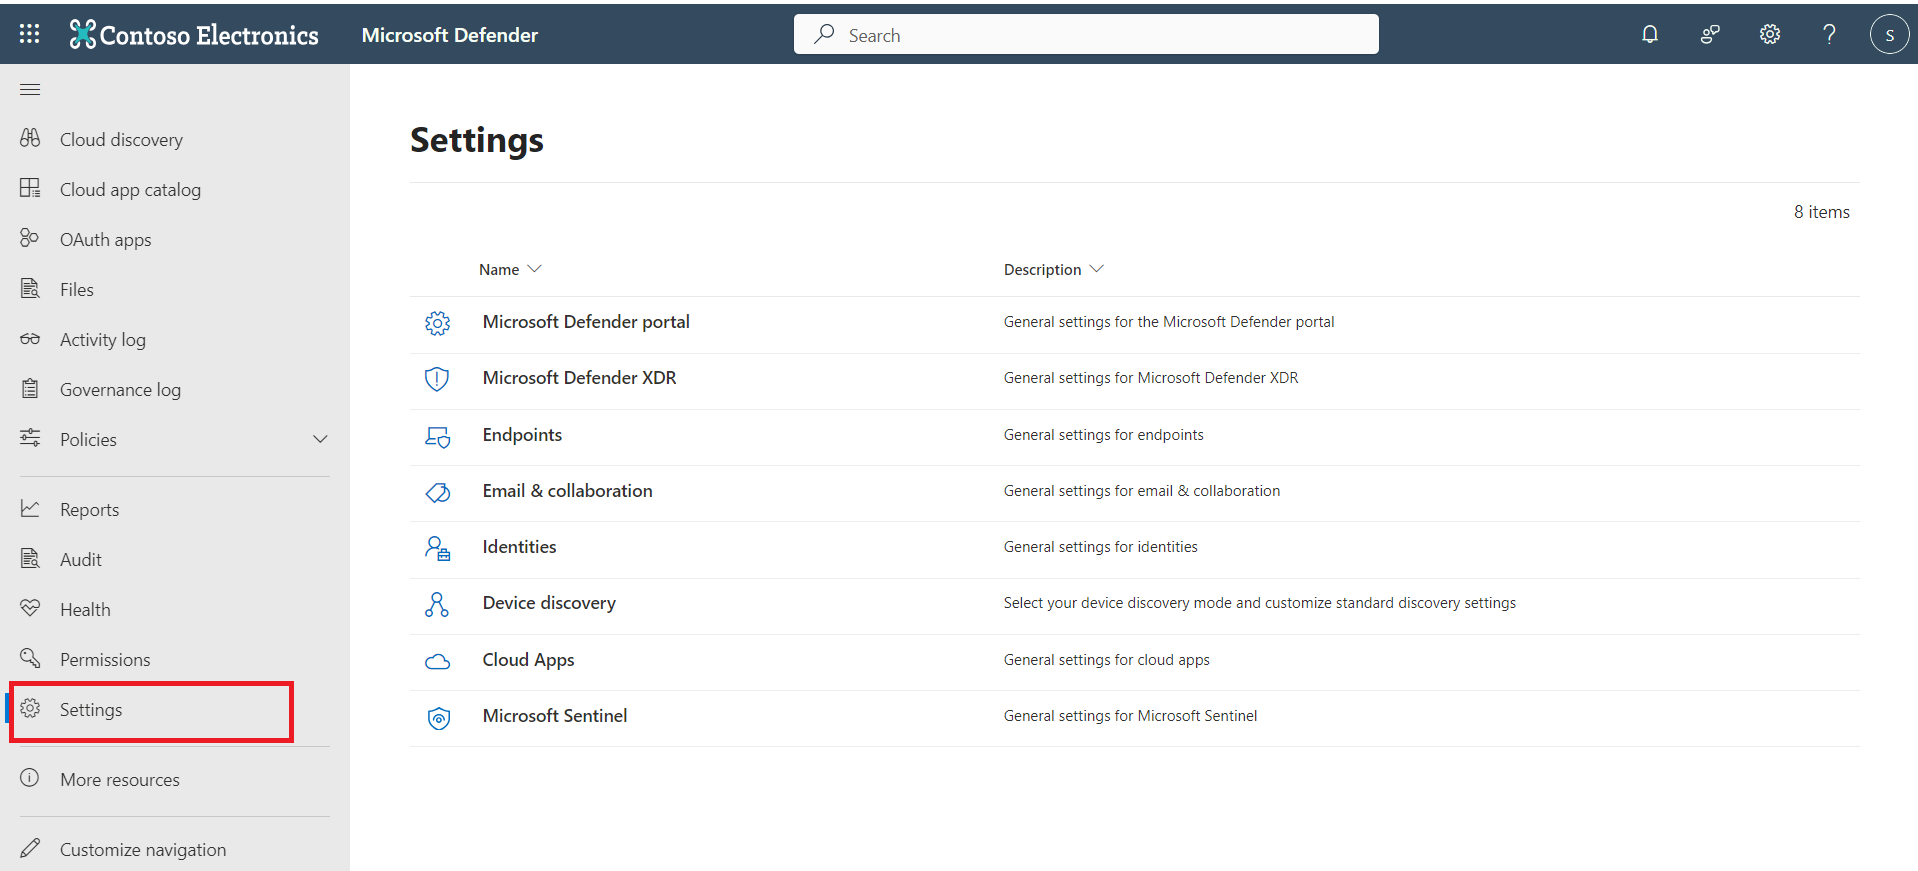
- In the Microsoft Defender portal, select Settings.
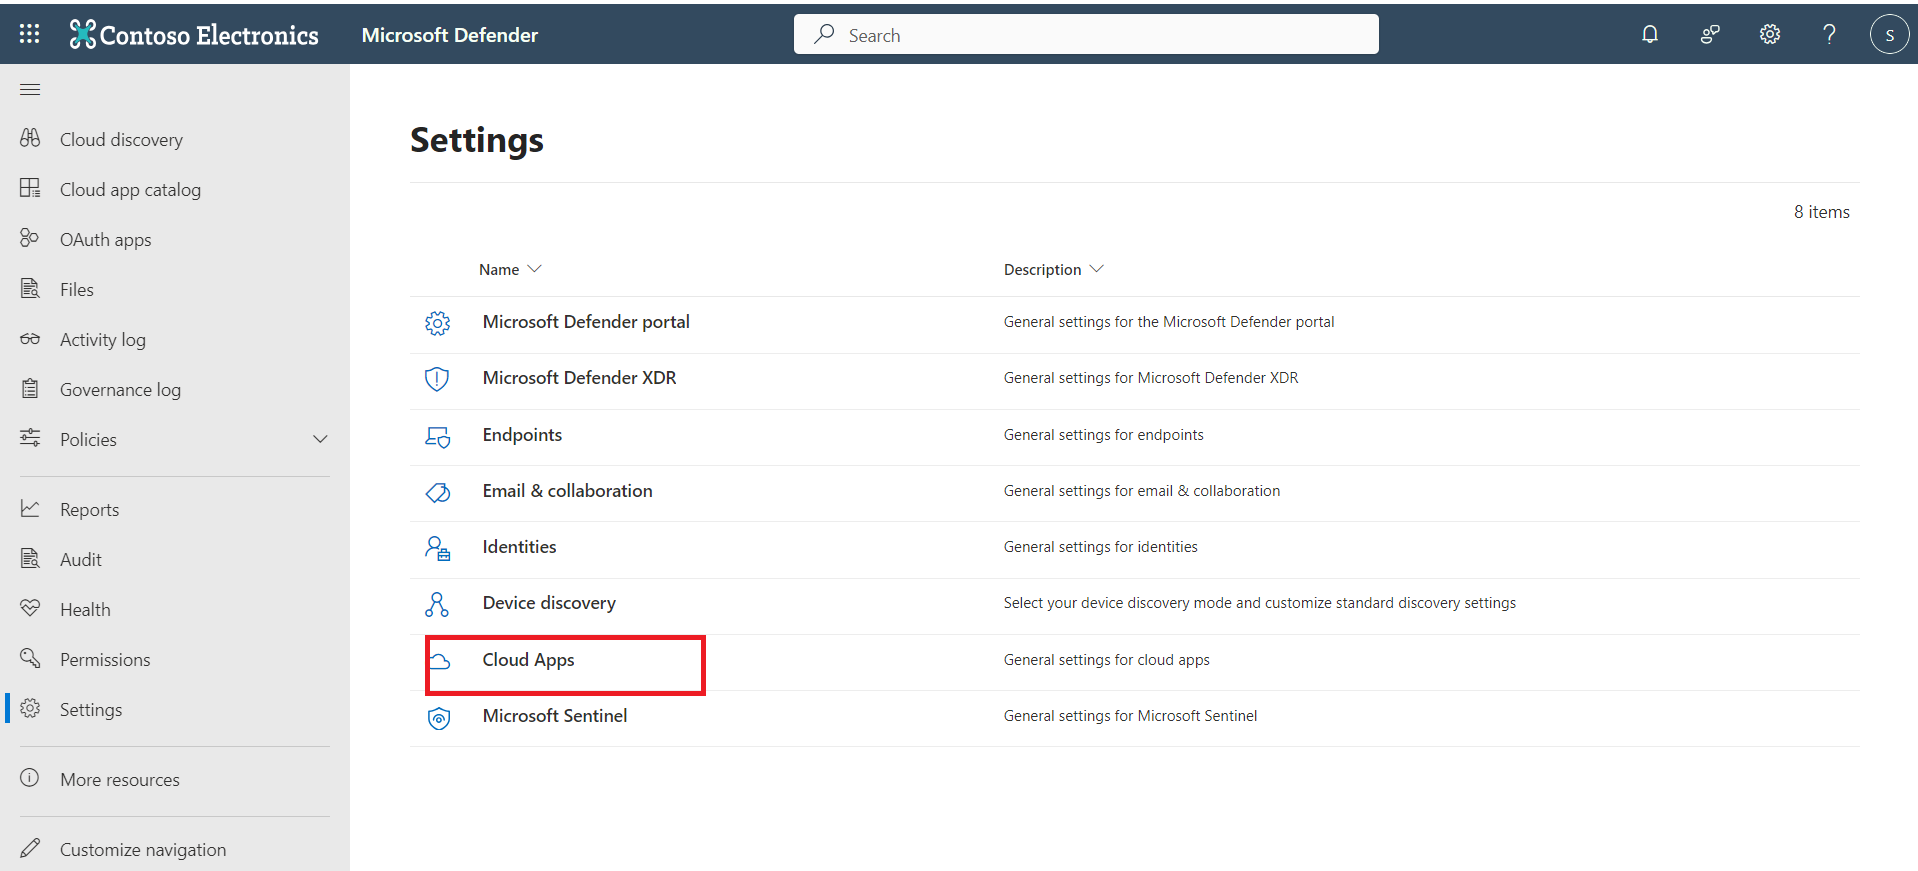
- Click Cloud Apps.
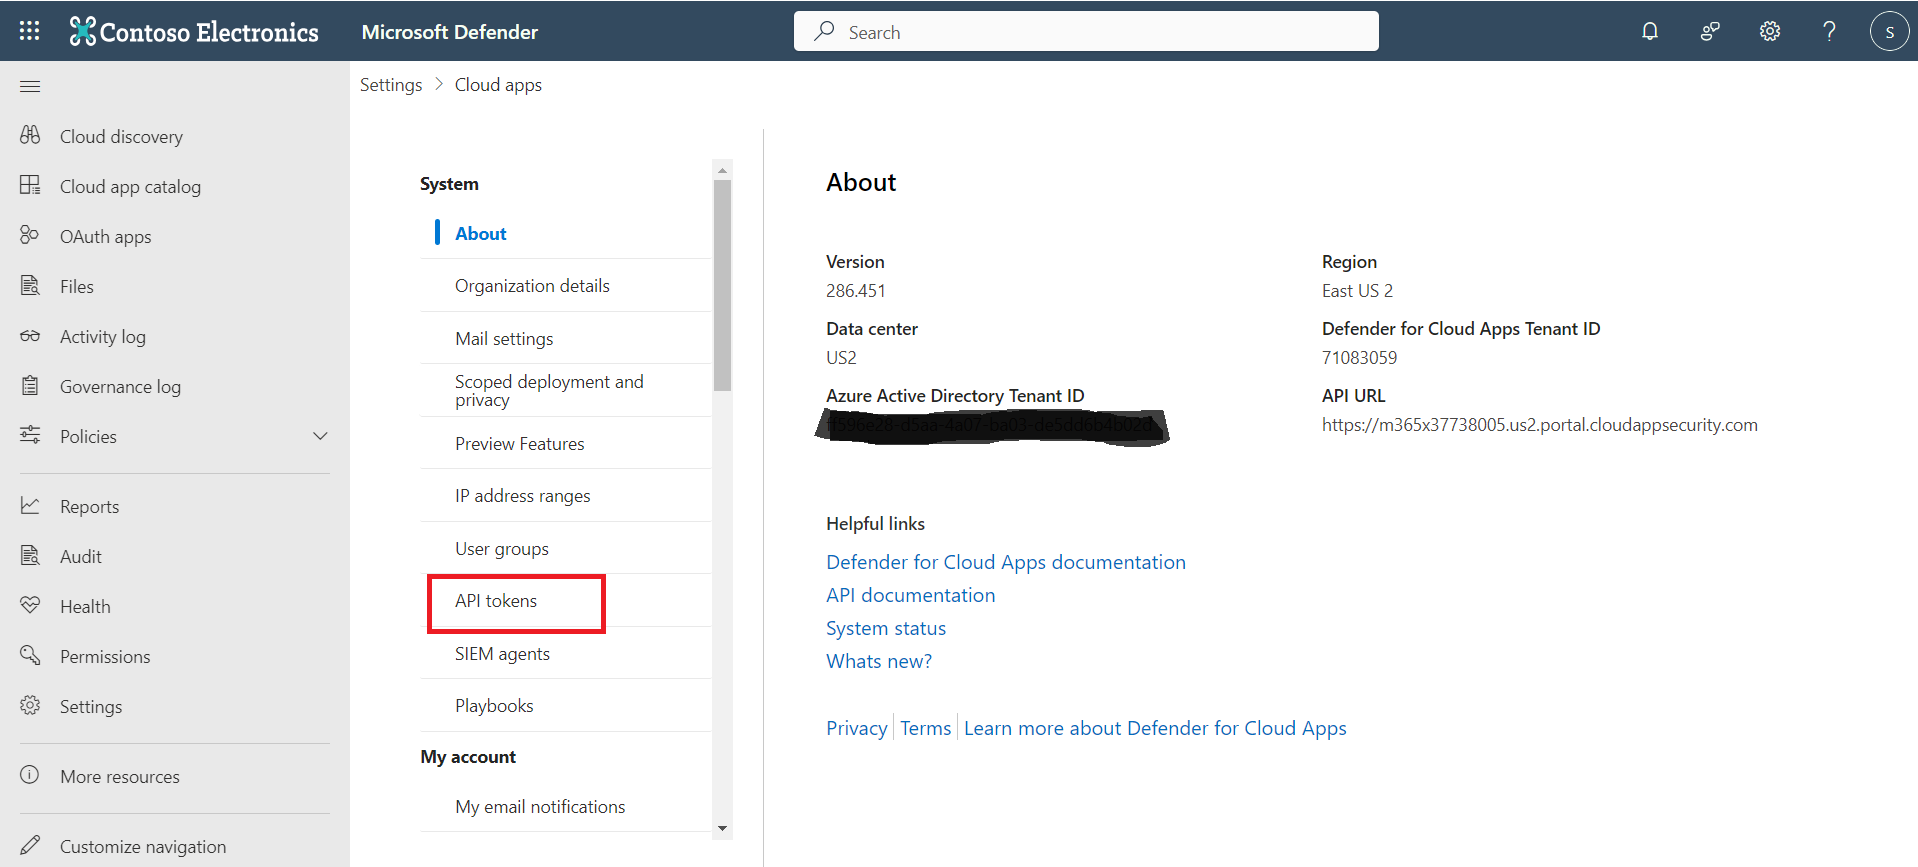
- Under System, click API tokens.
- Click Add token.
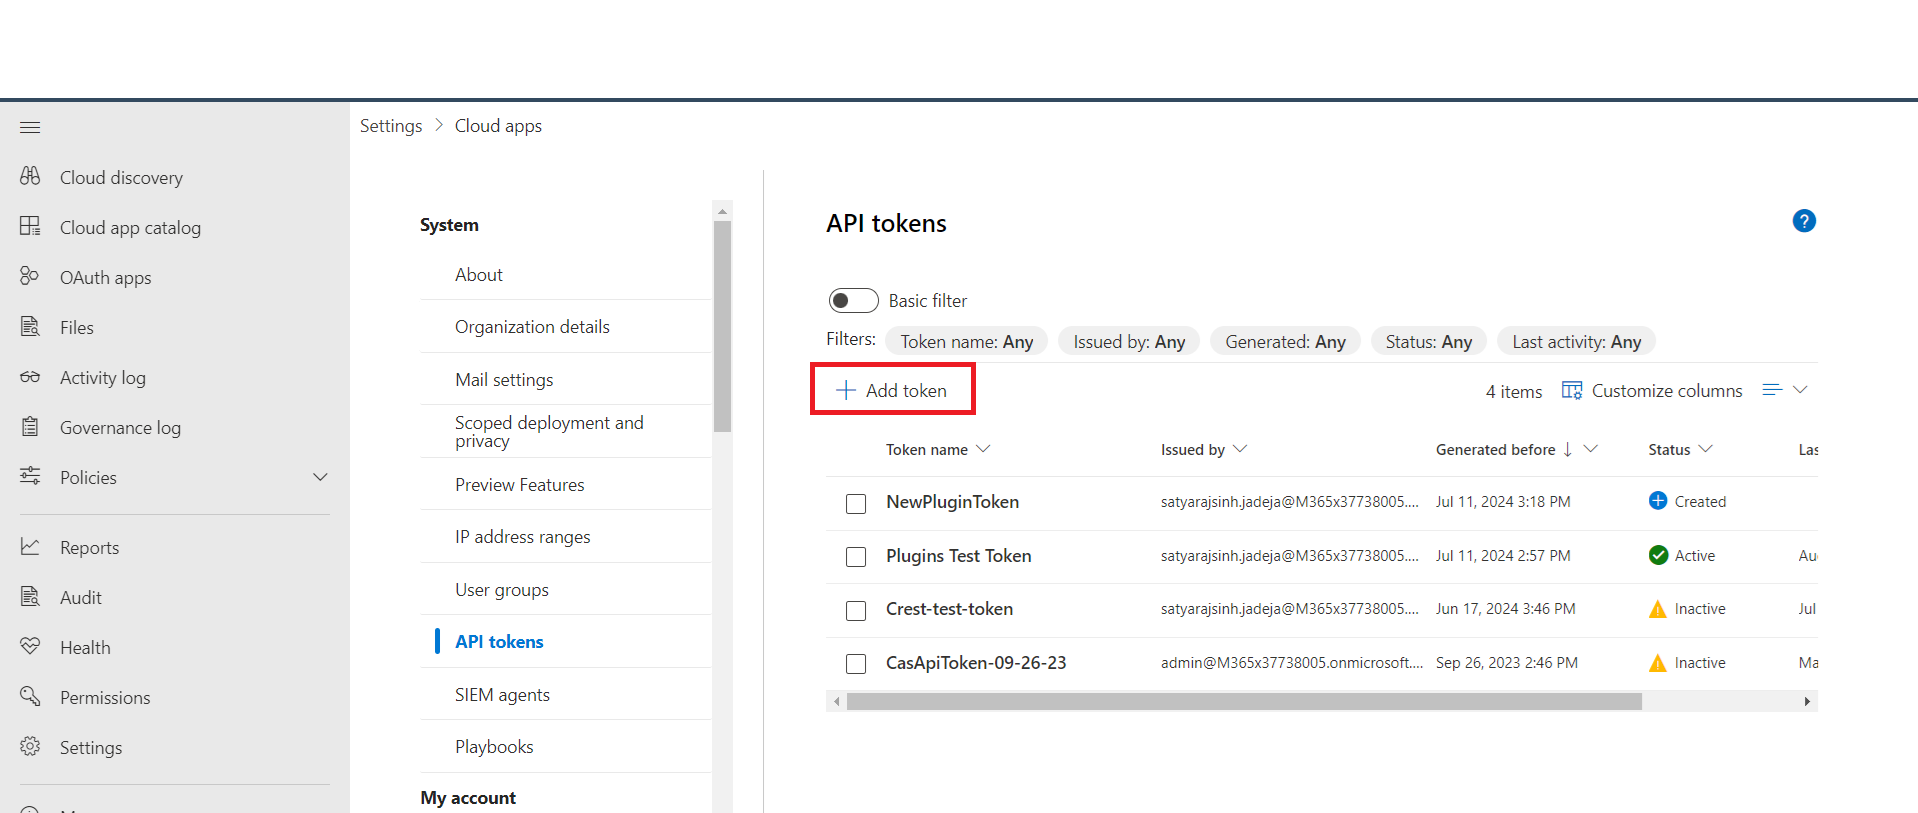
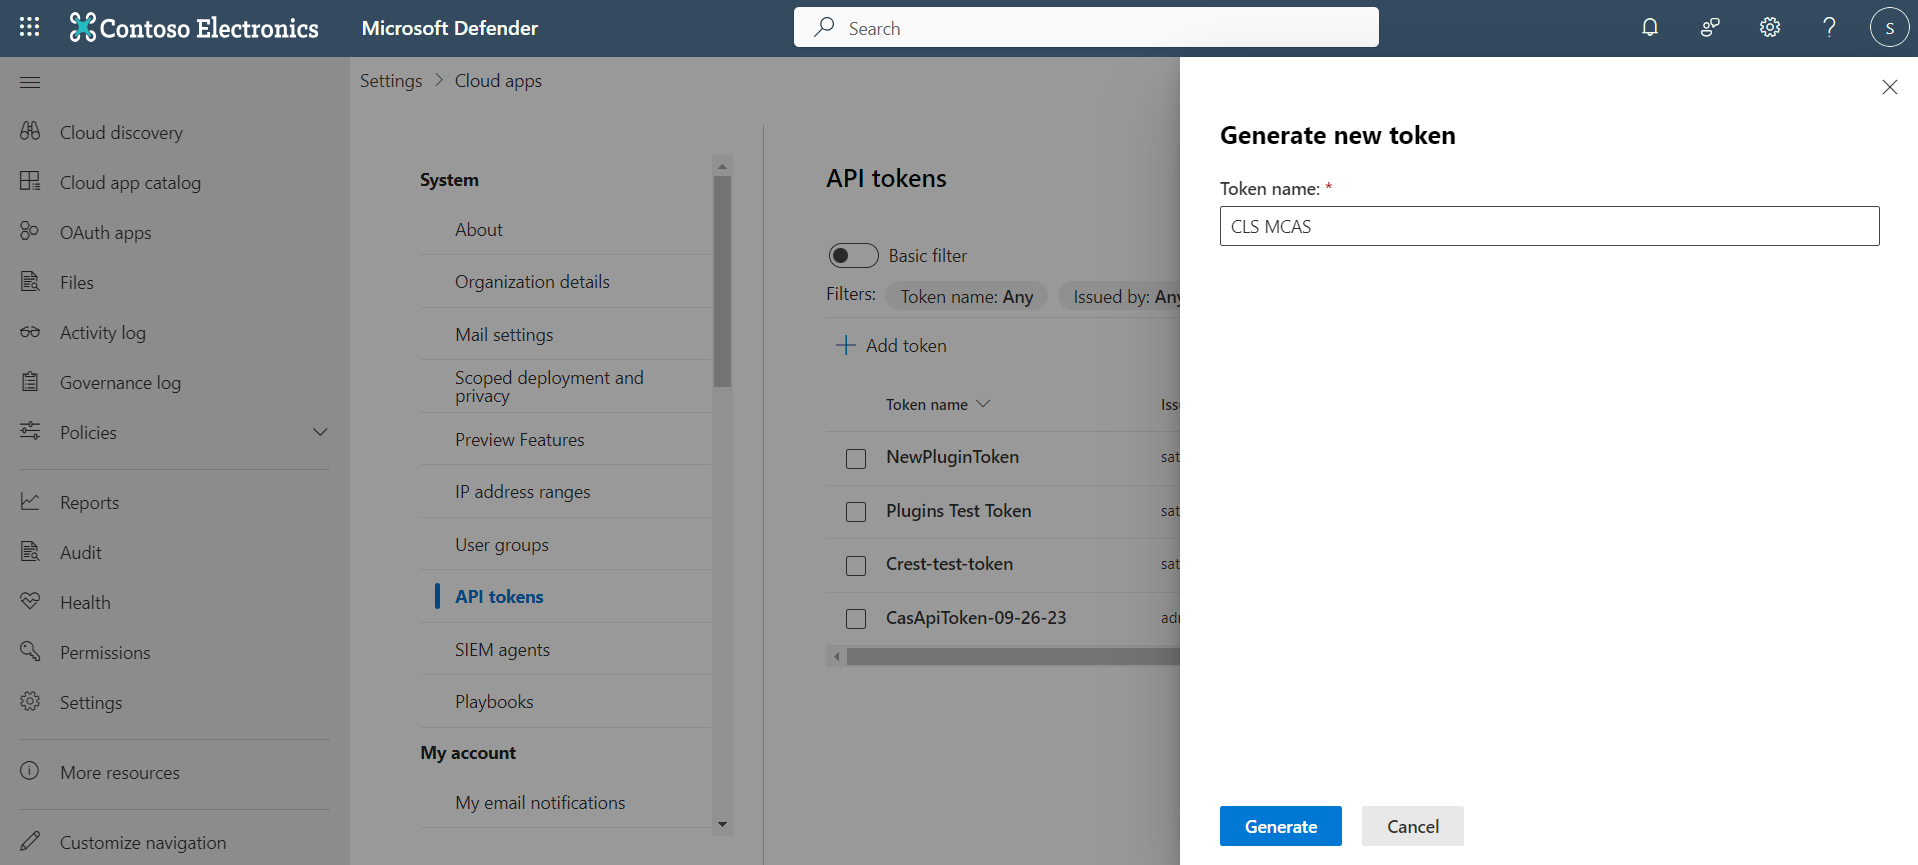
- Provide a name to identify the token, and click Generate.
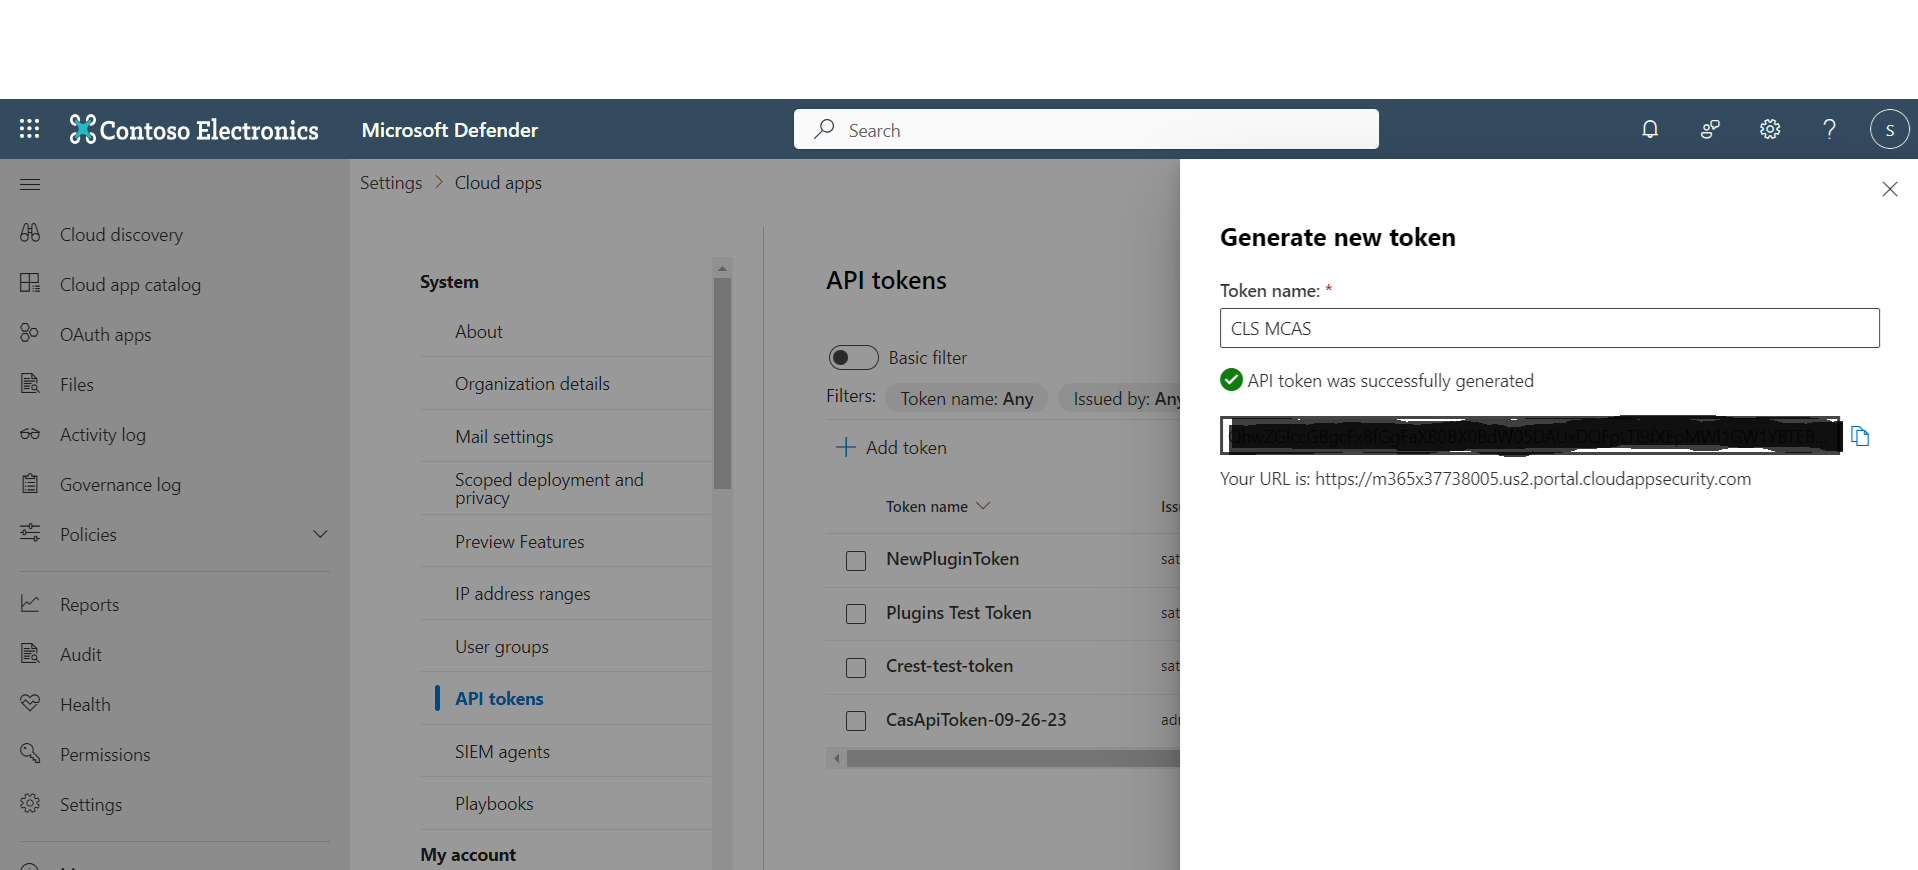
- Copy the token value and save it to use to configure the plugin. If you lose it, you need to regenerate the token. The token has the privileges of the user who issued it. For example, a security reader can’t issue a token that can alter data.
 You can filter the tokens by status: Active, Inactive, or Generated.
- Generated: Tokens that have never been used.
- Active: Tokens that were generated and used within the past seven days.
- Inactive: Tokens that were used but there was no activity in the last seven days.
- After you generate a new token, you’ll be provided with a new URL to use to access the Defender for Cloud Apps portal.
Generate the Client ID, Tenant ID, and Client Secret for OAuth 2.0 (Application context)
Follow the below steps to generate the Client ID, Tenant ID, and Client Secret for configuring the Microsoft Defender for Cloud Apps plugin using the OAuth 2.0 (Application context).
- Log in to your Microsoft Azure portal.
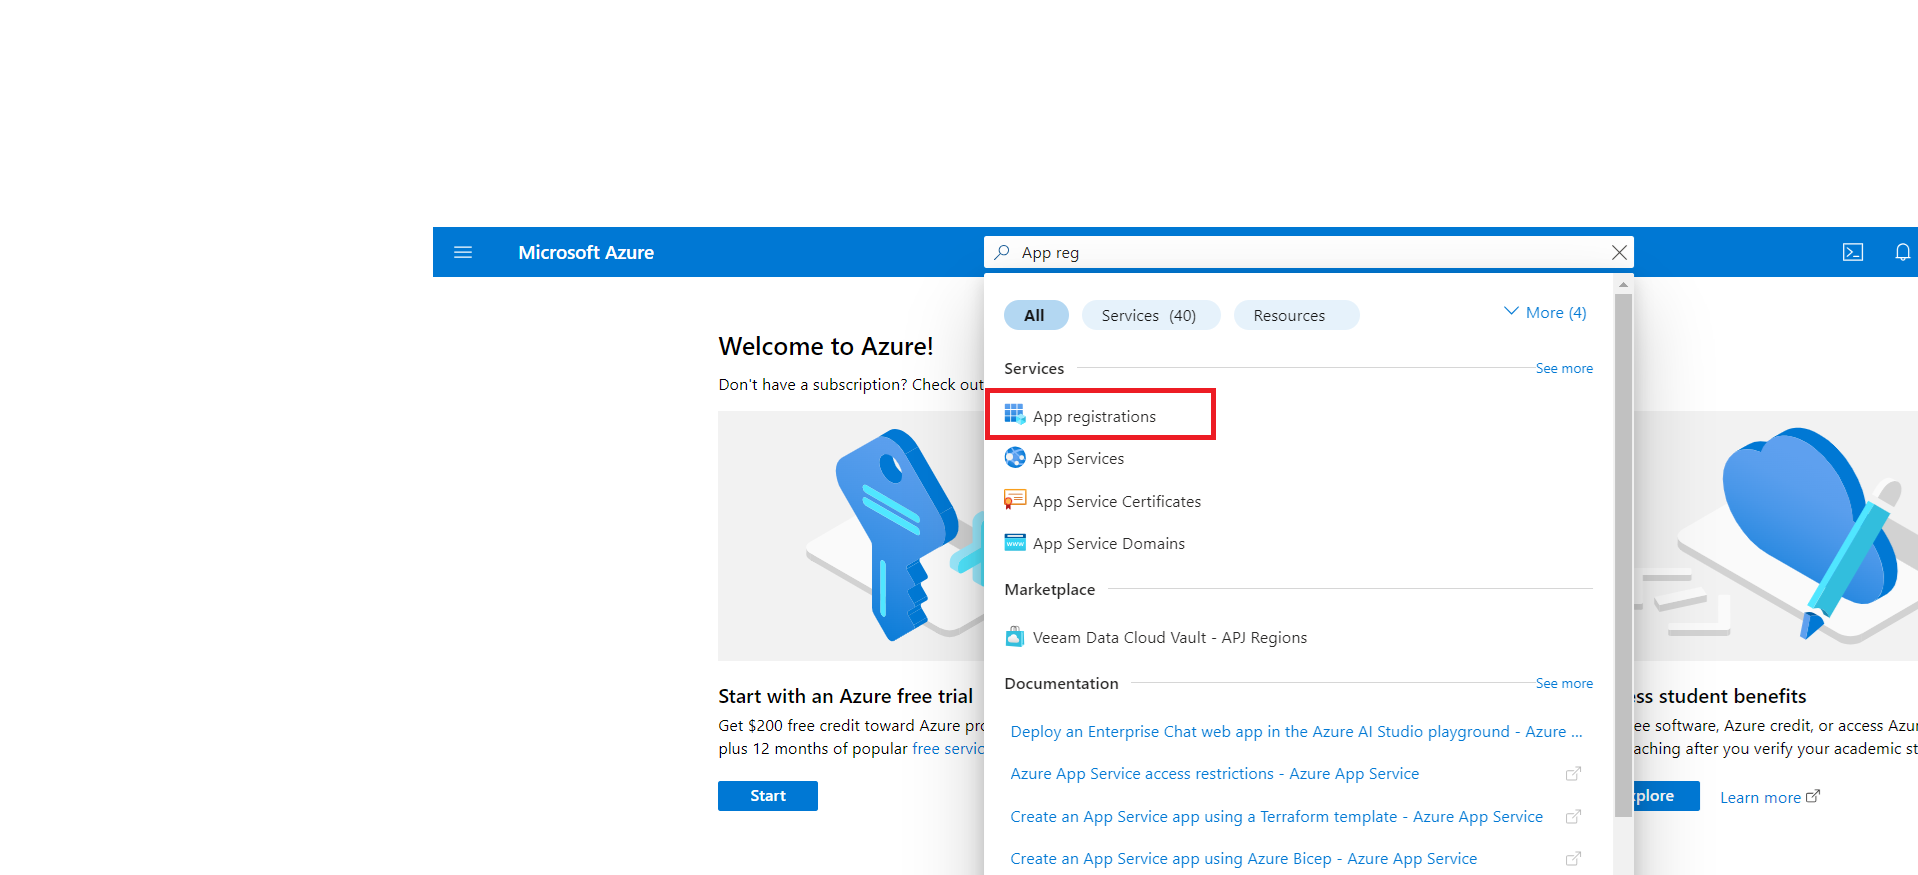
- Search for and select App registrations.
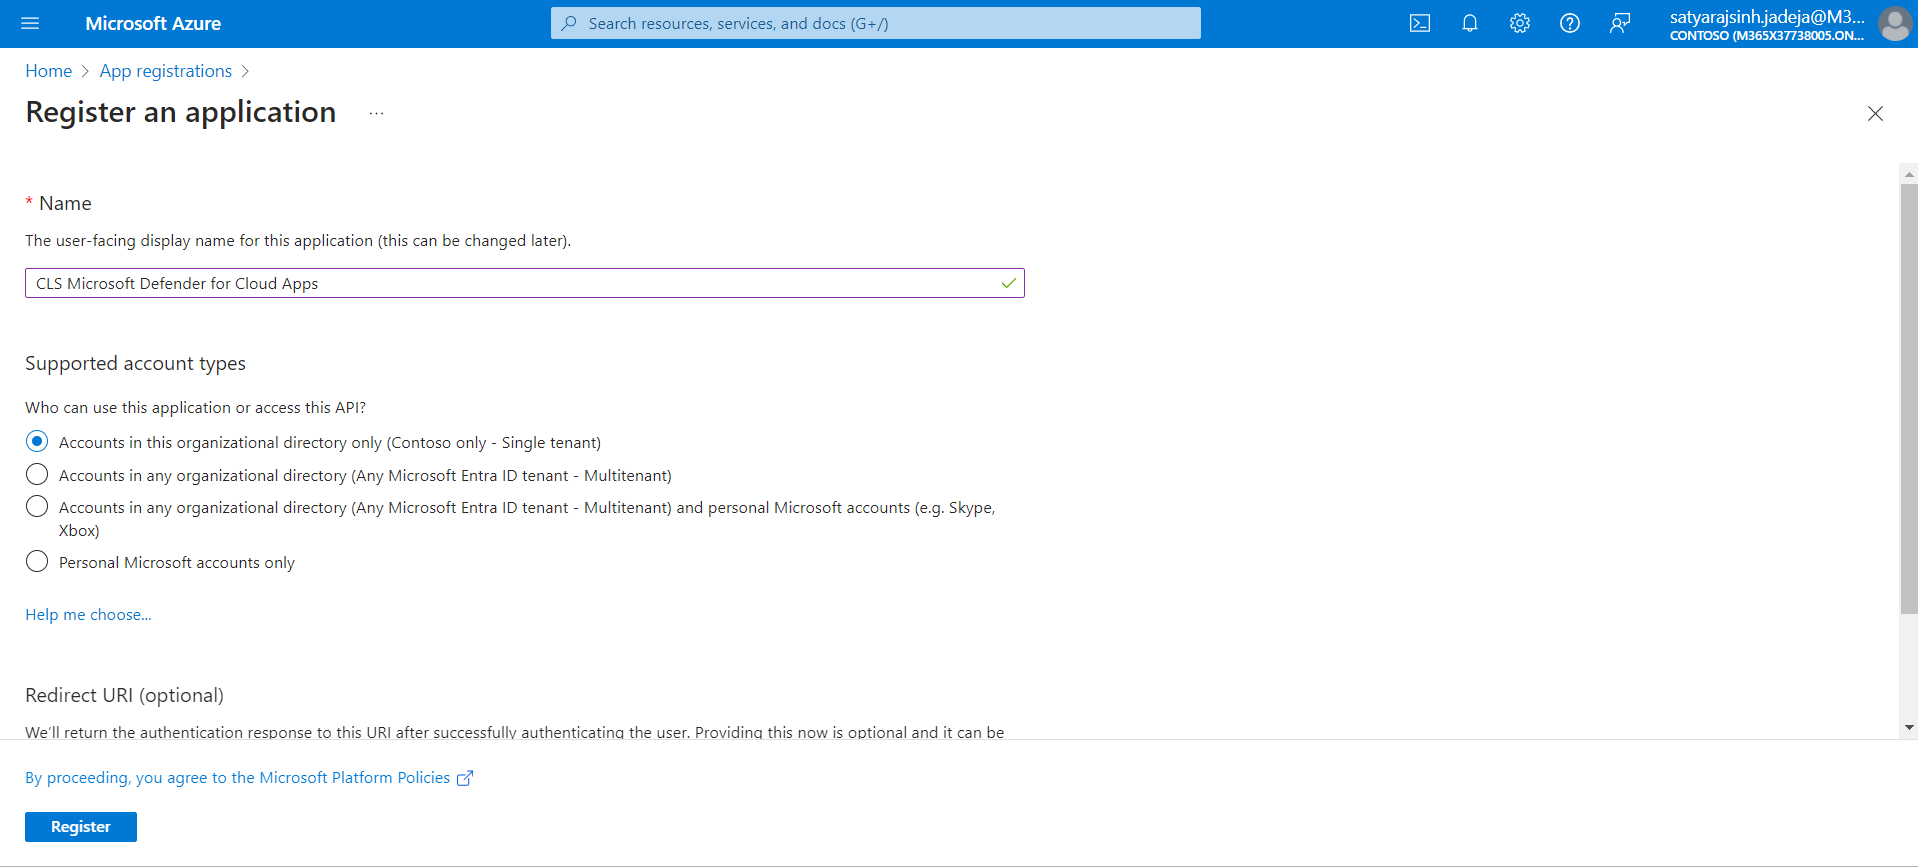
- Click New registration.
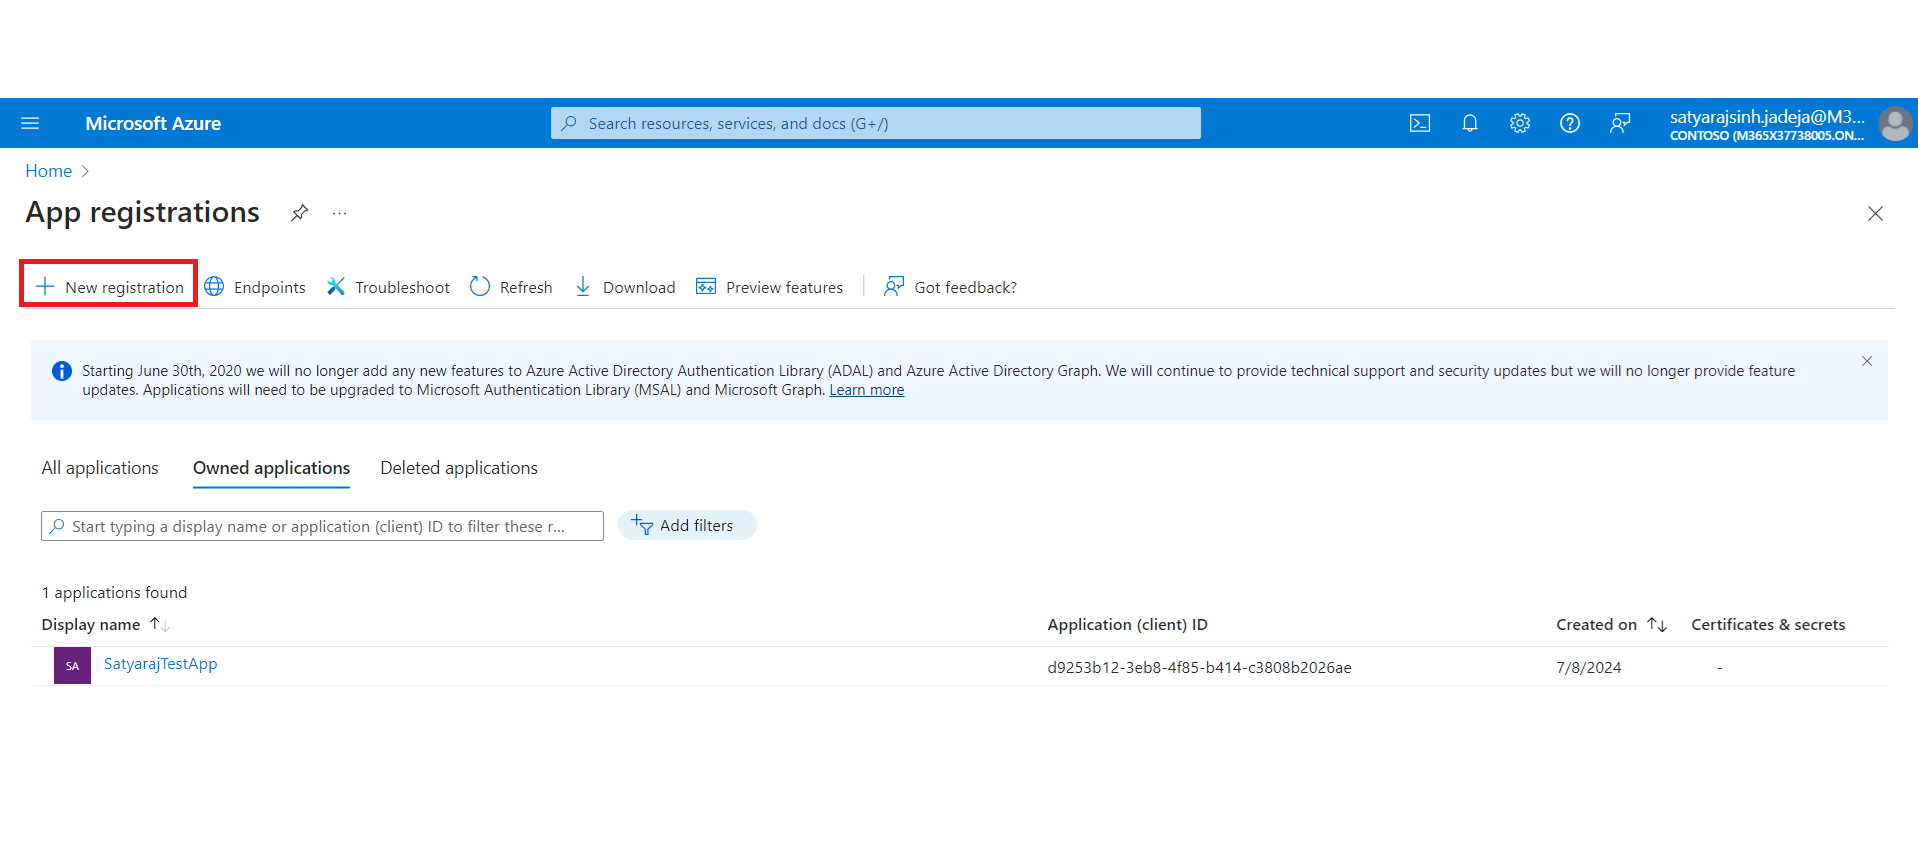
- Enter your Application Name and click Register.
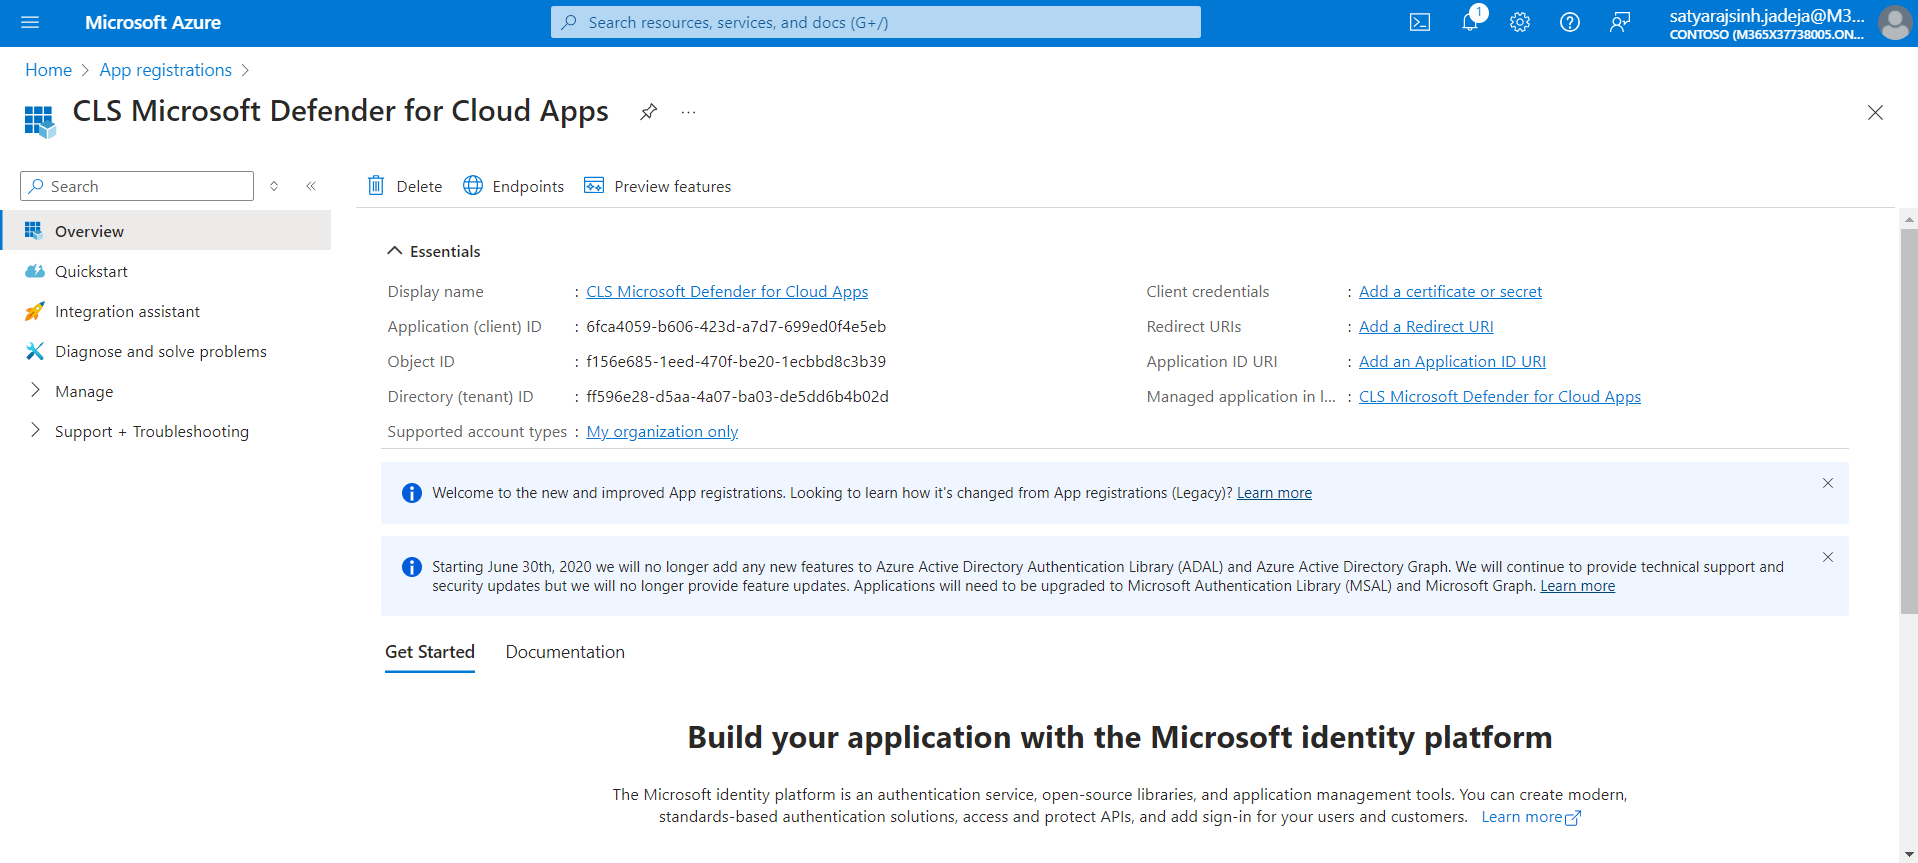
- Save the Client ID and Tenant ID to use it in your plugin configuration.
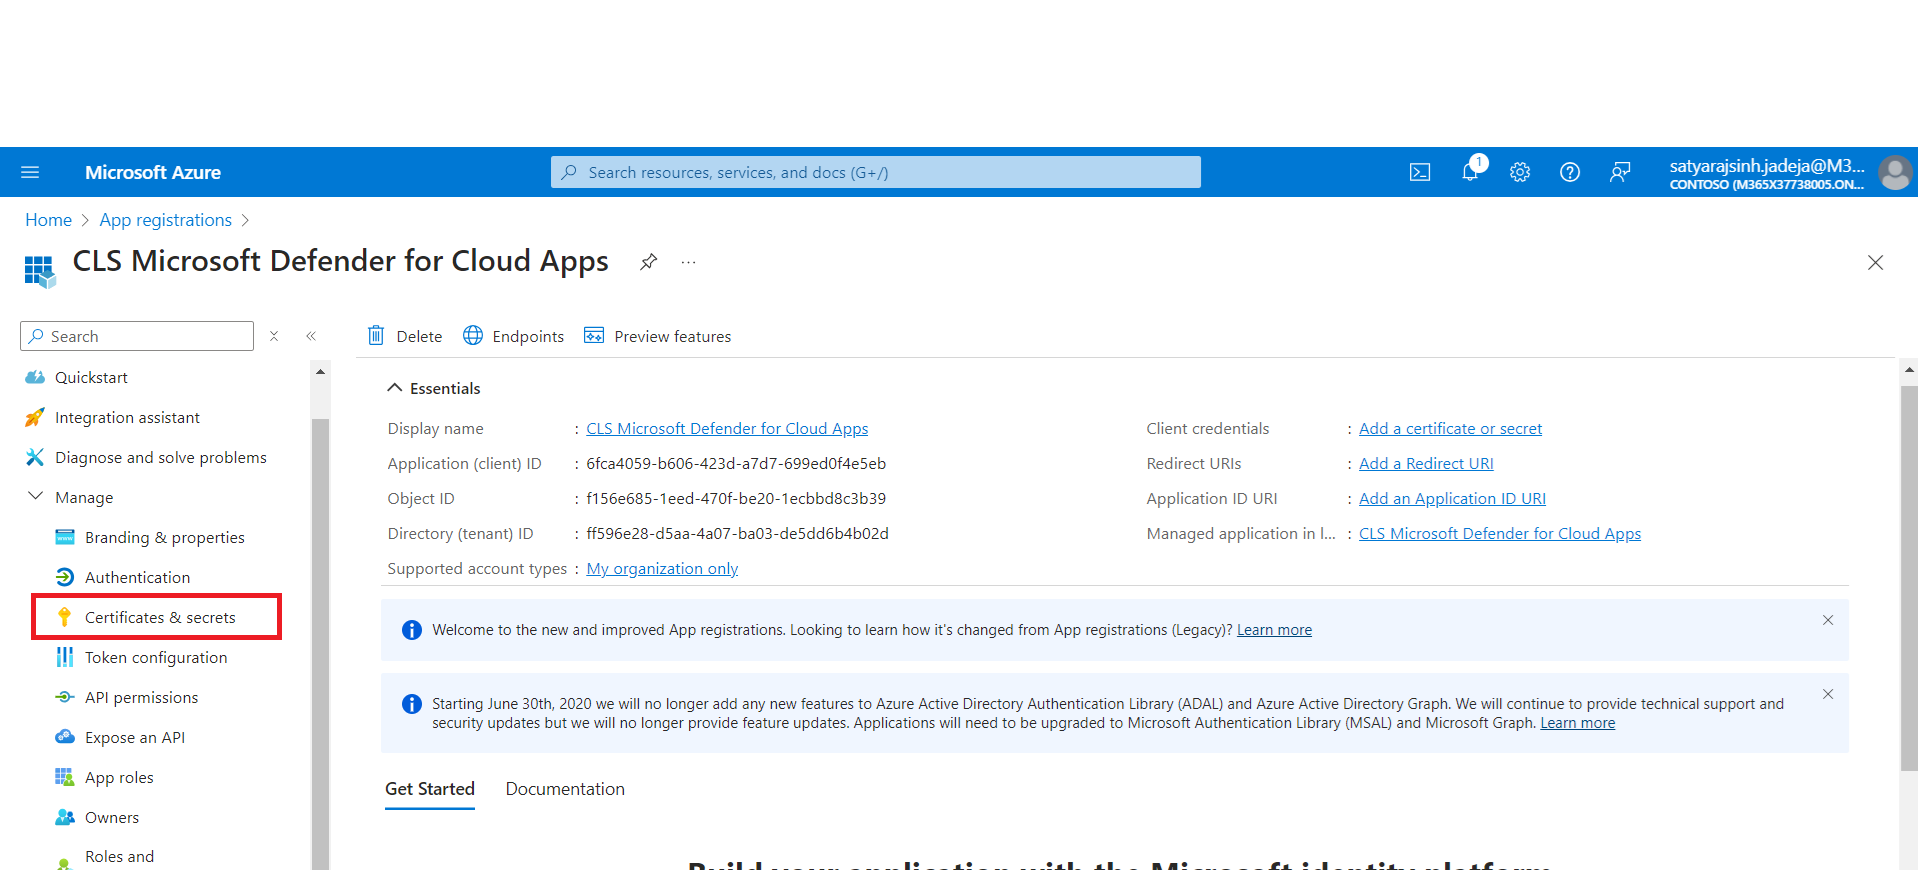
- Click Certificate and secrets to generate the Secret ID.
- Click New client secret, enter the description and expiration time, and then click Add.
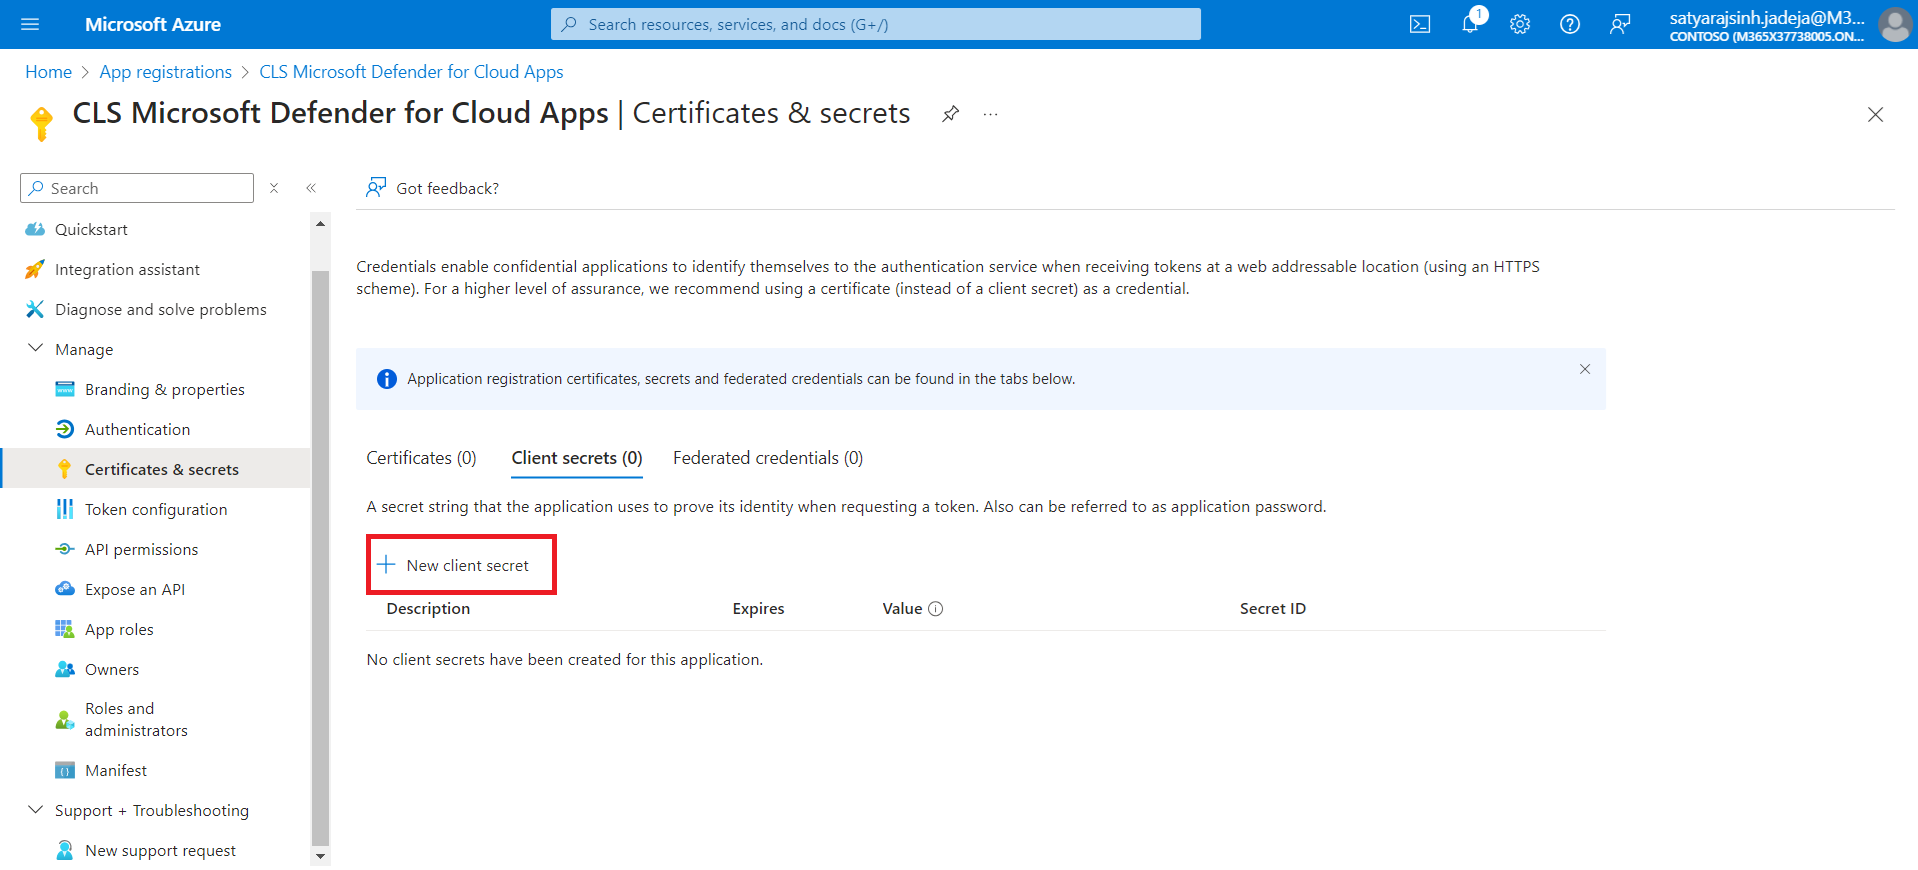
- Copy the Value in the Client Secret field; make sure to store the Client value safe, as it won’t be visible again.
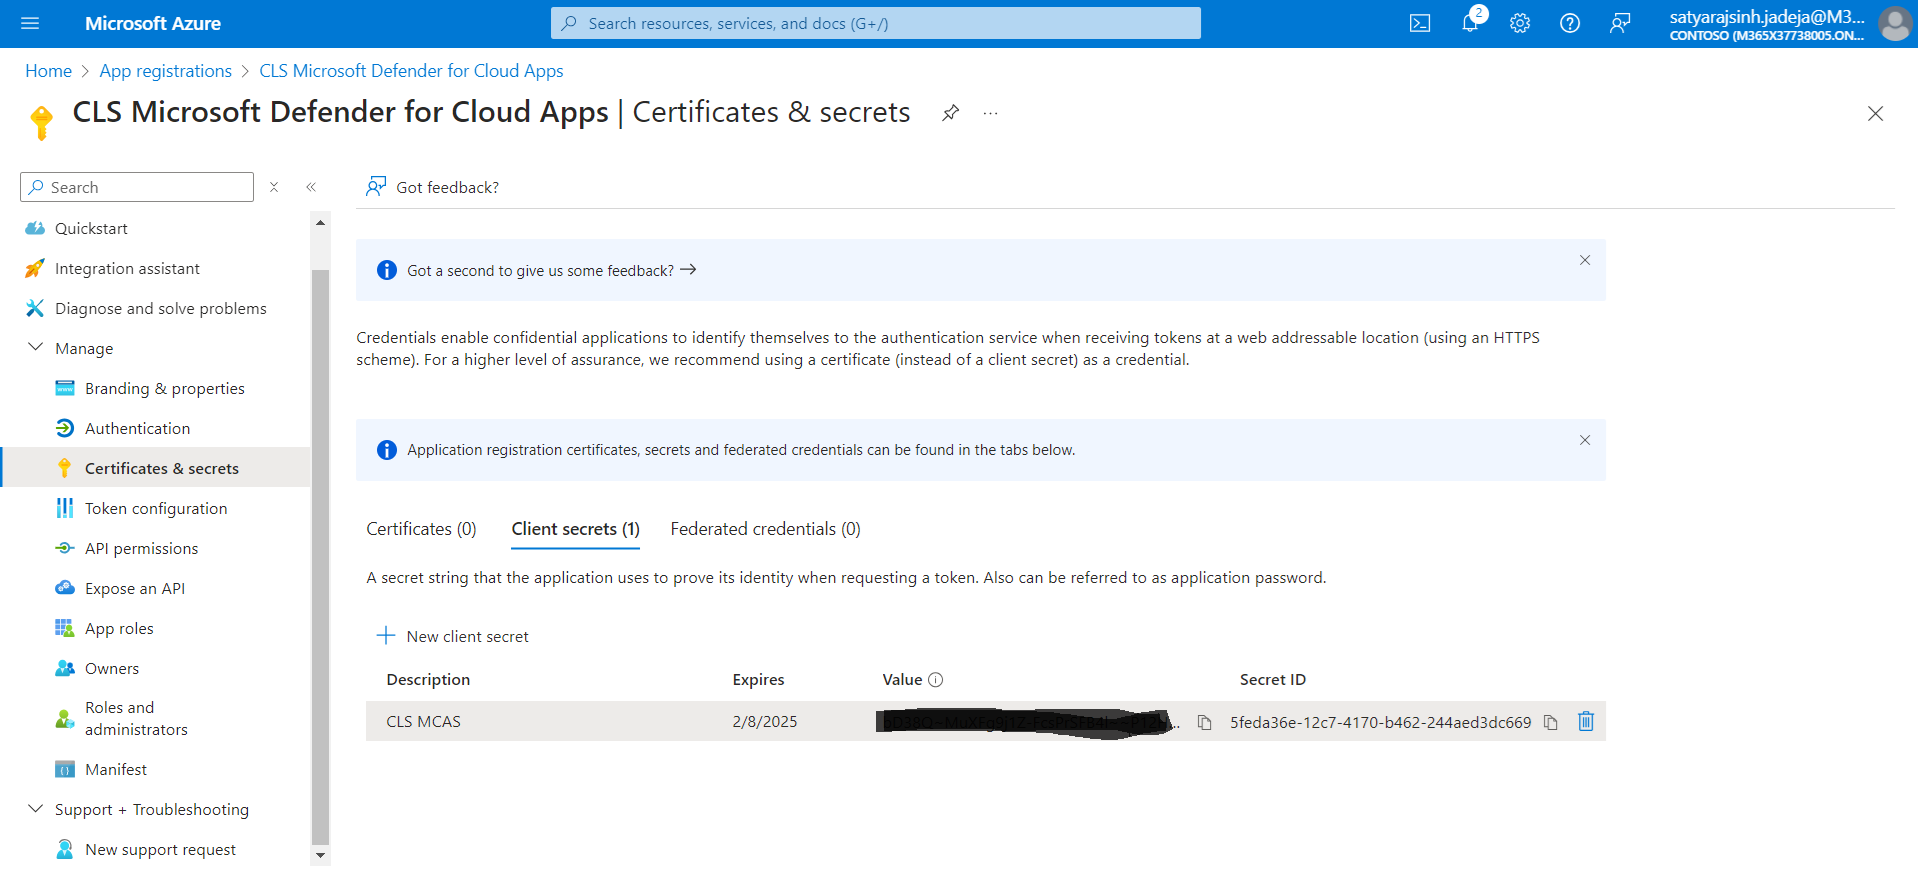
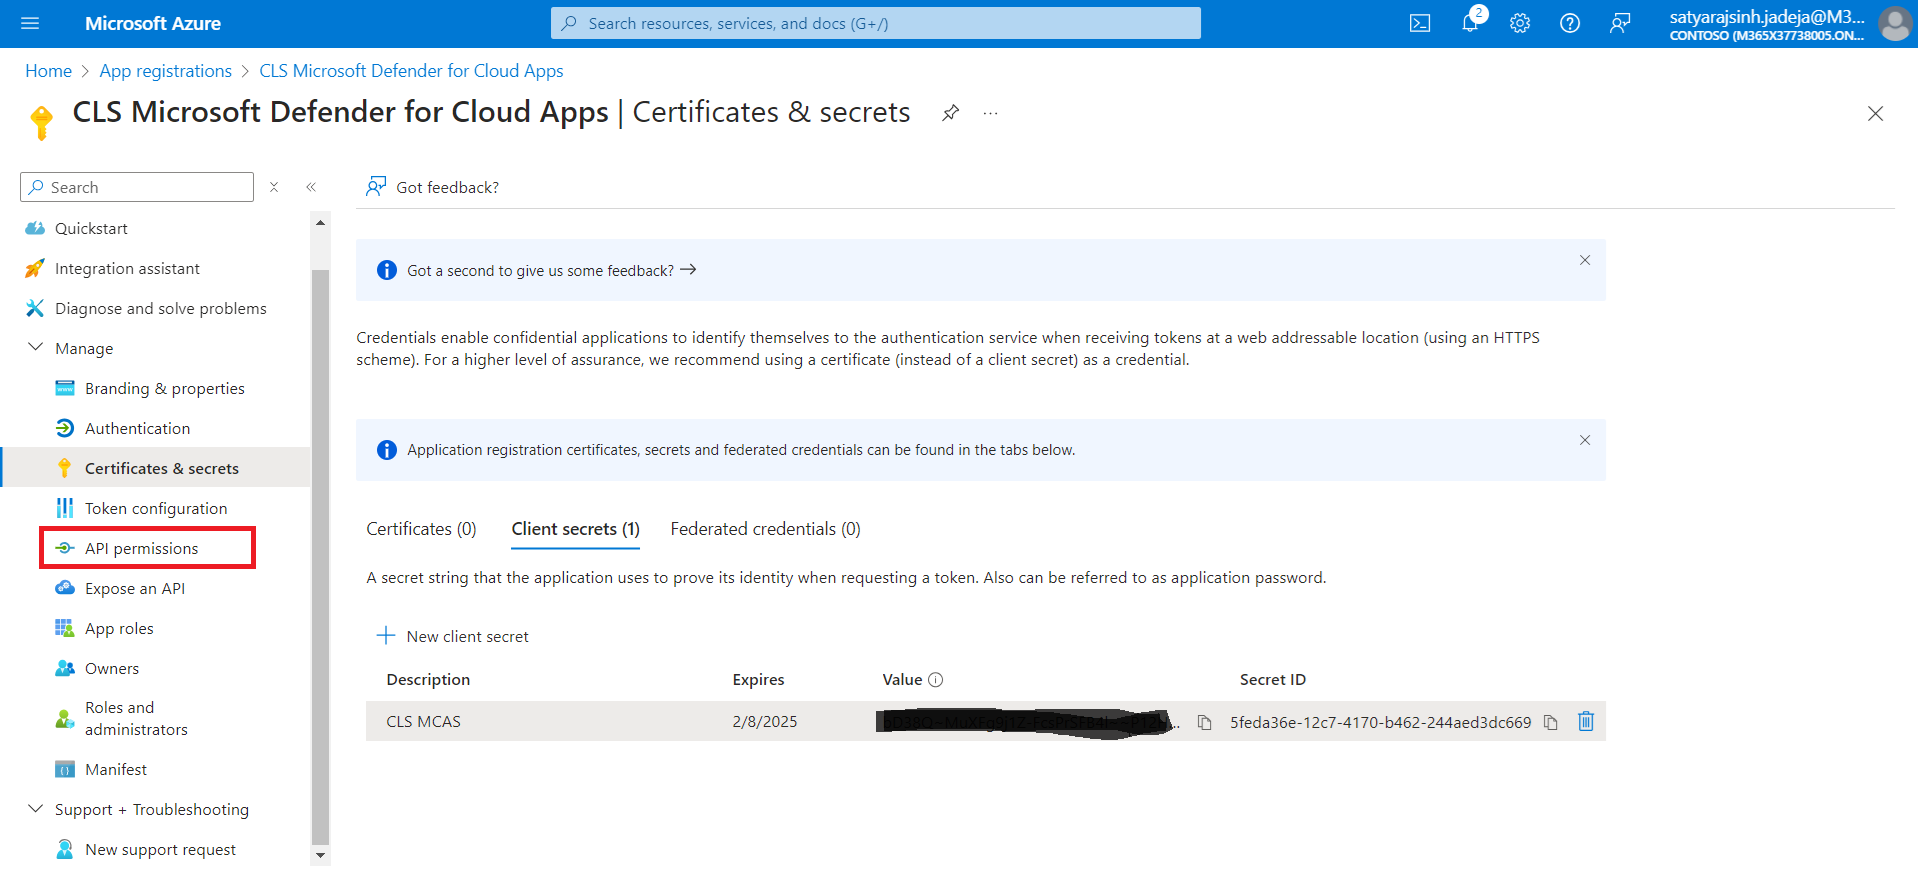
- Click API permissions from the left panel.
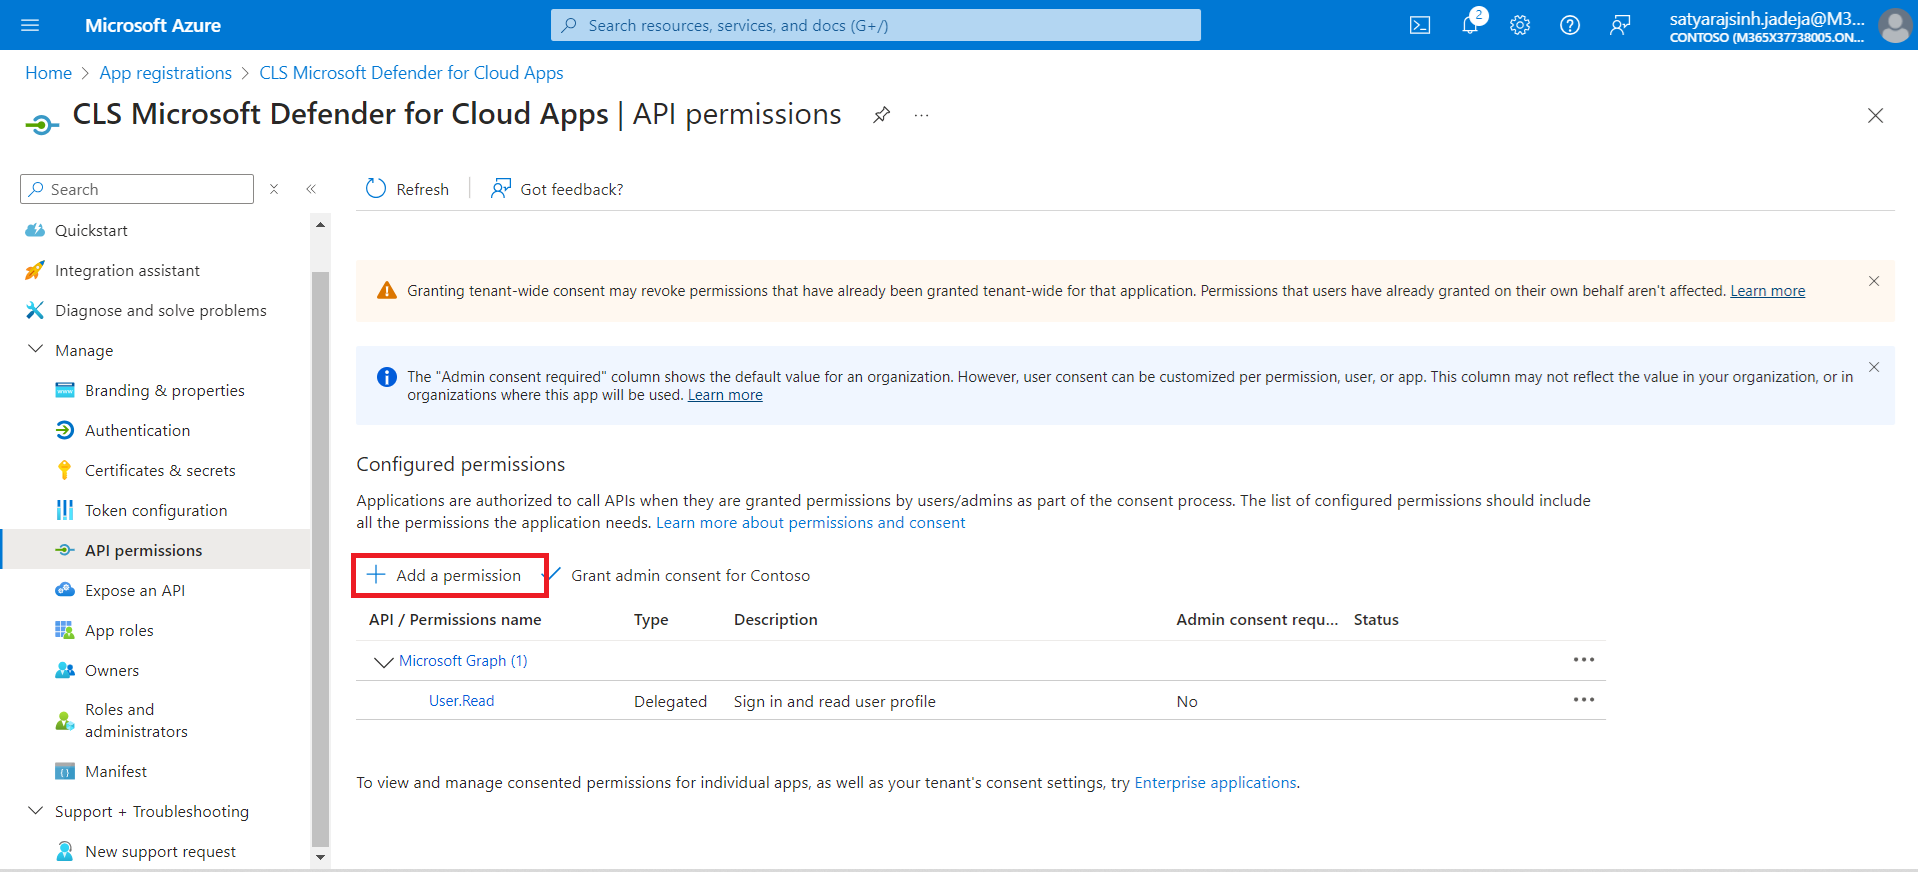
- Click Add permission to provide the necessary permission for ingesting the data.
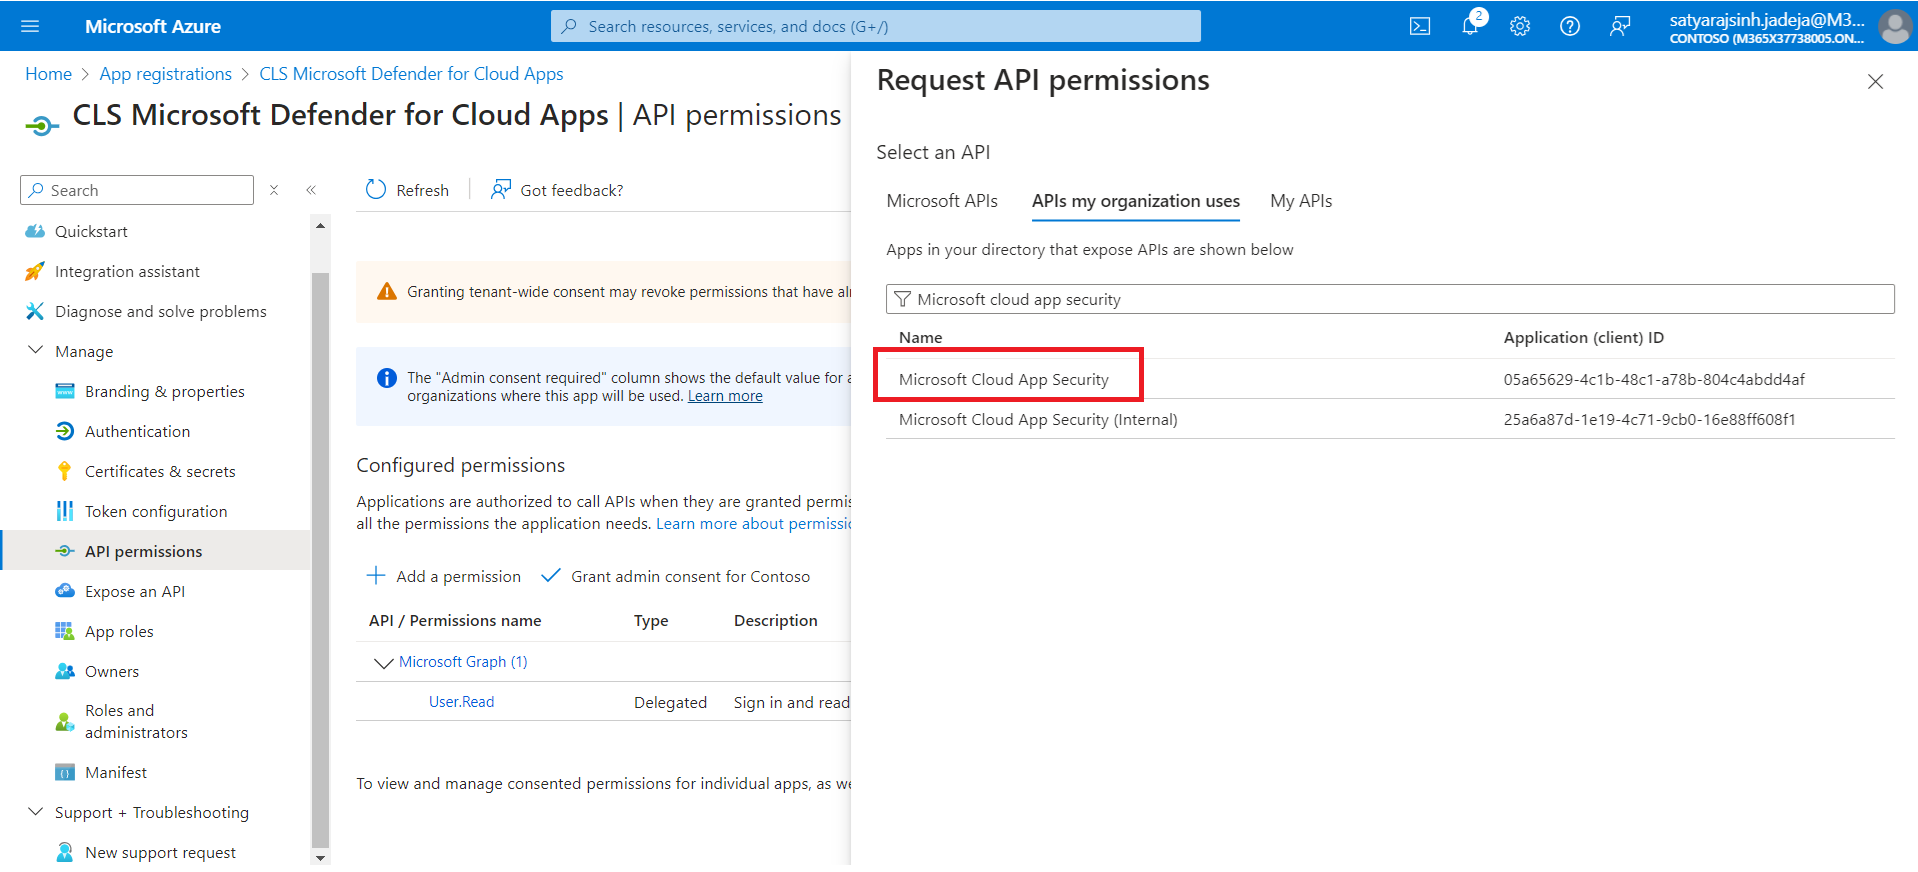
- Go to APIs my organization uses, search for the Microsoft Cloud App Security, and then click it.
- Select Application permissions.
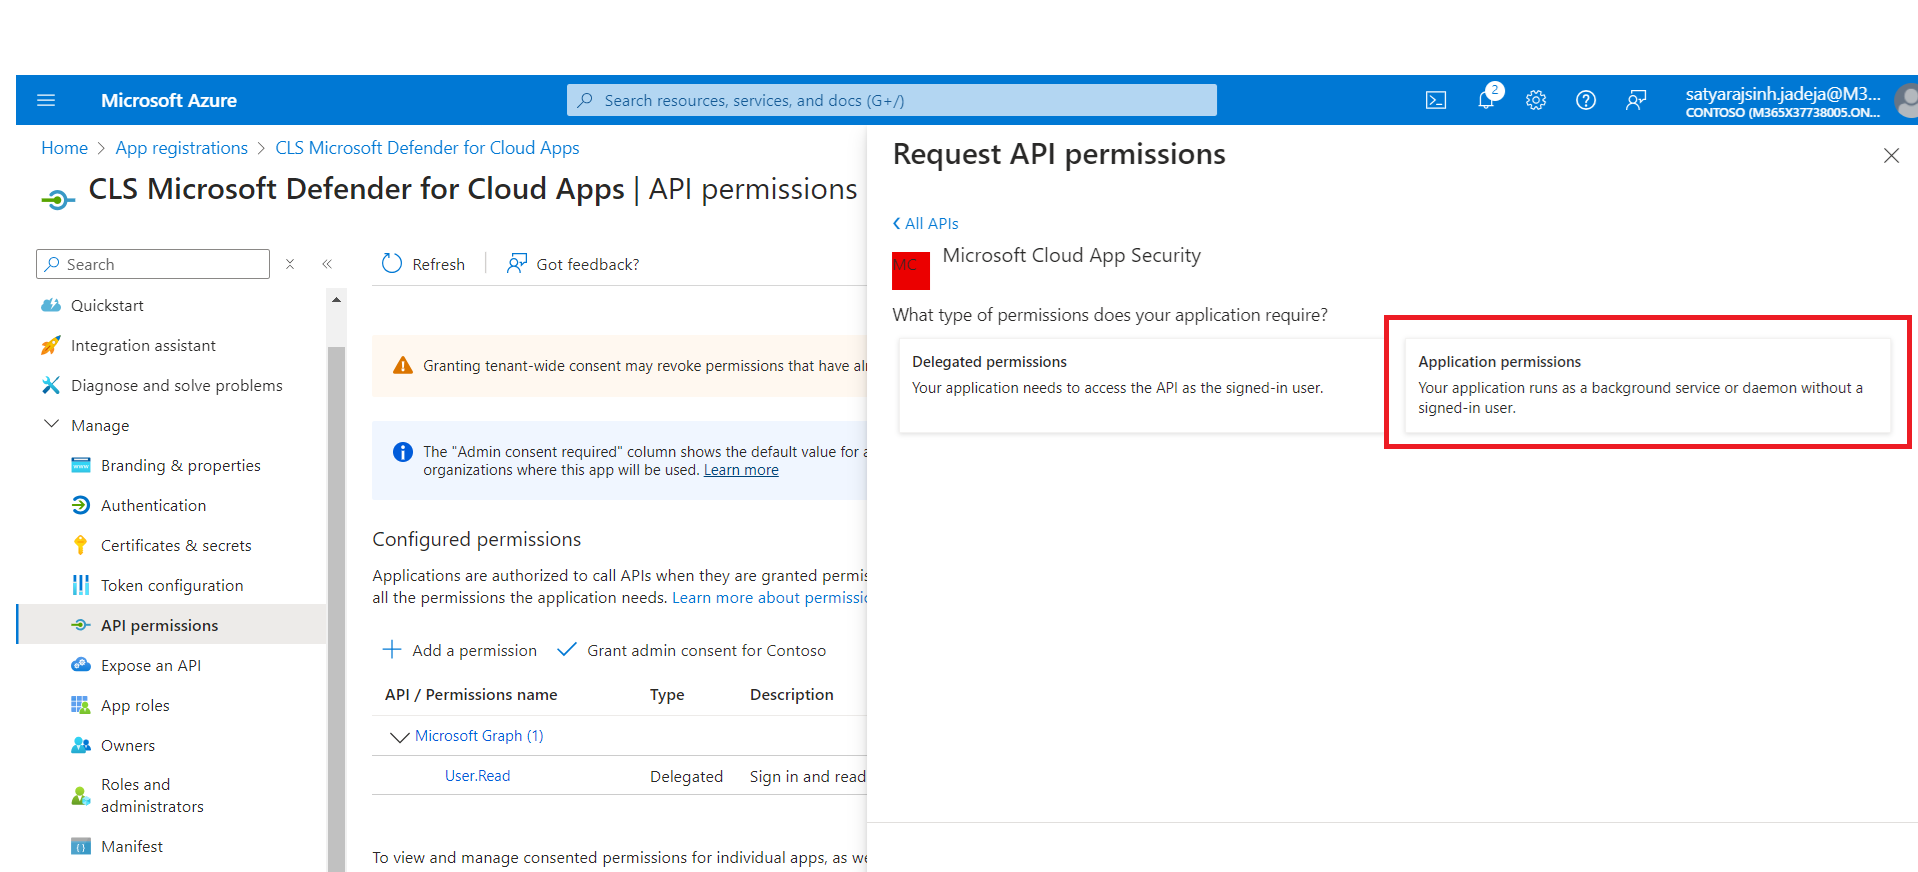
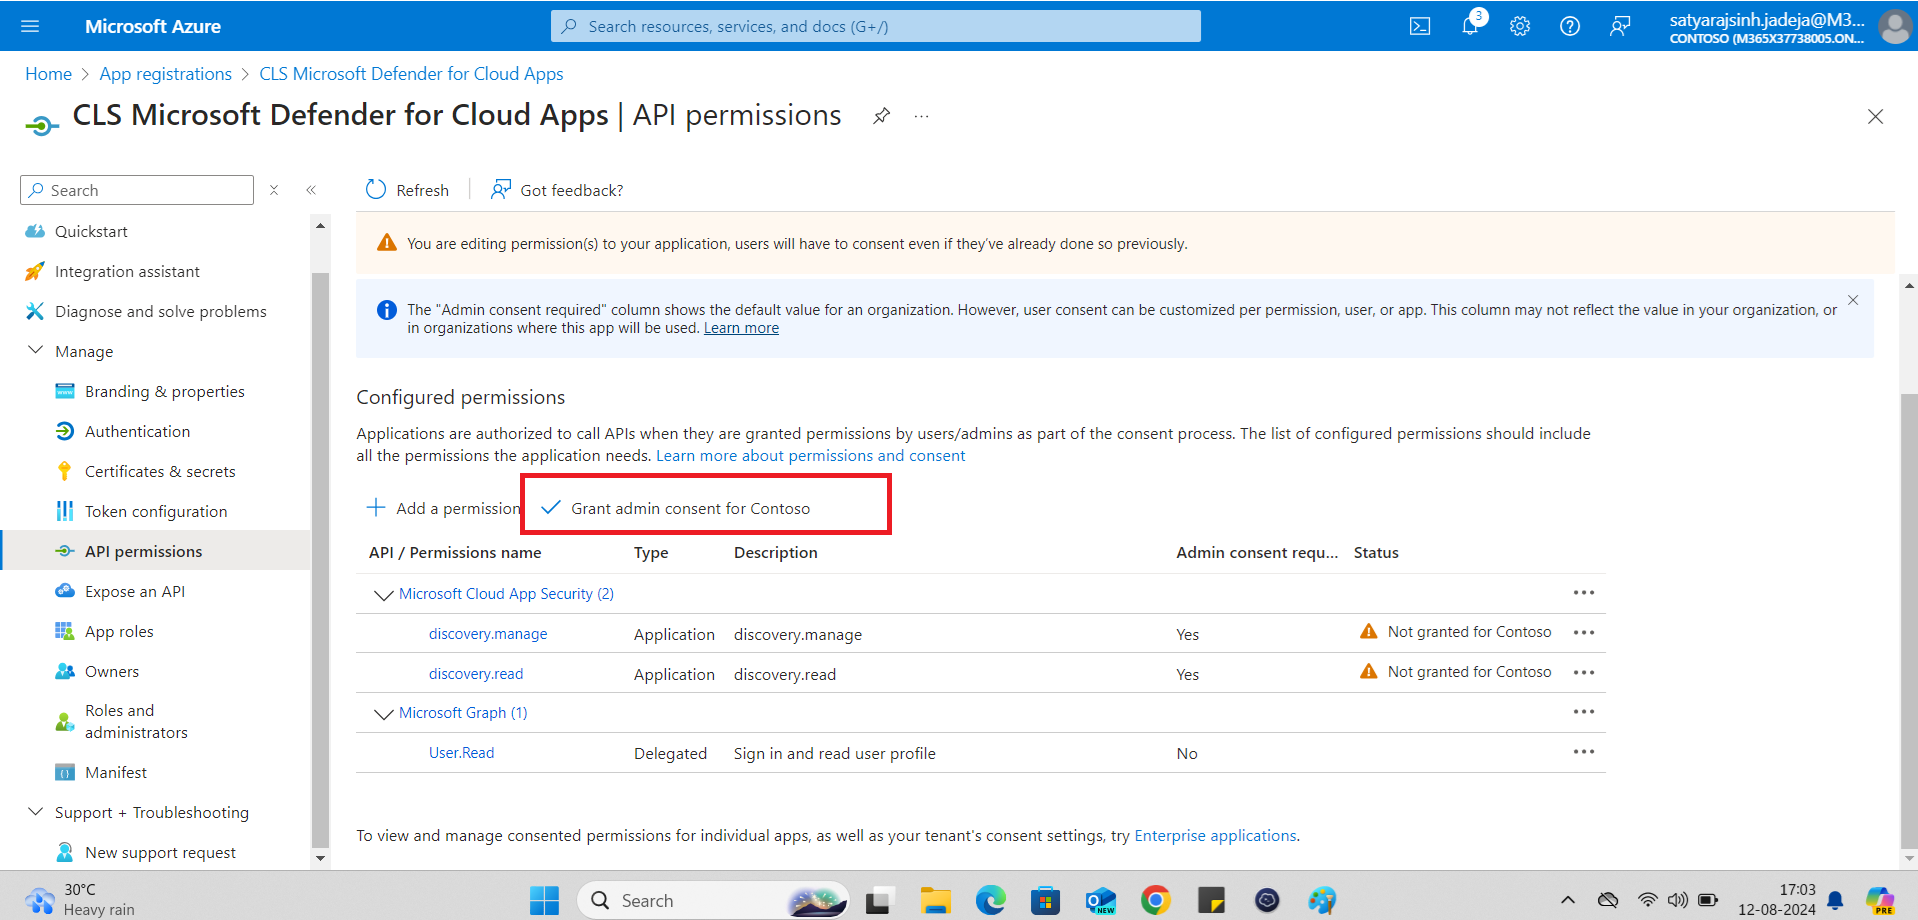
- Select the discovery.manage and discovery.read permissions and then click Add permission.

- Make sure to provide the admin consent.
Create a Data Source
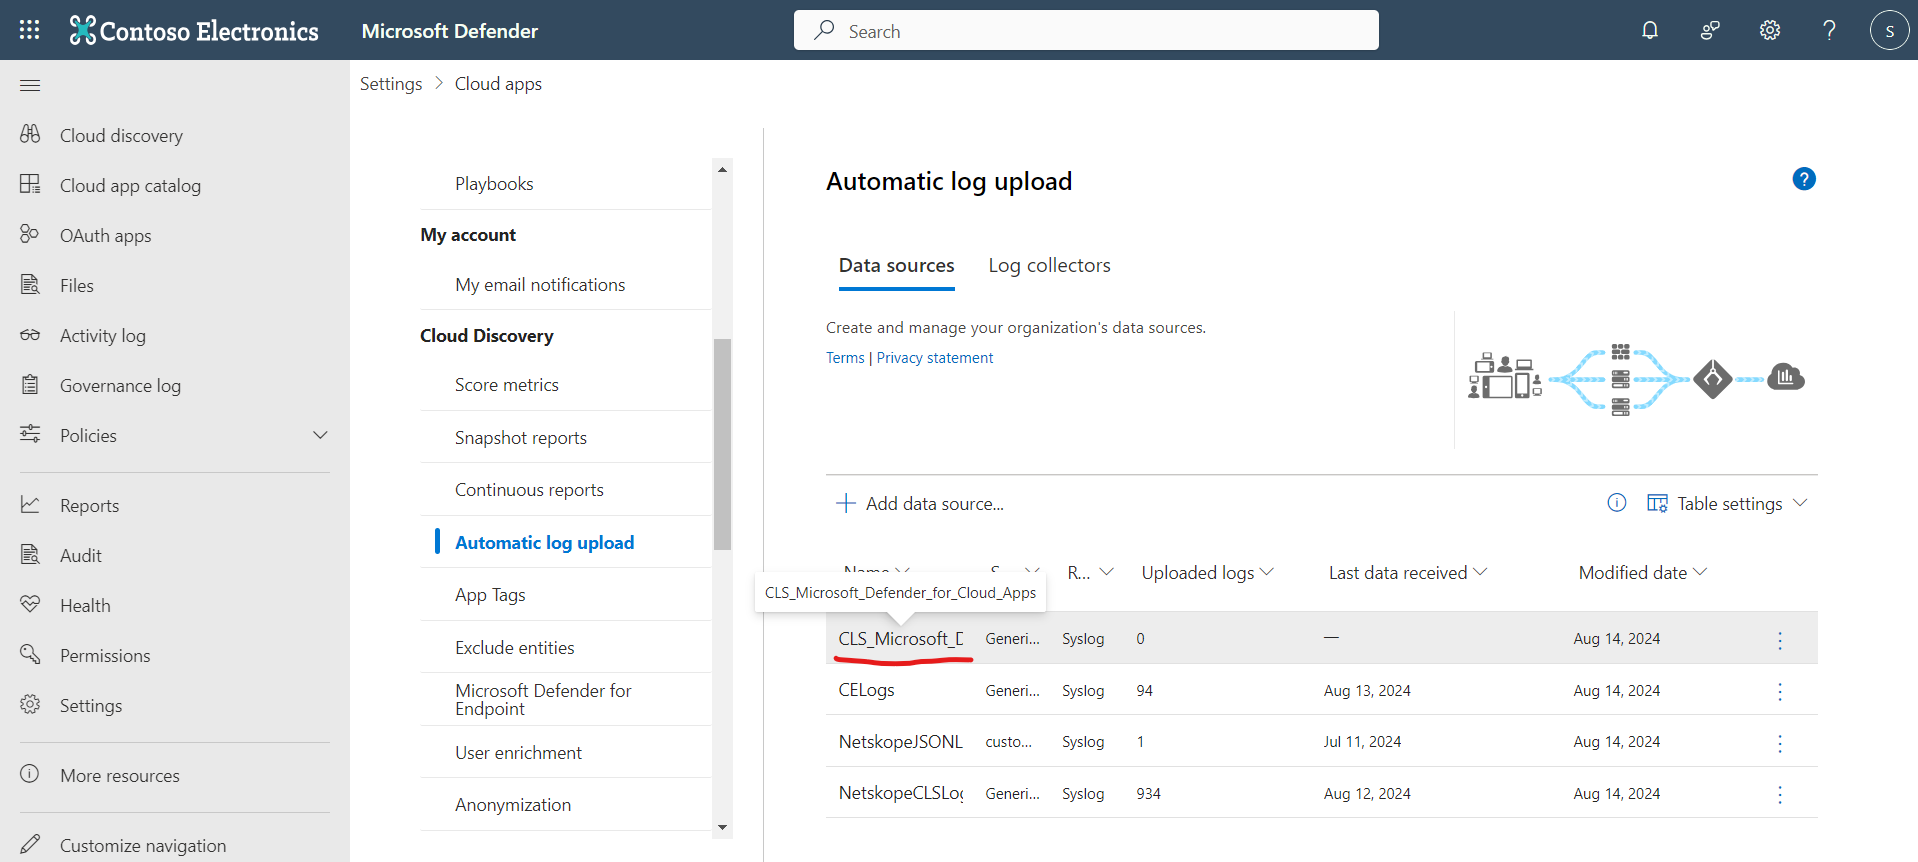
- In Microsoft Defender, go to Settings > Cloud Apps.
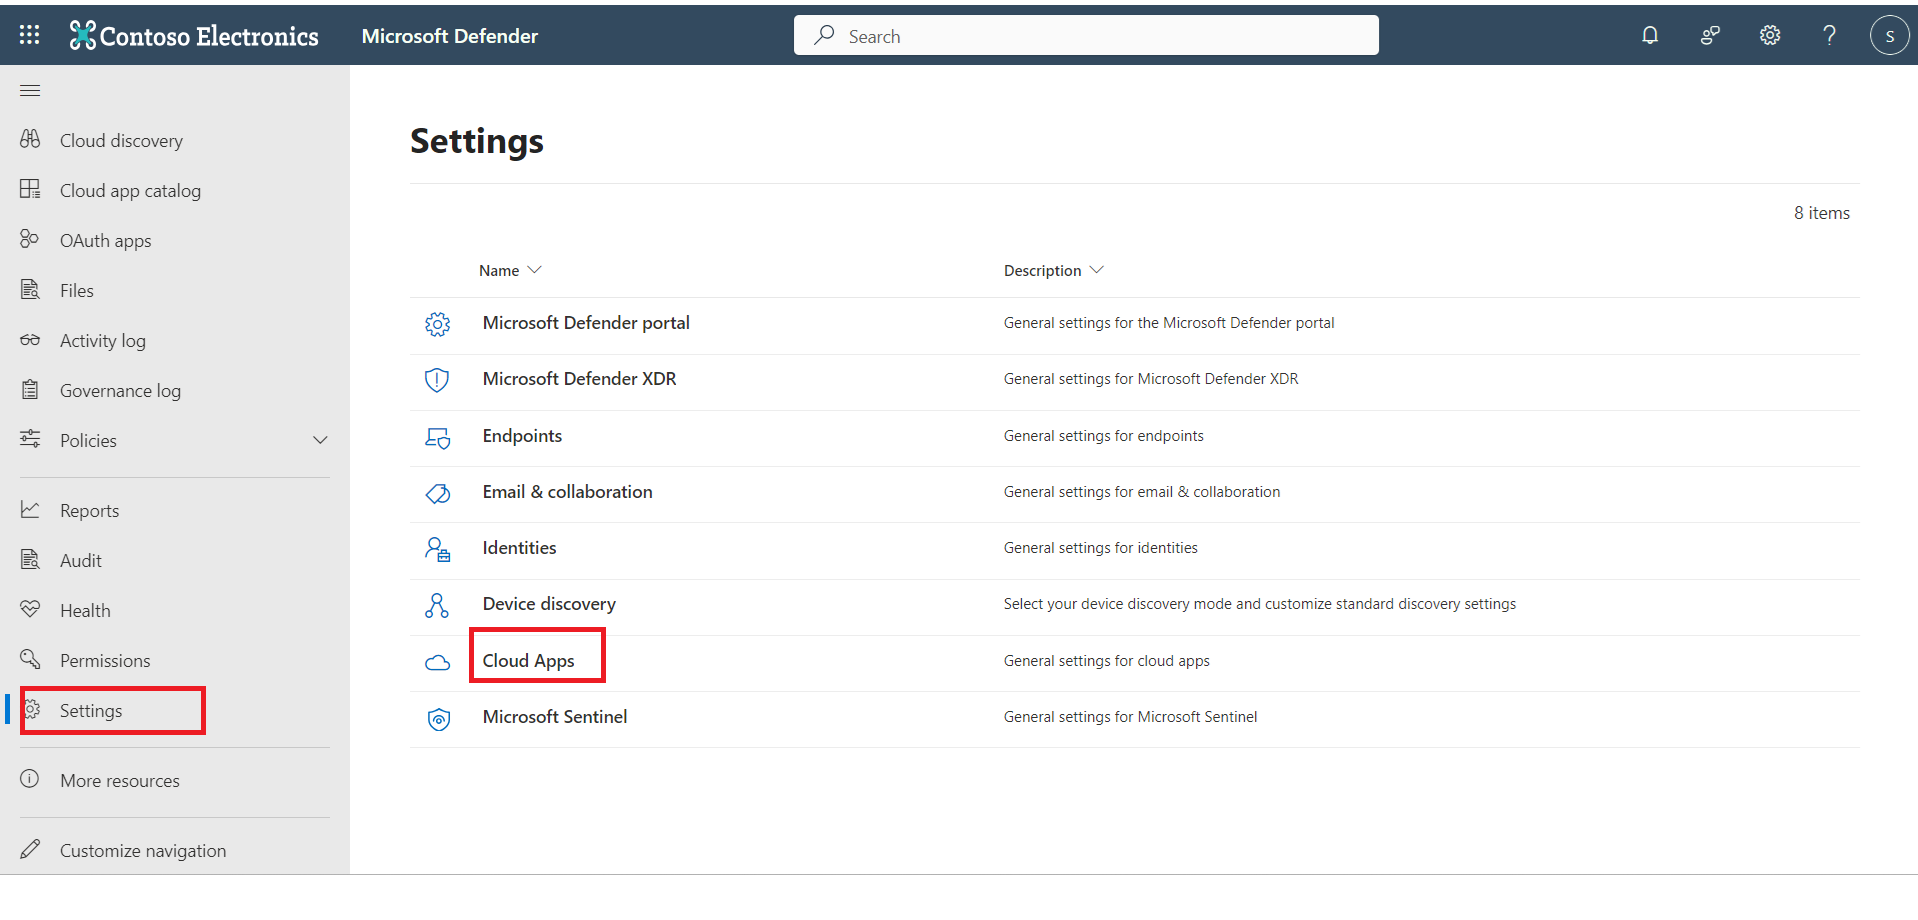
- Under Cloud Discovery, click Automatic log upload.

- Click Add data source.
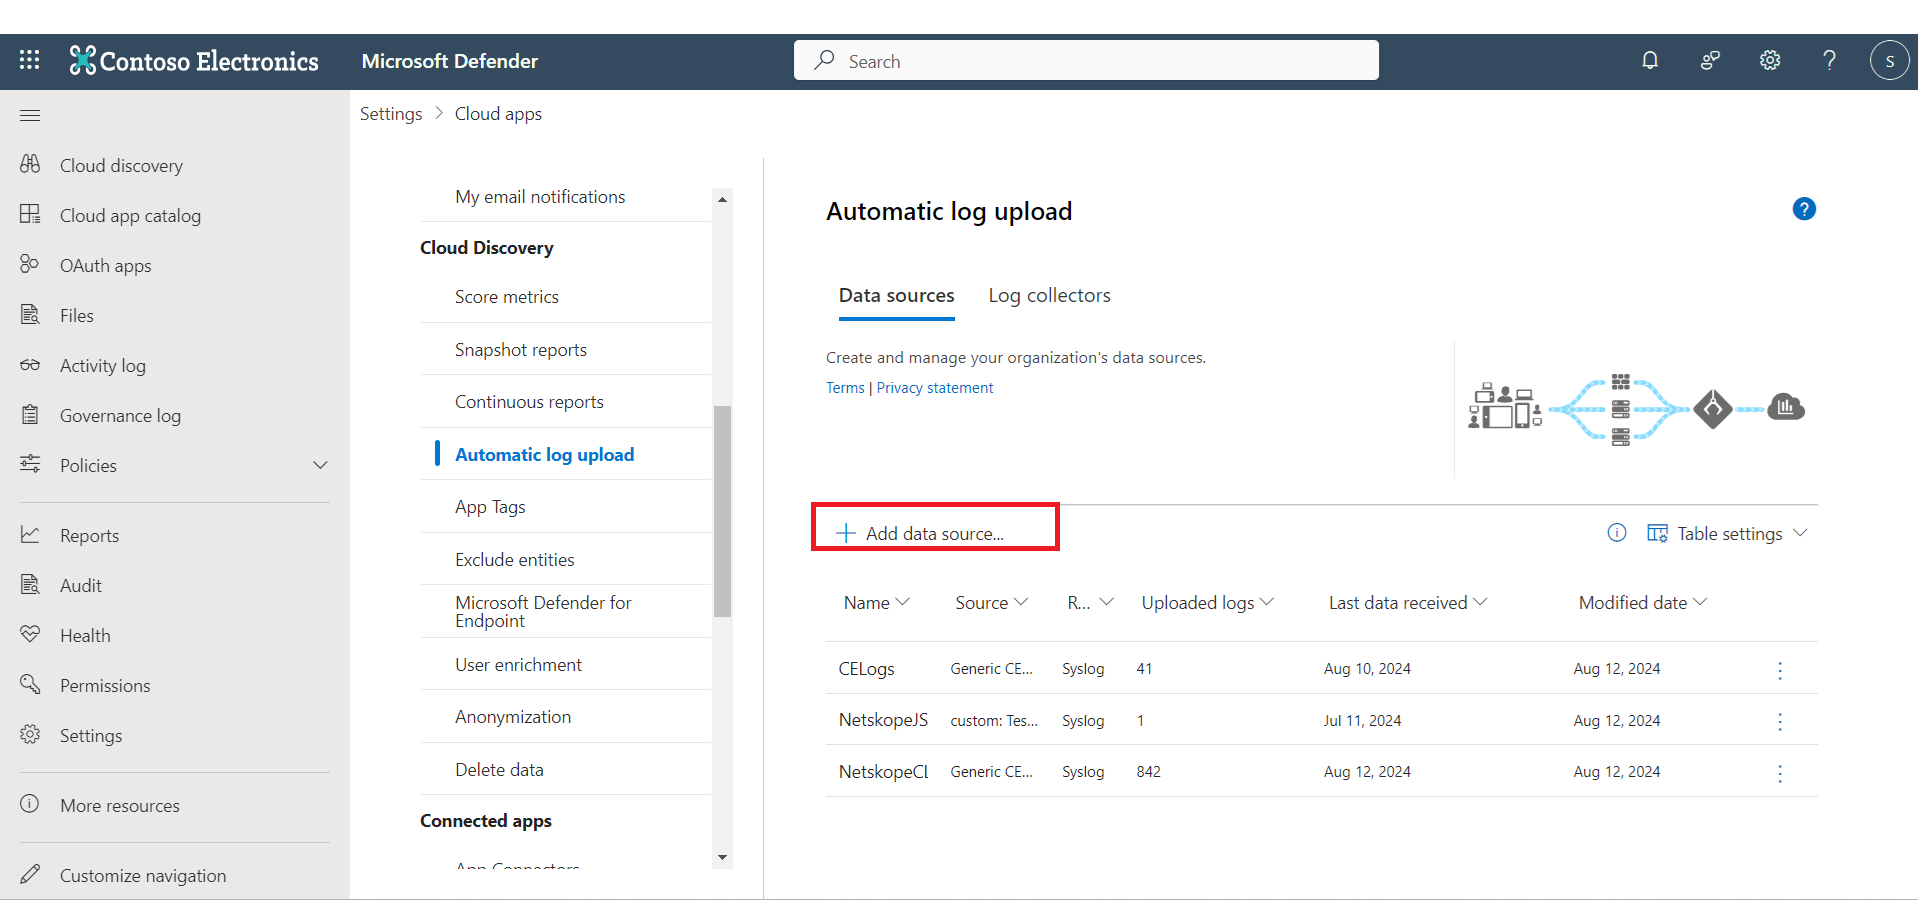
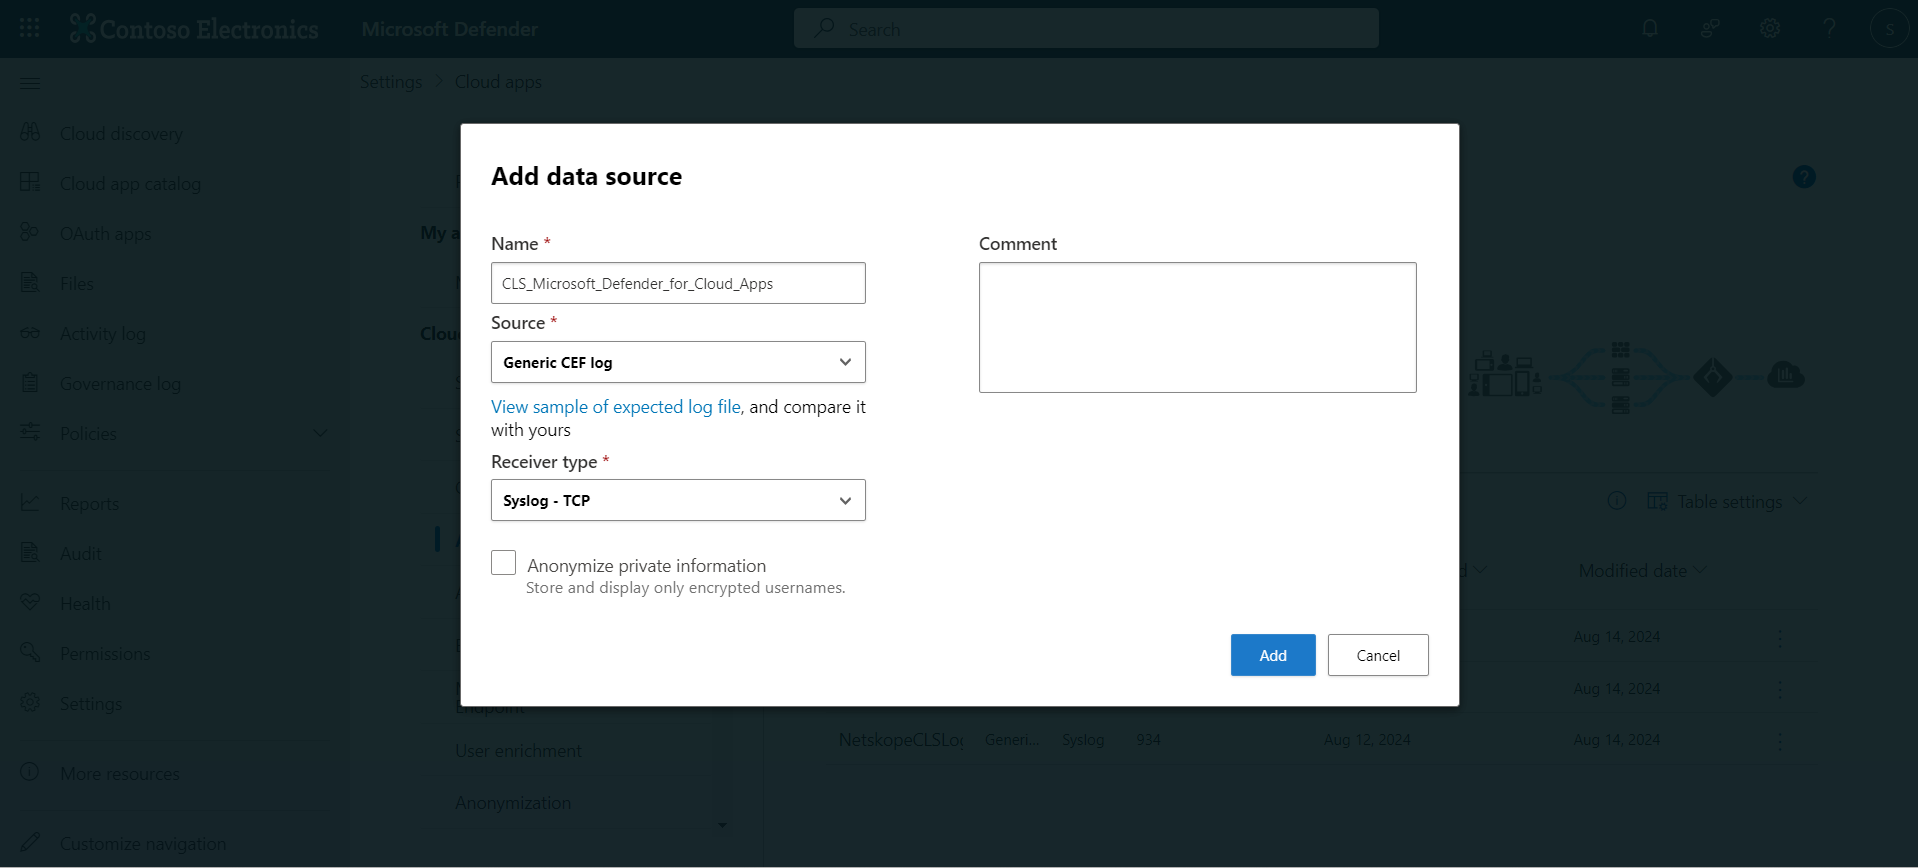
- Enter the name of the data source, select Generic CEF log for Source, and Syslog – TCP for Receiver type. Click Add.
Configure the Microsoft Defender for Cloud Apps Plugin
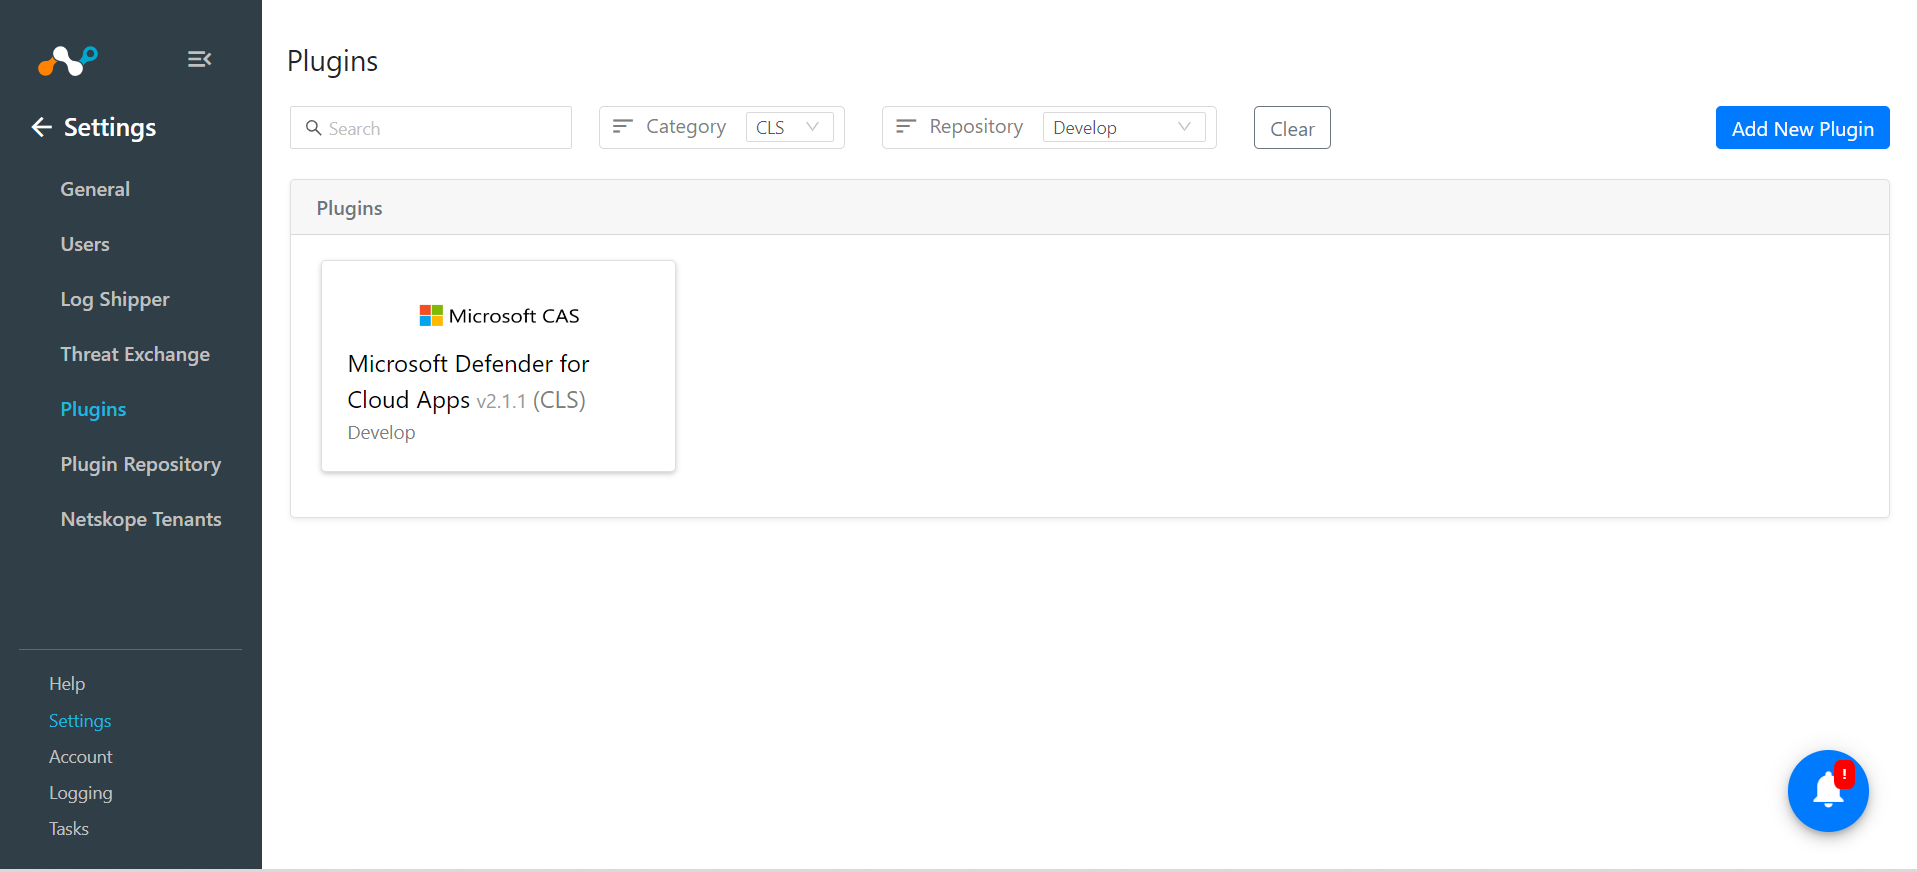
- In Cloud Exchange, go to Settings > Plugins. Search for and select the Microsoft Defender for Cloud Apps v2.1.1 (CLS) plugin box.
- Enter a configuration name, and make sure the Microsoft Defender for Cloud Apps Default Mapping is selected. Disable the toggle button to transform the logs to ingest the data in JSON format, or keep it enabled if you want to ingest the data in CEF format.
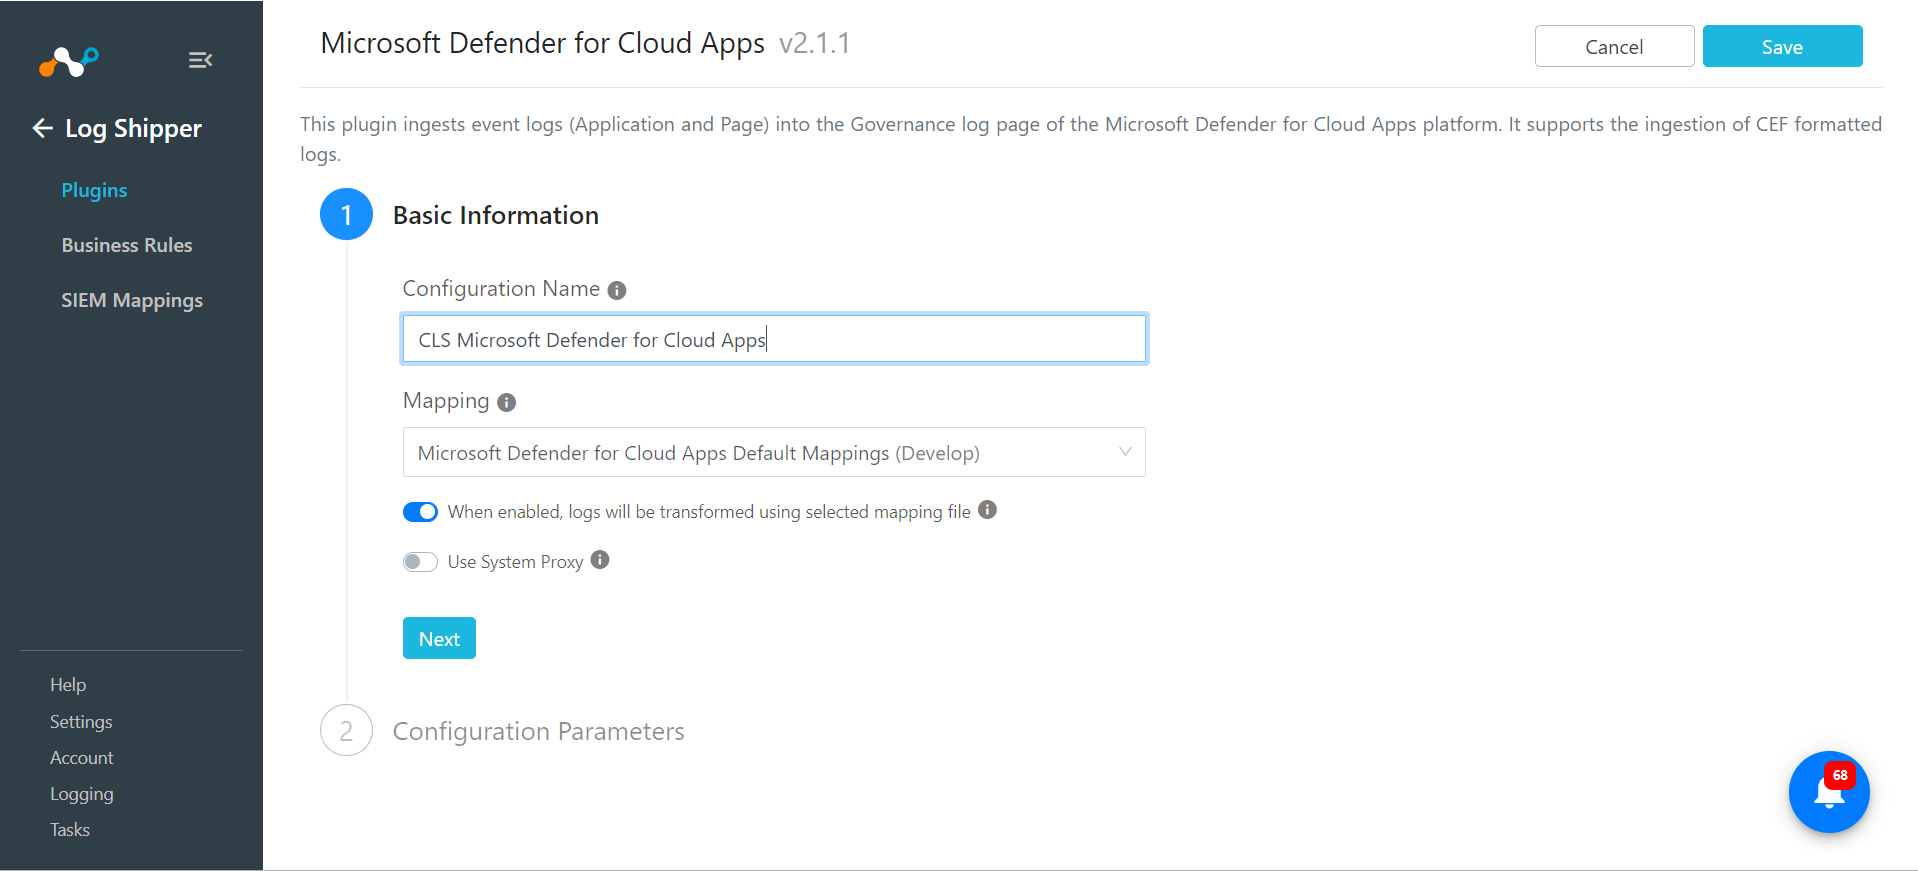
- Click Next, and then enter the Confirmation Parameters:
For Legacy Method (API Token)- Portal URL: URL for your Microsoft Defender for Cloud Apps platform (without https://).
- Authentication Method: Legacy Method (API Token).
- API Token: API token for authentication in the Microsoft Defender for Cloud Apps portal. The API token can be generated from the Settings > Cloud Apps > API Tokens page. The API token is required only if the Legacy Method (API Token) method is selected.
- Data Source: The data source where traffic logs from Log Shipper are to be uploaded. The data source can be found at Settings > Cloud Apps > Cloud Discovery > Automatic Log Upload.
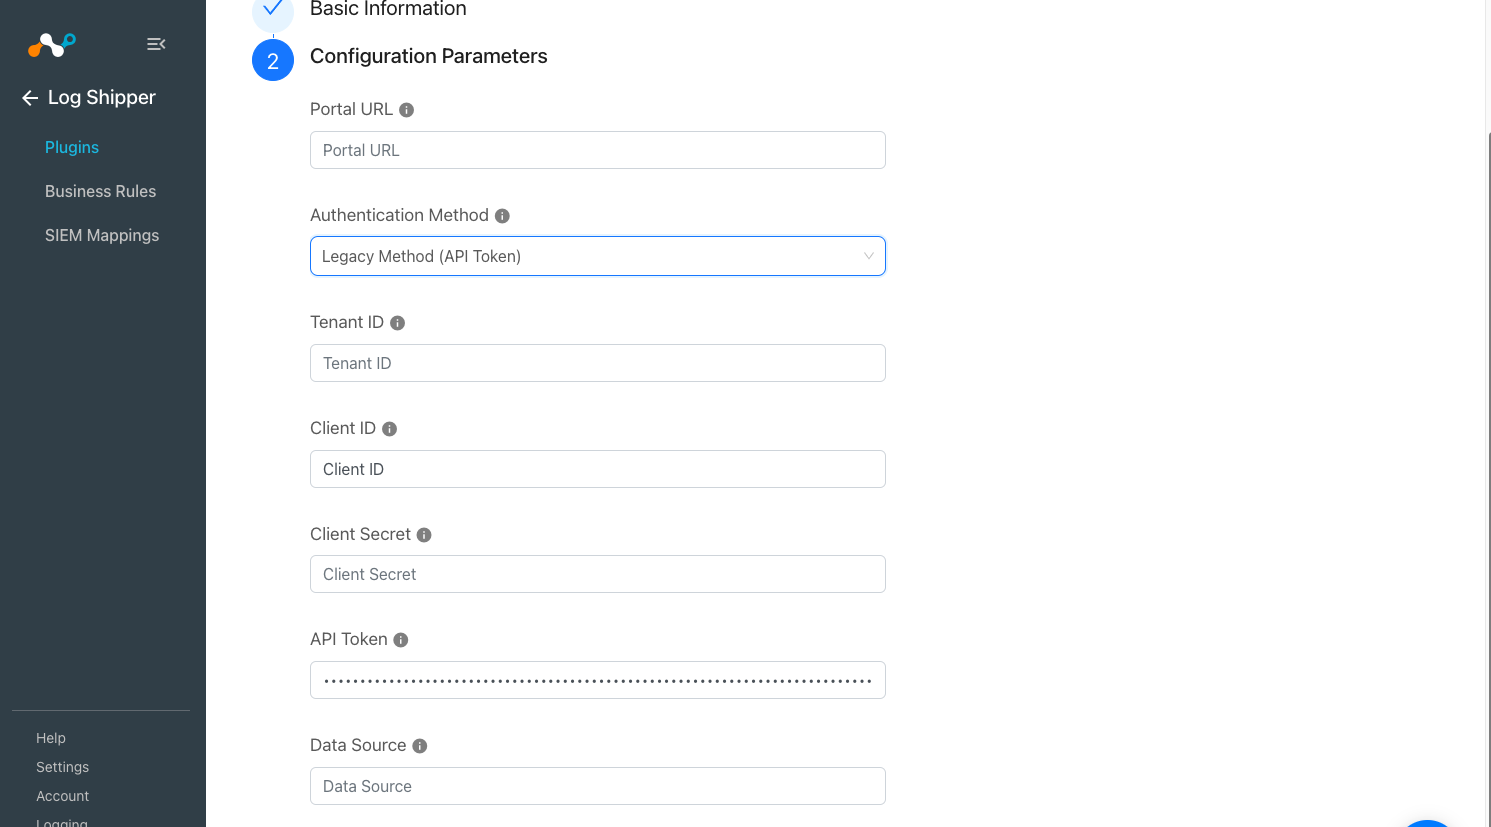
For OAuth 2.0 Method (Application context)
- Portal URL: URL for your Microsoft Defender for Cloud Apps platform (without https://).
- Authentication Method: OAuth 2.0 (Application context).
- Client ID: Client ID of your Azure application. The Client ID can be found from App registrations > App Name > Overview page. This is required only if the OAuth 2.0 (Application context) method is selected.
- Tenant ID: Tenant ID of your Azure application. The Tenant ID can be found from App registrations > App Name > Overview page. It is required only if the ‘OAuth 2.0 (Application context)’ method is selected.
- Client Secret: Client Secret of your Azure application. The Client Secret can be generated from App registrations > App Name > Certificates & secrets page. This is required only if the OAuth 2.0 (Application context) method is selected.
- Data Source: The data source where traffic logs from CLS are to be uploaded. The data source can be found at Settings > Cloud Apps > Cloud Discovery > Automatic Log Upload.

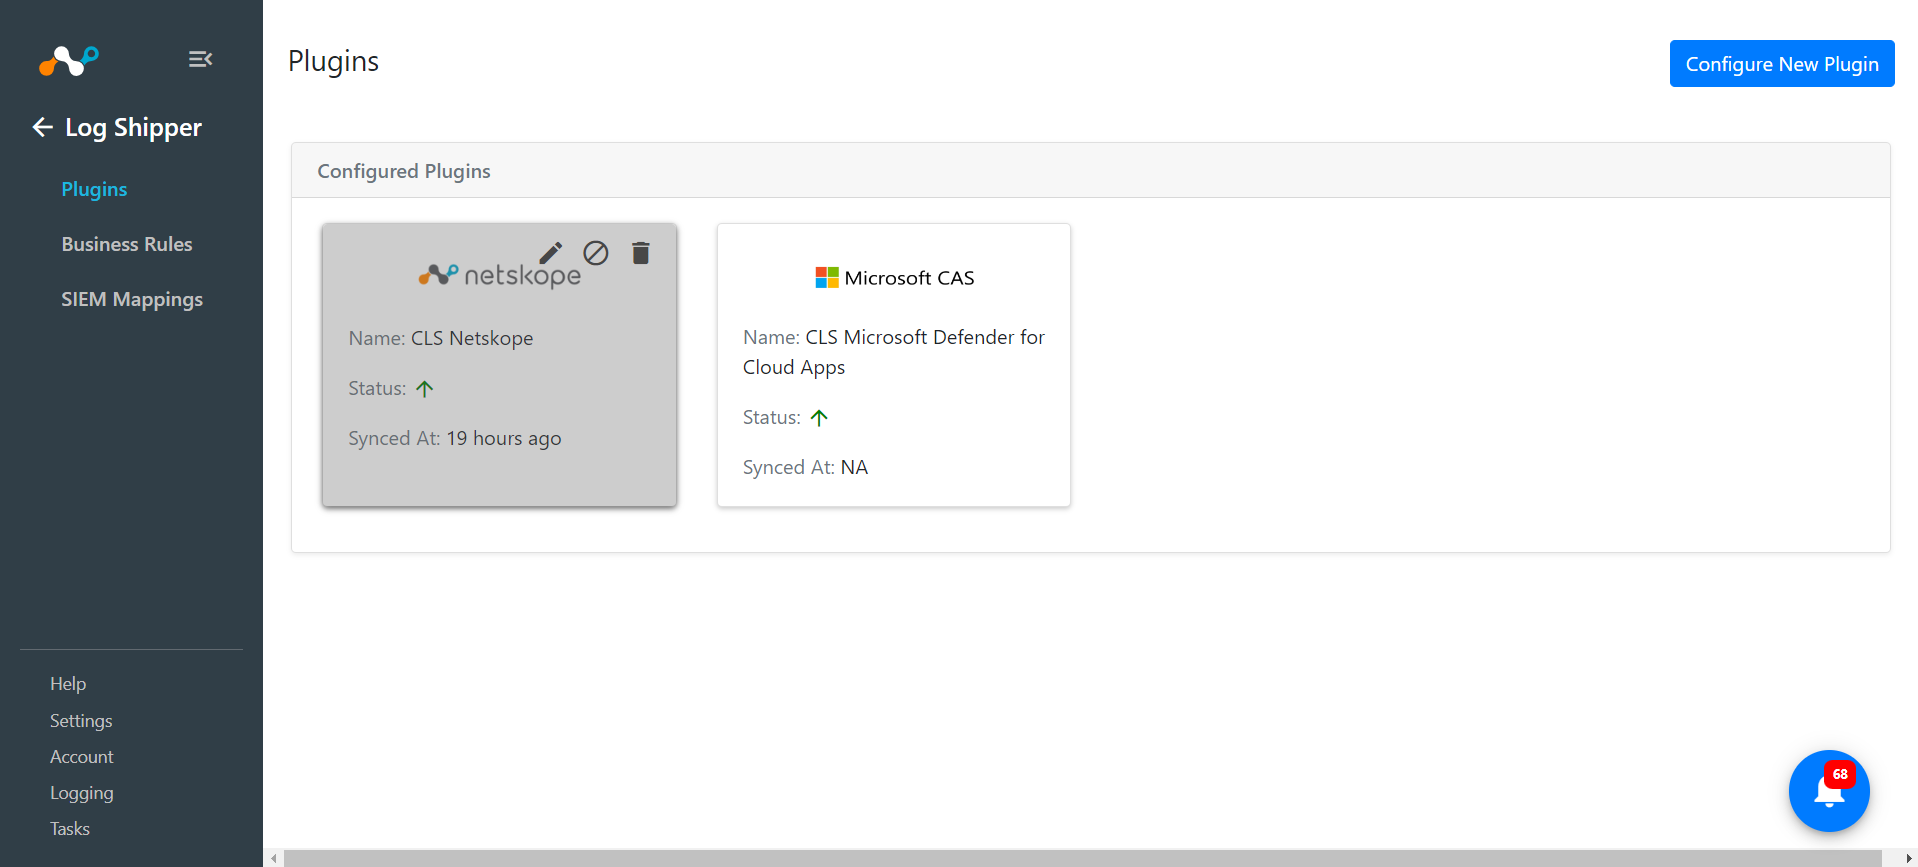
- Click Save. Plugin configuration will be available on the Cloud Log Shipper > Plugins page.
Configure a Log Shipper Business Rule for Microsoft Defender
- Go to Log Shipper > Business Rules.
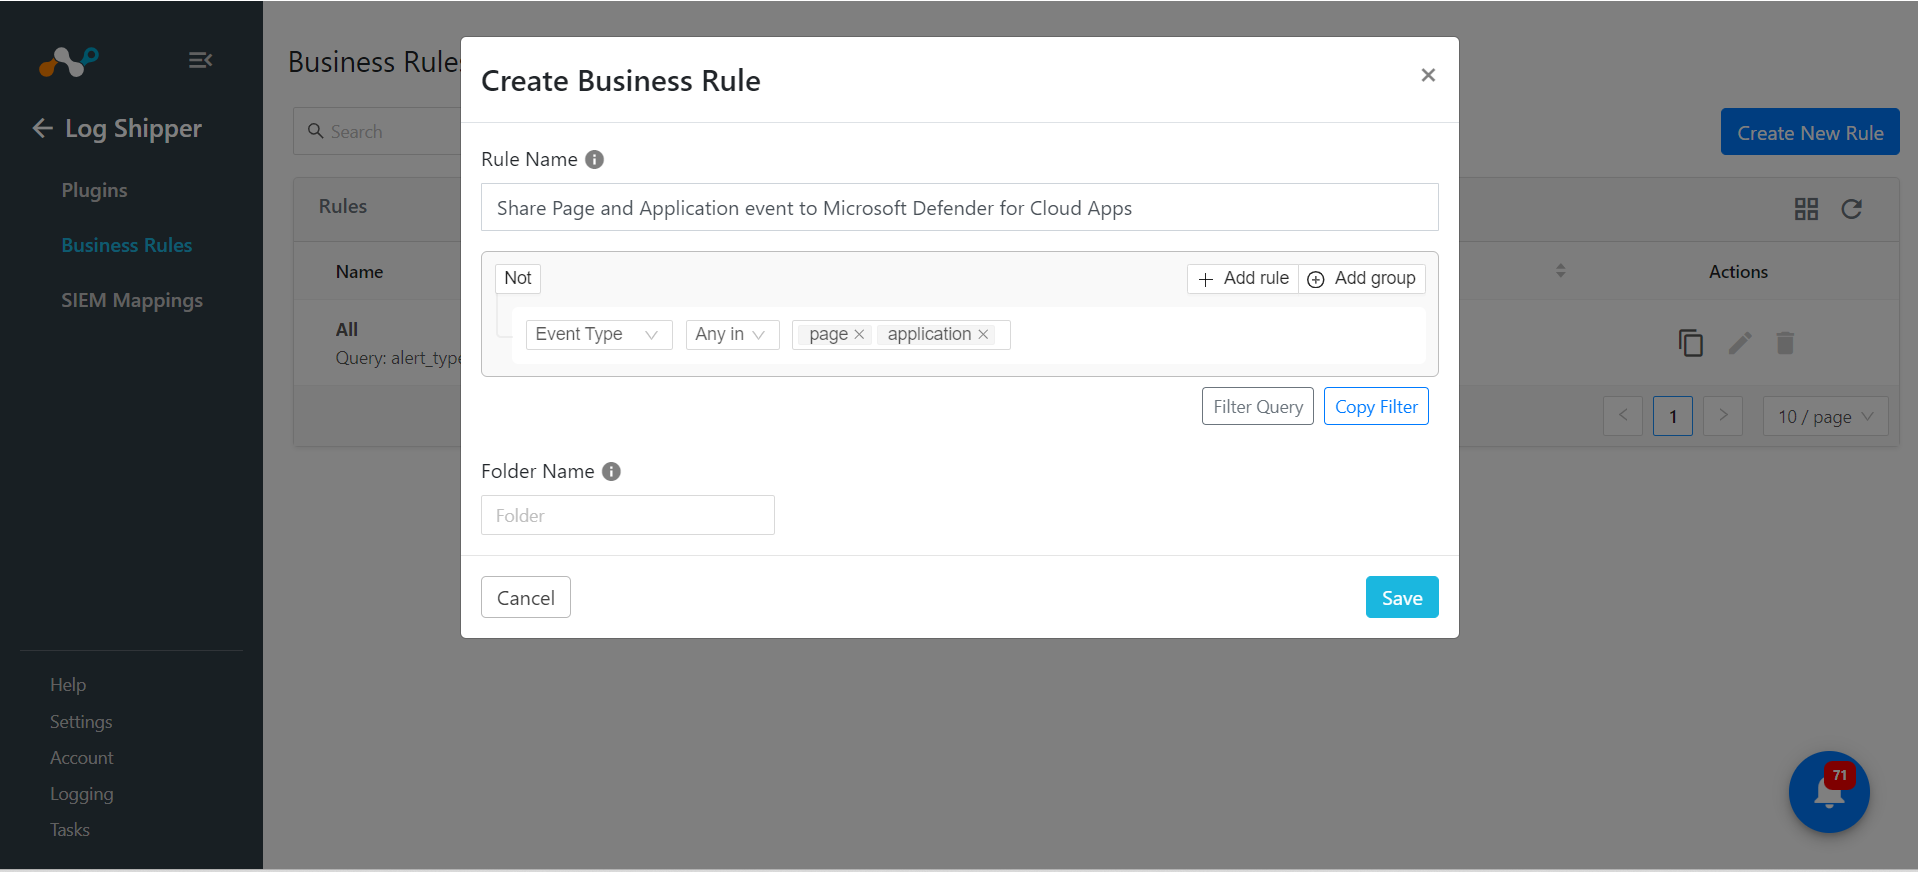
- By default, there’s a business rule that filters all alerts and events. If you want to filter out any specific type of alert or event, click Create New Rule and configure a new business rule by adding the rule name and filter(s).
- When finished, click Save.

Configure a Log Shipper SIEM Mapping for Microsoft Defender
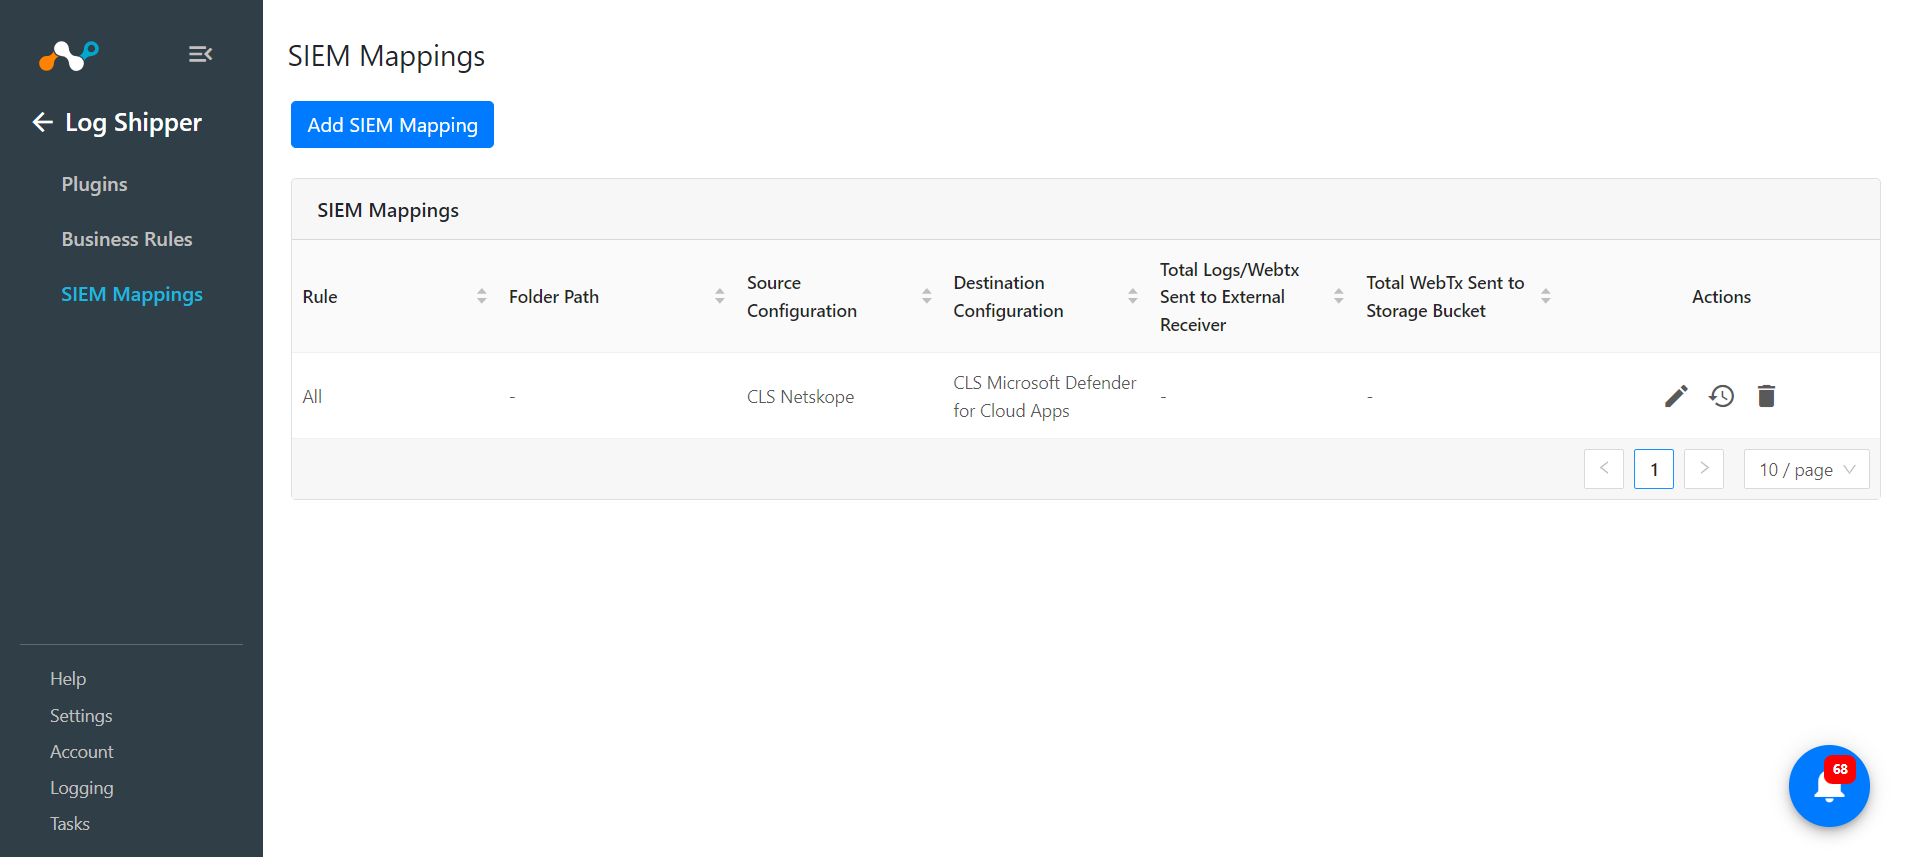
- Go to Log Shipper > SIEM Mappings and click Add SIEM Mapping.
- Select the Source plugin (Netskope CLS), Destination plugin (Microsoft Defender for Cloud Apps), and a business rule, and then click Save.
- After the SIEM mapping is added, the data will start to be pulled from the Netskope tenant, transformed, and ingested into the Microsoft Defender for Cloud Apps platform.
Validate the Plugin
Validate the Pull
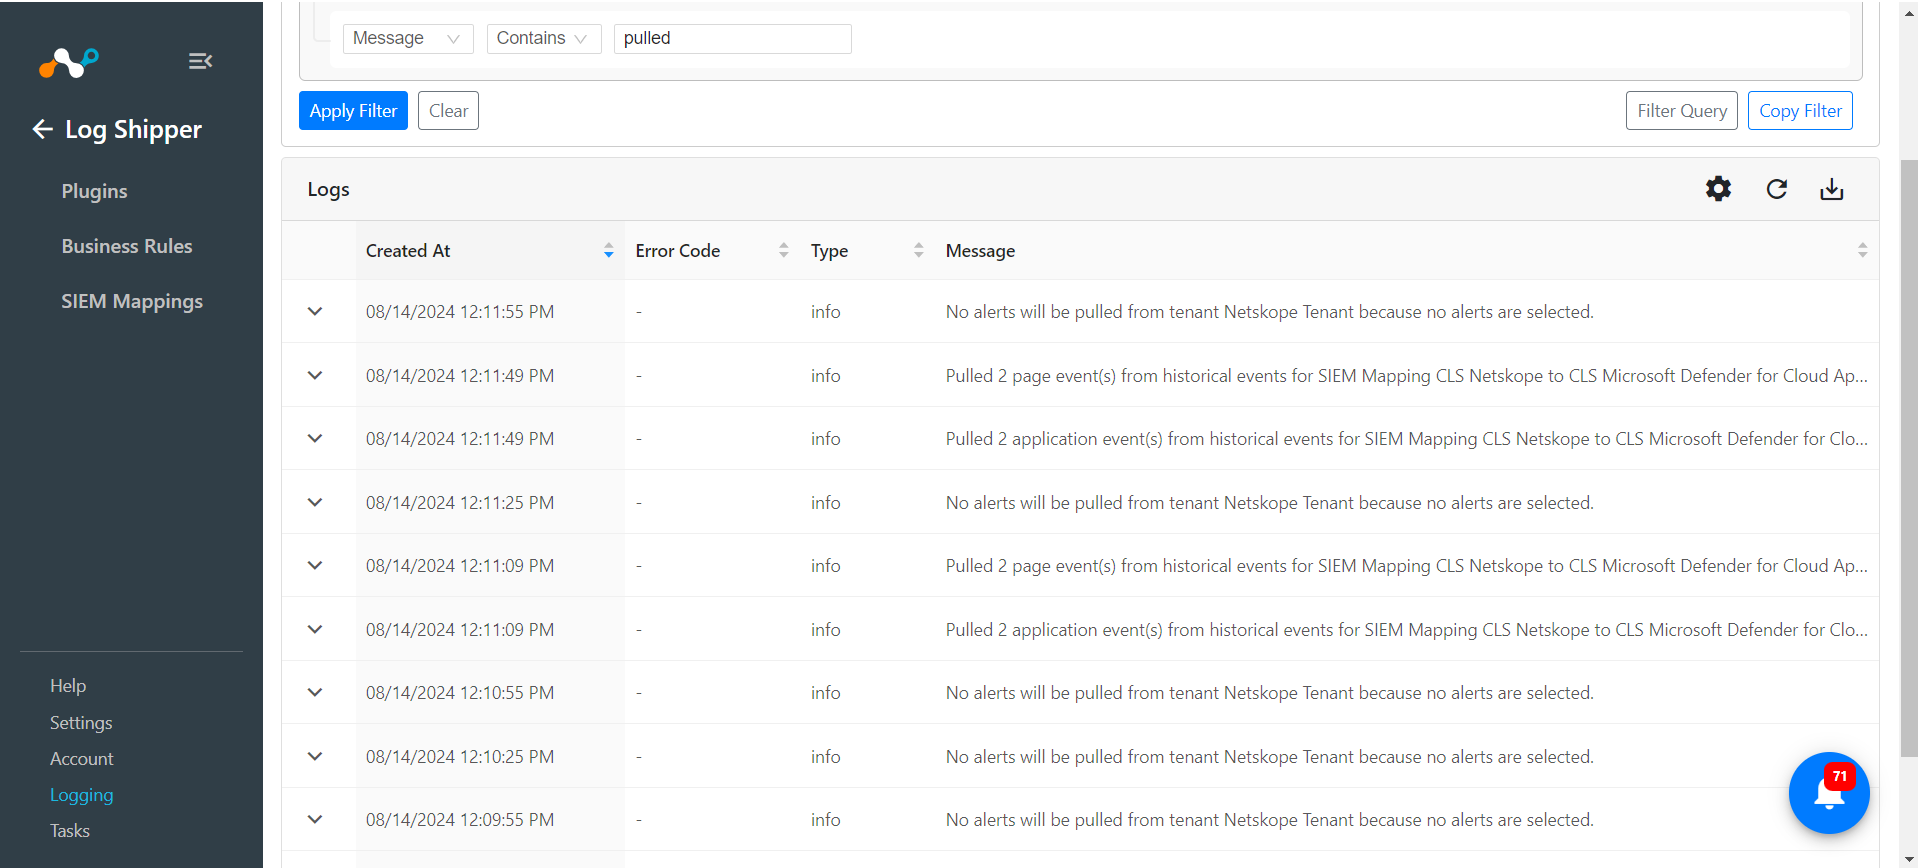
To validate the pulling of indicators from the Netskope tenant.
- Go to Logging in Cloud Exchange and search for the pulled logs.
Validate the Push
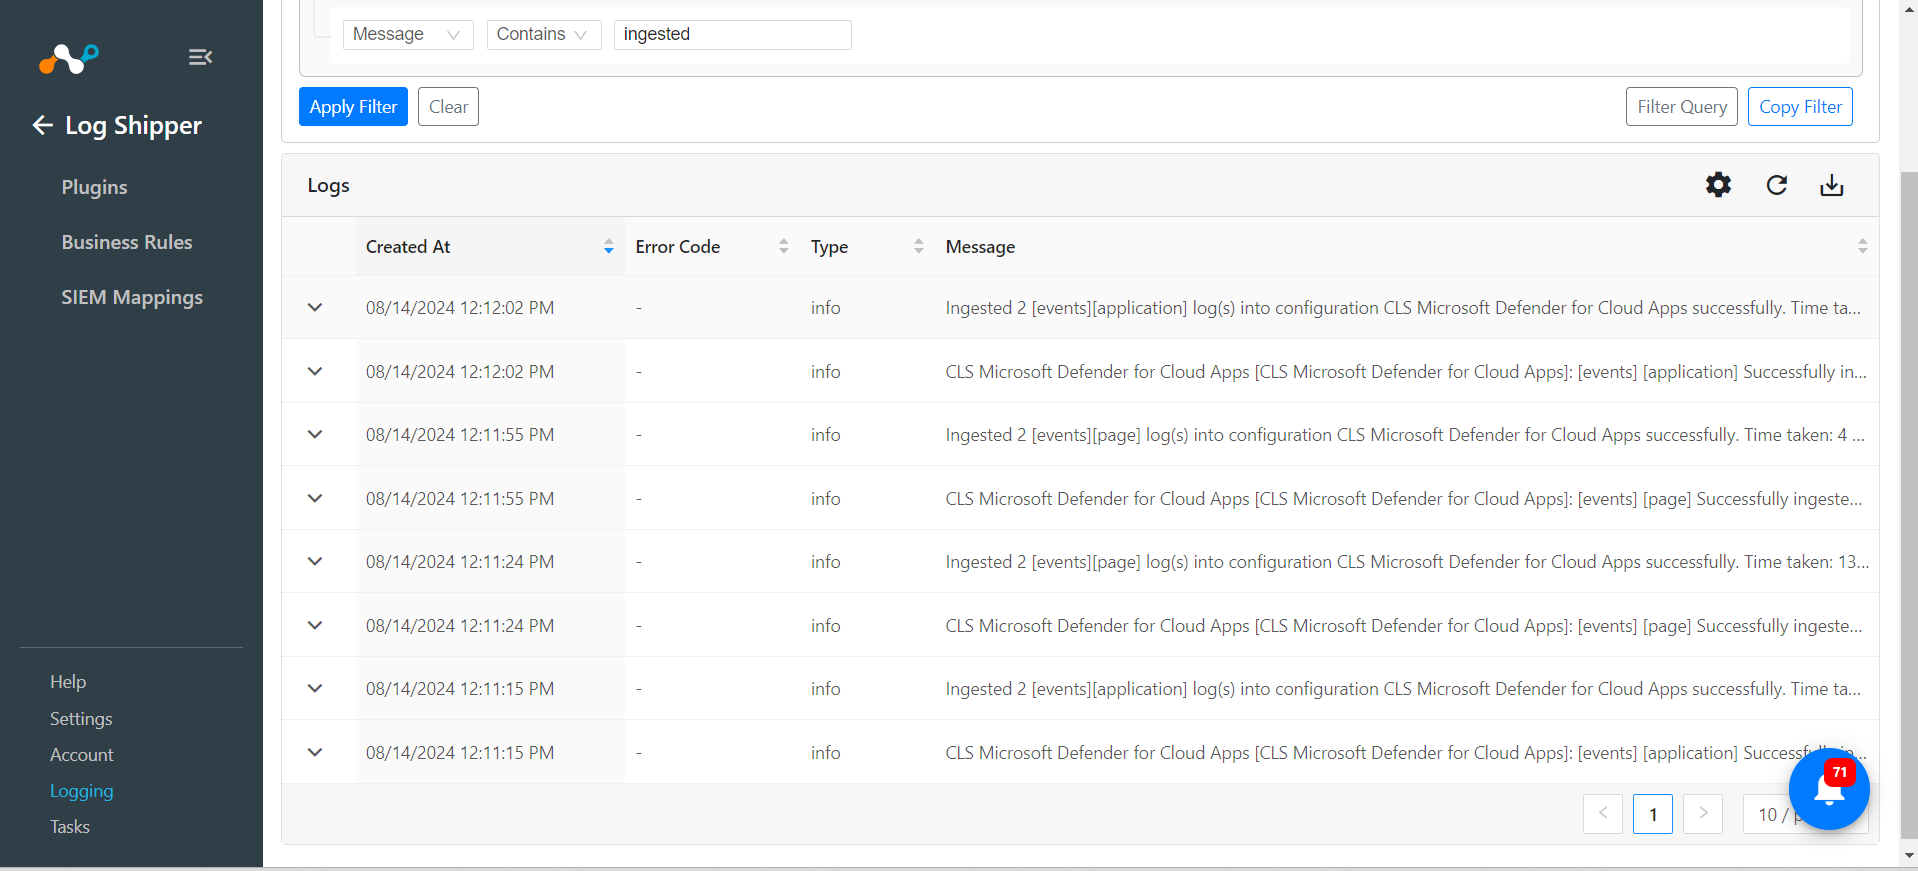
To validate the plugin workflow in Cloud Exchange:
- Go to Logging and search for ingested events with the filter message contains ingested, and the ingested logs will be filtered.
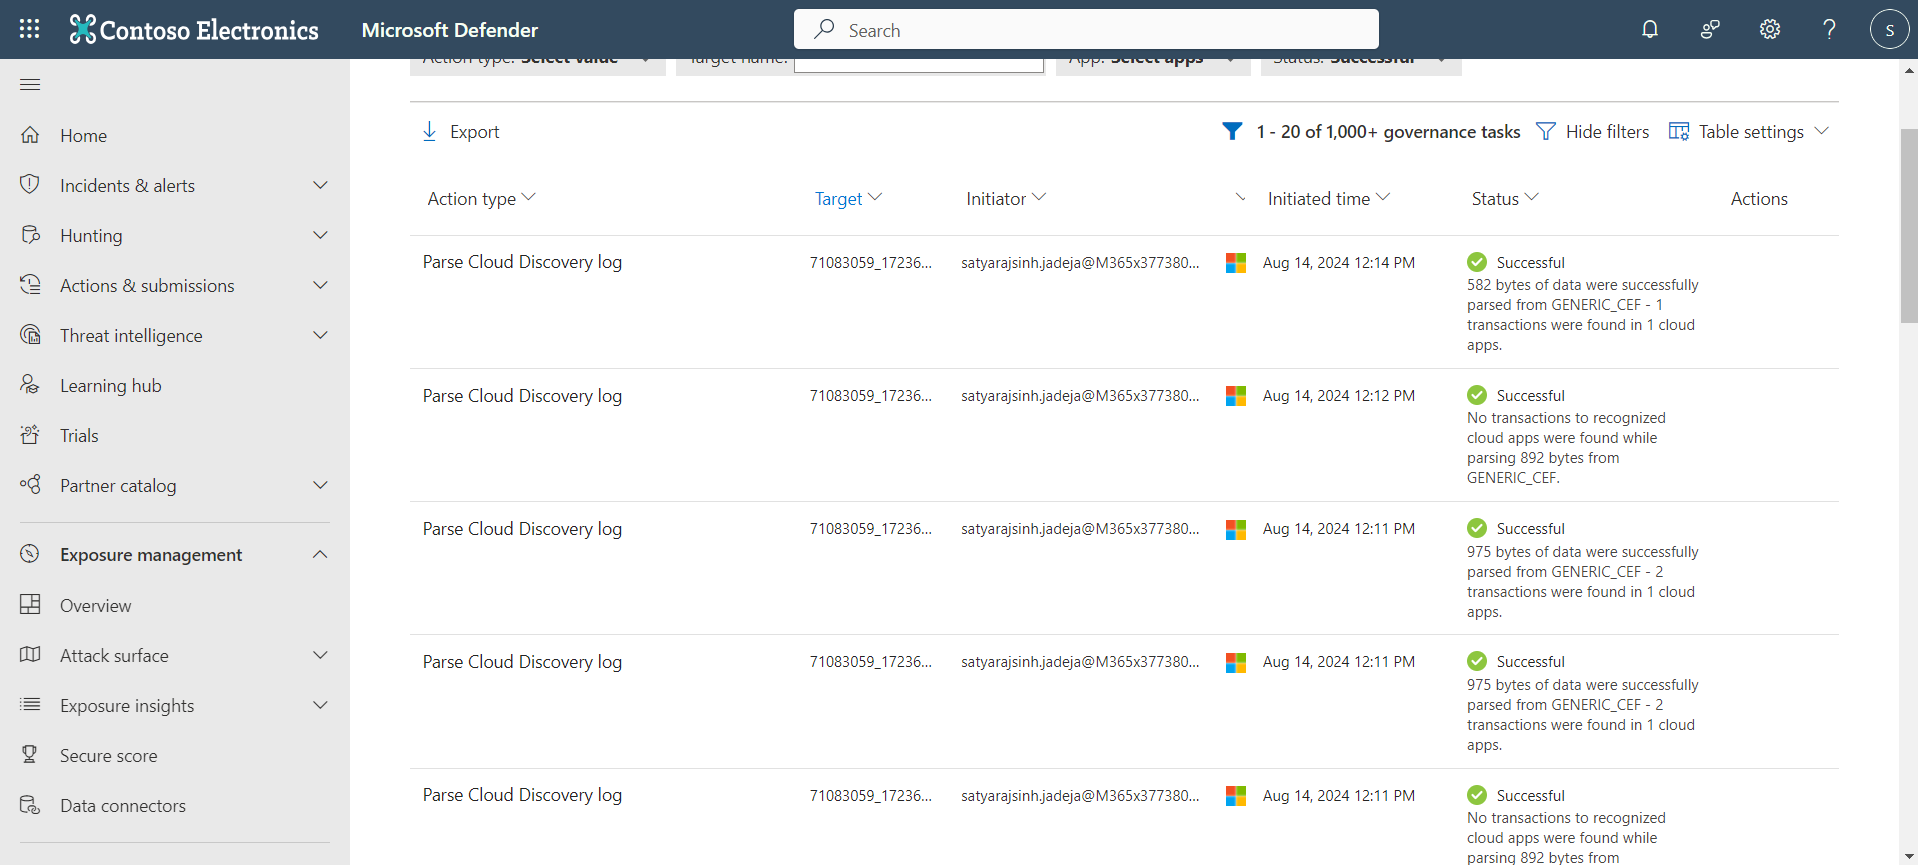
To validate the push on the Microsoft Defender platform:
- Go to Microsoft Defender for Cloud Apps Platform.
- On the left panel, under Cloud apps, click Governance log.
- Check the files to verify the ingested data is listed.
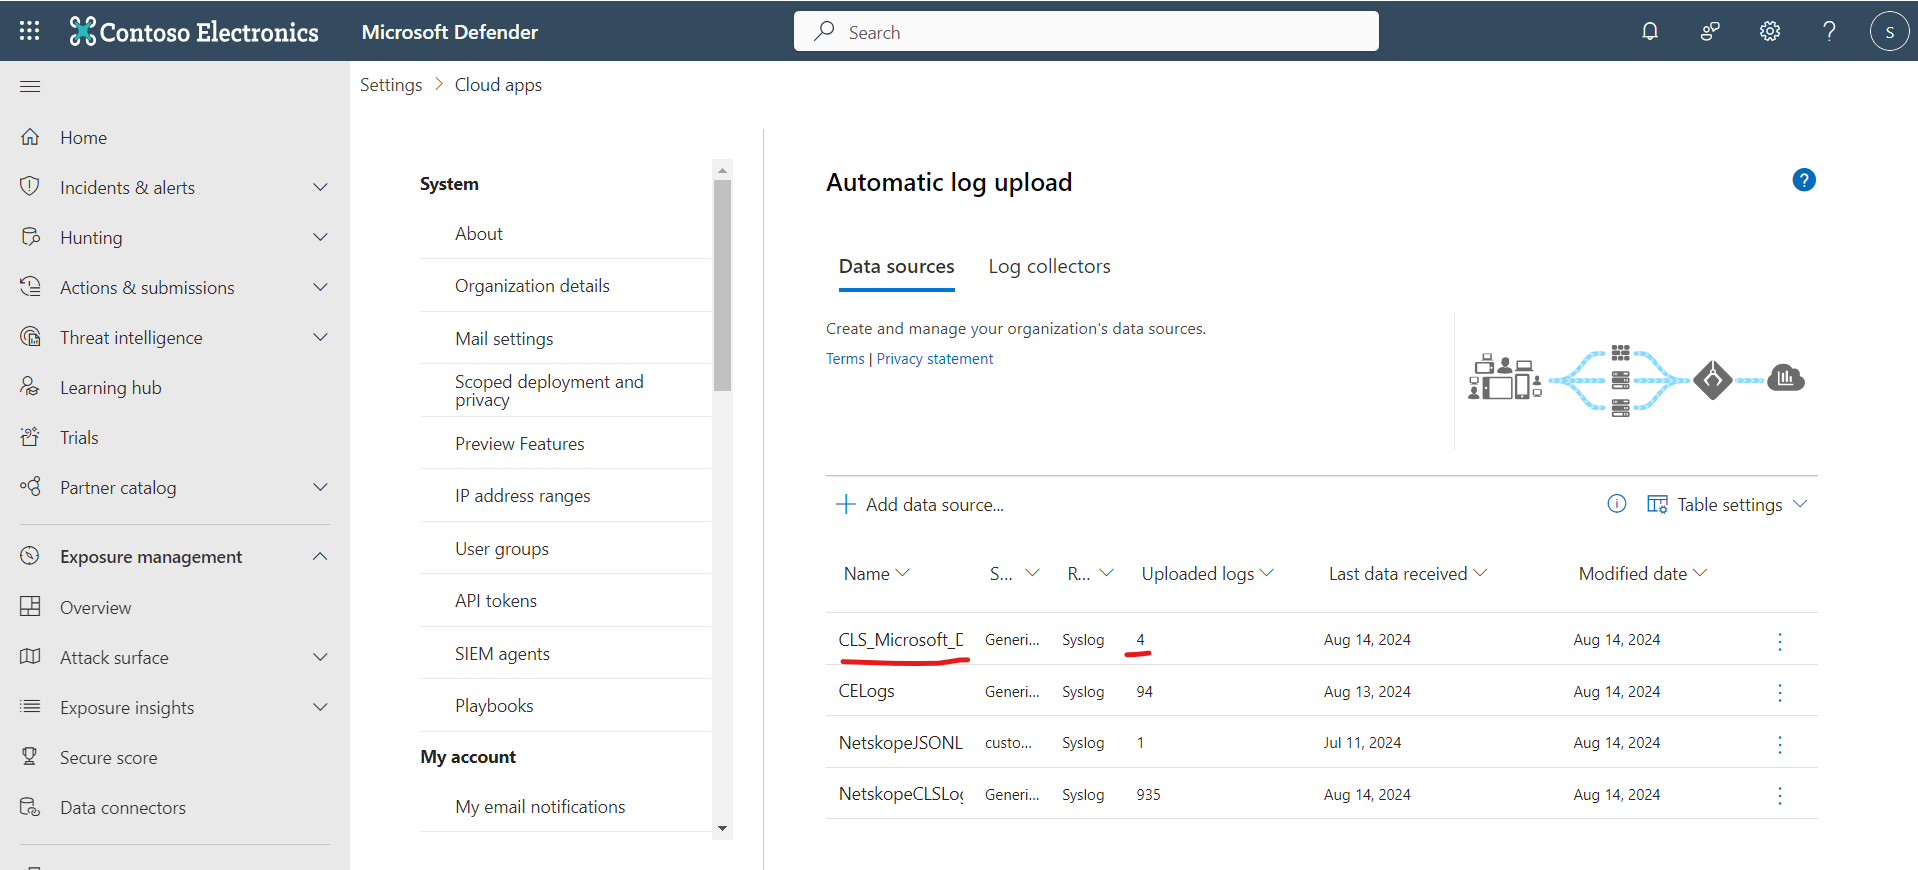
- Go to Settings > Cloud apps > Automatic log upload. Verify the count of the data source that you have provided while configuring the plugin.
- To view the extracted users from the logs, go to Home > Cloud Discovery.
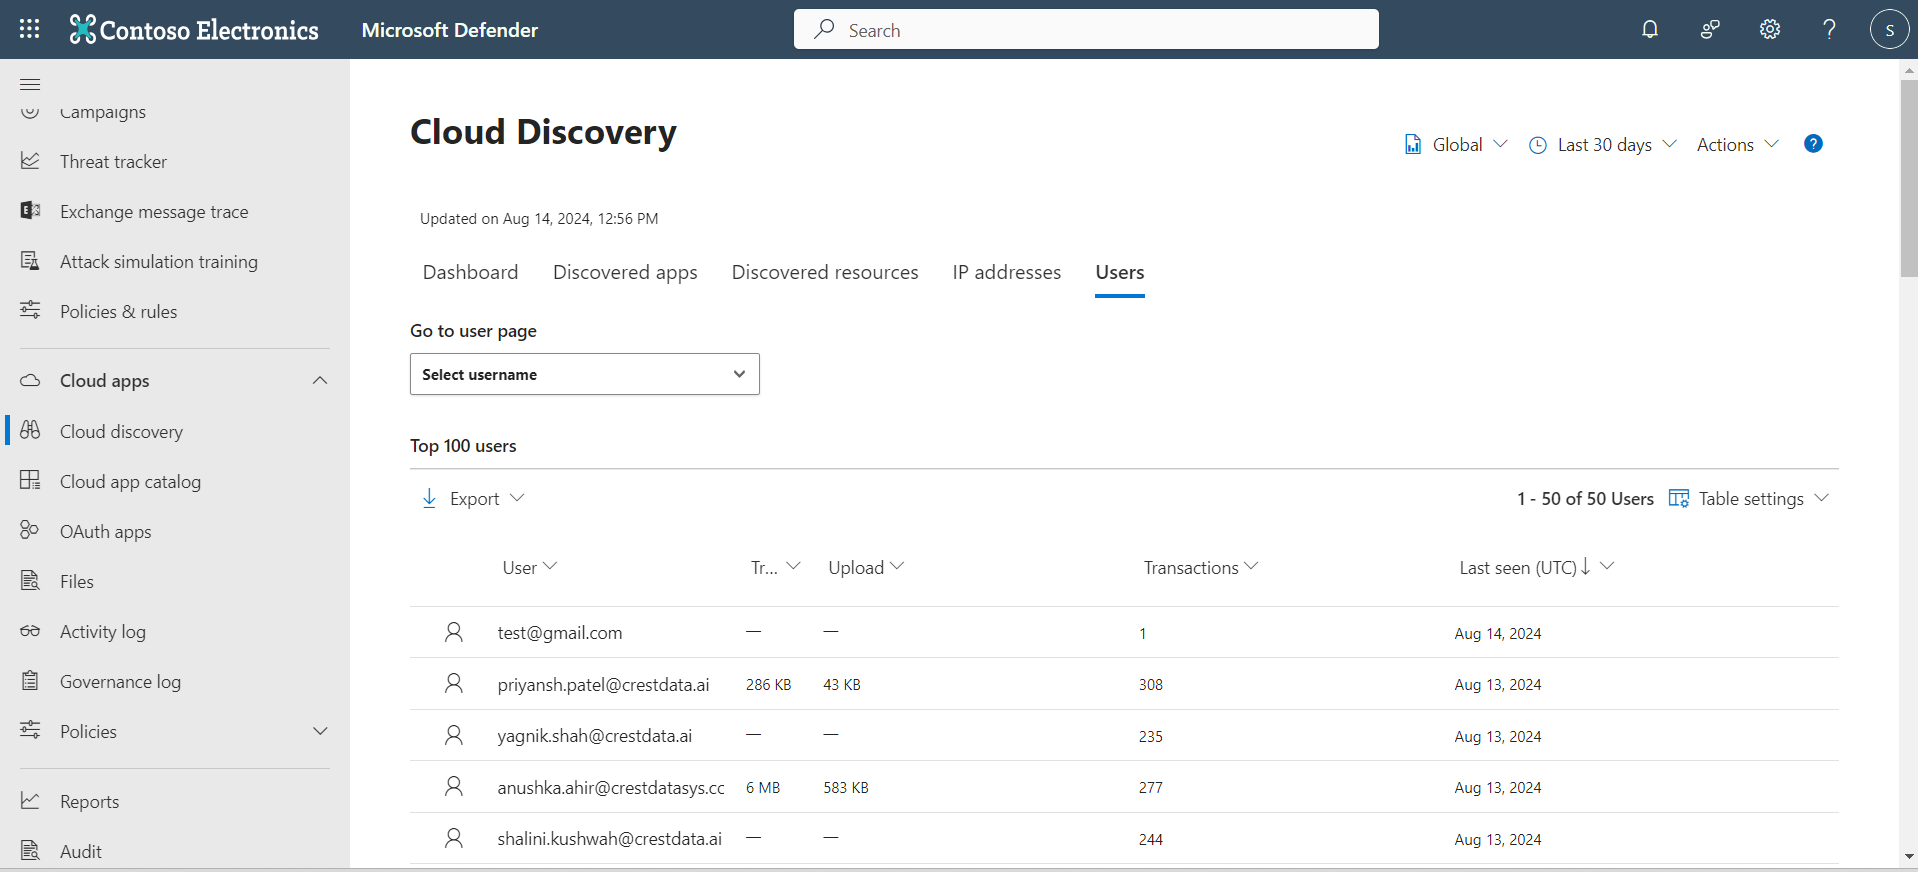
Troubleshooting the Microsoft Defender for Cloud Apps Plugin
Receiving the certificate verification failed error while ingesting the indicators
- If you encounter any error with error code “CLS_1005” while ingesting the events after setting up SIEM mapping from Netskope to Microsoft Defender for Cloud Apps.
- It might be due to the Microsoft Defender for Cloud Apps Portal URL being blocked on your machine.
What to do: To resolve this issue, contact your IT support team for assistance to unblock your URL.


Facing issues in the existing plugin configuration after the plugin update
If you have an existing Microsoft Defender for Cloud Apps plugin configured, you might face the below issue after you update your Microsoft Defender for Cloud Apps plugin: CE goes blank while editing the existing plugin configuration.
It is possible to encounter this issue in CE 4.2.0 and CE 5.0.0 if the existing plugin configuration is edited after the user goes on the Configuration Parameters page post the plugin update.
What to do: Verify your CE version and accordingly follow the below-mentioned workarounds.
For 4.2.0: The only solution for 4.2.0 is to delete the existing plugin configuration and create a new one.
For 5.0.0: If the plugin hasn’t already been updated, make sure to follow the below steps and save the plugin configuration while updating, not skip it.

- If you are using the Legacy Method (API Token) and want to continue using the Legacy Method, make sure your Authentication Method dropdown has Legacy Method (API Token) selected before you save the configuration in the plugin update on the Plugin Repository page.
- If you want to use the OAuth 2.0 (Application context) method, make sure to select it in the Authentication Methods dropdown and provide all configuration parameters. Do not skip.
Either way one of the solutions for any of the methods during the plugin update on the Plugin Repository page is to save the plugin update and not skip it.
If you have already updated the plugin and have selected skip while updating the plugin, delete the existing plugin configuration and configure a new Microsoft Defender for Cloud Apps plugin.
Receiving the File Upload error while ingesting the events to the Microsoft Defender for Cloud Apps platform
If the plugin is configured correctly and yet the below error is received, it means that the Data Source provided in the plugin configuration is not available on the Microsoft Defender for Cloud Apps platform.

What to do: Go to your Microsoft Defender for Cloud Apps platform.
- Go to the Automatic Log upload from Settings > Cloud Apps > Cloud Discovery.
- Search for the Data Source name used in the plugin configuration. If the data source name is not found, create a new Data Source.
- If the Data Source name is available, make sure the exact data source name is used.
Difficulty in tracking the ingested data
If any of the data ingestion is hard to track due to multiple files created on the Microsoft Defender platform, you can simply search the file name.
What to do:
Go to Logging in Cloud Exchange and check the API Request logs from the Microsoft Defender for Cloud Apps plugin. The logs have the file name that would be created on the Microsoft Defender for Cloud Apps platform for ingested data. Copy the file name and search for the file on the Microsoft Defender for Cloud Apps platform in the Governance Log under Cloud apps.
Limitations
- There is one limitation imposed by Microsoft Defender for Cloud Apps: it can only transmit files with a maximum size of 64 MB. If this limit is exceeded, an error indicating that the file is larger than 64 MB will be encountered in the plugin while ingesting the data.
- There is a limitation regarding the data retention on the Microsoft Defender for Cloud Apps: If the ingested data is older than 90 days, it will show a failed status on the Governance Log page where the events are ingested.