

This document explains how to migrate Netskope Cloud Exchange from AWS Fargate (Cloud Exchage 5.0.0) to an AMI EC2 VM (Cloud Exchange 5.1.2).
Prerequisites
Before beginning the migration process, ensure the following conditions are met to avoid configuration or permission issues during backup, restore, and migration:
- Verify Cloud Exchange Fargate is deployed via CloudFormation and the status is CREATE_COMPLETE or UPDATE_COMPLETE.
- Go to AWS ECS > Cluster > Task to verify that the ECS cluster and Fargate tasks are running.
- Select the cluster and ensure:
- The Cluster status is ACTIVE.
- Tasks and Services are in the RUNNING state.
- Go to AWS EFS to verify EFS is Active.
- Verify IAM permissions for backup and restore. If the account does not have sufficient permissions, such as administrative access or specific AWS Backup/EFS privileges to perform backup and restore operations, create and attach an IAM role with the necessary permissions to the user or service account responsible for performing the migration.
- For EFS Backup & Restore (AWS Backup):
backup:CreateBackupVault
backup:StartBackupJob
backup:StartRestoreJob
backup:GetRecoveryPointRestoreMetadata
backup:ListRecoveryPointsByBackupVault
efs:DescribeFileSystems
efs:DescribeMountTargets
efs:CreateFileSystem
efs:CreateMountTarget
- For Mounting EFS on EC2:
ec2:DescribeInstances
ec2:DescribeSecurityGroups
ec2:DescribeSubnets
ec2:DescribeVpcs
- If using a custom IAM role for backup/restore, ensure trust policies are configured for AWS Backup and ECS/Fargate.
{
  "Version": "2012-10-17",
  "Statement": [
   {
    "Effect": "Allow",
    "Principal": {
      "Service": "backup.amazonaws.com"
    },
    "Action": "sts:AssumeRole"
  }
 ]
}
- For EFS Backup & Restore (AWS Backup):
- A Mongo dump is a prerequisite.To collect the mongo dump, refer to the Collect the Mongo Dump section.
- About the Maintenance Password:
- Cloud Exchange uses MongoDB to collect plugin data, and accessing the database requires the MongoDB username and password.
- If the password is forgotten or unavailable, refer to the Forgot Maintenance Password section for steps to retrieve credentials from the running container using environment variables.
Before Performing a Migration
To stop Cloud Exchange Fargate ingestion:
- Disable all 3rd-party plugins in all modules, then wait until in-queue tasks finish before proceeding with the migration.
- Use these steps to identify in-queue tasks:
- After disabling the source plugins in all modules, wait for 20-30 minutes.
- Apply filters on logs:
- Go to the Logging section.
- Click Filter Query.
- In the Filters field, enter the following filter query: message Like “Ingested ” || message Like “Stored ” || message Like “task(s)” || message Like “Completed storing”.
- Click Load.
- Apply the filter to view relevant logs.
- Monitor Logs: After the logging filter is applied, monitor for new logs. When no new logs appear under this filter, proceed to the next section.
Connect to the Cluster via CloudShell
To connect to the cluster:
In the AWS console, go to cloudshell at the bottom left panel, and execute this command:
aws ecs execute-command \
 --region eu-central-1 \
 --cluster Netskope-CE-netskope-ce-Cluster \
 --task d16d1e82*****772a1c \
 --container mongodb-primary \
 --command "/bin/bash" \
 --interactive
Note
- First Argument: Region name.
- Second Argument: Cluster name (Find the cluster name Netskope-CE-netskope-ce-Cluster at Amazon ECS > Clusters).
- Third Argument: Task ID (Find the Task ID at Amazon ECS > Cluster > Task).
- Fourth Argument: Container name (Find the Container name at Amazon ECS > Cluster > Task > Containers).
- Fifth Argument: Command.
Collect the Mongo Dump
Go to AWS cloudshell, connect to the cluster, and then collect the mongo dump.
command:mongodump --uri="mongodb://<username>:<password>@host:port/cte" --out=/data/db
example:
mongodump --uri="mongodb://admin:admin123@localhost:27016/cte" --out=/data/db
Forgot Maintenance Password
If you forget your credentials, they can be found in environmental variable:
echo $MONGODB_USERNAME
echo $MONGODB_PASSWORD
Create a Custom Vault
A backup vault stores and organizes backups. A new vault needs to be created to hold the EFS backup for migrating the Cloud Exchange Fargate deployment.
To create a custom backup vault:
- Go to the Region.
- Creating custom backup vault in the same Region:
If Cloud Exchange needs to be migrated in the same AWS Region, you need to create a single backup vault in that region. This vault will store the backup recovery point and can be directly used to restore the EFS. - Creating custom backup vault in different Regions:
Create two backup vaults:- One in the source region (where Cloud Exchange Fargate resides), to store the initial backup.
- One in the destination region (where Cloud Exchange needs to be migrated), to receive the cross-region copy of the backup.
- Creating custom backup vault in the same Region:
- Open the AWS Backup console to create a new backup vault, and then click Create backup vault.
- Enter a Backup vault name and tags.
- Select an Encryption Key. Under Encryption, choose one of the following:
- Default AWS Backup Key (alias/aws/backup)
- Customer managed key (CMK): Allows AWS Backup to encrypt and decrypt resources via the customer provided key.
- The IAM role initiating the backup should also have the kms:GenerateDataKey, kms:Encrypt, kms:Decrypt, and kms:DescribeKey permissions.
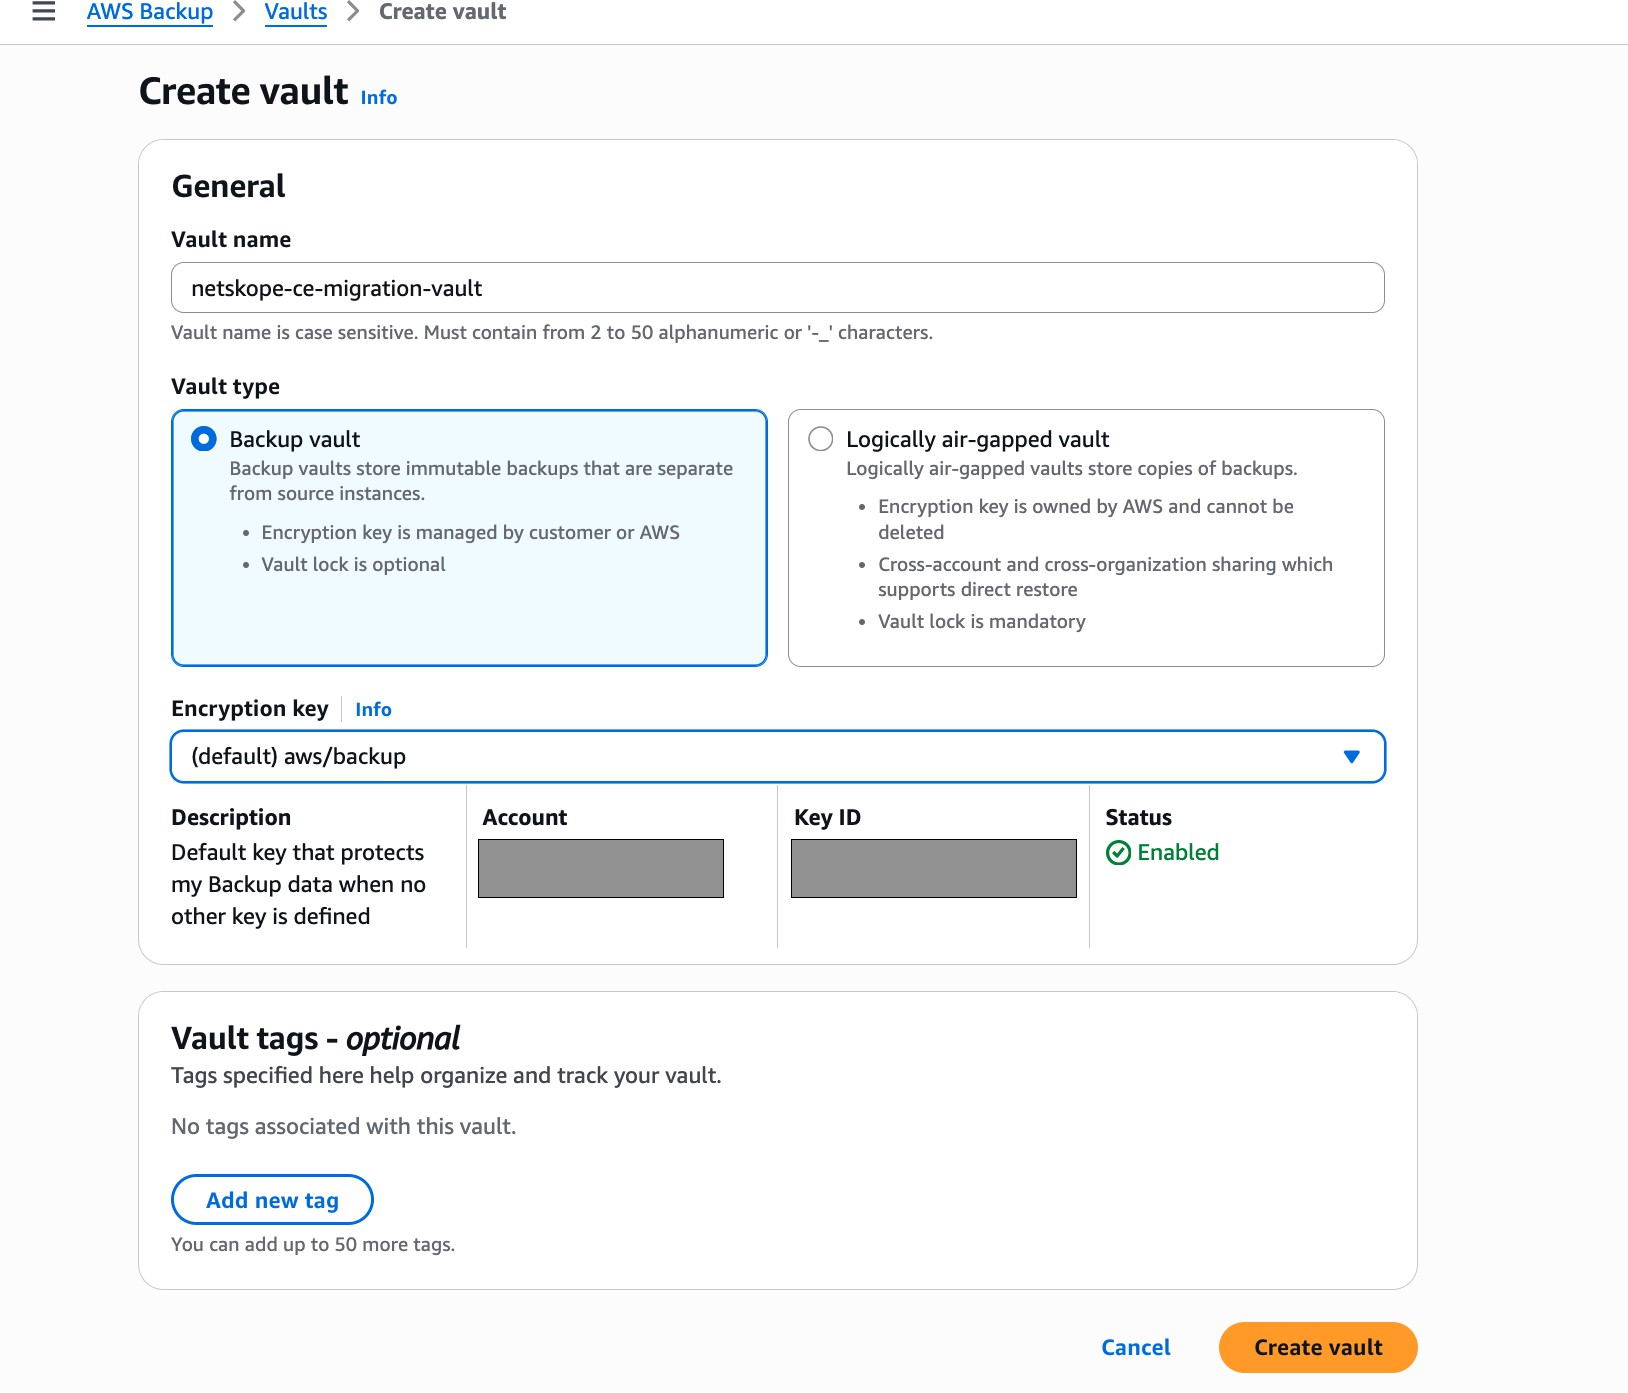
- Click Create vault.
Create an On-Demand Backup of EFS
To migrate Cloud Exchange, first create a backup of existing the Amazon EFS (Elastic File System).
- Go to the Region. In the AWS Console, verify that the current region matches the region of the source Cloud Exchange Fargate deployment.
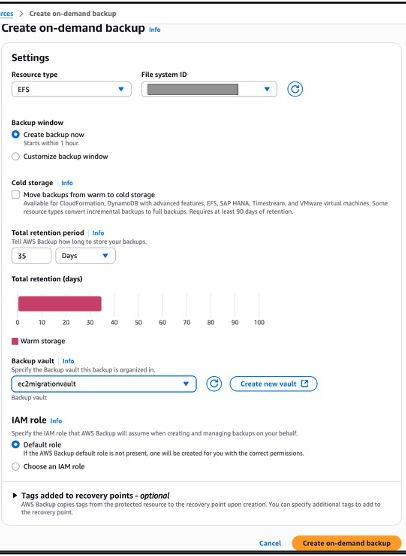
- Open the AWS Backup Console, go to Protected Resources, and then click Create on-demand backup.
- Configure a backup job:
- Resource type: Select EFS (Amazon Elastic File System).
- Resource ID: Choose a specific EFS file system ID from the dropdown.
- Backup vault: Choose the previously created custom backup vault.
- IAM role: Select the default AWS Backup service role (like AWSBackupDefaultServiceRole), which includes necessary permissions, or select a custom IAM role with efs:*, backup:*, and KMS permissions if using a custom encryption key.
- Review the settings and click Create on-demand backup.
- To monitor the backup status, go to Jobs > Backup jobs to monitor the progress.
- When completed, you can find the recovery point under: Backup Vaults > [Vault Name] > Recovery points.
Copy a Backup to a Different Region (skip if migrating in the same region)
If the Cloud Exchange instance to be migrated and the EFS file system (backup source) are in different AWS regions, ensure AWS Backup is enabled in both the source region (where the backup resides) and the destination region (where it will be restored). Additionally, configure the required IAM permissions and KMS key policies to support cross-region copy operations.
To copy a backup to another AWS region:
- In the AWS Backup Console, select the source region (where the recovery point currently resides).
- Select the backup vault containing the recovery point to be copied.
- Locate the Recovery Point and select the checkbox next to it.
- In the Actions dropdown, select Copy.
- Configure the Copy Settings:
- Destination region: Select the AWS Region where the recovery point is to be copied.
- Destination vault: Choose an existing backup vault in the destination region.
- Retention period: Specify the number of days the copied recovery point should be retained in the destination vault.
- For Encryption Settings, the copied recovery point will be encrypted using a KMS key in the destination region. Select:
- The default AWS Backup-managed key (alias/aws/backup)
- Or a customer managed KMS key in the destination region
Ensure the IAM role and the KMS key policy permit kms:Encrypt, kms:Decrypt, and kms:GenerateDataKey operations.
- Click Copy to begin the cross-region copy operation.
- Go to Jobs > Copy Jobs and monitor the status of the copied job until it shows Completed.
- Go to AWS Backup > Backup vaults > [Destination Vault] > Recovery Points to confirm the copied backup is available.
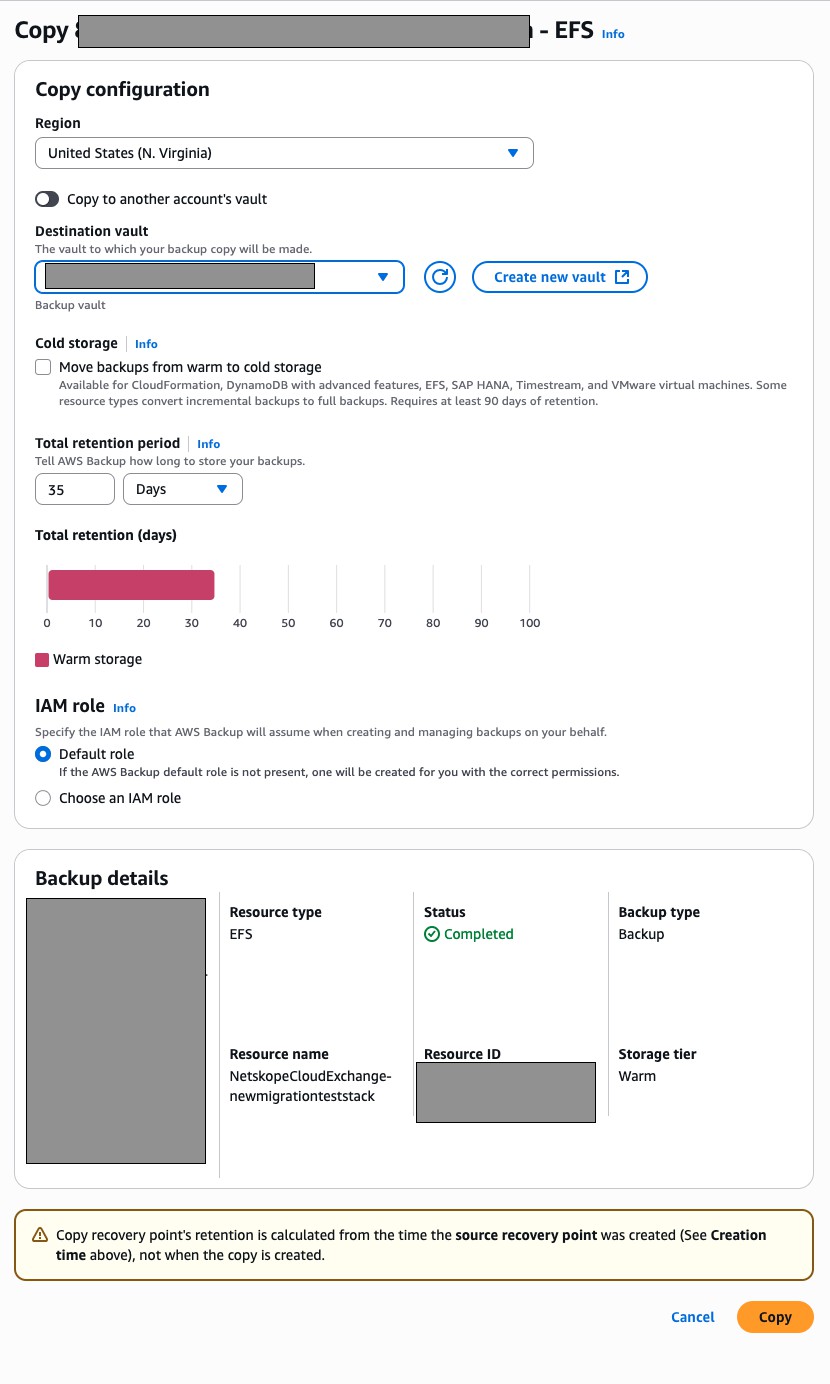
- Click Copy.
Restore the Backup
After an EFS backup is successfully created and available as a recovery point within the backup vault, a restore job can be initiated to recover the data.
To restore a backup from a Recovery Point:
- Go to the AWS Backup service in the region where the recovery point was created. If using a different region, first copy the backup to the new region, and then select the recovery point from that region.
- Under Recovery points, find the recovery point associated with the EFS and initiate the Restore Job. Select the recovery point and click Actions > Restore.
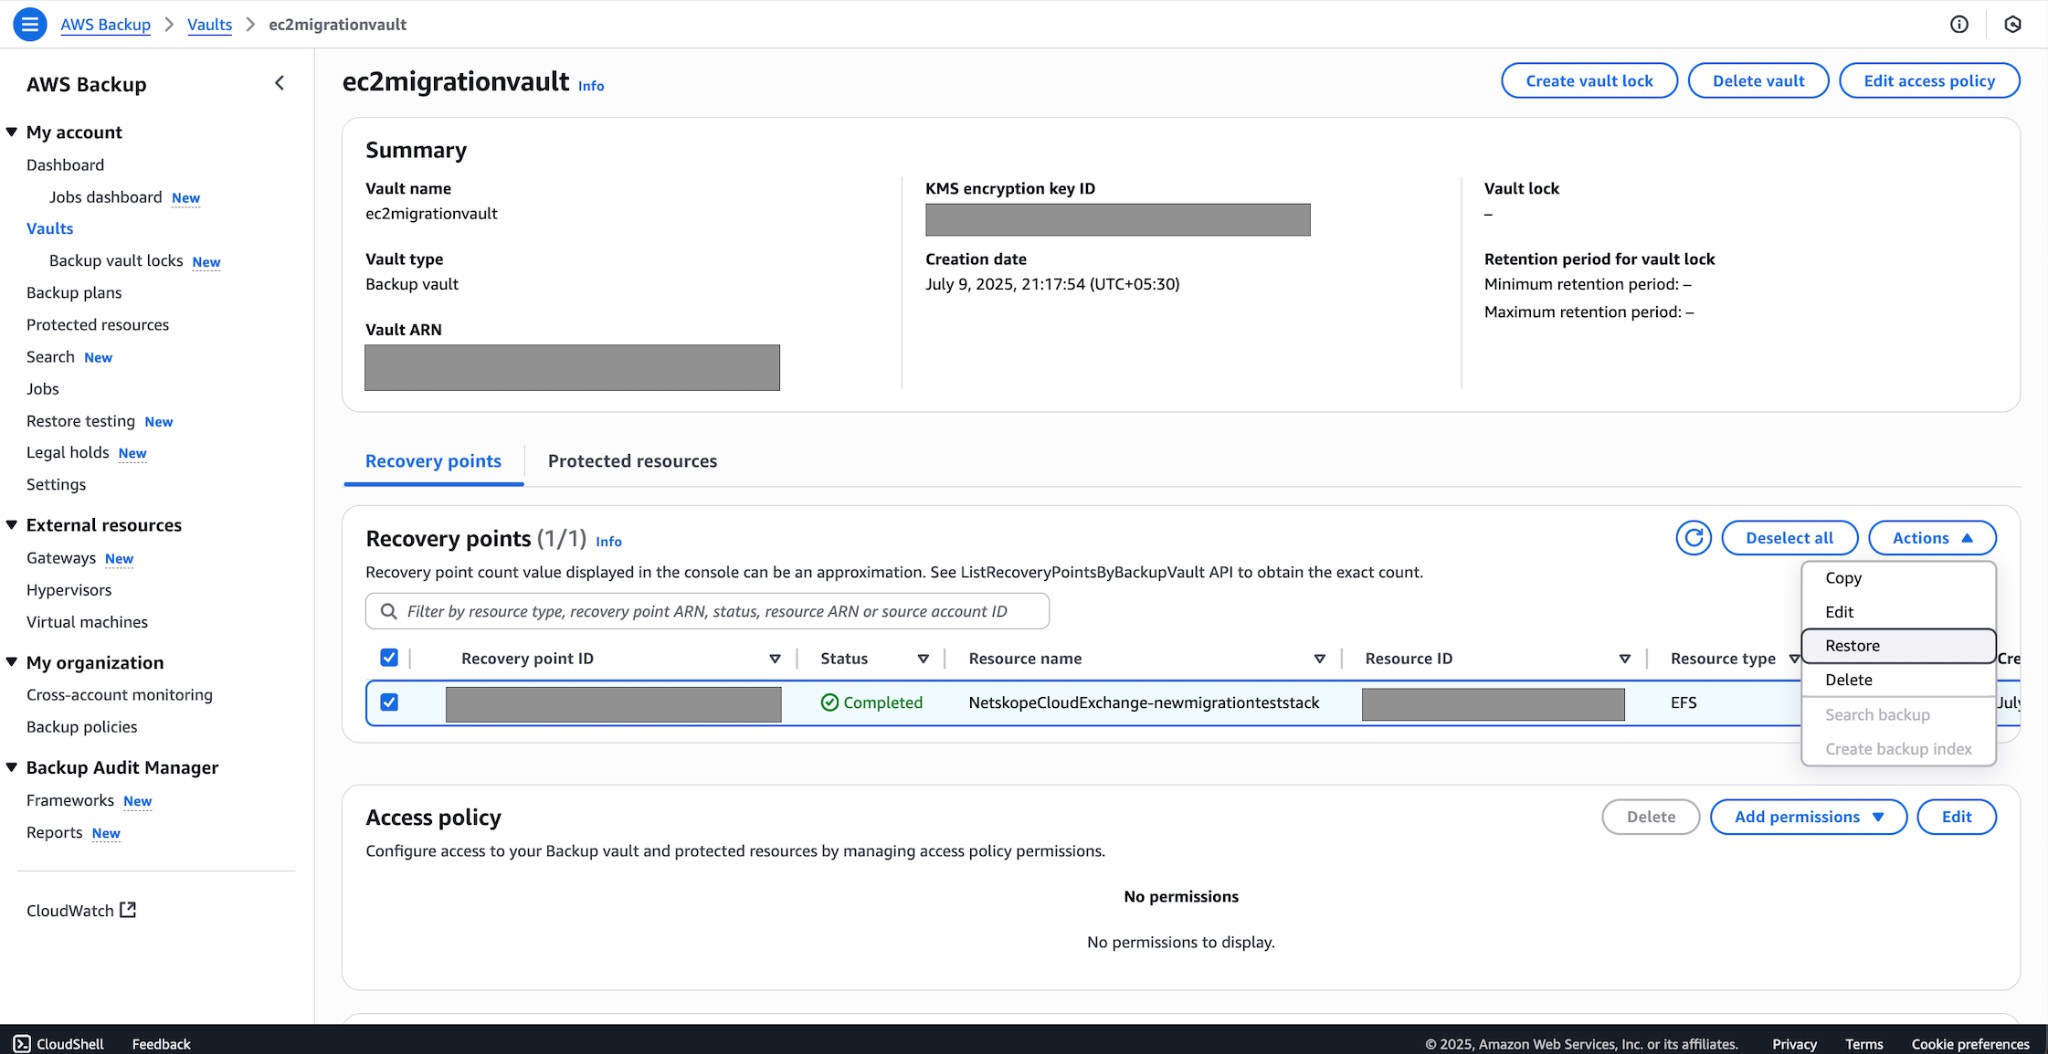
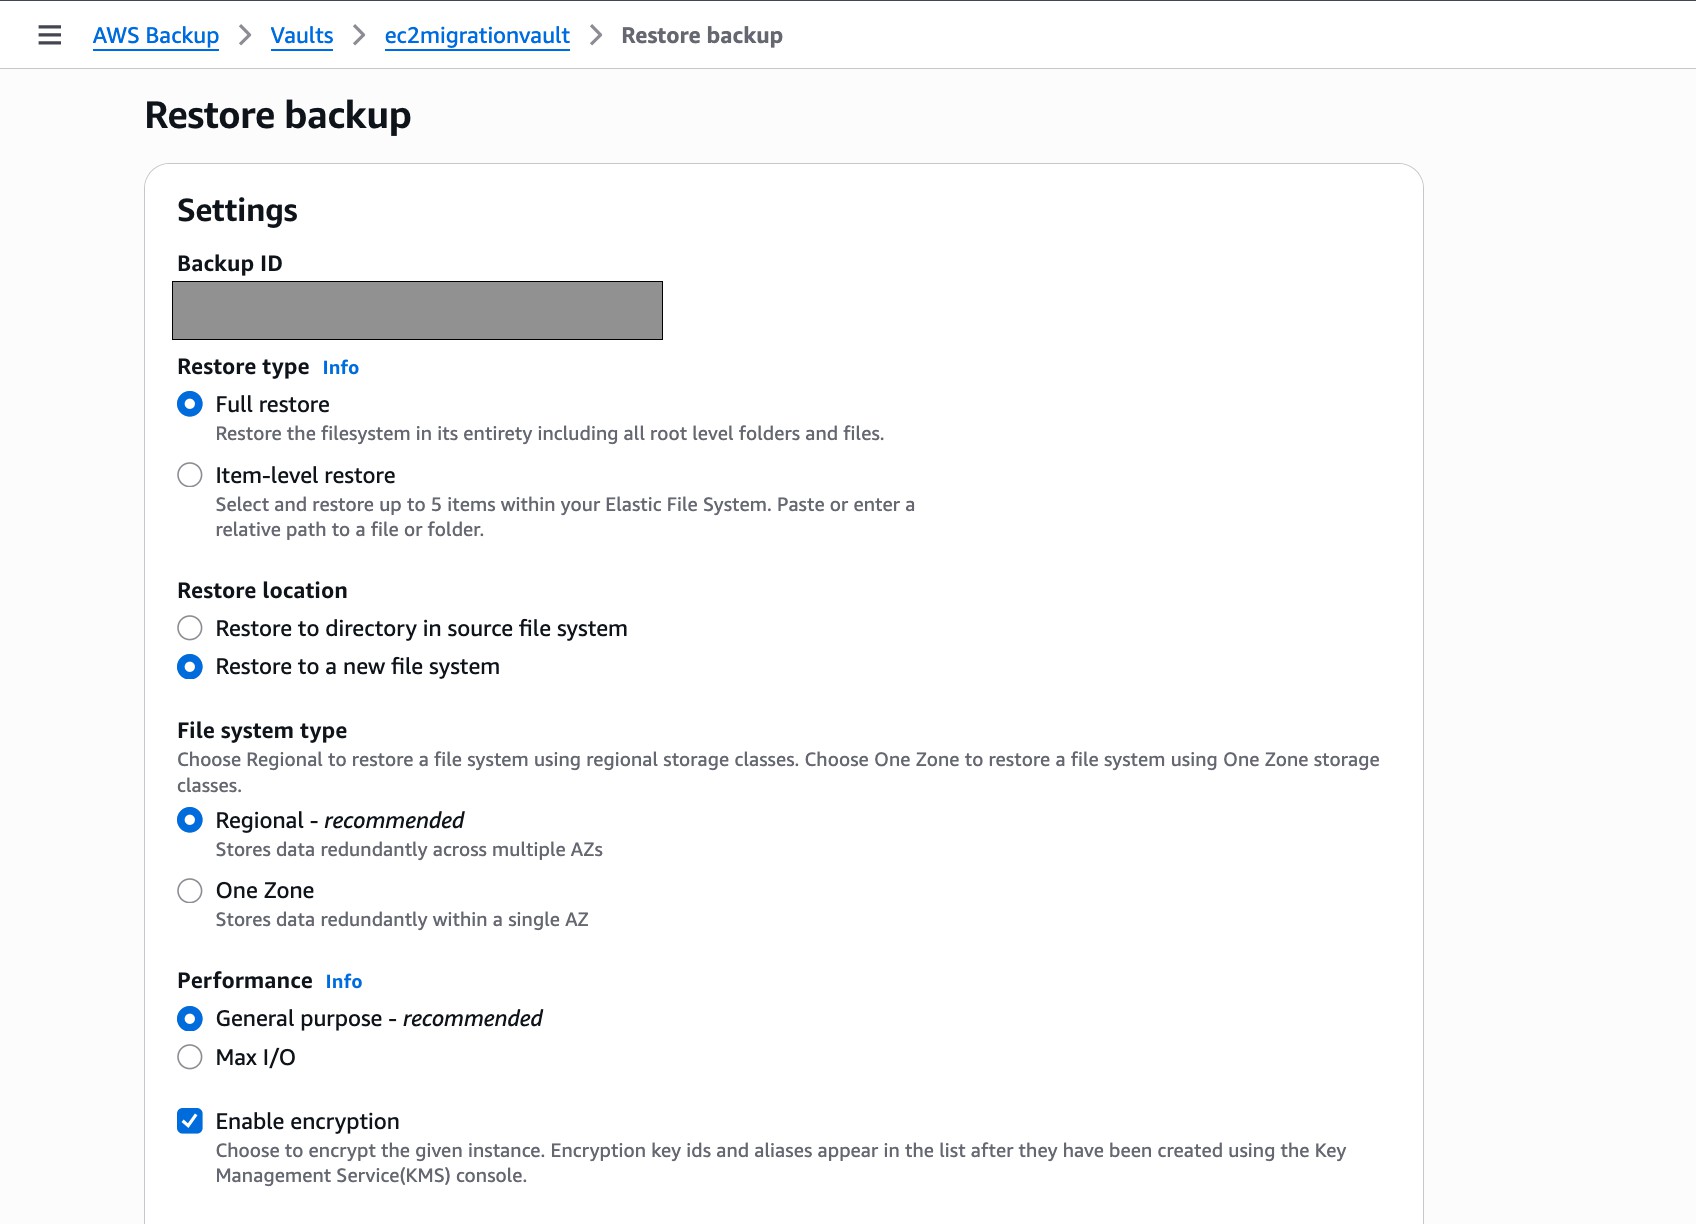
- Configure Restore Settings:
- Resource type: Select EFS.
- Restore type: Select Full Restore. This creates a brand new EFS file system with the restored data.
- Select Restore to a new file system (recommended for migration). This creates a new Amazon EFS file system and restores the data into it.
- Configure Encryption Settings:
- Encryption: Enable encryption-at-rest for the restored file system.
- KMS Key: Select the default AWS-managed key (aws/efs), or use a customer managed key (CMK) with the necessary permissions.
- Refer to the KMS permissions documentation if you are using a custom key.
- Use the default service-linked role (AWSBackupDefaultServiceRole), or a custom IAM role with these permissions:
- efs:CreateFileSystem
- efs:CreateMountTarget
- backup:StartRestoreJob
- kms:Decrypt (if applicable)
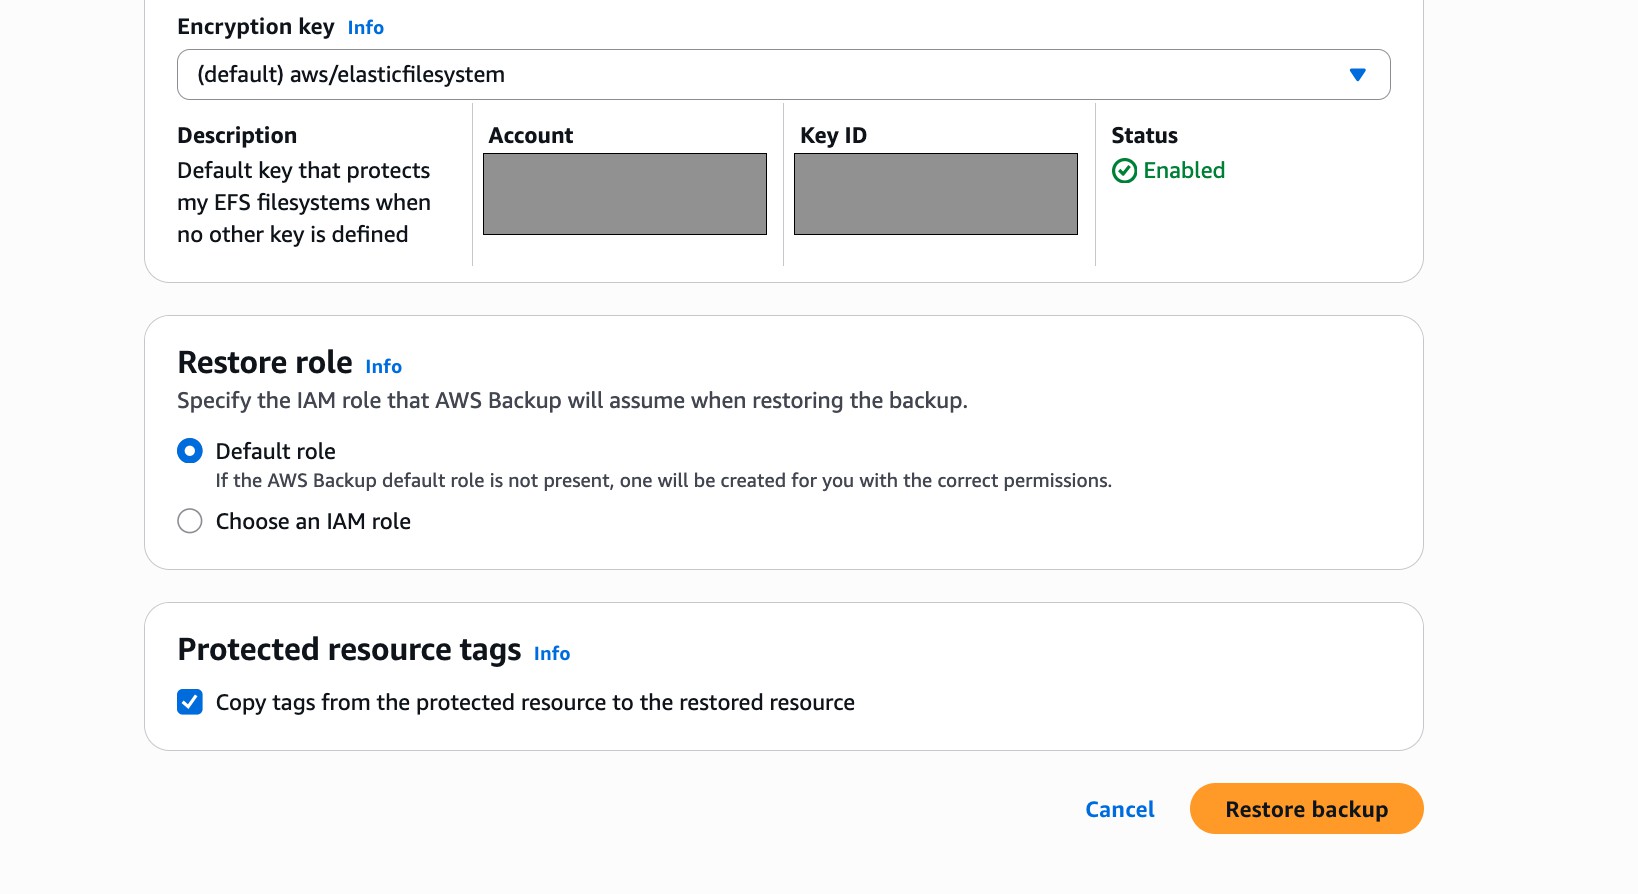
- Click Restore Backup.
Launch an Amazon EC2 instance for Netskope Cloud Exchange
As part of the migration process, a new Amazon EC2 instance will be deployed in the target region to host the Cloud Exchange (CE as VM) platform. This instance will be used to mount the restored EFS file system and configure the Cloud Exchange environment as needed.
To launch a new EC2 Instance:
- Go to the EC2 Console and launch a new instance.
- Choose an Amazon Machine Image (AMI).
- Go to Browse more AMIs click on the AWS Marketplace tab, and then search for Netskope Cloud Exchange AMI. Select the AMI version that matches the current deployment version to ensure compatibility. Review pricing and terms, then click Continue.
- Create, or select, a key pair and choose the instance type.
- Configure Storage.
- Configure Network Settings. Select a VPC and subnet different from the Netskope CE Fargate network.
- Configure the Security Group:
- Select an existing security group, or create a new one.
- Ensure the following inbound rules are allowed:
- SSH (port 22) from IP.
- HTTPS (port 443) for UI access.
- Custom TCP (port 3000) if using Cloud Exchange on an internal port.
- NFS (port 2049) for an EFS mount.
- Launch the Instance.
Configure EFS
After restoring the EFS file system from a recovery point using AWS Backup, a new EFS resource is automatically created. To make this EFS accessible to EC2 instances, mount targets must be created in the appropriate Availability Zone and VPC subnet.
To configure EFS:
- Go to the EFS console and select the region where the backup is restored.
- To Configure Mount Targets, click on the restored file system to view details.
- On the Network tab, locate the Mount targets section.
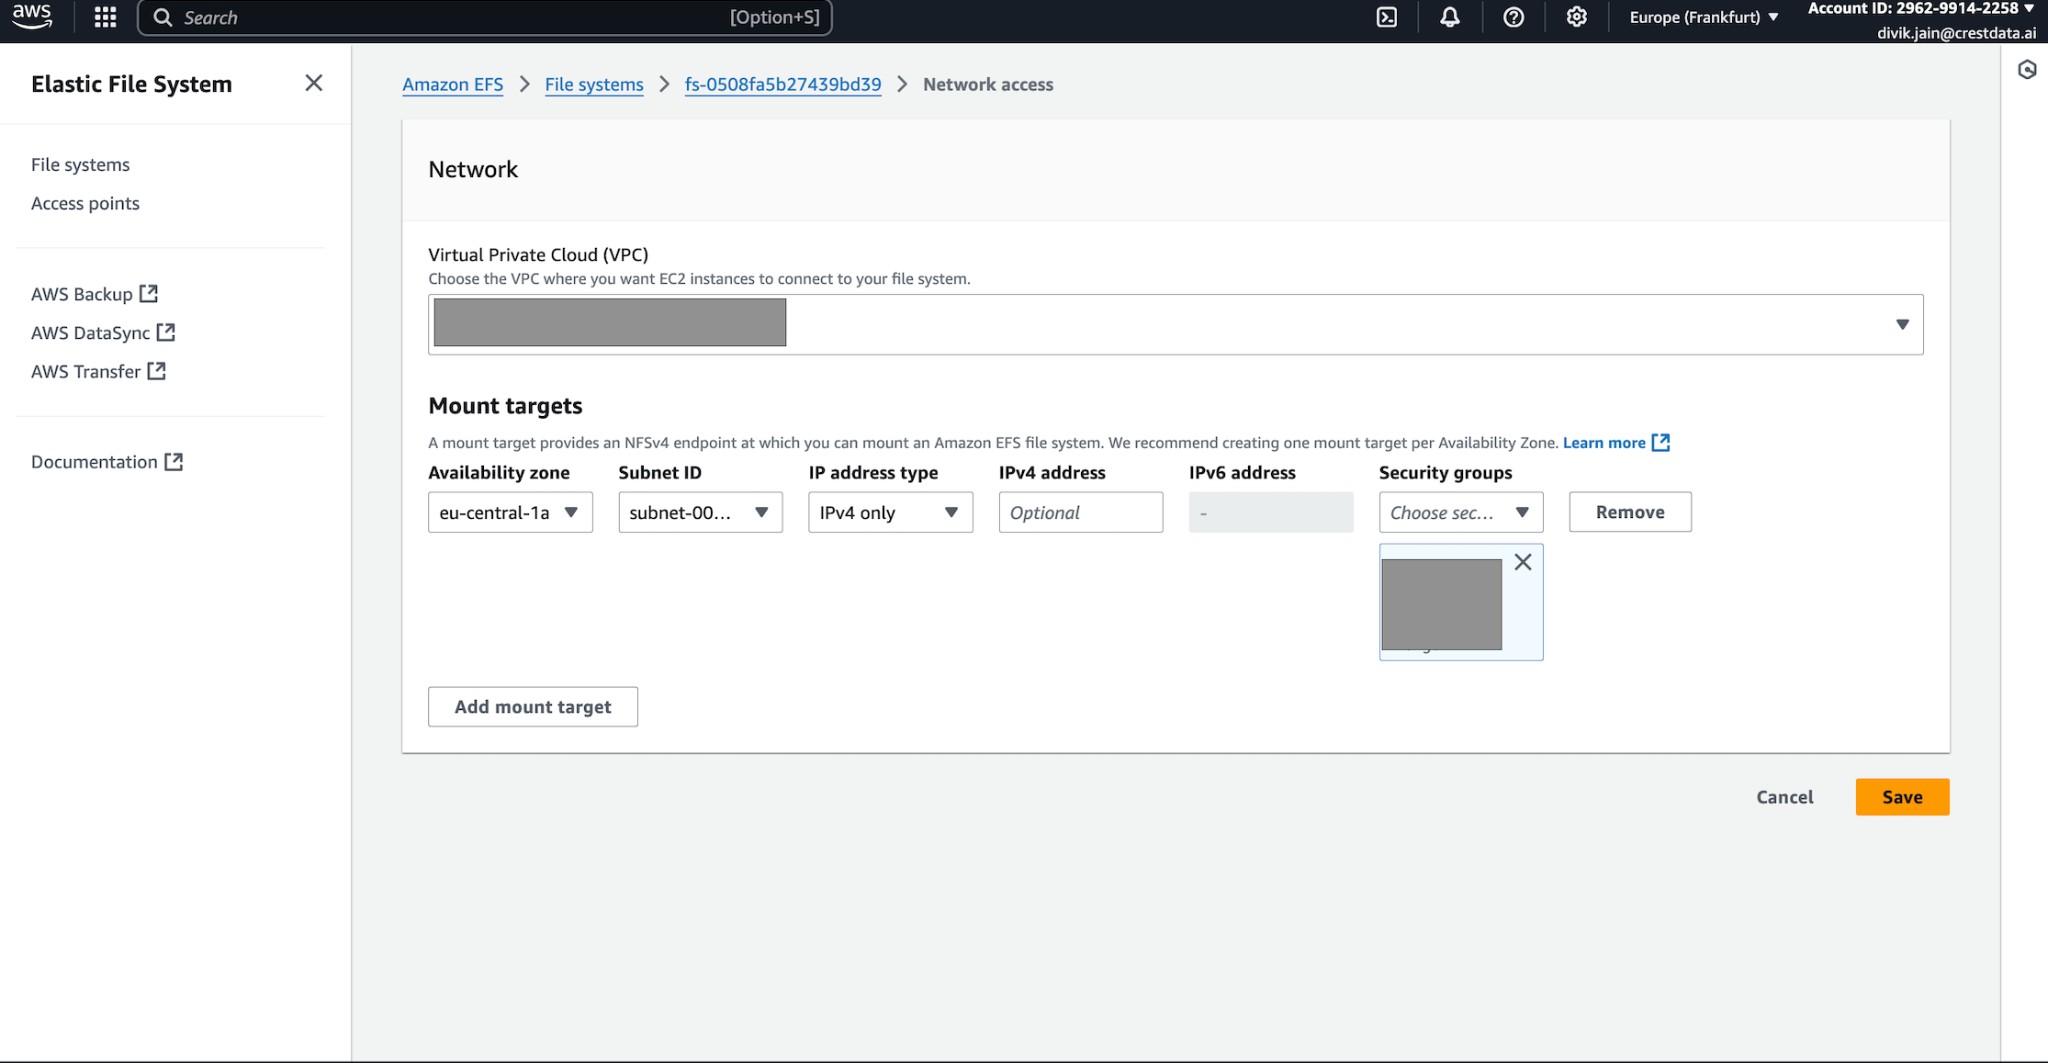
- Click Manage to create or update mount targets.
- Select VPC and Network Settings. Select the VPC, availability zone, subnet, and security group for where the EC2 instance resides.
- Click Add or Save changes to create the mount target. It may take a few seconds to become available.
Mount a New EFS to an EC2 Server
To mount the new EFS:
- Copy the EC2 public IPv4 DNS and run the SSH command to log in as
cteadmin:chmod 400 <private-key-path> ssh -i <private-key-path> cteadmin@<public-ipv4-dns>
- Install the required packages:
sudo apt update
sudo apt install -y nfs-common
- Go to the AWS EFS console and select the region where the backup EFS resides.
- Click Attach.
- Copy the command under Using the NFS client.
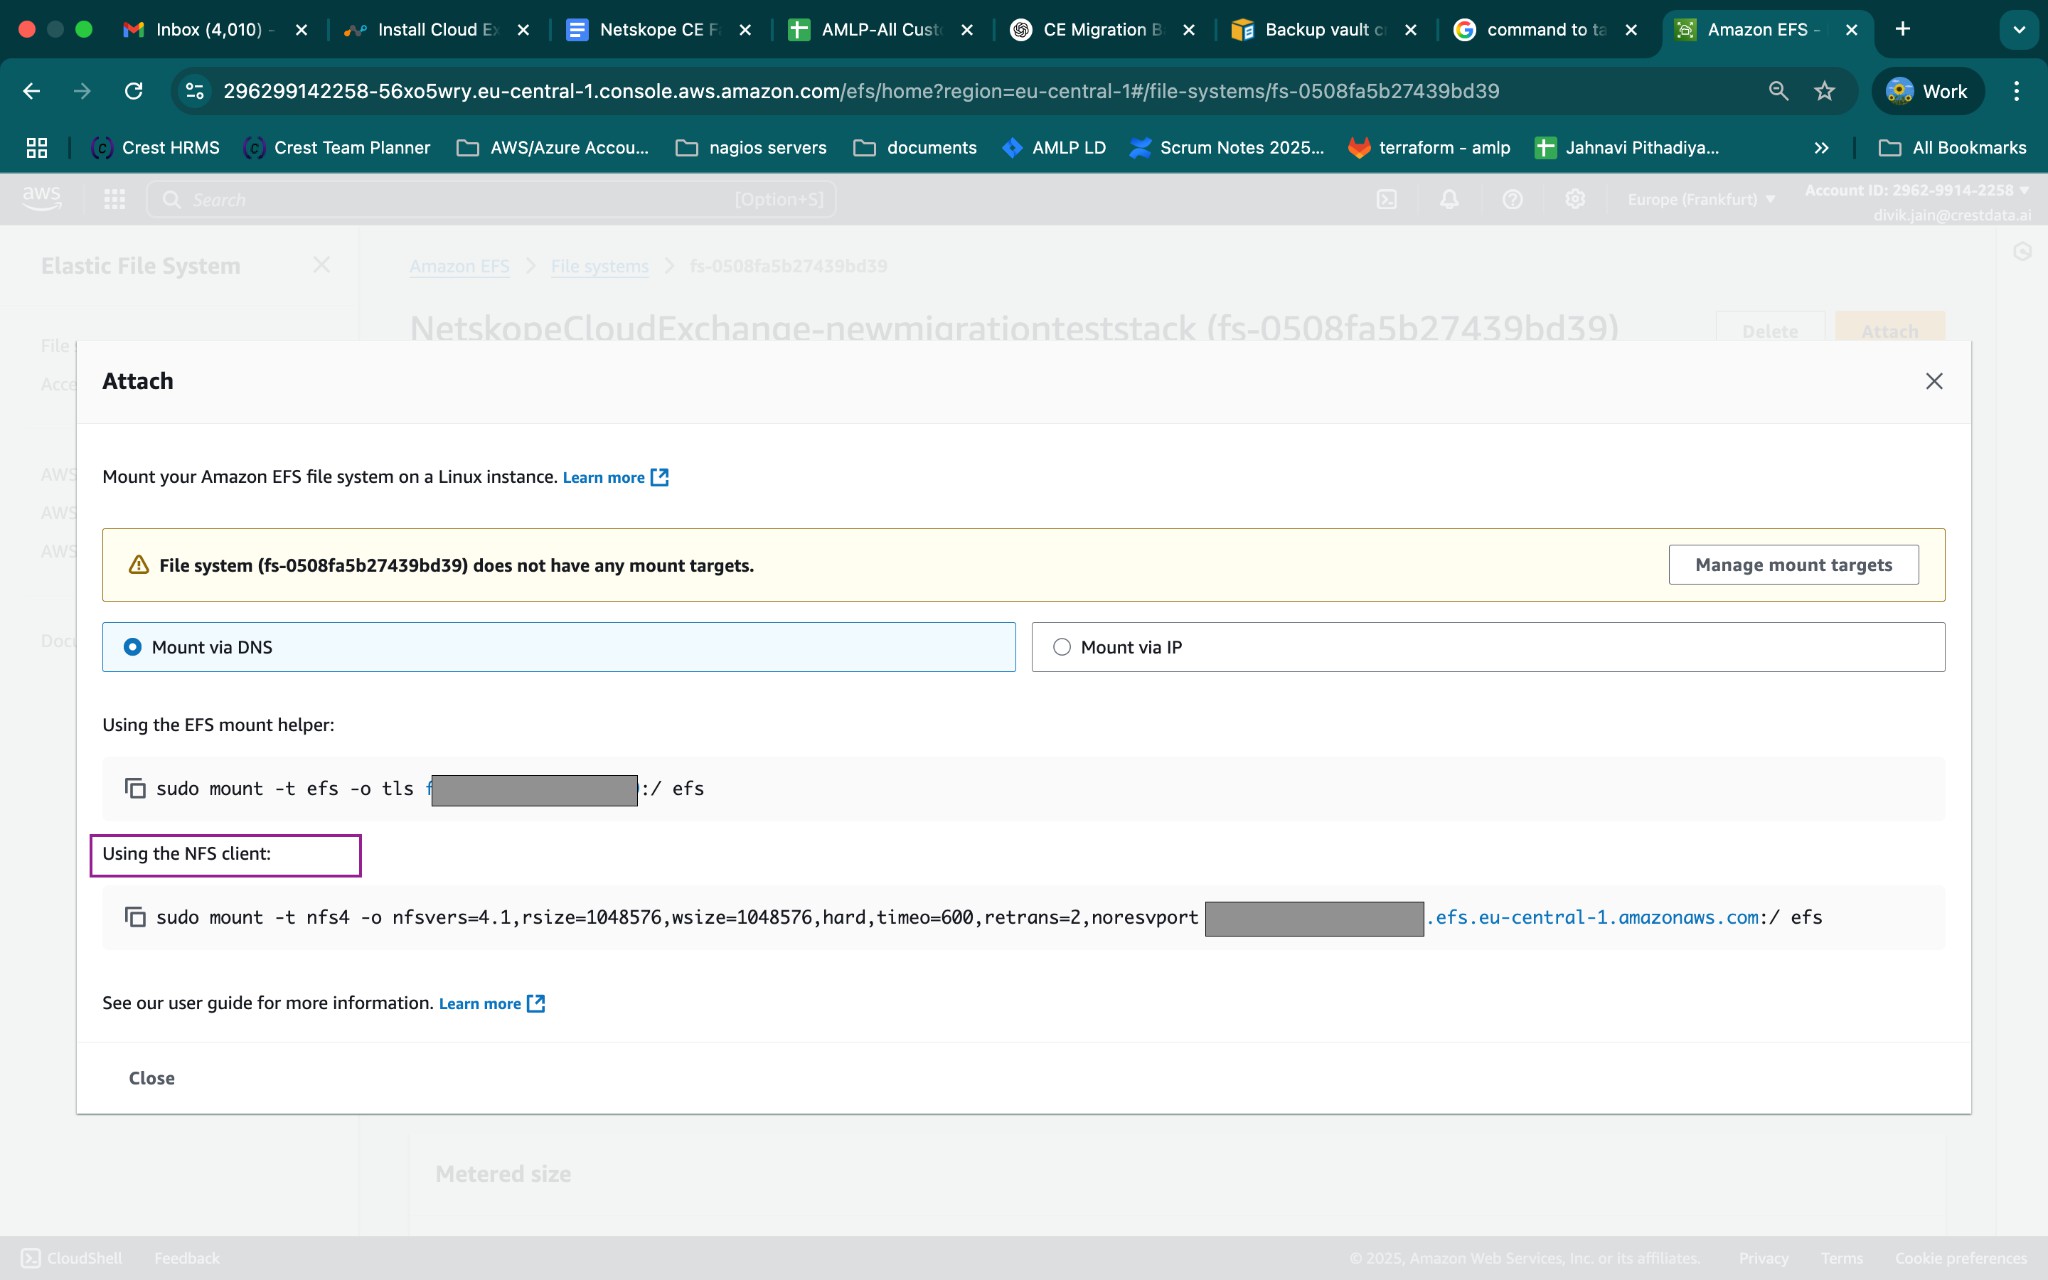
- Create a mount directory in EC2 instance. Execute the mount command in the EC2 instance:
mkdir efs
Via DNS:
sudo mount -t nfs4 -o
nfsvers=4.1,rsize=1048576,wsize=1048576,hard,timeo=600,retrans=2,noresvport <DNS name of new EFS>:/ <output_directory>
OR
Via IP
IP could be found in EFS > Network.sudo mount -t nfs4 -o nfsvers=4.1,rsize=1048576,wsize=1048576,hard,timeo=600,retrans=2,noresvport $MOUNT_TARGET_IP:/ efs
- Go to the
efsdirectory to access the restored data.
Move the old CE Data Files into the cloudexchange Directory
Prerequisites
Ensure this is a fresh installation and the setup process has not been initiated.
To move thecloudexchangedirectory.- Go to the
/data/mongo-data/data/db/ directory located within theefsdirectory.cd efs/<backup_restore_folder_name>/data/mongo-data/data/db/
- Copy the
ctefolder to thecloudexchangedirectory.cp -r cte /opt/cloudexchange/cloudexchange/
- Go to the
cloudexchangedirectory.cd /opt/cloudexchange/cloudexchange/
- Create a script file named
migrate_mongo_data.shusing the following command:vi migrate_mongo_data.sh
- Add the following content to the file and save it.
#!/bin/bash
set -e

[ -z "$MAINTENANCE_PASSWORD" ] && echo "Export the Maintenance Password. export MAINTENANCE_PASSWORD=<password>" && exit 1

[ "$(ls data/mongo-data/data/db | wc -l)" -ne 0 ] && echo "Cannot run migration as the mongo data directory is not empty." && exit 1

sudo chown -R 1001:1001 ./data/mongo-data

sudo docker run -d -t
-e MONGODB_ADVERTISED_HOSTNAME=mongodb-primary \
-e MONGO_INITDB_ROOT_USERNAME=root \
-e MONGO_INITDB_ROOT_PASSWORD=$MAINTENANCE_PASSW ORD \
-e MONGO_INITDB_DATABASE=cte \
-e MONGODB_USERNAME=cteadmin \
-e MONGODB_PASSWORD=$MAINTENANCE_PASSWORD \
-v ./data/mongo-data/data/db:/data/db:z \
-v ./data/database-init/mongo-init.sh:/docker-entrypoint-initdb.d/mongo
-init.sh:z \
-v ./cte:/opt/cte:z \
--name mongo-migration \

index.docker.io/netskopetechnicalalliances/cloudexchange:mongo8
-8.0.6

echo "Mongo container started" && sleep 60
echo "Restoring data..."
sudo docker exec mongo-migration bash -c "mongorestore -u cteadmin -p $MAINTENANCE_PASSWORD --db cte /opt/cte/"

sudo docker stop mongo-migration >/dev/null 2>&1 && echo "Mongo container stopped"
sudo docker rm mongo-migration >/dev/null 2>&1 && echo "Mongo container removed"

echo "Mongo data restored successfully"
- Grant executable permissions to the file.
chmod +x migrate_mongo_data.sh
- Export the
MAINTENANCE_PASSWORDvariable.export MAINTENANCE_PASSWORD=<maintenance_password>
- Execute the script.
./migrate_mongo_data.sh
- Go to the
/datadirectory located within theefsdirectory.cd efs/<backup_restore_folder_name>/data/
- Copy the repo folder to the
cloudexchangedirectory.cp -r repos /opt/cloudexchange/cloudexchange/data/
- Copy the
custom pluginsfolder to thecloudexchangedirectory.cp -r custom_plugins /opt/cloudexchange/cloudexchange/data/
- Go to the
cloudexchangedirectory.cd /opt/cloudexchange/cloudexchange/
- In the cloudexchange.config, add the maintenance password of the old Cloud Exchange Deployment.
cp cloudexchange.config.example cloudexchange.config
vi cloudexchange.config
- Execute the Cloud Exchange Setup script.
sudo ./setup
- After the setup completes successfully, run the Start script.
sudo ./start
Decommissioning a Cloudformation Stack using the AWS Management Console
Important
This action will permanently delete all resources associated with Netskope Cloud Exchange, including IAM roles, VPC, ECS, and other related components.
To decommission the stack:
- Sign in to the AWS Management Console and go to Cloudformation.
- In the navigation pane, choose Stacks and select the stack you want to delete.
- Click Delete in the top right corner. A confirmation dialog opens. Click Delete Stack.
- CloudFormation begins deleting the stack.
The Status will change to DELETE_IN_PROGRESS, then to DELETE_COMPLETE. - If a stack fails to delete, check for:
- Go to Resources and check if any resource Skipped. If so, you have to manually delete that resource. (such as if S3 buckets Skipped, you need to first empty, and then delete the bucket.)
- Termination protection being enabled.
- Dependent resources that cannot be deleted.
- Permissions issues.
- Retry the deletion.
- Select the cluster and ensure: