

This topic describes the various options available for an administrator to configure Netskope Client. You can configure system-wide settings using the Client Configuration dialog box.
Configure RBAC-Role Based Access Control
Client Configuration extends Netskope’s role-based access control (RBAC) so a role’s visibility in Client Configuration is limited to the app instances you assign to it, rather than the entire tenant. Use it to apply least-privilege access when you need direct visibility into the posture data.
To configure RBAC-based access control for Client Configuration:
-
Log into your tenant.
-
Go to Settings > Administration > Administrators & Roles.
-
Select Roles tab.
-
Click New.
-
In New Role panel, enter a Role Name and an optional Role Short Description.
-
Select Threat Protection.
-
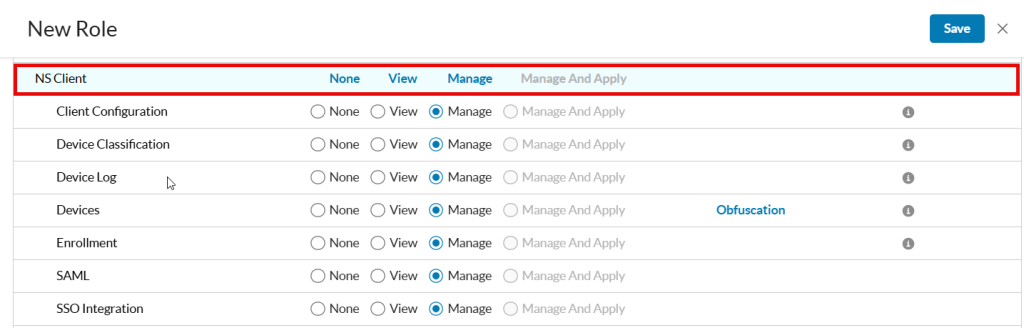
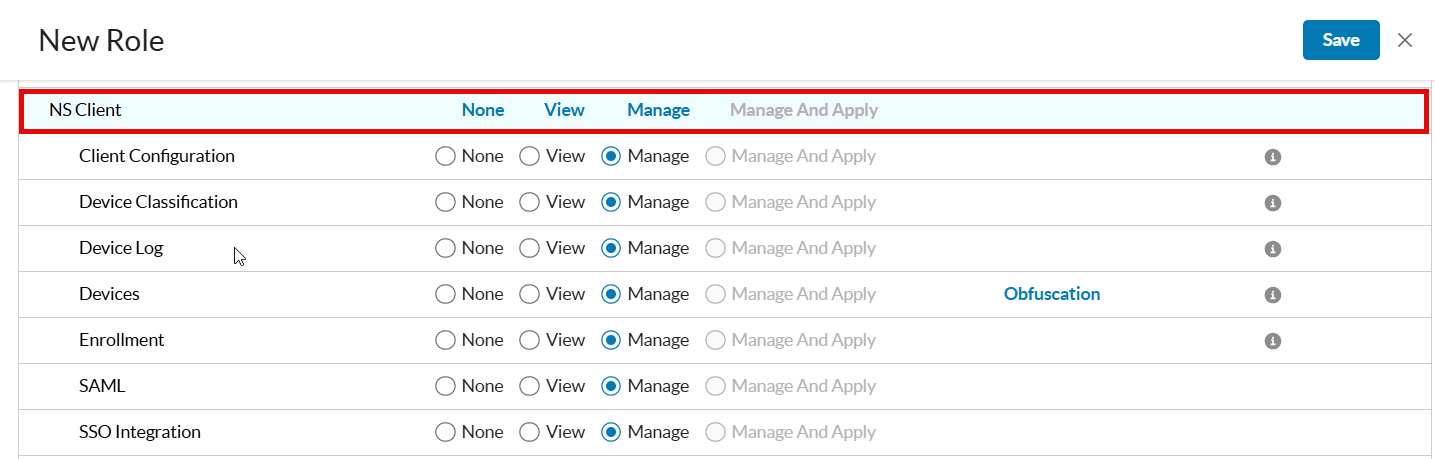
Under the NS Client category, set the Client Configuration permission according to the following roles:
Role Description Manage The user has full access to the Client Configuration page to edit and save changes to Client Configuration. View The user can view the Client Configuration page and its current settings, but cannot make any changes. None The user cannot see the Client Configuration page at all. -
Click Save.
User Group and Organization Unit (OU) Selection
You must choose either the Organizational Unit (OU) or a User Group for a configuration. You cannot apply the configuration to both simultaneously. The group listed first in the configuration list applies if a user belongs to multiple groups.

Create Client Configuration
To create a Client Configuration:
-
Log in to your tenant with admin credentials.
-
Go to Settings > Security Cloud Platform > Netskope Client > Client Configuration.
-
Click New Client Configuration to add a new global configuration.

Additional configurations can be created to obtain granular control over the behavior of the Netskope Client at a group or OU level by creating a new configuration. If these configurations are applied to groups, they must be prioritized to determine which configuration is applied to the Client when there is an overlap in group membership.

Note
- Multiple configurations can be created and applied to different OUs or Groups. But when applying a configuration only one OU or User Group can be selected.
- The Client configuration name cannot exceed 40 characters.
Enable DTLS (Data Transport Layer Security)
Enable DTLS (Data Transport Layer Security). Optionally, enter the MTU value.
– This option is supported only for Internet Services.
– DTLS is not supported on Netskope Client for Android and ChromeOS.
Enabling DTLS option supersedes TLS (Transport Layer Security) tunnel for communication thereby improving the network process. TCP inherently slows the overall flow performance if the network has high latency and packet drops. To overcome this issue, use DTLS tunnel (UDP tunnel). To know the current protocol, click the Client icon > Configurations > Tunnel Protocol.
The connection can fallback to TLS in the event of a DTLS connection issue. For example, the firewall blocking UDP traffic or data getting fragmented. To switch to DTLS, you can perform one of the following:
-
Manually disable and enable the Client.
-
Switch your network.
After enabling DTLS, you are prompted to enter the Maximum Transmission Unit (MTU) value. This value determines the maximum size of the IP packets sent by the Netskope Client to the next hop (router). The maximum configurable value is 1500; however, it takes the value 1350 if you do not enter any value in the MTU text-box.
Supported TLS/DTLS version: 1.2
On-Premises Detection
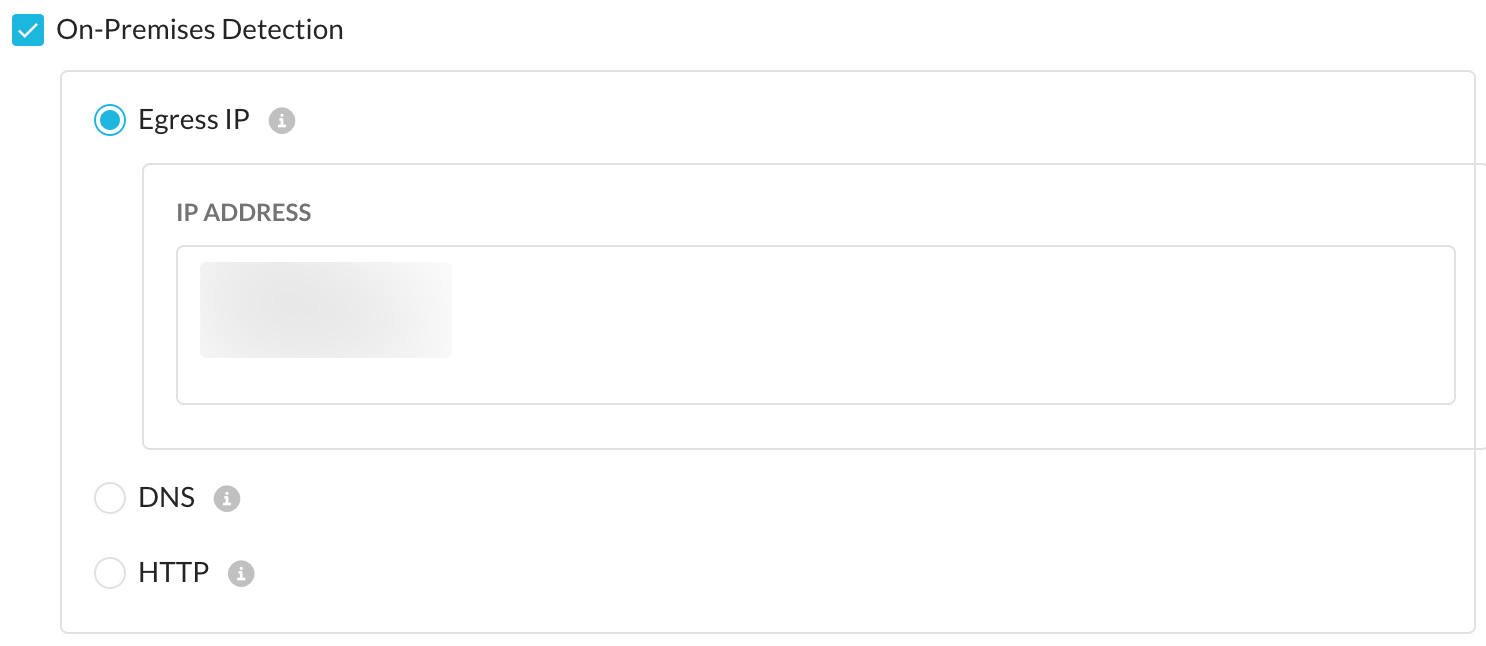
For On-Premises Detection, choose one of the following:
-
Egress IP
-
DNS
-
HTTP
By enabling any one of these options, you can detect the location of an endpoint. If the endpoint is on-premises or off-premises, the Client tunnels the traffic based on the traffic mode configured for dynamic steering.
On-Premise Detection enables you to add multiple entries in the DNS and HTTP fields. This allows you to add multiple URLs in the steering configuration. The maximum number of hosts and configured IPs that you can add is 16.
-
Egress IP
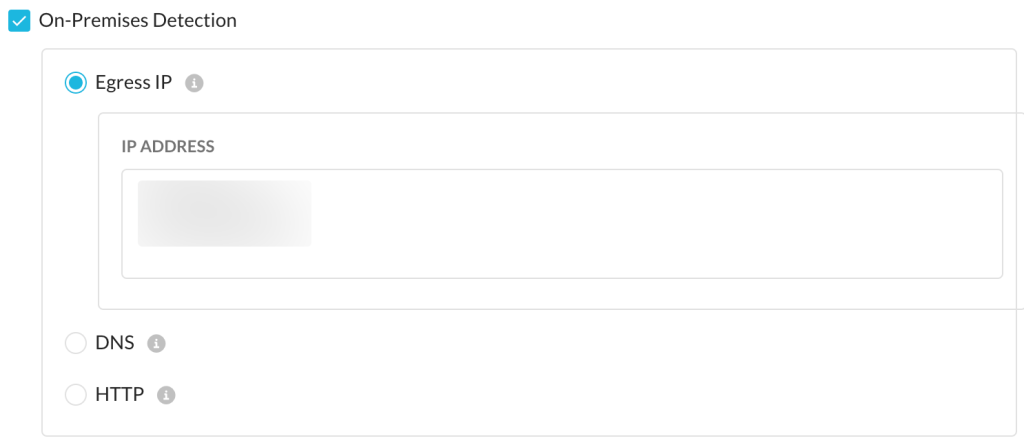
This option provides the ability to detect location of users (On vs Off Premises) using egress public IP address of the user location. Netskope Client detects egress public IP of the user connecting to the Netskope cloud. If the egress IP matches the entry configured in Client Configuration created by the user, then the user is marked as On-Premises.
Maximum allowed IP address entries: 100
-
DNS
If the FQDN entered resolves to the provided IP Address, the Netskope client is considered to be on-premises. Ensure that this is a valid DNS record that is resolvable only when on your network
-
HTTP
If the Client looks for the HTTP response code 200, and if successful, the device is deemed to be on-premises. Also enter a connection timeout value. The default is 10 seconds, and the max is 60 seconds.
- Don’t use a .local hostname for the DNS check because the mDNS responder on Mac OSX might interfere with the resolution of local hostnames.
- Don’t use hostnames or IP addresses that are defined for Netskope Private Access in DNS or HTTP checks because they cause flapping in the On-Premises check. Netskope recommends you use a separate domain name that does not overlap with NPA app definitions. You can configure a dedicated forward lookup or separate entry in your enterprise DNS for the on-prem detection.


On-Premises/Off-Premises: If the endpoint is On-Premises or Off-Premises, the Netskope Client tunnels the following types of traffic and this traffic is bypassed either at Netskope Cloud or Netskope Client depending on the bypass exception traffic in the steering configuration:
-
Cert pinned apps
-
Exception domains
-
Exception categories
Periodic Device Classification
Enable this option to run periodic device classification validations. You can set the time in minutes(between 1 and 120) while choosing this option.
After enabling, the Client:
-
Monitors the processes, files, or other criteria configured in the Device Classification.
-
Classifies that device as unmanaged in the event of any change in the criteria.
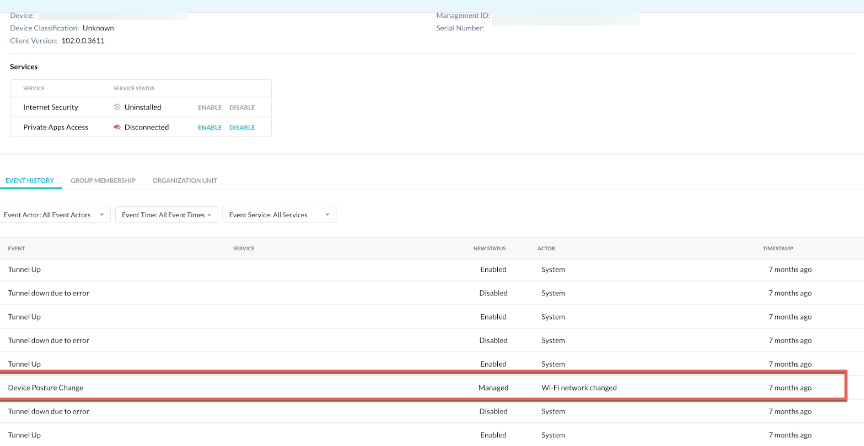
You can view the event details in Settings > Security Cloud Platform > Device details > Event History tab. In this section, check for the event Device Posture Change to understand the events in your device. The following events trigger a recheck of the device posture:
-
Network joined
-
Wi-Fi network joined
-
System wake up
For example, when a device connects to Wi-Fi, it triggers the Device Classification scan and checks if the current status of the device matches with the rule. The status is updated only when:
-
There is a change in the device status.
-
The current status does not match the previous status. If the previous status is unmanaged and after the device classification scan, the current status changes to managed, the New Status column in the device details user interface displays the updated status.
Allow users to select POP
This feature allows administrators to grant permission to the user group or organizational unit (OU) to pin to a particular Point of Presence (POP).
To learn more about Data Center Pinning, view Data Center Pinning in Netskope Client.
Supported Operating Systems: Windows, macOS, and Linux.

The administrator can set the timeout period for the automatic unpinning and reversion to the optimal Point of Presence (POP). The minimum setting is 30 minutes (the default time), and the maximum allowed duration is 24 hours.
Advanced Options
Toggle the Advanced link to see the following options:
Interoperate with Proxy
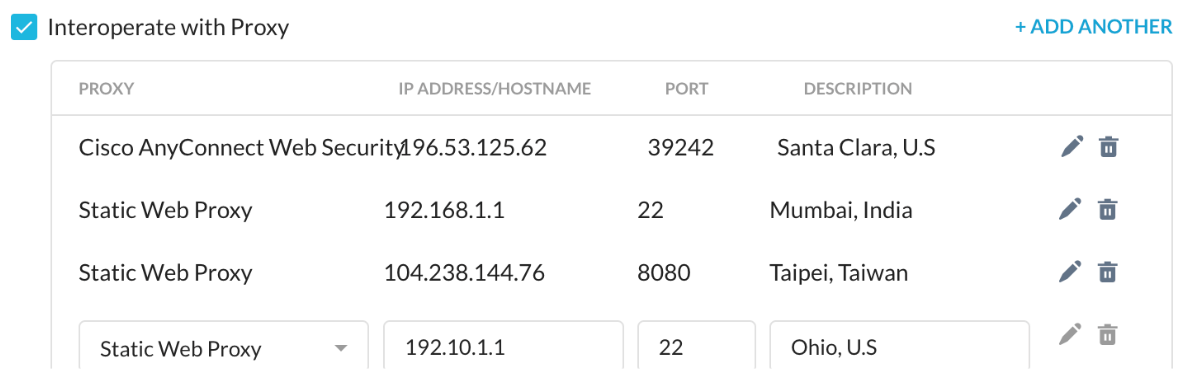
Using this feature, the administrator can now configure proxies irrespective of their location in Netskope Client Configuration. By default, Netskope Client automatically detects the configured proxy by connecting to addon-<tenant> <MP>.<tenant-domain>, where MP = eu|de|au. If the PAC(Proxy Auto-Configuration) file redirects some traffic to other proxies, it is mandatory to declare them in the Interoperate with Proxy settings.
Netskope Client always detect and intercept traffic that is sent to proxies declared in Interoperate with Proxy. Even though it is not mandatory to select this feature, you can use it whenever multiple proxies are deployed in the Network. Netskope Client always analyze requests sent to proxies defined in the Interoperate with Proxy settings based on the steering configuration to decide if the requests should be intercepted or bypassed.
The Netskope Client also conducts an availability check to select the proxy to use to contact Netskope Cloud services. The Netskope Client performs this check when:
-
The Client service starts.
-
Updates in the Client configuration.
-
Modifications in the proxy settings.
-
Change in the network.
Availability check is performed by contacting addon-<tenant> <MP>.<tenant-domain>. The auto detected proxy is always the preferred proxy to contact Netskope Cloud services.After you configure the proxies along with the Port, Netskope Client checks for the system proxy along with the configured proxies and verifies if any proxy is reachable:
-
If the system proxy is reachable, the Client connects to the local proxy.
-
If the system proxy is unreachable, the Client checks with the other proxy IP addresses configured on the UI.
Supported platforms: Windows and macOS.
Select the option Interoperate with Proxy to enable this feature and add multiple proxy IP addresses.
Interoperate with Proxy WorkflowThe following steps describe working of Netskope Client when an administrator selects Interoperate with Proxy:
-
Netskope Client downloads the Client configuration that consists of all Client configurations. By default Netskope Client checks the configuration every hour and can be forced with manual update.
-
The Client checks if the Interoperate with proxy feature is enabled and checks if the proxy IP addresses are configured in the Client Configuration WebUI.
-
Afterwards, Client checks if any system proxy is configured. If yes, then the client uses that system proxy along with the configured and available proxies.
Preference is given to the system proxy rather than the configured IP address. -
The Client then performs health check to all proxies to identify the ones that provide access to
addon-<tenant><MP>.goskope.com. The first active proxy is used to contact Netskope Cloud services. -
Traffic send to all proxies will be analyzed by the Client to determine if it should be intercepted and forwarded to Netskope Security Cloud.
Enable device classification and client-based end user notifications when the client is not tunneling traffic
This disables the Client when GRE, IPSec, Secure Forwarder and Data Plane On-Premises steering methods are detected.
Perform SNI (Server Name Indication) check
In scenarios where multiple domains use single IP address, it is recommended to use SNI in addition to DNS to make a steering decision.The Netskope Client tunnels or bypasses the traffic whenever there is an overlap between the IP addresses of different domain names. Use the option Perform SNI check to get the domain name from SNI and for the Client to validate the traffic based on the SNI check. If this option is enabled, the domain name is obtained from SNI for lookup.For example, YouTube, drive.google.com, and plus.google.com are resolved with the same IP address. In such scenarios, the unmanaged YouTube traffic is allowed to the Netskope proxy because the client steers the SaaS traffic based on the IP address. To eliminate the IP address overlapping, you can configure the Client to steer the SaaS traffic based on SNI instead of IP address. The SNI feature supports the following operating systems:
-
Windows
-
macOS
- When SNI-based steering is enabled, the initial TCP three-way handshake is not steered inside the Netskope tunnel. The Client steers the traffic only after it retrieves SNI hostname from the SSL Client Hello packet. All applications with source IP restrictions fail as this happens outside the Netskope tunnel and is sourced from a non-Netskope IP.
- With Client version 142.0.0, for Windows devices, you can configure the Client to keep the initial TCP handshake inside the Netskope tunnel instead, and detect the domain in SNI post completion of handshake to decide whether to bypass at Client or tunnel the traffic. This prevents failures for applications with source IP restrictions and in networks where a firewall blocks all non-tunnel connections. To enable this feature, contact Netskope Support.
Zone Selection
Zone Selection enables customers to selectively provide access to specialized infrastructure, such as China Elite POPs or Special Access POPs, based on the user identity such as Users Groups or Organization Units (OUs).
The administrator can select one of the two options available in Zone Selection:
-
China Elite: Returns an ordered list of Elite POPs followed by Premium POPs.
-
China Elite Extended: Returns China Elite Extended POPs (for example, HKG2), followed by Elite POPs and then Premium POPs.
To learn more about implementation, view GSLB Zone Selection based on User Identity.
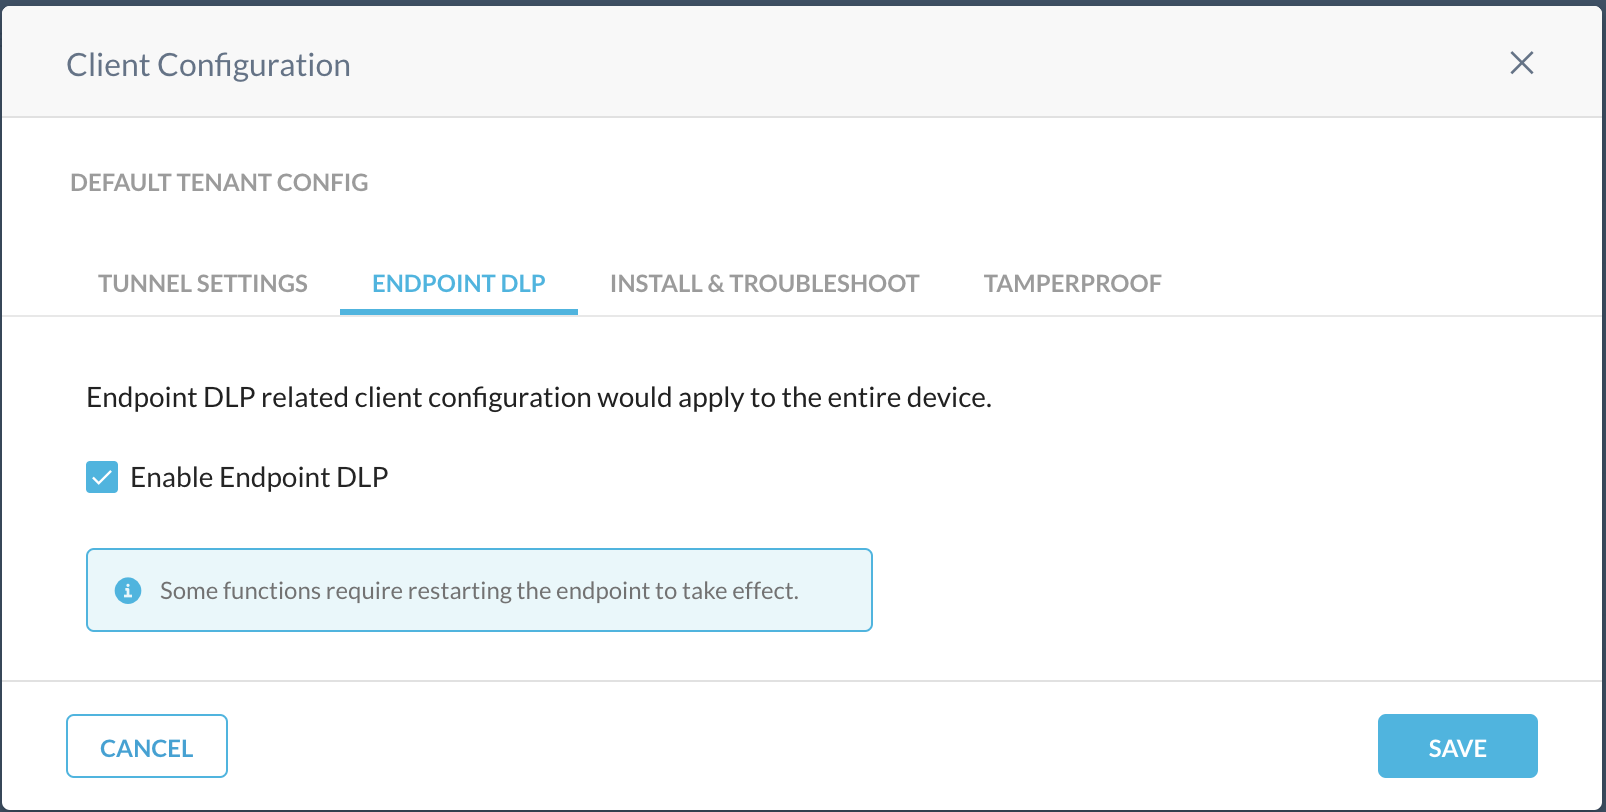
Select Enable Endpoint DLP to enable Endpoint Data Loss Prevention for the client configuration and apply Content and Device Control policies to the devices. You can enable Endpoint DLP for the Default Tenant Config to apply policies to all client users or for custom client configurations to apply policies to specific users.
For non “Default tenant config” settings, the admin can override the default settings by checking a checkbox and changing the default settings:
Prelogon for Private App Segments
Enable this option to allow the device to connect to the private apps. In the pre-login state, the device can authenticate to the Netskope cloud and access limited resources. After you enable the prelogon option:
-
Enter a prelogon username.
The email address always end in “@prelogon.netskope.com”. This is used to create a local user for pre-logon in the next section. -
To use a device certification authority, click Select File to upload the certificates in PEM format.
-
To validate the device certificate against a Certificate Revocation List, enable Validate CRL. The CRL used to validate the device comes from the CA certificate.
-
Enable Start Prelogon tunnel when user tunnel disconnects. This enables the Client to always try to re-establish the prelogon tunnel when the user tunnel switches from connected to disconnected, even when the user disables the Client.
VDI Support for Private App Segments
In Virtual Desktop Infrastructure (VDI) environments, private application traffic originates from both interactive user sessions and system processes (Session ID 0). To address this, NPA introduces a dedicated VDI User that creates its own dedicated tunnel to steer traffic from the Netskope Client from processes that can’t be attributed to a user. This design ensures that private app packets, whether from user-initiated or system processes, are securely handled and routed based on defined policies. Learn more.
Periodic re-authentication for Private App Segments
Enable the Periodic re-authentication for Private App Segments option to force a user to re-authenticate into the Netskope Client if the user’s device restarts, or logs out of the PC and logs back into the device. Contact Support to enable this functionality in your tenant.
Select a time period from the Re-Authentication Interval dropdown list for how often you want re-authentication to occur. To allow a user time to re-authenticate after the specified interval time has expired, enable the Grace Period checkbox and enter the minutes. The grace period must be less than the interval.
Partner Tenant Access
Use this option to allow your users to access their partner’s private app resources without the need to unenrolling the Netskope Client.

Supported OS: Windows, macOS
You can add partner details as shared by the partner organization administrator. Apply this configuration only in the tenant from where the users are connecting to the other tenant and not bi-directional. Select the checkbox to enable Partner Tenant Access for your end-users. For a user to access the partner tenant, the partner need to have a Forward SAML proxy configured for Client enrollment and the partner needs to supply appropriate credentials to the partner that receives access.
After you select Partner Tenant Access, perform the following to add partner to Netskope Client:
-
Enter the tenant name in the first text-box. For example, Partner 1.
-
Enter the tenant URL. For example, Partner1.goskope.com.
-
Click +ADD to include another tenant partner account.
-
Click Save.
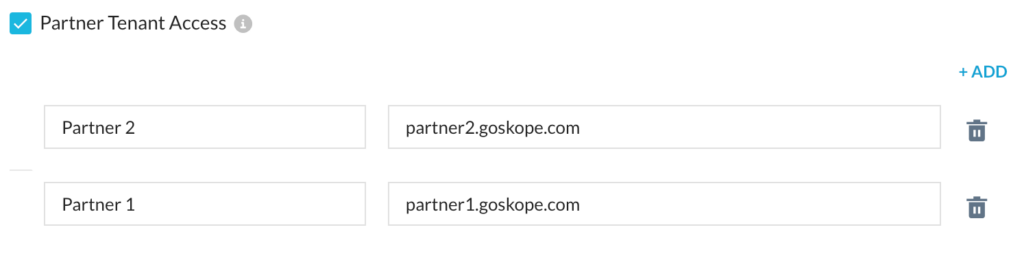 You can only add up to 20 partner details here.
Use the delete icon to remove the existing tenant partner details from the webUI.

Upgrade Client automatically to a specific release version
For a tenant with automatic Client Upgrade option enabled, Netskope Client is set to upgrade automatically every 480 minutes or eight hours.
Netskope Client checks for an update at regular intervals and in the event of an update, Netskope Client downloads the installation package and performs the update silently when one of the following conditions are met:
-
The idle time for the tunnel between Netskope Client and Netskope Cloud is greater than or equal to 25 seconds (no traffic flowing through the tunnel).
-
Tunnel getting re-established (this occurs upon network change, user location change and so on).
-
Netskope Client is starting (this occurs when the machine is rebooted by the user).
Once an update is complete, a pop-up is displayed to inform the user that the Client update was done automatically.
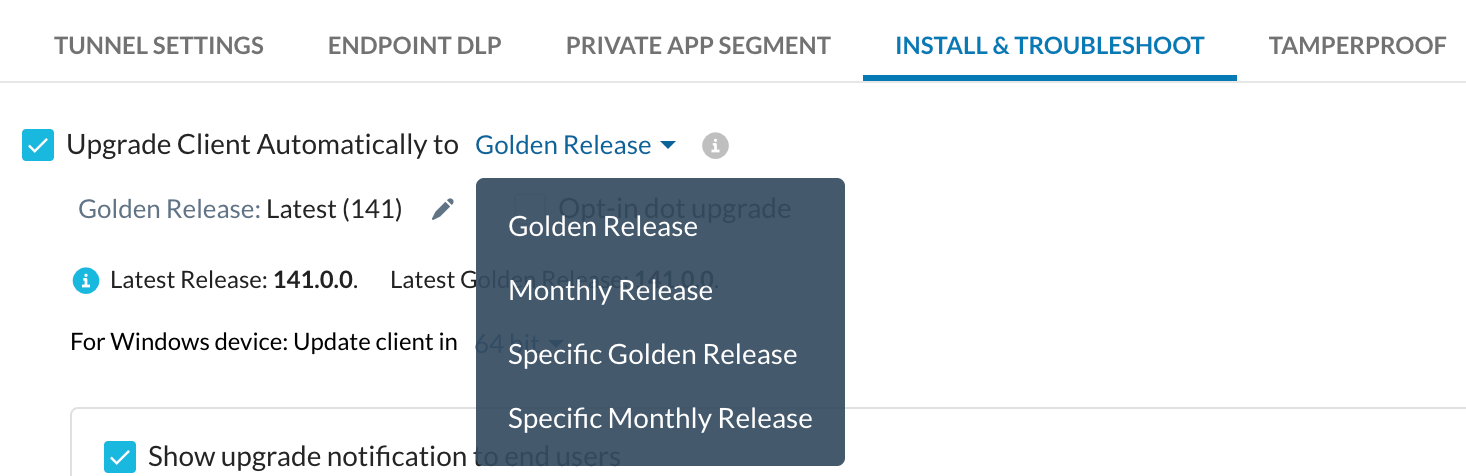
For example, consider a scenario where an administrator configures the Client Configuration to use Specific Golden Release selecting version 129.0.0 which is one of the currently supported golden versions (for example 129.0.0, 132.0.0, and 135.0.0). In this scenario, all end-users will have Client version 129.0.0 on their devices. Usually, when a new golden version ( for example, 138.0.0) becomes available, 129.0.0 automatically goes out-of-support. However, since the administrator explicitly selected Specific Golden Release, the Client versions for end-users will remain on 129.0.0 and will not automatically upgrade to the new golden version (138.0.0).
You can choose from the following upgrade options:
-
Golden Release: You can upgrade to any of the supported golden release versions of Netskope Client.The options include up to latest (current golden release version), latest-1, and latest-2 golden release versions. To know more about golden releases, view the Client Downloads page. Select Opt-in dot upgrade, if you want to automatically upgrade to the latest hotfix or minor version of the golden version of Netskope Client. When unchecked, clients remain on the exact selected version.
-
Monthly Release: This displays the monthly release versions. The options include up to n-2 release versions. Select Opt-in upgrade, if you want to automatically upgrade to the latest minor or hotfix versions of the golden releases of Netskope Client. When unchecked, clients remain on exact selected version.
-
Specific Golden Release: You can set all clients to be upgraded to a specific golden release. After selecting this option, you can select the golden release from the list of available versions. In addition, you can select Opt-in Upgrade to ensure the clients are upgraded to the latest minor or hot fix version of the selected golden release. For example, available Specific Golden Release versions might include 132.0.0, 132.0.7, 132.0.13, 132.0.23, 135.0.0, and 135.1.0. If you choose version 135.1.0 and enable the Opt-in Upgrade setting to allow automatic minor version updates, the Netskope Client will transition to version 135.1.10 once it becomes available. To know more about golden releases, view Client Downloads page.
-
Specific Monthly Release: You can set all clients to be upgraded to a specific monthly release version. This includes the hotfix or minor versions available in that specific monthly release.
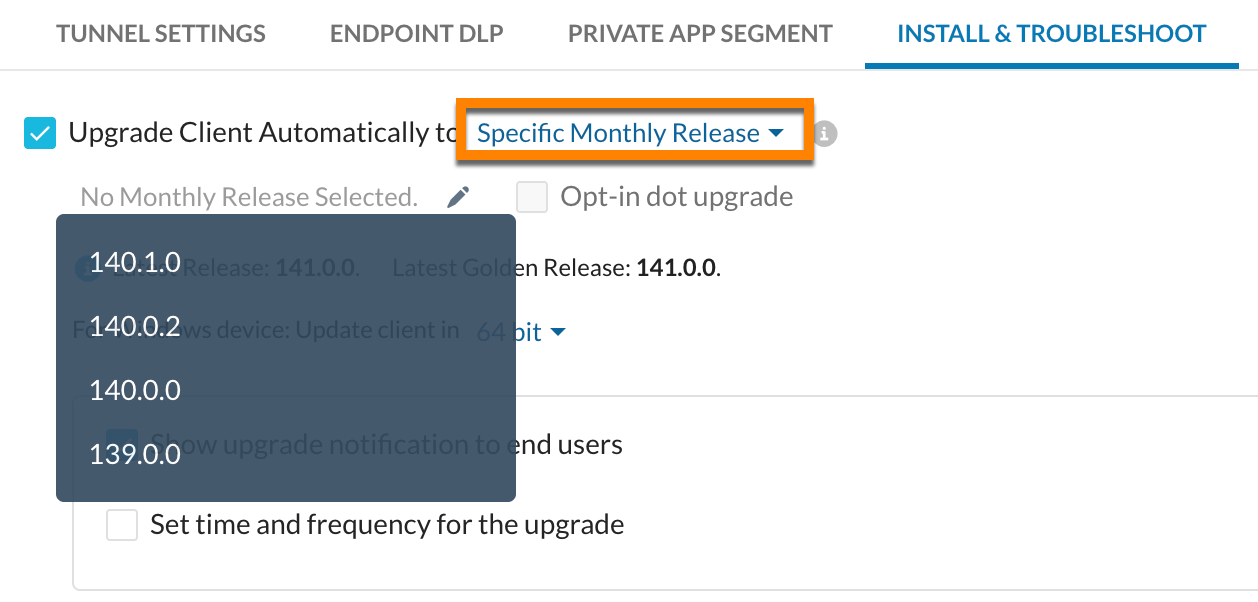
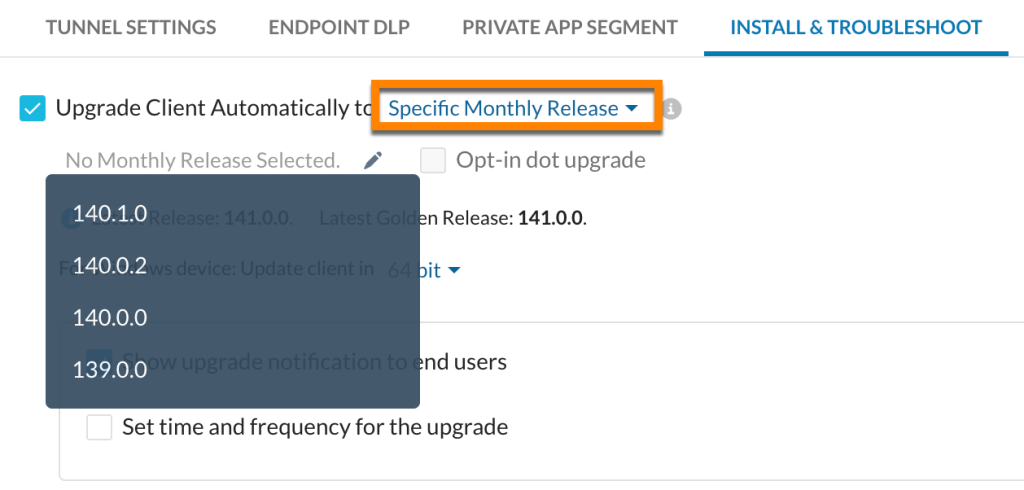 If a release qualifies as a Golden Release, it appears only in the Specific Golden Release list. A Golden Release version does not appear in the Specific Monthly list even if it was released that month. To upgrade to a specific Golden Release version, select the version from the Specific Golden Release list.
-
Show upgrade notification to end users: Select this option to send notification to end-users after an upgrade is completed. This option is visible only if an upgrade option is selected.
-
Set time and frequency for the upgrade: Allows you to schedule automatic upgrades and define the time and day for the upgrade. The main benefit of this feature is you can schedule upgrades during critical business hours. Using this feature you can:
-
Set a day and time on a Daily, Weekly, or Monthly basis and the time depends on your device timezone.
-
Choose the order in which you want to schedule the upgrade after selecting the Monthly option.
For example, you want to schedule automatic upgrades to the latest release on the first Monday of every month. You can choose the following options on the webUI:
-
Repeat: Monthly
-
Order: First
-
Day: Monday
-
Time: 10:00 AM

With this selection, the device can start upgrading anytime after 10:00 AM. The time that you set denotes the starting time to check for a latest upgrade.
The Netskope client currently waits for an idle tunnel to initiate schedule upgrade and to ensure smooth auto upgrade experience. This behavior continues and might not explicitly see the system getting updated exactly at the scheduled time.Another set of examples to elucidate this feature:
-
Example 1: You configure Monthly – First – Monday – 10:00 AM in Set time and frequency for the upgrade option on Jan 15, 2024 and the current Netskope Client is in version 111.1.0. Netskope releases 112.0.0 on Feb 1, 2024. The Client cannot start upgrading until Feb 5, 2024 10:00 AM according to the scheduled upgrade setting. Feb 5 is the first Monday after the 112.0.0 release.
-
Example 2: One device out of many is offline for a few days from Jan 19 to Feb 6, 2024(Tuesday) 7:00 AM. Here, the Netskope client auto upgrades on Tuesday 7:00 AM as schedule upgrade check already elapsed on Feb 5 10:00 AM.
-
Example 3: Netskope releases 112.1.0 on Feb 20, 2024, Netskope Client upgrades to 112.1.0 only on Mar 4, 2024; the first Monday of the next month after releasing 112.1.0.
If a lower version is selected, then the endpoint with the higher version of Netskope Client will need manual uninstall and reinstall of the lower version of Netskope Client. Netskope Client checks for newer versions every 8 hours and if a new version is available, the Client will silently auto-upgrade. -
-
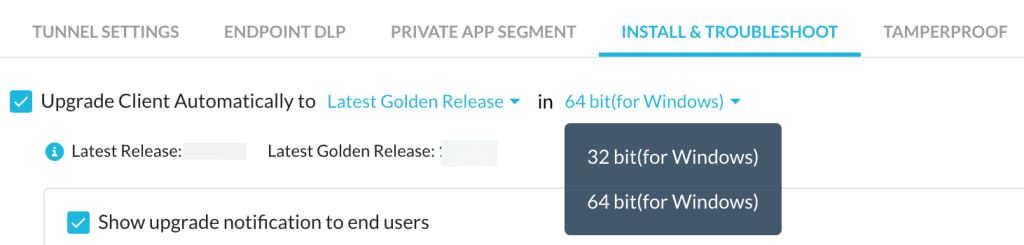
32 bit and 64 bit for Windows: You can choose to upgrade Client to the latest golden release version or latest release for 32 bit and 64 bit Windows architecture. This option is not applicable to any release version older than 131.0.0.


Uninstall clients automatically when users are removed from Netskope
The Netskope Client is uninstalled automatically whenever a user is removed from the Netskope tenant. The user need not manually uninstall Client from the endpoint.
Supported OS: Windows and macOS
For macOS devices, whenever this option is selected, the administrator must ensure to select Removable System Extension option under the System Extension Type in the MDM profile used to deploy Netskope Client. Otherwise, the uninstallation fails due to the OS restriction. No configurations required for Windows in the MDM profile.
Allow users to unenroll
If the Netskope client is provisioned via IdP, selecting this option allows users to unenroll from Netskope. When unenrolled the user is logged out from client and the Client is disabled, the user will be required to enter their IdP credentials to enroll again to enable Client.
Advanced Options

Enable advanced debug option
Enable this option to view the debugging options. To view the debugging options, click the Client icon > Advanced Debugging option.
Log Level
This option provides the flexibility for the administrator to control and choose the log level and the default log level is Info. The Netskope Client uses log level received from the webUI. The log levels in nsdebug.log are displayed as Dump, Debug, Info, Warning, Error, and Critical. Setting to Dump level generates more logs to files. The Netskope Client keeps two log files (fixed file size 10M) for rotation. The Dump level can expedite the rotation that may incur useful logs being overwritten. The log files are stored by default in the following location:
-
Windows Devices: %ProgramData%/Netskope/stagent/Logs/nsdebug.log
-
macOS Devices: /Library/Logs/Netskope/nsdebug.log
-
Linux Devices: /opt/netskope/stagent/logs/nsdebug.log
Allow disabling of all Client services together
This option was earlier displayed as Allow disabling of Client on the webUI.

The new option Allow disabling of all Client Services together serves as a business continuity plan in the event of a disaster that provides an easy way to disable Netskope Client across the user base without reaching out to Netskope Support. Select the checkbox Allow disabling of all Client Services together to enable this option. After you enable it, the webUI displays a Master Password text box(optional) that allows you to configure a password that the end-user can use while disabling the Netskope Client.

For disabling Netskope Client services such as CASB, SWG, or NPA, Netskope plans to provide a separate option in the future releases. You can leverage these options based on your requirements.
– The hide/view icon is displayed on the webUI only when the administrator configures a new Client Configuration profile and enables master password. The icon is not available in the edit mode.
After the administrator enables or selects this option, it facilitates the end-users to disable Netskope Client with or without password, based on the password configured or excluded in the Client Configuration. The password configured is not dynamic and remains static until the administrator decides to change. To learn more about the working of Master Password, view Using Netskope Client.
Ensure to configure a password beforehand if you decide to configure a master password in the Client Configuration. For example, in the event of a disaster in an organization, if the master password is already configured in advance in the Netskope Client Configuration, then, you as an administrator can share the configured password to multiple users at the same time. The end-users can use the same password shared by the administrator to disable Netskope Client from their devices.
Auto Re-enable Duration (Optional)
Use this option to reactivate the Netskope Client automatically after a pre-configured interval, even if the user has not manually re-enabled it.
-
Supported Operating Systems: Windows, macOS, Linux
-
Minimum Netskope Client Version: 139.0.0
The Master Password (when enabled) acts as an authentication gate before the Client disables all services. The Auto Re-Enable Timer is an independent feature that determines when services automatically turn back on; you do not need to configure both simultaneously.

In the Auto Re-Enable Duration field, enter a numeric value and select the unit in minutes or hour(s). The duration ranges from 5 minute to 7 days (10080 minutes).
When a user clicks Disable All Client Services on the Netskope Client UI:
-
If you configured a Master Password, the Client prompts the user for it before proceeding.
-
The Client disables all configured services.
-
The client calculates the end time (current time + configured duration) and stores it in the per-user configuration file nsuser.conf.
-
A countdown timer starts on the Netskope Client UI, showing the remaining time before the Client automatically re-enables services.

When the timer expires, the Netskope Client automatically re-enables all configured services.
Allow disabling of Internet Security
You can disable Netskope Client for Internet Security services using Allow disabling of Internet Security. For example, you want to test a critical application in your organization without Netskope Client being enabled. This option eliminates the need to uninstall Netskope Client and at the same time maintain business continuity.
– Netskope Private Access is currently not supported and will be available in the future releases.
– Upgrade your Netskope Client to version 118.0.0 or higher for Windows and version 130.0.0 or higher for macOS to enable this feature in your tenant.
Enable One-Time Password: After choosing Allow disabling of Internet Security, you can also optionally select Allow One-Time Disable with Password to enable a one-time password(OTP) for the enrolled devices. The end-users can later use the OTP while disabling Netskope Client for Internet Security. To enable OTP:
-
Select the checkbox for Allow One-Time-Disable with password.
-
In Default Time Duration, enter the duration you want to disable Netskope Client in minutes.
After the timer expires the Netskope Client is enabled again automatically.
The minimum and maximum values allowed here are five minutes and 24 hours respectively.

After you select the Allow One-Time Disable with password option and configure the duration, it generates a dynamic password for each device that you can access or view from the Devices page.

The OTP is auto-generated and cannot be set by the administrator. Once the admin selects the OTP option in the Client Configuration, it triggers or generates an OTP for each enrolled device. You can share this OTP to each end-users that has the permission to disable internet security. Once the user successfully uses the password, a new OTP is fetched on subsequent tunnel establishment and stored for future use. To learn more about disabling Internet Security from the system tray, view Using Netskope Client.
Allow disabling of Private Apps access
Allow users to disable the Client for Private Apps Access. After enabling this option, you can view Enable/Disable Private Apps Access in the Netskope Client system tray icon. To learn more, view Allow Users to Disable Private Apps.
Hide Client Icon on System Tray
Hides the Client icon from end users devices system tray. This will also prevent Client notifications from being displayed to the user.
Password protection for Client uninstallation
Enable this option to prevent unauthorized uninstallation of the Client from end user devices. The end users need to enter the admin password for uninstalling the Client. Password protected uninstallation is supported in both Windows, macOS, and Linux devices. Service stop option is available only to Windows devices.
Protect Client configuration and resources
After you select this option, users with elevated permissions are prevented from altering any sub-part (files, folders, and process) of the Netskope Client installation. It prevents users from modifying, renaming, or deleting Netskope processes, folders, files, and registry keys. If the Client becomes corrupted or otherwise unrecoverable while this feature is enabled, force-removal utilities will not function and the affected device may require reimaging or rebuilding to remove the Client.
– Supported Platforms: Windows 10 or higher versions.
– Netskope recommends you to enable the Password protect Client uninstallation option to restrict users from uninstalling or stopping the Netskope Client services.
– With this feature enabled, there are access restrictions to the default Netskope folders. If you have any processes that utilize the default Netskope folder, change the path to another folder that your process can access. For example, refer Configuring CLI-based Tools and Development Frameworks to work with Netskope SSL Interception to perform such configurations where CLI tools have access to Netskope folder.
– Contact Netskope Support to allow READ permissions when the Protect Client configuration and resources option is enabled on Windows devices. By default, the READ permissions are denied when the Protect Client configuration and resources option is enabled.
With version 125.0.0, Netskope recommends enabling Password protection for Client uninstallation and Protect Client configuration and resources to prevent admins from tampering with the Netskope Client.
Fail Close
Blocks all traffic when a tunnel to Netskope is not established. Domain-based, IP-based, and Cert-pinned exceptions will be applied, but category-based exceptions will be blocked.
– Older Netskope Client will continue to use Fail Close settings from Client configuration
On a multi-user environment, once one user enrolls and maps to a Client Configuration with Fail-Close enabled, Fail-Close blocks all traffic for the other non-provisioned user(s) on that device, except the enrollment and IDP login screens, which remain reachable.
For example, two users, User A and User B, share a device.
- User A logs in first and completes IDP enrollment successfully. The profile maps to a Client Configuration with Fail-Close enabled. This activates Fail-Close on the device.
- User B then logs into the same device but hasn’t enrolled yet. Because Fail-Close is now active (triggered by User A’s enrollment), it blocks all of User B’s regular traffic. User B can still open the IDP login/enrollment screen and authenticate, since that traffic always bypasses Fail-Close.
- If a non-provisioned user (User B) is already logged in when another user (User A) enrolls and activates Fail Close, the traffic continues to work normally for both users. If the non-provisioned user (User B) then logs out and logs back in, Fail-Close takes effect and blocks all traffic except access to the enrollment screen.
- If a Netskope Internet Services tunnel fails to come up we recommend that you block the steered traffic from that device.

When Fail Close is enabled, the Password Protection for Client Uninstallation and Service Stop become enabled and Allow Disabling of Clients options becomes disabled. With Fail Close, you can Exclude Private Apps Traffic, so Private Access is not affected, and also Show Notifications.
– Reach out to Netskope Support to enable “Block Private IP address in Fail Close”. This is supported from Netskope Client version 130.0.0.
– Remove the steering exception for Local IP address range in Destination Location from all Steering Configurations to be used with Fail-Close.
This configuration does not apply to the Private Access traffic. It is applicable only for Internet Security.
To enable Fail Close:
-
Select the checkbox.
-
This prompts a warning pop-up Enabling “Fail Close” will also enable “Password protection for client uninstallation and service stop” and disable “Allow disabling of clients”. Click Proceed.
-
Upon selecting Proceed, the following options are displayed:
Exclude Private App Traffic
Use this option to exempt private access traffic while fail close is enabled.
Show Notification
A fail-close pop-up is displayed whenever the tunneling to Netskope is blocked. You can select the checkbox for Show Notification to alert users why they are unable to access web applications.NoteNetskope recommends to enable the Show Notification option to get notifications.

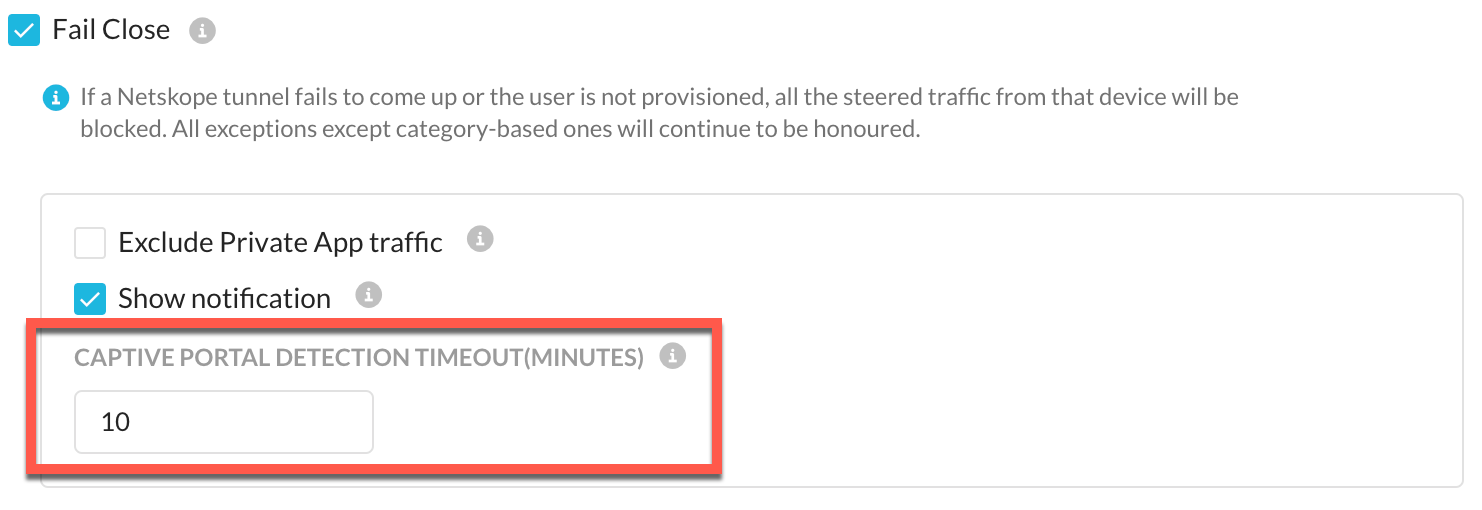
Captive Portal Detection Timeout (Minutes)
A captive portal is a web page displayed, whenever a user tries to access the network where captive portal is enabled, to let the users authenticate prior to accessing the network. For example, if you are trying to connect to the free Wi-Fi or hotspot in an airport or restaurant where captive portals are enabled, you need to complete a set of actions to access the network.
This option enables the administrator to define captive portal grace period. If the tunnel is disconnected or cannot be established and fail close is enabled, this triggers captive portal detection. If Netskope Client is detecting or detects a captive portal, it does not enforce fail close for the configured duration to enable captive portal detection to complete. If captive portal is not detected after the detection completes, it enforces fail close again. This supports Windows OS native captive portal detection and allows user to perform captive portal authentication.
Netskope Client performs captive portal detection on Windows and macOS platforms. Admin can enter a value between 1-10 (minutes) in the Captive Portal Detection Timeout input box.
-
Captive Portal With WebView2 Browser: With version 130.0.0, Netskope Client provides embedded mini-browser support for captive portal authentication in Windows.
When the Netskope Client detects a captive portal, it automatically displays a Captive Portal dialog box that uses a WebView2 mini browser. The dialog box closes automatically when the Netskope Client establishes its tunnel or if the current network no longer detects a captive portal.
Captive portal authentication might at times access the MAC address to track devices. When one user authenticates a device with valid credentials, it can grant network access to other users logging into the same device.
-
Fail Close transition from Client Configuration to Steering Configuration
The enhanced Fail Close setting, now managed in Steering Configuration, is currently limited to Windows devices in version 136.0.0. The Client Configuration web UI now displays a pop-up prompting administrators to manage Fail Close through Steering Configuration.

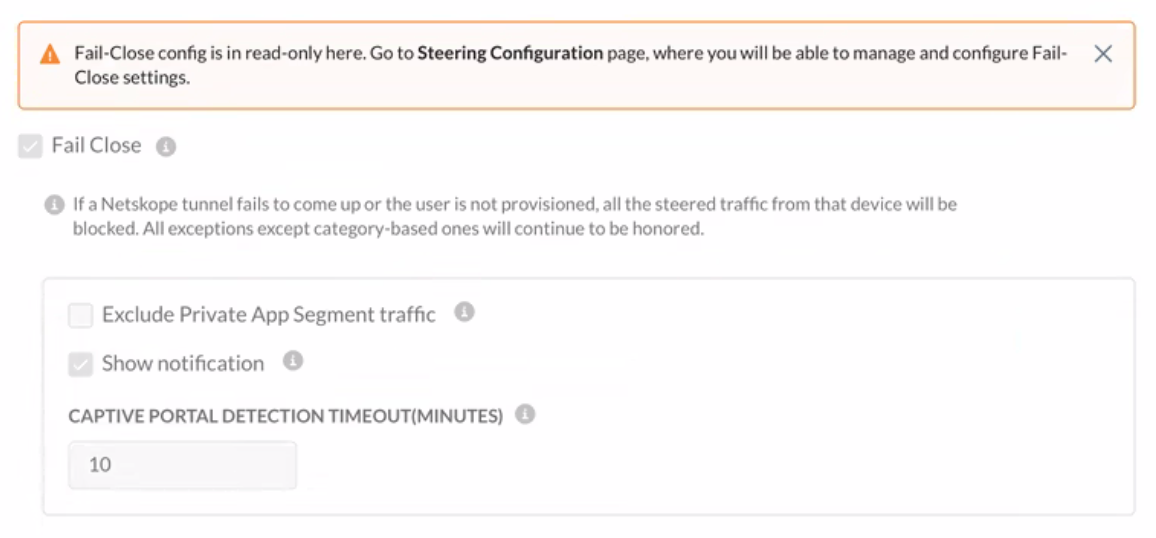
To enable Fail Close for iOS and macOS devices in this scenario, the administrator must first configure the Fail Close settings within Client Configuration. Following this, they should contact the Netskope Support team to enable the enhanced Fail Close setting in Steering Configuration.
With the new Fail Close setting in Steering Configuration, Netskope removed previous dependencies; enabling independent management of options such as password-protected uninstallation and service disabling, regardless of Fail-Close status.

Client Configuration Encryption
Client configuration files generated in the admin config and downloaded by the client can be encrypted via the encryptClientConfig feature flag. This flag is disabled by default. To enable encryption reach out to Netskope Support.
encryptbranding feature flag. This can be enabled via a support ticket. Also, files generated by the user device are not encrypted. This option is not available in the Netskope Tenant Admin console and can be enabled only via a support ticket.Log files sent for debugging are decrypted before creating a zip bundle of all the log file
Use this option to enable the scanning capability on the Netskope Client to automatically detect and inventory AI agents, locally running LLMs, local MCP servers, and AI browser/IDE extensions operating on Windows and macOS endpoints. The scanner runs periodically (at a configurable interval), uses signature-based matching to identify known AI assets, and reports all discovered assets to the Netskope Cloud.
-
Prerequisites: Netskope Client version 138 or above
-
Supported platforms: Windows (64-bit), macOS
To enable automatic scanning, perform the following:
-
Click the checkbox for Enable AI Discovery.
Once enabled, the Periodic Discovery field becomes active.
-
In the Periodic Discovery field, enter the time in minutes or hours for the scan frequency. Choose a frequency that balances visibility with endpoint resource consumption. A 60-minute interval is recommended for most deployments.
-
Click Save to apply the configuration.


Audit Logs for Client Configuration
Use Audit Logs to check logs for all intentional or accidental changes such as create, modify, or delete. Navigate to Settings > Administration > Audit Logs to view Audit Logs.
On the Audit Log page, click the View Details option and it displays Audit Log Details.

A few examples:
-
Suppose you edit a few details in Netskope Client Configuration, the Audit Log Details window displays:

-
When you create a new Netskope Client Configuration:

-
When you delete an existing Netskope Client Configuration:


