

The admin console sends email invitations to install the Netskope Client. The user can click the link in the email they received to download and install the Client (or the mobile profile) on their device.
Supported OS
Email enrollment is available for user enrollment of the Netskope Client installed in the following end-user environments:
- Windows
- macOS
- Linux
- Android
- iOS
– Reference: https://support.apple.com/en-us/HT209435
– To enroll in the iOS beta program and try this experience, view https://appleseed.apple.com/
Prerequisites
-
Import a user with a valid and accessible email into the tenant. To learn more, view Prerequisites to deploy Client through Email Invite.
-
Set up the user account on the tenant before sending out the email invite. To learn more, view Provisioning Users for Netskope Client.
-
Installation of client requires administrator rights on the end-user devices.
Advantages
-
The admin need not share any user authentication parameters for enrollment.
-
Send Email Invites for corporate and personal Email IDs.
-
Quick way to deploy for BYOD users.
Disadvantages
-
The user requires admin rights to install the Client software.
-
Misuse of the Email by forwarding it to the unintended recipients.
-
Download installation package name contains the org key and the activation key (not secure).
Netskope Client Deployment Using Email Invite
The following sections describe how to deploy Netskope Client using email invite in different operating systems:
Create Email Invite for New Users
Perform the following instructions in your (administrator account required) Netskope admin console to create the email invite:
-
Go to Settings > Security Cloud Platform > Netskope Client > Users.
-
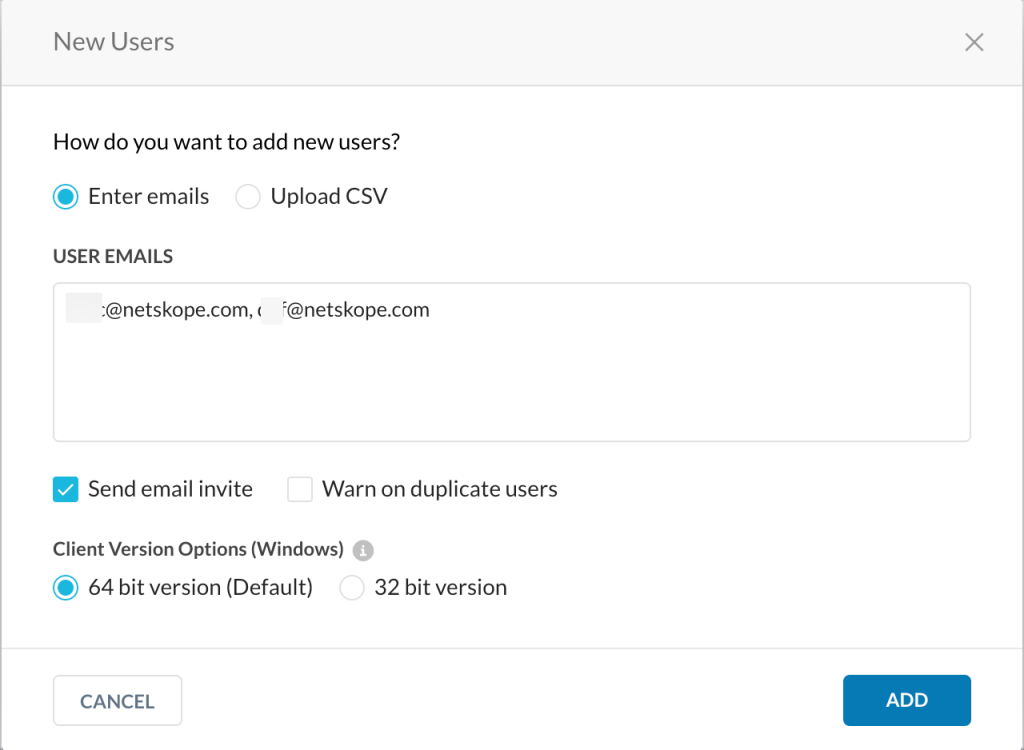
Click New Users.
-
Enter the following in the New Users pop-up window:
-
In User email address, enter comma separated email address if adding more than one user.
In addition, to add bulk users you can upload a CSV file with the email address of all users. The CSV file entries must have this format: email, lastname, firstname. Last name and First name are optional.
-
Select the Send email invite checkbox.
-
Select one of the following in Client Version Options (Windows):
-
64 bit
-
32 bit
-
-
-
Click Add.

Create Email Invite for Existing Users
Perform the following instructions in your (administrator account required) Netskope admin console to send email invite to an existing user:
-
Go to Settings > Security Cloud Platform > Netskope Client > Users.
-
Select the user (s) on the Users webUI.
-
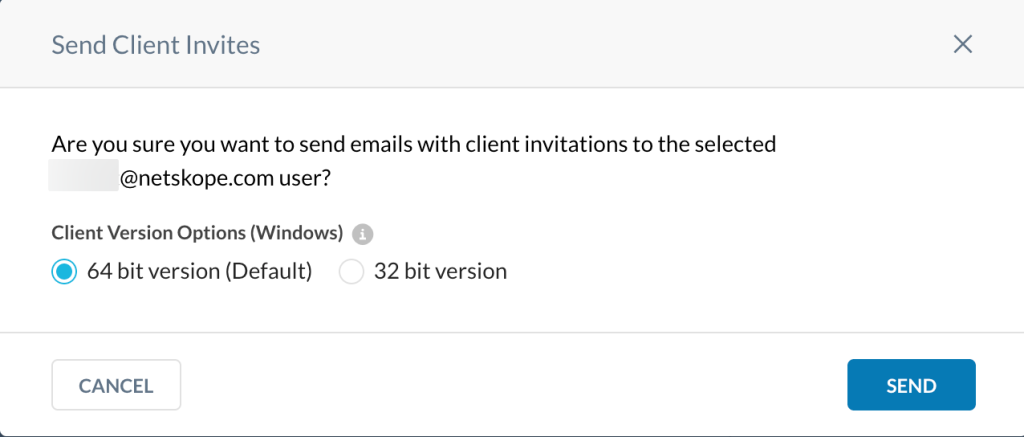
Click Send Invitation.
-
In Send Client Invites, if you are using Windows OS, select one of the following in Client Version options (Windows):
-
64 bit version
-
32 bit version
-
-
Click Send.
The webUI displays Invite Successfully Sent confirmation box.

Install Netskope Client Through Email Invite
You can install Netskope Client using an email invitation sent from the Netskope Admin console.
After you receive the email:
-
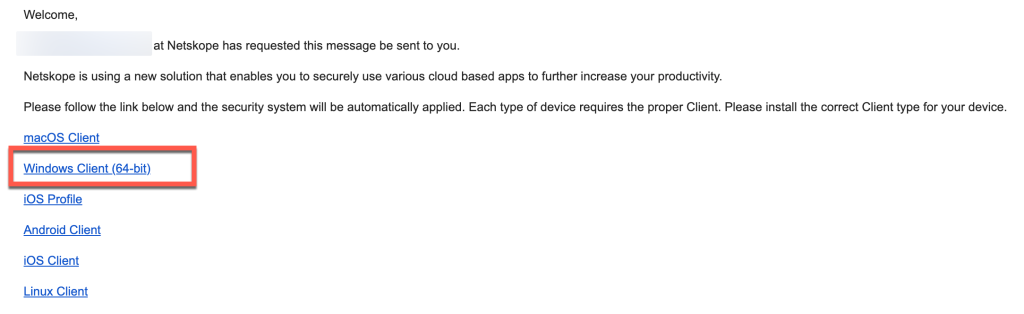
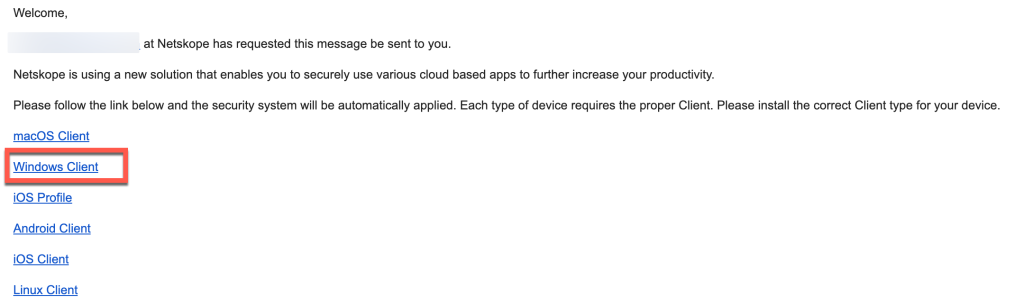
Check your email from Netskope Onboarding and click the link for Windows.
-
If you selected 64 bit Windows Client version in the Netskope tenant webUI, select Windows Client (64-bit) in the email. The email that you receive can contain a similar format as shown in the following screenshot.
-
If you selected 32 bit Windows Client version in the Netskope tenant webUI, select Windows Client in the email. The email that you receive can contain a similar format as shown in the following screenshot.
-
Click Download.
This downloads to your default location.
-
Click the installer file.
-
Follow the steps as displayed in the Install Netskope Client window.
-
Once the installation is complete, you can see the Netskope Client running on your taskbar.


All new installations that use the email invitation feature require the end user to approve the kernel extension. Users will see a message that guides them through the steps to grant approval.
Note
The system behavior presents the approval dialog in the Security > Privacy preferences pane for 30 minutes after the above alert is generated. No traffic is tunneled to Netskope unless this approval is granted if the client is installed manually via the email invitation method.
Before you do a fresh installation of Netskope Client on macOS, do the following:
- Install Netskope Client as an admin user (A non-admin cannot approve KEXT).
- When the system blocks KEXT during installation, users must approve the KEXT from System Preferences > Security > Privacy. In a few minutes, the Client will detect the approved KEXT.
Create Email Invite For New Users
Perform the following instructions in your (administrator account required) Netskope admin console to create the email invite:
-
Go to Settings > Security Cloud Platform > Netskope Client > Users.
-
Click New Users and enter the following in the New Users pop-up window:
-
User email address. Enter comma separated email address if adding more than one user.
In addition, to add bulk users you can upload a CSV file with the email address of all users. The CSV file entries must have this format: email, lastname, firstname. Last name and First name are optional. -
Select the Send email invite checkbox.
-
-
Click Add.
Create Email Invite For Existing Users
Perform the following instructions in your (administrator account required) Netskope admin console to send email invite to an existing user:
-
Go to Settings > Security Cloud Platform > Netskope Client > Users.
-
Select the user (s) on the Users webUI.
-
Click Send Invitation.
The webUI displays a Send Client Invite confirmation box.
-
Click Send.
Install Netskope Client Through Email Invite
You can install Netskope Client using an email invitation sent from the Netskope Admin console.
After you receive the email:
-
Check your email from Netskope Onboarding and click the link for Mac Client.

-
Click Download. This downloads to your default location.
-
Click the installer file.
-
Follow the steps as displayed in the Install Netskope Client window.
-
Once the installation is complete, you can see the Netskope Client running on your taskbar.

To learn more about the installation process for Netskope Client for Linux using Email ID, view Install and Enroll by Email ID.
Deployments through an email invite is a two step process:
- iOS Profile link: This installs tenant certificates on the device. They are necessary for SSL Decrypt related functionality. This profile contains only certificates.
- iOS Client link: Helps to find the Client in the App Store and enroll it after installation.
– If you are unable to see the link to download Netskope Client for iOS in the email invite, use the default email template that includes the link to download Netskope Client for iOS.
After you receive the email:
- Check your email from Netskope Onboarding and click iOS Profile to install the profile with certificates to your iOS device.

- Click Allow for the pop-up This website is trying to download a configuration profile. Do you want to allow this?

- Close the pop-up after the profile is downloaded.
- In your iOS device, go to Settings app > General and tap Profile Downloaded. The profile consists of the root and tenant certificates.

- Tap Install in the upper-right corner. Follow the installation instructions displayed on the screen.
- Go to Settings > General > About > Certificate Trust Settings.
- Tap to enable the option Enable Full Trust to Root Certificates.

- Click Continue to close the warning.
- Click the iOS Client link in the email invite.

- This opens a page with two links and perform the following steps:

- Click Install to download Netskope Client from Apple Store to iOS devices. Perform the following instructions:
- Click Allow to add VPN configurations.

- Wait for the Client enrollment.
- Click Allow to add VPN configurations.
- Click Download iOS configurations to complete the enrollment process.
- Follow the enrollment steps as displayed on your screen.
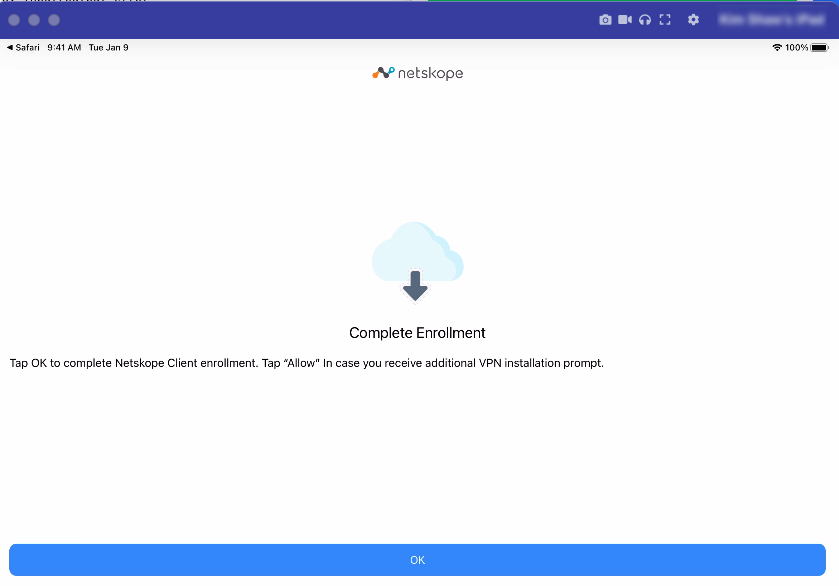
- Click Install to download Netskope Client from Apple Store to iOS devices. Perform the following instructions:
- After completing the enrollment steps, go to VPN & Device Management.
- Check whether VPN displays the Connected status to ensure the successful installation of the iOS configuration profile.

You can install Netskope Client using the email invitation sent from the admin console.
After you receive the email:
-
Check your email from Netskope Onboarding and click Android Client.

-
Follow the instructions on your screens to install Netskope Client from Google Play Store.
-
Click Install.
-
After you install, Click Open.
-
Click Allow for notifications.
-
The app opens after it completes downloading the configurations.

Support for Chromebook
To install Netskope client in Chromebook, use the following procedure to install the Netskope root CA cert in Chrome OS cert store.
Ensure that you have purchased additional Chromebook management licence for the Google admin account.
Cert pinned app domains are bypassed in Netskope Android AppEnroll Chromebook to Google Managed Account
- Power on the Chromebook and follow the on-screen instructions until you see the sign-in screen. Don’t sign in yet. If you see the enrollment screen instead of the sign-in screen, go to step 4.
- If you’re enrolling a Chromebook tablet, tap Email or phone. Then, tap the More option (three vertical dots).
- Switch to full layout to open the on-screen keyboard.
- Choose an option to get to the enrollment screen:
- Press Ctrl+Alt+E.
- Click More options > Enterprise enrollment
Note
This option is not available on Chromebook tablets.
- Enter the username and password from your Google admin welcome letter or for a Google Account that has the permissions to enroll. If prompted, enter the asset ID and location and click Next.
- When you get a confirmation message that the device is successfully enrolled, click Done.
Configure Google Admin Account
- Sign in to your Google admin account console.
- Click Device Management.
- On the left, click Network and click Certificates.
- [Optional] On the left, choose the organizational unit to add the certificate.
Note
The top-level organization is selected by default to give all users (including those in sub-organizations) access to any added certificates.
- Click Add Certificate. Choose the certificate file to upload and click Open.
- [Optional] If the certificate is used as a root CA for an SSL-inspecting web filter or to allow the browser to validate the full digital certificate chain of servers, check the Use this certificate as an HTTPS certificate authority box.
- Click Save and then Done to confirm.
Deploy the Certificate to Chrome Devices
Enroll the Chromebook to the organization’s Google account. Chrome devices will authenticate to Google and receive the SSL certificate. The pushed certificate applies to all enrolled Chrome devices.
The admin sends an invitation email to the Chromebook user and the user must click the Android app link to install the Android app in Chromebook.