

This document describes the available deployment methods and users enrollment options when users install Netskope Client on Windows devices.
Supported Operating Systems
Refer to Netskope Client Supported OS and Platform for more details on the supported Windows operating system (OS) versions.
Download Client Packages
You can download Netskope Client installers from Netskope Support Portal.
Netskope Client MSIEXEC Parameters
Use Windows Installer (msiexec) to deploy Netskope Client on Windows devices.
Refer to the following table to view the parameters available to the Windows Installer. You can customize these parameters and adjust based on the installation requirements.
| Parameter | Description |
|---|---|
/I <package name> | Not required for some MDM configurations. Required for command line installations through Windows Installer (msiexec). For more information, view Microsoft MSIEXEC. |
tenant=<tenant-name> | Required only for deployments using IDP user enrollment. Do not use it when enrolling a user using UPN. For example,
|
domain=[region.]<tenant-domain> | Required only for deployments using IDP user enrollment. Do not use it when enrolling a user using UPN. For example,
|
installmode=idp | Required only for deployment using IDP user enrollment. Do not use it when enrolling a user using UPN. |
host=addon-<tenant-name>.[region.]<tenant-domain> | Required only for deployments using UPN user enrollment. Do not use it when enrolling users using IDP. This is the addon hostname of your tenant. For example,
|
token=<Organization ID> | Required only for deployments using UPN user enrollment. Do not use it when enrolling users using IDP. To find your organization ID:
|
enrollauthtoken=<Authentication Token> | Required when enrolling users using UPN with Secure Enrollment Authentication Token that is enabled and enforced in the Netskope admin console. Required when using Private Access Prelogon (UPN and IdP enrollment) with Secure Enrollment Authentication Token that is enabled and enforced in the Netskope admin console. Requires elevated admin privileges to register a token on the endpoint device. |
enrollencryptiontoken=<Encryption Token> | Required when enrolling users using UPN or IdP with Secure Enrollment Encryption token enabled and enforced in the Netskope admin console. Requires elevated admin privileges to register a token on the endpoint device. |
mode=peruserconfig | (Optional Parameter) Use when installing on a multi-user system. With this parameter set, each user needs to enroll Netskope Client independently. Without this parameter set, the Netskope Client can enroll one time for all users. |
npavdimode=on | (Optional Parameter) Use when installing on a multi-user Windows desktop with concurrent users logged on at the same time, such as some Citrix VDI and Azure Virtual Desktop Environments. |
userconfiglocation=<path> | (Optional Parameter) Overrides the default path for storing the user configuration. It is recommended to not use this parameter unless users' home directories are hosted on external file servers or network shares. In addition, this parameter is recommended to be used only for multi-user systems (when mode=peruserconfig is included in the parameters). The default path: %AppData%\Netskope\STAgentNote: The custom path can be an absolute path, a network share, or a path utilizing environment variables. Environment variables need to be properly escaped depending on how the Windows installer (msiexec) command is run:
|
fail-close=disable|no-npa | (Optional Parameter) This setting overrides the Fail Close settings in the Client Configuration.
For more details, view Fail Close. |
prelogonuser=<prelogon username> @prelogon.netskope.com | (Optional Parameter) Use when deploying Private Access Prelogon. For more information, view Prelogon. |
autoupdate=on|off | (optional Parameter)
|
/l*v | (optional Parameter) Sets the Windows Installer (msiexec) installation log file path. For Example: /l*v %PUBLIC%nscinstall.log |
/qn | (optional Parameter) Use this option for silent installation. |
enforceenrollsteeringprofileid | (Optional Parameter) Copy and paste the Steering Profile ID from the Steering Configuration profile > Enforce Enrollment > Steering Profile ID. |
enforceenrollfrequency | (Optional Parameter) If the end-user closes the Netskope Client enrollment window, an enrollment reminder appears on the screen periodically. The frequency of the enrollment reminder is determined by this parameter. The unit is minutes and the allowed values are 1 - 1440 (24 hours). The default frequency is 5 minutes if this parameter is not set or if the value is outside the allowed range. |
INSTTAG | (Optional Parameter) Use when installing Client using Device Tags. These tags can be used as part of Steering configuration or Device Classification rules as a match parameters. Add Device Tags configured in the Device webUI. |
fipsmode = <value> | (Optional Parameter) Administrators can enable FIPS Mode at installation time or upgrade by appending the fipsmode parameter directly to the MSI installer command. This writes the FipsMode value to the Windows Registry automatically during installation. The values for fipsmode can be: 0 = FIPS Disabled, 1 = Strict FIPS Mode, 2 = Permissive FIPS Mode |
Netskope Client Deployment Commands – Examples
The parameters used depend on the deployment mode, user enrollment method, features required, and environment. Use the table in the previous section and the following examples for more information.
– Some MDM deployments (for example, Microsoft Intune) only require the parameters and do not require the leading
msiexec /I NSClient.msi part in the following examples. Refer to Netskope Client deployment section for more details.– The Windows installer (msiexec)
/j option is not supported for Netskope Client installation.To learn more, view Deploy Netskope Client Using IDP.
| Deployment Option | Command |
|---|---|
| All MSIEXEC IDP Options | msiexec /I NSClient.msi tenant=<tenant-name> domain=[region.]<tenant-domain> installmode=idp [enrollauthtoken=<Authentication Token>] [enrollencryptiontoken=<Encryption Token>] [mode=peruserconfig [npavdimode=on] [userconfiglocation=<path>]] [fail-close=no-npa|disable] [prelogonuser=<prelogon username>@prelogon.netskope.com] [autoupdate=on|off] [enforceenrollsteeringprofileid=<steering profile ID>] [enforceenrollfrequency=<time in minutes>] [INSTTAG=Tag 1, Tag 2] [/l*v %PUBLIC%nscinstall.log] [/qn]Note: If you are using Enforce enrollment parameters: [enforceenrollsteeringprofileid] and [enforceenrollfrequency] , ensure to add the the following parameters:
|
| Single-User Mode Installation for IDP-based Enrollment System-level enrollment based on the first user to enroll Netskope Client using IDP | msiexec /I NSClient.msi tenant=<tenant-name> domain=[region.]<tenant-domain> enrollencryptiontoken=<Encryption Token> /qnExample 1: msiexec /I NSClient.msi tenant=corp domain=goskope.com installmode=IDP enrollencryptiontoken=XXX /qn Example 2: msiexec /I NSClient.msi tenant=corp domain=eu.goskope.com installmode=IDP enrollencryptiontoken=XXX /qn |
| Multi-User Mode Installation for IDP-based Enrollment Per-user enrollment; each user must enroll in the Netskope Client using IDP | msiexec /I NSClient.msi tenant=<tenant-name> domain=[region.]<tenant-domain> enrollencryptiontoken=<Encryption Token> mode=peruserconfig /qnExample 1: msiexec /I NSClient.msi tenant=corp domain=goskope.com installmode=IDP mode=peruserconfig enrollencryptiontoken=XXX /qn Example 2: msiexec /I NSClient.msi tenant=corp domain=eu.goskope.com installmode=IDP mode=peruserconfig enrollencryptiontoken=XXX /qn |
| Deployment Option | Command |
|---|---|
| All MSIEXEC UPN Options | msiexec /I NSClient.msi host=addon-<tenant-name>.[region.]<tenant-domain> token=<Organization ID> [enrollauthtoken=<Authentication Token>] [enrollencryptiontoken=<Encryption Token>] [mode=peruserconfig [npavdimode=on] [userconfiglocation=<path>]] [fail-close=no-npa|disable] [prelogonuser=<prelogon username>@prelogon.netskope.com] [INSTTAG=Tag 1, Tag 2] [autoupdate=on|off] [/l*v %PUBLIC%nscinstall.log] [/qn] |
| Single-User Mode Installation for Domain-joined Endpoints System-level enrollment; auto-enrolled one time based on the UPN of the first domain user to log in | msiexec /I NSClient.msi host=addon-<tenant-name>.[region.]<tenant-domain> token=<Organization ID> enrollauthtoken=<Authentication Token> enrollencryptiontoken=<Encryption Token> /qnExample 1: msiexec /I NSClient.msi host=addon-corp.goskope.com token=XXX enrollauthtoken=XXX enrollencryptiontoken=XXX /qnExample 2: msiexec /I NSClient.msi host=addon-corp.eu.goskope.com token=XXX enrollauthtoken=XXX enrollencryptiontoken=XXX /qn |
| Multi-User Mode Installation for Domain-joined Endpoints Per-user enrollment; each user auto-enrolled at login based on their UPN | msiexec /I NSClient.msi host=addon-<tenant-name>.[region.]<tenant-domain> token=<Organization ID> enrollauthtoken=<Authentication Token> enrollencryptiontoken=<Encryption Token> mode=peruserconfig /qnExample 1: msiexec /I NSClient.msi host=addon-corp.goskope.com token=XXX enrollauthtoken=XXX enrollencryptiontoken=XXX mode=peruserconfig /qnExample 2: msiexec /I NSClient.msi host=addon-corp.eu.goskope.com token=XXX enrollauthtoken=XXX enrollencryptiontoken=XXX mode=peruserconfig /qn |
To install and enable the Netskope Client for Netskope Private Access Prelogon connectivity, include the prelogonuser, enrollauthtoken, and enrollencryptiontoken parameters in the table referenced in the previous section.
Prelogon Usernames are configured in Client Configurations. The Prelogon Username set in the Windows installer (msiexec) parameters must match an existing Client Configuration.
msiexec /I NSClient.msi host=addon-<tenant-name>.[region.]<tenant-domain> token=<Organization ID> enrollauthtoken=<Authentication Token> enrollencryptiontoken=<Encryption Token> mode=peruserconfig prelogonuser=<prelogon user>@prelogon.netskope.com /qn
Example with Client Configuration configured with Prelogon User user1@prelogon.netskope.com:
msiexec /I NSClient.msi host=addon-corp.goskope.com token=XXX enrollauthtoken=XXX enrollencryptiontoken=XXX mode=peruserconfig prelogonuser=user1@prelogon.netskope.com /qn
To learn more, view Configure Client Prelogon Connectivity.
For MDM-specific deployments, view Netskope Client Deployment Options.
Netskope Client Support for 64-Bit Version
With version 131.0.0, Netskope upgraded its support from 32-bit to 64-bit mode for Windows OS. This enhancement allows Netskope Client to utilize the native 64-bit capabilities of the operating system; that may improve the traffic forwarding performance. Administrators can comply to their organization software policies by having 64-bit native agents running on their end-user devices.

After the feature is available for all tenants, you can upgrade to the latest version of Netskope Client for your 64-bit OS through auto-upgrade or using the existing the Netskope Client deployment options.
On a Windows machine, the Netskope Client detects if the OS is running in 64-bit or 32-bit mode and runs in 64-bit mode only if the OS supports; otherwise it fallback to the 32-bit mode.
While upgrading from 32 bit to 64 bit:
-
The 32 bit Netskope Client automatically upgrades to the 64 bit version during the subsequent upgrade cycle if the Auto-Upgrade option in Client Configuration is set to 64 bit.
-
Users can view the Client architecture (for example, x64) alongside the version number by navigating to Netskope Client UI > About.
Starting with version 133.0.0, the architecture field (e.g., x64) is displayed in the About Netskope Client screen alongside the version number only if the 64-bit installer is used to install or upgrade the Client.
Upgrade Rollback
In case of any MSI issues during the upgrade process to the 64-bit Netskope Client for Windows, the Netskope Client roll back and restores the original 32-bit Netskope Client for Windows. The upgrade service monitor can also restart the upgrade process on failure.
Uninstall Netskope Client In Windows
This section provides the instructions to uninstall Netskope Client from your Windows devices. You can uninstall using multiple methods as outlined in the following sections.
Manual Uninstallation
To uninstall Client from Settings in Windows:
- Go to Start > Settings > Apps > Apps & Features.
- Find and select the Netskope Client app.
- Click Uninstall.

- You are prompted to enter your administrative credentials at this point.

- Click OK.
- The Netskope Client is uninstalled from your machine.
You can check Apps & features under Apps to ensure that the Netskope Client is uninstalled from your device. To learn more about uninstalling applications used in other Windows features, view Uninstall Apps in Windows.
Using MSI file From PowerShell
To uninstall Client:
-
Open PowerShell as an administrator.
-
Enter the following command:
Start-Process msiexec.exe -ArgumentList "/x <PRODUCT_CODE> PASSWORD=<PASSWORD> /qn /norestart /l*v `"$env:PUBLIC\nscuninstall.log`"" -Wait -Verb RunAs
The PASSWORD parameter is optional unless Password Protection for Client uninstallation is configured under Tamperproof in Client Configuration.Execute the following command in PowerShell to find the product code:
Get-ItemProperty HKLM:\SOFTWARE\Microsoft\Windows\CurrentVersion\Uninstall\*,HKLM:\SOFTWARE\WOW6432Node\Microsoft\Windows\CurrentVersion\Uninstall\* -ErrorAction SilentlyContinue | Where-Object {$_.DisplayName -eq "Netskope Client"} | Select-Object -ExpandProperty PSChildName
Using GPO Scripts
You can uninstall through GPO using a batch script similar to installation. The uninstallation script is:
Get-WmiObject Win32_Product | Where-Object Name -eq "Netskope Client" | % { $_.Uninstall() }
Using Script in Microsoft Endpoint Configuration Manager
@echo off
REM ---------------------------------------------------------------
REM Improved Uninstall Netskope Client (Password Protected)
REM Uses PowerShell to read registry and extract MSI GUID
REM ---------------------------------------------------------------

setlocal

set "LOGFILE=%PUBLIC%\nscuninstall.log"
set "PASSWORD=<password>"

echo Searching for Netskope Client...

powershell -NoLogo -NoProfile -Command ^
    "$apps = Get-ItemProperty HKLM:\Software\Microsoft\Windows\CurrentVersion\Uninstall\*,HKLM:\Software\WOW6432Node\Microsoft\Windows\CurrentVersion\Uninstall\* | Where-Object { $_.DisplayName -eq 'Netskope Client' };" ^
    "if (-not $apps) { Write-Host 'Netskope Client not found.'; exit 1 };" ^
    "$success = $false;" ^
    "foreach ($app in $apps) {" ^
    "    Write-Host 'Found:' $($app.DisplayName);" ^
    "    if ($app.UninstallString -and $app.UninstallString -match '\{[A-F0-9\-]+\}') {" ^
    "        $guid = $matches[0];" ^
    "        Write-Host \"Uninstalling $($app.DisplayName) with GUID: $guid\";" ^
    "        try {" ^
    "            Start-Process msiexec.exe -ArgumentList \"/x $guid PASSWORD=`\"%PASSWORD%`\" /qn /l*v `\"%LOGFILE%`\"\" -Wait -PassThru | Out-Null;" ^
    "            Write-Host 'Uninstall completed for:' $($app.DisplayName);" ^
    "            $success = $true;" ^
    "        } catch {" ^
    "            Write-Error \"Failed to uninstall $($app.DisplayName): $_\";" ^
    "            exit 2;" ^
    "        }" ^
    "    } else {" ^
    "        Write-Host 'No MSI GUID found for:' $($app.DisplayName);" ^
    "    }" ^
    "};" ^
    "if (-not $success) { exit 2 } else { exit 0 }"

set "ec=%ERRORLEVEL%"

if %ec%==0 (
    echo Uninstallation completed successfully.
) else if %ec%==1 (
    echo Netskope Client not found.
) else (
    echo Uninstallation failed. Check the log file: %LOGFILE%.
)

endlocal
exit /b
– This script works only in Admin mode.
Multilingual Support For Windows
Netskope supports the following languages for Netskope Client:
-
French
-
German
This helps non-english speaking users understand Netskope Client menu and notifications. To display end-user Netskope Client notifications in French and German, modify your language and region settings in the Windows devices. To learn more about how to change your language and region settings in your Windows devices, view Manage display language settings in Windows.
English Language Support For Netskope Client UI
With version 130.0.0, Netskope allows displaying the Netskope Client UI options for Windows in a language selected in the Windows display language setting. To configure:
-
In Windows 11, go to Settings > Time & Language > Language & region and select the desired language in Windows display language.
-
In Windows 10, go to Settings > Time & Language > Language and select the desired language in Windows display language.
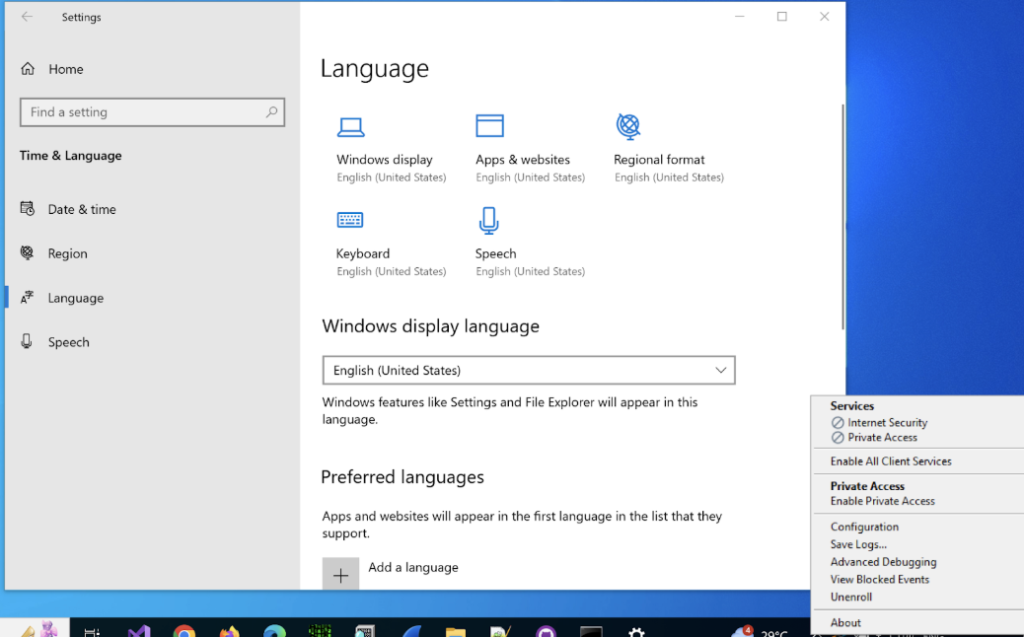

This option is more suitable for instances where the Netskope Client UI is displayed in one language while the Regional Format setting for the device is in another language.
Windows Support For WSLv2
Netskope Client supports Windows Subsystem for Linux (WSL) version 2 that allows you to run Linux on your Windows devices without the need of a separate virtual machine. This enables a seamless and simultaneous usage of Windows and Linux operating systems. You can deploy Netskope Client for Linux onto a Linux distribution to extend Netskope services to WSLv2 Linux environment.
– Windows support for WSLv2 is now available for Netskope Private Access.
– Periodic reauthentication is not supported with the CLI version of the Linux Client on WSLv2.
To learn more, view Install Linux on Windows Using WSL.
Supported Versions
-
Windows OS: Windows 10 and later versions.
-
WSLv2 and Minor Version 0.67.6 or above.
-
Netskope Client: Version 113.0.0 or later.
- Set the systemd flag in your WSL distro settings. If systemd is disabled, turn on the flag and reboot the distro.Check the WSL version and Netskope Client does not support WSLv1.
Limitations
-
WSL Linux distribution contains no login name as it does not support UI desktop by default. This info only appears as an install log message and not used by Netskope Client features. Hence it does not impact any functionalities.
-
The device manufacture information is not available in WSL Linux distributions as the standard file “/sys/devices/virtual/dmi/id/sys_vendor” does not exist. Device Manufacture information is for display only and does not impact any functionalities of the product.
-
If the Netskope Client for Linux is installed before the installation of browser applications such as Firefox and Chrome, a reboot of the WSL distro is required.
Netskope Client Auto-Restart
To address situations where users forget to re-enable the Netskope Client after disabling it, Netskope introduced a feature flag called AutoStart NSClient with Reboot/Relogin. After the administrator enables the feature flag, Netskope Client re-enables automatically the next time the user restarts their system or logs out and logs in again.
– This feature is available only for Windows and macOS devices.
– Administrators cannot use this feature flag alongside NPA services.
– This feature does not apply when the user puts the device in sleep mode.
Netskope Client Auto-Upgrade Failures and Rollback
In certain situations, the Netskope Client can encounter issues during the auto-upgrade process that require halting the upgrade and reverting to the previous version.
In the event of an upgrade or uninstallation failures, the Netskope Client rolls back to the previous version of the Client thereby preventing disruption on the end-user device.
To view the events related to Client upgrades or upgrade failures, navigate to Settings > Security Cloud Platform > Netskope Client > Devices to view the events displayed during the Client upgrade failure. Click the device name to view the related events and the corresponding details. The following table lists the different events displayed in the event of a Client upgrade or uninstallation:
| Event | Event Details |
|---|---|
| Installed | Installed client version ‘x’ |
| Uninstalled | Uninstalled client version ‘x’ |
| Installation Failure | Failed to install client version ‘x’ – < reason for failure> |
| Uninstallation Failure | Failed to uninstall client version ‘x’ – < reason for failure > |
| Upgraded | Upgraded from client version ‘x’ to ‘y’ |
| Upgrade Failure | Failed to upgrade from ‘x’ to ‘y’ – < Reason for failure > |
| Rollback Success | Rolled back to client version ‘x’ |
| Rollback Failure | Failed to rollback to client version ‘x’ |
Rollback Success, Upgrade Failure, Installed
 |
Rollback Failure
 |
Uninstalled, Uninstallation Failure
 |
Upgraded
 |
Client Upgrade Failure During System Restart/ Shutdown/ Hard Reboot/ Power Failure
There are occurrences where the auto-upgrade processes gets impacted due to unplanned events such as:
- System restart
- Shutdown
- Crash
- Hard reboot
- Power failure
 |
To reduce issues during the upgrade process, Netskope creates an installation monitor service stAgentSvcMon.exe that is a copy of the existing Netskope Client Services, with limited functionality. The installation monitor service relaunches the Client installation process on the end-user device whenever the auto-upgrade process is interrupted by system restart, crash, shutdown, hard-reboot, or power failure. Once the auto-upgrade process is completed, this monitor service is removed from the endpoint.
However, there are a few scenarios that stops the monitor service from relaunching the Client installation process. Refer to the following table to learn more:
| Scenario | Client Behavior |
|---|---|
| Consecutive system restarts during the auto-upgrade process | The monitor service stops the auto-upgrade process after two attempts. |
| The monitor service stops | In case of improper upgrade, Installation monitor service reattempts to upgrade twice before ending the process. |
| The auto-upgrade process fails and an unplanned event like system restart or crash happens during rollback phase | The monitor service attempts to reinstall the new build. |
| Antivirus configurations block the monitor services | The copy of the Client services is not launched. |
| Unplanned Windows Installer (msiexec) behavior during upgrades | Sometimes, Windows Installer (msiexec) may restart the system during this process. |
Private Access Tunnel Status Update in Windows Registry
Private Access service on Netskope Windows Client updates the status of the tunnel in the following registry location:
HKEY_LOCAL_MACHINE\SOFTWARE\NetSkope\NpaTunnel/NpaStatus
Status Descriptions
Tunnel Status Registry Value
Enabled Connected
Disabled Disconnected
In addition, the timestamp at which this status change was made is updated in the following registry location: HKEY_LOCAL_MACHINE\SOFTWARE\NetSkope\NpaTunnel/NpaStatusLastChanged.