

Overview
This guide provides instructions to onboard your AWS infrastructure to Netskope DSPM (also known as Netskope One DSPM) using AWS CloudFormation. This automated method deploys the necessary IAM roles for DSPM to discover and scan your data stores.
This process has been updated to use more granular, feature-based IAM permissions. The CloudFormation templates are now provided in YAML format (replacing the previous JSON format) to improve readability and include inline comments explaining each permission’s purpose.
Template Permission Summary
The CloudFormation template is dynamically generated based on the capabilities you select in the Netskope UI. This section explains what permissions the template will automatically create in your AWS environment.
| Permission Type | Policies & Permissions | Purpose |
|---|---|---|
| Base Permissions (Always Included) | • IAMReadOnlyAccess (Managed Policy)• AWSOrganizationsReadOnlyAccess (Managed Policy, Org only)• Trust Policy for Netskope & EC2 | Provides basic read-only access and allows Netskope to assume the role. |
| Optional Permissions (Based on Capabilities) | • If "Ingest Tags" is enabled: - tag:GetResources (Custom Permission)• If "Auto-Discover New Data Stores" is enabled: - 5 Managed Policies (S3, Redshift, RDS, EC2, DynamoDB ReadOnly) - 3 Custom Policies (EFS, Redshift Credentials, Athena/Glue) • If "Scan EBS/EFS and Auto-Discover Unmanaged Data Stores" is enabled: - 7 custom EC2 policies for creating and deleting temporary scan environments. • If "Authorize Data Store Snapshots Access" is enabled: - All permissions from "Unmanaged Data Stores" - 8 Custom RDS & KMS Policies for scanning snapshots. • If Enable AWS Inventory is enabled: - s3:PutInventoryConfiguration (Custom Permission). Required when Enable AWS Inventory is toggled on. Allows DSPM to configure S3 Inventory on customer buckets to store metadata in a dedicated inventory bucket. The inventory bucket is server-side encrypted using AWS S3 Managed Keys (SSE-S3). | Adds specific permissions for each feature you select in the UI. |
Instructions for Infrastructure Connection
Follow the steps below to onboard your AWS infrastructure into the Netskope DSPM application. Depending on your setup, choose either the Individual AWS Account or AWS Organization section to proceed.
This workflow starts in Netskope DSPM, continues with actions in the AWS Console, and ends back in DSPM to complete the setup.
-
In the Netskope DSPM Console:
-
Go to Administration > Infrastructure Connections.
-
Click Add Infrastructure > Select AWS > Add Account.
-
Select Capabilities tab > Adjust the toggles based on your discovery and classification needs:
Toggle Description Details Auto-Discover New Accounts Lets DSPM automatically detect new accounts as they are created. Auto-Discover New Data Stores Lets DSPM automatically detect new data stores as they are created. Scan EBS/EFS and Auto-Discover Unmanaged Data Stores Finds data stores on disk volumes.
This is off by default due to potential performance impact on large environments.Ingest Tags Pulls AWS tags from each connected data store for filtering and policy use. Authorize Data Store Snapshots Access Adds required IAM permissions to the CloudFormation or Terraform templates for snapshot-based onboarding. These templates are created in the next step. Enable AWS Inventory Toggle this option to allow DSPM to use the native AWS S3 Inventory feature for S3 data stores. When enabled, DSPM stores bucket metadata in a dedicated inventory bucket instead of making individual API calls to fetch file metadata. This significantly reduces API costs for large buckets.
Note: This toggle is disabled by default because it requires additional AWS permissions. When enabled at the infrastructure level, the Use S3 Inventory option becomes available when connecting individual S3 data stores. For more details, see Connect AWS S3 to DSPM. -
Select CloudFormation > Fill in the following values > Click Next.
Field Value Account Name Any name to help you identify the connection in Netskope DSPM. Account ID Get this from your AWS Organizations console.

Netskope Service Account Role Defaults to Netskope_Role. This name must be unique per onboarded organization. -
Click Launch Template
This will open the AWS Console in a new browser tab.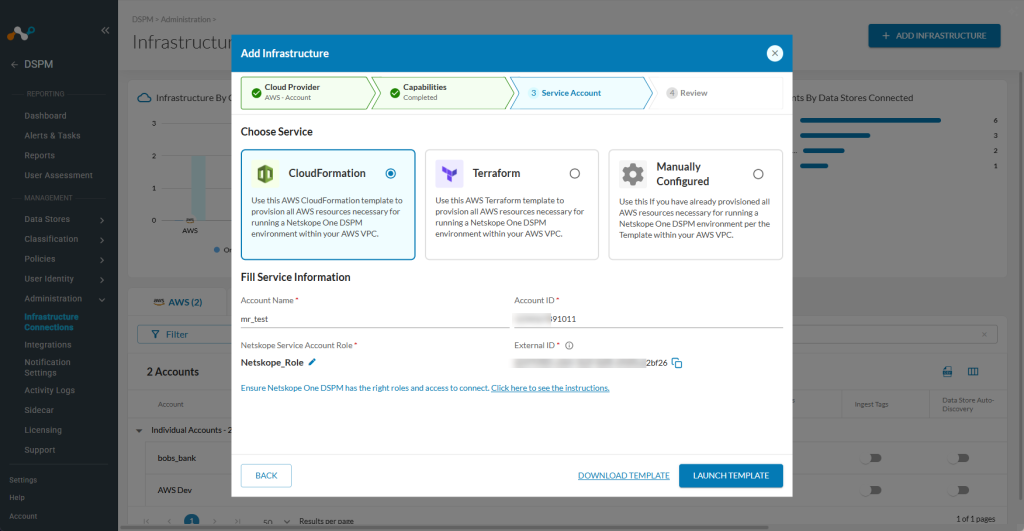
-
Don’t close this window and leave it on the Add Infrastructure modal to return to it later.
-
-
In the AWS Console:
-
The CloudFormation Create stack wizard will open. The template URL and parameters (like
DaseraRoleNameandExternalID) are pre-populated. -
Review the parameters > Click Next.
-
On the Configure stack options page, click Next.
-
On the Review page, scroll to the bottom and check the box: “I acknowledge that AWS CloudFormation might create IAM resources.“
-
Click Create stack
-
Wait for the stack status to change to
CREATE_COMPLETE.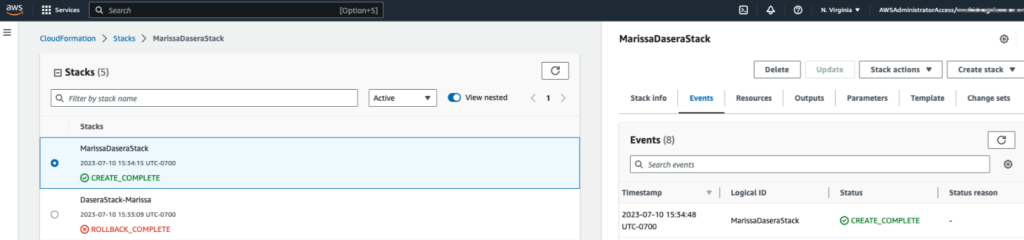
-
-
In the Netskope Console:
-
Return to the Netskope DSPM browser tab you left open.
-
Click Save.
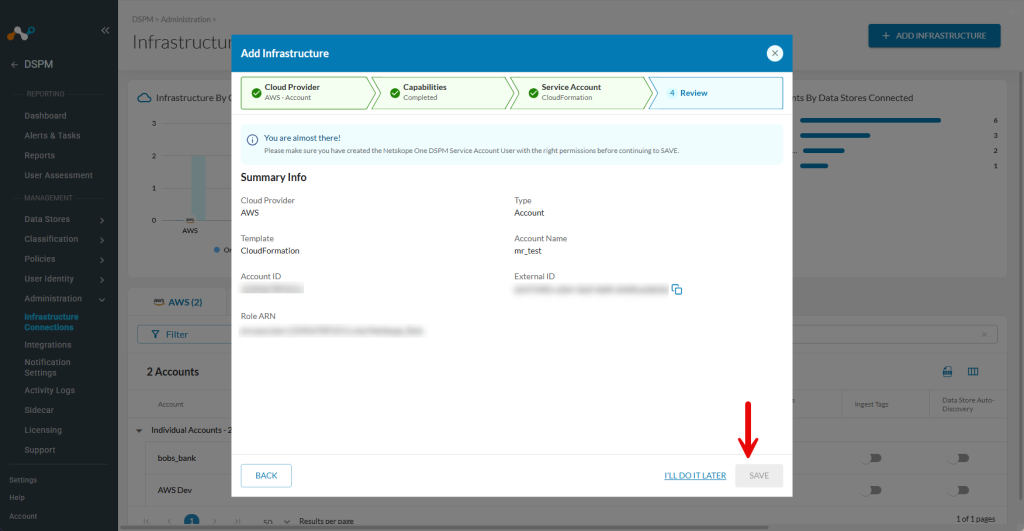 If your Netskope DSPM session expires while you are working in the AWS console, you can easily recover. Once your CloudFormation stack is
CREATE_COMPLETE.
1. Log back into Netskope DSPM > Start a new Add Infrastructure workflow > Select Manually Configured > Enter de Account Name > Click Next.
2. In your AWS Console, find and copy the Role ARN of the role your CloudFormation stack you just created.
3. Paste this Role ARN into the Summary Info from Netskope DSPM > Click Save.
-
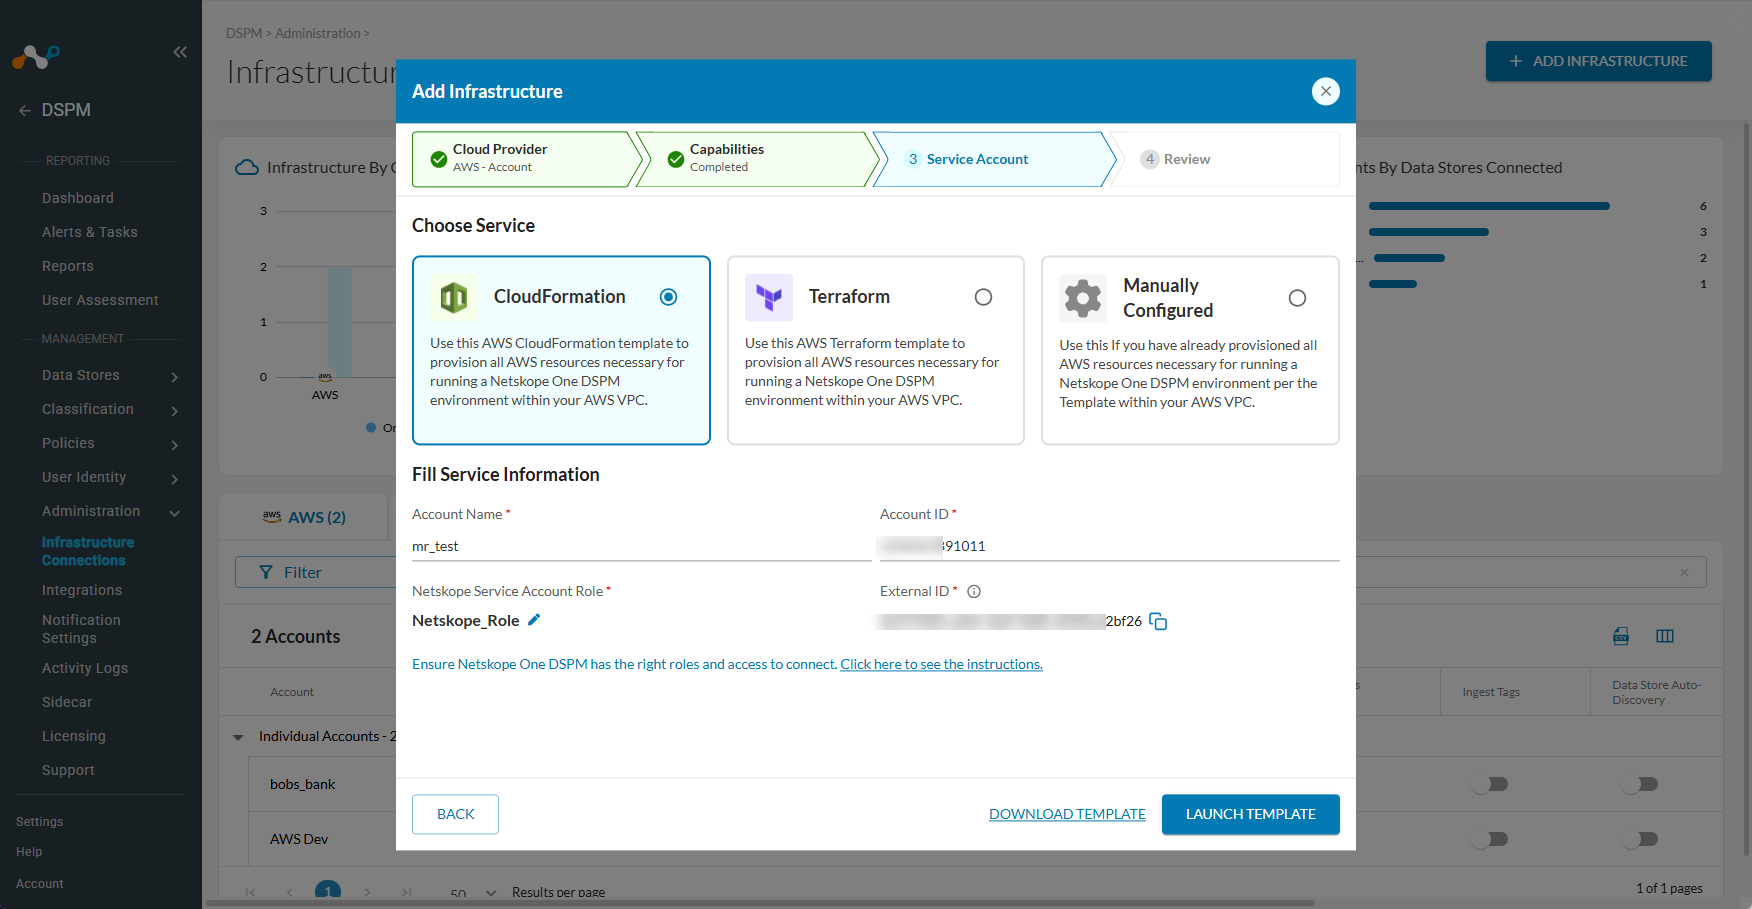

Your AWS account infrastructure is now connected, and Netskope DSPM can start discovering accounts and data stores for analysis. Every account that is part of an onboarded organization will appear under that organization in the UI.
Follow this workflow to onboard an entire AWS Organization or specific Organizational Units (OUs).
-
In the Netskope DSPM Console:
-
Go to Administration > Infrastructure Connections.
-
Click Add Infrastructure > Select AWS > Add Account.
-
Select Capabilities tab > Adjust the toggles based on your discovery and classification needs:
Toggle Description Details Auto-Discover New Accounts Lets DSPM automatically detect new accounts as they are created. Auto-Discover New Data Stores Lets DSPM automatically detect new data stores as they are created. Scan EBS/EFS and Auto-Discover Unmanaged Data Stores Finds data stores on disk volumes.
This is off by default due to potential performance impact on large environments.Ingest Tags Pulls AWS tags from each connected data store for filtering and policy use. Authorize Data Store Snapshots Access Adds required IAM permissions to the CloudFormation or Terraform templates for snapshot-based onboarding. These templates are created in the next step. Enable AWS Inventory Toggle this option to allow DSPM to use the native AWS S3 Inventory feature for S3 data stores. When enabled, DSPM stores bucket metadata in a dedicated inventory bucket instead of making individual API calls to fetch file metadata. This significantly reduces API costs for large buckets.
Note: This toggle is disabled by default because it requires additional AWS permissions. When enabled at the infrastructure level, the Use S3 Inventory option becomes available when connecting individual S3 data stores. For more details, see Connect AWS S3 to DSPM. -
Select CloudFormation > Fill in the following values > Click Next.
Field Value Organization Name Any name to help you identify the connection in Netskope DSPM. Organization ID Get this from your AWS Organizations console. You can onboard at the root or OU level to include all linked accounts.
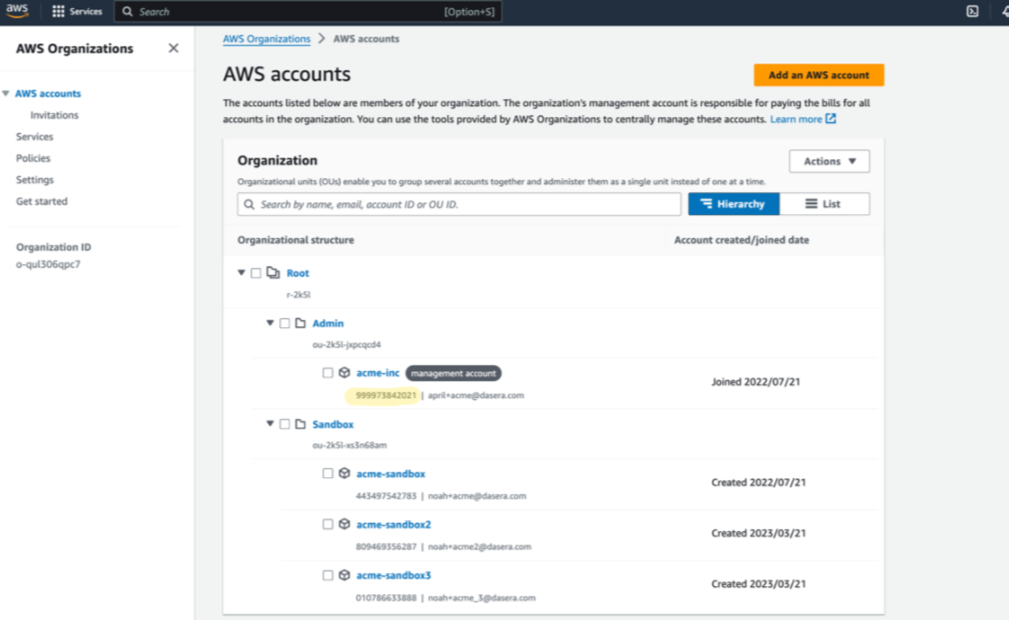
Netskope One DSPM Service Account Role Defaults to Netskope_Role. This name must be unique per onboarded organization. -
Click Download Template
- This downloads the YAML file (e.g.,
CloudFormationTemplateOrg.yaml) to your local machine.
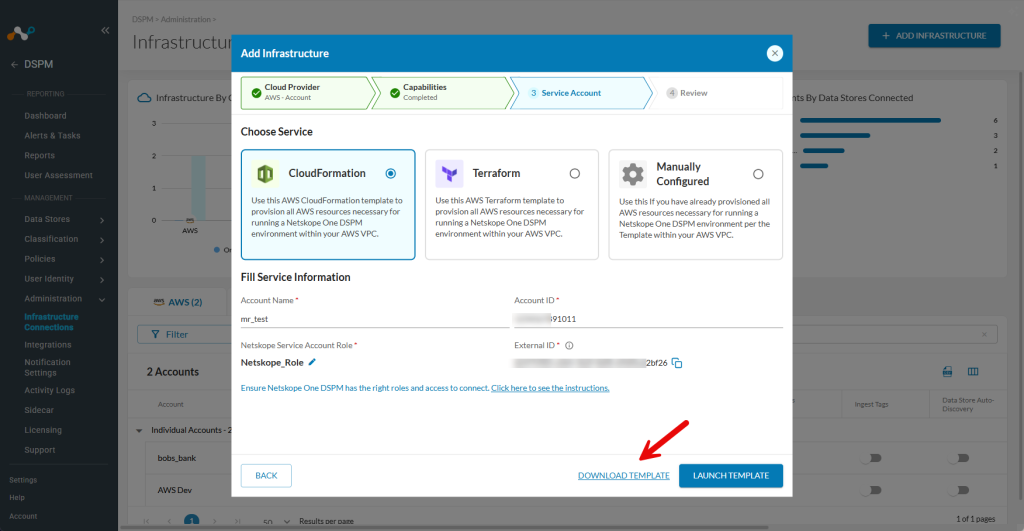
- This downloads the YAML file (e.g.,
-
Don’t close this window and leave it on the Add Infrastructure modal to return to it later.
-
-
In the AWS Console:
-
Log in to the AWS Management Account for your organization.
-
Go to the CloudFormation service > Select StackSets dashboard > Click Create stackset.
-
In the Choose a template step, under Permissions > Choose Service-managed permissions.
-
Under Prerequisite – Prepare template > select Template is ready.
-
Under Specify template > Choose Upload a template file > Click Choose file.

-
Upload the YAML file you downloaded from Netskope DSPM here > Click Next.
-
In the Specify StackSet details step, enter a name (e.g.,
NetskopeDSPM-Org-Role) and a description for your StackSet > Click Next. -
In the Configure StackSet options step, click Next.
-
In the Set deployment options step, under Deployment targets, choose to deploy to your entire organization or to specific OUs.
-
Select at least one region (e.g.,
us-east-1) > Click NextIAM roles are global, but this step is required by AWS. -
In the Review step, review the settings, check the acknowledgment box, and click Submit.
-
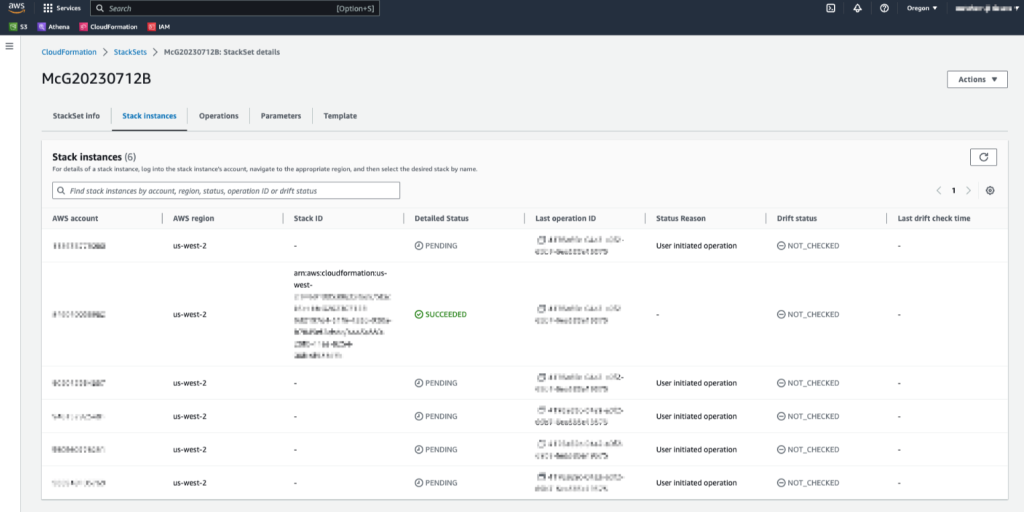
Wait for the StackSet Operations tab to show the deployment has succeeded.
You can monitor the StackSet in the Operations tab, then confirm completion in Stack Instances. This deploys the required DSPM IAM roles to all accounts in the organization.
-
-
Deploy the DSPM Role in the Management Account
StackSets do not create resources in the management account where the StackSet is deployed. You must deploy the DSPM role separately in the management account using a standard CloudFormation stack. Without this step, no DSPM role exists in the target account and onboarding cannot complete.-
In the AWS Management Account, go to CloudFormation > Click Create stack > With new resources (standard).
-
Under Specify template > Choose Upload a template file > Upload the same YAML file you used for the StackSet.
-
Click Next > Enter a stack name (e.g.,
NetskopeDSPM-MgmtAccount-Role) > Click Next. -
On the Configure stack options page, click Next.
-
On the Review page, check the acknowledgment box and click Create stack.
-
Wait for the stack status to change to
CREATE_COMPLETE.
-
-
In the Netskope Console:
-
Return to the Netskope DSPM browser tab you left open.
-
Click Save.
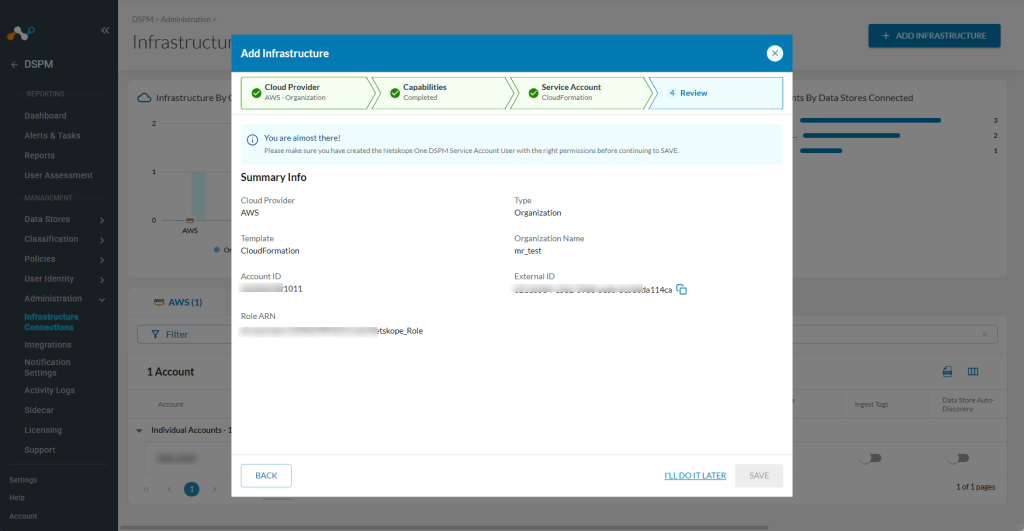 If your Netskope DSPM session expires while you are working in the AWS console, you can easily recover. Once your CloudFormation stack is
CREATE_COMPLETE.
1. Log back into Netskope DSPM > Start a new Add Infrastructure workflow > Select Manually Configured > Enter de Organization Name > Click Next.
2. In your AWS Console, find and copy the Role ARN of the role your CloudFormation stack you just created.
3. Paste this Role ARN into the Summary Info from Netskope DSPM > Click Save.Your AWS Organization infrastructure is now connected, and Netskope DSPM can start discovering accounts and data stores across your organization for analysis.
-


Troubleshooting
| Error | Cause | Fix |
|---|---|---|
| “Cannot ingest AWS tags due to missing permissions.” | The "Ingest Tags" capability was not selected during the initial onboarding. | Re-download the template from DSPM with "Ingest Tags" enabled and update your CloudFormation stack. |
| “Netskope encountered an error while scanning... Missing required AWS permissions: ec2:DeleteSnapshot” | The "Scan EBS/EFS and Auto-Discover Unmanaged Data Stores" capability was not selected. | Re-download the template with this feature enabled and update your CloudFormation stack. |
| “KMS decryption failed for RDS snapshot” | The "Authorize Data Store Snapshots Access" capability was not selected. | Re-download the template with this feature enabled and update your CloudFormation stack. |
Next Steps
Now that your AWS infrastructure is connected, if you enabled Auto-Discover New Data Stores, you can proceed to the Data Stores Inventory to view your discovered resources.