

Overview
Netskope DSPM (also known as Netskope One DSPM) lets you onboard, connect to, and scan individual GCP projects or those under a GCP Organization. These actions require programmatic access to the data stores, which you enable by configuring the right IAM roles and API permissions.
Depending on your setup, choose either the GCP Organization or Individual GCP Project section below to proceed. We recommend configuring permissions using a modular “Capability Blocks” approach, allowing you to grant only the access required for the specific data stores and features you intend to use.
You can also onboard GCP using Terraform with the same permission model. For more information, see Onboard GCP Infrastructure via Terraform.
GCP Organization
Use this section if you are onboarding a GCP organization. Netskope DSPM will then manage all current and future member projects under that organization, within the scope of the permissions you grant.
Step 1: Create the Netskope DSPM Service Account (Required)
-
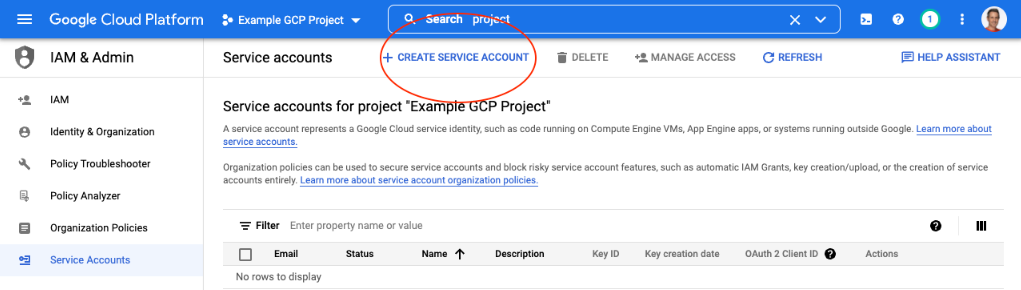
Go to IAM & Admin > Service Accounts.
-
Select the project where you want to create the service account (this can be any existing member project).
-
Click Create service account.
-
Under Service account details, enter:
Field Value Service account name Any value; it is recommended to include "Netskope DSPM" in the name to make it easier to identify Service account description Any value -
Click Create and continue.
- For now, do not assign any roles
-
Click Done.
Step 2: Create Custom IAM Roles (Organization-Scoped Capability Blocks)
Next, create custom IAM roles at the organization level to group the permissions Netskope DSPM needs by capability. You will assign these roles to the service account later.
1. DSPM Service Usage Role (Required)
This role allows Netskope DSPM to use GCP services and APIs across your organization.
In your GCP Console:
-
Go to IAM & Admin > Roles.
-
Click Create Role > Fill in the following Role details:
Field Value Title Netskope One DSPM Service Usage ID CustomRoleXXX, where XXX could be any numeric -
Click Add permissions, filter by Service Usage Admin, and select
serviceusage.services.enable.
-
Click Add, then Create.
Purpose: Enabling and using required GCP APIs for DSPM operations across the organization.
2. GCS Data Store Permissions
If you want Netskope DSPM to scan Cloud Storage (GCS) buckets across projects in your organization, extend the core role or create a separate storage role.
To extend the Netskope One DSPM Service Usage role:
-
Edit the custom role created above.
-
Filter by Storage Admin and add:
storage.buckets.get,storage.buckets.getIamPolicy,storage.buckets.list,storage.buckets.listEffectiveTags,storage.buckets.listTagBindings,storage.multipartUploads.list,storage.multipartUploads.listParts,storage.objects.get,storage.objects.list.
-
Click Save.
Purpose: Discovering buckets and reading objects for classification. Skip this if you do not plan to scan GCS.
3. BigQuery Connection Role
If you want Netskope DSPM to connect to and scan BigQuery data across your organization, create a custom BigQuery role at the organization level.
-
Go to IAM & Admin > Roles > Create role > Fill in the following Role details:
Field Value Title Netskope One DSPM BigQuery Connection User ID CustomRoleXXX, where XXX could be any numeric -
Click Add permissions, filter by BigQuery Connection User, and select all listed permissions.

-
Click Create.
-
Go to the BigQuery API page within this project and click Enable.

Purpose: Connecting to and scanning BigQuery tables and views. Skip this if you do not use BigQuery.
4. Other Data Store and Feature Roles
Depending on which data stores and features you plan to enable, you may also rely on the following predefined IAM roles at the organization level (no custom creation needed):
- Cloud Spanner:
Cloud Spanner Viewer,Cloud Spanner Database Reader - Data Catalog:
Data Catalog Viewer(Used when you enable Ingest Policy Tag Taxonomy). - Organization-level project discovery:
Organization Viewer(Used to view the organization hierarchy and discover member projects).
Step 3: Elevate the Service Account to Organization Principal and Assign Roles
Now elevate the Netskope DSPM service account to an organization-level principal and assign the appropriate roles based on the capability blocks you need.
In the GCP Console:
- Go to IAM & Admin > IAM.
- Choose your organization in the selector.
- Click Grant access (or Add principal).
- Enter the service account email you created in Step 1.
- Under Assign roles, add roles according to your needs:
| Capability Block | Purpose and Roles to Assign |
|---|---|
| Core Roles (Required) | Add roles that allow Netskope DSPM to use required services, publish notifications, and read logs. • Netskope One DSPM Service Usage (Custom role)• Pub/Sub Admin (or equivalent publisher role)• Logs Viewer |
| GCS roles (when scanning Cloud Storage) | If you configured GCS permissions in Step 2.2, ensure the service account receives: • The extended Netskope One DSPM Service Usage role with storage permissions, or• A dedicated storage custom role, if you created one. |
| BigQuery Roles (when scanning BigQuery) | If you are scanning BigQuery, assign: • Netskope One DSPM BigQuery Connection User (Custom role)• BigQuery Data Viewer• BigQuery Job User• BigQuery Metadata Viewer• BigQuery Read Session User• BigQuery Resource Viewer |
| Cloud Spanner Roles (when scanning Spanner) | • Cloud Spanner Viewer• Cloud Spanner Database Reader |
| Cloud SQL Roles (when scanning Cloud SQL) | • Cloud SQL Admin (Required for Snapshot Scans)• Cloud SQL Client• Cloud SQL Viewer |
| Data Catalog Role (when ingesting policy tags) | • Data Catalog Viewer |
| Organization‑level discovery (when discovering projects) | • Organization Viewer |
- Click Save.
Step 4: Generate the Service Account Key
Generate and download a JSON key for the Netskope DSPM service account to authenticate to your GCP organization.
- Go to IAM & Admin > Service Accounts.
- Select the project where the service account resides and click the service account you created.
- Open the Keys tab.
- Click Add key > Create new key.
- Select JSON as the key type and click Create to download the key.
Step 5: Create the Netskope DSPM Infrastructure Connection (Organization)
In the Netskope DSPM Console:
-
Go to Administration > Infrastructure Connections.
-
Click Add Infrastructure > Select GCP.
-
Fill in the required values (see the table for reference).
Field Value I want to onboard a GCP Organization Organization Name Any value (this is used to identify your Infrastructure Connection within the Netskope One DSPM UI). Organization ID Your GCP Organization ID, which can be found within the GCP Console under the IAM & Admin > Manage Resources screen. -
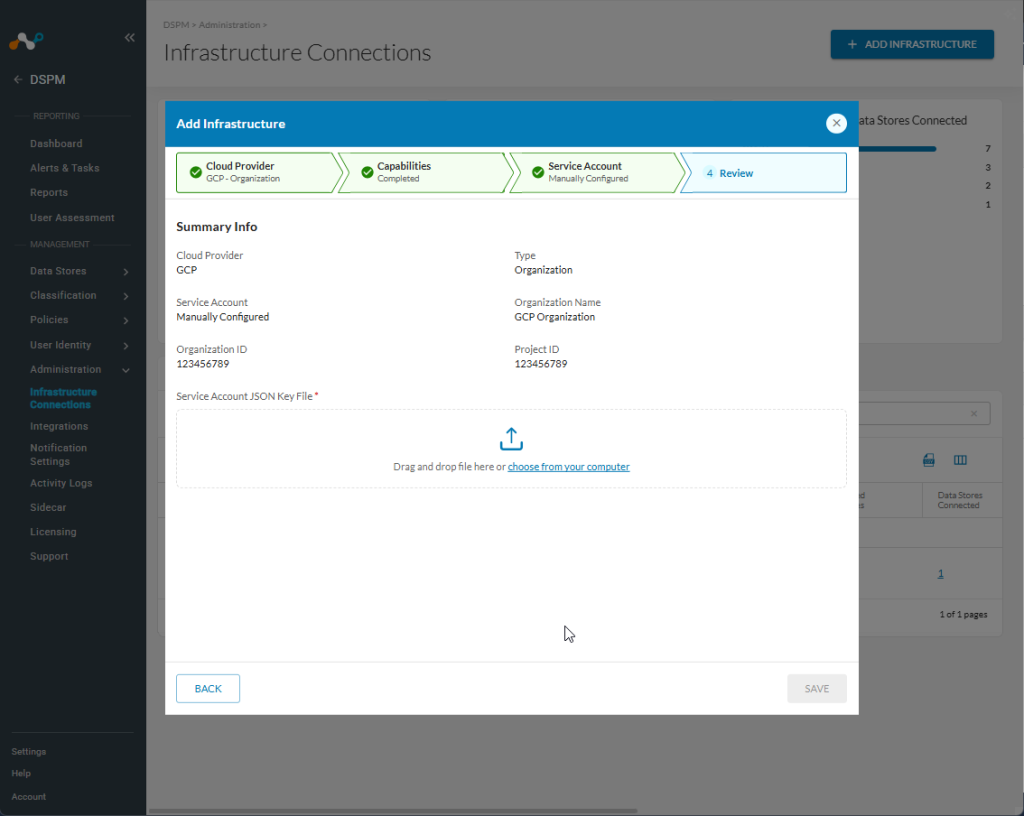
Upload the JSON key file you created earlier.
-
Choose your organization defaults. These apply to all member projects during onboarding, but you can change them later.
Setting Details When Enabled Auto-Discovery Netskope One DSPM will discover Data Stores within a GCP Project. To learn more, please visit our Data Store Inventory article. Ingest the Policy Tag Taxonomy Any GCP Policy Taxonomies associated with a GCP Project will be imported. To learn more, please visit our Data Tags article. -
Click Acknowledge.
We recommend deleting your local copy of the JSON key file to prevent unauthorized access.

Individual GCP Project
Use this section if you want to onboard one specific GCP project into Netskope DSPM instead of an entire organization. You must repeat these steps for each GCP project that you want to onboard individually.
Step 1: Create the Netskope DSPM Service Account (Required)
-
Go to IAM & Admin > Service Accounts.
-
Select the project where you want to create the service account (this can be any existing member project).
-
Click Create service account.
-
Under Service account details, enter:
Field Value Service account name Any value; it is recommended to include "Netskope DSPM" in the name to make it easier to identify Service account description Any value -
Click Create and continue.
- For now, do not assign any roles
-
Click Done.
Step 2: Create Custom IAM Roles (Organization-Scoped Capability Blocks)
Next, create custom IAM roles at the organization level to group the permissions Netskope DSPM needs by capability. You will assign these roles to the service account later.
1. DSPM Service Usage Role (Required)
In your GCP Console:
-
Go to IAM & Admin > Roles.
-
Click Create Role > Fill in the following Role details:
Field Value Title Netskope One DSPM Service Usage ID CustomRoleXXX, where XXX could be any numeric -
Click Add permissions, filter by Service Usage Admin, and select
serviceusage.services.enable. -
Click Add, then Create.
2. GCS Data Store Permissions
If scanning Cloud Storage, extend the core role or create a separate one.
-
Edit the custom role created above.
-
Filter by Storage Admin and add:
storage.buckets.get,storage.buckets.getIamPolicy,storage.buckets.list,storage.buckets.listEffectiveTags,storage.buckets.listTagBindings,storage.multipartUploads.list,storage.multipartUploads.listParts,storage.objects.get,storage.objects.list. -
Click Save.
3. BigQuery Connection Role
If you want Netskope DSPM to connect to and scan BigQuery data across your individual project, create a custom BigQuery role.
In your GCP Console:
-
Go to IAM & Admin > Roles > Create role > Fill in the following Role details:
Field Value Title Netskope One DSPM BigQuery Connection User ID CustomRoleXXX, where XXX could be any numeric -
Click Add permissions, filter by BigQuery Connection User, and select all listed permissions.
-
Click Create.
-
Go to the BigQuery API page within this project and click Enable.
4. Other Data Store and Feature Roles
You can rely on predefined IAM roles for other features (Spanner, Cloud SQL, Data Catalog) during the assignment step. No custom role creation is required for them.
Step 3: Assign IAM Roles to the Service Account (Project Scope)
- Go to IAM & Admin > IAM.
- Confirm you are in the project you want to onboard.
- Click Grant access.
- Enter the service account email you created in Step 1.
- Add the roles based on the capabilities you need:
| Capability Block | Purpose and Roles to Assign |
|---|---|
| Core Roles (Required) | Add roles that allow Netskope DSPM to use required services, publish notifications, and read logs. • Netskope One DSPM Service Usage (Custom role)• Pub/Sub Admin (or equivalent publisher role)• Logs Viewer |
| GCS roles (when scanning Cloud Storage) | If you configured GCS permissions in Step 2.2, ensure the service account receives: • The extended Netskope One DSPM Service Usage role with storage permissions, or• A dedicated storage custom role, if you created one. |
| BigQuery Roles (when scanning BigQuery) | If you are scanning BigQuery, assign: • Netskope One DSPM BigQuery Connection User (Custom role)• BigQuery Data Viewer• BigQuery Job User• BigQuery Metadata Viewer• BigQuery Read Session User• BigQuery Resource Viewer |
| Cloud Spanner Roles (when scanning Spanner) | • Cloud Spanner Viewer• Cloud Spanner Database Reader |
| Cloud SQL Roles (when scanning Cloud SQL) | • Cloud SQL Admin (Required for Snapshot Scans)• Cloud SQL Client• Cloud SQL Viewer |
| Data Catalog Role (when ingesting policy tags) | • Data Catalog Viewer |
| Organization‑level discovery (when discovering projects) | • Organization Viewer |
- Click Save.
Step 4: Generate the Service Account Key
- Go to IAM & Admin > Service Accounts.
- Click your Netskope DSPM service account and open the Keys tab.
- Click Add key > Create new key, select JSON, and download it. Delete local copies after onboarding.
Step 5: Create the Netskope DSPM Infrastructure Connection (Project)
In the Netskope DSPM Console:
-
Go to Administration > Infrastructure Connections.
-
Click Add Infrastructure > Select GCP.
-
Fill in the required values (see the table for reference).
Field Value I want to onboard a GCP Organization Organization Name Any value (this is used to identify your Infrastructure Connection within the Netskope One DSPM UI). Organization ID Your GCP Organization ID, which can be found within the GCP Console under the IAM & Admin > Manage Resources screen. -
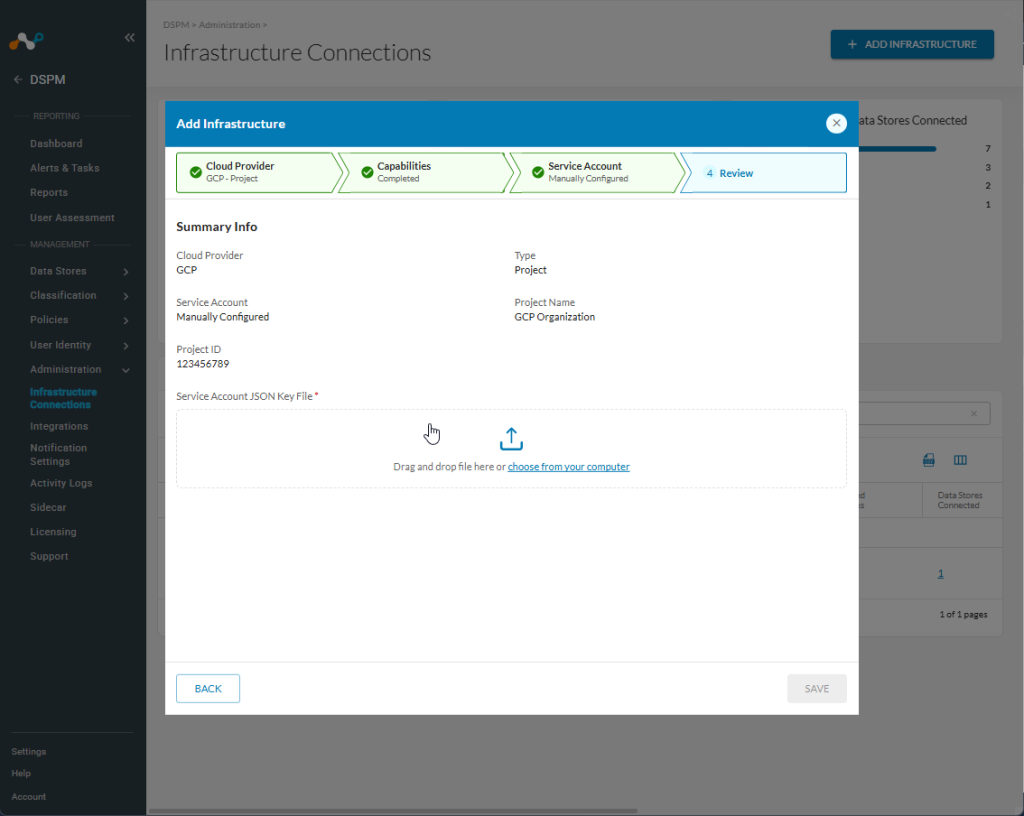
Upload the JSON key file you created earlier.
-
Choose your organization defaults. These apply to all member projects during onboarding, but you can change them later.
Setting Details When Enabled Auto-Discovery Netskope One DSPM will discover Data Stores within a GCP Project. To learn more, please visit our Data Store Inventory article. Ingest the Policy Tag Taxonomy Any GCP Policy Taxonomies associated with a GCP Project will be imported. To learn more, please visit our Data Tags article. -
Click Acknowledge.
We recommend deleting your local copy of the JSON key file to prevent unauthorized access.

Netskope DSPM will then verify the connection, onboard your project(s), and begin discovering data stores. On the GCP Infrastructure Connections screen, any project not part of an organization will appear with a blank Organization Name.