

Overview
Follow these steps to onboard both GCP Projects and GCP Organizations to Netskope DSPM as infrastructure connections via Terraform. These connections allow Netskope DSPM (also known as Netskope One DSPM) to:
- Discover data stores.
- Run scans and classification.
Prerequisites:
Before you begin, make sure you have the required tools installed and set up on your machine:
You can run the terraform --version and gcloud --version commands to verify that both tools are installed and accessible from your terminal
Template Permission Summary
The Terraform template you download from Netskope DSPM is dynamically generated based on the capabilities (toggles) you select in the UI. This section explains what permissions the template will automatically create in your GCP environment, giving you transparency similar to the AWS and Azure Terraform flows.
| Permission Type | Policies & Permissions | Purpose |
|---|---|---|
| Base Permissions (Always Included) | • roles/pubsub.publisher• roles/browser• NetskopeServiceUsageRole (serviceusage.services.use)• roles/logging.viewer | Provides basic read-only access and allows Netskope to assume the role. |
| Optional Permissions (Based on Capabilities) | If “Auto-Discover Unmanaged Data Stores” is enabled: • Two custom Compute Engine roles (36 permissions total) to create, attach, and clean up temporary scan VMs and disks. If “Ingest the Policy Tag Taxonomy” is enabled: • roles/datacatalog.viewer to read Data Catalog policy tags.If “Authorize Data Store Snapshots Access” is enabled: • NetskopeCloudSQLSnapshotRole to create, manage, and restore CloudSQL backups for snapshot-based scanning.If “Auto-Discover New Projects” (Org only) is enabled: • roles/resourcemanager.organizationViewer to list and monitor member projects under the organization. | Adds specific permissions for each feature you select in the UI. |
Instructions for Infrastructure Connection
Follow the steps below to onboard your GCP infrastructure into the Netskope DSPM application. Depending on your setup, choose either the Individual GCP Project or GCP Organization section to proceed.
Individual GCP Project
You will need to repeat these steps individually for every GCP project you want to onboard into Netskope DSPM.
This workflow:
- Starts in the Netskope DSPM Console.
- Continues with actions in the Terminal on your local machine.
- Ends back in Netskope DSPM to complete the setup.
In the Netskope DSPM Console:
-
Go to Administration > Infrastructure Connections.
-
Click GCP > Add Infrastructure > Add Project.
-
Select the Capabilities tab and adjust the toggles based on your discovery and classification needs for this project.
The choices you make here determine which capabilities the Terraform template is configured to support. The generated template is structured so you can easily see which parts of the script correspond to each capability and adjust it if your use case changes.
Toggle Description Details Auto-Discover New Projects Enables the auto-discovery and onboarding of newly discovered organization members, ensuring your accounts list remains accurate within DSPM.
Note: For individual project onboarding, this is typically disabled; it is most relevant for organization onboarding.Auto-Discover New Data Stores Enables the auto-discovery of newly created data stores so that DSPM is always aware of all possible data stores. Auto-Discover Unmanaged Data Stores Enables the auto-discovery of data stores on your disk volumes, to ensure that DSPM is aware of unmanaged data.
Note: Disabled by default because it can impact performance in environments with many disks.Ingest the Policy Tag Taxonomy Enables ingestion of GCP policy tags associated with each connected data store, for use in filters and downstream policy conditions. Authorize Data Store Snapshots Access Enables low-touch onboarding using snapshots, allowing DSPM to safely create and scan CloudSQL backups without requiring broad administrative roles. -
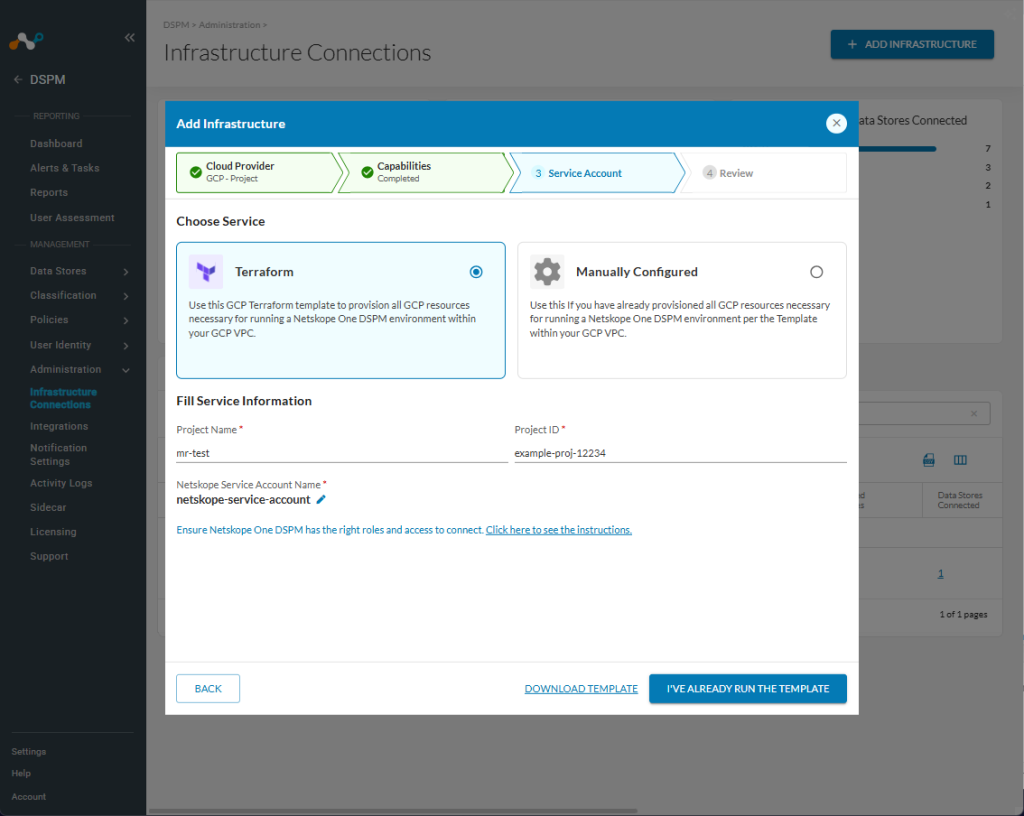
Click Next > Fill in the following values.
Field Value Organization Name Any value (this is used to identify your infrastructure connection within Netskope DSPM). Organization ID Obtain from your GCP Organizations console.

Netskope DSPM Service Account Name Will default to Netskope DSPM-service-account. Note that this value needs to be unique to each onboarded organization. -
Under Deployment method, select Terraform and click Download Template to download the Terraform ZIP file for this project.
-
Do not close this window. Leave it on the Add Infrastructure modal so you can return to it later.

In the Terminal on Your Local Machine:
- Go to the ZIP file path of the downloaded Terraform template. For example:
cd C:\Users\User\Downloads - Run the unzip command on the downloaded file. For example:
unzip file_name.zip- In the extracted
accountfolder, you will find the necessary Terraform files for this project.
- In the extracted
- Navigate into the
accountfolder and run the following command to initialize Terraform:terraform init- You will see “Initializing the backend”, followed by a success message.
- Run the following command to start the script:
terraform apply- Note: Terraform will show a warning if you are not logged in or your GCP credentials are not set correctly. Terraform will display a plan listing the resources that will be created in your account folder.
- When you see the output of resources to be created, type
yesto confirm.- After completion, you will see the
Apply complete! Resources: XX added, 0 changed, 0 destroyedmessage.
- After completion, you will see the
When the Terraform script runs successfully, a JSON service account key file is created in your account folder (for example, Netskope One DSPM-credentials.json).
In the Netskope DSPM Console
-
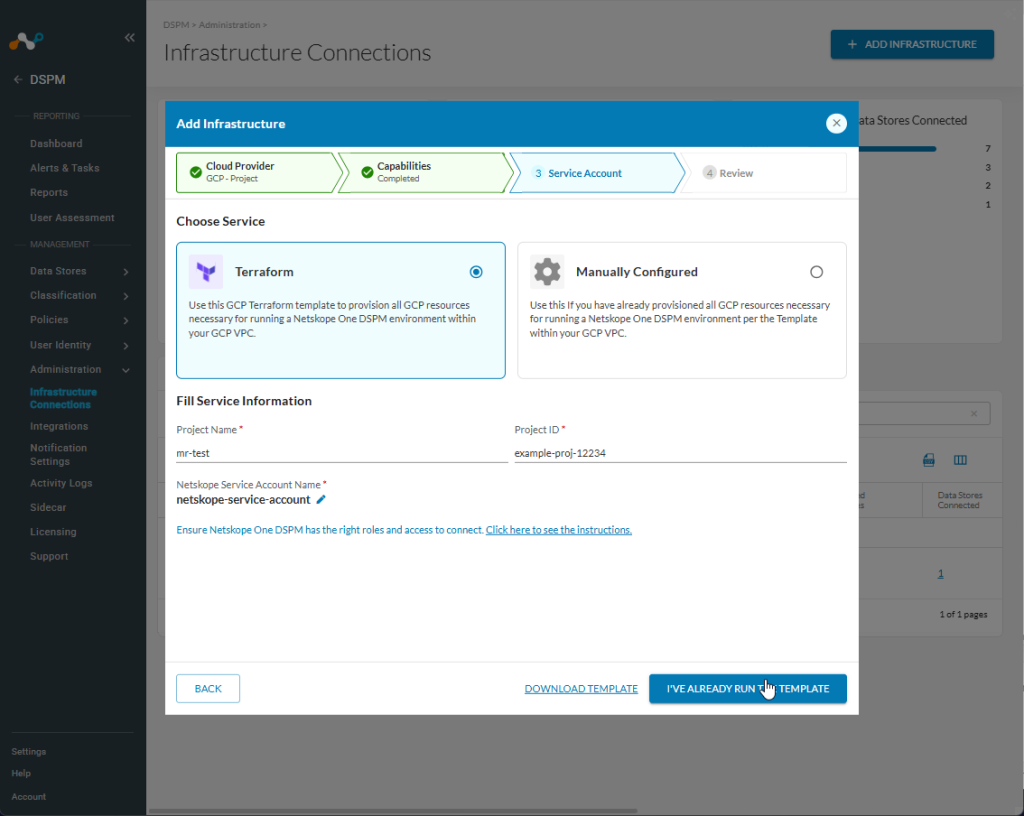
Go back to the Add Infrastructure modal and click I’ve already run the template.
-
Click Choose from your computer > Browse to the
accountfolder, and find theNetskope One DSPM-credentials.jsonfile created by Terraform.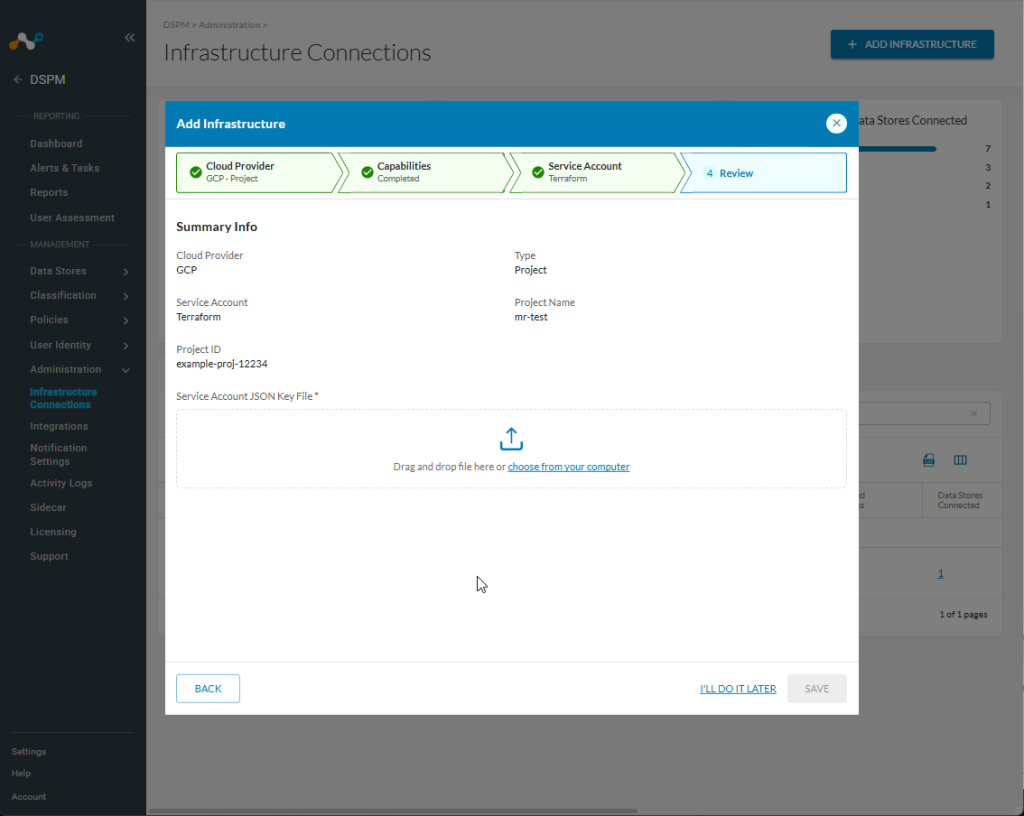
-
Click Save.


Your GCP Project is now connected, and Netskope DSPM can start discovering data stores for analysis, according to the capabilities you selected when generating the template.
GCP Organization
You will need to repeat these steps individually for every GCP organization you want to onboard into Netskope DSPM. Any changes to the membership units under your organization (such as newly-added or removed projects) will be handled automatically according to the configuration created by the Terraform script.
This workflow:
- Starts in the Netskope DSPM Console.
- Continues with actions in the Terminal on your local machine.
- Ends back in Netskope DSPM to complete the setup.
In the Netskope DSPM Console
-
Go to Administration > Infrastructure Connections.
-
Click GCP > Add Infrastructure > Add Organization.
-
Select the Capabilities tab and adjust the toggles based on your discovery and classification needs for this organization.
The choices you make here determine which capabilities the generated Terraform template is set up to support. The template is organized so you can clearly see which sections correspond to each capability and adjust them if your requirements change.
Toggle Description Details Auto-Discover New Projects Enables the auto-discovery and onboarding of newly discovered organization members, ensuring your accounts list remains accurate within DSPM.
Note: For individual project onboarding, this is typically disabled; it is most relevant for organization onboarding.Auto-Discover New Data Stores Enables the auto-discovery of newly created data stores so that DSPM is always aware of all possible data stores. Auto-Discover Unmanaged Data Stores Enables the auto-discovery of data stores on your disk volumes, to ensure that DSPM is aware of unmanaged data.
Note: Disabled by default because it can impact performance in environments with many disks.Ingest the Policy Tag Taxonomy Enables ingestion of GCP policy tags associated with each connected data store, for use in filters and downstream policy conditions. Authorize Data Store Snapshots Access Enables low-touch onboarding using snapshots, allowing DSPM to safely create and scan CloudSQL backups without requiring broad administrative roles. -
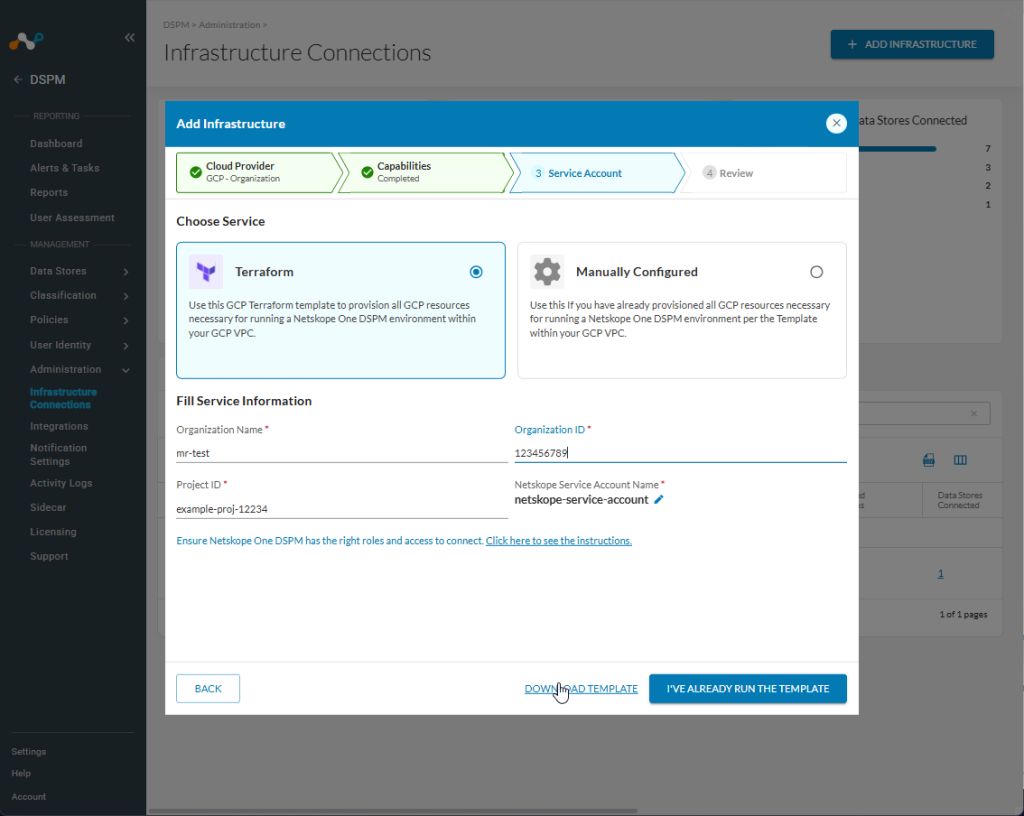
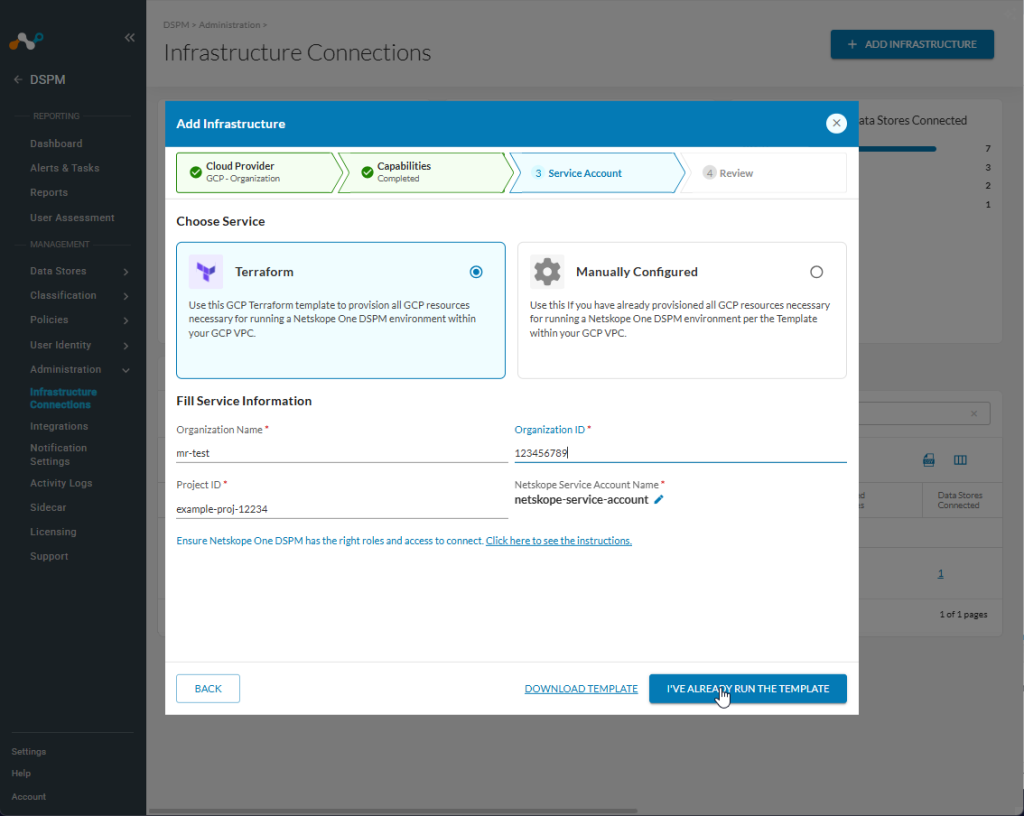
Click Next > Fill in the following values.
Field Value Organization Name Any value (this is used to identify your infrastructure connection within Netskope DSPM). Organization ID Obtain from your GCP Organizations console.
Netskope DSPM Service Account Name Will default to Netskope DSPM-service-account. Note that this value needs to be unique to each onboarded organization. -
Select Terraform as the deployment method and click Download Template.
-
Do not close this window. Leave it on the Add Infrastructure modal so you can return to it later.

In the Terminal on Your Local Machine
- Go to the ZIP file path of the downloaded Terraform template. For example:
cd C:\Users\User\Downloads - Run the unzip command on the downloaded file. For example:
unzip file_name.zip- In the extracted
orgfolder, you will find the necessary Terraform files for organization onboarding.
- In the extracted
- Navigate into the
orgfolder and run the following command to initialize Terraform:terraform init- You will see “Initializing the backend”, followed by a success message.
- Run the following command to start the script:
terraform apply- Note: Terraform will show a warning if you are not logged in or your GCP credentials are not set correctly. Terraform will display a plan listing the resources that will be created in your org folder.
- When you see the output of resources to be created, type
yesto confirm.- After completion, you will see the
Apply complete! Resources: XX added, 0 changed, 0 destroyedmessage.
- After completion, you will see the
When the Terraform script runs successfully, a JSON service account key file is created in your org folder (for example, Netskope One DSPM-credentials.json).
In the Netskope DSPM Console
-
Go back to the Add Infrastructure modal and click I’ve already run the template.
-
Click Choose from your computer > Browse to the
orgfolder, and find theNetskope One DSPM-credentials.jsonfile created by Terraform.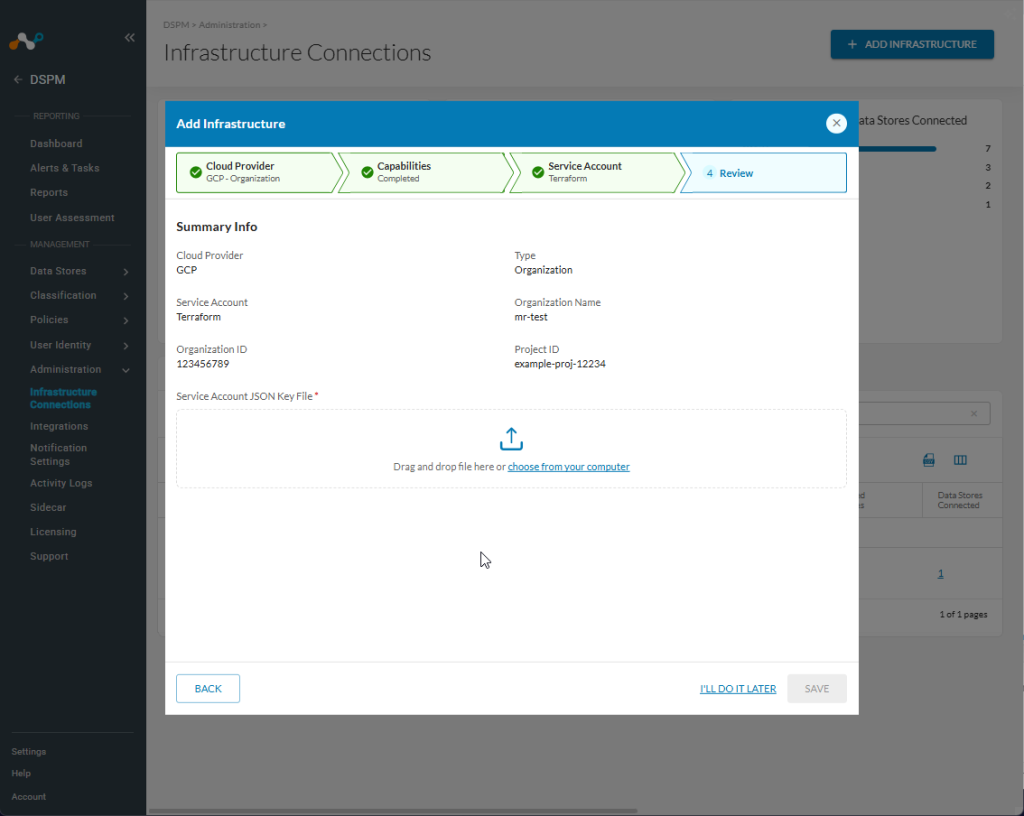
-
Click Save.


Your GCP Organization infrastructure is now connected, and Netskope DSPM can start discovering accounts and data stores for analysis, according to the capabilities you selected before generating the template.