

To access the Rule-Based policy page, go to Policies > Insider Threats & Advanced Compromise > Rule-Based tab.
Important
Basic UBA or UBA standard includes UEBA predefined sequential rules. Advanced UBA includes UEBA ML models, UEBA user scoring with user confidence index (UCI), UCI based inline policies, and Custom UBA sequence rules.
Only Application Events from applications with dedicated application connectors are evaluated for standard UEBA.
Contact Support to enable this feature in your account, additional licensing is required.

Filtering the Policy View
Use the left side panel to filter your policy view. The default view displays all policies and severity types.
Tip
All grayed out features or tabs means the feature is disabled by your admin or globally it’s disabled because you need additional licensing.
- Policy Type – select the All, Rule, or Machine tabs to view the particular policy type. For the Rule tab, you can further filter to view All rules, Predefined rules, or Custom rules.
- Severity – select the severity type.
- CriticalHighMediumLowInformational
- Scenarios – select from the predefined scenarios to auto-populate/suggest policies.
- Tags – select from the predefined data sources: Real-time Protection or API-enabled Protection. Each policy listed (image above #8) is tagged with a data source.
- Reset – at any time you click reset to remove all filters and start with your default view. The default view displays all policies and severity types.
- Search – type keywords to search for policy names.
- Apply Changes – after you edit your policy, you must click Apply Changes to save your edits. Optionally, you can click to
 before applying changes. Anything that you changed, added, or deleted is described.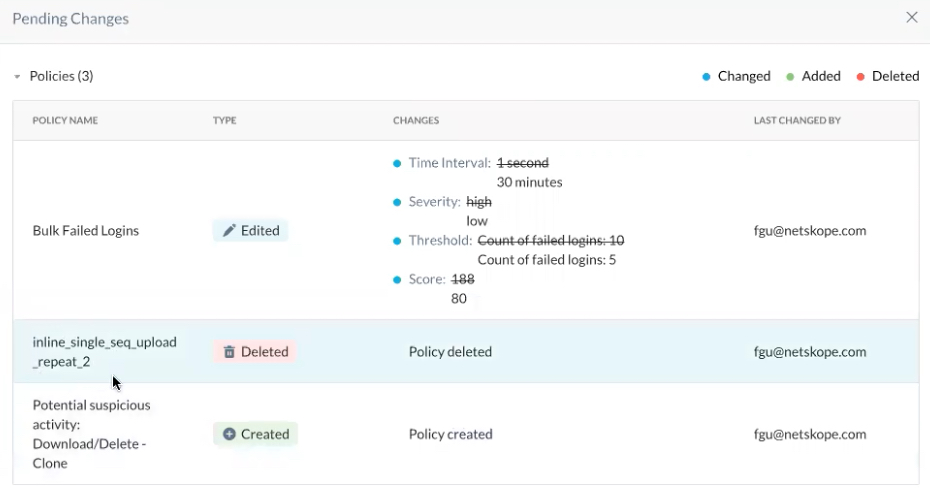
- By severity (image above #8) – you can view the filtered policies by Ascending or Descending severity. The default view (Descending) displays the most critical policies first.
- Policy list view (image above #9) – this section lists the policies that match the filters you apply.
Compromised Account Detection Using IP threat Intel

Use Advanced UEBA to detect cases of compromised credentials (CASB API, API Connector). The system finds source IP addresses in app events that match malicious or Tor IPs. This will help find compromised users that need their credentials reset.


Use Advanced UEBA to detect cases of compromised devices (Transaction logs). The system finds destination IP addresses in transactions that match malicious or Tor IPs. This will help find devices that are compromised and need to be remediated.


Editing a Policy
To edit the policy, select the tile and click the pencil icon to open the Configure Policy window. Not all rules can be edited, deleted, or cloned.

After you make your changes you will see an important icon (image above #1). This will remain visible until you apply your changes (image above #3).
Optionally, you can revert your changes (image above #2). You will see the following dialog box.

For the rule-based policies above, you can include or exclude certain users, user groups, or organizational units from the policy.
- Click the pencil icon to edit the policy. The Configure Rule Policy panel displays.

- Click User, User Group, or Organizational Unit to display the dropdown. Note, only one dropdown will display at a time.
- Click Exception to select the User, User Group, or Organizational Unit to exclude. Note, exclude options that were already selected are disabled in the UI and cannot be used again until you delete the selection.

- Optionally, you can include any User, User Group, or Organizational Unit before saving. Note, options that were already selected are disabled in the UI and cannot be used again until you delete the selection.

Also, you can use combinations of specific apps, app instances, and sanctioned apps as “AND” or “OR” conditions to include or exclude Note, custom apps and predefined apps also appear in the app list and can be used for policies.
Tip
The following apps appear in the list but are not triggering alerts at this time.
- Amazon Web Services
- Google Cloud Dataflow
- Google Cloud Platform
- Google Cloud Big Data
- Google Cloud Storage
- Microsoft Azure
- Amazon DynamoDB
- Amazon Web Services
- Amazon S3
- Windows Azure
- To undo the include or exclude action, hover over the selection and click the “X”. If you are in a field and cannot see the Exception field, click out of the box to make it visible. You can also click the “X” beside the box to delete all the selections.

Custom Rule-Based Policies
Click the dropdown to create a rule-based policy. You can create a new policy or create a policy from the template library.
New from Template Custom Rule Policies
The template library contains the following templates for the new behavior analytics custom rule-based policies for potential suspicious activity. You can change any option once you select a template. The right panel edit window opens to enable editing.
- Download / Delete: Download and Delete, 20 repetitions in one hour on Box.
- Share / Delete: Share and Delete, 10 repetitions in one hour on Dropbox.
- Upload / Share: Upload and Share, 10 repetitions in one hour on Google Drive.
Policies are defined using a set of variables. These variables define the criteria for detecting policy violations. Specify the match criteria for the activity sequence that you want to be alerted on. Each sequence is defined based on a single user, group, organizational unit, and app. All match criteria are ‘And’ed.
To create a new custom rule policy:
- On the Rule-Based Policies page, click the New Custom Rule Policy dropdown > New. The Configure Custom Rule Policy right panel window opens.

- Type a name for the new policy.
- Optionally, type a policy description.
- Select a Scan Type, Real-time Protection, API Data Protection, or API Data Protection (Next Gen). Real-time Protection will monitor all Inline activities including Client, Reverse Proxy, GRE, and Forward Proxy. API Protection monitors all Introspection traffic which is captured by the APIs.
- Select a severity for this new policy.

Note
The Shared Credentials severity is configurable for Advanced UEBA enabled accounts and fixed as “Informational” for Advanced UEBA disabled accounts.
- Define the policy for apps, app instance, or sanctioned apps. You can sue any combination of specific apps, app instances, and sanctioned apps as “AND” or “OR” conditions to include or exclude. Based on your Access Method selection, the list will dynamically generate the available choices for apps, app instance, and sanctioned apps.
- Select any Risky Countries that you want to trigger a policy violation.

- Select the Sequence of activities that will trigger the policy. You cannot have more than four activities listed in the sequence and actions cannot be the same.

- Max duration time cannot exceed 3600 seconds. This is the max duration of time for the sequence of activities that will trigger the policy.
- Number of times the activity was repeated. The number must be greater than zero.
- Add an activity. Your choices may include the following or a subset based on your Access Method selection:

- Select the Rigid text box if you want to enforce the order of activities. Rigid means that the activities must occur inn the order specified to raise a detection. If not selected, the activities can occur in any order.
- Enable Status to activate the policy.
- Click Save to create the new policy. The policy name appears in the Rule-Based tab under the Custom Rule-Based Policies section.

Troubleshooting
Suspicious Data Movement Alert Not Triggered for Data Movement Between Instances of the Same Cloud Storage Application
Symptom
The Suspicious Data Movement alert doesn’t fire when a user downloads data from one instance of a cloud storage application (such as Box, Google Drive, or OneDrive) and uploads it to a different instance of the same application—even when the source instance is tagged as Sanctioned.
Cause
By default, the Suspicious Data Movement policy evaluates data movement from sanctioned applications to unsanctioned destinations. When data moves between two instances of the same application, the policy may not trigger because the source instance isn’t explicitly included in the policy’s evaluation scope. Without specifying the source app instances in the policy’s Additional Criteria, the system doesn’t recognize the cross-instance transfer as a suspicious data movement event.
Resolution
To ensure the Suspicious Data Movement alert triggers for data movement between different instances of the same cloud storage application, add the sanctioned source app instances to the policy configuration.
To configure the policy:
-
Navigate to Policies > Insider Threats & Advanced Compromise > Rule-Based tab.
-
Locate the Suspicious Data Movement policy and click the pencil icon to edit it.
-
In the Configure Policy panel, go to Additional Criteria > App.
-
Under App Instances, add the sanctioned source app instance or instances from which data is being downloaded.
-
Click Save, then click Apply Changes on the Rule-Based Policies page.
The policy now evaluates download activity from the specified instances and triggers a Suspicious Data Movement alert when data is subsequently uploaded to a different instance of the same application.
Suspicious Data Movement Policy when App Instance is Added as an Exception
This section describes how a Suspicious Data Movement policy behaves when a specific App Instance ID is added as an exception.
Background / Observed Behavior
Customer scenario:
- Suspicious Data Movement alerts were initially generating as expected.
- Customer created an App Instance with ID
3XXXXXXX38. - They then added this App Instance as an exception in the Suspicious Data Movement policy.
- This policy change was made on a specific date and noted (evening).
- After this change, no Suspicious Data Movement alerts were triggered.
- Incident history shows alerts up to the specific, and none after the evening policy change.
- The following day, the customer reverted the configuration (removed the App Instance exception).
- After the rollback on the following day, Suspicious Data Movement incidents started generating again.
Technical Explanation
When the customer marks App Instance ID as an exception in the Suspicious Data Movement policy, the effective logic becomes:3XXXXXXX38
- Treat only
App Instance ID(and any other instances added to this exception list) as unsanctioned applications for the purpose of this policy.3XXXXXXX38 - For the policy to trigger:
- The download must be from a sanctioned application / instance (in the Include list), and
- The upload must be specifically to
App Instance ID(or another app instance added to this exception list).3XXXXXXX38
If user activity does not match this exact pattern, the policy will not match, and no Suspicious Data Movement incidents will be generated—even though the policy configuration is syntactically valid.