

Netskope utilizes the System for Cross-domain Identity Management (SCIM) standard to automate user lifecycle management and synchronize identity data from Microsoft Entra ID to the Netskope Security Cloud Platform. This integration supports the automated creation, update, and deactivation of user accounts and group memberships, ensuring identity consistency across your security infrastructure.
Before initiating the SAML handshake, ensure your Netskope tenant is configured to allow traffic from Microsoft Entra ID and that you have generated a secure access token for service-level communication.
Prerequisites to Provisioning with Entra ID
Before beginning the configuration, ensure you have the following:
-
Administrative Access: Global Administrator permissions in the Microsoft Entra admin center.
-
Network Requirements: If using an IP Allowlist, add the Microsoft Entra ID source IP addresses to your Netskope Custom IP list (Settings > Administration > IP Allowlist)
-
Authentication Token: An RBAC v3 token generated via a Service Account in your Netskope tenant webUI to ensure persistent integration .
See this help topic for instructions to create a token.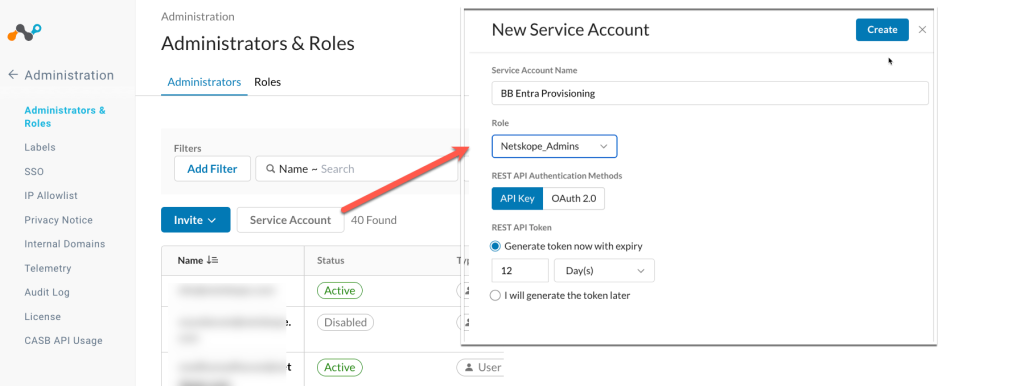

Recommended Order of Operations
SAML configuration between Netskope and Microsoft Entra ID can begin from either platform. However, starting the configuration in Microsoft Entra ID introduces a circular dependency: the Basic SAML Configuration in Microsoft Entra ID requires the Identifier (Entity ID) and Reply URL (ACS URL) before the setup can proceed, but Netskope generates these values only after the corresponding IdP configuration has been created.
The following workflow uses temporary placeholder values to resolve this dependency, allowing administrators to complete the configuration in Microsoft Entra ID first and update it with the correct values once they become available.
-
Enter Temporary Values in Microsoft Entra ID. In the Basic SAML Configuration of the Netskope enterprise application in Microsoft Entra ID, enter temporary placeholder values for the Identifier (Entity ID) and Reply URL (Assertion Consumer Service URL) fields — for example,
https://placeholder. Click Save to proceed with the remaining configuration. -
Complete the Configuration in Microsoft Entra ID. Configure the Attributes & Claims as described later in this article, download the SAML Signing Certificate (Base64), and copy the Login URL and Microsoft Entra Identifier values from the SAML configuration page.
-
Create the SAML Account in Netskope. In the Netskope Admin Console, navigate to Settings > Security Cloud Platform > Forward Proxy > SAML and click New Account. Enter the Login URL as the IDP SSO URL, the Microsoft Entra Identifier as the IDP Entity ID, and upload the certificate. Save the configuration.
-
Retrieve the Actual Values from Netskope. After saving, click Netskope Settings (or the settings icon) next to the newly created SAML account to view the actual SAML Entity ID and SAML Proxy ACS URL.
-
Update Microsoft Entra ID with the Correct Values. Return to the Basic SAML Configuration in Microsoft Entra ID and replace the placeholder values with the actual SAML Entity ID (Identifier field) and SAML Proxy ACS URL (Reply URL field). Save the changes.
Creating the Netskope SAML App
This section provides steps to locate and deploy the official Netskope User Authentication application from the Microsoft Entra App Gallery to serve as the gateway for single sign-on (SSO)
-
Log in to the Microsoft Entra admin center https://entra.microsoft.com
-
Go to Applications > Enterprise Applications and click New Application.
-
Enter Netskope in the search bar. Select Netskope User Authentication. Enter a name, for example, Netskope Authentication (for example). Click Create.
The chosen application name (for example: Netskope Authentication) is what will appear in the My Apps portal.
-
After the app is created, you will be redirected to the app’s overview page. Select Single sign-on > SAML.

-
Click Edit to enter the Basic SAML Configuration parameters.


Basic SAML Configuration
This section provide the steps to establish the technical connection between the two platforms by exchanging the unique Entity IDs and Assertion Consumer Service (ACS) URLs found in your Netskope tenant.
-
Click Edit to enter the Basic SAML Configuration parameters.

-
Enter Netskope Entity ID and Netskope ACS URL copied from the Netskope UI in the required fields, and then click Save.
IDP Field Netskope Field Identifier (Entity ID) SAML Entity ID Reply URL SAML ACS URL To get the Netskope Entity ID and Netskope ACS URL, login to your Netskope tenant and do the following:
-
Go to Settings > SAML (under Forward Proxy). Click New Account. In step 1 of the New Account pop-up, enter an Account Name and select SAML.Click Save and Continue.
-
In step 2 of the New Account pop-up, Netskope Settings tab will display the SAML Entity ID and SAML ACS URL, along with SAML Certificate and Netskope Metadata for download.
 If your Netskope ACS URL contains a placeholder, you can find your specific Organization ID in the Netskope UI under Settings > Security Cloud Platform > MDM Distribution (under Netskope Client). Find your Organization key here.
-

You will be prompted to test SSO. Select No, I’ll test later.
User Attributes and Claims
This section provides steps to configure the specific identity data—such as email addresses—that Entra ID must pass to Netskope within the SAML assertion to uniquely identify and authenticate users.
user.mail to prevent authentication failures-
Go to and edit the Attributes & Claims section.

Delete all the default Additional claims. You only need the Required Claim
-
Select the value to edit the Unique User Identifier (Name ID) field.

-
Set the Source attribute as user.mail and click Save.

-
user.mail is set as the claim value for Name ID. Click on the x to close this section.

Finalizing Integration & User Assignment
The section provides the steps to complete the integration by downloading the Entra ID security certificate and assigning specific users or groups who are authorized to access the Netskope platform via SSO.
-
Download the certificate in Certificate (Base64) format, and copy the Login URL and Azure AD Identifier values. These need to be entered into the Netskope Forward Proxy – SAML settings page later on.

-
Next, assign users who will log in using the Entra ID SAML Auth. Go to Users and Groups > Add user/group.

-
Select Users and groups. Select the users, and then click Select.
-
Click Assign to complete this procedure. This step enables the SSO app for the selected identites,.


Troubleshooting Tips
-
Entity ID / ACS URL not visible in Netskope: Ensure you have clicked New IDP Instance or Add New. The values appear on the configuration form under Service Provider Details or SP Metadata once the form is open.
-
Multiple IdP instances: Each new IDP instance generates its own unique Entity ID and ACS URL values. Ensure you are copying from the correct instance.
-
Metadata upload fails: Ensure the XML file downloaded from Entra ID is unmodified and contains a valid signing certificate.