

Exact match validates the presence or absence of an identifier against the data set checked by a policy. Exact match reduces the false positives and guarantees precise data leak prevention of specific entries in the data set. A couple sample use cases are:
- Prevent data leakage of SSNs and Employee IDs present in your enterprise database.
- A list of retail coupon codes formatted like credit card numbers but not valid credit card numbers. A credit card match result present in this data set will be ignored.
EDM enables high-confidence detection of sensitive structured data with:
- Zero exposure of raw data
- High precision, low false positives
- Scalable ingestion via UI, Python, or API
To use Exact Match, you must first upload a data set to your On-Premises Virtual Appliance or the Netskope tenant UI.
The first row of the data set file must contain the column name describing the data in its column. If the data set does not include a column header, the file upload will fail.
These column names can be mapped to a DLP identifier for validation when building a DLP rule.
For example, you can create a file that contains dash-delimited credit card number, (Column 1), first name (Column 2), and last name (Column 3). Each entry in the file will be SHA-256 hashed and uploaded to the tenant instance. In the DLP rule, you need to match against the identifiers for credit card number, first name, and last name.
Preparation
The file can be in CSV or TXT formats and the maximum file size limit is 8MB or 160 GB with multipart upload.
The input file for EDM needs to be UTF-8 encoded.
There must be a header row, no empty rows, and the same number of columns as headers.
Normalization
Normalization ensures consistency in data representation before hashing, eliminating variations that could lead to false negatives.
- Case insensitive, Utf-8 Encoding
- Names and Postal Address – Dictionaries
- Delimiters, No-empty files – minimum 1 row, Consistent Columns with Headers
- File names – Alphanumeric with underscore ; avoid special characters
Example
| Raw Data | Normalized Data |
|---|---|
| Jxx.Dyy@email.com | jxx.dyy@email.com |
| 987-654-3210 | 9876543210 |
Best Practices
- Apply consistent normalization rules across all cells
- Validate normalized output before hashing
Upload Methods
Tenant UI
To upload via Tenant UI:
- Go to Policies > Profiles > DLP > Edit Rules > Data Loss Prevention > Exact Match in the Netskope UI.
- Click New Exact Match.
- In the New Exact Match File dialog box, specify the type of delimiter used in the file.
- Click Select File and upload your exact match file. The first row of the file which is the column header, is displayed in the New Exact Match File dialog box.
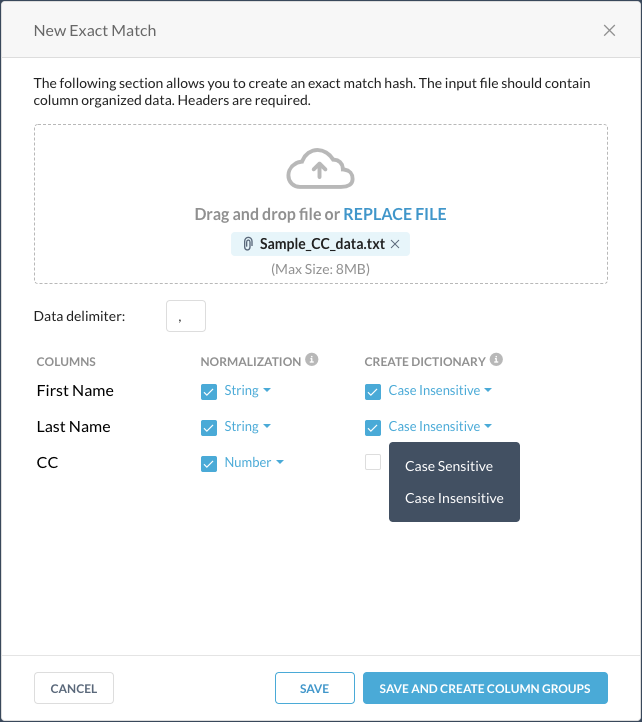
- For each column header, select if you want to normalize the data in that column as string or number, and create a dictionary of unique data that can be used in a DLP rule.
- Click Save and Create Column Groups.
- In the Create Column Groups dialog box, you can create exact match groups with a combination of columns. Columns in each column group will be ANDed during exact match.

Alternatively, you skip this step and add column groups after the file is uploaded.
- Click Save.
Python Scripts
Only a virtual machine is required to perform a multipart upload (not virtual appliance).
For large datasets exceeding the UI limits or scheduled ingestion pipelines, you can automate dataset uploads through scripting.
Local Hash Generation
Hashing transforms sensitive data into irreversible fingerprints, enabling secure matching without exposing raw values.
Supported Approach
- Cryptographic hashing (e.g., SHA-256)
- Optional salting
Key Requirements
- Deterministic: Same input → Same hash
- Collision-resistant
- Non-reversible
Example (Conceptual)
| Normalized Value | Hash Output (SHA-256) |
|---|---|
| john.doe@email.com | 5f4dcc3b5aa765d61d8327deb882cf99 |
Once the data is uploaded, each entry in the file will be SHA-256 hashed and sent to your tenant instance in the Netskope cloud.
Choosing the right upload method depends on:
- Dataset size
- Automation needs
- Integration maturity
Sample Workflow
- Generate a API token with `dlp_profile` read-write access can be downloaded from Netskope Tenant UI
- Tenant UI – Settings > Administration> Service Account > Roles
- Settings RBAC: `dlp_profile` required

- Initiate EDM Hash generator Script to generate SHA256 hashes of raw data
- All binary files will be compressed into a single archive file
- Upload Hashed file to Netskope Cloud using EDM upload Script
Sample Python Snippet (Illustrative)
`bash
# Upload with description
python3 edm_api_upload.py \
-s mycompany.goskope.com \   -p 443 \  -c ~/netskope_api_token.txt \
-v \  upload \  -d "Employee SSN database - Q4 2024 refresh" \ employees_2024_q4.tgz
A list of detailed steps and Scripts (downloadable) are captured in EDM Hash Generation and Upload Guide
Best Practices
Clean Staging files once complete
Validate each chunk upload response
REST API v2
Only a virtual machine is required to perform a multipart upload (not virtual appliance).
Local Hash Generation
Hashing transforms sensitive data into irreversible fingerprints, enabling secure matching without exposing raw values.
Supported Approach
- Cryptographic hashing (e.g., SHA-256)
- Optional salting
Key Requirements
- Deterministic: Same input → Same hash
- Collision-resistant
- Non-reversible
Example (Conceptual)
| Normalized Value | Hash Output (SHA-256) |
|---|---|
| john.doe@email.com | 5f4dcc3b5aa765d61d8327deb882cf99 |
Once the data is uploaded, each entry in the file will be SHA-256 hashed and sent to your tenant instance in the Netskope cloud.
Choosing the right upload method depends on:
- Dataset size
- Automation needs
- Integration maturity
API Endpoints are
Head to Tenant UI – Tools – Rest API v2 Section
- Click API Documentation

- Swagger UI in a new tab, displaying all available endpoints and parameters

Sample Workflow
Following are steps of a multi-phase workflow:
- Staging: Upload metadata and initiate multipart upload
- POST /dlp/edm/file/staging
- Uploading: Upload file chunks using PUT requests
- PUT /dlp/edm/file/staging/{fileid}
- Get File Status
- GET /dlp/edm/file/staging/{fileid}
- Completion: Complete the multipart upload using POST
- POST /dlp/edm/file/staging/{fileid}?uploadid={uploadid}
- Applying: Apply the staged file to the EDM system
- POST /dlp/edm/file/apply/{fileid}
- Clean Up: Automatic or manual deletion of staging files
- DELETE /dlp/edm/file/staging/{fileid}
For a list of Detailed steps and Scripts, please refer to DLP-EDM-Upload-Service—API-Users-Guide
Netskope Virtual Appliance
To create a hash of your structured content:
- Prepare the file in CSV format structured in rows and columns. We recommend that the CSV file has no more than 50 million records and includes a header row that names the columns. These names will show up in the DLP rule under File Column for Exact Match validation. Ensure the data in the columns are normalized. There are two ways to normalize the data, depending on the data type.
Normalize columns that contain numbers: Ensure data, like credit cards, are consecutive numbers that don’t contain special characters such as dashes, commas, quotes, and spaces.
Normalize columns that contain strings: Ensure data, like first and last names, are in Sentence case, with the first letter in uppercase and the remainder in lower case.
- Using
nstransferaccount, transfer the CSV file to thepdd_datadirectory on the Virtual Appliance:scp <CSV file> nstransfer@<virtual_appliance_host>:/home/nstransfer/pdd_data
The location of the
pdd_datadirectory varies between thenstransferandnsadminuser accounts. When using thenstransferaccount to copy the file to the appliance, the location of thepdd_datadirectory is/home/nstransfer/pdd_data. When you log in to the appliance using thensadminaccount, thepdd_datadirectory is located at/var/ns/docker/mounts/lclw/mountpoint/nslogs/user/pdd_data. - After the data is successfully transferred, log in to the appliance using the
nsadminaccount. - Run the following command at the Netskope shell prompt to hash the data and upload the data to the Netskope cloud:
request dlp-pdd upload column_name_present true csv_delim ~ norm_str 2,3 file /var/ns/docker/mounts/lclw/mountpoint/nslogs/user/pdd_data/upload/sensitivedata.csv
Tip
column_name_present truespecifies that there is a header row in the file.csv_delim ~specifies that the CSV file is tilda-delimited.norm_str 2,3specifies that columns 2 and 3 are to be treated as strings.file <CSV_file>specifies the file that needs to be hashed and uploaded.The command returns:
PDD uploader pid 9501 started. Monitor the status with >request dlp-pdd status.
- Check the status of the upload:
request dlp-pdd status
The command returns:
Successfully uploaded the data from /var/ns/docker/mounts/lclw/mountpoint/nslogs/user/pdd_data/upload/sensitivedata.csv to Netskope cloud
- When the data is successfully uploaded, the
sensitivedata.csvfile and its corresponding column names will appear in the Exact Match tab of the DLP rules.
Go to the Netskope Support site for access to the scripts.
edm_hash_generator.py – This script converts a CSV file into Salted SHA256 hashes.
After the script has executed, there should be a number of files created in the output directory specified in the command. Upload all of the files to appliance and follow “dlp-pdd” instruction for uploading EDM files to the cloud.
The following is the help text:
usage: usage: edm_hash_generator.py [options] <mode> <input_csv> <output_dir>

Mode (hash) generates secure hashes for each column of the input csv file.
Example - edm_hash_generator.py hash <input_csv> <output_dir>.

positional arguments:
  mode                  Mode (hash) generates secure hashes for each column of
                        the input csv file. Example - edm_hash_generator.py
                        hash <input_csv> <output_dir>.
  input_csv             Input CSV file
  output_dir            Output directory

optional arguments:
  -h, --help            show this help message and exit
  -l LOG_FILE, --log LOG_FILE
                        Log file
  -d DELIMITER, --delimiter DELIMITER
                        Delimiter for the input file. Default is comma
  -c COLUMN_NAMES, --column-names COLUMN_NAMES
                        Comma separated column names. Useful when the input
                        file does not have column names in the first line.
  -p, --parse-column-names
                        First line of the input file contains column names. If
                        specified, this line is used to infer column names and
                        the -c/--column-names option is ignored.
  --dict-cs DICT_CS     Case sensitive dictionary column list. Ex: 1,2
  --dict-cins DICT_CINS
                        Case insensitive dictionary column list. Ex: 3,4
  --skip-hash           Skip hash generation, Requires one of --dict-
                        cs/--dict-cins option.
  --edk-lic-dir EDK_LIC_DIR
                        Directory where EDK license file (licensekey.dat) is
                        present [default . (current_dir)]
  --edk-tool-dir EDK_TOOL_DIR
                        Directory where EDK tool (edktool.exe) is present
                        [default . (current_dir)]
  --input-encoding INPUT_ENCODING
                        Set input csv file's character encoding like
                        iso-8859-1. Default is utf-8
  --fips                Enforce Openssl FIPS mode only
Once the script has successfully run, you can upload the hashed files on the appliance with the following command:
nsappliance> request dlp-pdd hash-upload dir /var/ns/docker/mounts/lclw/mountpoint/nslogs/user/pdd_data/upload/<pathtohashdata>/ metadata /var/ns/docker/mounts/lclw/mountpoint/nslogs/user/pdd_data/upload/<pathtomedata/metadatafile.json>
Cloud Exchange Deployments
For additional details, please see Exact Data Match Module (Beta).
Next Steps
Checking EDM Status and Creating a DLP Rule
The uploaded exact match file is displayed in the top row of the DLP – Exact Match page.
The default upload status is displayed as Pending. If you did not create column groups previously, the upload status is shown as Incomplete.

To view the latest upload status, click the Refresh Status button on top of the page.

You can edit the uploaded exact match file uploaded through the tenant UI. Click … in the row that displays the exact match file and select Upload File.
The Upload File option is only displayed if the file was uploaded through the tenant UI. The following screenshot provides a comparison of the options available for an exact match file when uploaded through the tenant UI versus the appliance.

After uploading an exact match file, you can add it to a new custom DLP rule.
- In the Exact Match section of the New DLP rule, select Enable Exact Match checkbox
- Select the exact match file you just uploaded from the dropdown list and then select the column groups you want to include. The exact match columns are displayed.
- For each identifier, select the appropriate value from the dropdown list for each column.

- When finished, click Next.