

The ServiceNow Netskope SecOps app provides an end-to-end configuration management integration with capabilities to create and update ServiceNow SIR data based on Netskope alerts, audit logs, plus manage Netskope Applications based on ServiceNow CI data.
Application Features
The main features of the integration include:
- Ability to configure the Netskope Configuration Tile.
- Ability to configure Netskope Profile Configuration.
- Ability to Import URL Lists and URL Category Lists.
- Ability to manage Security Incidents in ServiceNow created/updated based on the import of Netskope alerts.
- Ability to manage Applications and their related data in ServiceNow based on the import of Netskope Apps.
- Ability to schedule a job for Alerts and Applications import from Netskope.
- Ability to track the process of integration runs for Alerts and application import.
- Ability to navigate to the support page.
- Ability to see the application logs.
Compatibility Matrix
ServiceNow Version: Xanadu, Yokohama and Zurich
Netskope API Version: v2, v1 (Add to File Hash)
Netskope Platform Version: 3.1.4
Netskope SecOps Integration
This section describes how to download and install the Netskope SecOps Integration application from the store.
Installation Instructions
This section describes how to download and install the Netskope SecOps Integration from the store.
Prerequisites
Add Endpoints to a Token
Add these endpoints to the API token with read and write permission.
| Function | Sub-Function | Permission |
|---|---|---|
| Skope IT | Alerts | View |
| Application Events | View | |
| Objects | URL List | Manage |
| CASB | CCI | Manage |
| Threat Protection | Sandbox File Submission | Manage |
| Administration | Audit Log | View |
| Behavior Analytics | Incidents | View |
| Threat Protection | Malware | View |
These API endpoints are covered under the particular function.
| Endpoint | Permission |
|---|---|
| /api/v2/events/dataexport/events/alert | Read |
| /api/v2/policy/urllist/file | Read + Write |
| /api/v2/policy/urllist/deploy | Read + Write |
| /api/v2/services/cci/tags | Read + Write |
| /api/v2/events/dataexport/alerts/uba | Read |
| /api/v2/events/dataexport/alerts/securityassessment |
Read |
| /api/v2/events/dataexport/alerts/quarantine | Read |
| /api/v2/events/dataexport/alerts/remediation | Read |
| /api/v2/events/dataexport/alerts/policy | Read |
| /api/v2/events/dataexport/alerts/malware | Read |
| /api/v2/events/dataexport/alerts/malsite | Read |
| /api/v2/events/dataexport/alerts/compromisedcredential | Read |
| /api/v2/events/dataexport/alerts/ctep | Read |
| /api/v2/events/dataexport/alerts/watchlist | Read |
| /api/v2/atp/scans/filescan | Read + Write |
| /api/v2/events/dataexport/events/alert | Read |
| api/v2/events/dataexport/events/audit | Read |
| /api/v2/atp/scans/reports |
Read |
| /api/v2/incidents/uba/getuci | Read + Write |
| /api/v2/nsiq/retrohunt/ioc/info | Read |
| /api/v2/policy/urllist | Read + Write |
| /api/v2/events/dataexport/events/application | Read |
ServiceNow Plugins
These ServiceNow plugins must be activated:
- ServiceNow IntegrationHub Action Step – REST (com.glide.hub.action_step.rest)
- ServiceNow IntegrationHub Runtime (com.glide.hub.integration.runtime)
- Security Incident Response (sn_si)
- Version – 13.1.0
To install these plugins:
- Log in to your ServiceNow instance with your user credentials.
- Verify you have the system administrator (admin) role.
- Go to System Definition > Plugins in ServiceNow.
- Search for and install the Netskope SecOps Integration plugin.
Permission and Roles
The ServiceNow system administrator is required to create a user or provide permissions to an existing user for the Netskope SecOps Integration.
The ServiceNow system administrator can create these types of users for the Netskope SecOps Integration.
| User | Role | Permission | Description |
|---|---|---|---|
| System Administrator | admin |
| The user of this role will be the admin of the ServiceNow Instance. |
| SecOps Admin | sn_si.admin |
| The user of this role will be the admin for Security Incident Response. |
| App Admin | x_netsk_nets_sir.netskope_admin |
| The user of this role will be the admin for Netskope SecOps integration. |
| SecOps Analyst | sn_si.analyst |
| The user of this role will be the analyst for Security Incident Response. |
| User | x_netsk_nets_sir.netskope_user |
| The user of this role will be the user for Netskope SecOps integration. |
Application Download and Installation
Users with the System administrator (admin) role can install the application from the ServiceNow Store.
To install the application from the ServiceNow Store:
- Go to https://store.servicenow.com
- Search for and select Netskope SecOps Integration.
- Click Get and enter the HI credentials of your instance.
- After it is added successfully, open the instance and go to Applications > All Available Applications > All.
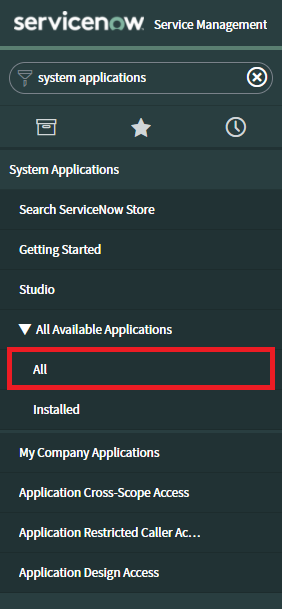
- Find the application using the filter criteria and search bar.
- Next to the application listing, click Install.
Activate Schedulers
Activate schedulers for the application:
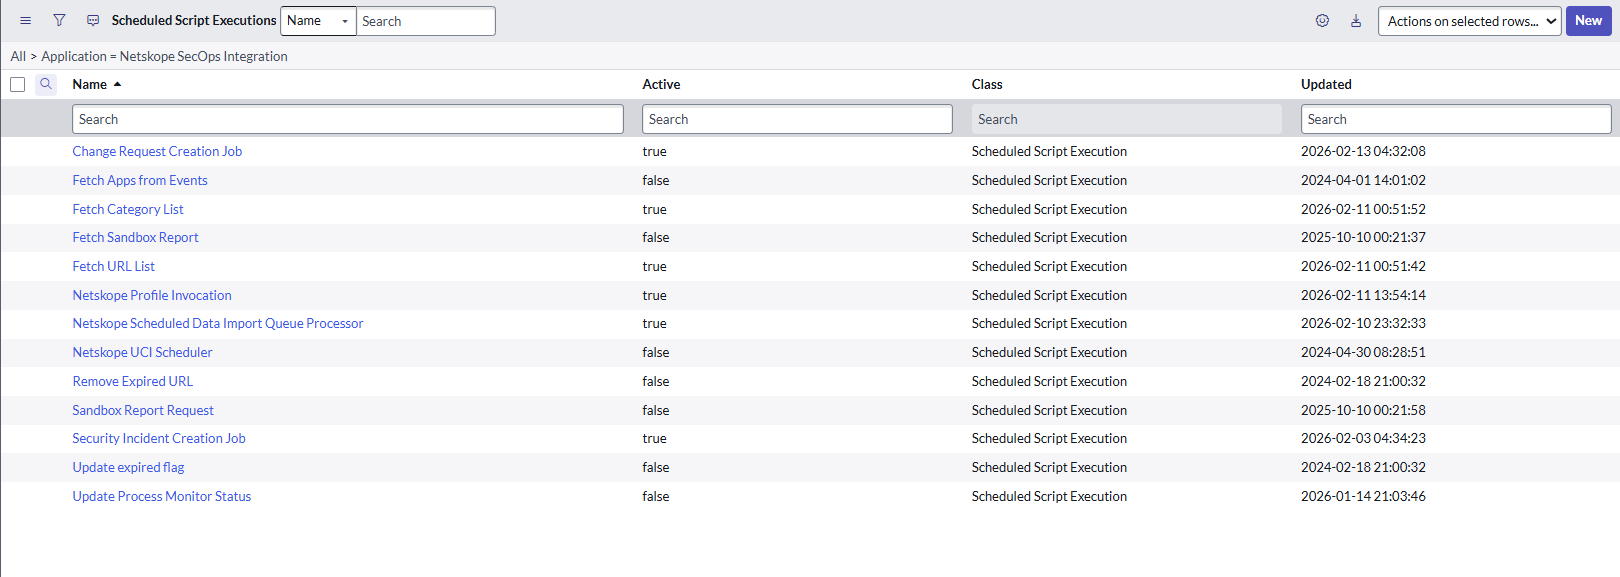
- Go to the sysauto_script.list table.
- Filter Application using Netskope SecOps Integration.
- Mark all schedulers of the application as Active = true and set the frequency.
Configuration Instructions
Create Users
The ServiceNow platform admin creates the various Netskope users.
| Username (for example) | Role to be Assigned |
|---|---|
| Application Admin | sn_si.admin, x_netsk_nets_sir.netskope_admin,personalize_dictionary |
| Application User | sn_si.analyst, x_netsk_nets_sir.netskope_user, personalize_dictionary |
Here is an example showing how to create a Netskope user and assigning a role to it.
Role Required: System Administrator (admin)
Procedure
- Go to Organization >Users.
- Click Users.
- On the Users list that is displayed, click New. A new user form is displayed
- Enter these parameters:
Field Description User ID Unique User ID for the role in your ServiceNow Platform instance. An example is netskope_admin. First Name Person you are assigning Last Name Person you are assigning Title Job Title, for example, Netskope admin Password The unique password created for this role. Email Unique email address - Click Submit. After being submitted, you can assign the role.
- On the Users list in the User ID column, click on the name of the new user you created. For example: netskope_admin
- After the record is open, the Set password UI is visible in the form view of the record.
- Click Set Password UI.
- After the pop-up opens, click Generate. This will generate a unique password for the created user that needs to be changed on the first log-in.
- Copy the generated password and close the pop-up.
- On the Users list in the User ID column, click on the name of the new user you created for example: netskope_admin
- After the record is open, go to Roles and click Edit.
- On the Edit Members form that is displayed, enter sn_si.admin in the Collection field.
- In the Collection column, select sn_si.admin and move to the Roles List.
- Click Save.
Configure the Netskope Integration Tile
This section describes how to create a configuration, which is used to connect the Netskope platform with ServiceNow.
Role Required: sn_si.admin
Procedure
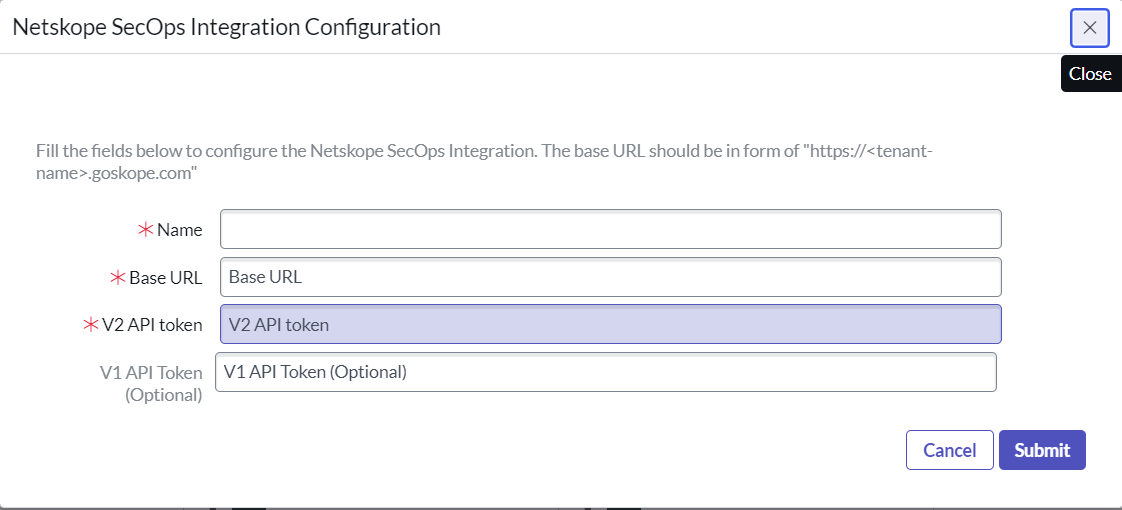
- Go to Security Operations > Integrations > Integration Configurations.
- Click Configure on the Netskope SecOps Integration tile shown in the list view.
- Enter a Name, Base URL, V2 API token, and V1 API token(optional).
- Click Submit to authenticate.
Configure Threat Lookup
This section describes how to configure Threat Lookup integration capability to initiate a threat lookup on Netskope.
Role Required: sn_si.admin
Procedure
- Go to Integration Capabilities (Flows) and open the Threat Lookup capability.
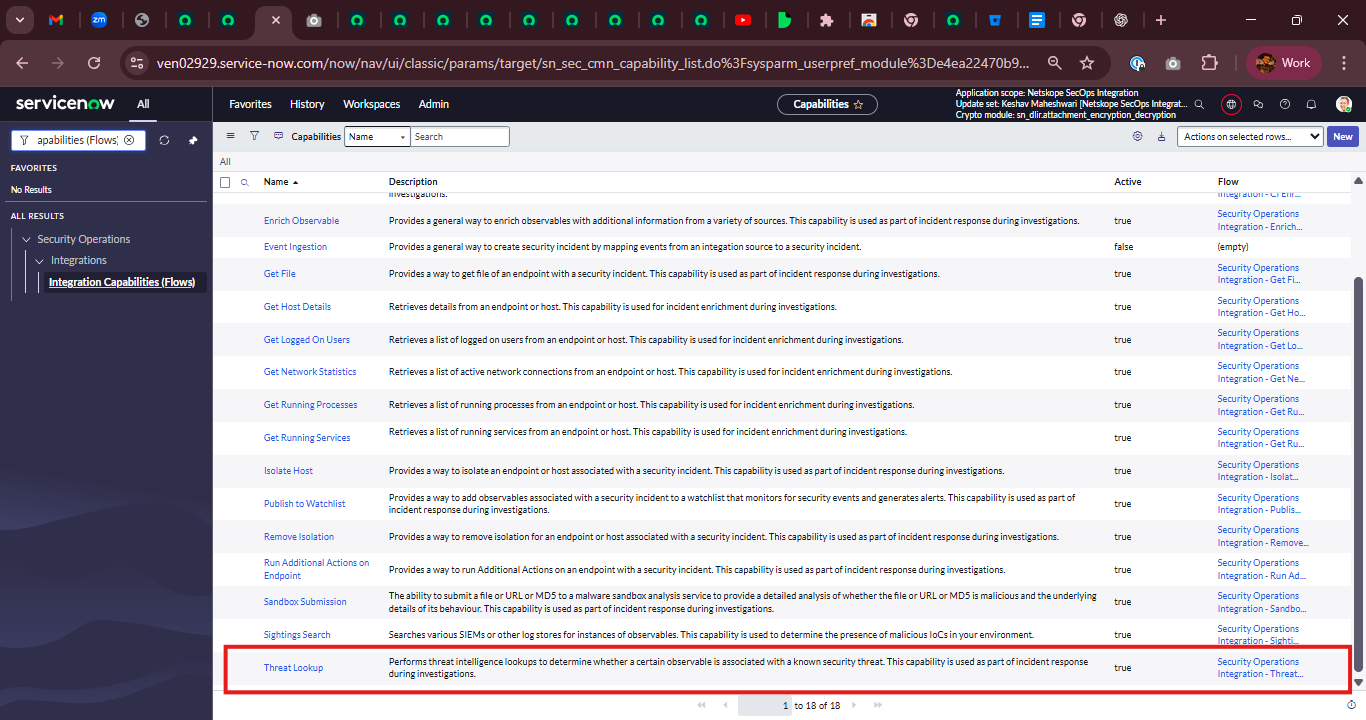
- Select Netskope – Threat Lookup V2.
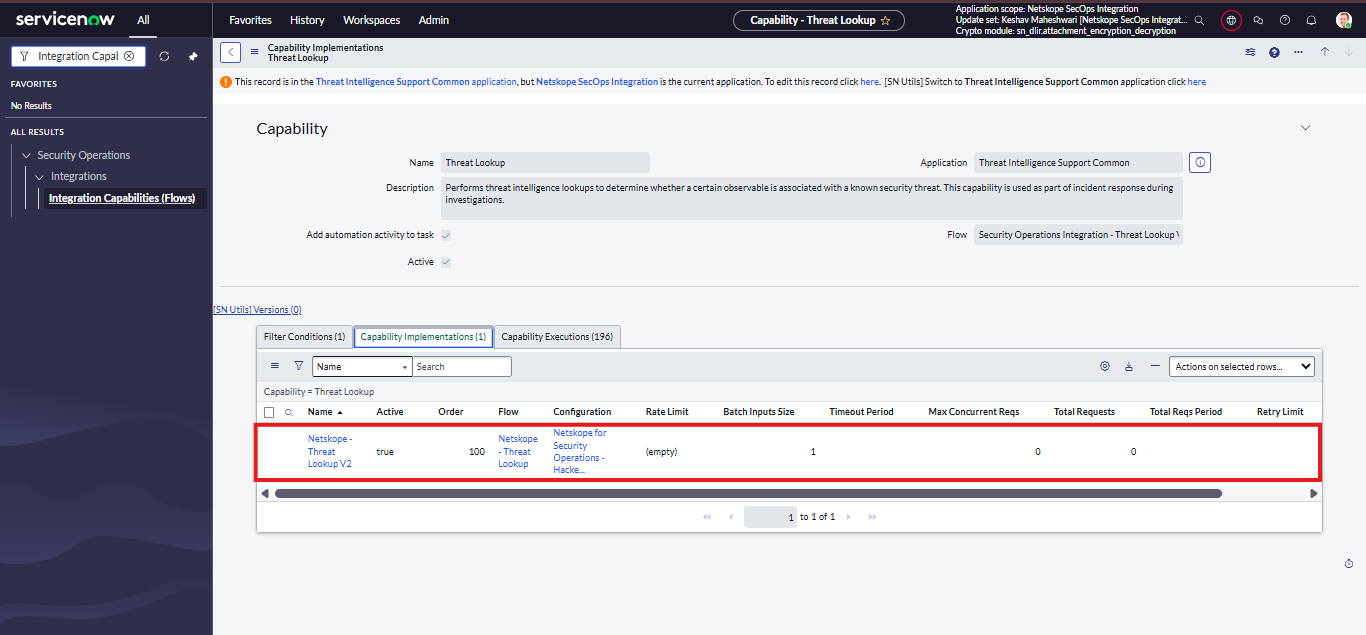
- Select a valid Integration Configuration record for the Threat Lookup that should be performed on Netskope, and then click Update.
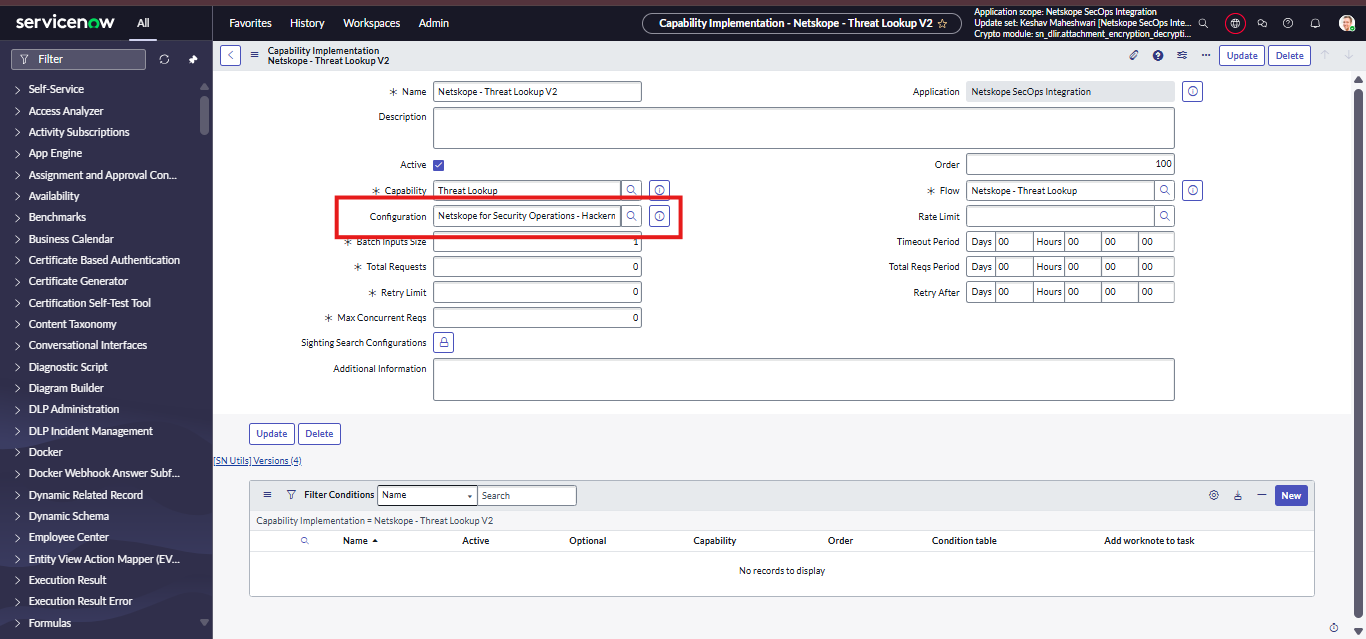
- To perform Threat Lookup using a different Integration Configuration, update the configuration field with the desired Integration Configuration record.
Configure Observable Enrichment
This section describes how to configure the Observable Enrichment integration capability to enrich observables through Netskope.
Role Required: sn_si.admin
Procedure
- Go to Integration Capabilities (Flows) and open the Enrich Observable capability.
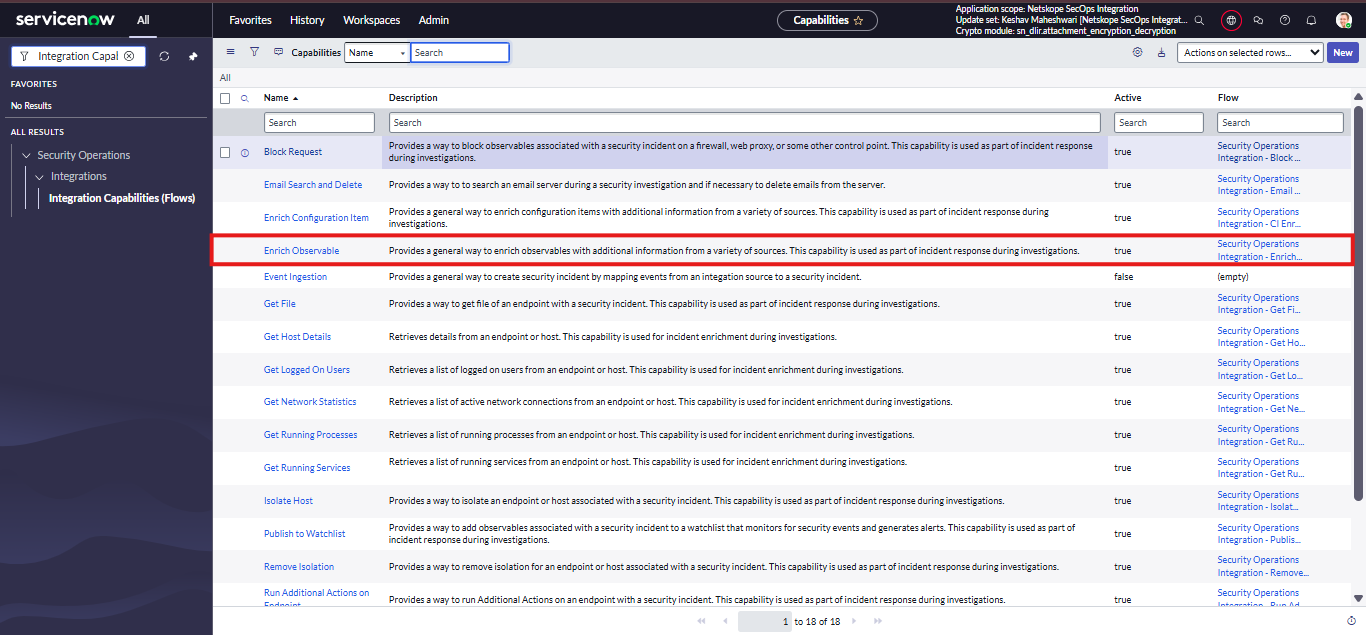
- Select Netskope Observable Enrichment.
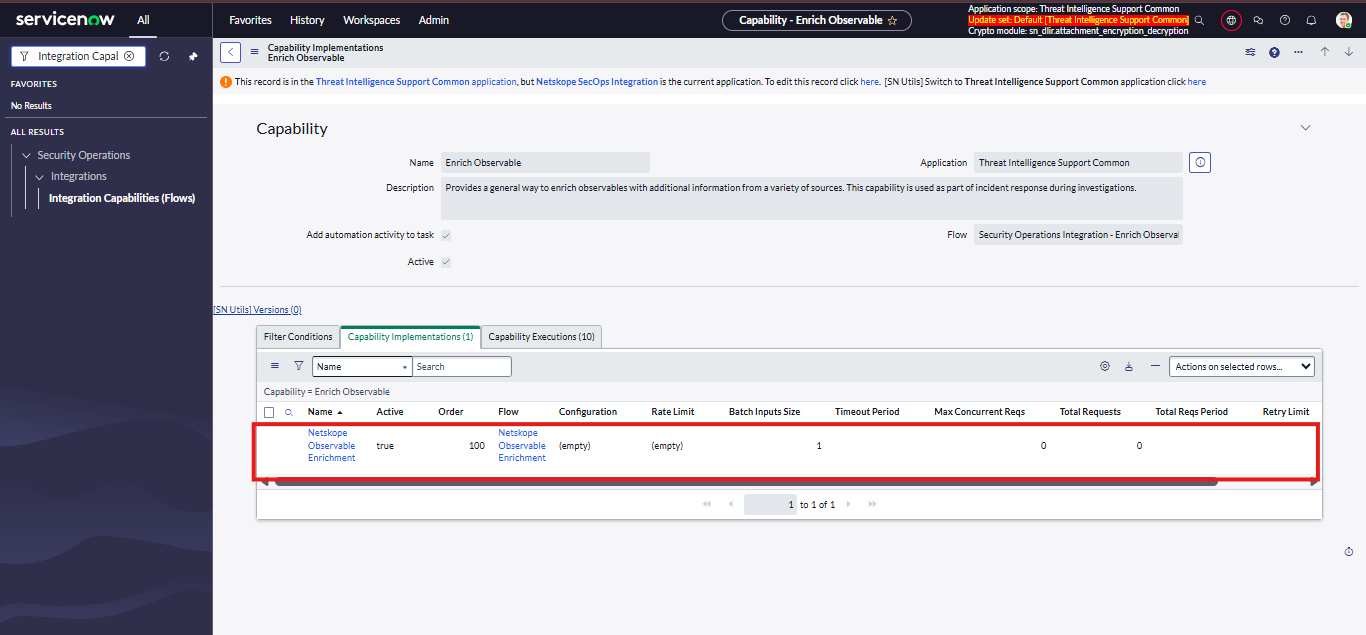
- Select a valid Integration Configuration record for the observables that should be enriched from Netkope, and then click Update.
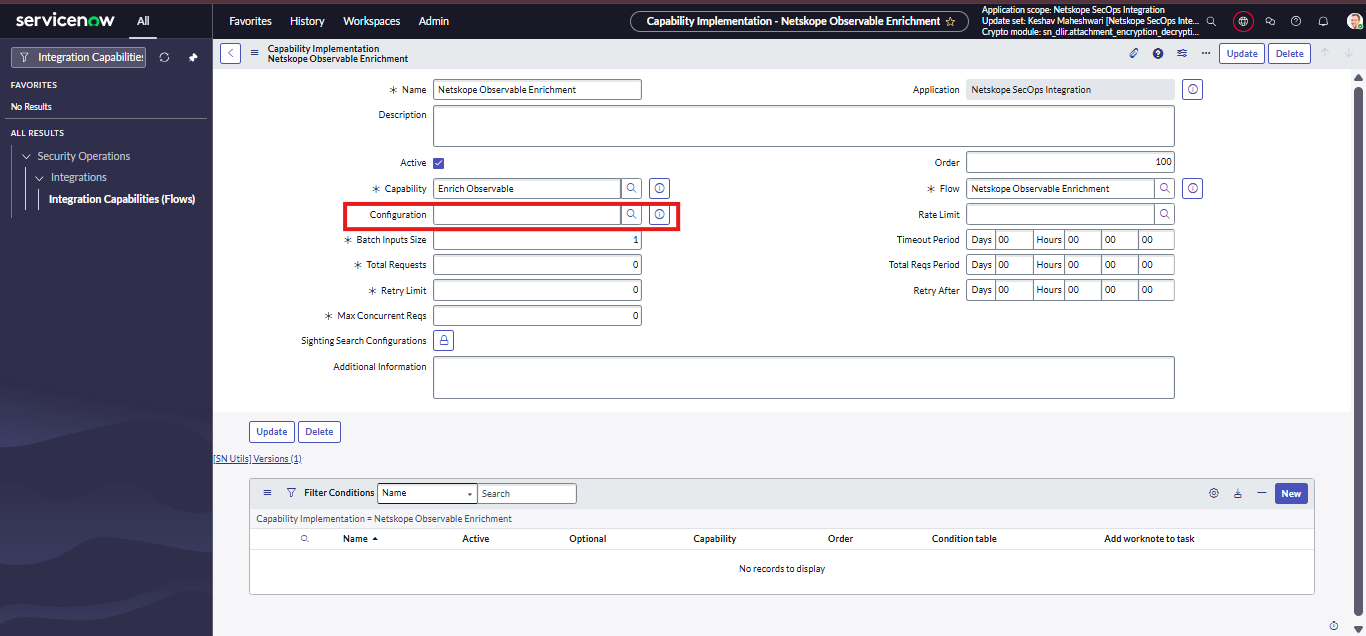
- To perform Observable Enrichment using a different Integration Configuration, update the configuration field with the desired Integration Configuration record.
Use Cases
Data Ingestion Profile Configurations
Role Required: sn_si.admin, x_netsk_nets_sir.netskope_admin,personalize_dictionary
Procedure
- Go to Netskope for Security Operations > Profile Configuration.
- Click New in the list view.
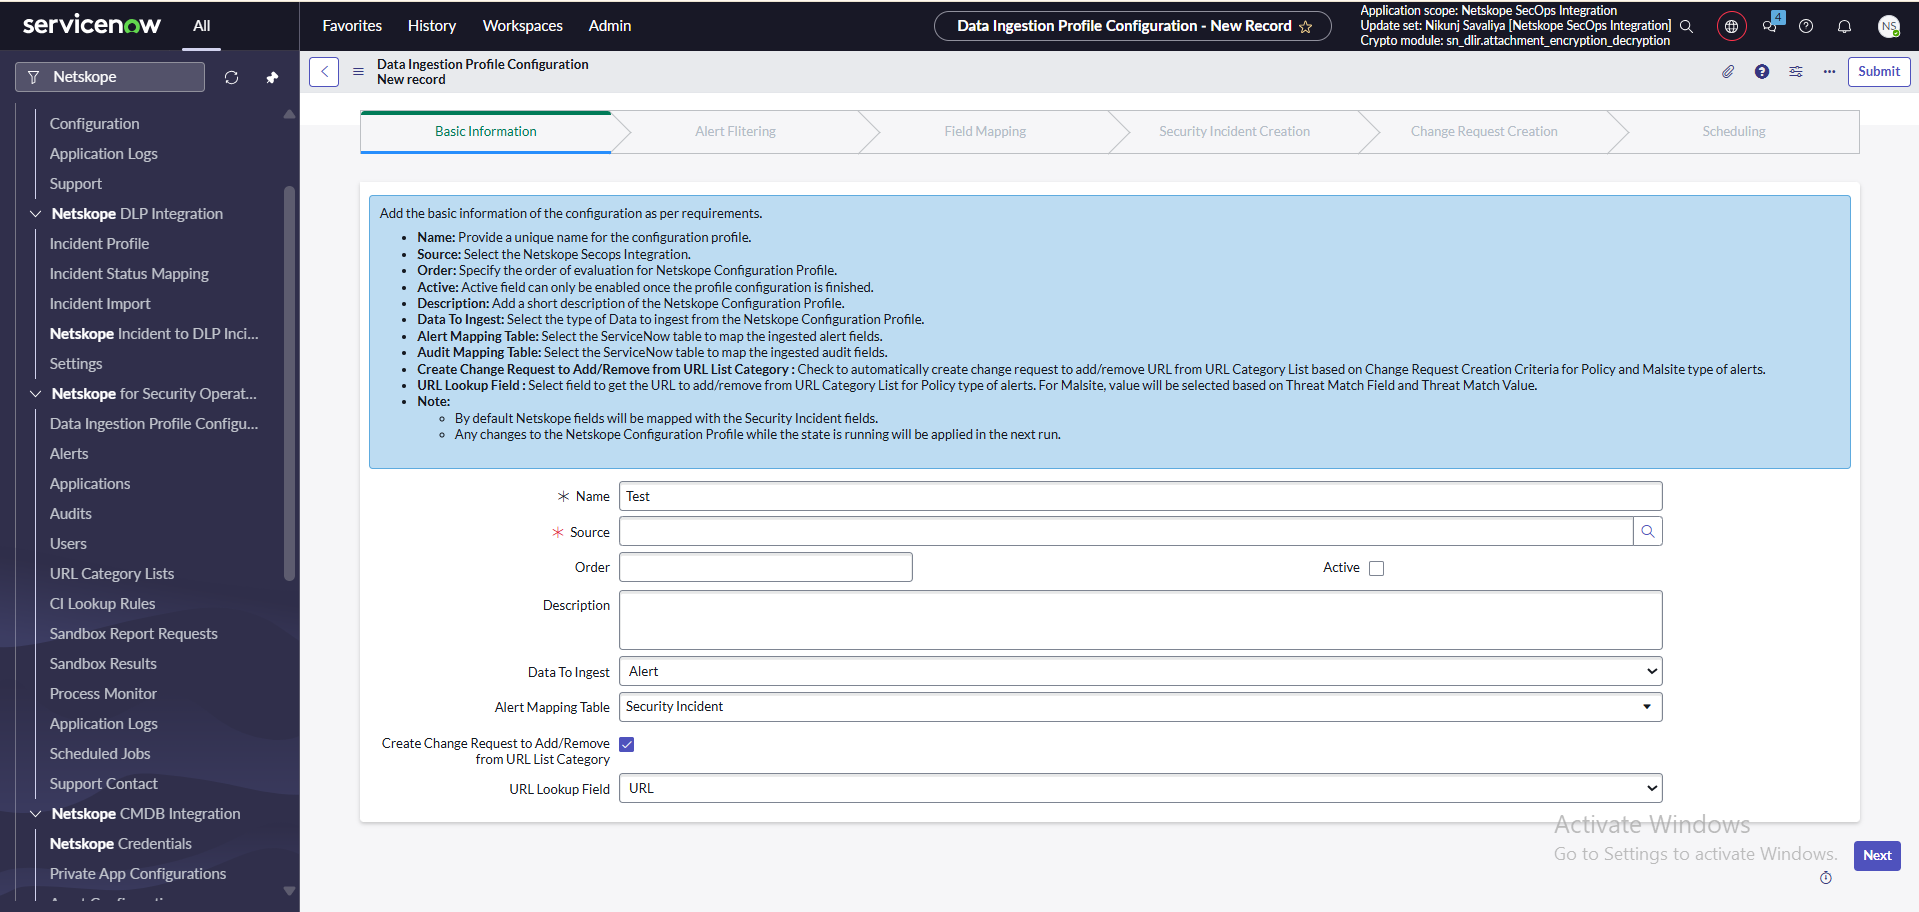
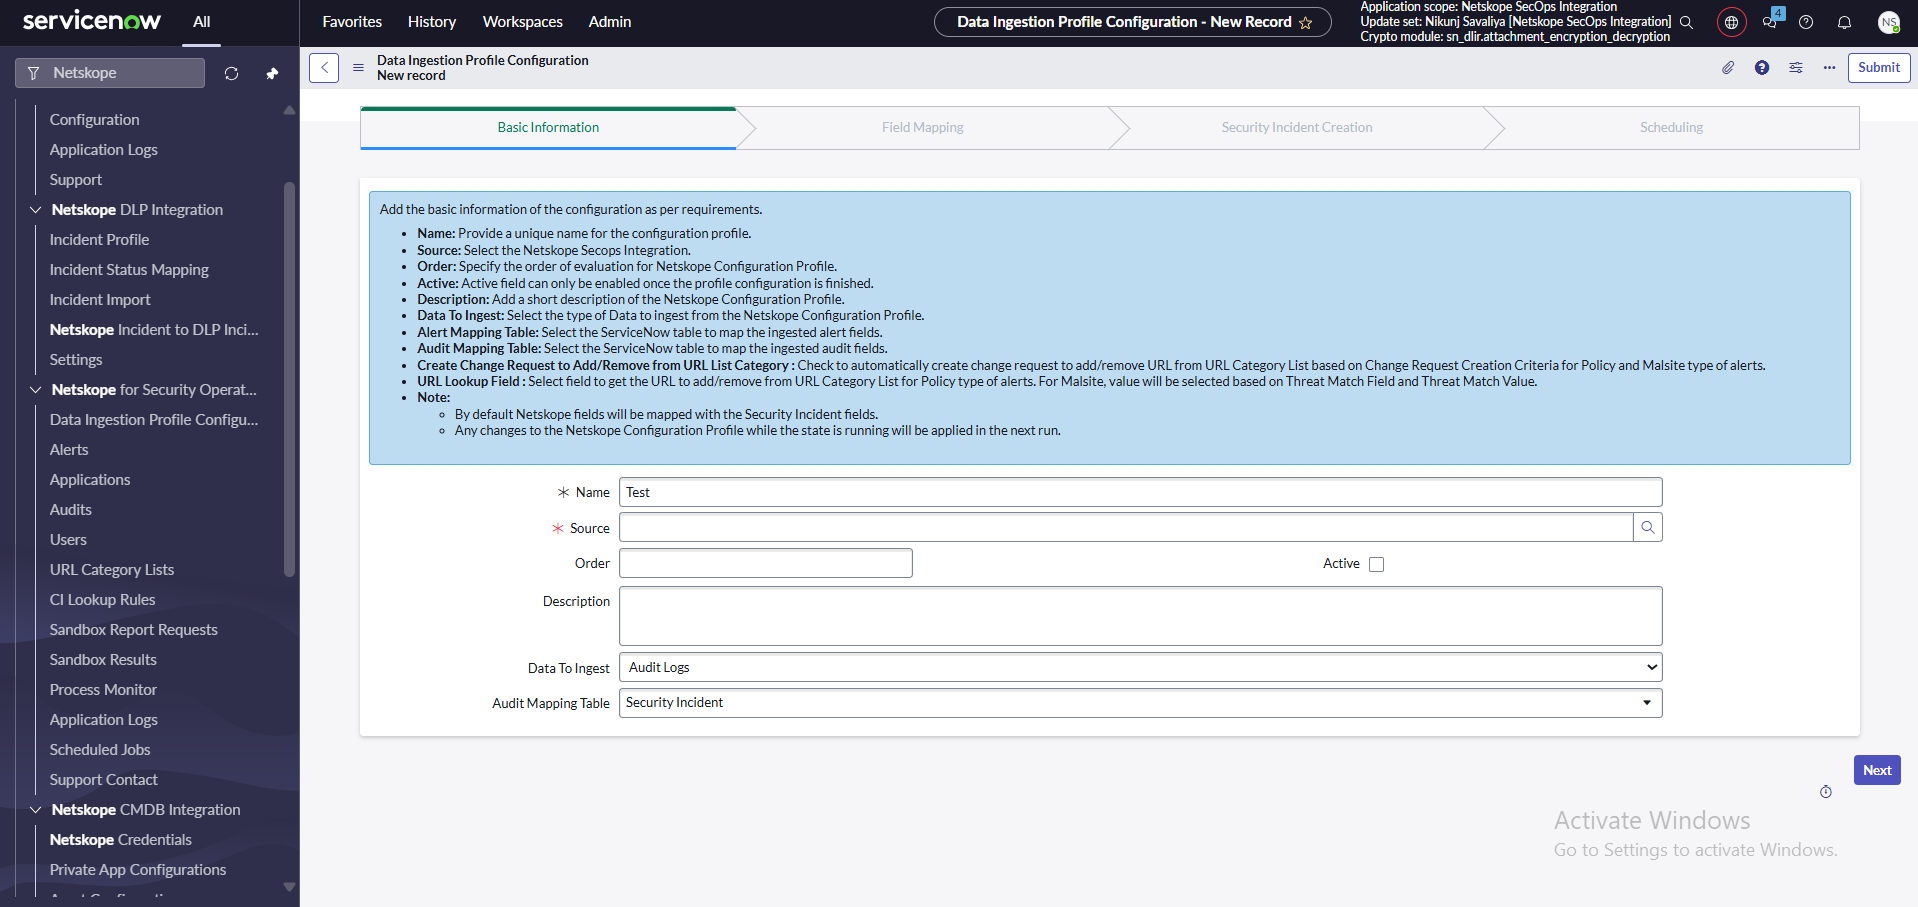
- Insert a Name, Source, Order, and Description.
- Select the Data To Ingest field as either Alert or Audit Logs based on your requirement.
- Select the Alert/Audit Mapping Table to map the incoming alerts/audit logs to selected tables.
- You can select any table that extends the Task table in ServiceNow. By default, the selected table is Security Incident Response.
If you want to allow additional tables, update the following system properties:
- x_netsk_nets_sir.table.alert.whitelist – for the Alert Mapping Table
- x_netsk_nets_sir.table.audit.whitelist – for the Audit Mapping Table
To access these system properties:
- Open the Application Navigator.
- In the filter, type sys_properties.list and open it.
- Search for the above property names.
- Add the table names in the value field that you want to allow, separated by commas.
Example: sys_user,incident,sys_user_group - To create a Change Request for a policy or malsite type of alerts to add/remove URL to URL category list, mark Create Change Request to Add/Remove from URL List Category as true.
- If Create Change Request to Add/Remove from URL List Category is true, select the field to get the URL to add/remove from URL Category List for Policy type of alerts. For Malsite, avalue will be selected based on the Threat Match Field and Threat Match Value.
Important
While selecting a table make sure users have enough roles to insert records in the selected table. Also make sure cross-scope privileges are allowed.
- Click Next to save configuration and proceed to the next tab.
For Alert Type:
For Audit Logs Type:
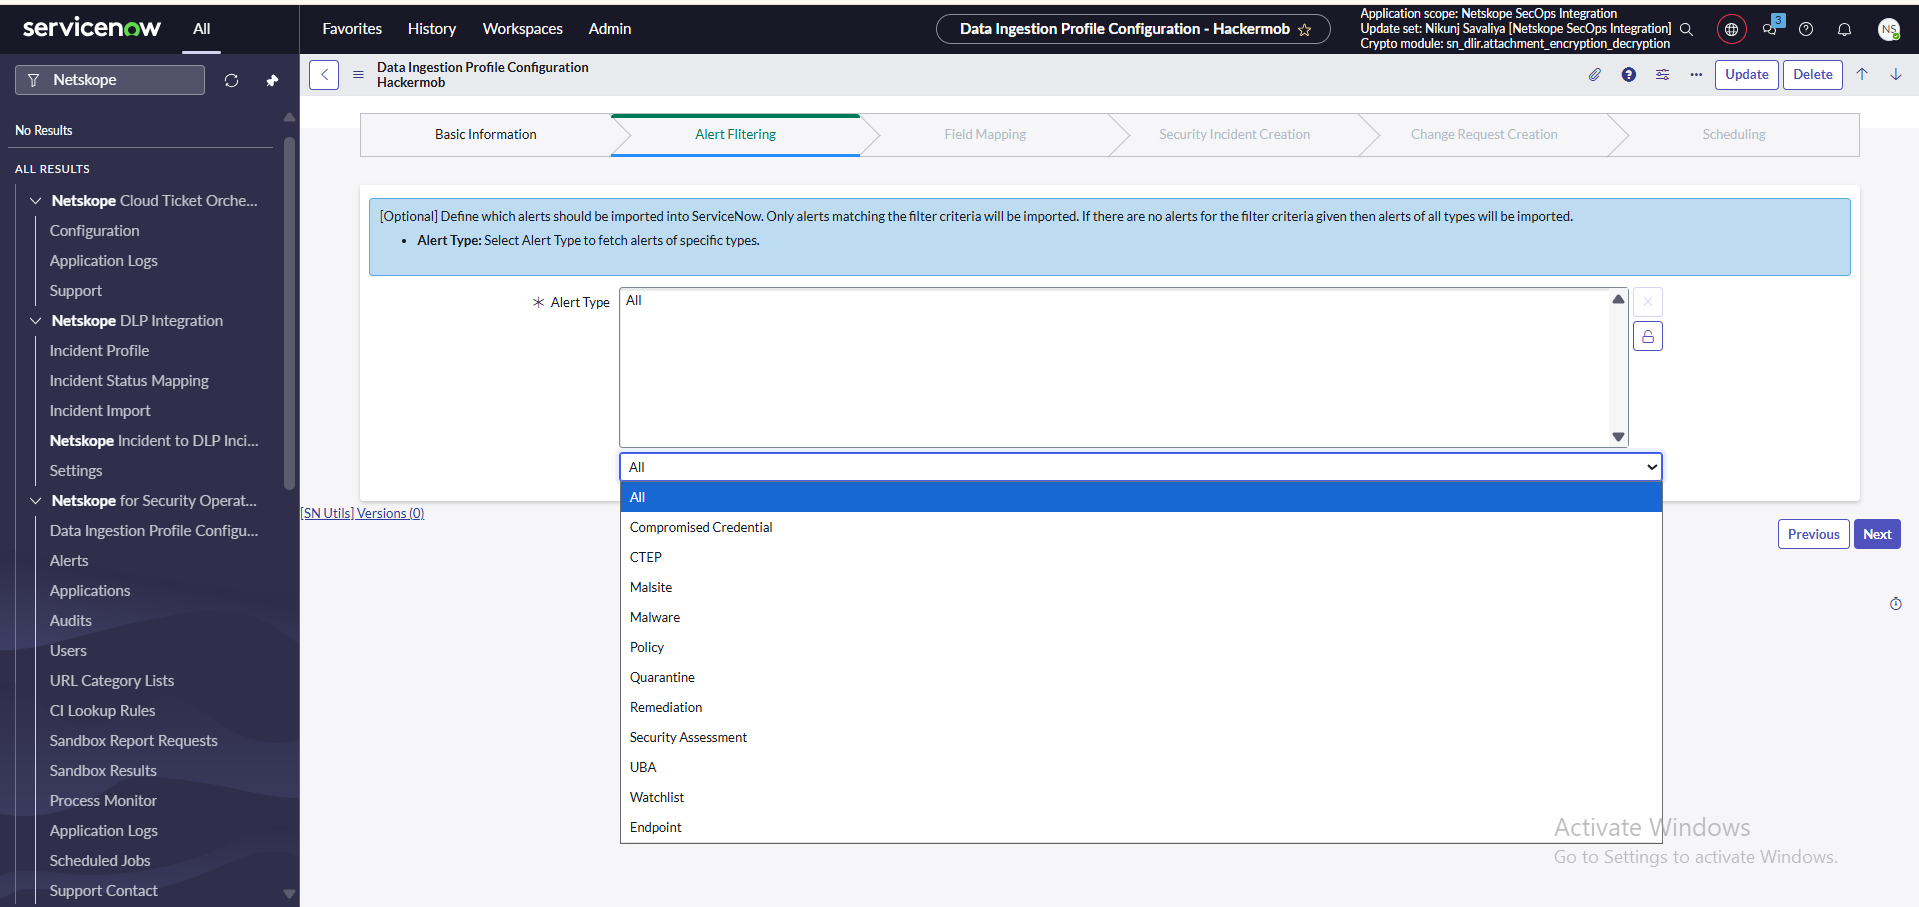
- You will be directed to the Alert Filtering tab if the Data To Ingest field is selected as Alert. where Select the type of Alerts that are required to be ingested.
- By Default, all alerts are selected in the Alert type. If All is selected in the Alert type along with different alert types, only the selected alert types will be fetched, and not all alerts.
- Click Next to move to the Field Mapping tab.
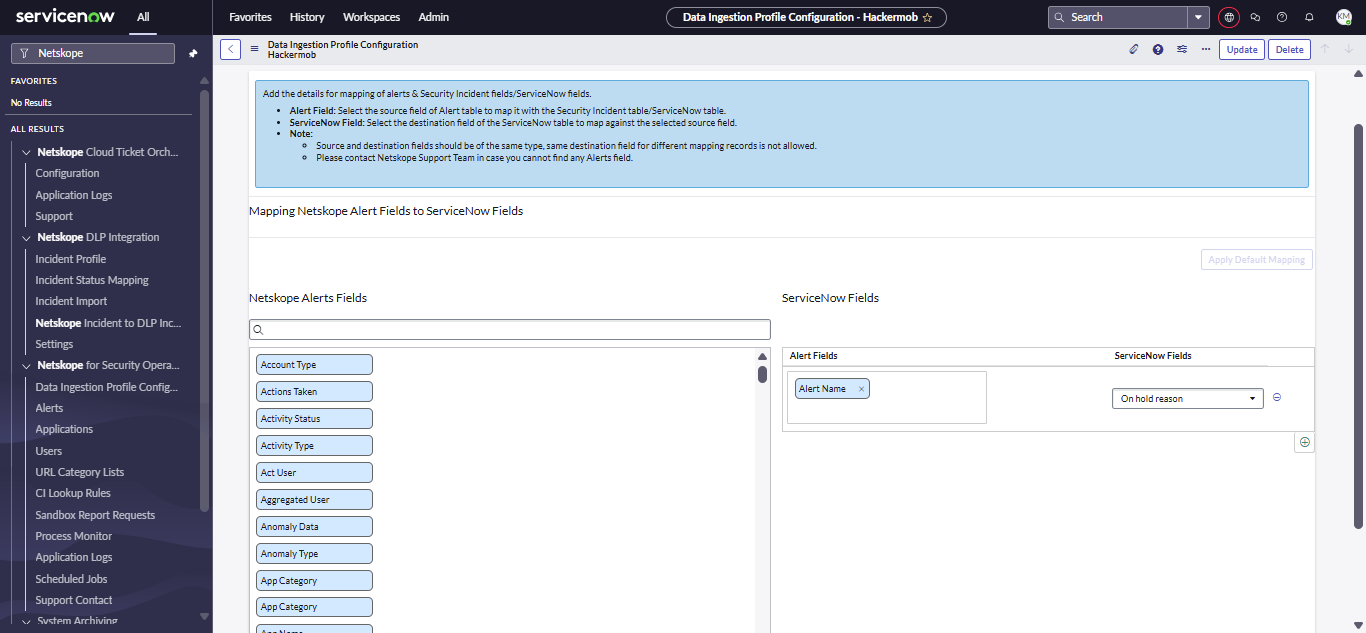
- Provide custom mappings for the alerts/audit logs fields to their selected Alert / Audit Mapping table fields via Field Mapping tab.
Use the ‘\n’ next line escape character in the field mapping to push the next. - Click Next to go to the Security Incident Creation tab.
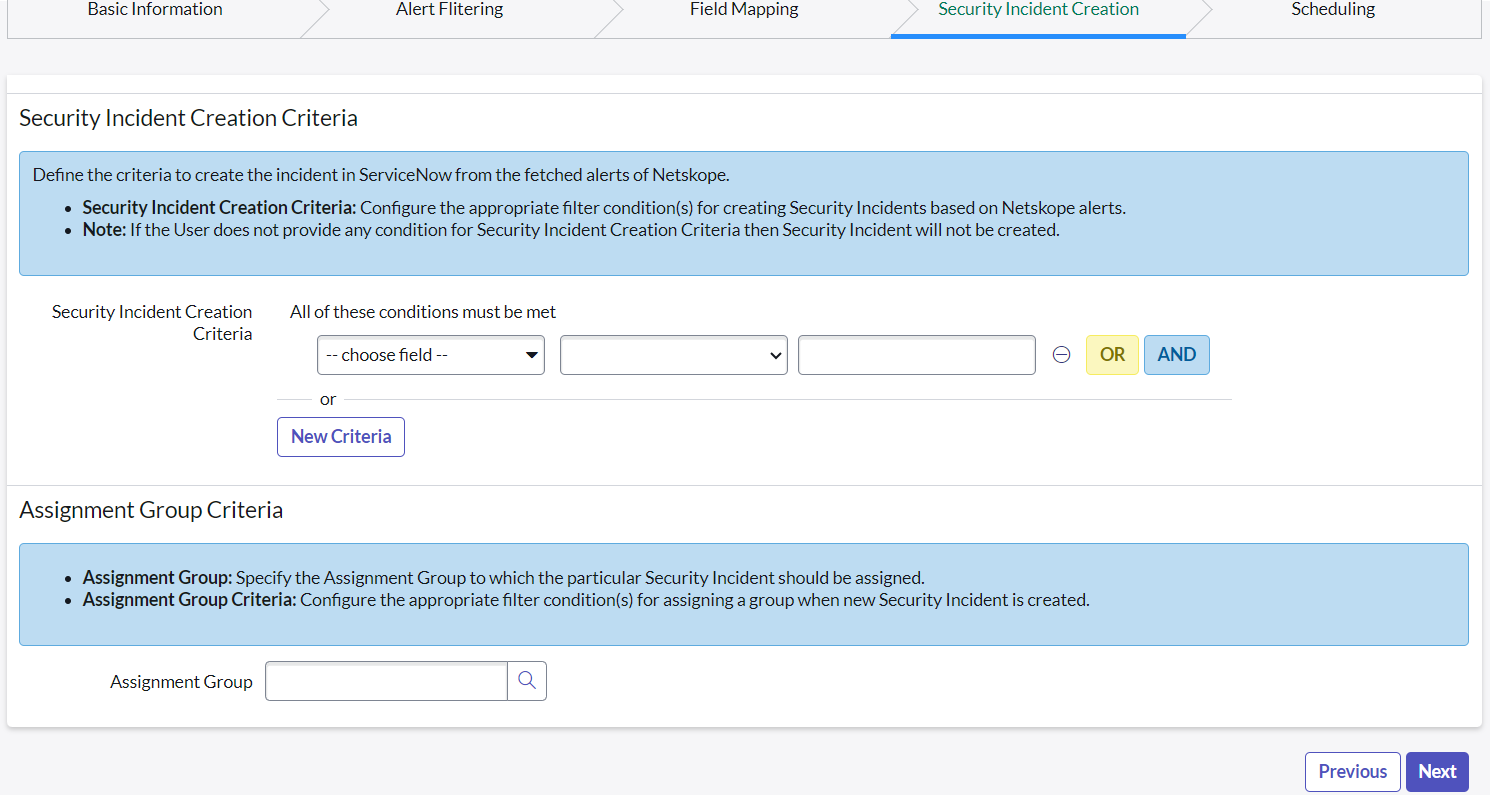
- In the Security Incident tab, provide the criteria for the Security Incident to be created and whom to assign.
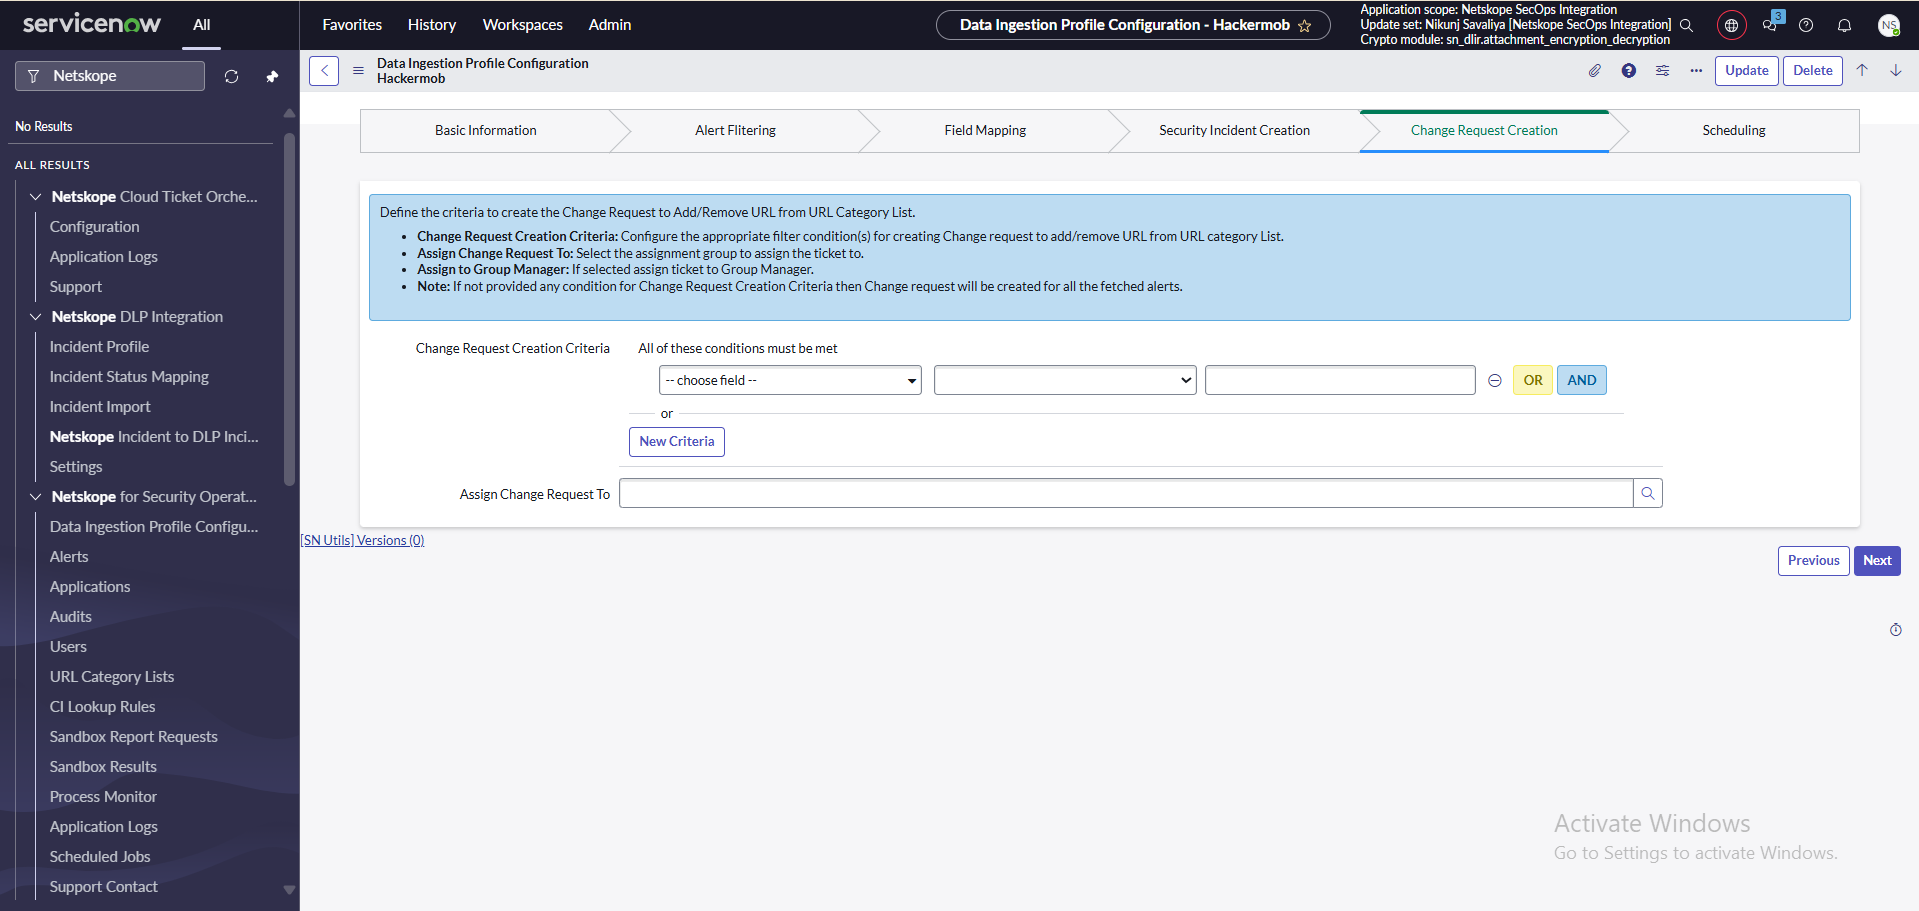
- Click Next to save the criteria and move to the Change Request Creation tab if Create Change Request to Add/Remove from URL List Category is selected.
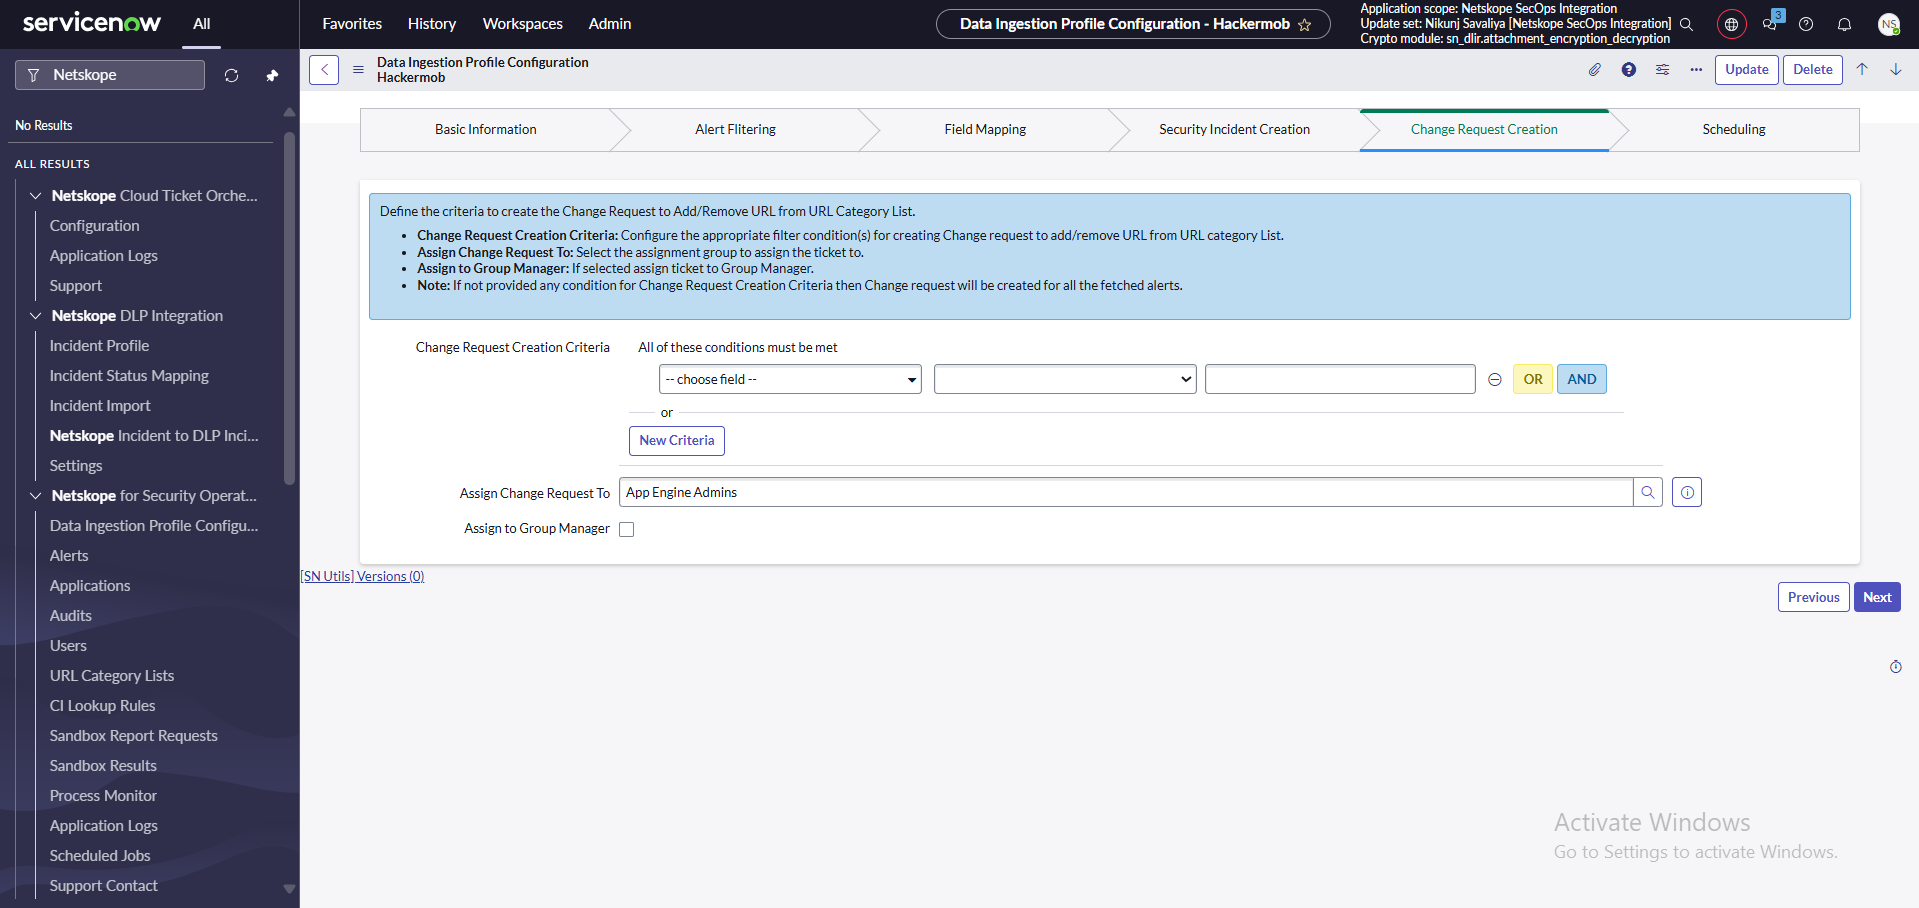
- In the Change Request Creation tab, provide the criteria for the Change Request to be created and whom to assign. If Assign change request to is selected, select who to assign as the manager of the group, and if not selected, the change request will remain unassigned.
- Click Next to save the criteria, and move to the scheduling part.
- In the Scheduling tab, select if you want one time data collection or recurring data collection, and also specify additional parameters, such as Start Time and Interval, based on your choices.
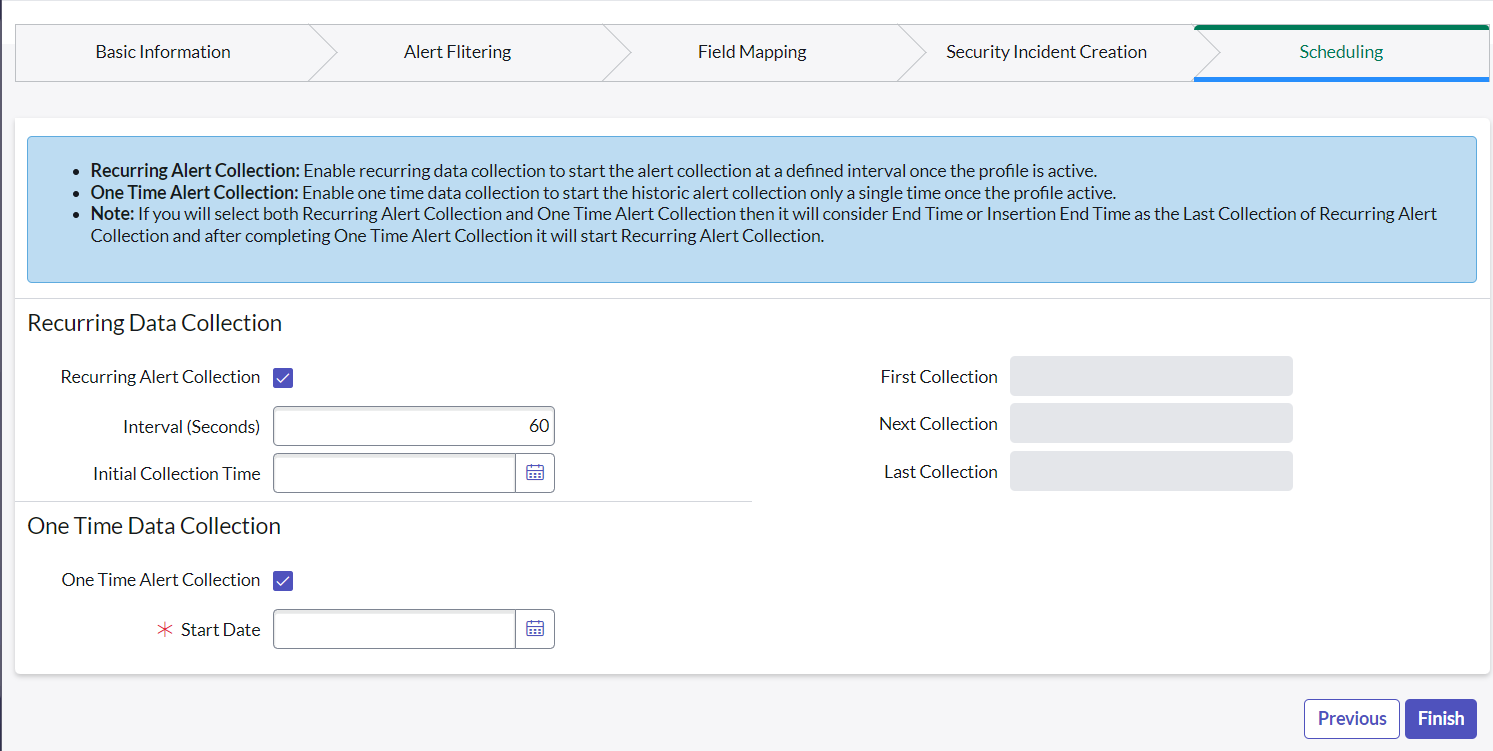
- Click Finish to save the Netskope Profile Configuration.
Imported Alerts
You can view all the alerts that have been imported from the Netskope platform. A list of all the imported alerts and their details is available to users.
Role Required: x_netsk_nets_sir.netskope_admin or x_netsk_nets_sir.netskope_user
Procedure:
- Go to Netskope for Security Operations > Alerts.
- Click on any imported alert record.
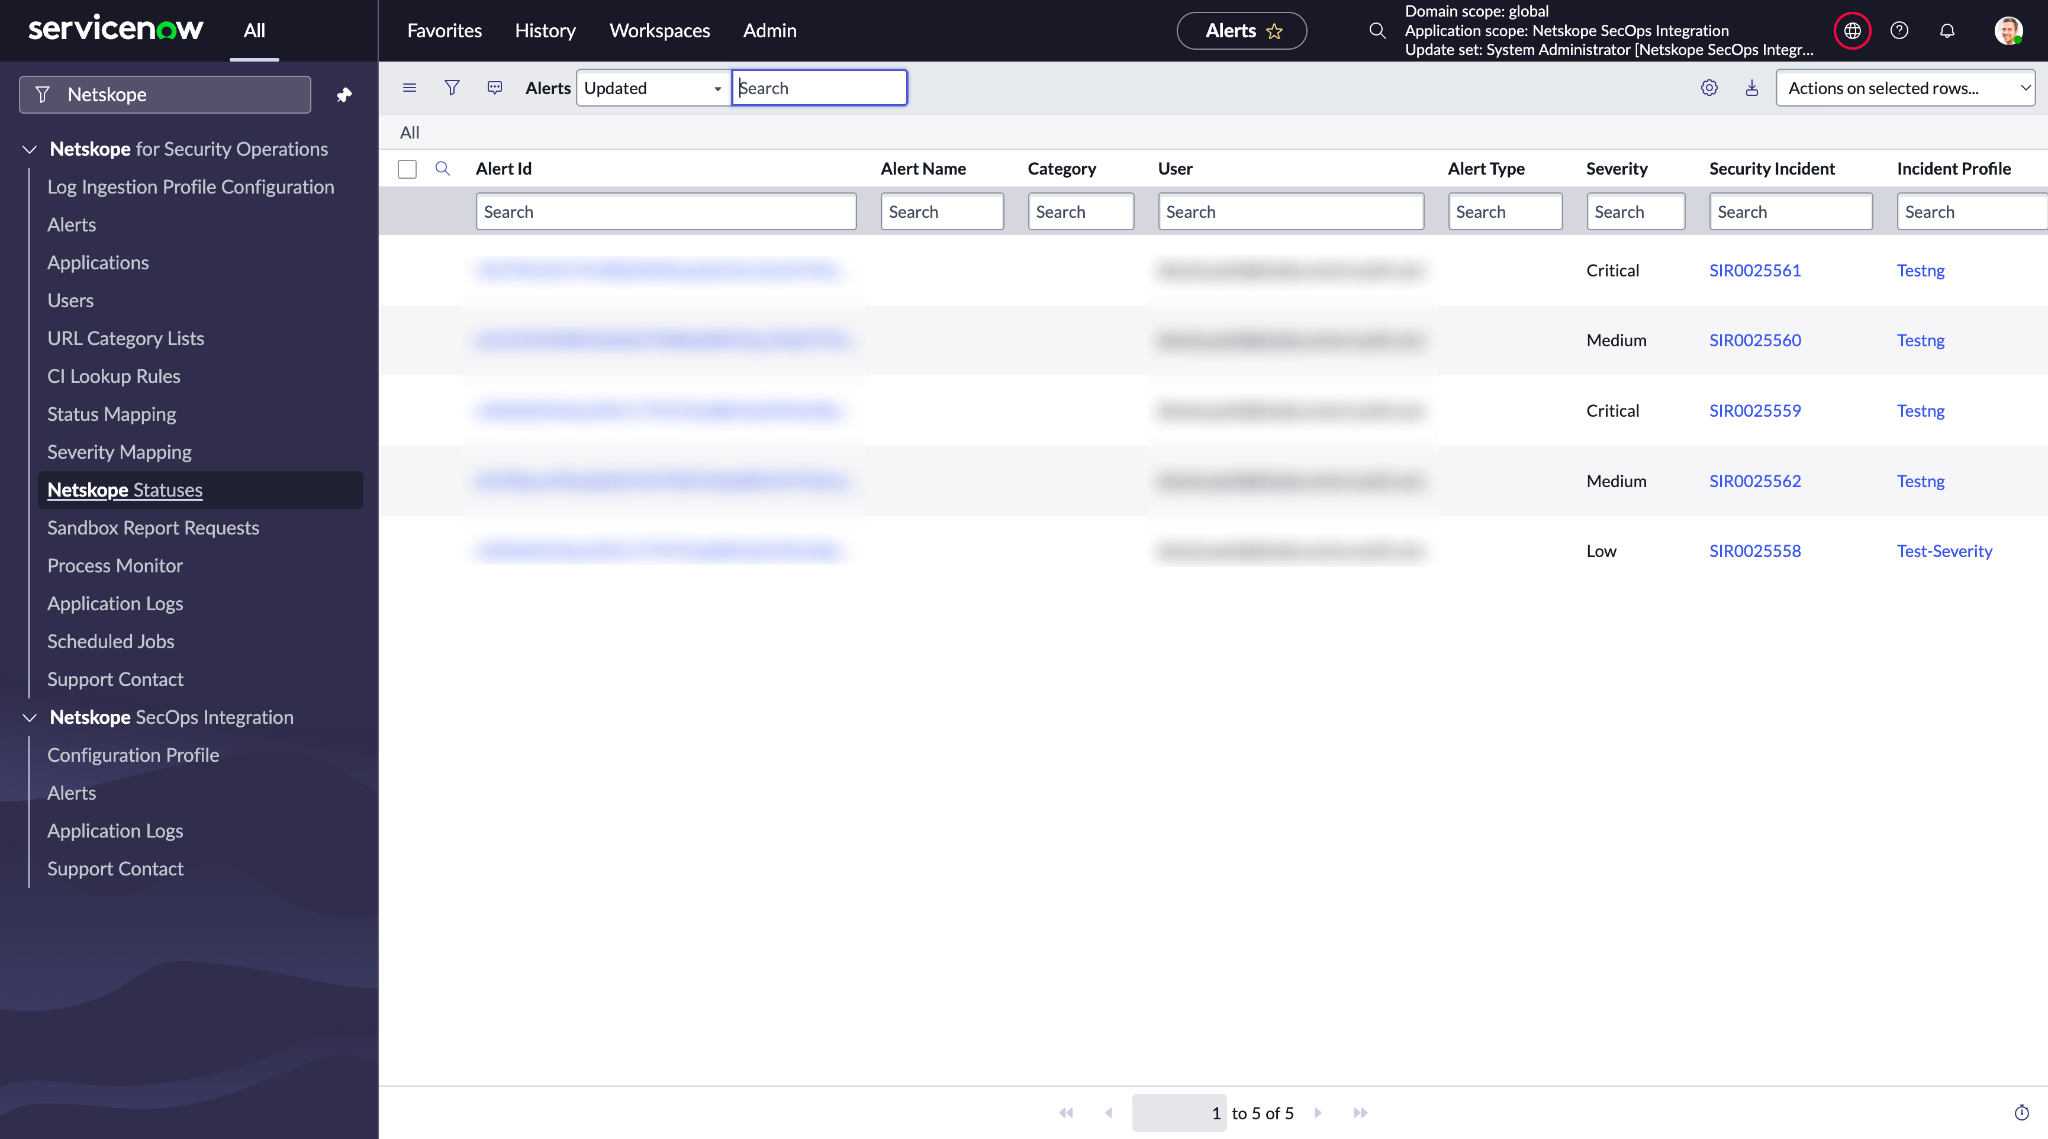
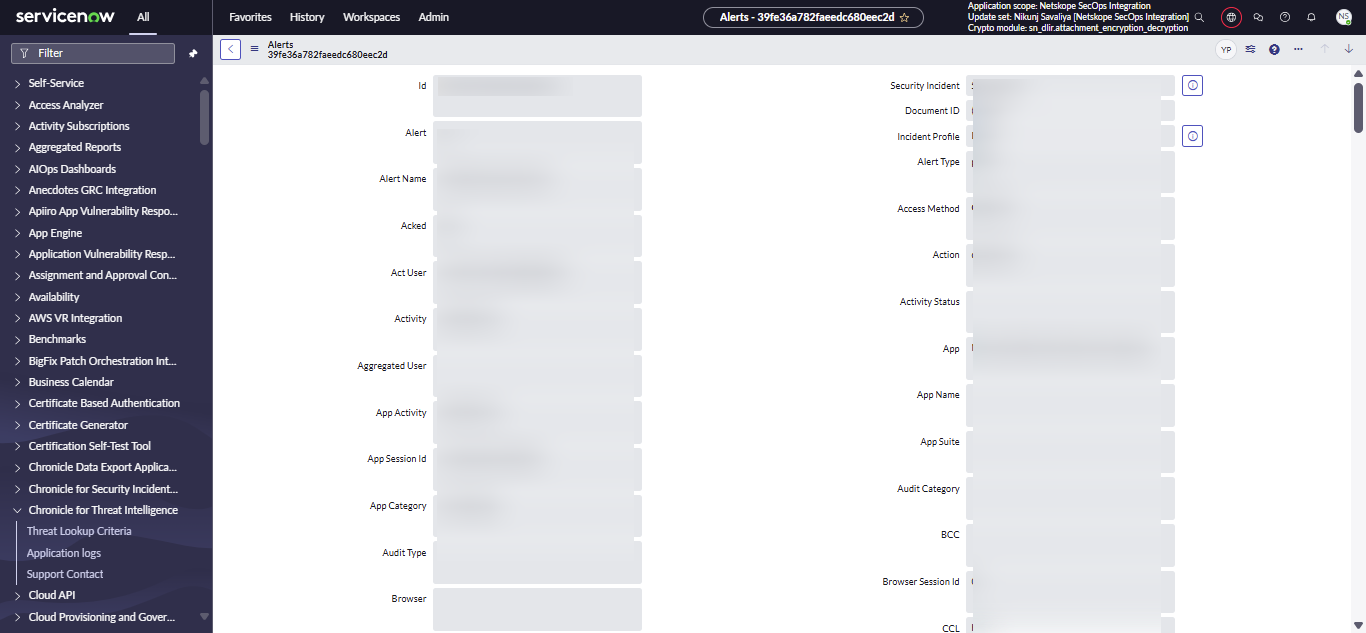
- You can view all the fetched details of a selected alert in read-only mode.
- If the selected Alert Mapping Table is selected as sn_si_incident in the Profile Configuration, then the reference of the security incident will be shown in the Security Incident field. If any other table is selected in the Alert Mapping Table, then the reference of the created record will be shown in the Document ID field.
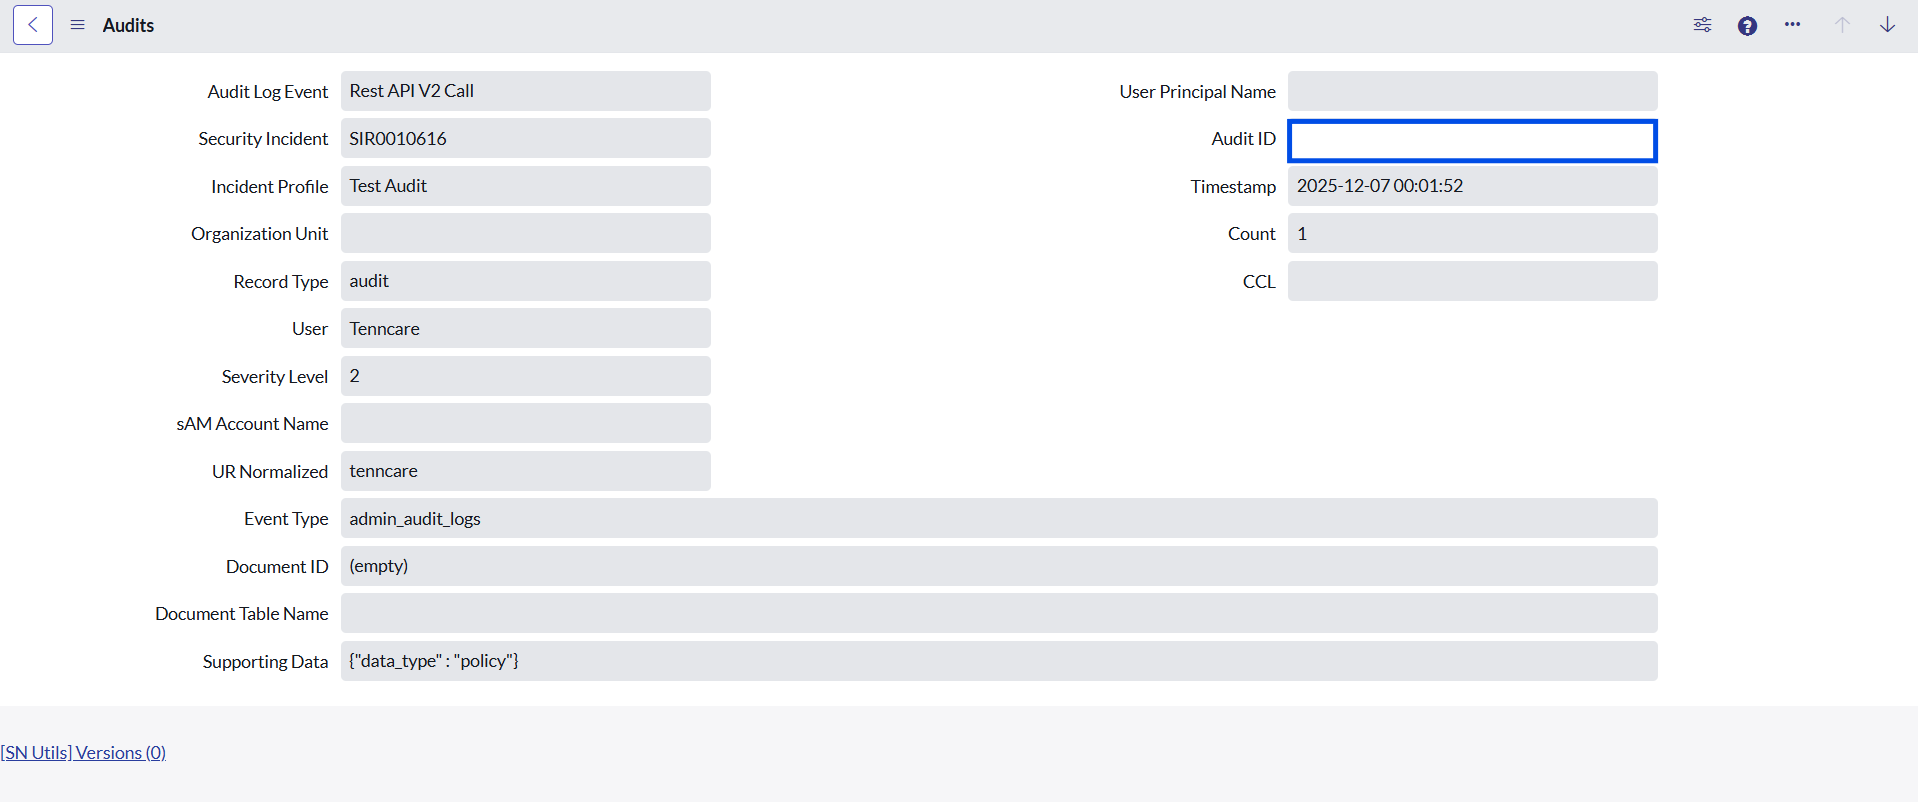
Imported Audit Logs
Users can view all the audit logs that have been imported from the Netskope platform. A list of all the imported logs and their details is available to users.
Role Required: x_netsk_nets_sir.netskope_admin or x_netsk_nets_sir.netskope_user
Procedure
- Go to Netskope for Security Operations > Audits.
- Click on any imported audit record.
- You can view all the fetched details of a selected audit in read-only mode.
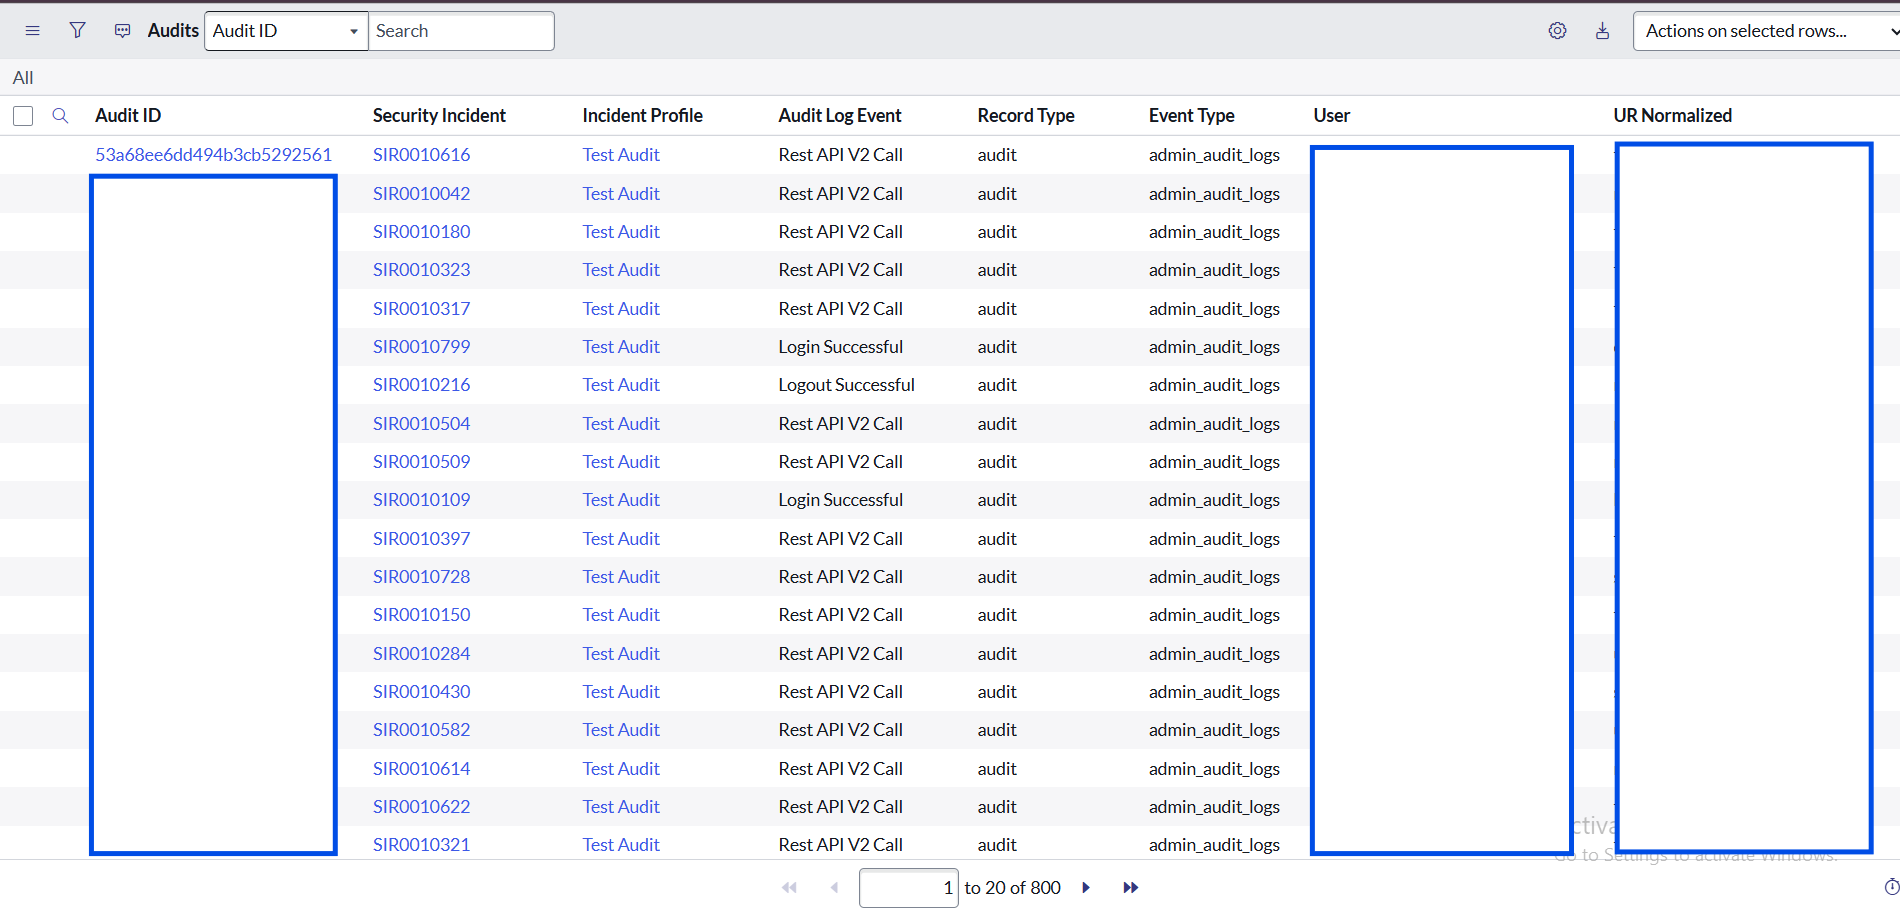
- If the selected Audit Mapping Table is selected as sn_si_incident in the Profile Configuration, then the reference of the security incident will be shown in the Security Incident field. If any other table is selected in the Alert Mapping Table, then the reference of the created record will be shown in the Audit ID field.
Imported Applications
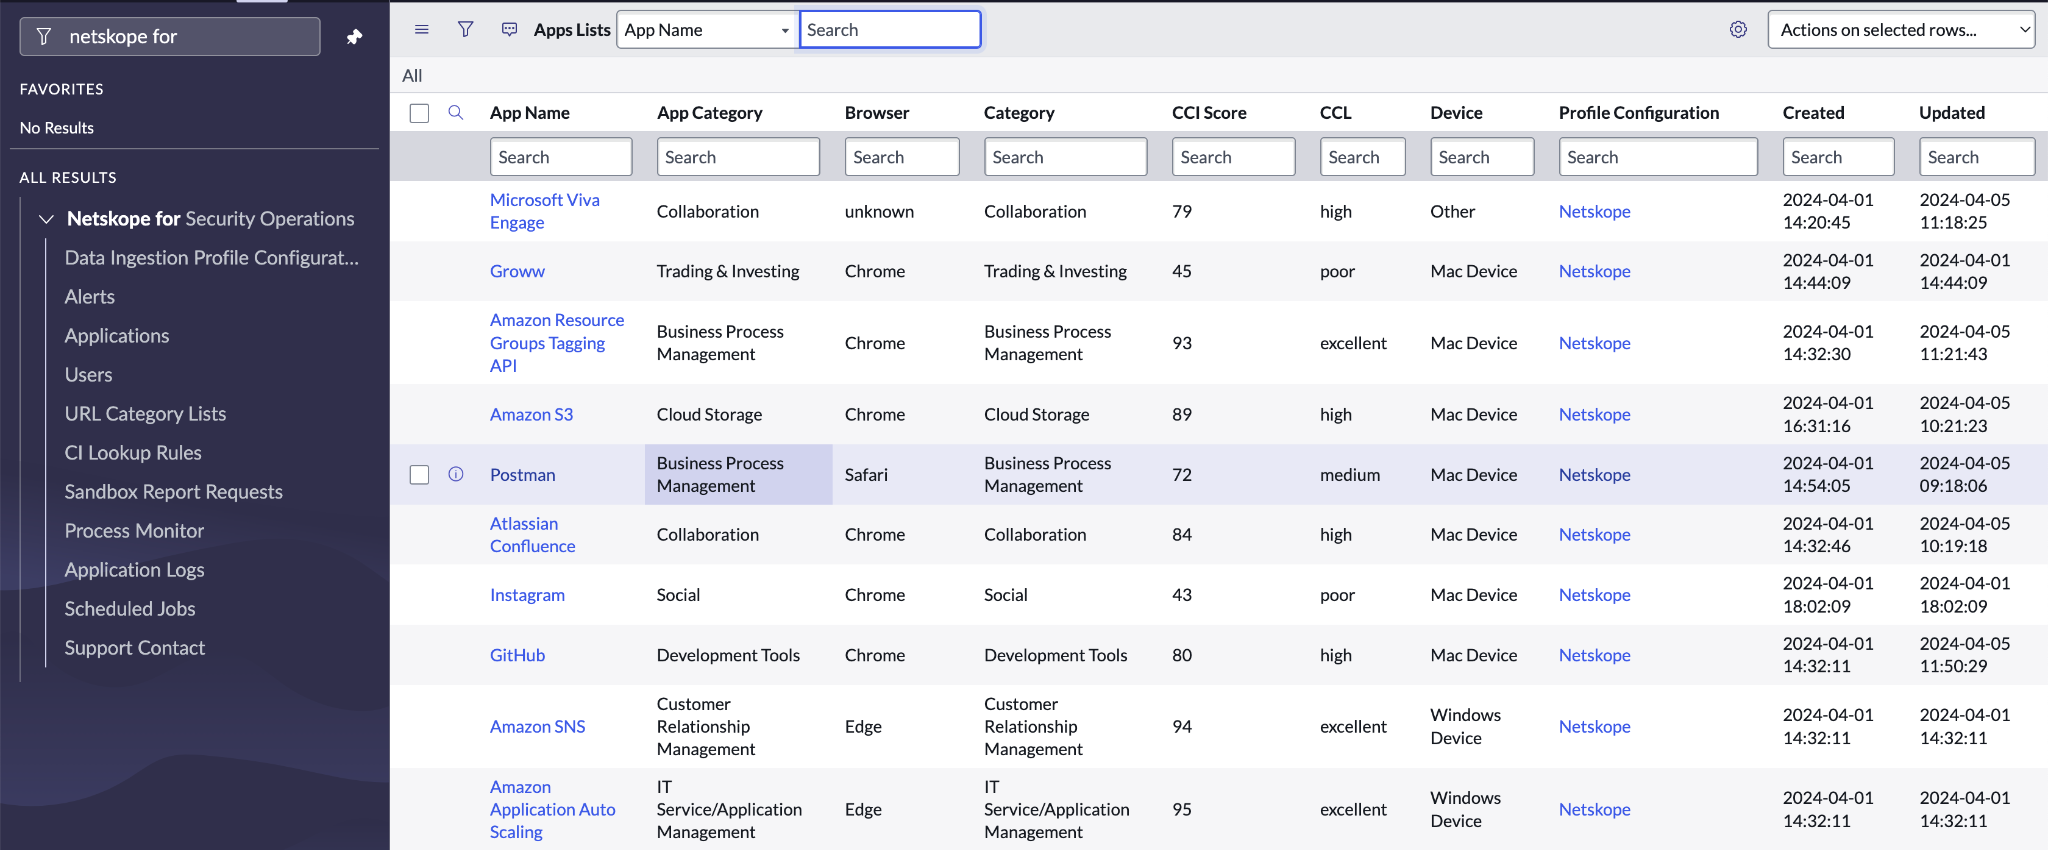
You can view all the applications that have been imported from the Netskope platform. A list of all applications with their details is available to users. Additionally you can also find the imported applications in the cmdb_ci_appl table in ServiceNow.
Role Required: x_netsk_nets_sir.netskope_admin or x_netsk_nets_sir.netskope_user
Procedure
- Go to Netskope for Security Operations > Applications.
- Click on any application record.
- You can view all the fetched details of the selected application in read-only mode.
Imported Users
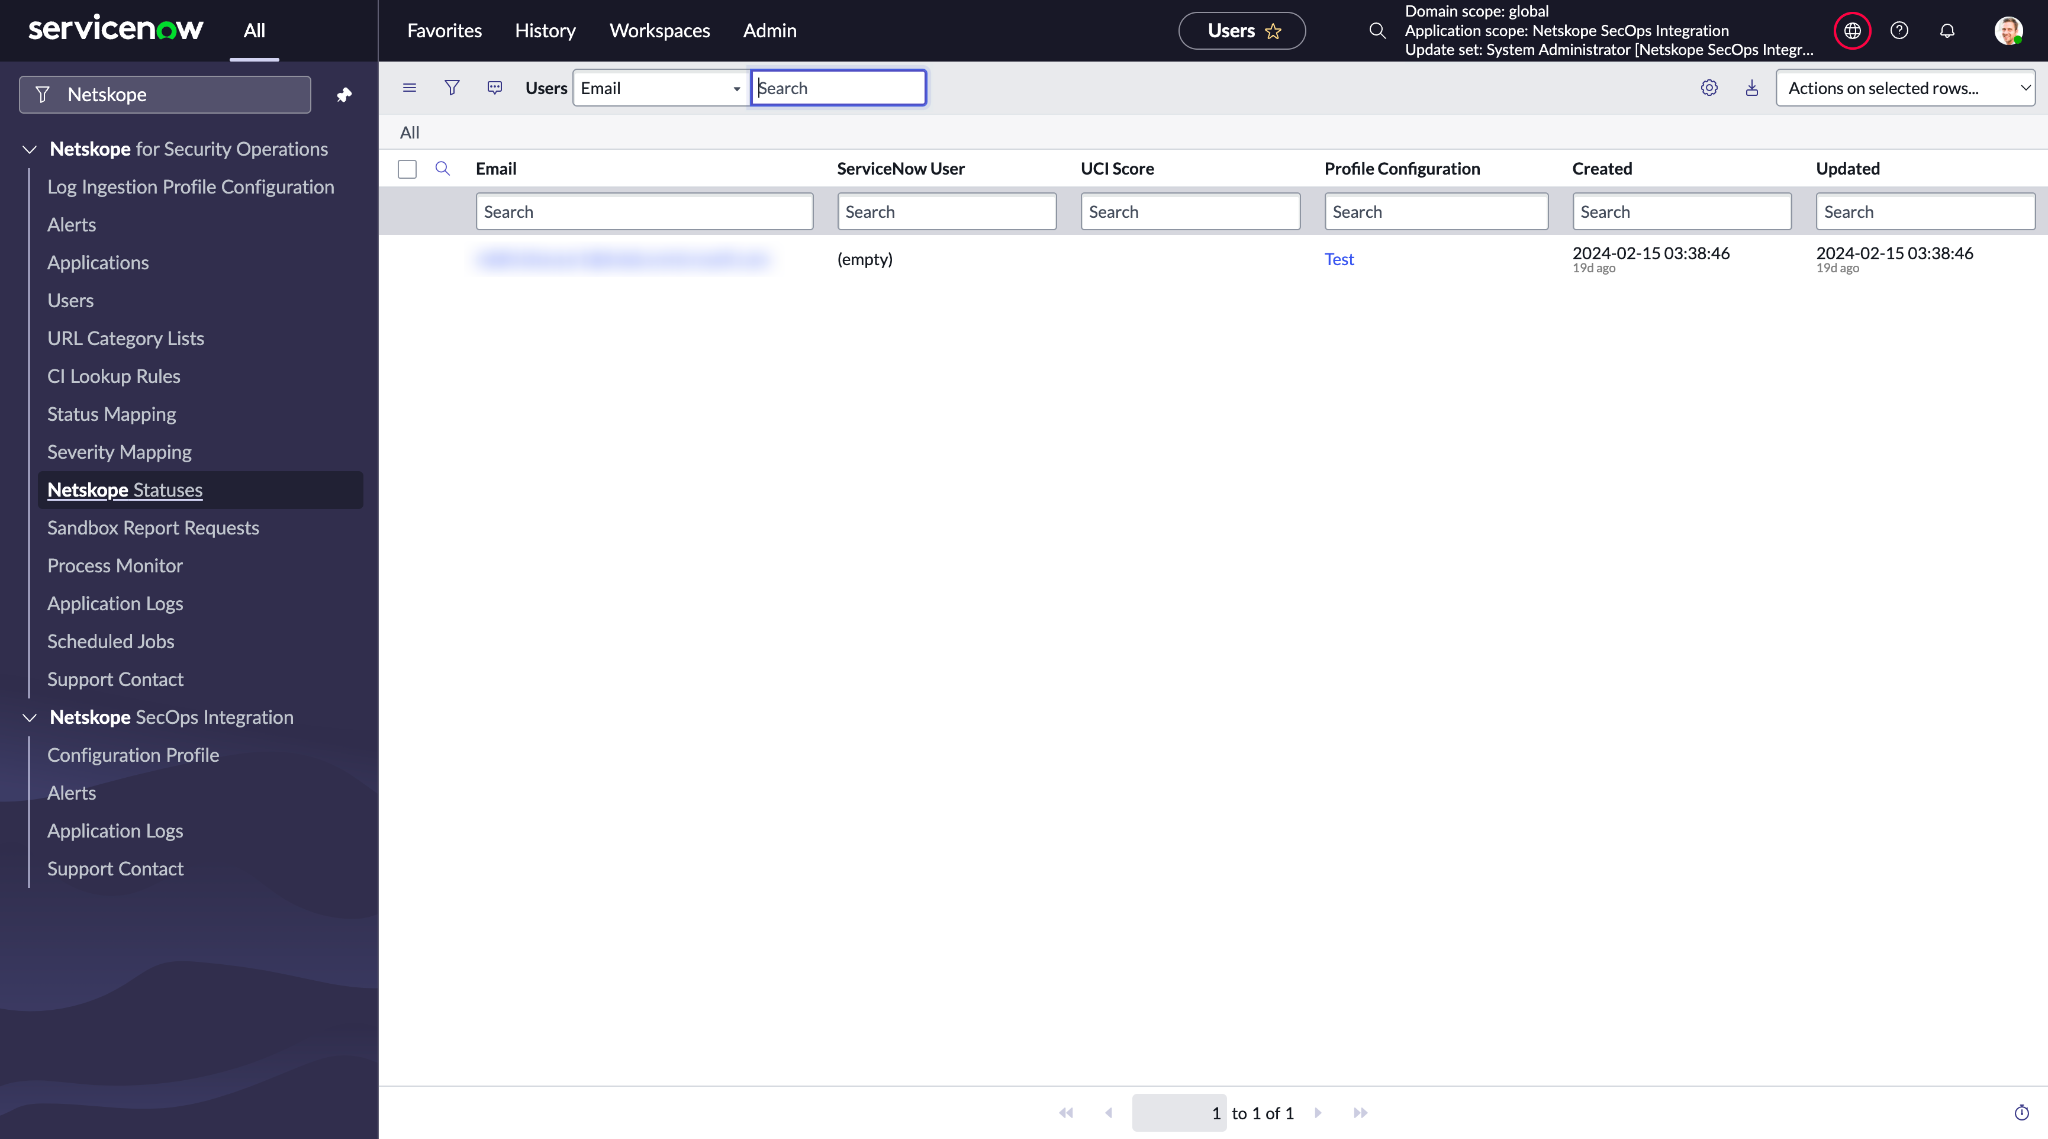
You can view all the Users that have been imported from the Netskope platform. A list of all users with their details is available to users.
Role Required: x_netsk_nets_sir.netskope_admin or x_netsk_nets_sir.netskope_user
Procedure
- Go to Netskope for Security Operations > Users.
- Click on any application record.
- You can view all the fetched details of the selected Users in read-only mode.
Observable Enrichment
You can enrich more information about observables using the Observable Enrichment capability.
Roles Required: sn_si.admin or sn_si.analyst
Procedure
- Go to Security Incidents.
- Click on a Security Incident record.
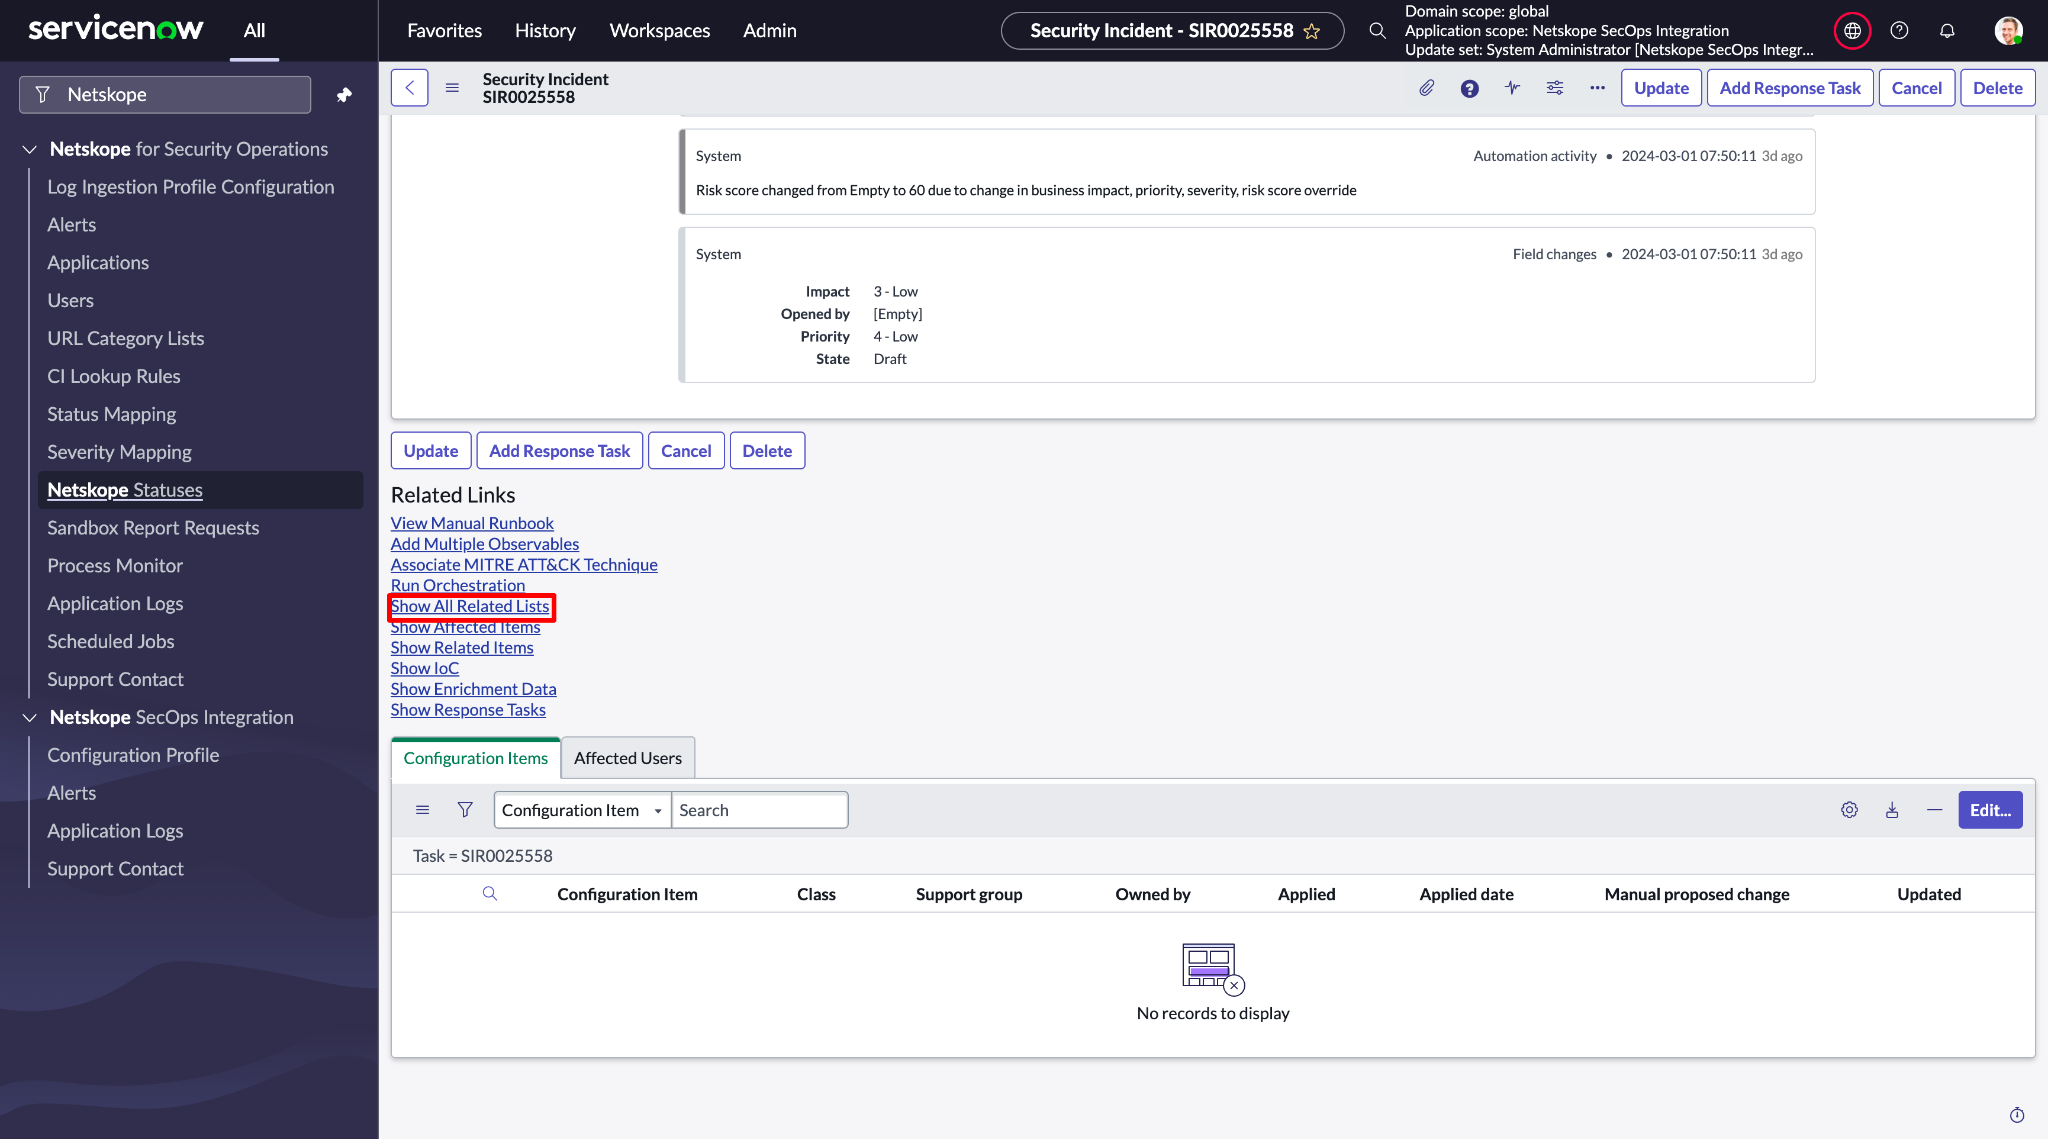
- Locate the Associated Observables related list. If the related list is not visible, click Show All Related Lists.
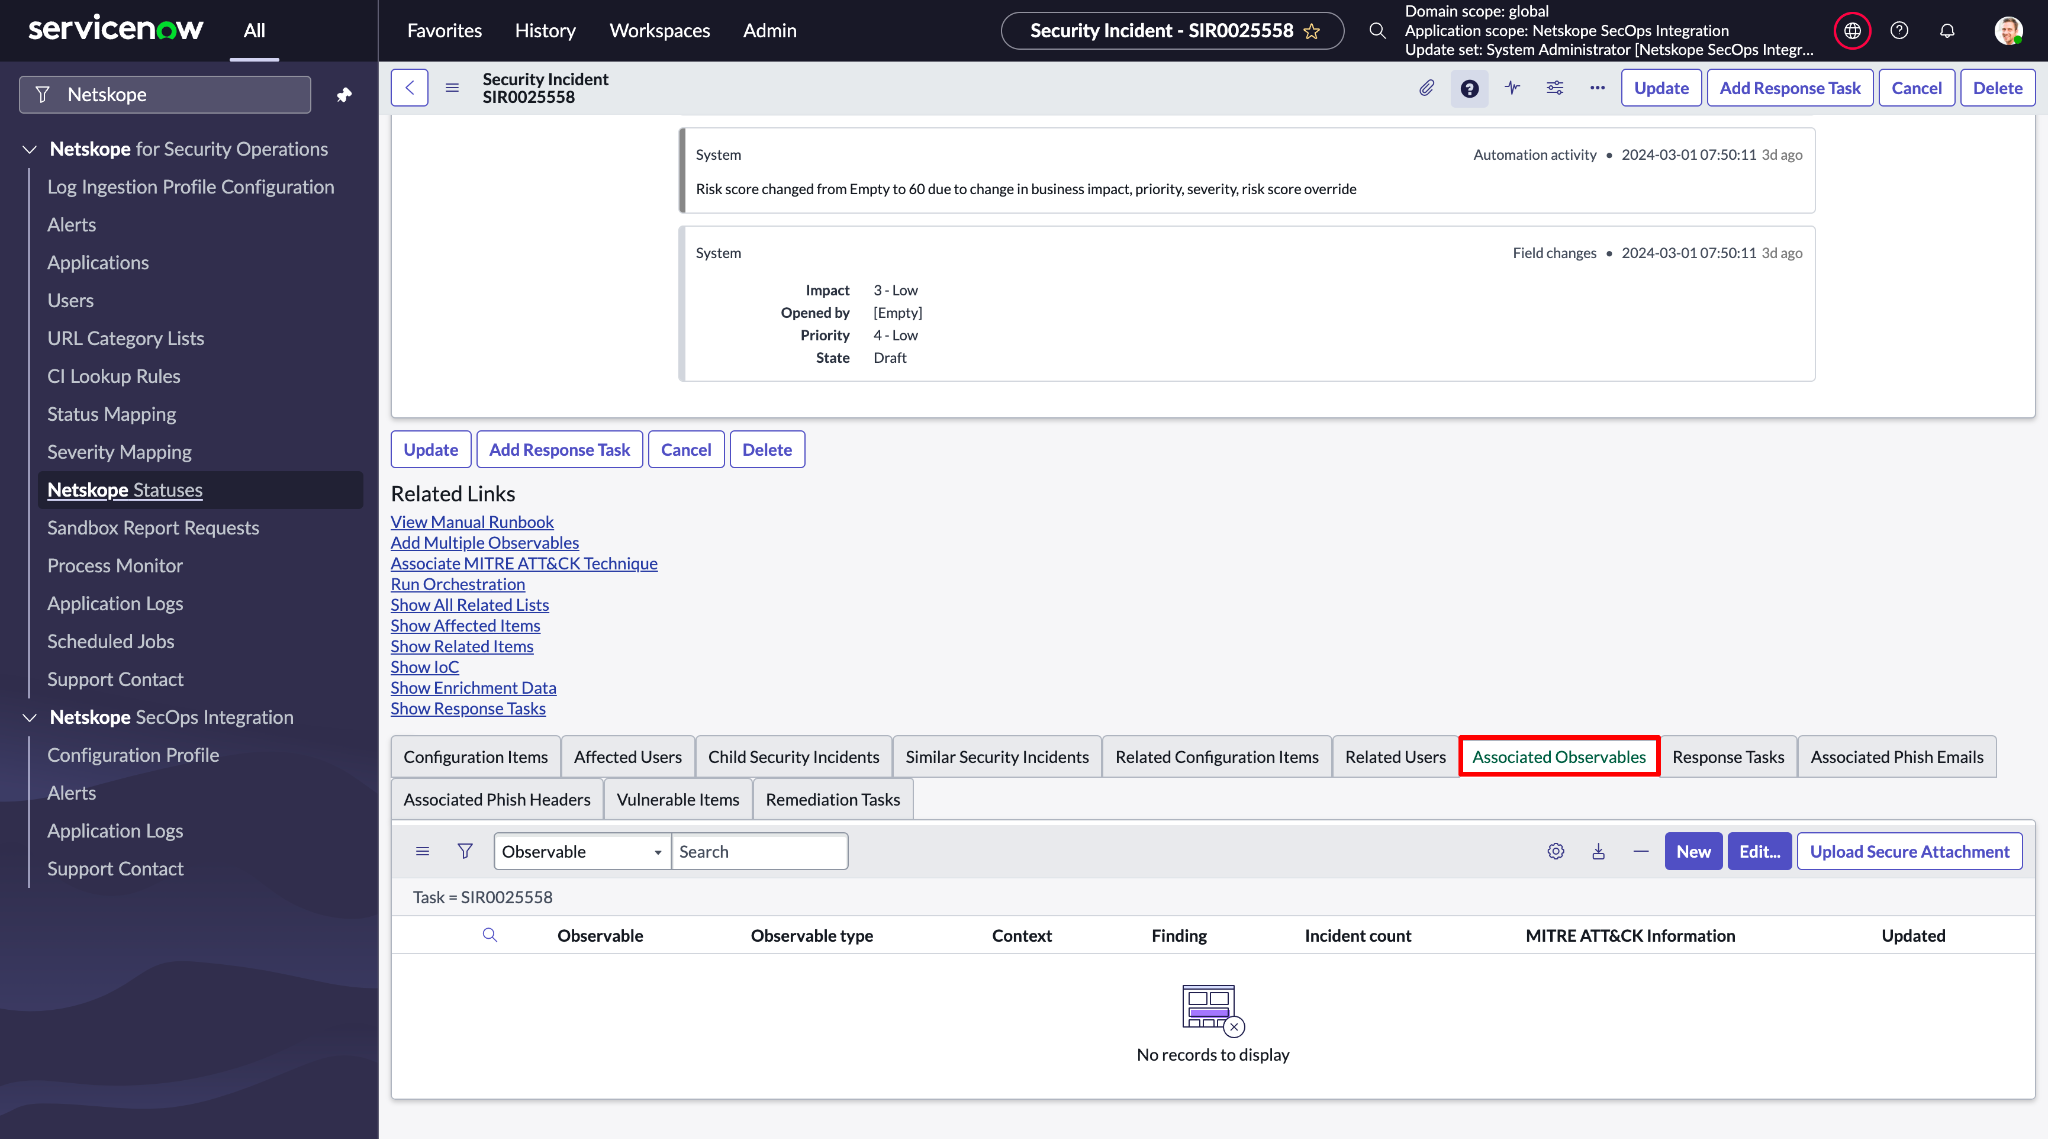
- Select the Observable of type URL, click the Actions on selected rows dropdown and select Run Observable Enrichment.
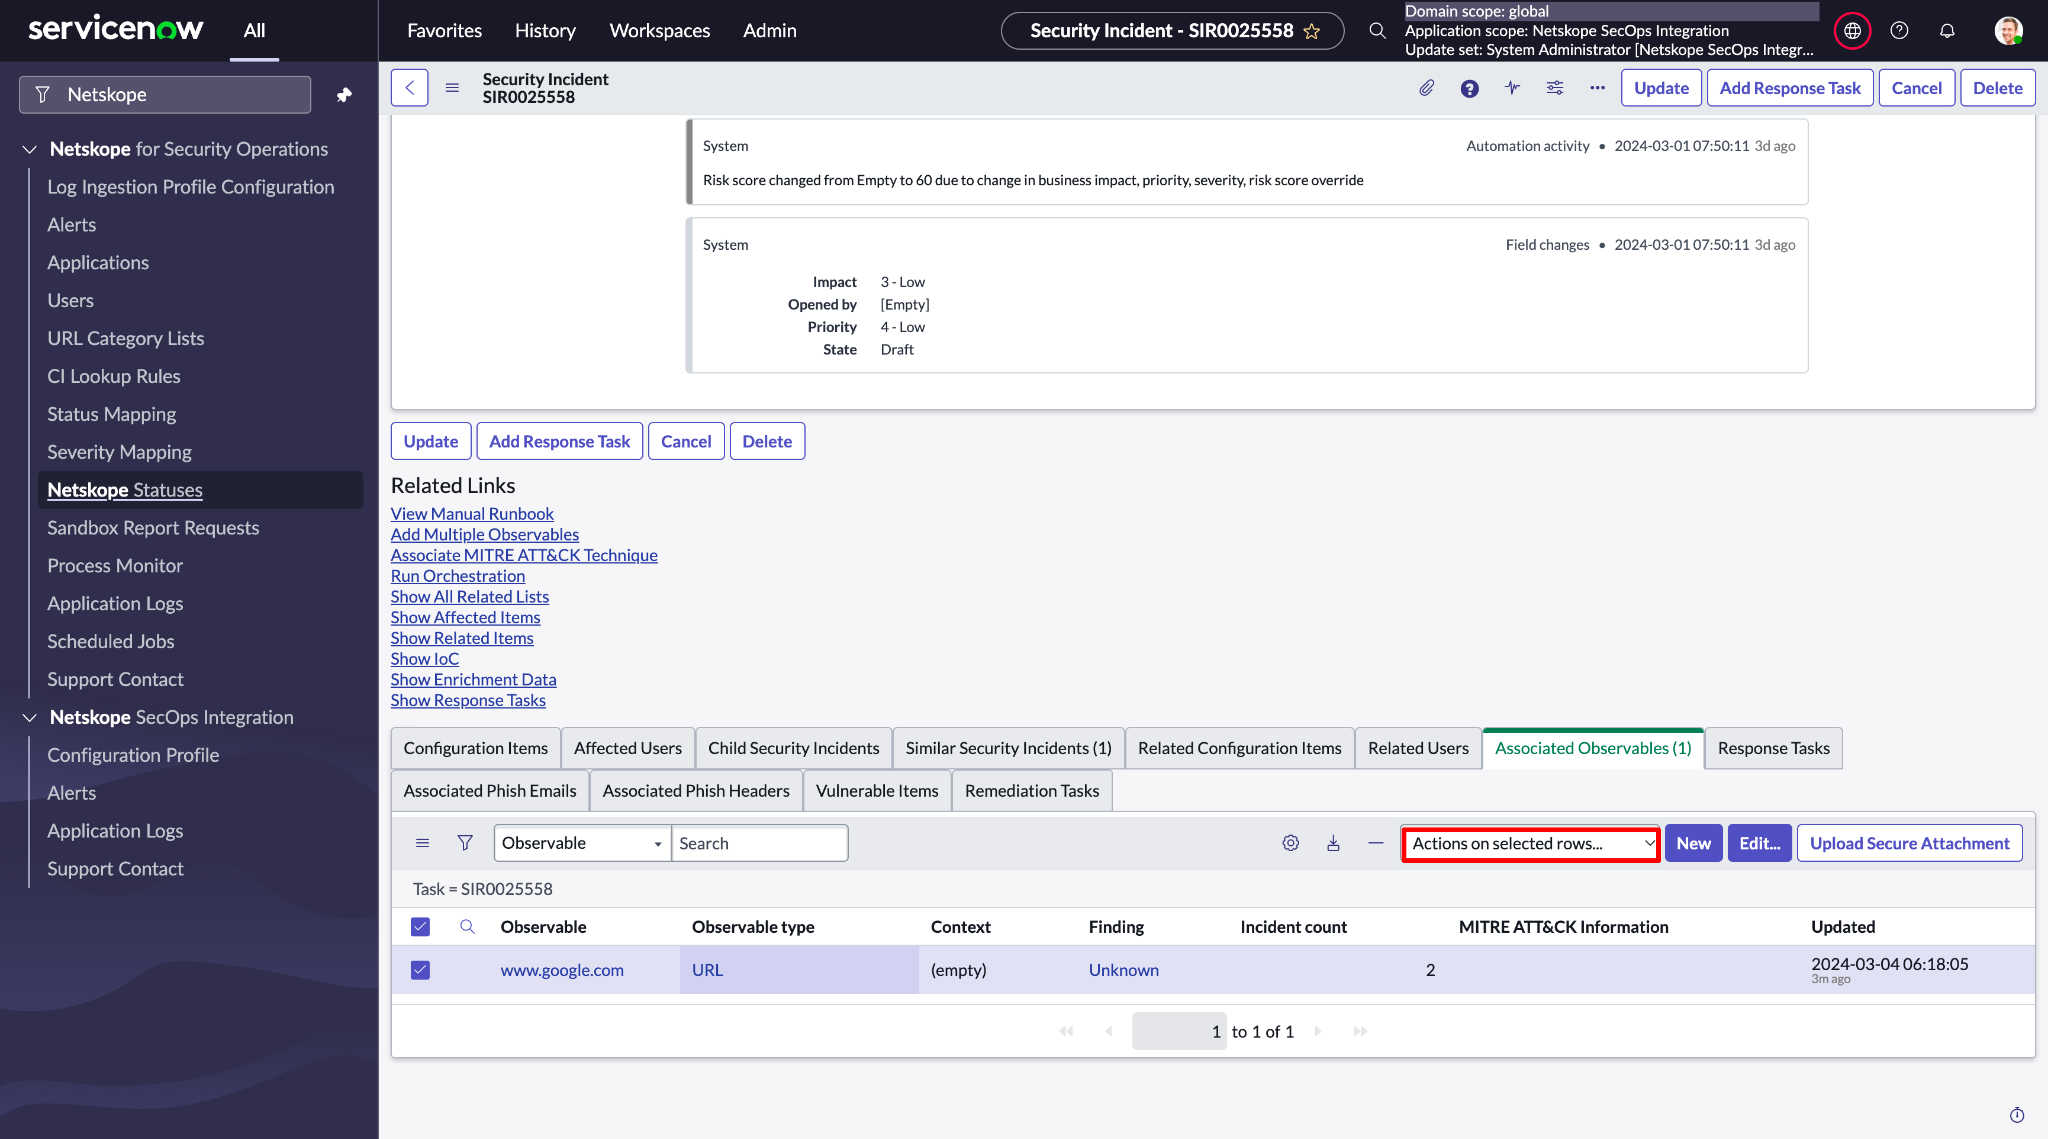
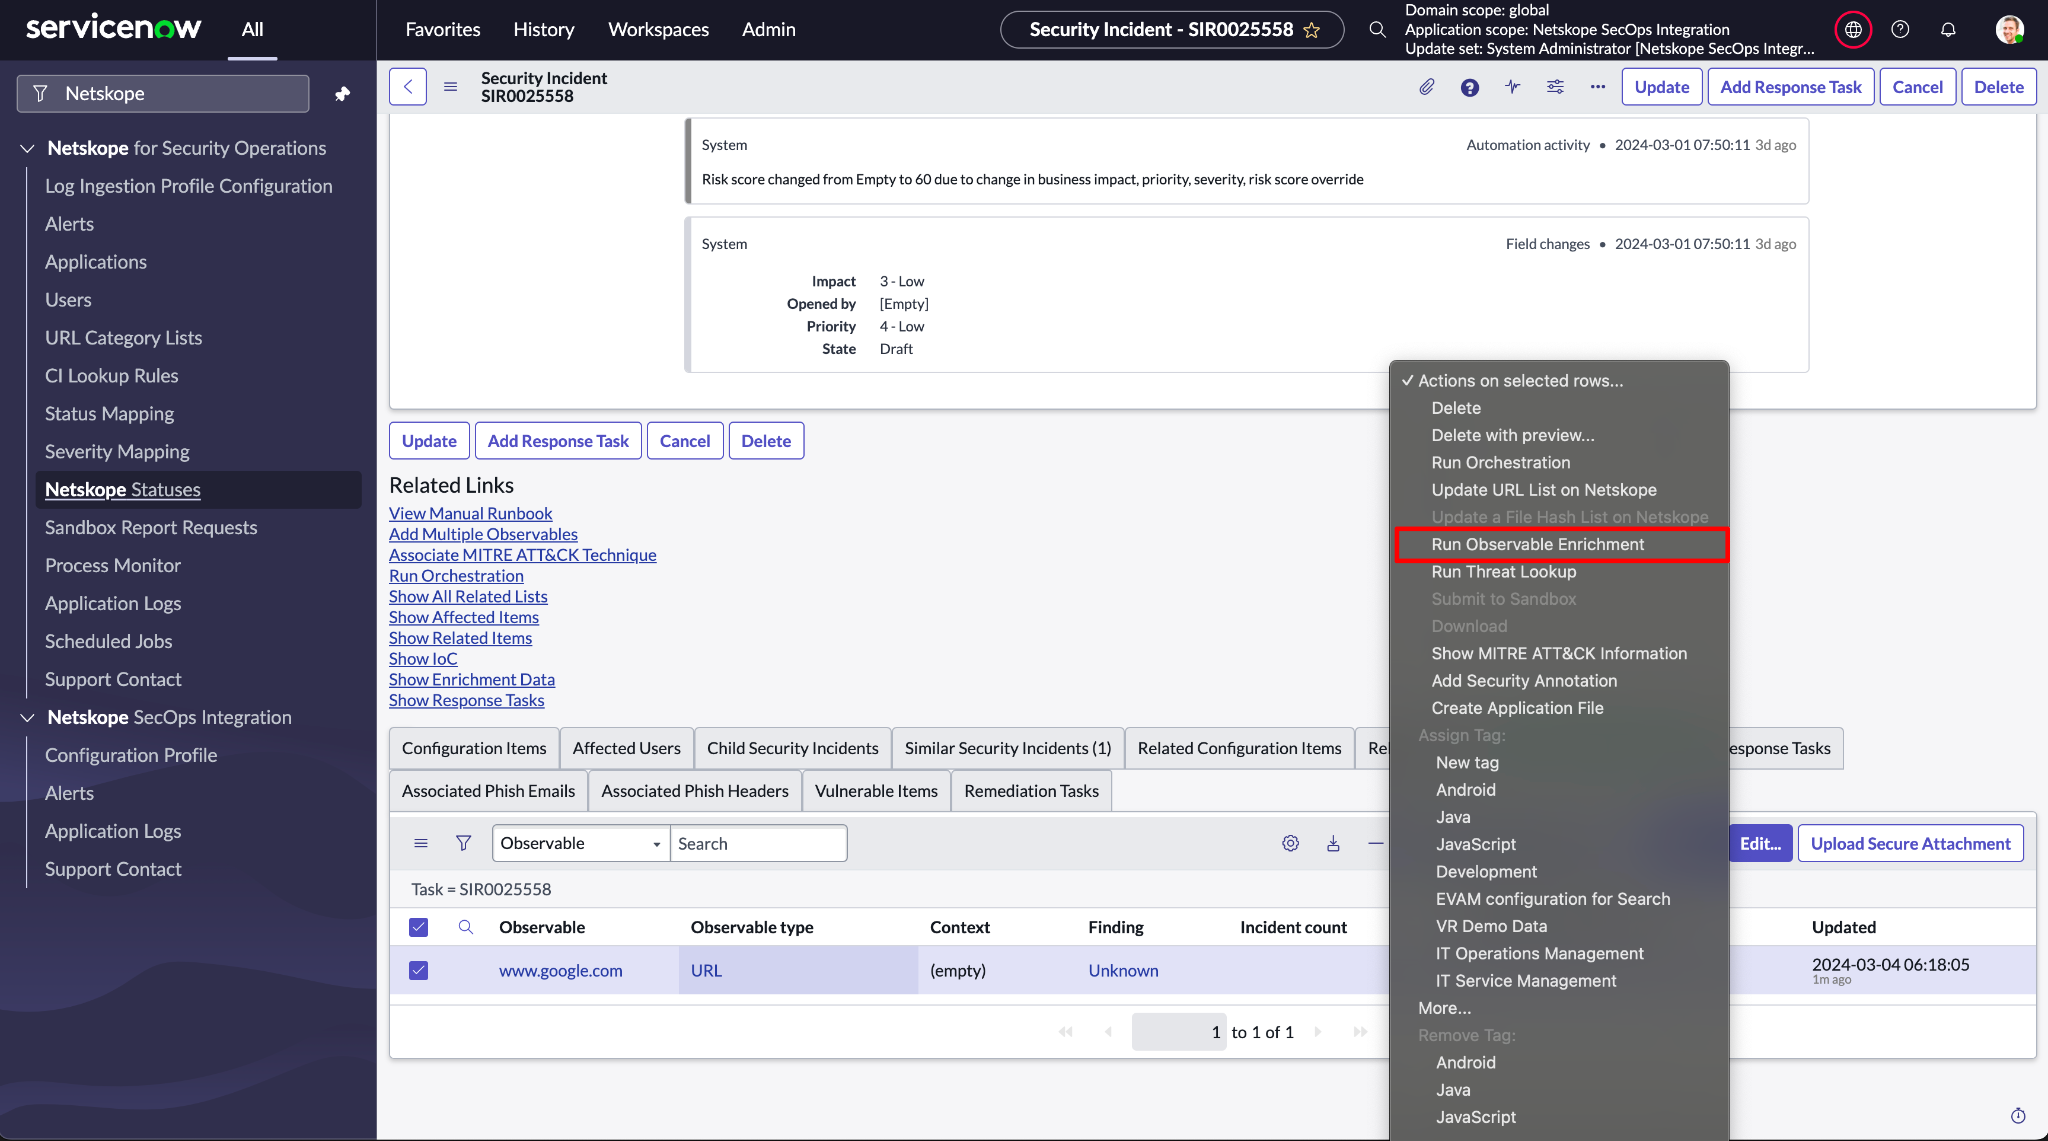 After the observable enrichment runs successfully, you’ll find the results in the Observable table (sn_ti_observable).
 - You can also run the observable enrichment from the Observable table by following steps 3 and 4.
CI Lookup Rules
You can create multiple rules and based on the Order, it does the lookup into the CMDB tables. It will attach the CI records in Security tables, based on the lookup configured in the CI Lookup rules.
If the table selected in the CI Lookup rule does not have a configuration item, then the Security Incident will not have an association with CI and remain blank.
Roles Required: x_netsk_nets_sir.netskope_admin (Write) and x_netsk_nets_sir.netskope_user (Read)
Procedure
- Go to Netskope for Security Operations > CI Lookup Rules.
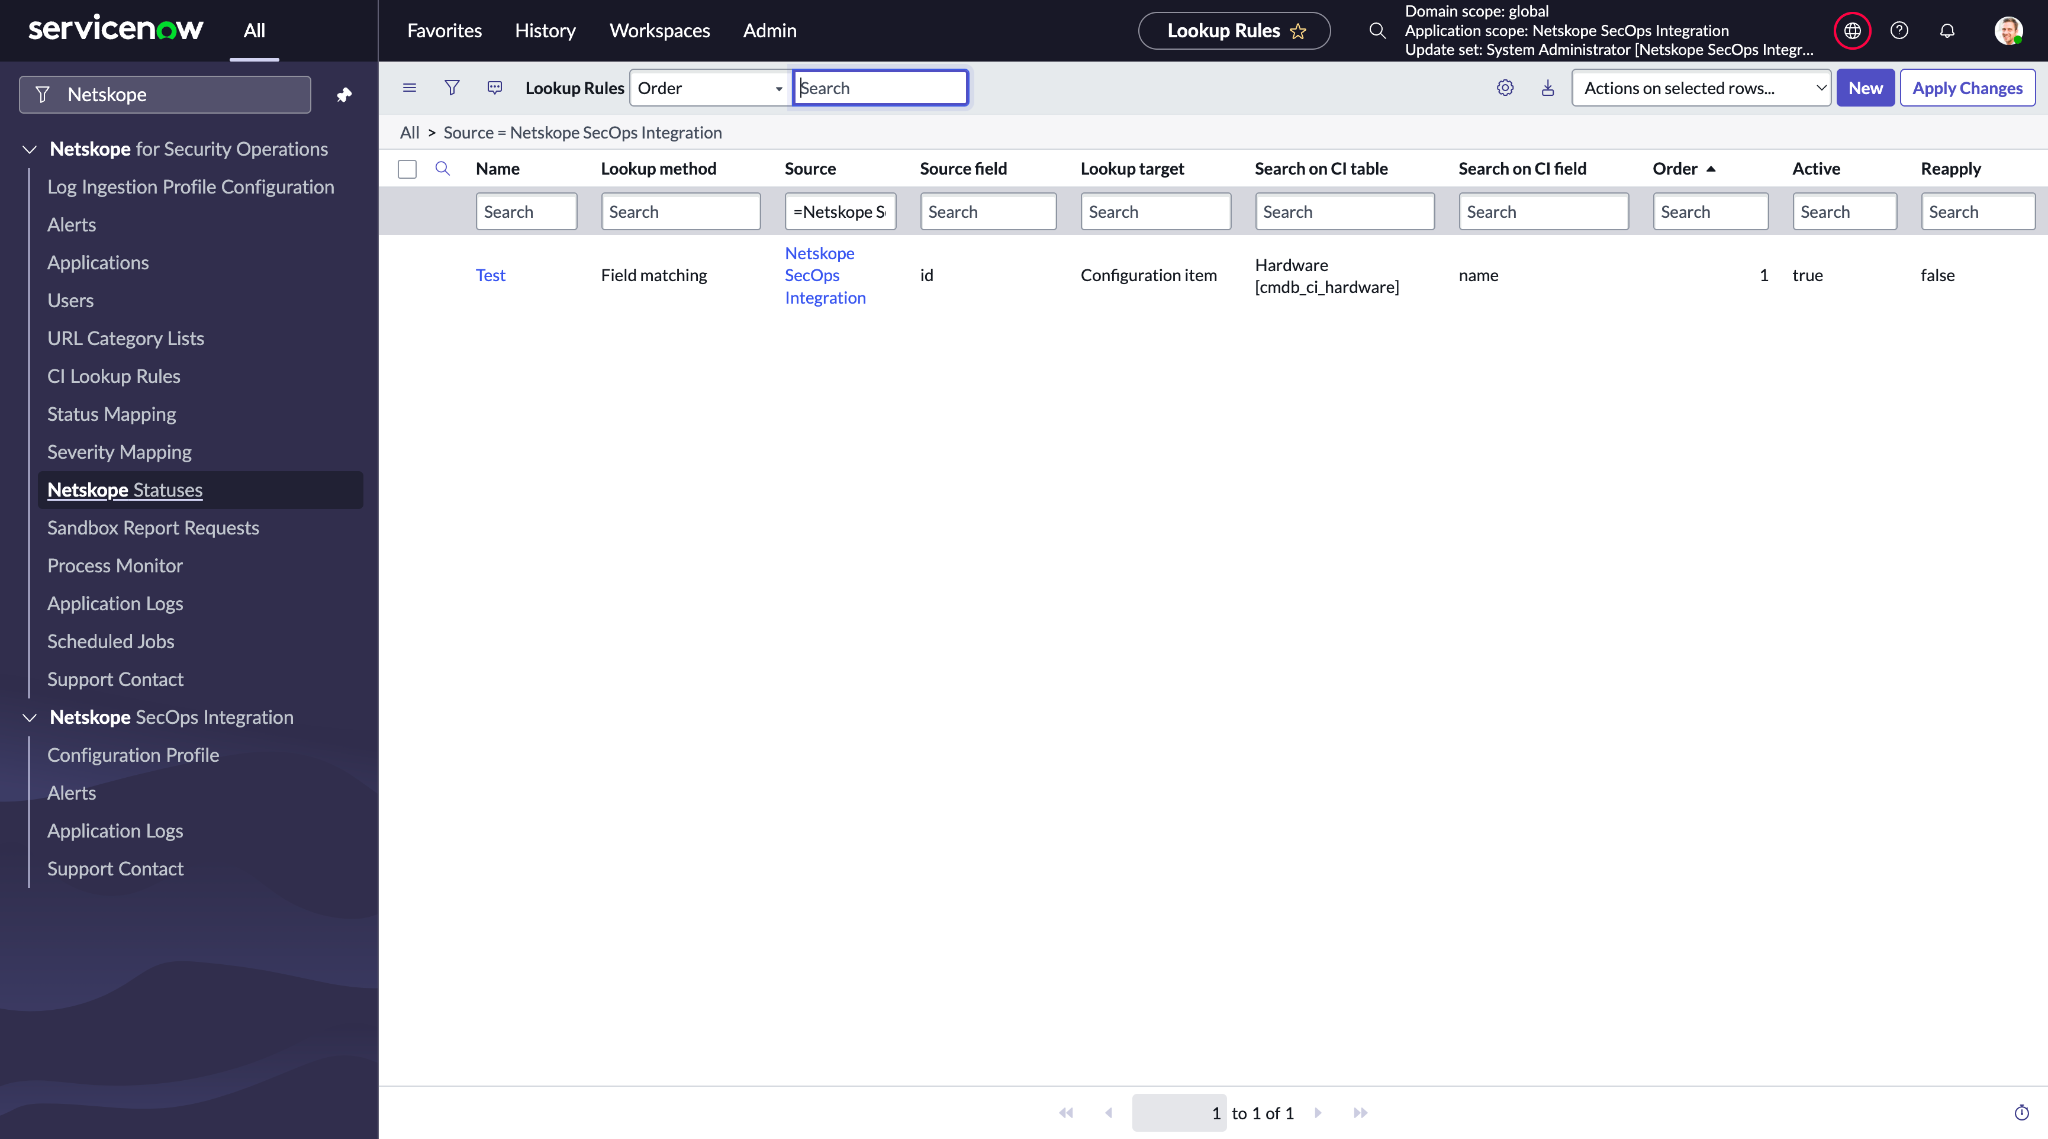
- Click New to create a new rule.
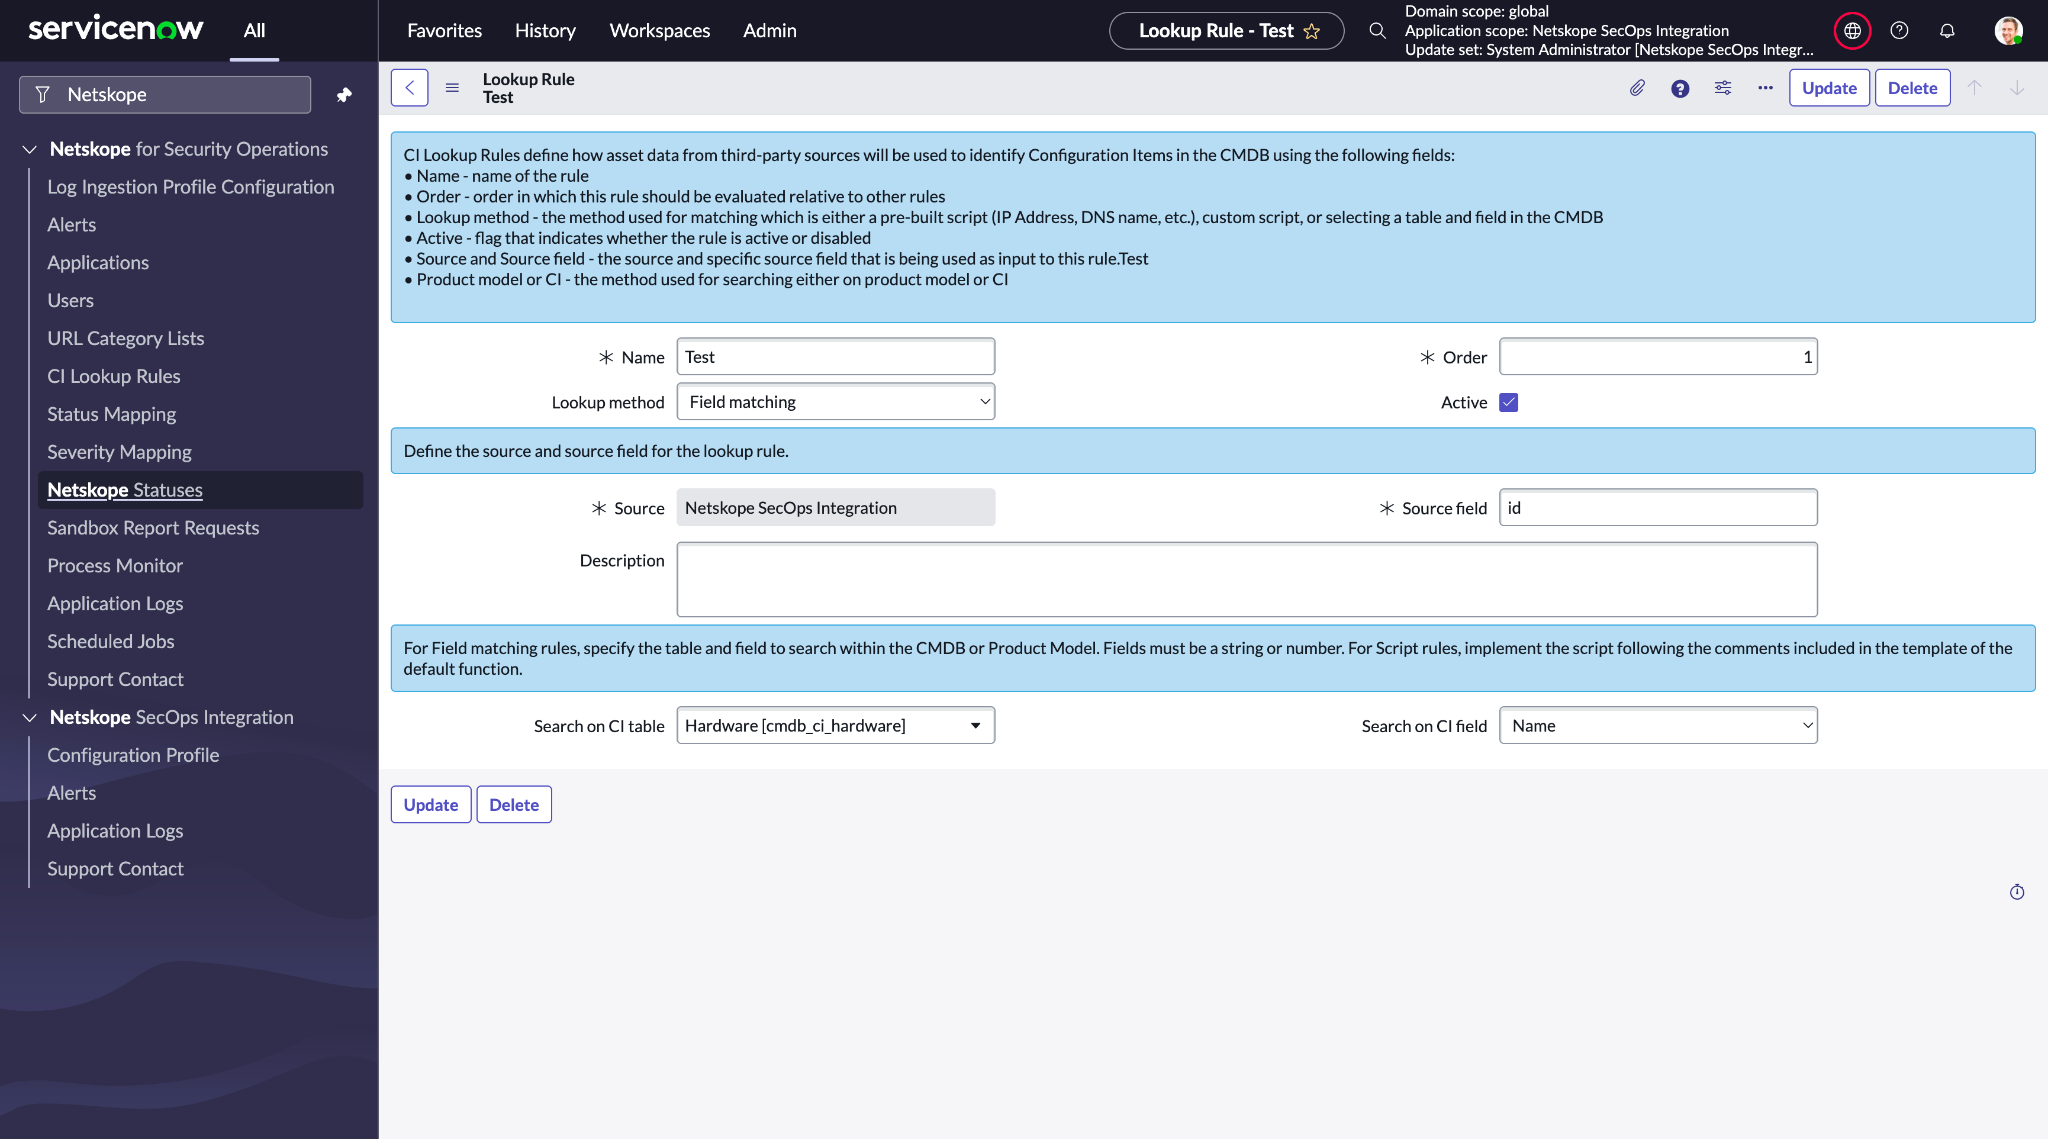
- Provide a Name, Source field, and select the Search on table value in destination fields. Search on the field.
- Click Submit.
Run the scheduler. After the job is completed, a Security Incident has a record linked in the Configuration Item field.
Sandbox Report Request
You can request Sandbox report analysis for files with extension .zip.
Roles Required: x_netsk_nets_sir.netskope_admin (Write) and x_netsk_nets_sir.netskope_user (Read).
Procedure
- Go to Sandbox Report Requests.
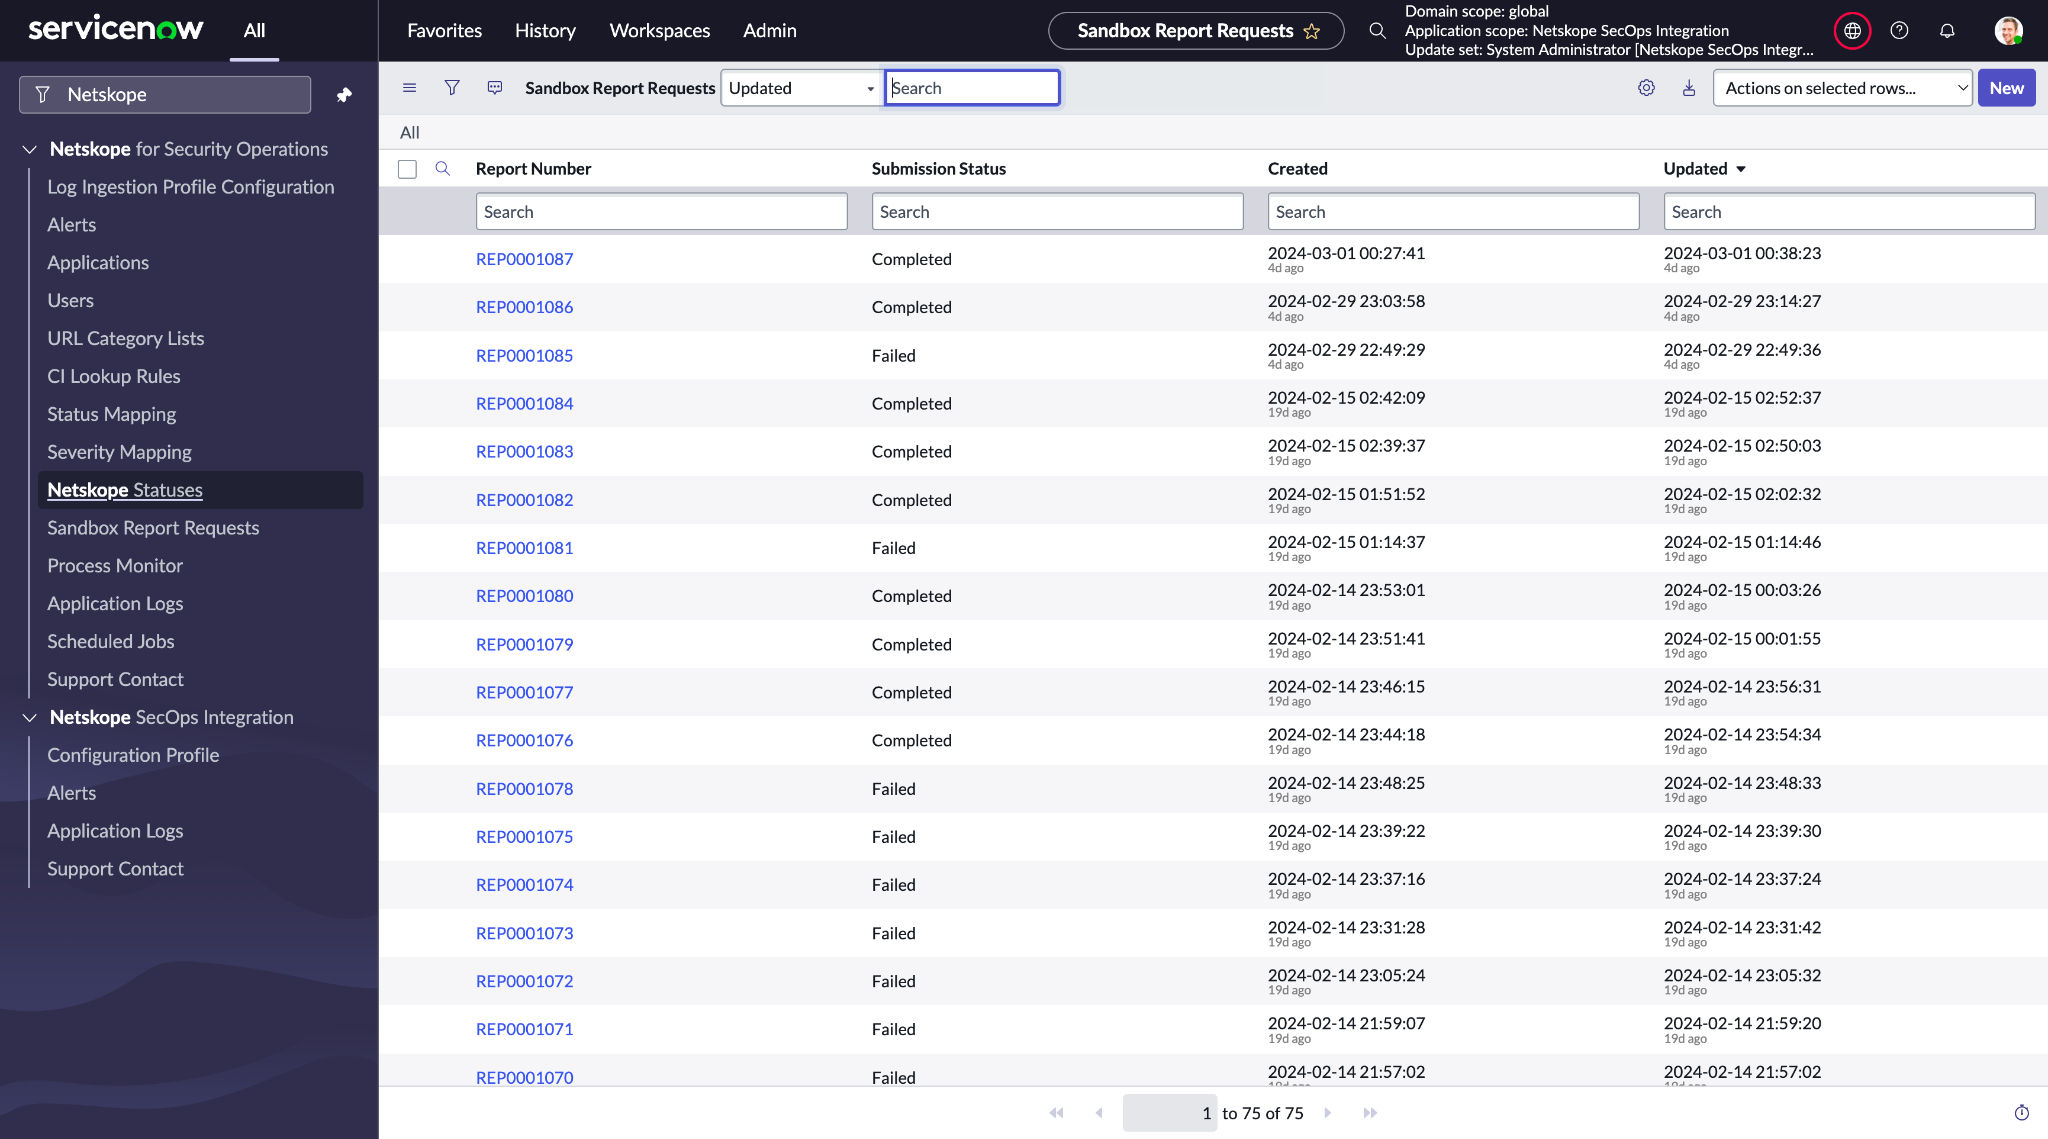
- Create a new Sandbox Report Request record.
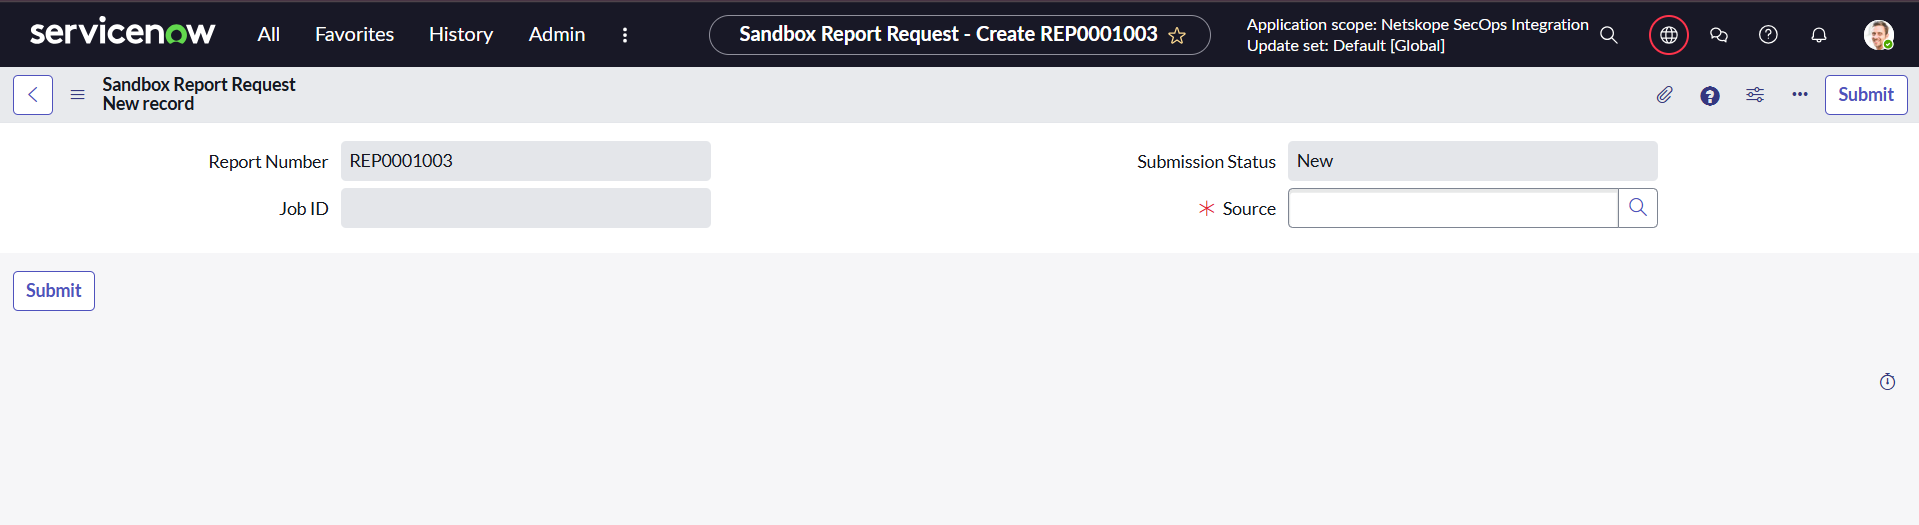
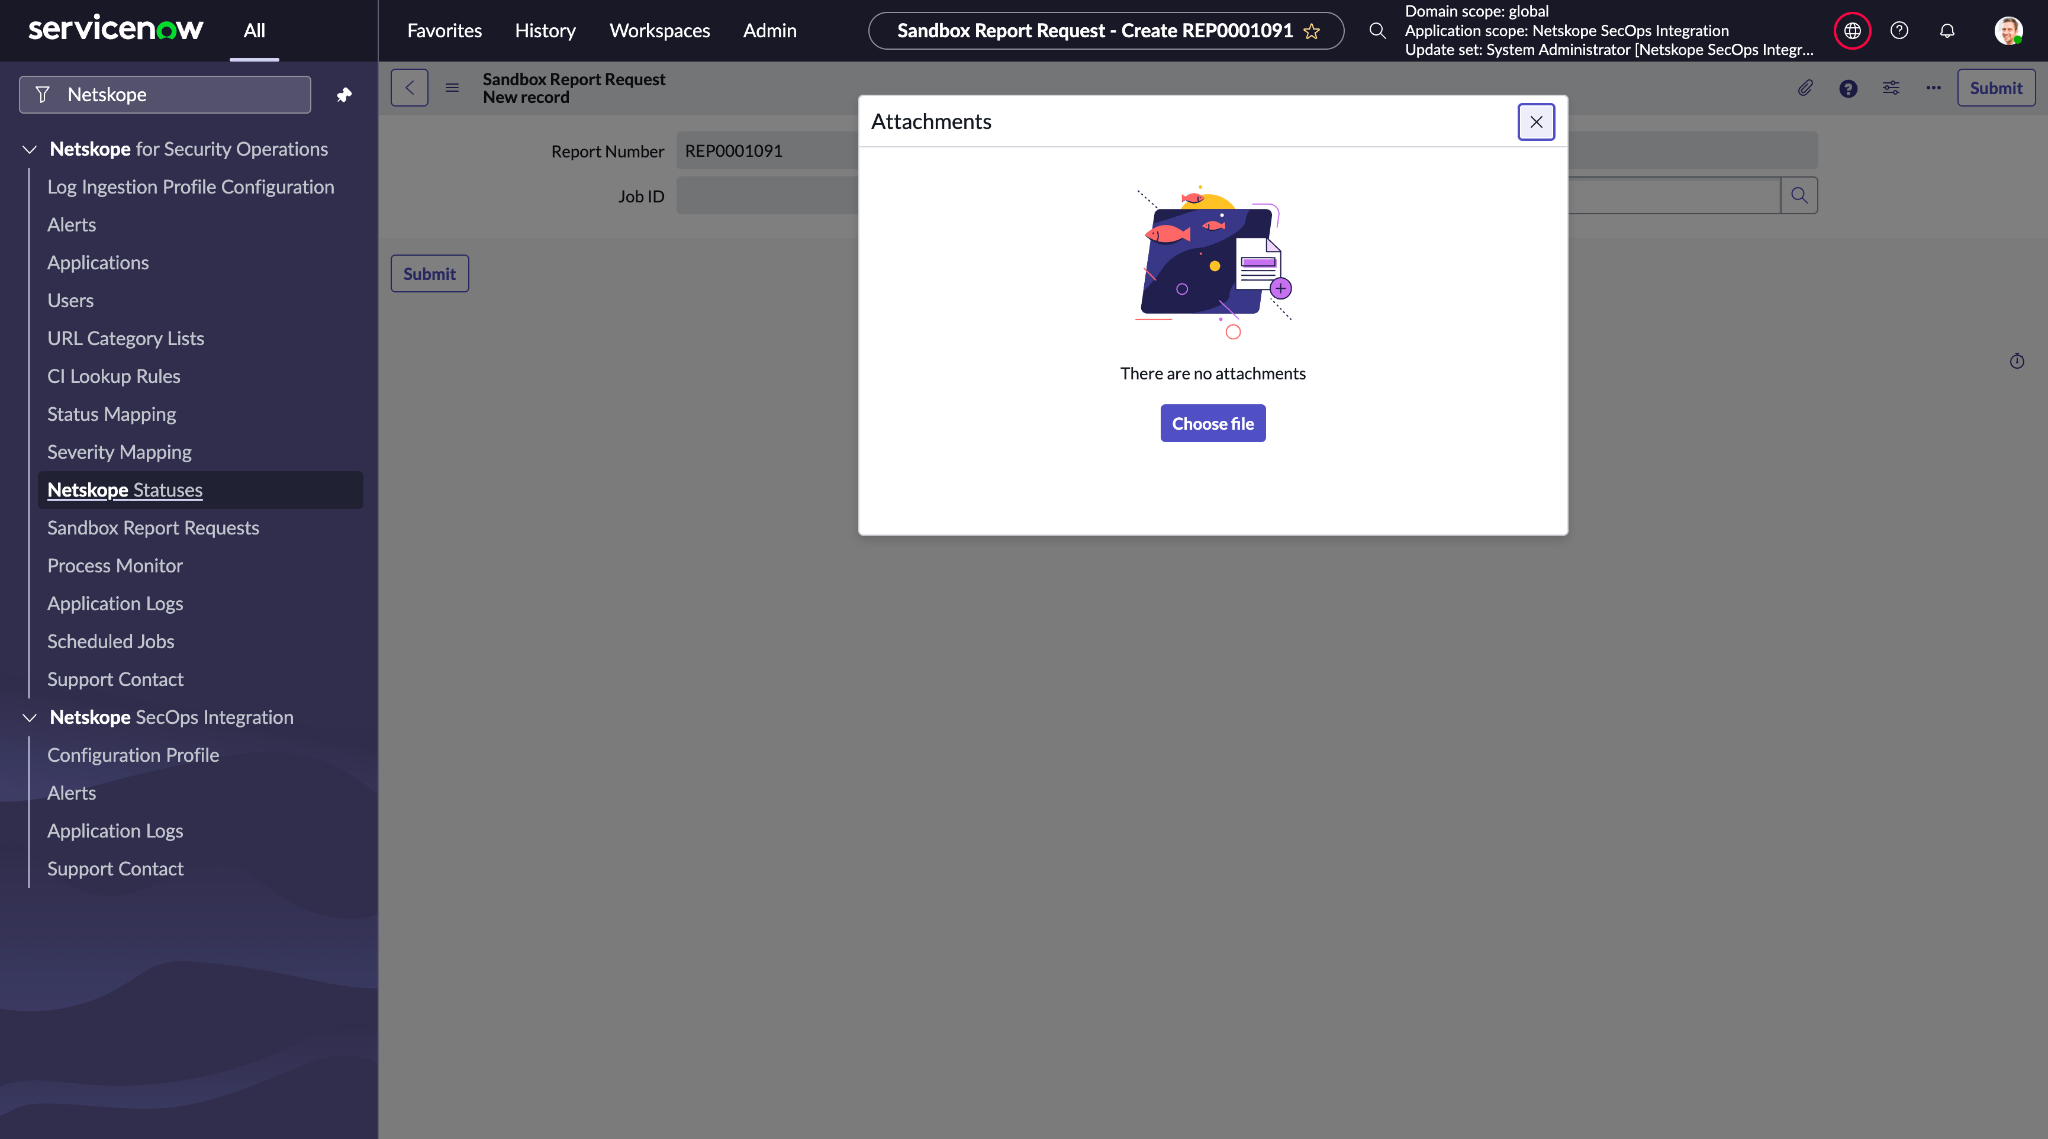
- Select the profile to use to create a Sandbox request, and attach the .zip file with the record and click Submit.
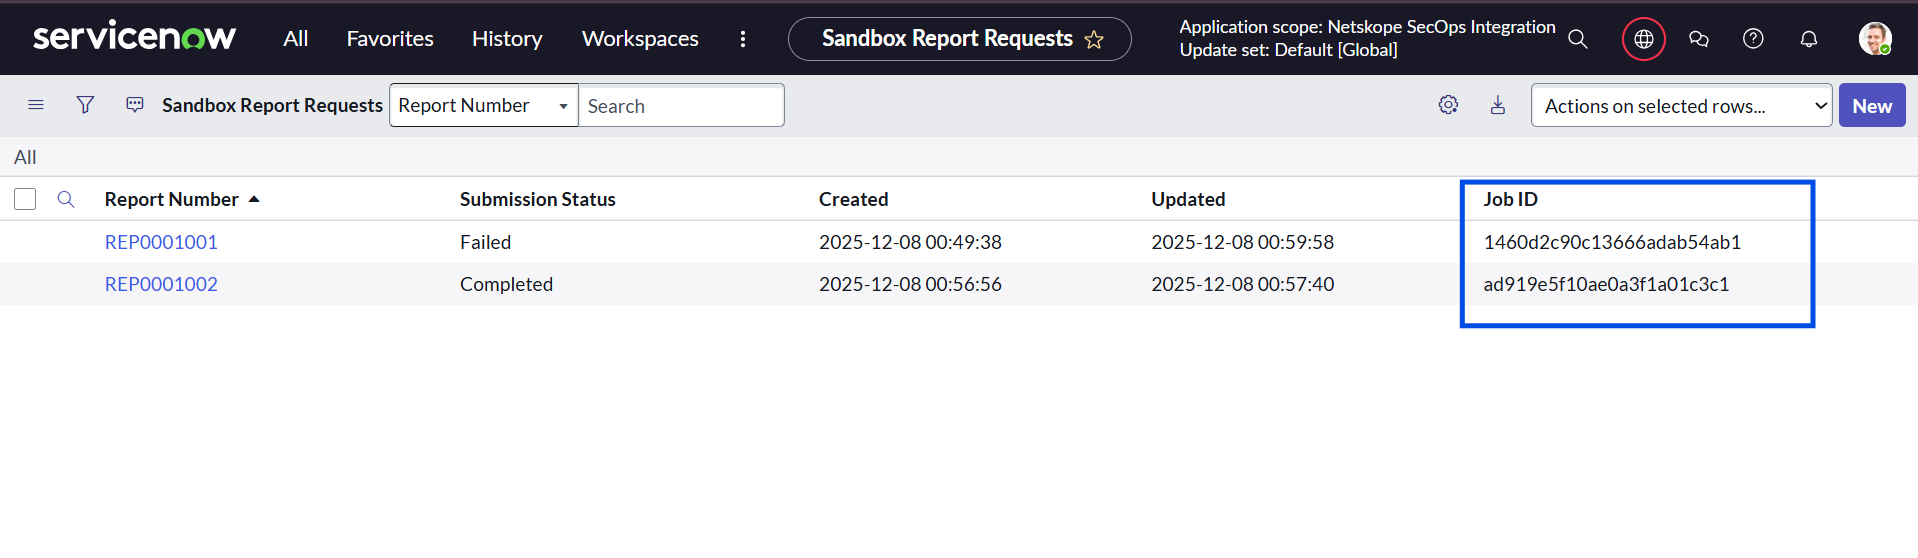
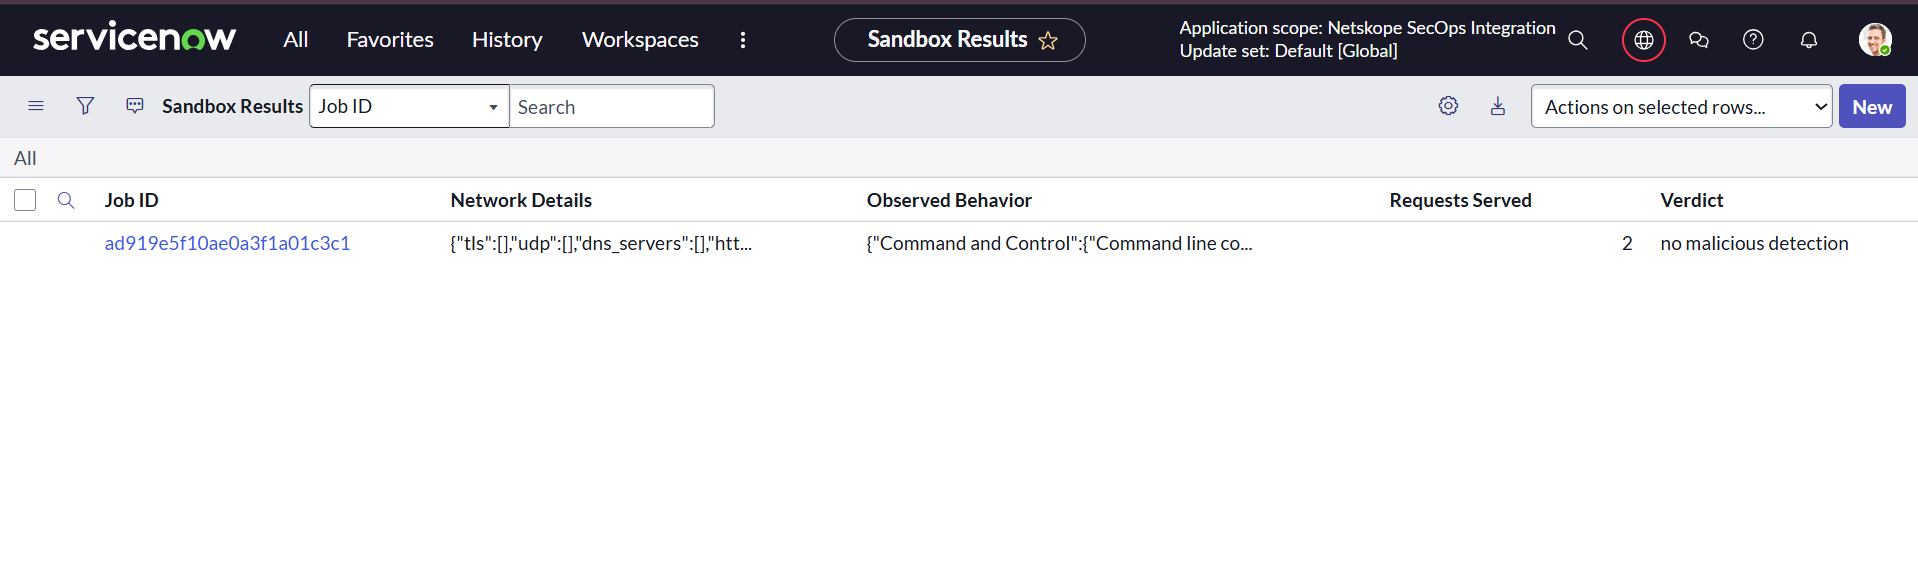
- After the sandbox request is submitted, it is sent to the Netskope server for analysis. After the request is accepted, a Job ID is returned by Netskope and stored in the same Sandbox Request record. When the analysis is complete, a corresponding entry will appear in the Sandbox Results table for that Job ID, allowing you to view the detailed results. The detailed report will also be available for download as an attachment on the Sandbox Request record.
Threat Lookup
You can get more details about the applications using the Threat Lookup capability
Roles Required: sn_si.admin or sn_si.analyst
Procedure
- Go to Security Incidents.
- Click on a Security Incident record.
- Locate the Associated Observables related list. If the related list is not visible, click Show All Related Lists.
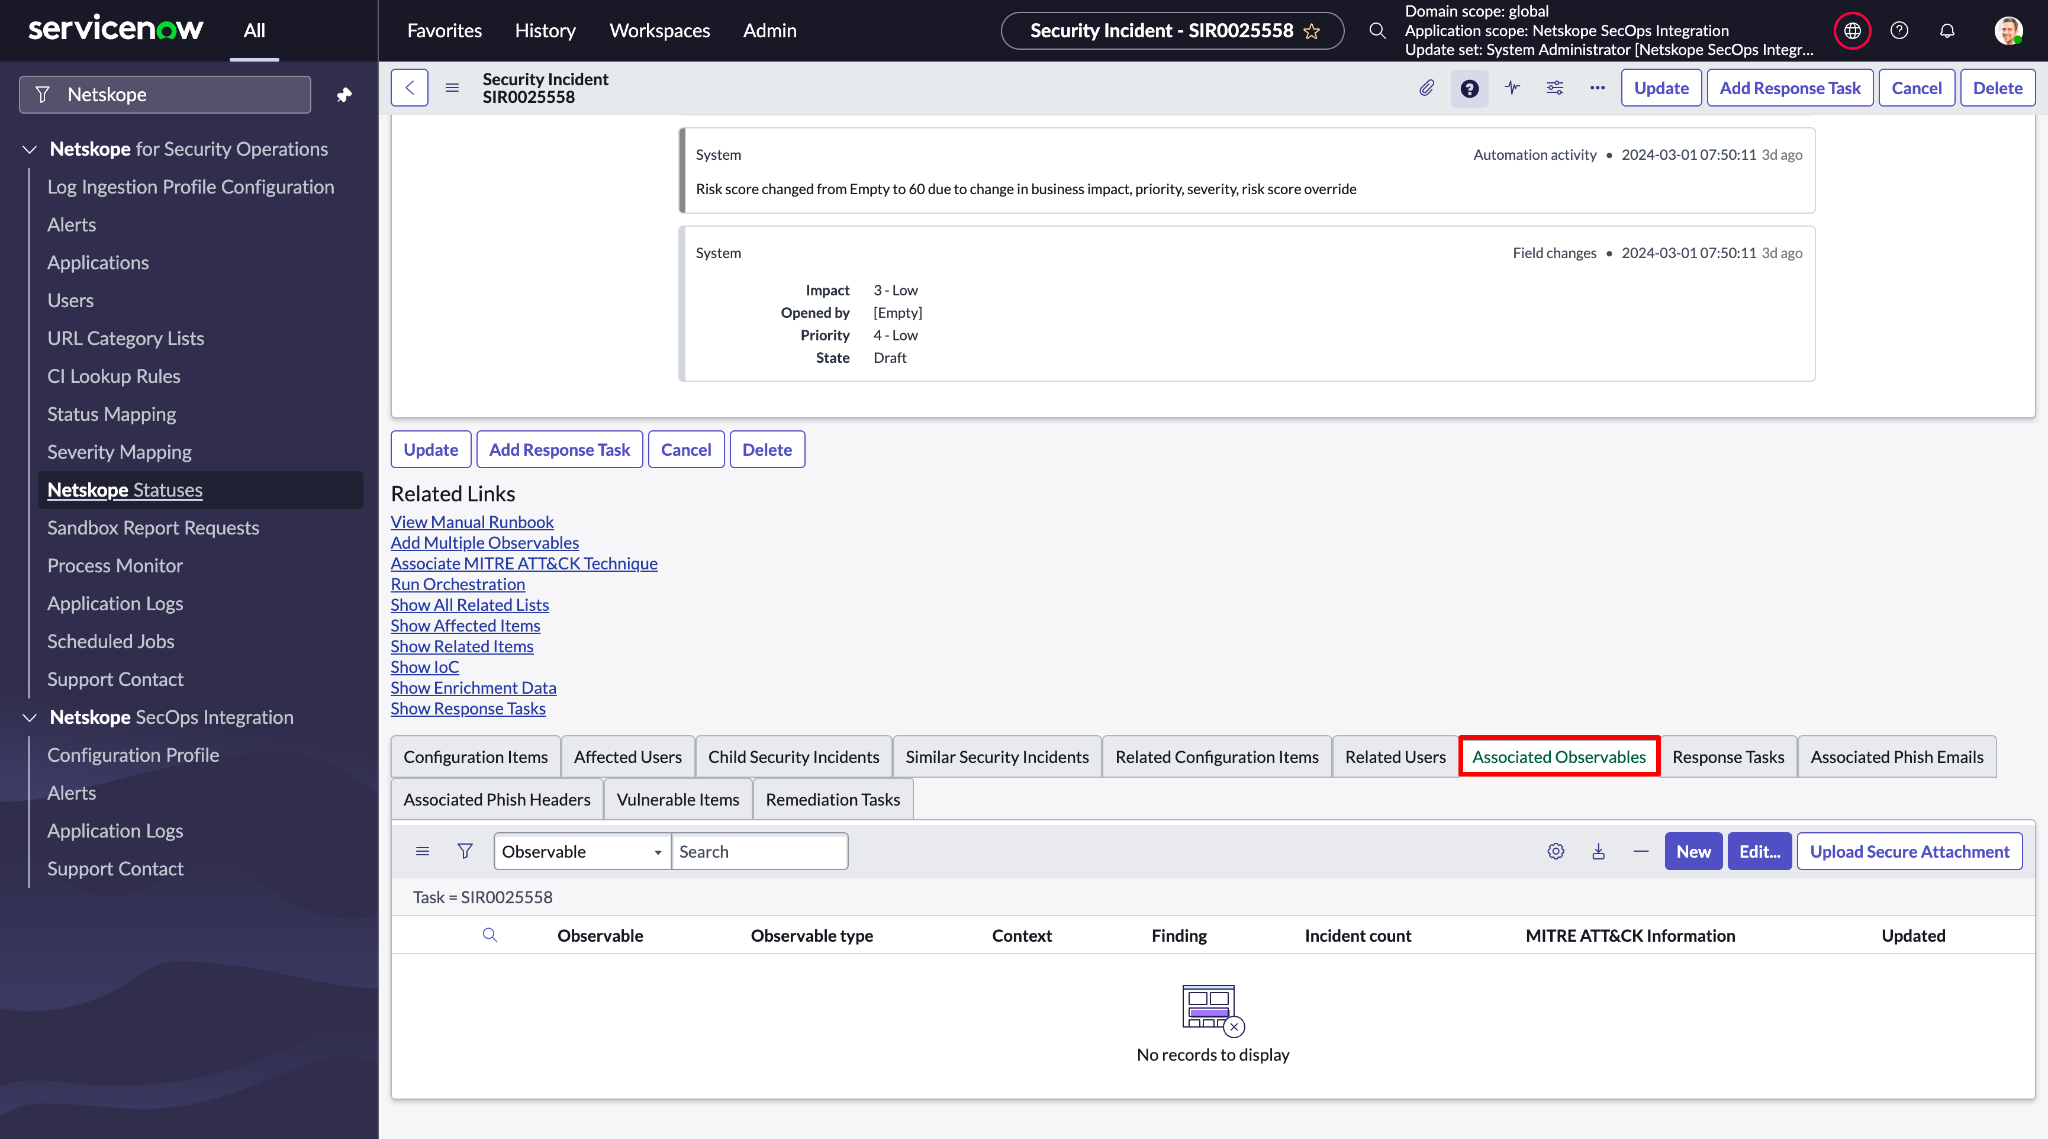
- To run threat lookup for Application, create an observable of type unknown with the Observables name as the application name. Select this observable to run Threat Lookup.
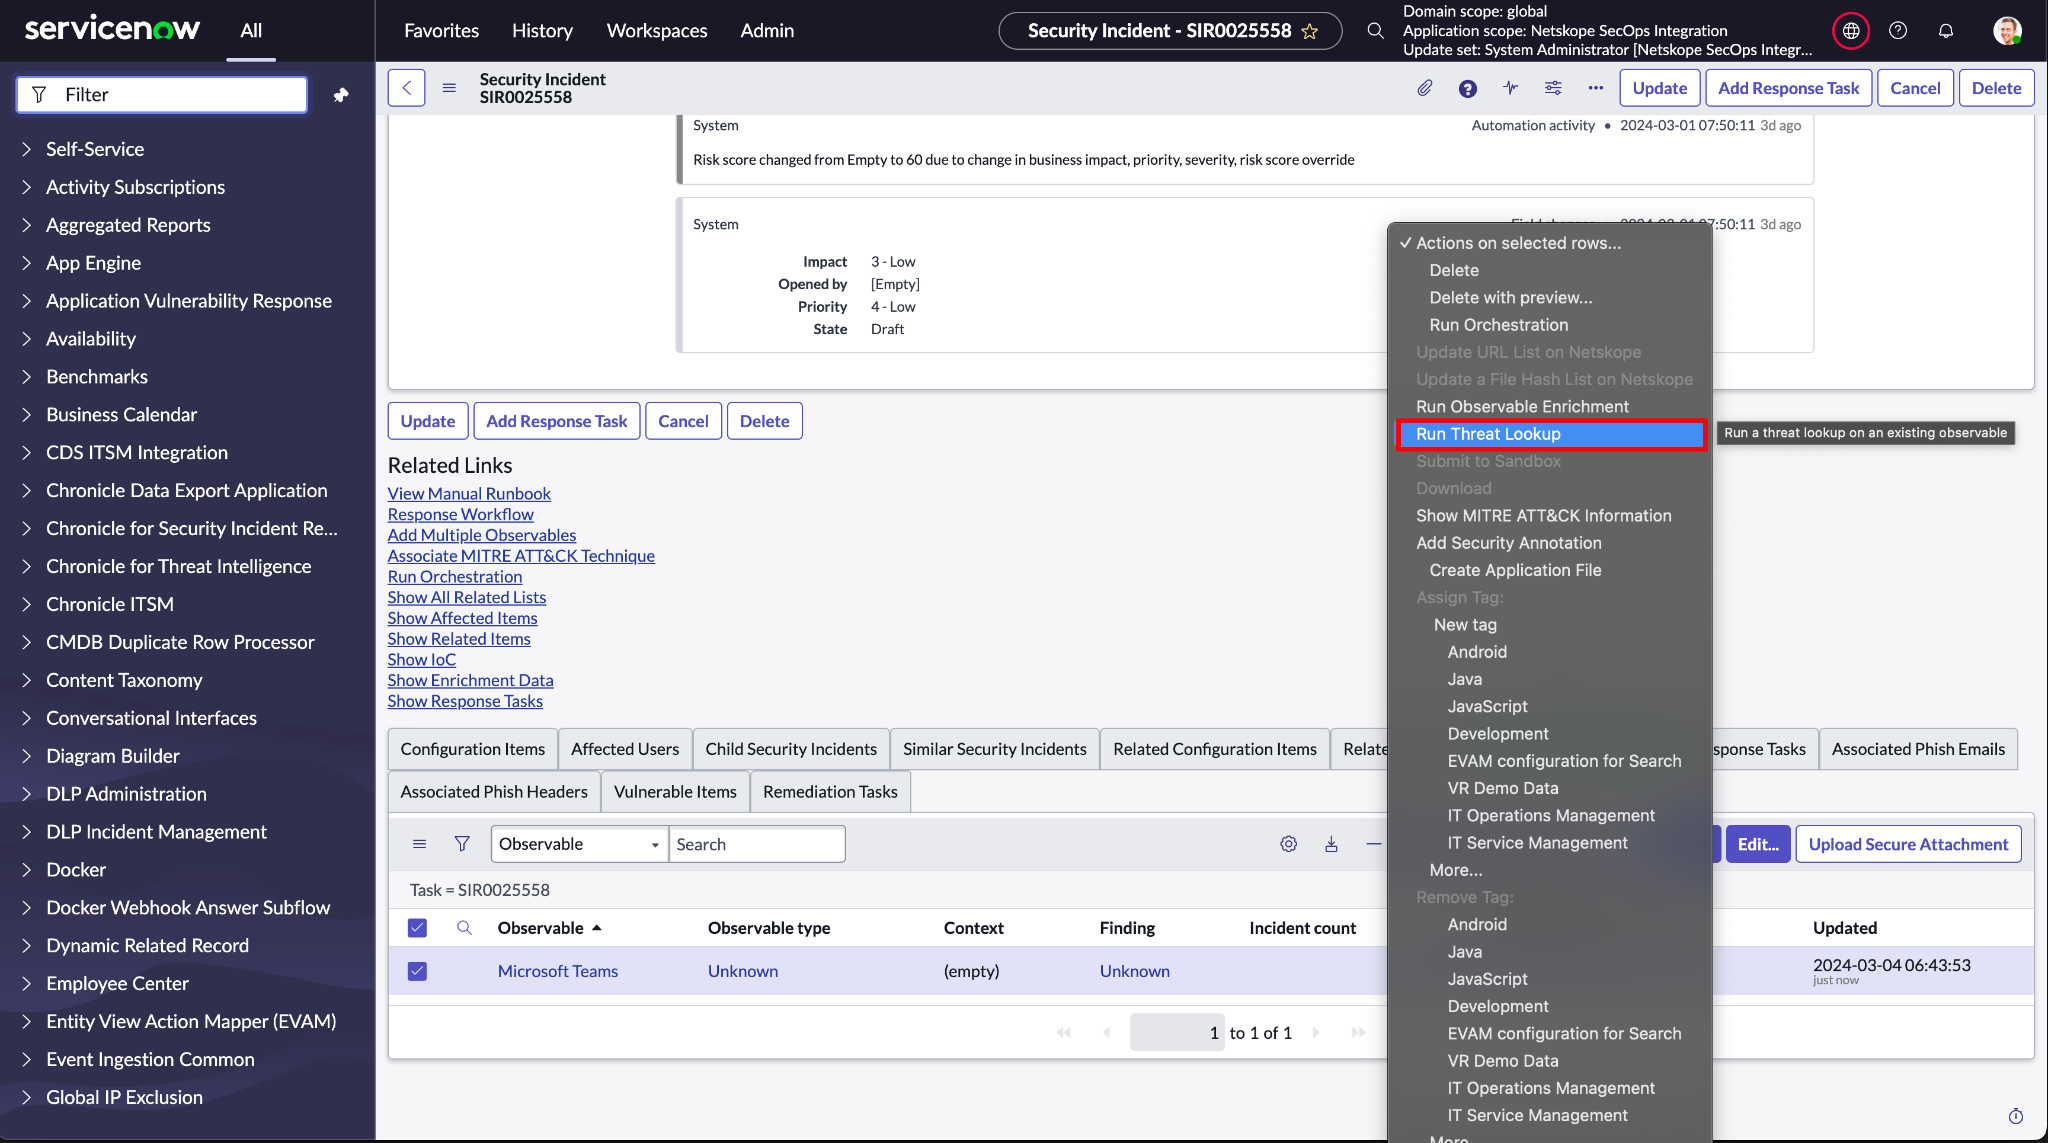
- After the Threat Lookup runs successfully, you will find the results in the Threat Lookup Results table (sn_ti_lookup_result).
- You can also run the threat lookup from the Observables table by following steps 4 and 5.
Add to URL Category
You can add observables of type URL/ip/domain to a category list in Netskope.
Roles Required: sn_si.admin or sn_si.analyst
Procedure
- Go to Security Incidents.
- Click on a Security Incident record.
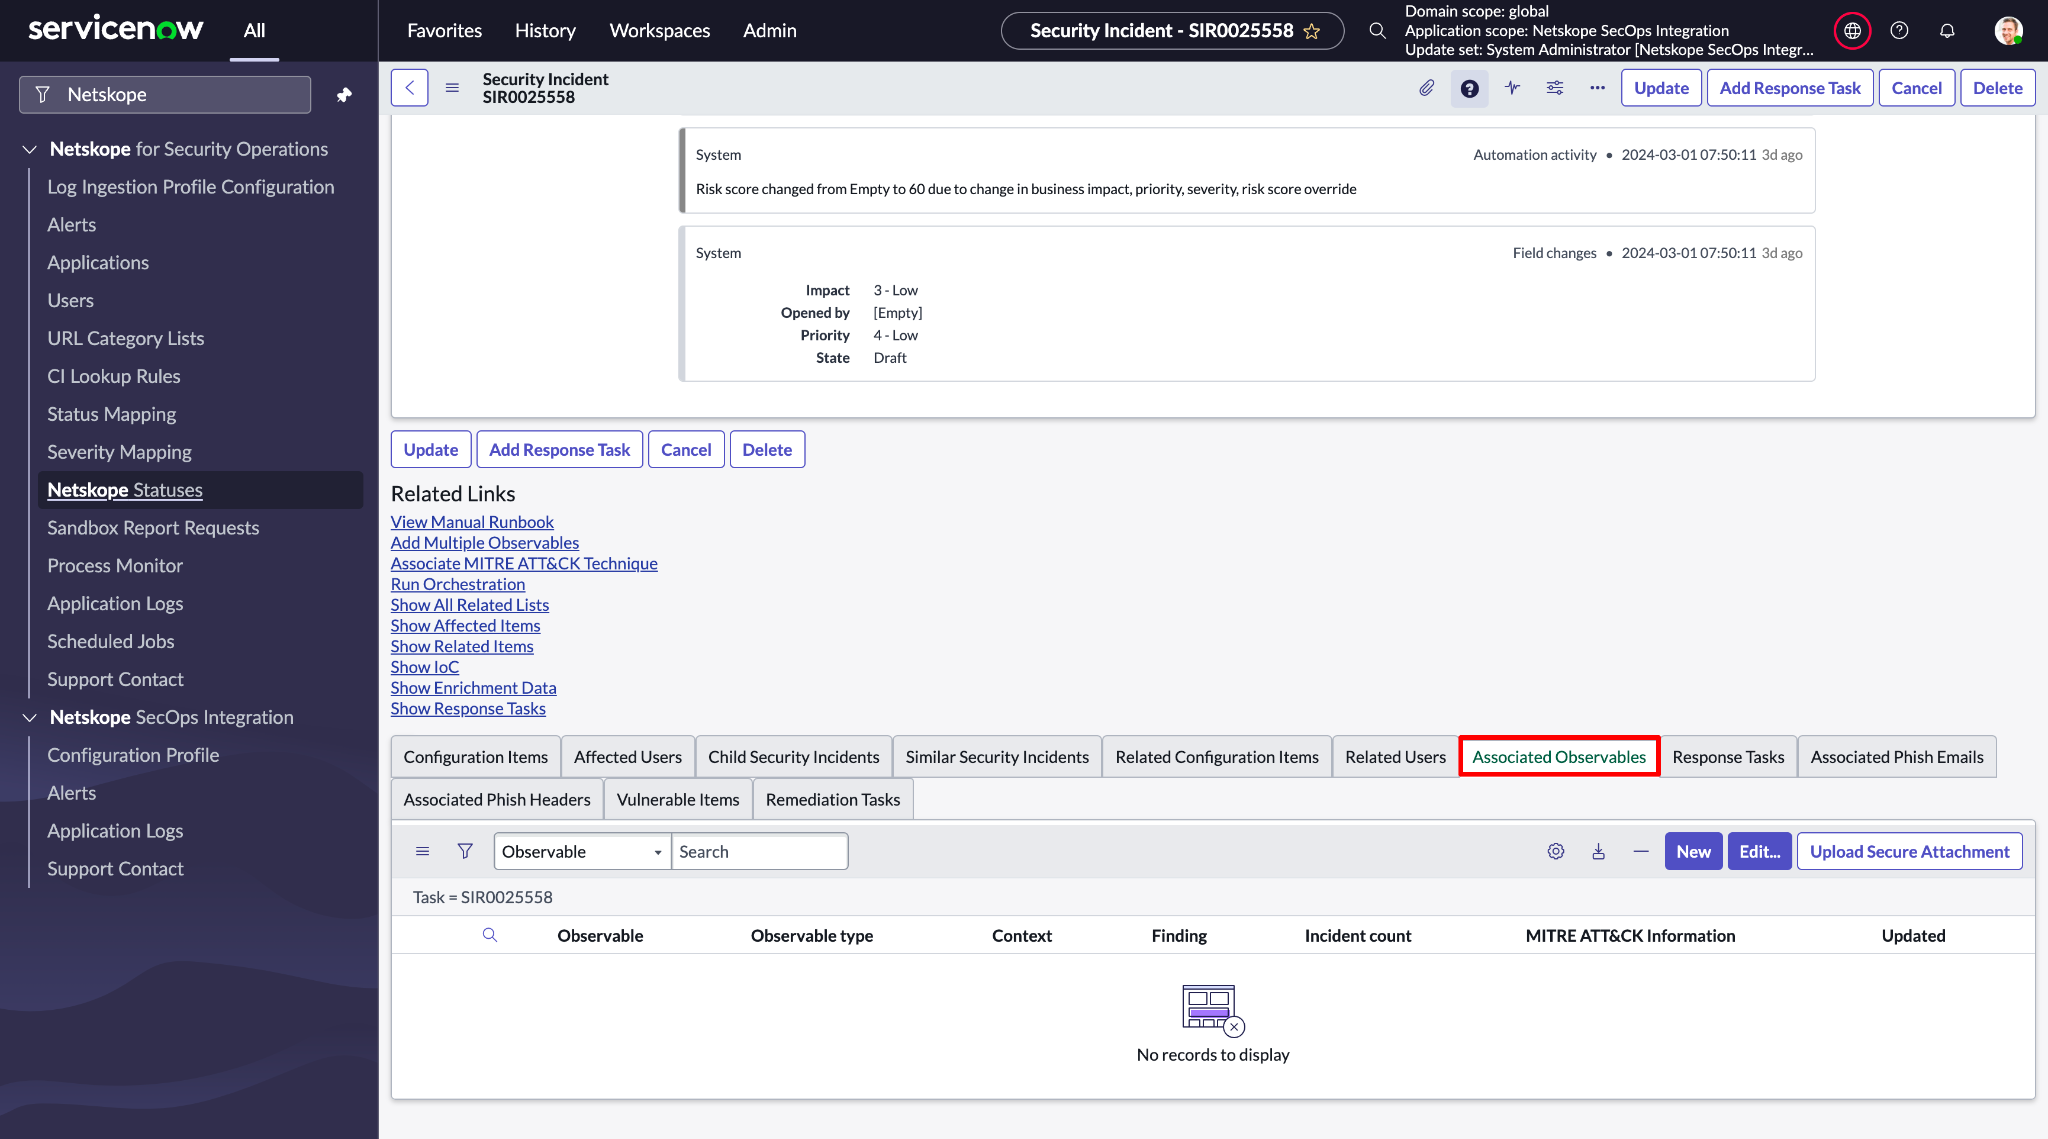
- Locate the Associated Observables related list. If the related list is not visible, click Show All Related Lists.
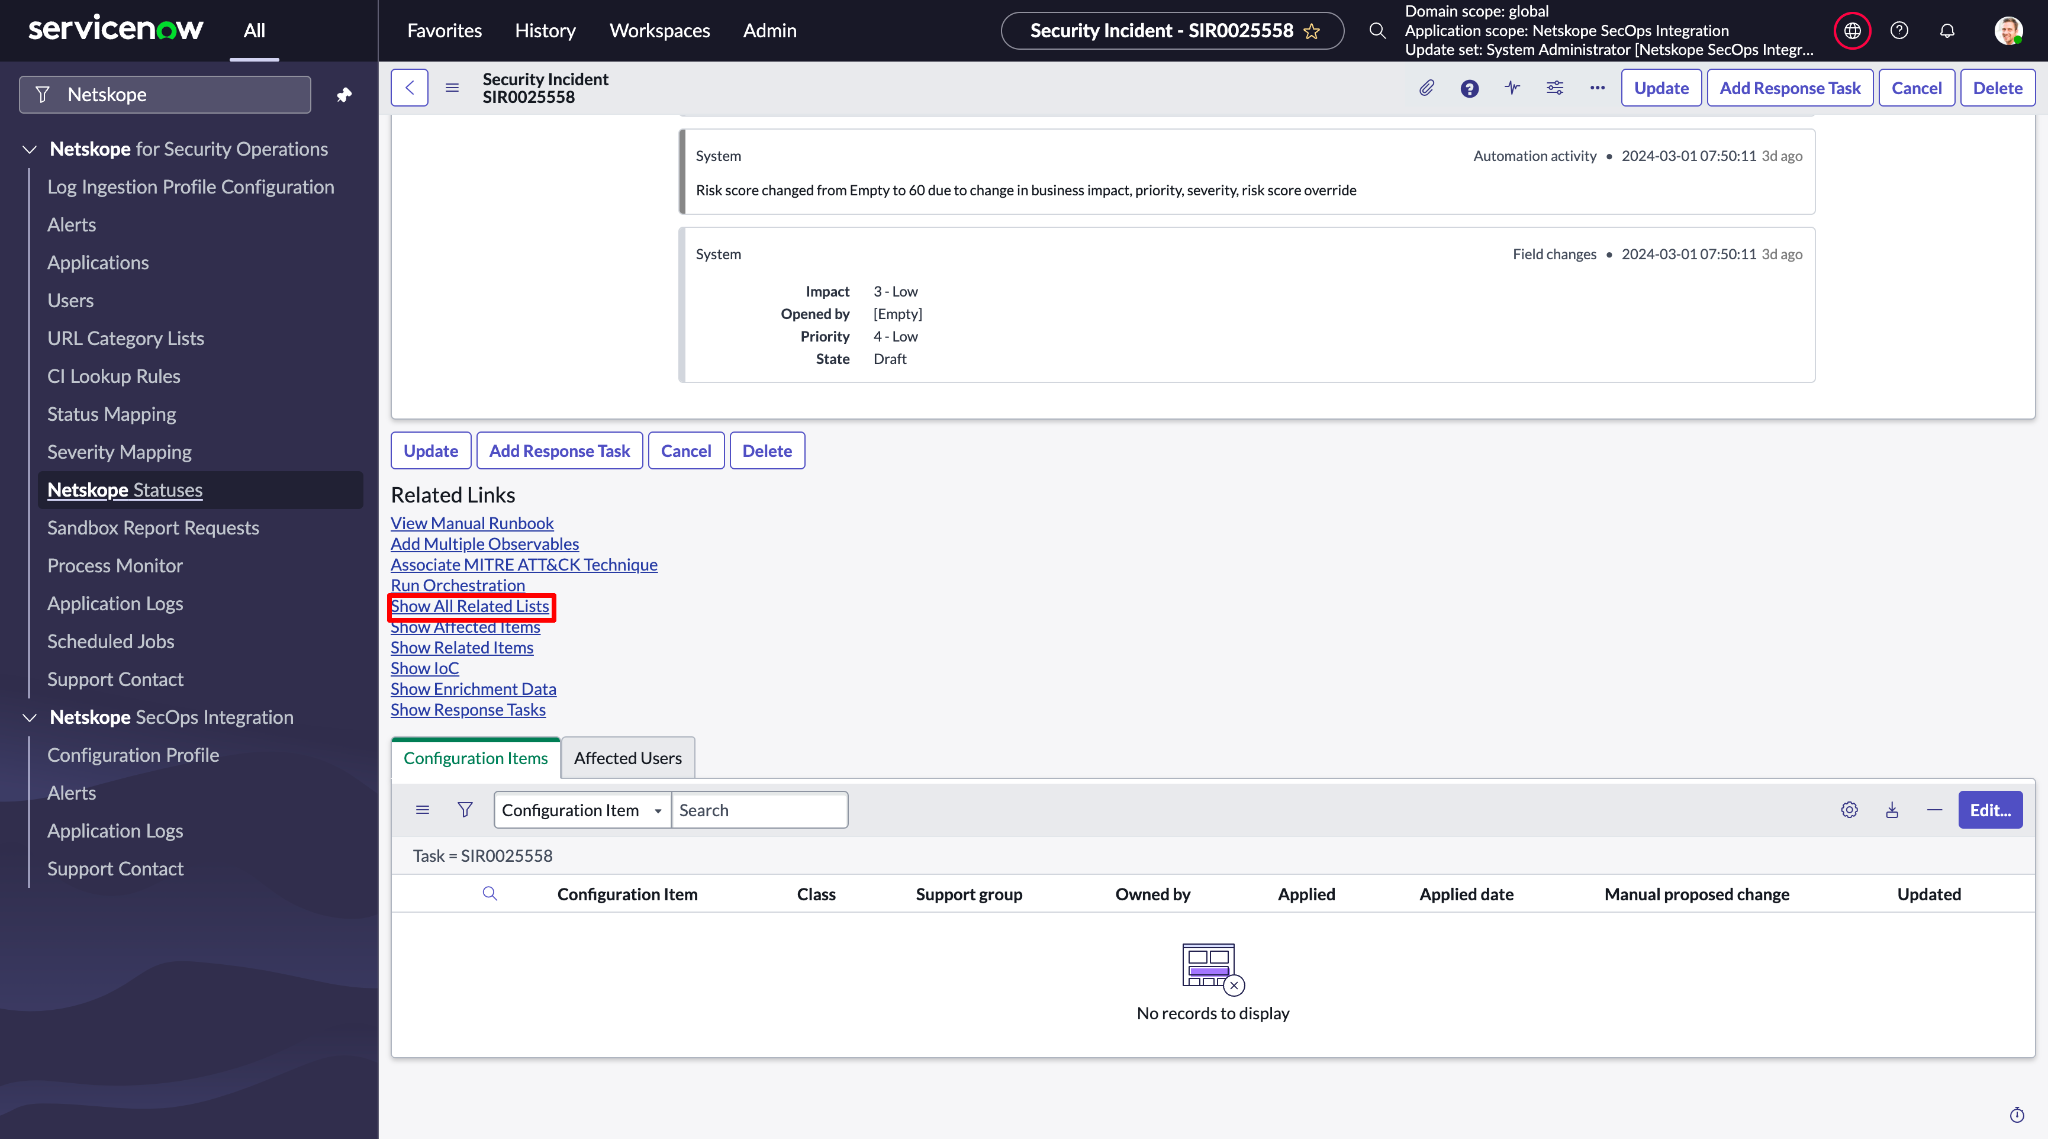
- An Observables list will be displayed. If the Observable is of type URL, Domain, or IP, then the user can perform Add to URL Category action.
- Click on an Observables record.
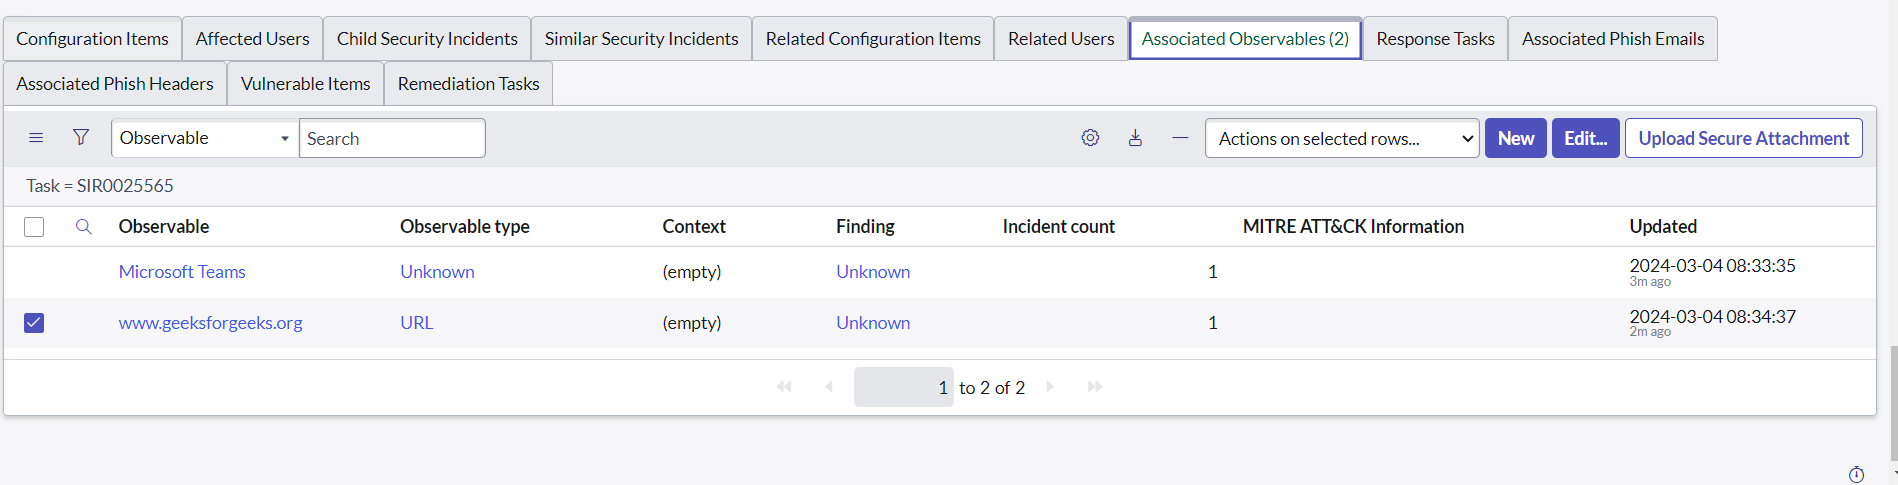
- On top of the form there will be the UI Action Add to URL Category. Click on that and enter the required parameters.
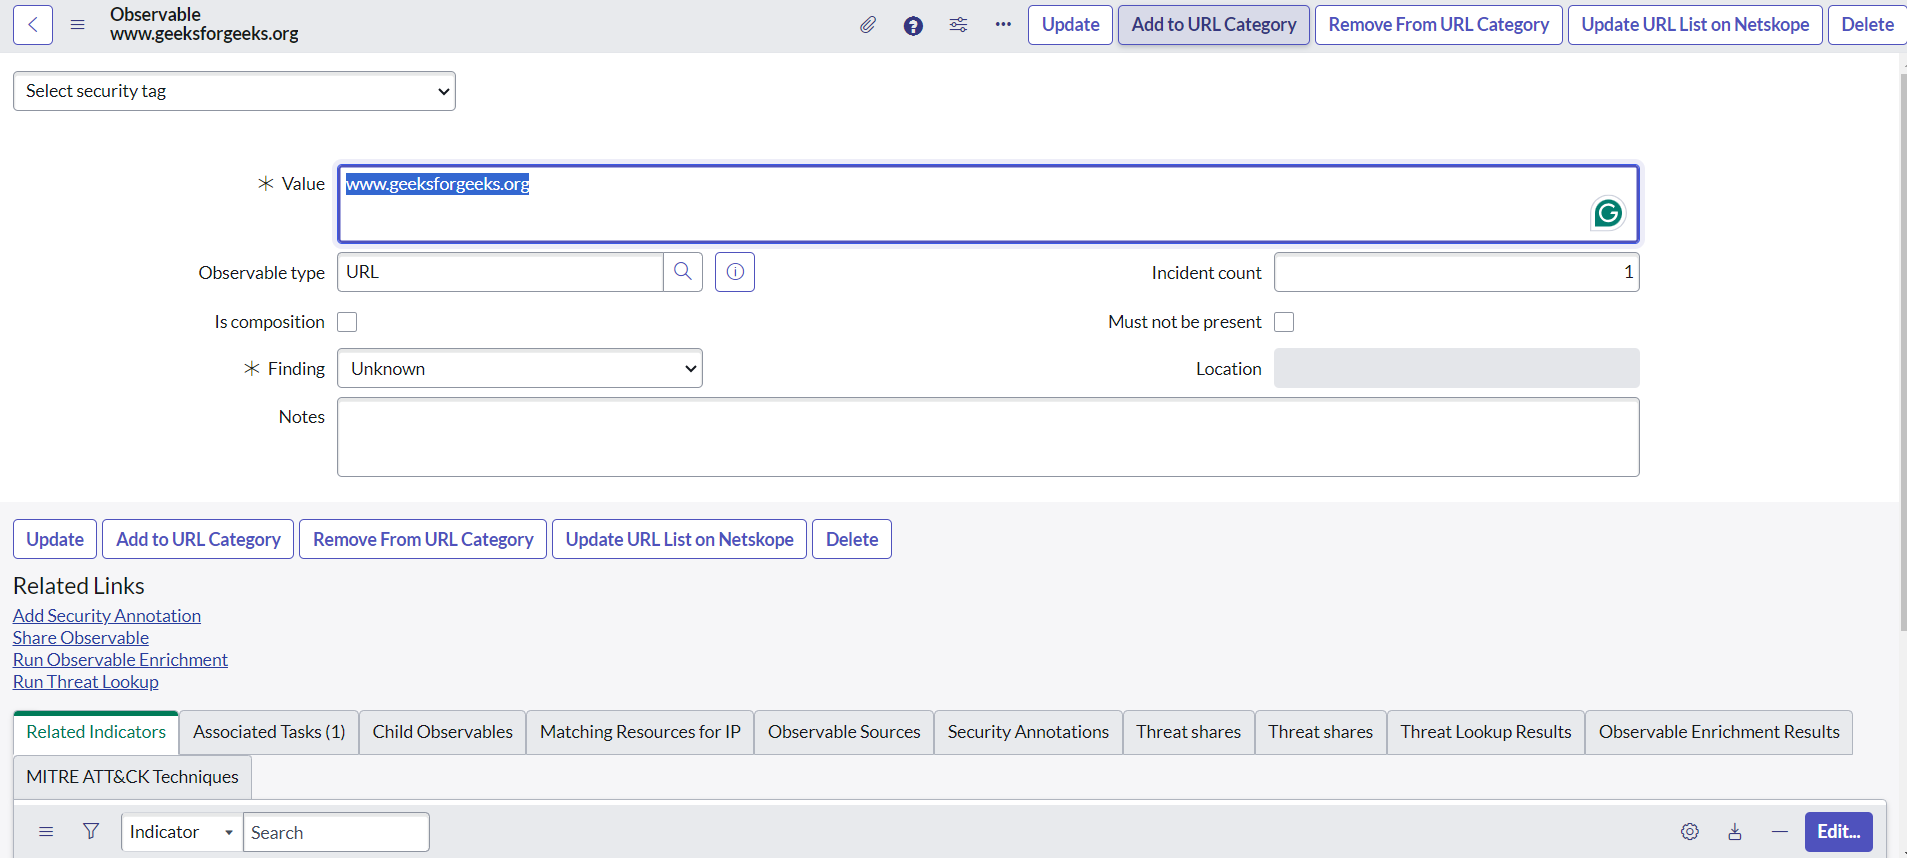
- Click Submit.
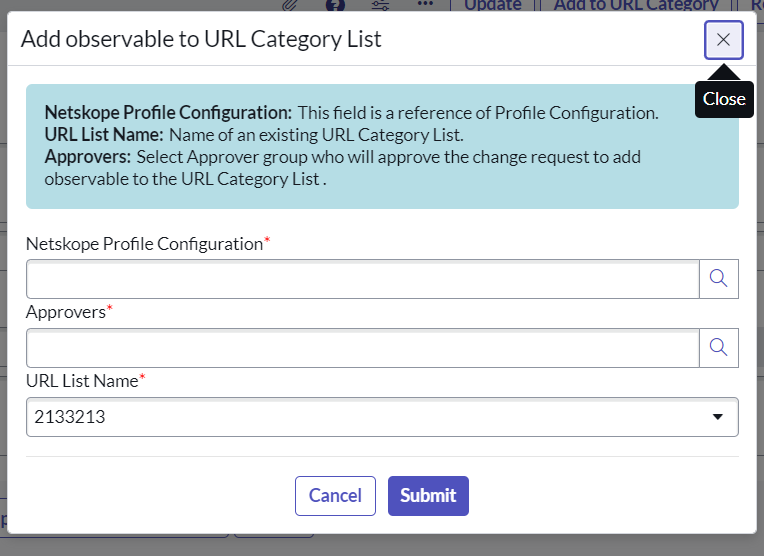
After submitting, a change request will be created. When the approver approves the change request, then the URL will be added to URL Category in Netskope.
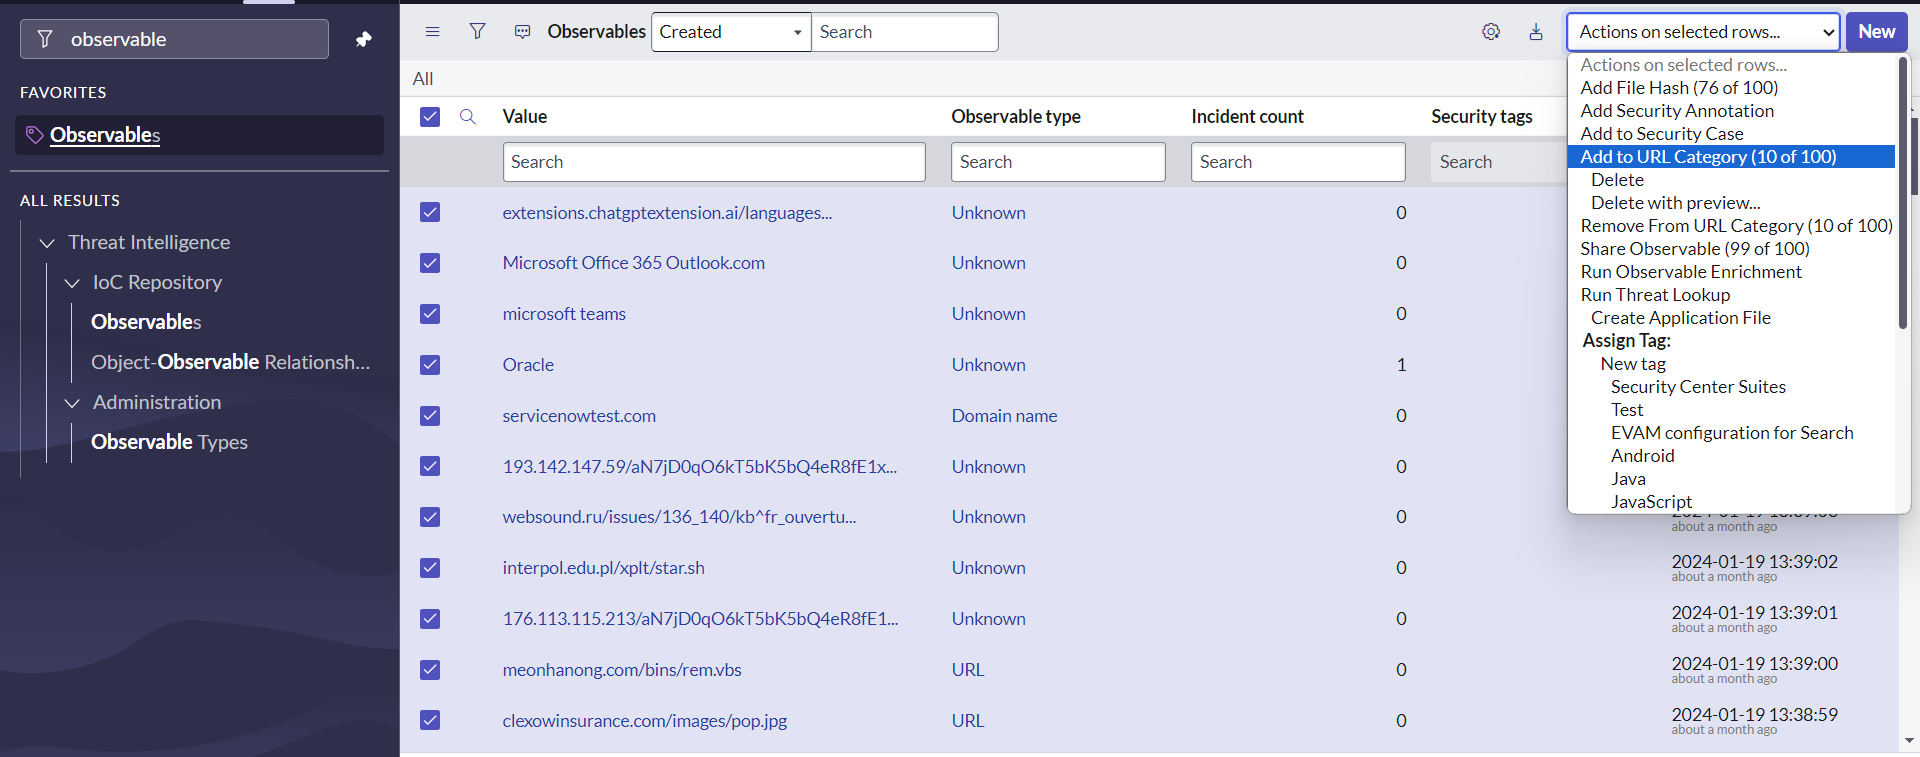
The action can also be performed from the list of the Observables table.
Remove from URL Category
You can remove observables of type URL/ip/domain from a category list in Netskope.
Roles Required: sn_si.admin or sn_si.analyst
Procedure
- Go to Security Incidents.
- Click on a Security Incident record.
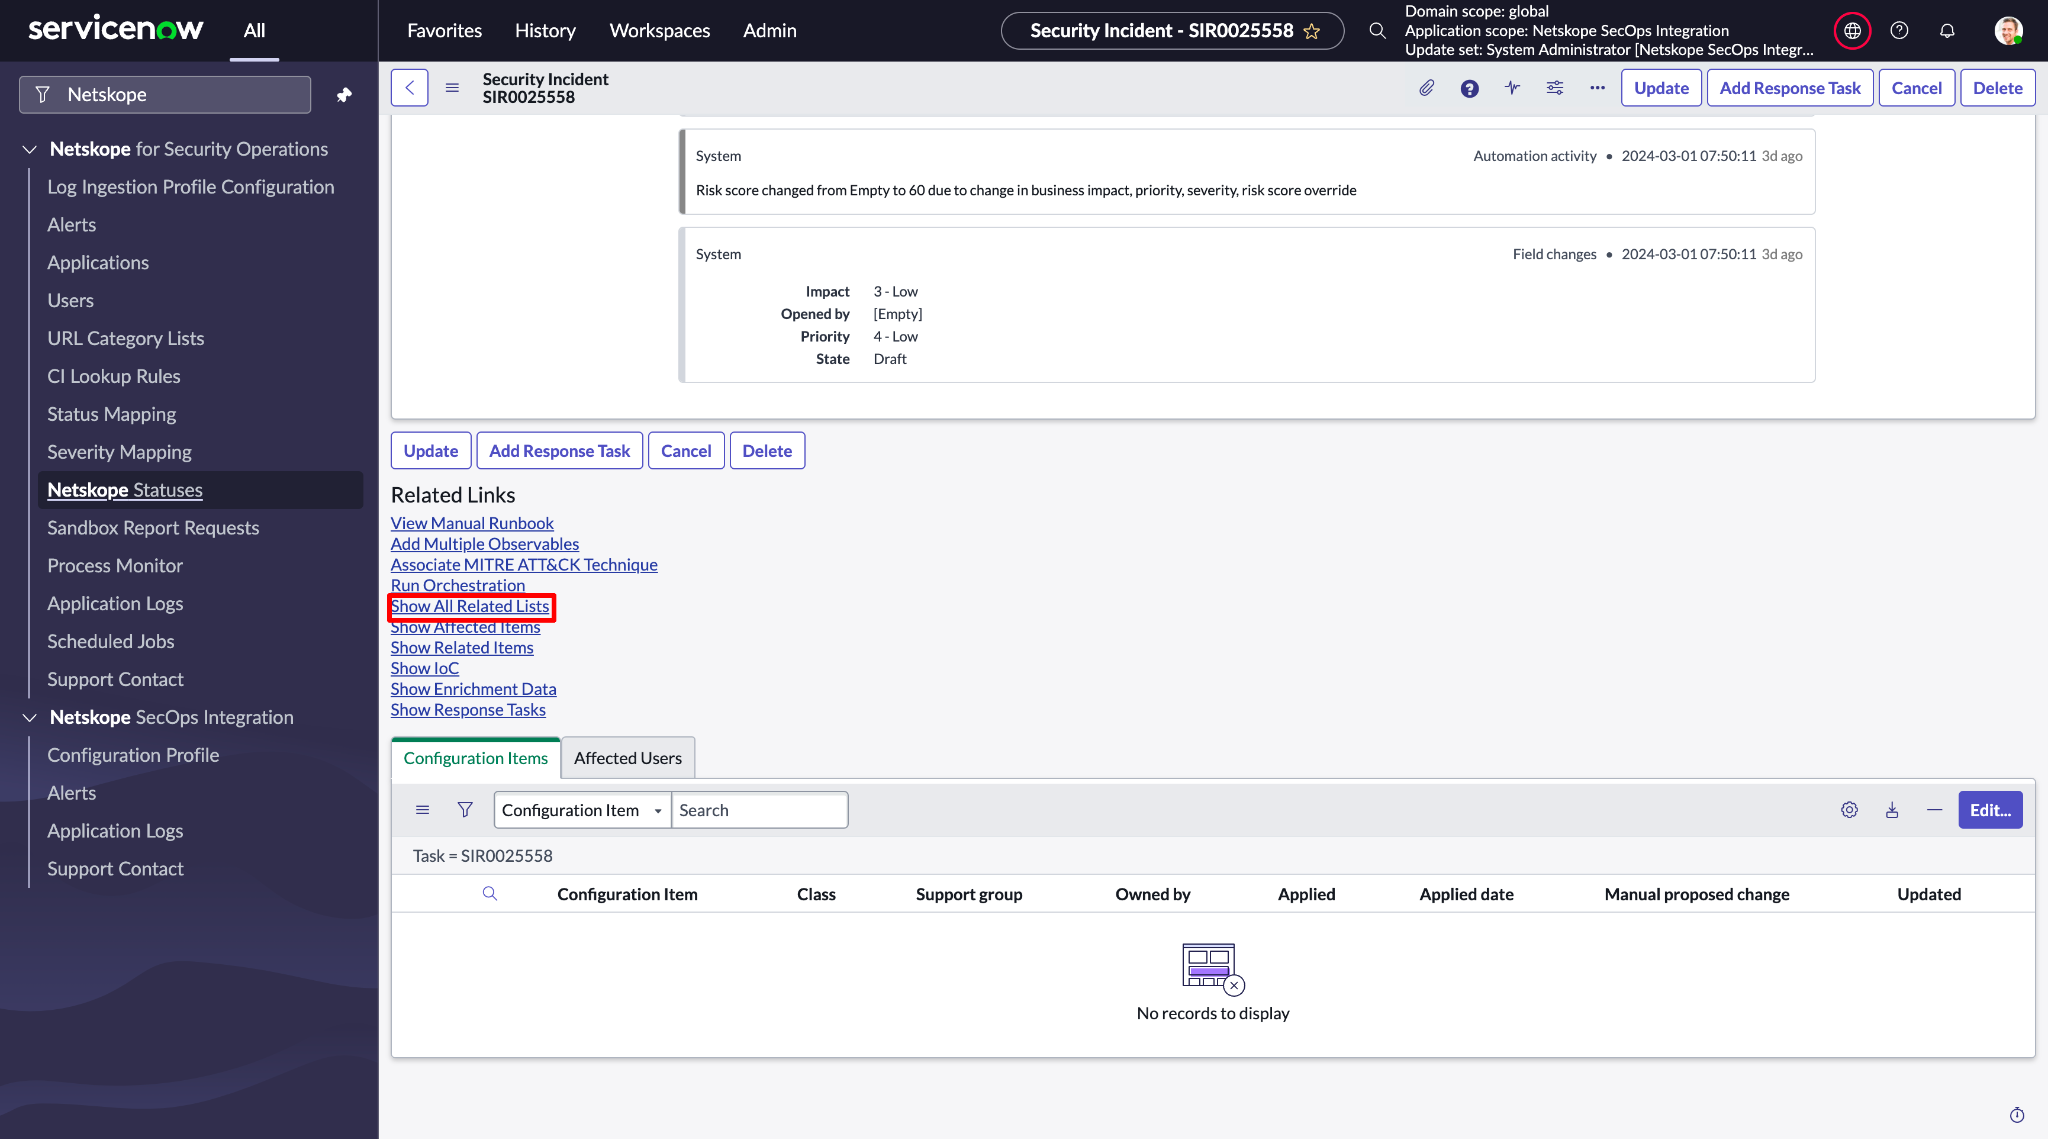
- Locate the Associated Observables related list. If the related list is not visible, click Show All Related Lists.
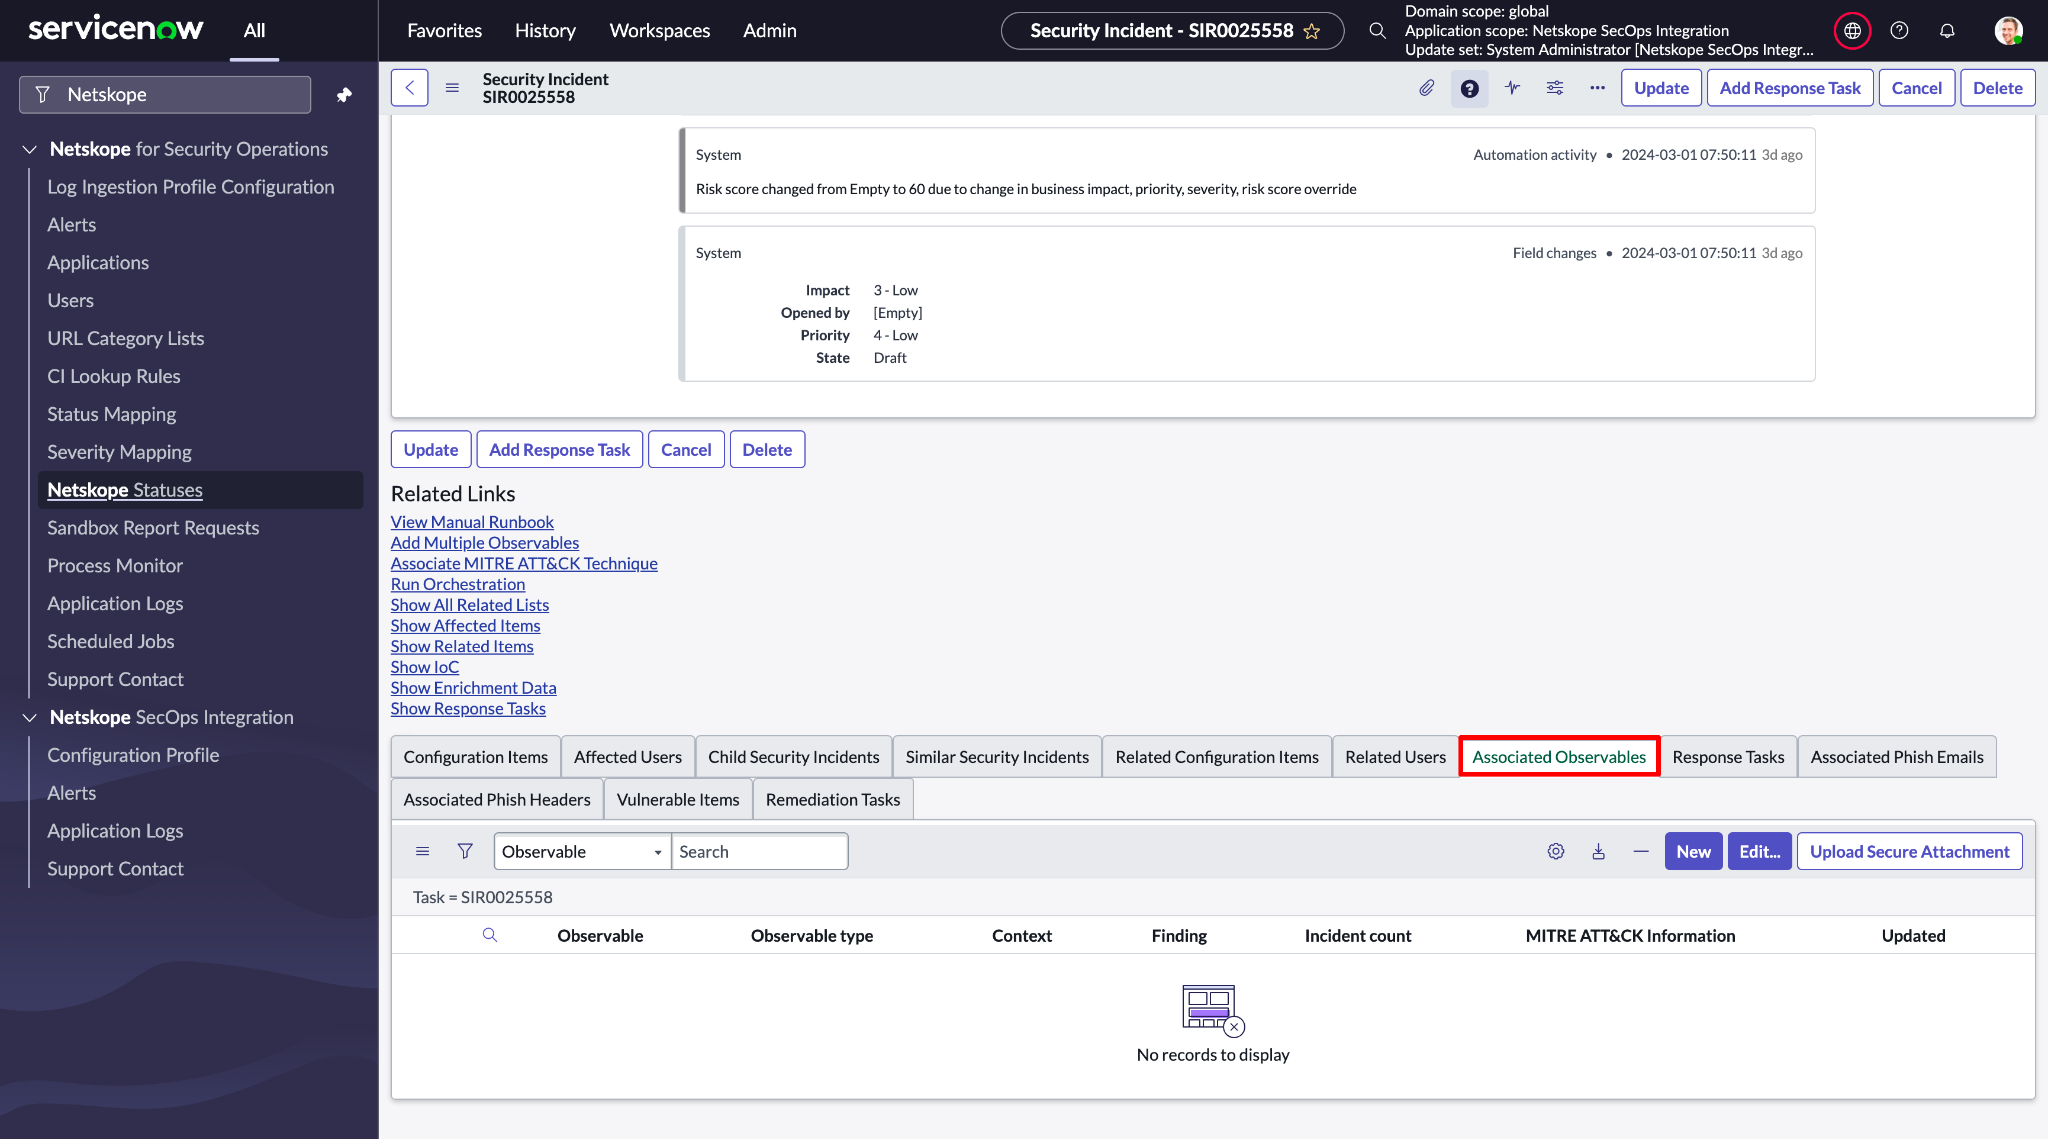
- A list of Observables will be displayed.
- If the Observable is of type URL, Domain, or IP, then the user can perform Add to URL Category action.
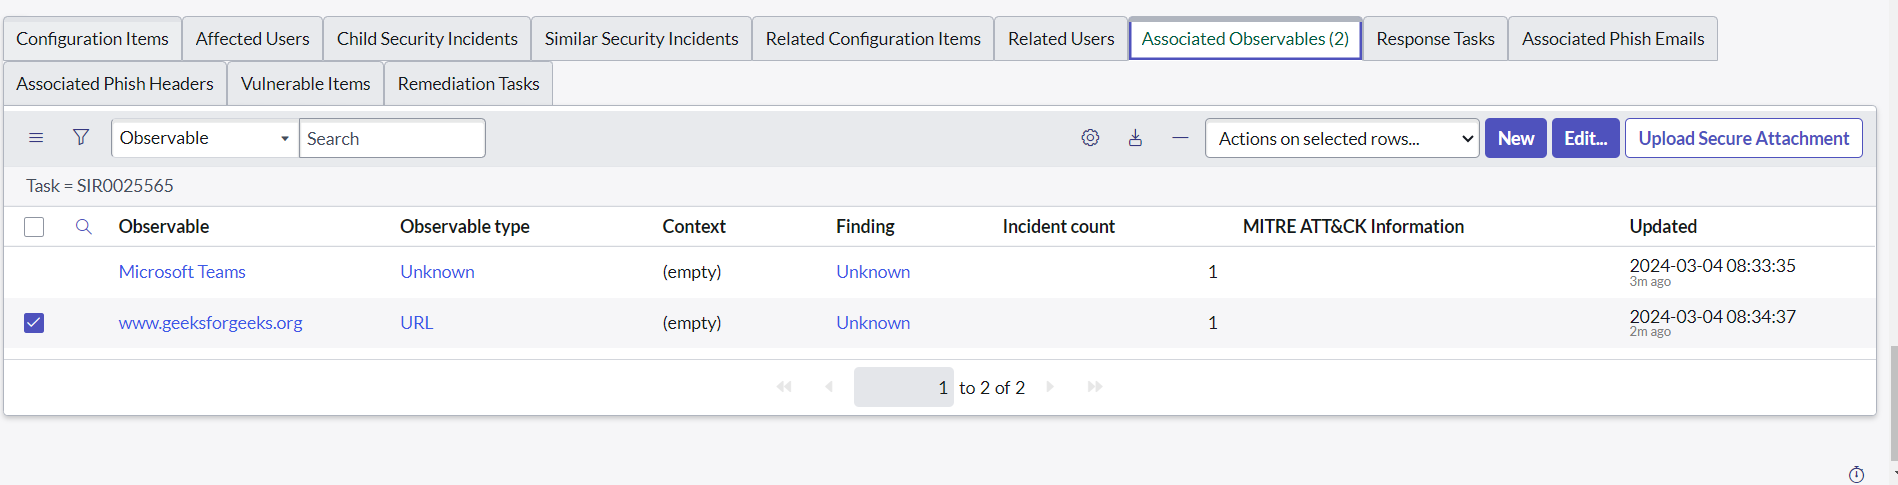
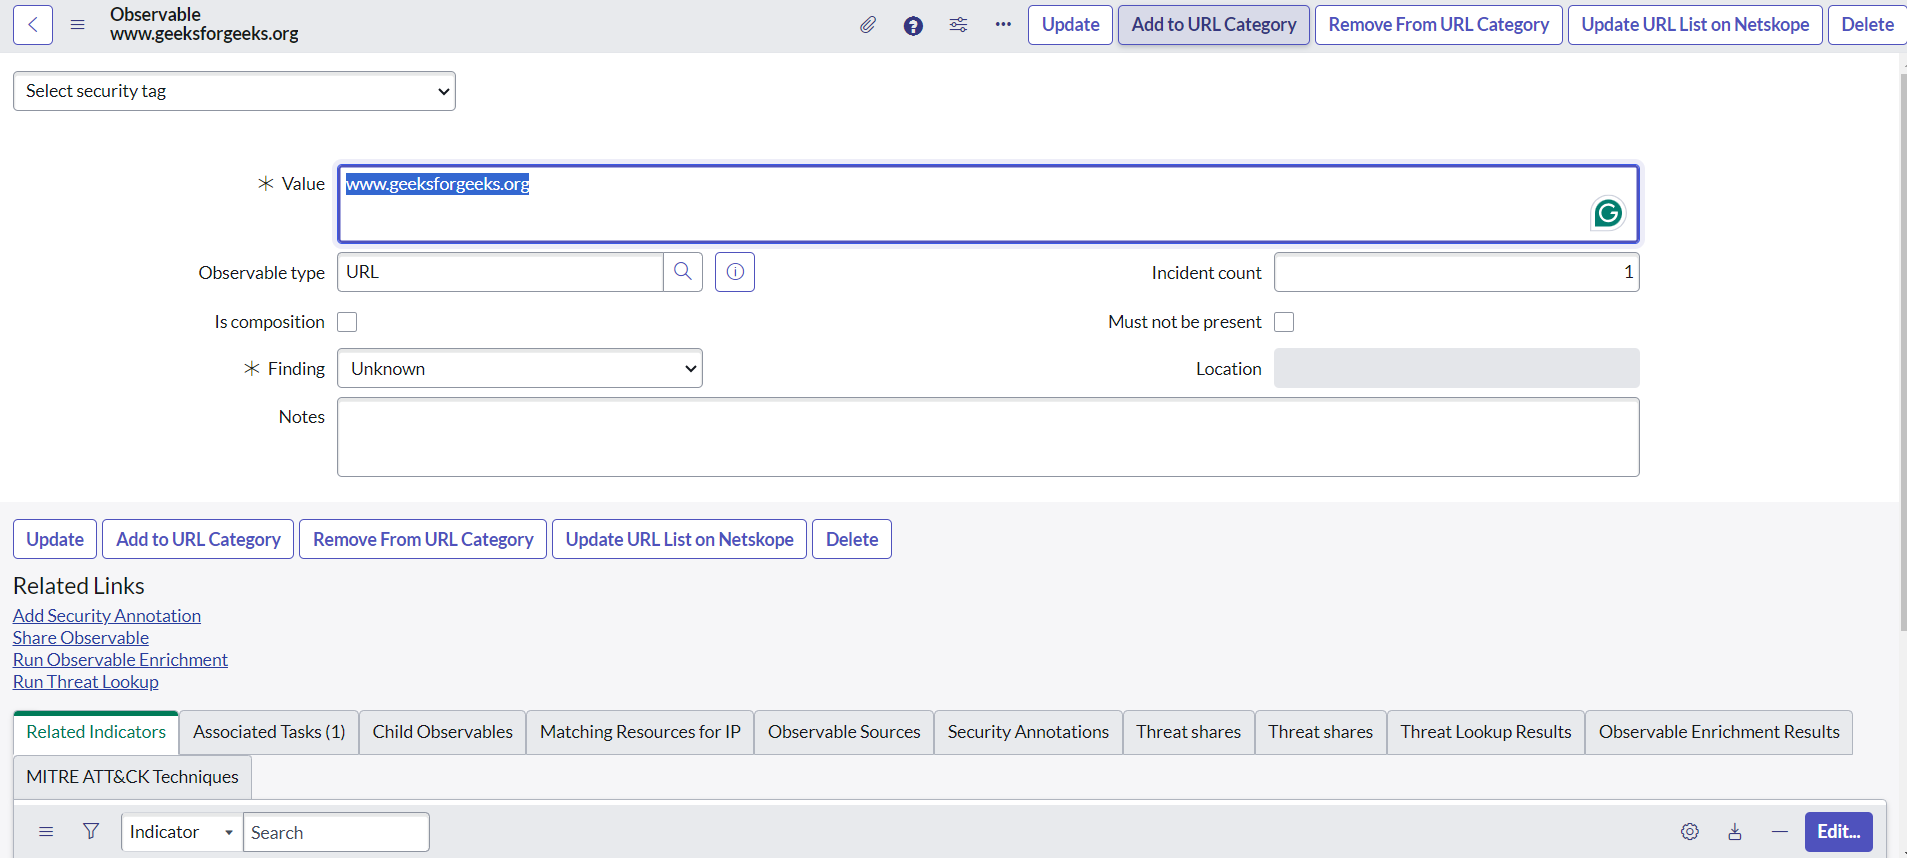
- Click on an Observables record.
- On top of the form. there will be a UI Action Remove from URL Category. Click on that, enter the required fields, and click Submit.
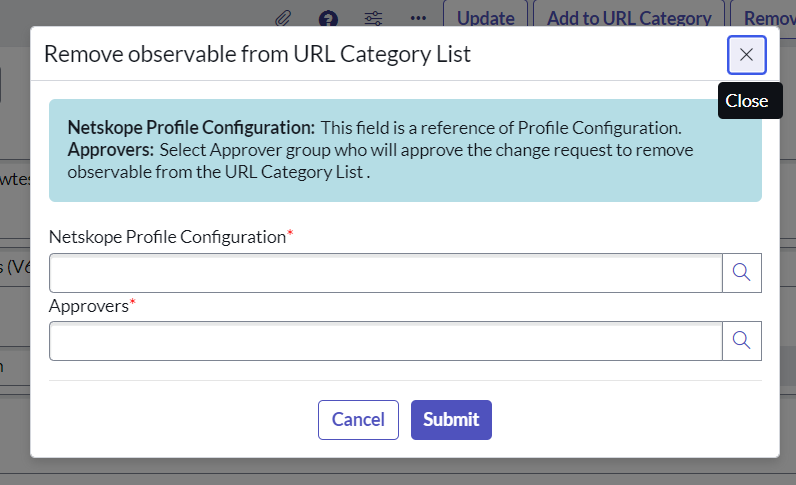
- After submitting, a change request will be created. When the approver approves the change request, then the URL will be removed from URL Category in Netskope.
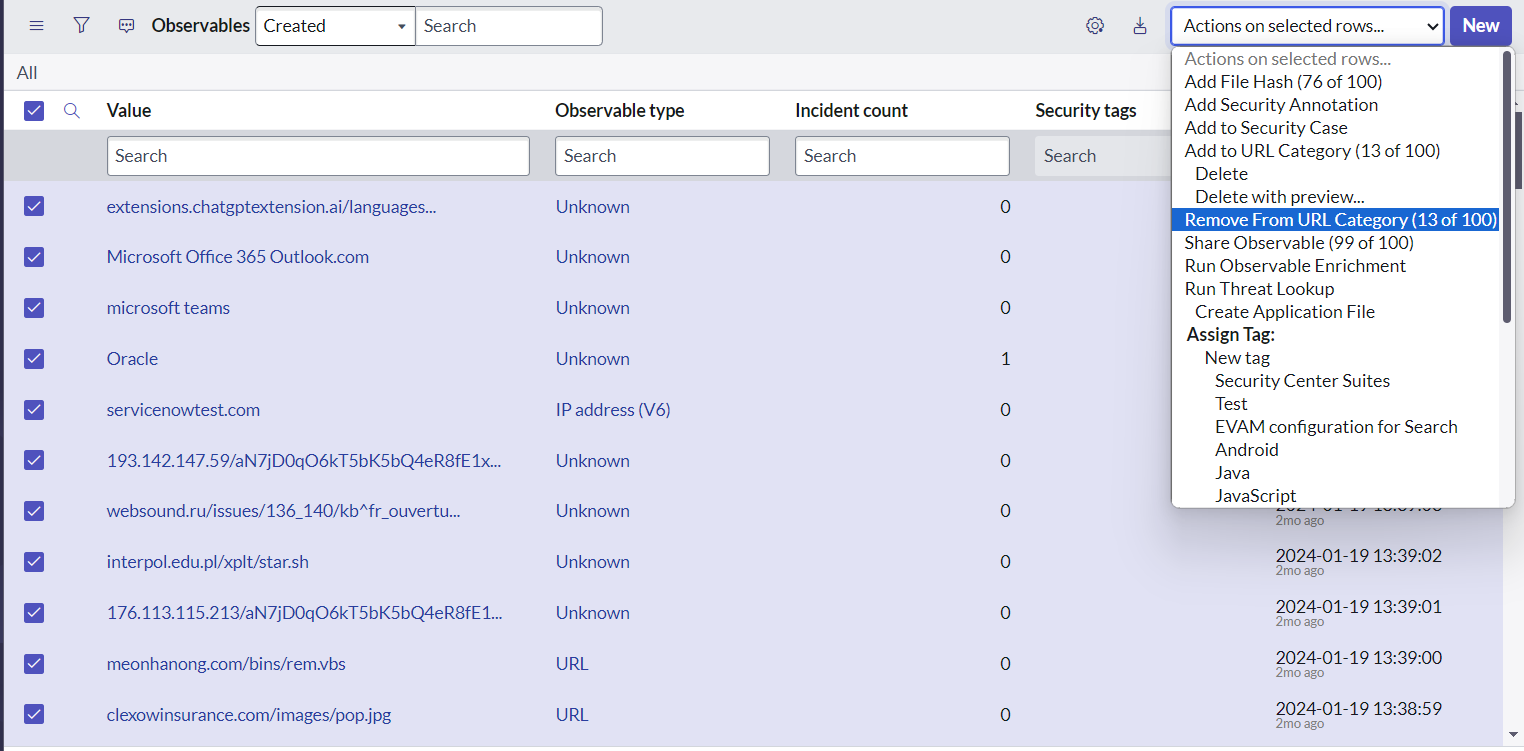
The action can also be performed from the list of the Observables table.
Add/Remove URL from URL List Category for an Auto-generated Change Request.
You can add/remove URL based on the selected URL Lookup Field selected in the configuration.
Roles Required: sn_si.admin
Procedure
For a change request created automatically for a policy or malsite type of alerts, you can add/remove URLs using the created change request.
- Based on the Change Request Creation criteria, change requests will be created for a Policy or Malsite type of alerts.
- Go to the created change request from the Alerts list view to find the change request associated with the alert.
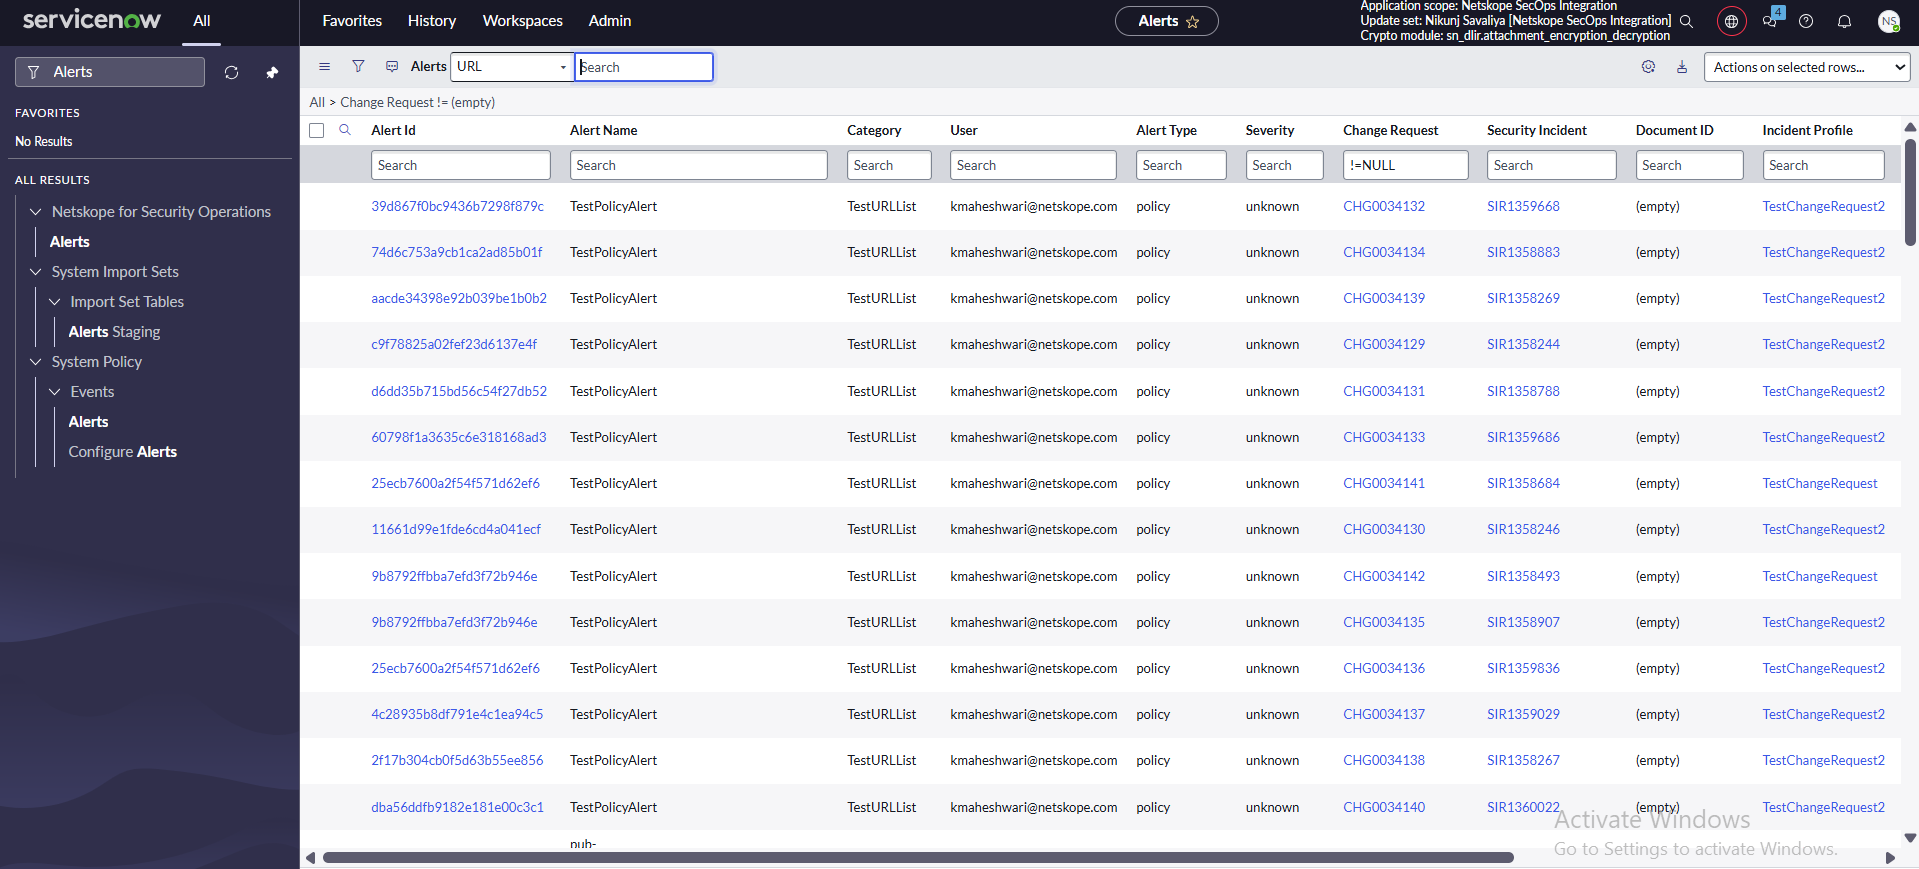
- For Policy type of alerts, a change request will be generated based on the selected URL lookup field and Change Request Creation criteria.
- For Malsite type of alerts, a change request will be generated based on the alert’s Threat Match Field and Threat Match Value.
- In the description, the URL will be displayed that will be added/removed based on the operation.
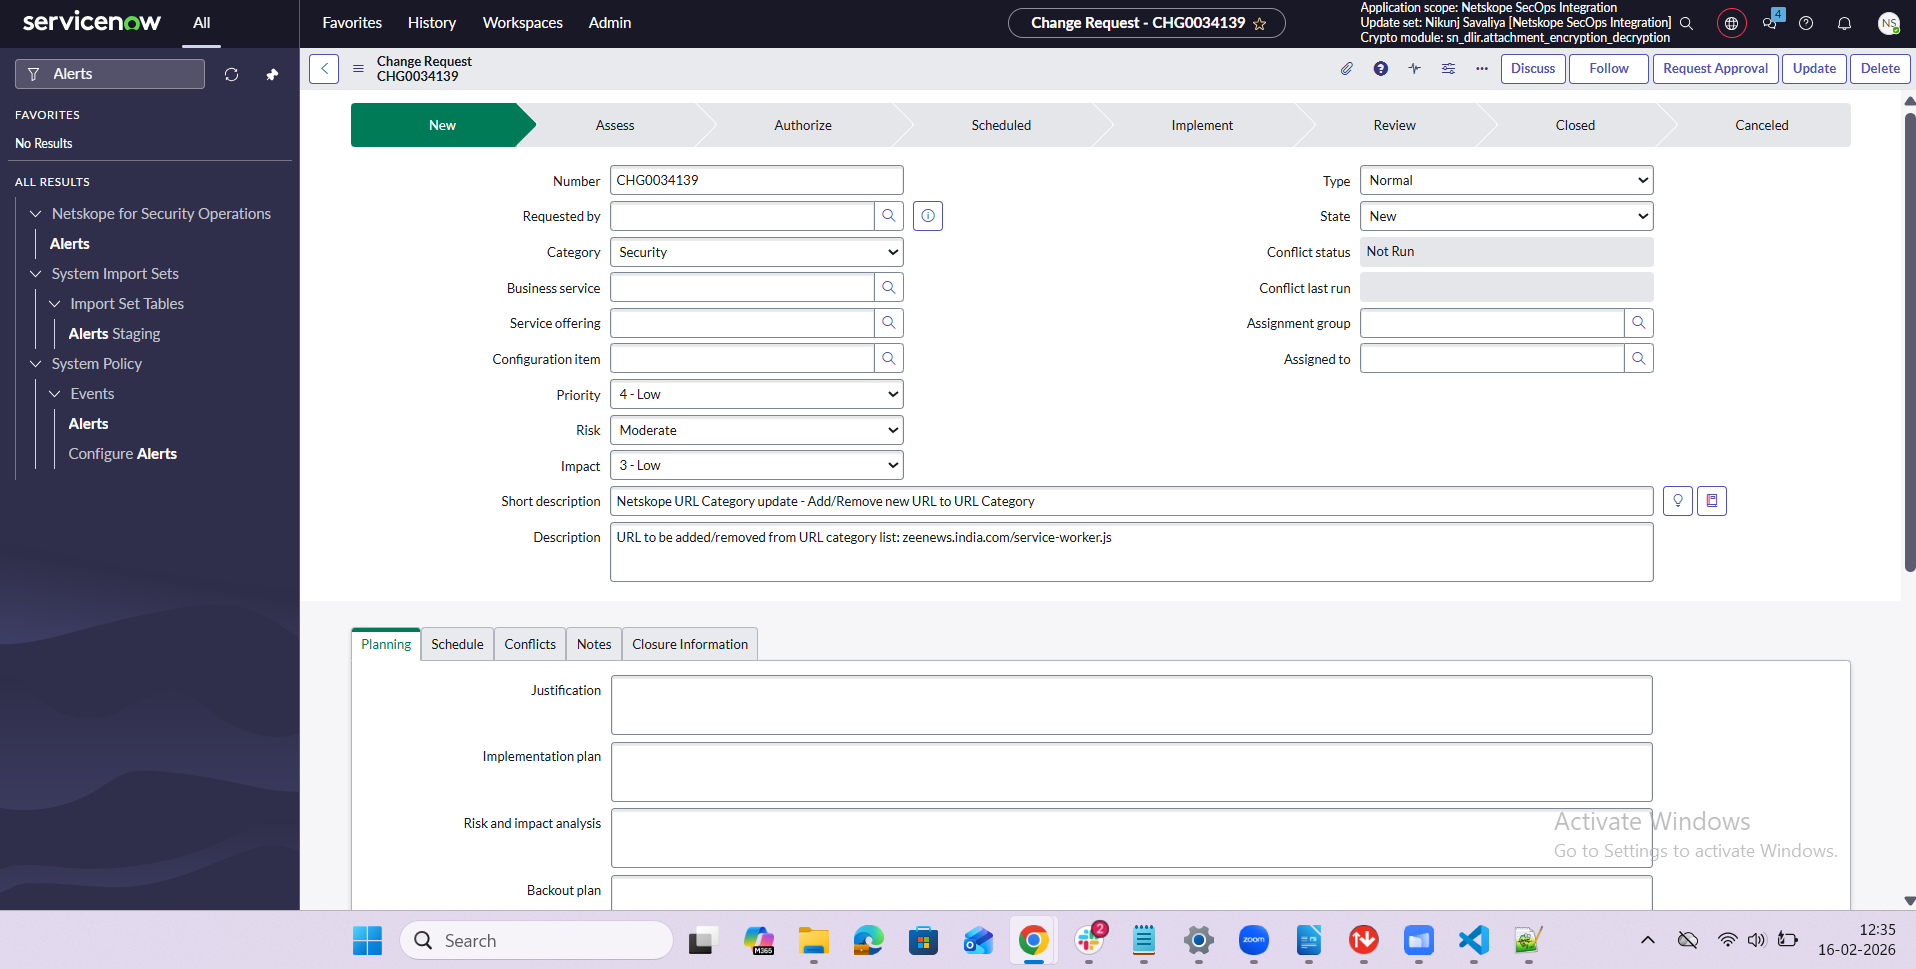
- The Change Request will be assigned to the group configured in the Change Request Creation Criteria.
- After the change request gets approved, two UI actions will be visible: Add URL to URL Category List and Remove URL from URL Category List.
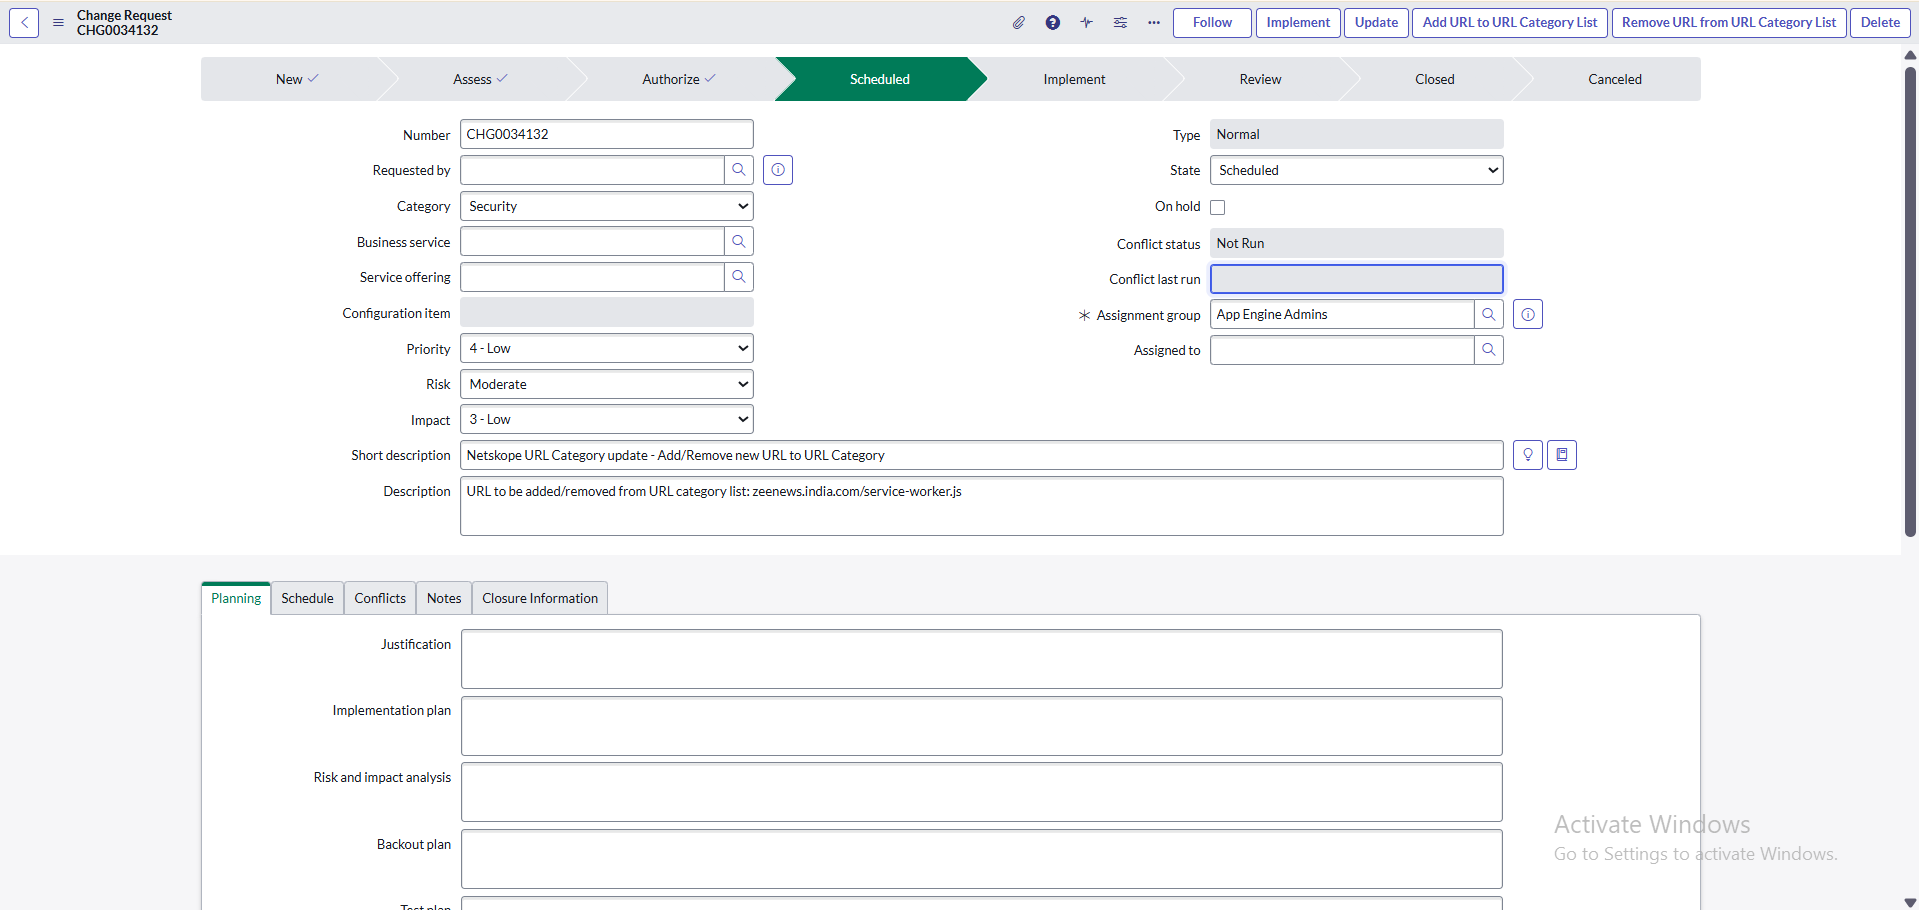
- To add it to URL Category List, click Add URL to URL Category List.
- A modal will open with URL, URL Type, and URL List name fields.
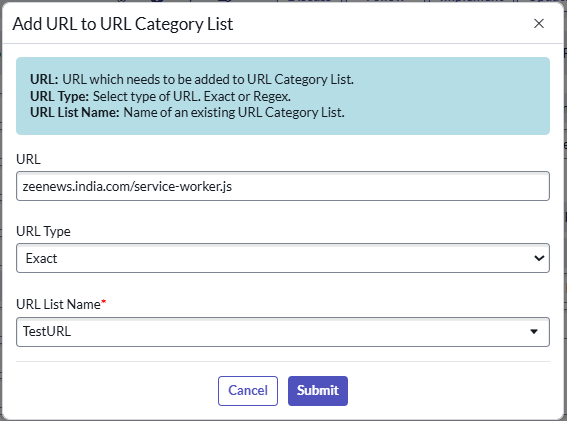
- Select the URL Type as Exact or Regex.
- Select the desired URL List Name where you want to add the URL, and click Submit.
- To remove a URL from URL Category List, click Remove URL from URL Category List.
- A modal will open with URL, URL Type and URL List name field.
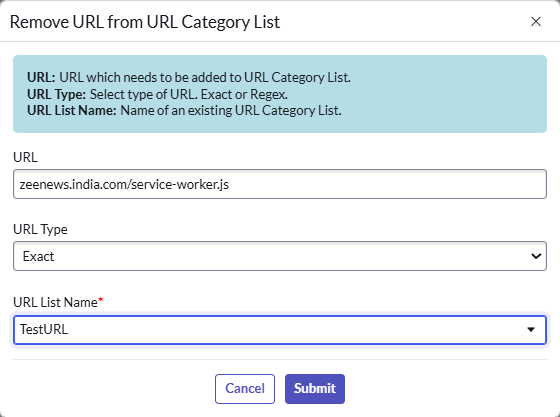
- Select the desired URL List Name from where you want to remove the URL and click Submit.
Add to File Hash
You can add observables of type URL to a category list in Netskope.
Roles Required: sn_si.admin or sn_si.analyst
Procedure
- Go to Security Incidents.
- Click on a Security Incident record.
- Locate the Associated Observables related list. If the related list is not visible, click Show All Related Lists.
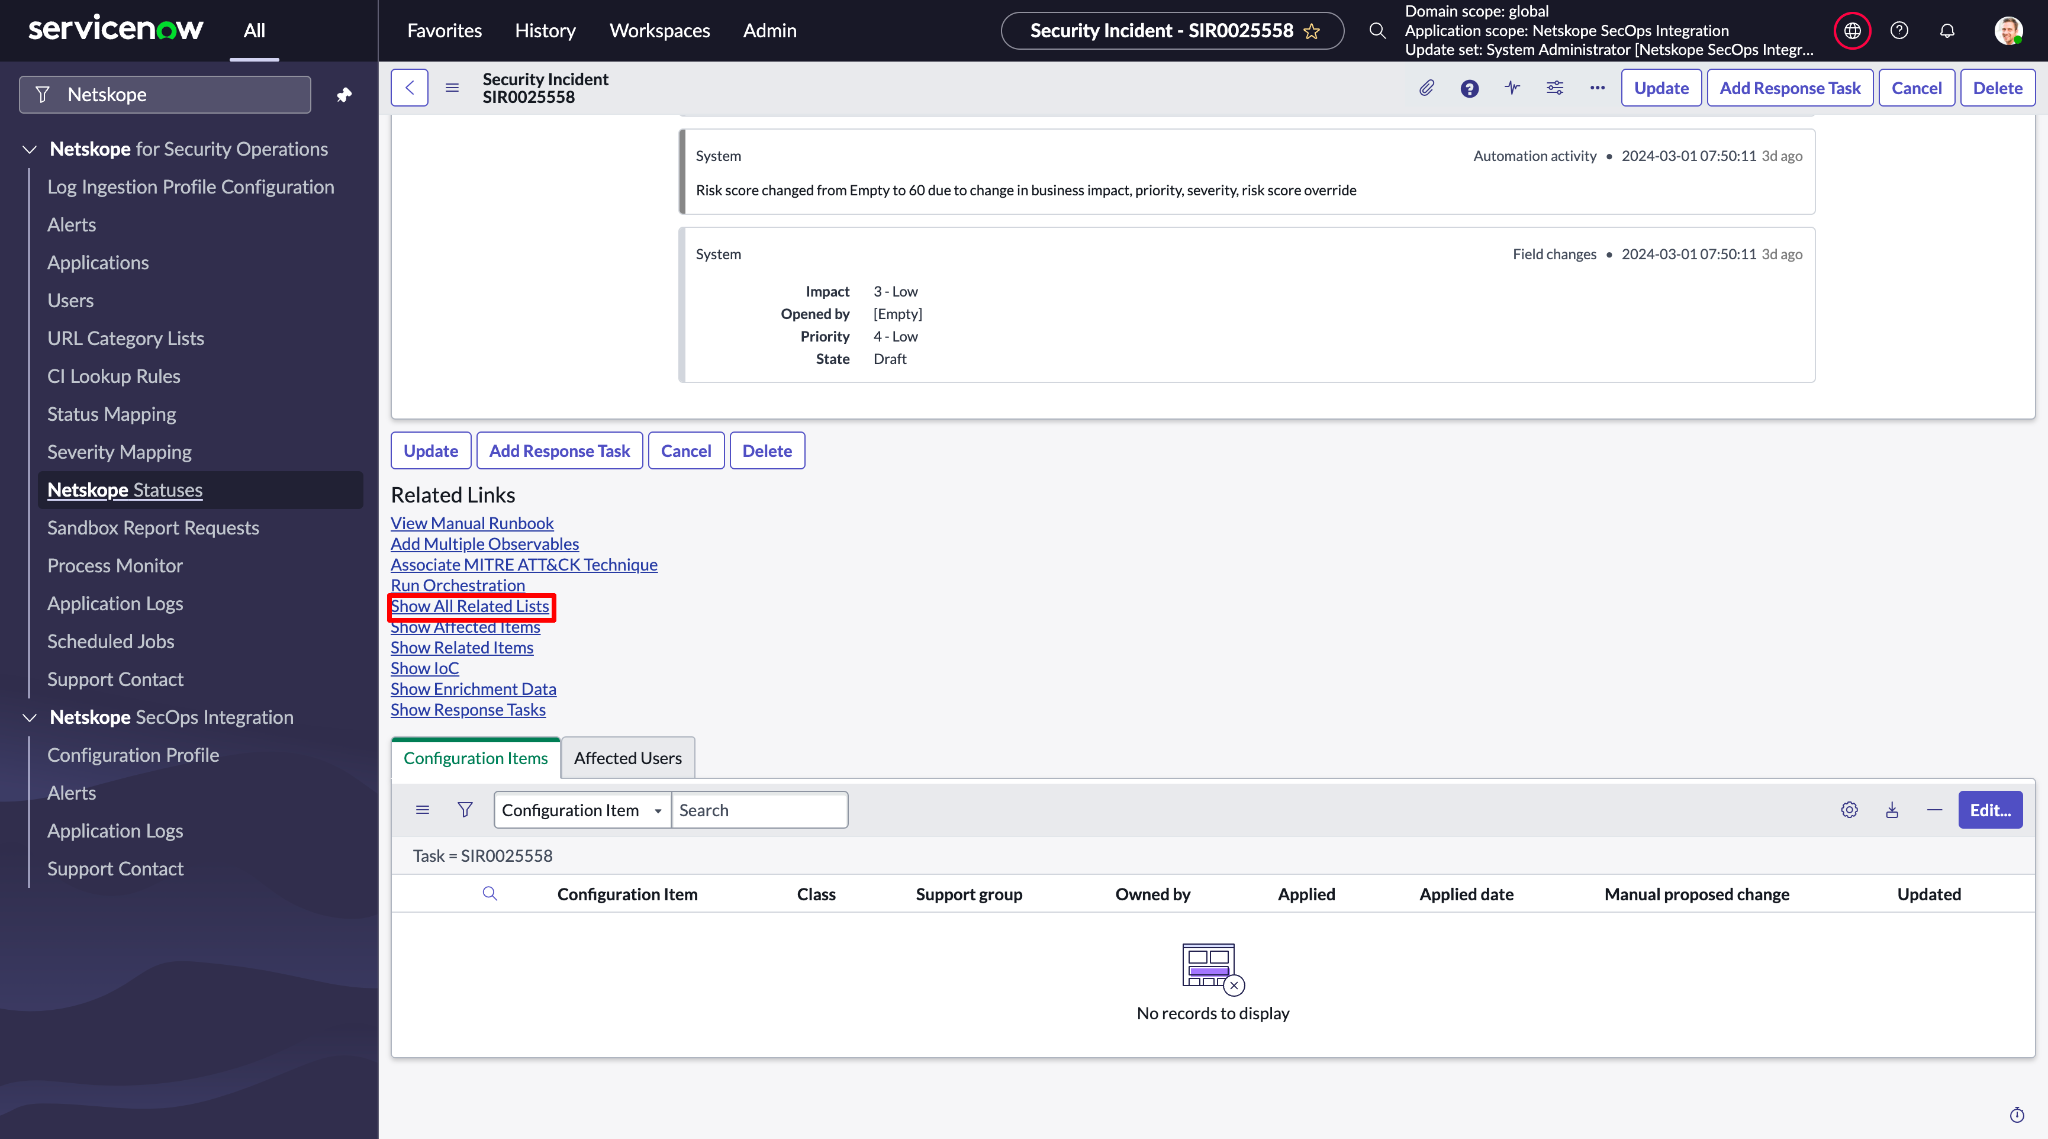
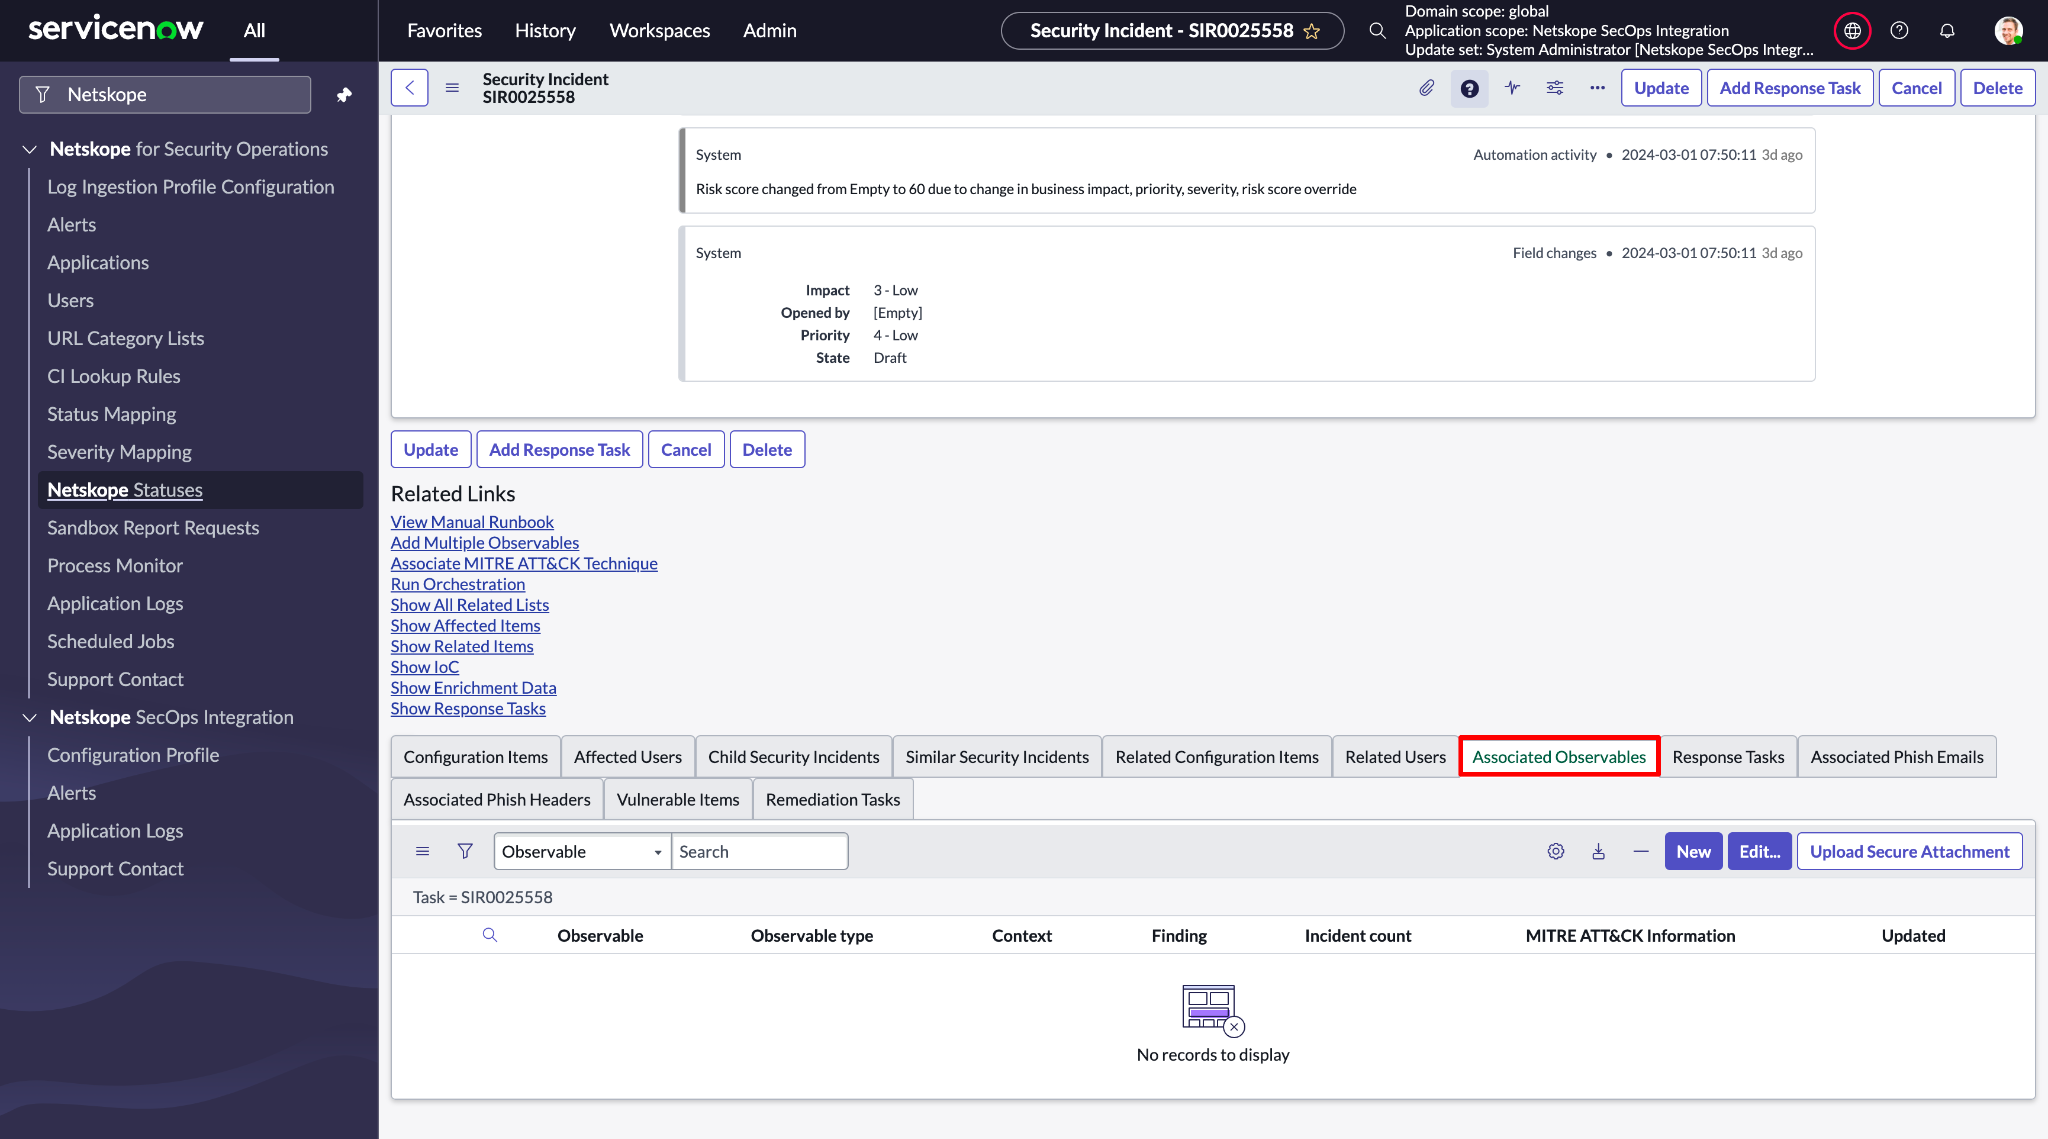
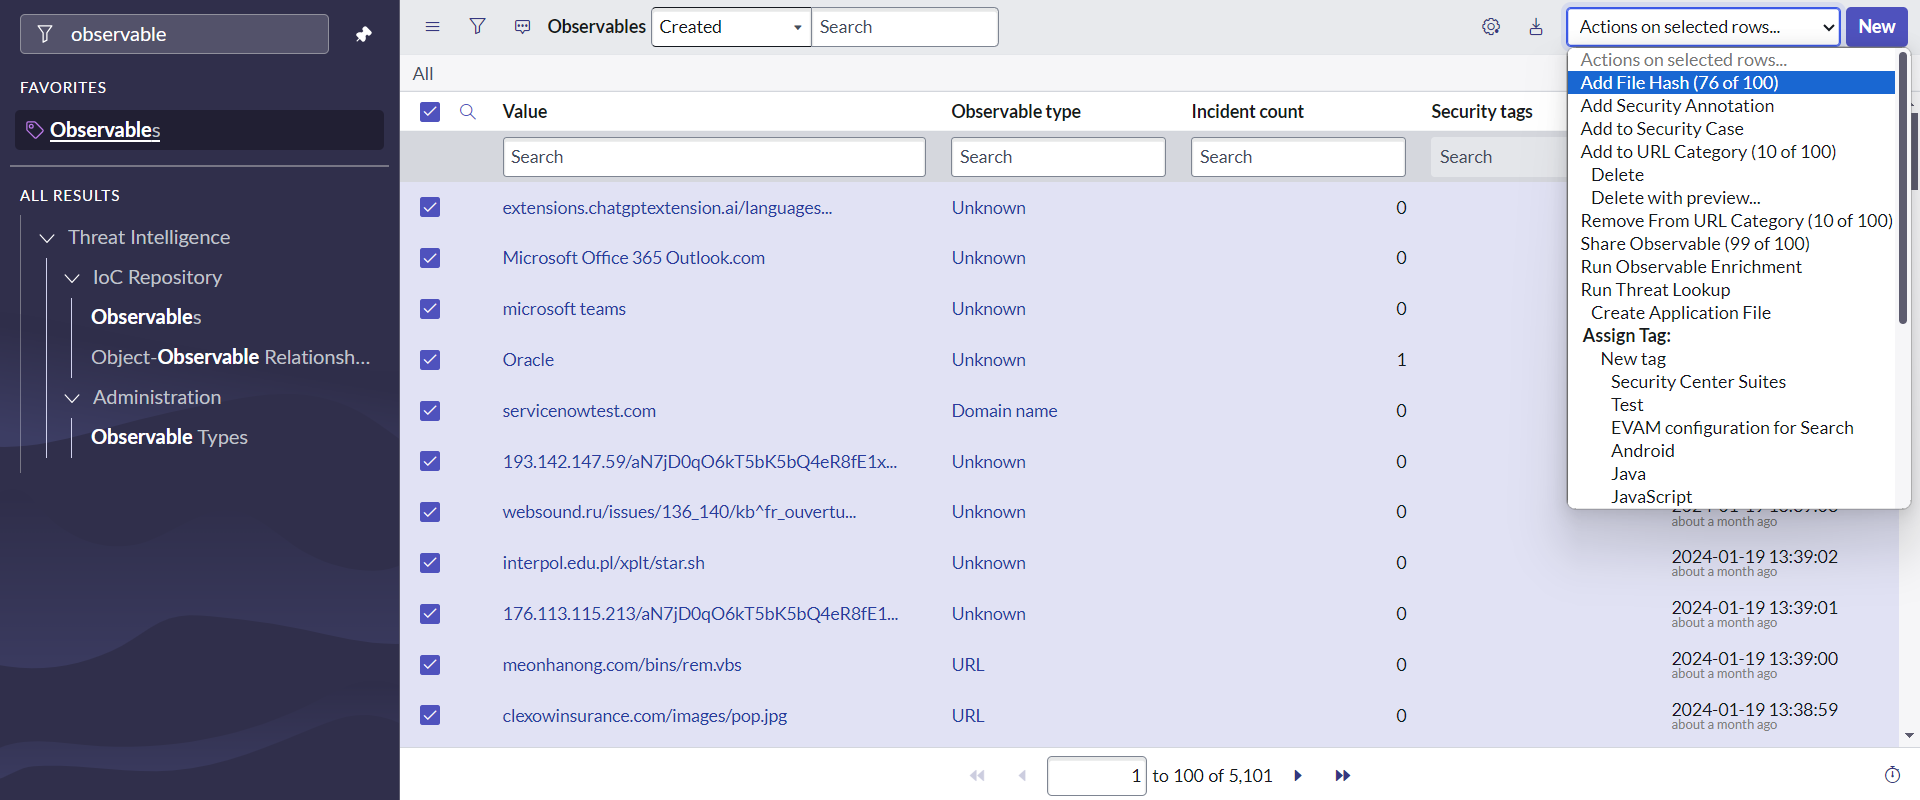
- A list of Observables will be displayed. If the Observable is of type MD5 or SHA256, then you can perform the Add File Hash action.
- Click on an Observables record.
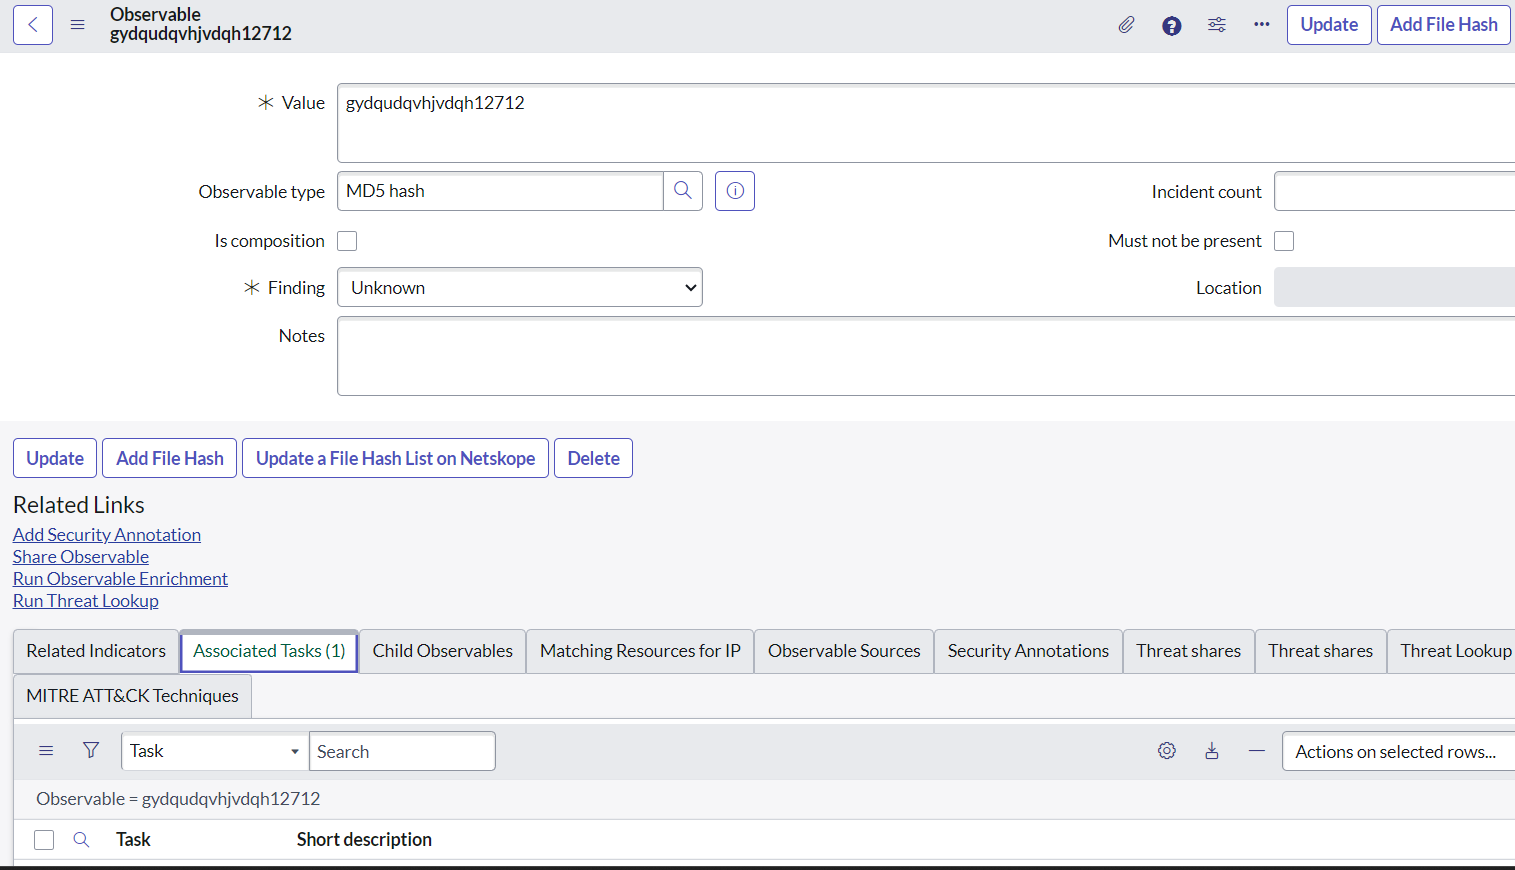
- On top of the form there will be a UI Action Add File Hash. Click on that, enter the required fields, and click Submit.
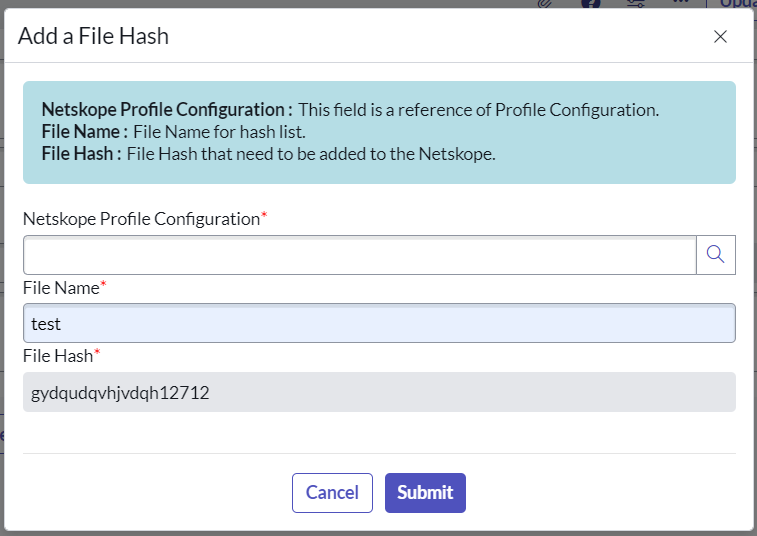
The action can also be performed from the list of the Observables (sn_ti_observable) table.
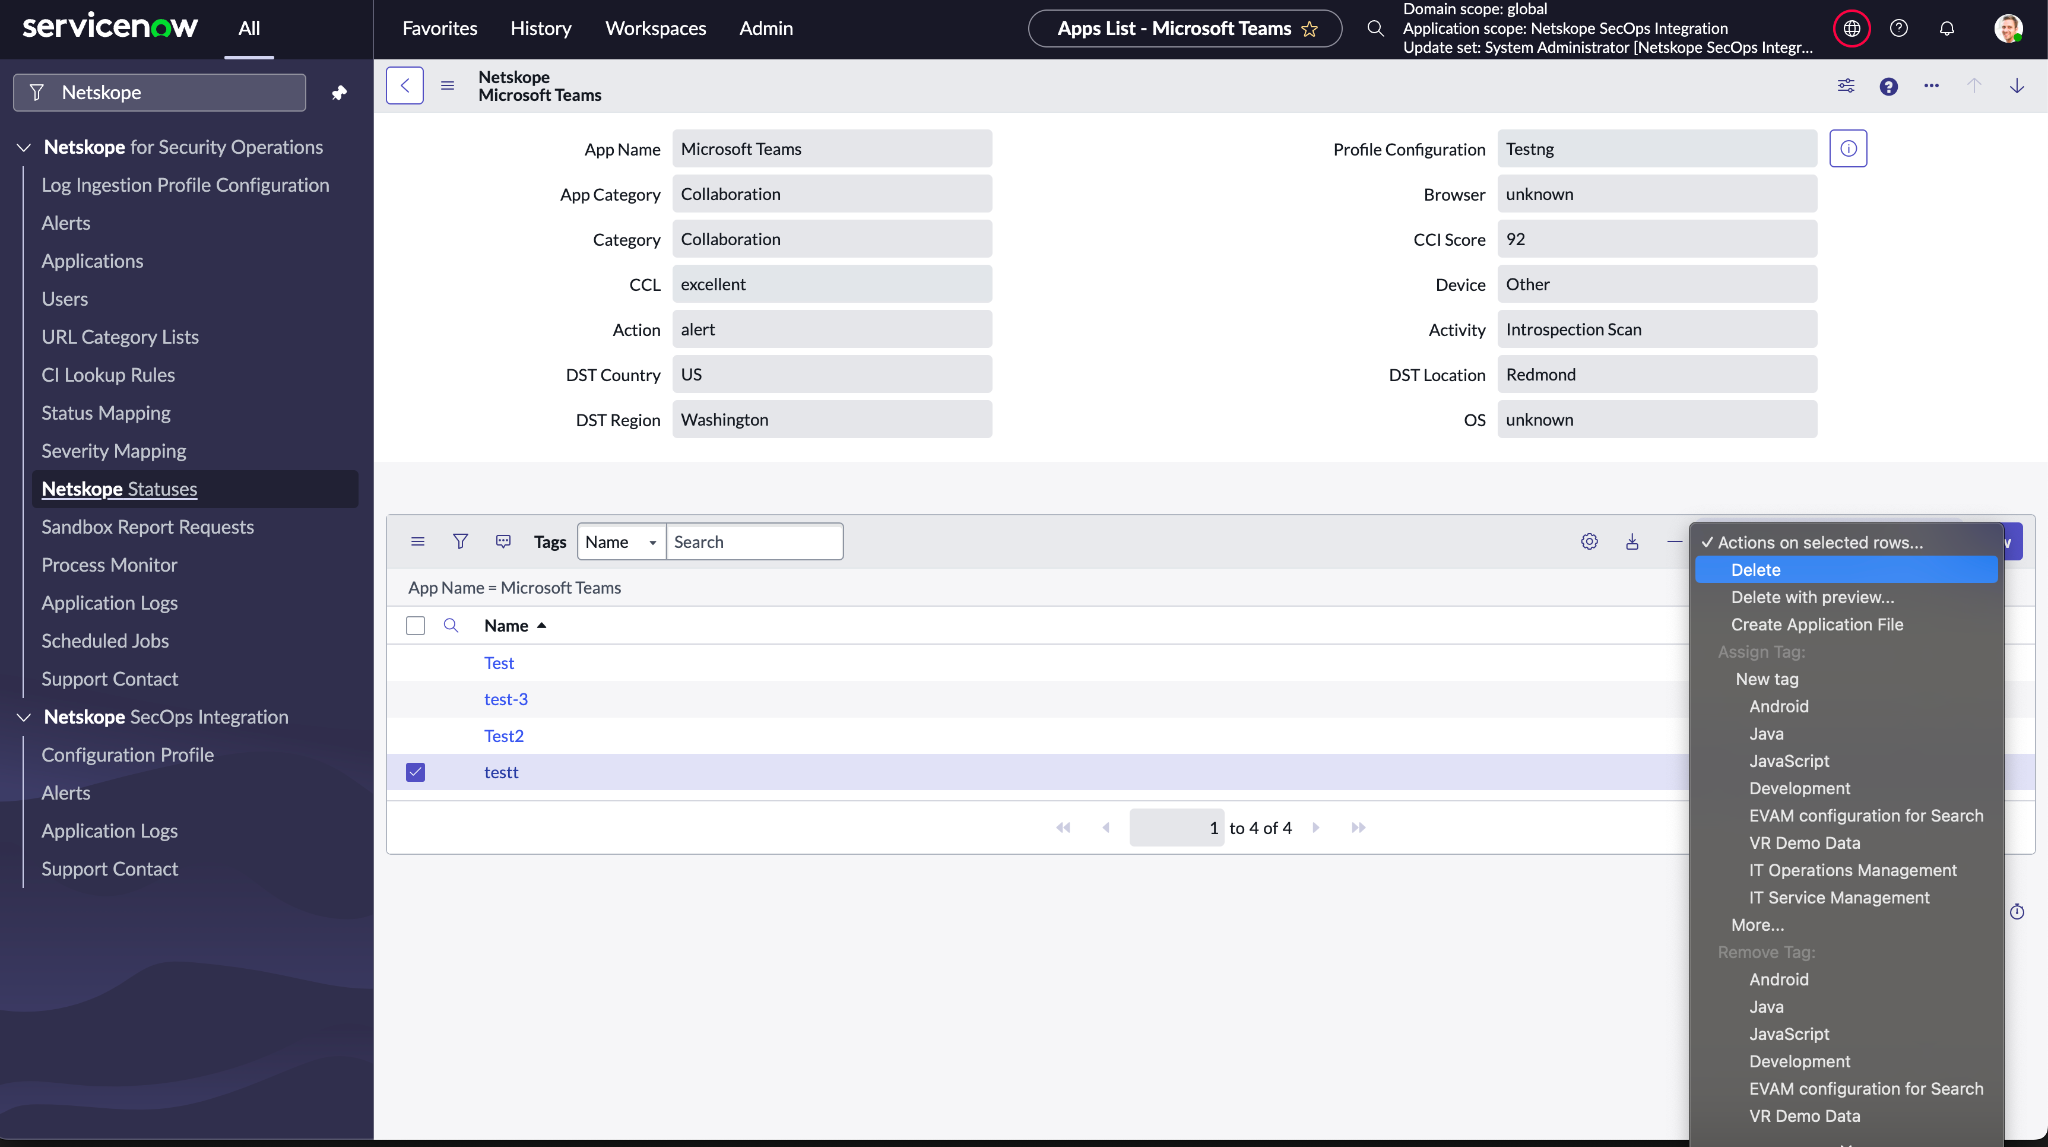
Add/Remove Tags
You can add or remove tags from applications on Netskope.
Roles Required: x_netsk_nets_sir.netskope_admin or x_netsk_nets_sir.netskope_user
Procedure
- Go to Netskope for Security Operations > Applications.
- Open an application record.
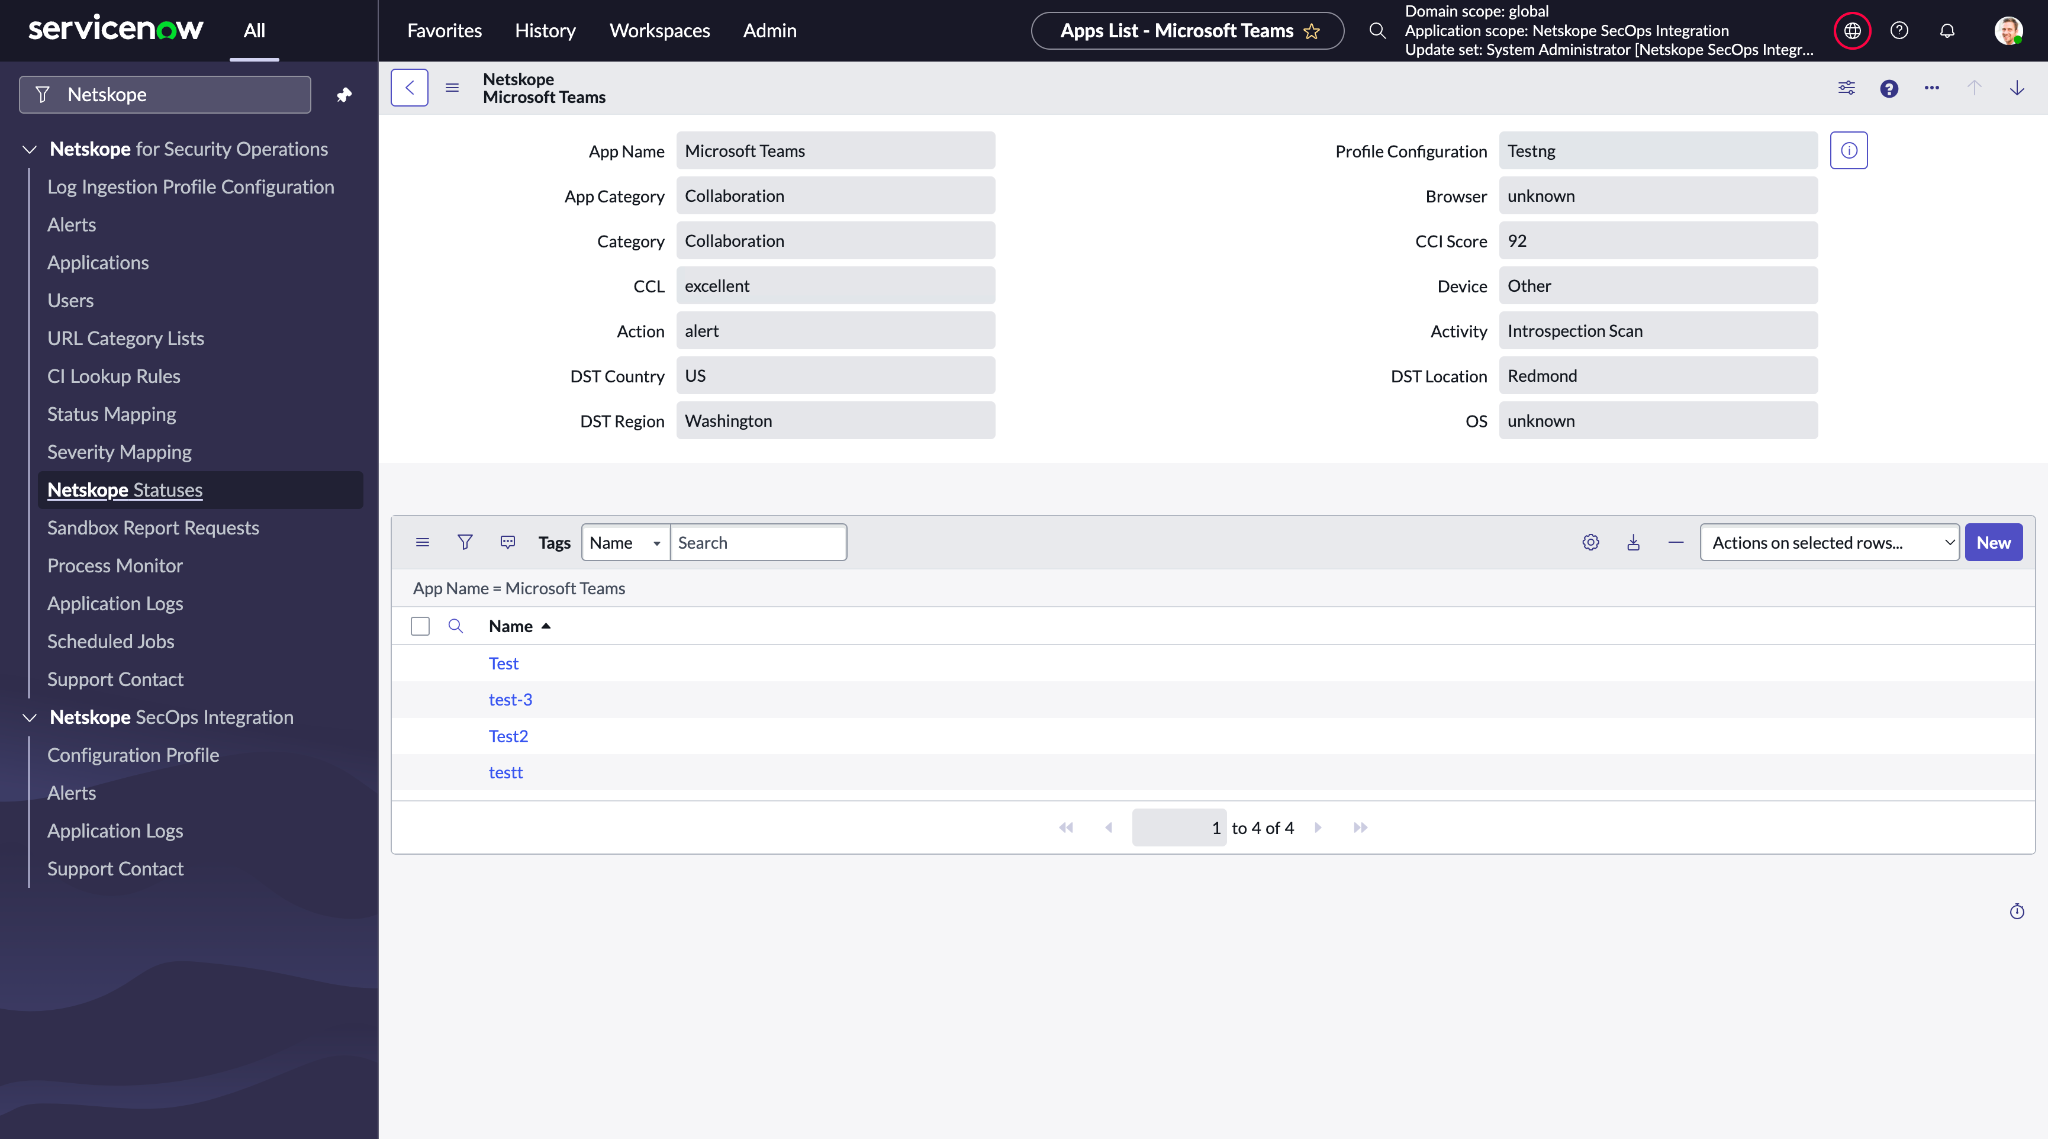
- Click New to add new tags.
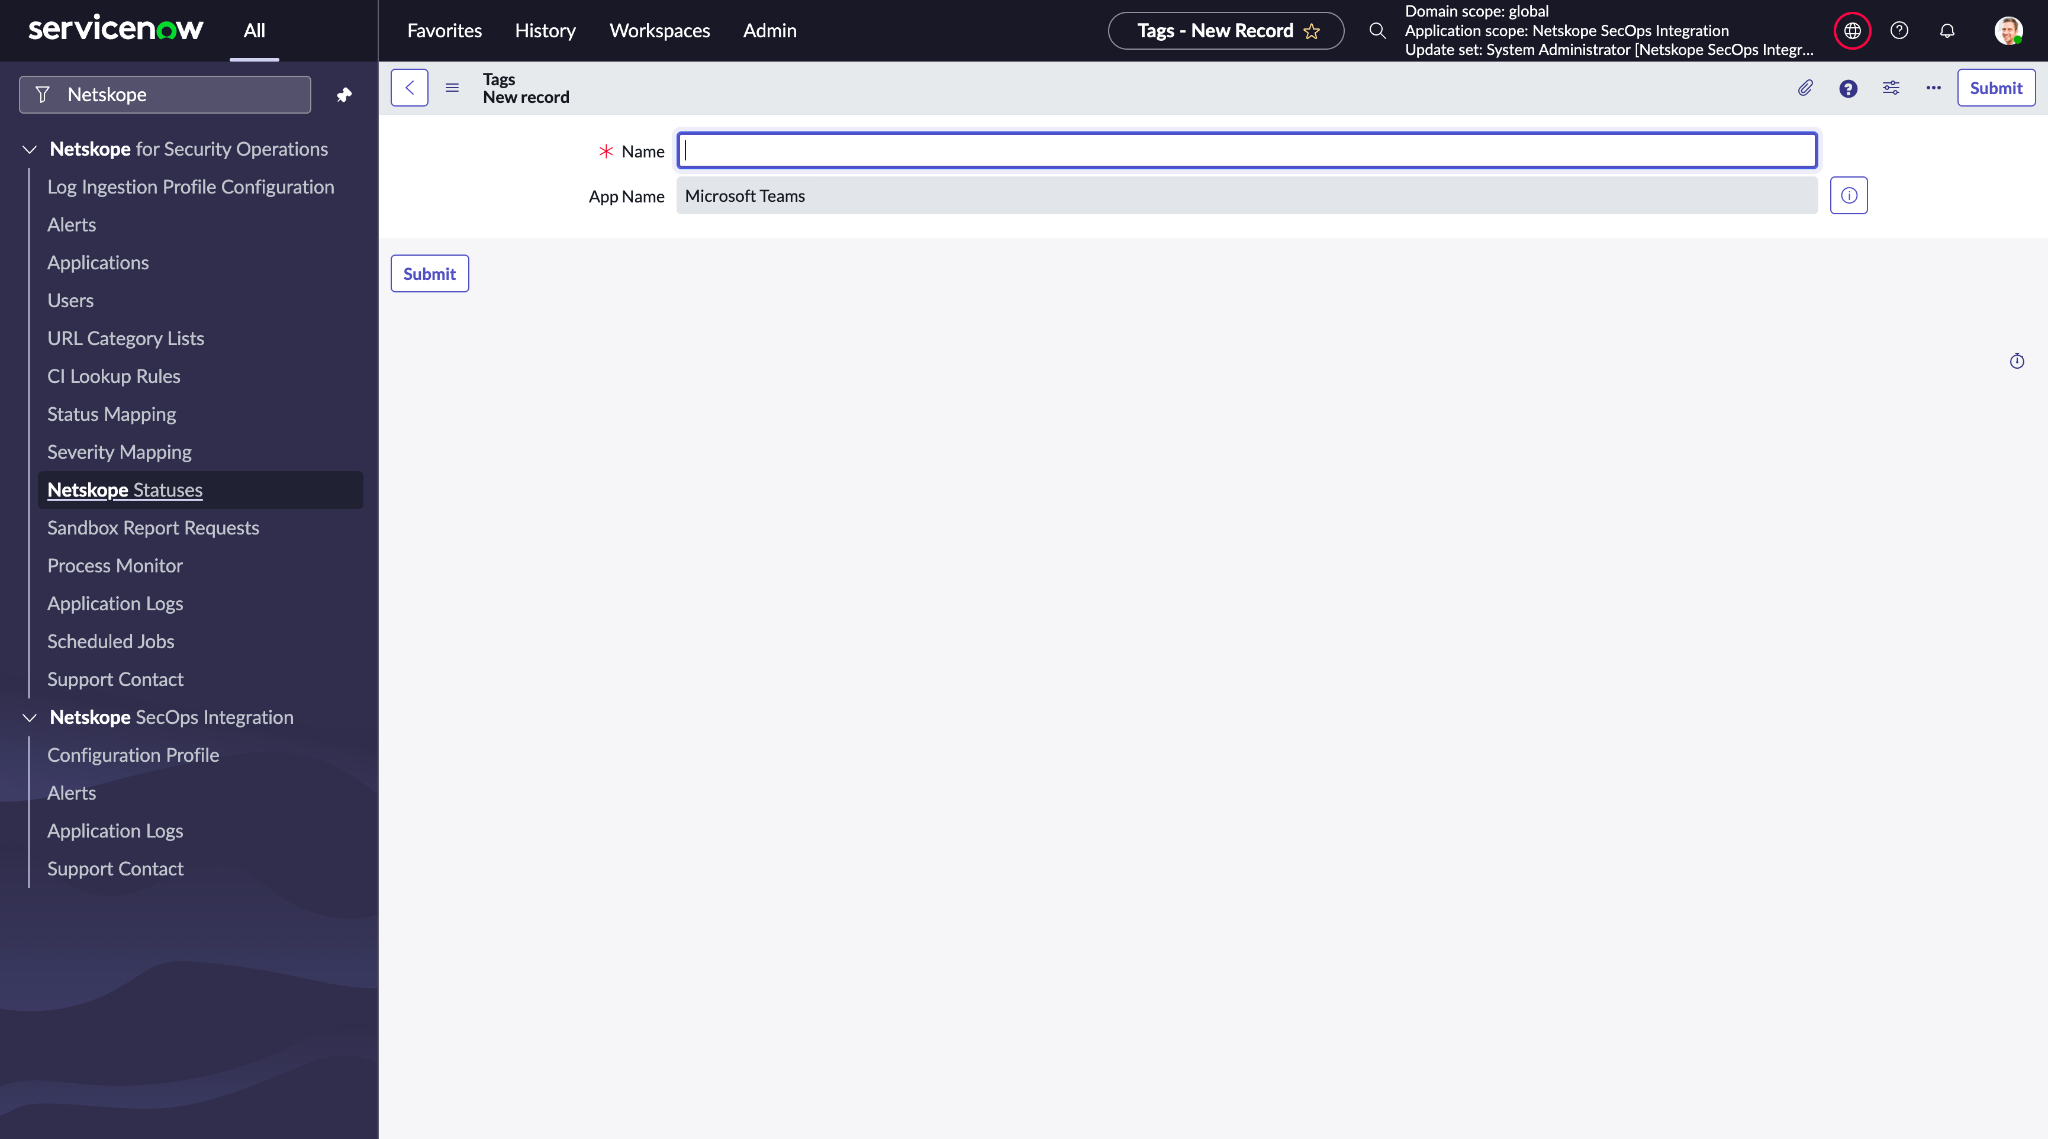
- Enter a name for the tag to add and click Submit.
- To remove a tag, select the tag, click the Action on selected rows dropdown and select Delete.
Expiration Time Support
You can set expiration time for URLs which are added into a category list. After the expiration time exceeds the URL will be removed from that category list.
Required Roles: x_netsk_nets_sir.netskope_admin (Write) and x_netsk_nets_sir.netskope_user (Read)
Procedure
- Go to Netskope for Security Operations > URL Category List.
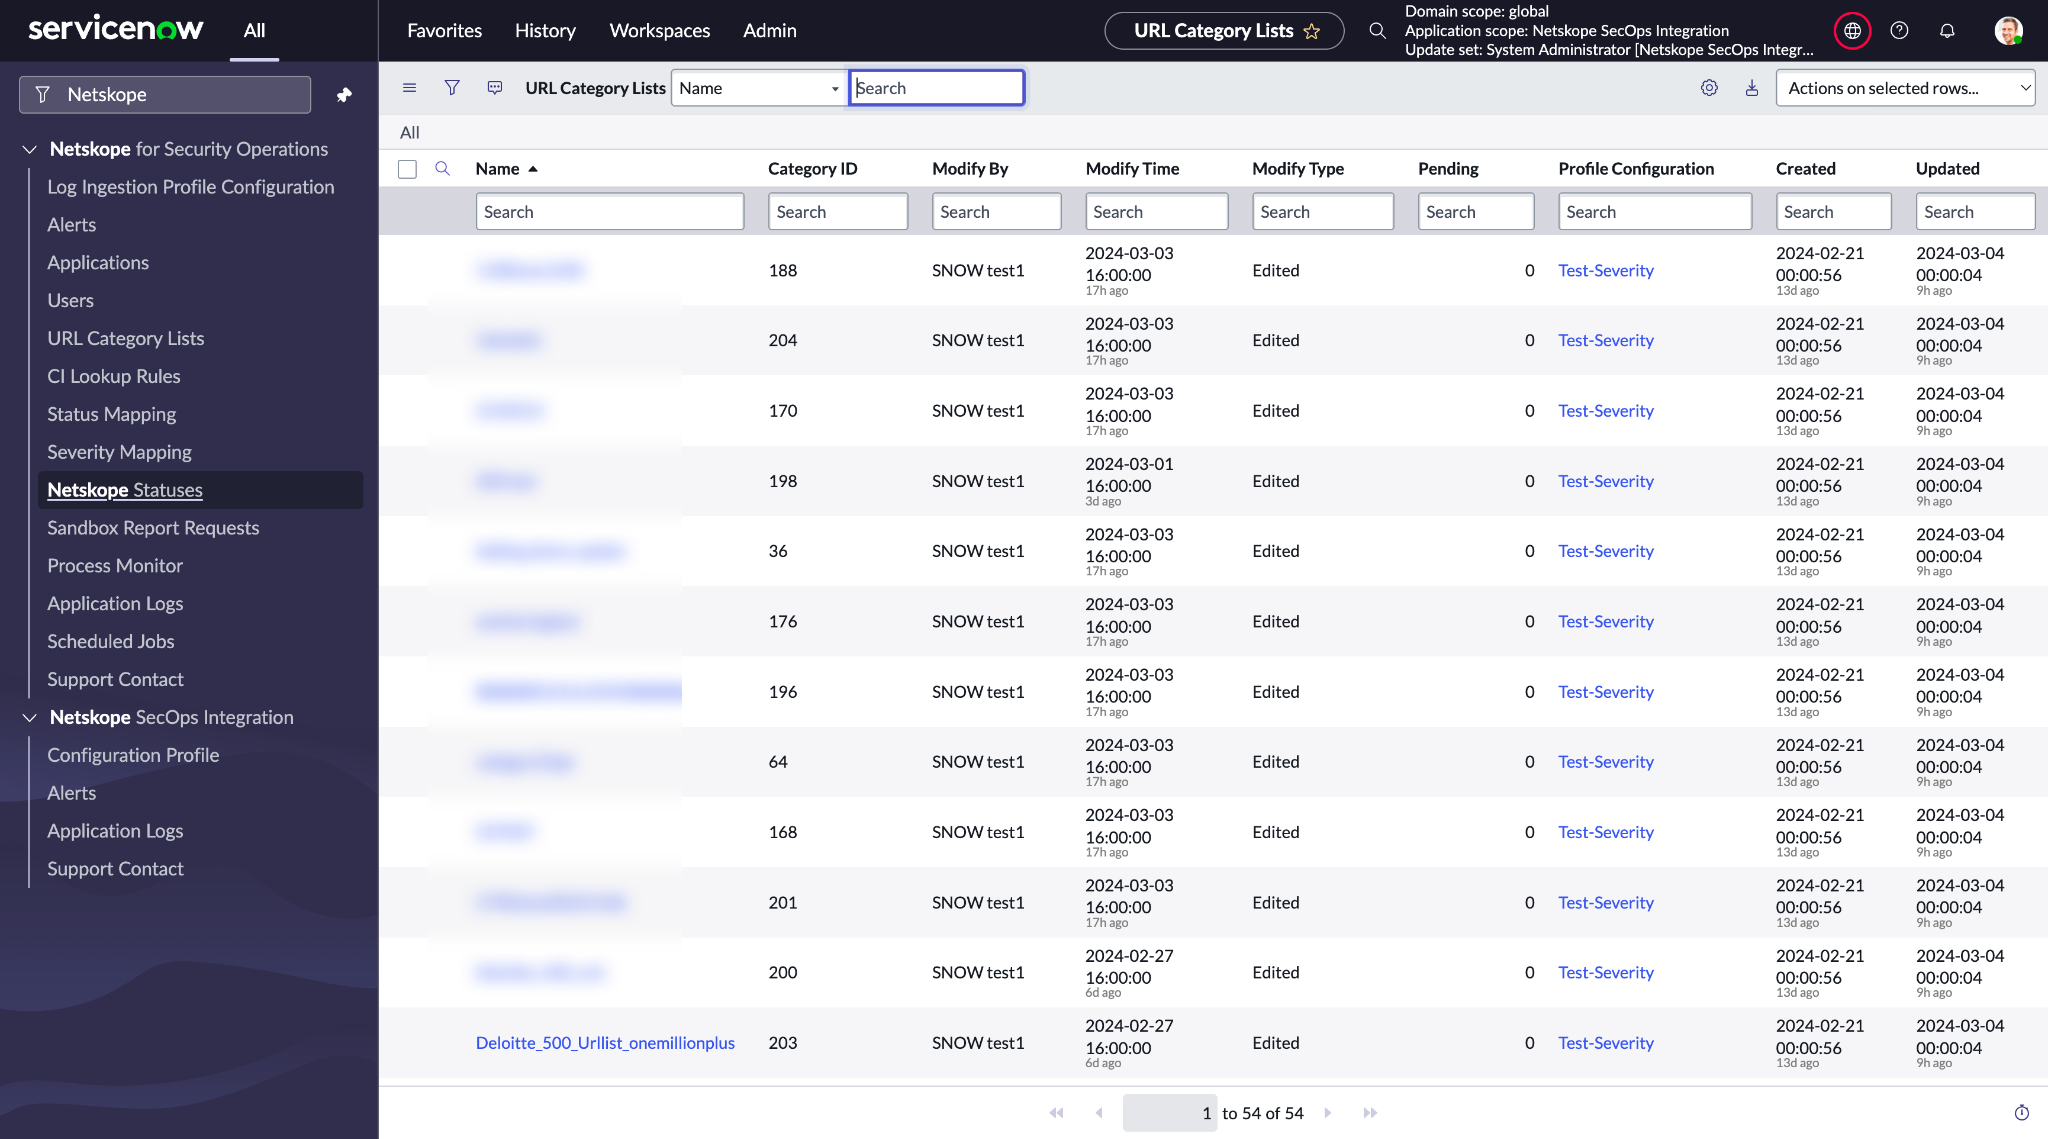
- Select a category.
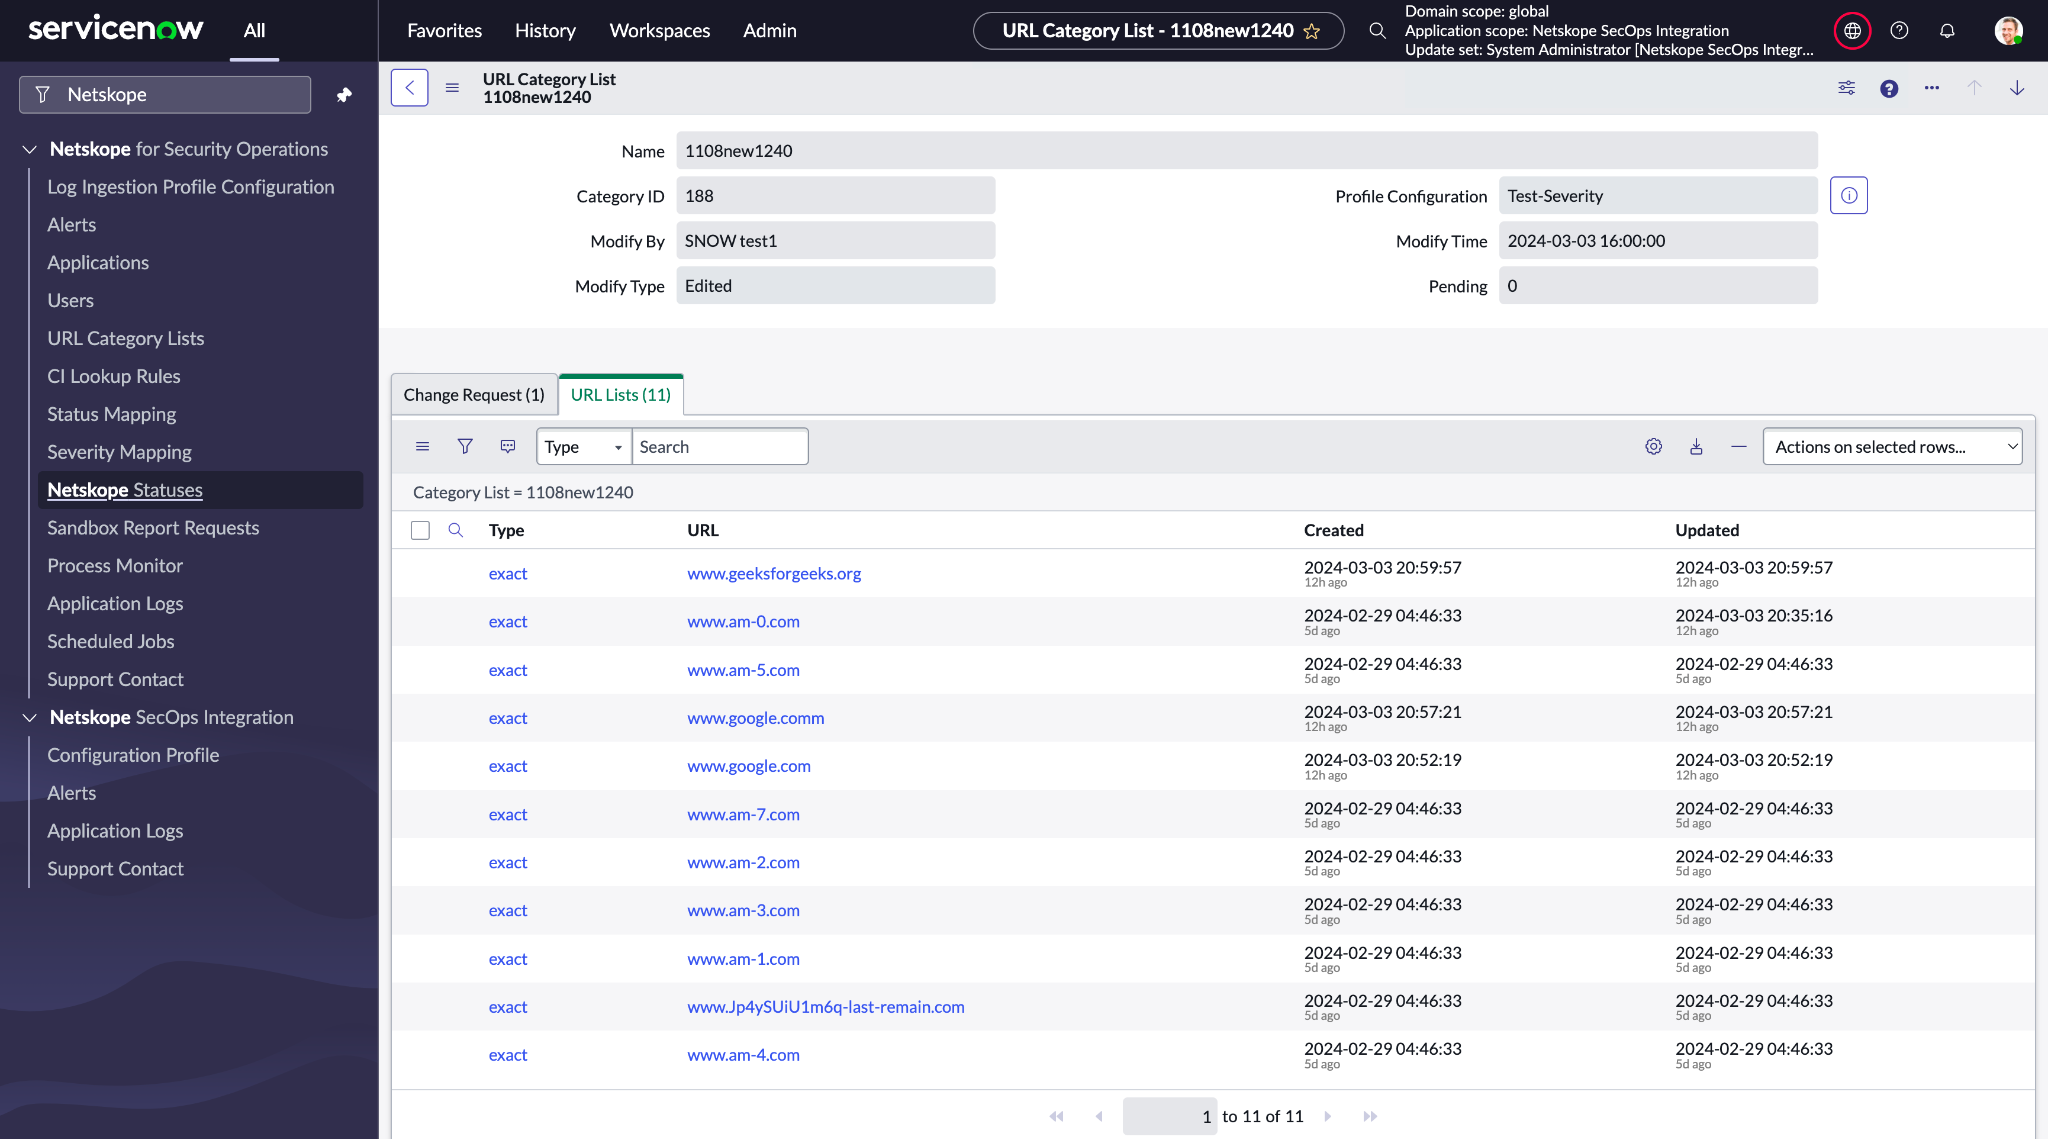
- If URLs exist for that category, URL Lists related lists will be visible.
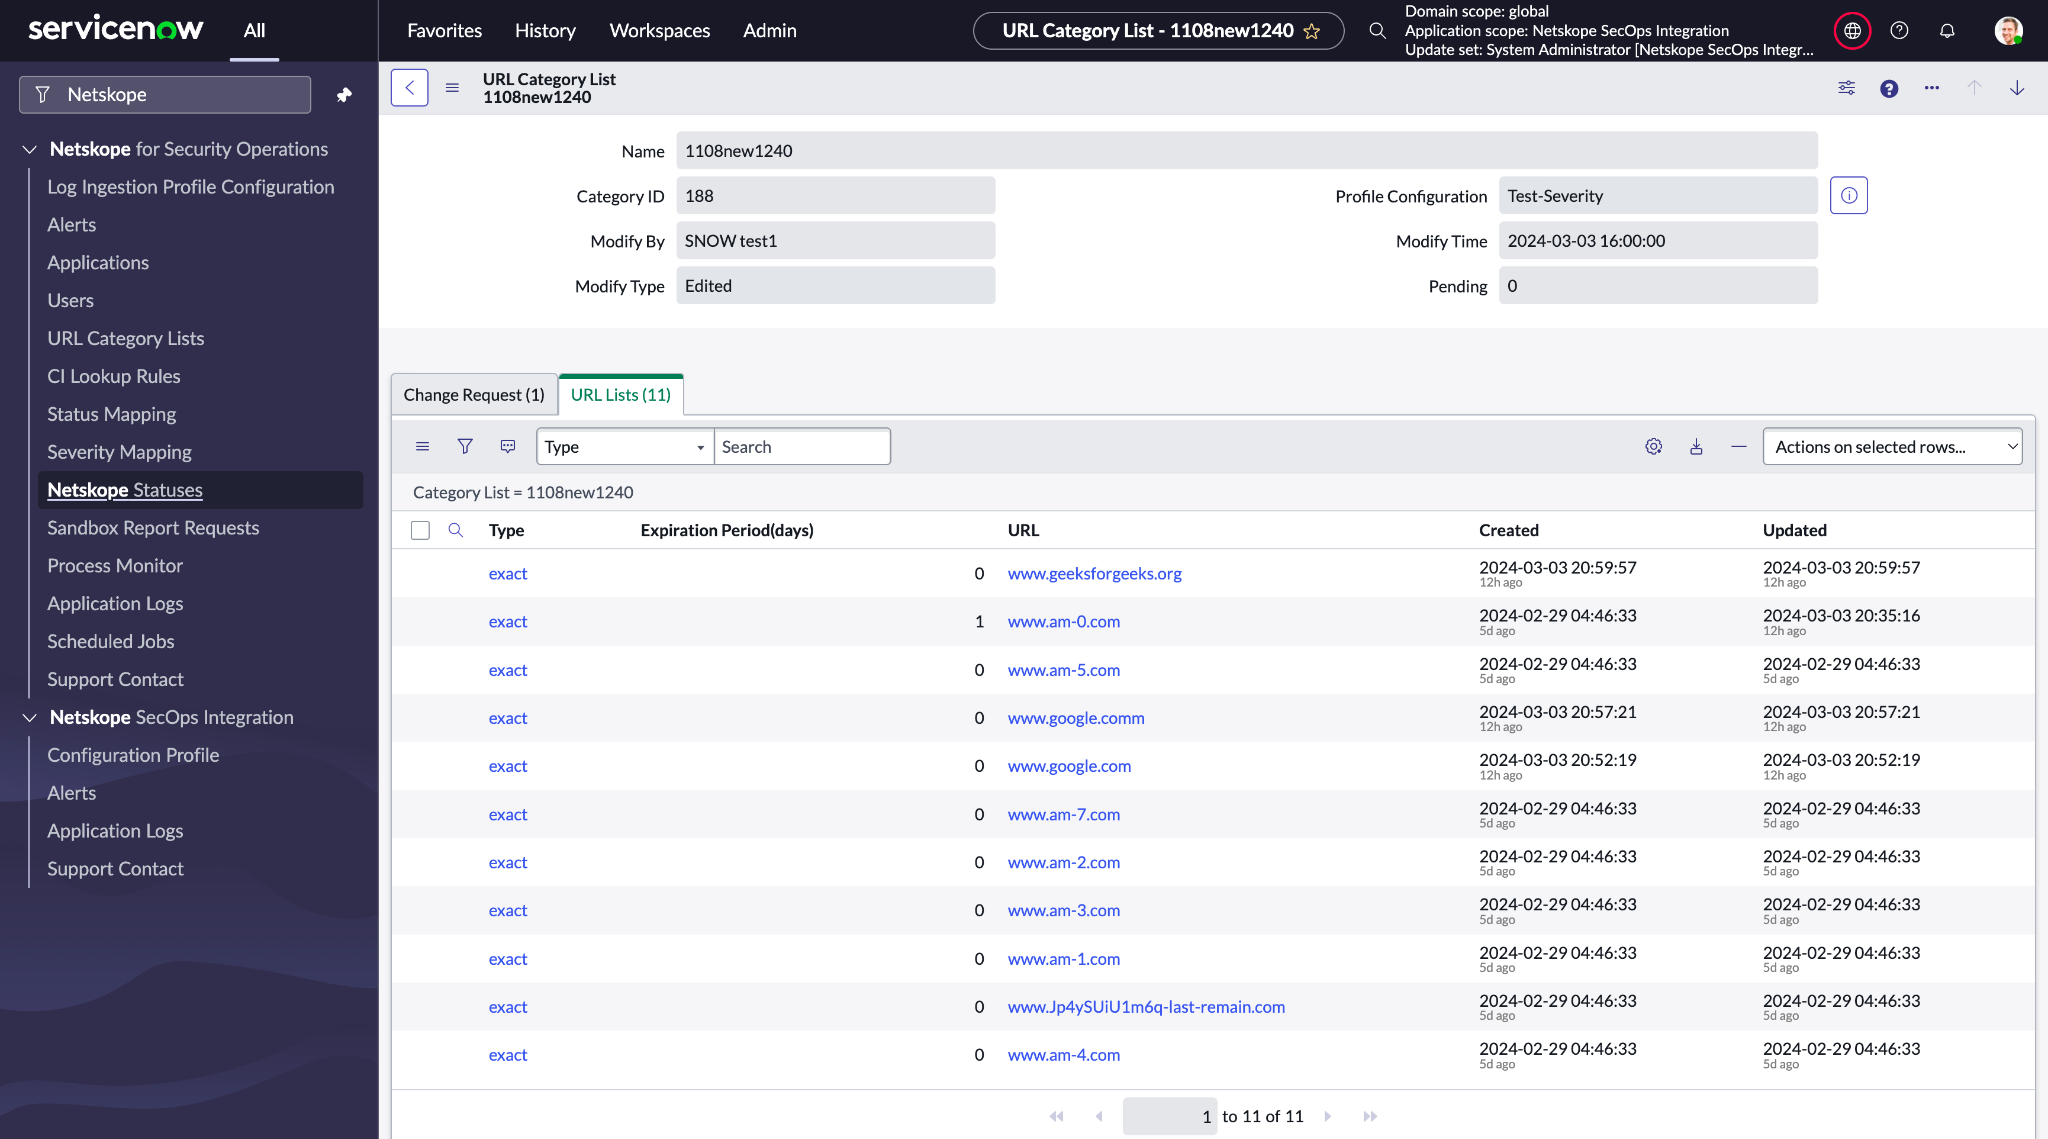
- Select the URL to add the expiration time.
- Add an expiration time for that URL. The URL will be removed after the expiration time exceeds the current time.
Process Monitor
The application provides a Process Monitor module for reviewing high-level metrics from past runs of the feature. This module will populate the list of all the processes with Scheduled job names to users. The form view of the process monitor will contain the descriptive logs and reason for the process failure.
Role Required: sn_si.analyst, sn_si.admin
Procedure
- Go to Netskope for Security Operations > Process Monitor.
- Open the top record to monitor the ongoing process.
- Different statuses are used to track the process.
- Initiated: Whenever the job is initiated, the status for that process should be initiated when the queue is in queue.
- In Progress: Whenever the job is in progress, that means the queue is getting processed for that job, and the status should be in progress.
- Failed: Whenever the job fails due to any failure in API Call, or a selected configuration is deleted, then the status should be failed.
- Completed: Whenever the job is completed successfully, then the status should be completed.
- Completed with Error: Whenever the job is completed, but all queues are not processed successfully (Combination of failed and processed queues), then the status should be completed with error.
Uninstallation
This section describes how to uninstall the Netskope SecOps Integration integration from a ServiceNow instance.
Role Required: System Administrator (admin)
Procedure
- Go to System Applications > All Available Applications > All.
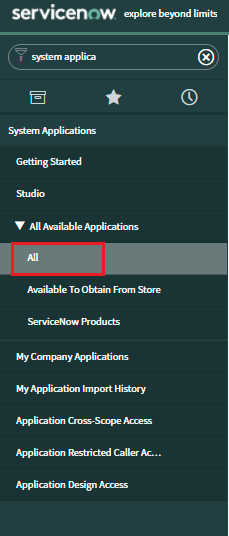
- Check the Installed checkbox. A list of applications installed in the instance is displayed.
- Locate the Netskope SecOps Integration, select it, and click Uninstall under the related links.
- The application will be uninstalled from your instance.
Support, Troubleshooting, and Known Limitations
Support
You may be instructed to contact the integration provider (Netskope) for technical support. But if you first contact ServiceNow Customer Support, then ServiceNow Customer Support will isolate the problem and instruct you on how to resolve the issue with your organization.
Support Contact Details: https://www.netskope.com/training#support
Troubleshooting
Application Logs
From the Logs window, the ServiceNow system administrator or the Netskope ServiceNow Security App admin can configure and view all the Netskope ServiceNow Security App logs. The Netskope SecOps Integration displays four types of logs:
- ERROR: An error represents serious issues and the failure of an operation in the Netskope SecOps Integration.
- WARN: The warning logs represent an unusual situation in the Netskope SecOps Integration.
- INFO: The info log represents the informational messages that highlight the progress of the Netskope SecOps Integration.
- DEBUG: The debug logs provide details about the application’s behavior.
Role Required: System Administrator (admin)
Procedure
- You should check the application logs whenever any errors occur.
- Go to Netskope SecOps Integration > Diagnostics.
- Open Application Logs.
Enable Outbound HTTP logs
Outbound REST functionality enables you to retrieve, create, update, or delete data on a web services server that supports the REST architecture. You can send a REST message by a REST workflow activity, or by using the RESTMessageV2 script API.
Prerequisite: You must be the ServiceNow system administrator.
Procedure
- Log in to ServiceNow.
- In the navigation filter, enter sys_properties.list.
- Search and set below system properties:
- glide.outbound_http_log.override.level = all
- glide.outbound_http.content.max_limit = 1000
- glide.outbound_http_log.override = true
- Go to the HTTP Outbound Requests module under System logs.
- Sort all records by Created Date in descending order.
- You will be able to see the API calls made for the application.
FAQs
- Unable to install an application from the ServiceNow Store.
- Verify you have the system administrator (admin) role.
- Go to System Applications > All Available Applications > All.
- Verify the application appears under the Installed tab.
- Unable to create a new user. Review the following link and execute the steps: User Administration
- The report Generation process fails after some time.
- Go to the System Property module of the application.
- Increase the value of the retry count or retry interval system property and try again.
- Unable to see the Execute Now button in the scheduled job.
- Submitting the configuration in the first place for the scheduled job is mandatory to avoid misconfiguration.
- After the scheduled job is configured, open the same configuration, and you should be able to see the Execute Now button.
- Can select past time in the scheduled job only once or periodically.
- In the scheduled job, if you select past time, it will directly consider the current time when the you submit or update the configuration.
- There can be a case where the user has selected the future time and spent some time on the same page before submitting the configuration and still be able to submit the configuration. To avoid such a scenario, a past date will always be changed to the current time of configuration submission.
- Can see multiple running jobs in the process monitor, though I executed only one time.
- When a user modifies any scheduled job, the starting time for that scheduled job will be considered as the current time and that will trigger the job at the specified starting time.
- At the same time, a user clicks on the execute now button and triggers the job which can lead to multiple jobs running concurrently.
- If your scheduled job is scheduled for once, and you are modifying any fields, then click only the update button, and that will trigger your job as per the starting time (which will be set to the current time after clicking on the Update button).
- The scheduled job is taking some time to reflect on the process monitor.
- The backend scheduler will check the eligible scheduler that needs to be executed every 18 seconds.
- After the backend scheduler is executed, all the eligible queued scheduled jobs will be picked for execution and the process monitor will reflect the same time.
- Processes are not getting completed though configurations are correct.
- As part of the prerequisites, it is necessary to mark all five schedulers of the application available in the sysauto_script.list table as active = true.
- To mark them as active, kindly request your system administrator to follow these steps:
- Go to the sysauto_script.list table.
- Add an application filter.
- Open the form view of each record and mark them as active = true.