Step 1/3: Configure a Microsoft Entra ID Application for CSA - Netskope Technical Documentation
Step 1/3: Configure a Microsoft Entra ID Application for CSA
To configure Azure for Continuous Security Assessment (CSA), you must log in to the Azure portal as a subscription owner or global administrator and configure the following tasks:
Create a Microsoft Entra ID Application
Get the Application ID and Directory ID
Get the Authentication Key
Assign a Role to the Microsoft Entra ID Application
List AD Users
Assess Key Vault
Create an Microsoft Entra ID Application
To create a Microsoft Entra ID application, follow the steps below:
Navigate to All services > Identity > Microsoft Entra ID.
Click App registrations.
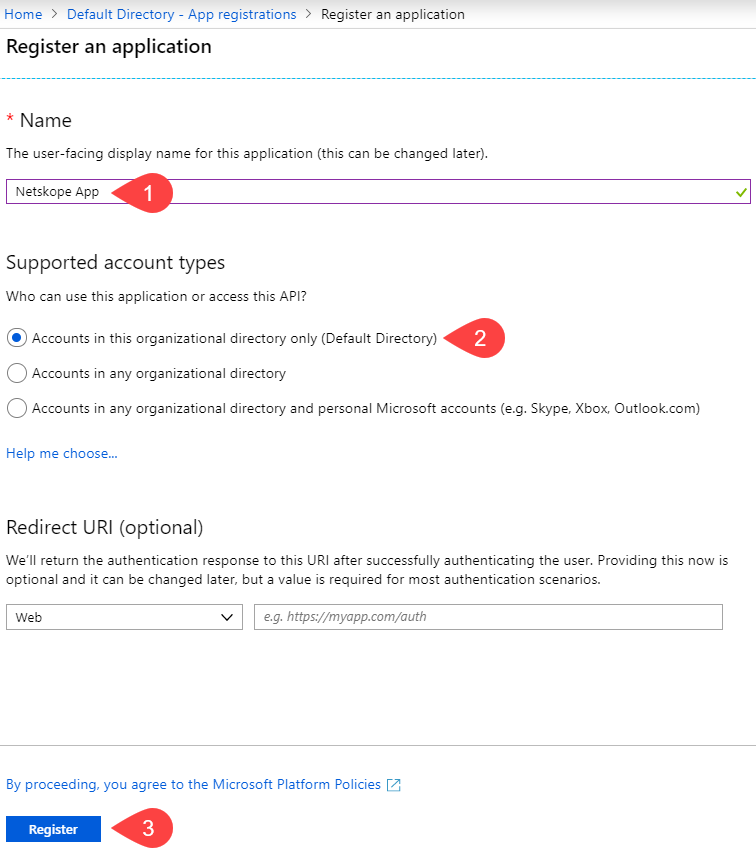
Click + New registration and enter the following details:
Name: Enter the name of the application.
Supported account types: Keep the default selection to Accounts in this organizational directory only.
Redirect URL (optional): Leave this blank.
Click Register.
For additional information, refer to the Microsoft Azure documentation located here.
Get the Application ID and Directory ID
After registering the Microsoft Entra ID application, the page redirects you to the Microsoft Entra ID application Overview page. Note down the Application (client) ID and Directory (tenant) ID.
Note
These values will be required when you set up the Azure application instance in the Netskope UI.
Get the Authentication Key
To get the authentication key, follow the steps below:
On the left navigation bar of the Microsoft Entra ID application page, click Certificates & secrets.
Under Client secrets, click + New client secret and enter the following details:
Description: Provide a description of the key.
Expires: Set a duration for the key.
Click Add.
After you save the configuration changes, under Client secrets, the Value column contains the authentication key. Copy it.
Important
Ensure that you authentication key under the Value column as it is not accessible once you leave this page. The authentication key will be required when you set up the Azure application instance in the Netskope UI.
For additional information, refer to the Microsoft Azure documentation located here.
Assign a Role to the Microsoft Entra ID Application
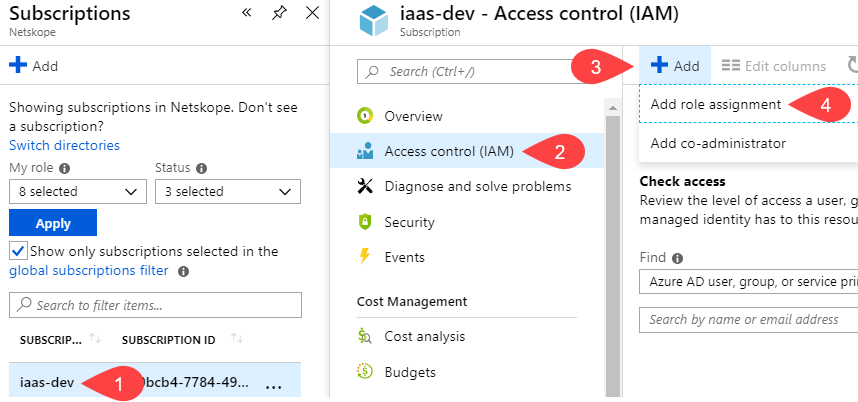
Navigate to All services > General > Subscriptions.
On the Subscriptions page, click the appropriate subscription from the list.
If you want to set up multiple subscriptions, group them under a Management Group and assign a role at the Management Group. When you add a new subscription to the management group, Netskope will automatically detect the subscription and perform scans as per your configuration.