

Use a Threat Protection profile to inspect supported private web traffic with the licensed threat engines.
Before You Begin
- Enable the required NPA Threat Protection entitlement.
- Use Client as the access method.
- Select private web applications that use HTTP on port 80 or HTTPS on port 443.
- Configure a matching application access policy.
If the policy needs file hash controls, prepare the required MD5 or SHA-256 hash lists in Threat Protection configuration. Use allowlists for files that should be treated as trusted and blocklists for files that should be detected. Review each list’s effect before applying it.
Configure Threat Protection Policies
Netskope Private Access (NPA) allows organizations to apply Threat Protection to web traffic (ports 80 and 443) for private apps, ensuring files are scanned for malware in real-time. When using Threat Protection with NPA, note that this feature:
- Requires Client as the Access Method.
- Scans all web traffic on HTTP (80) and HTTPS (443).
- Applies real-time scanning to protect private app access from malware and other advanced threats.
Netskope Private Access now also supports Client to Server IPS protections based on HTTP (80) and HTTPS (443). More information can be found here: About IPS Settings.
Create a File Hash List
- Define hash values (MD5/SHA-256) for files to be detected.
- Use these lists to allowlist (safe) or blocklist (malicious) known file hashes.
Configure Threat Protection for Real-Time Private App Access Policies
- Go to Policies > Real-time Protection.
- Click New Policy and then Private App Access.
- On the Real-time Protection policy page, enter the settings for Source (Users, Access Method and other Source Criteria) and Destination (Private App/Private App Tag) first.
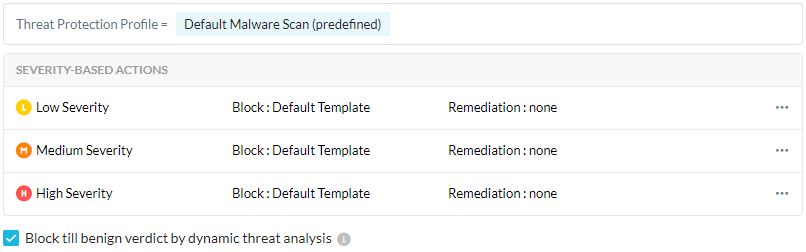
- In the Profile & Action section, select Add Profile and choose Threat Protection Profile. Netskope recommends selecting Default Malware Scan (predefined), because it automatically scans across all Threat Protection engines your platform is licensed for.
- Select the Action for each severity level. The recommended action for every severity level is Block. This ensures the best protection for users. To apply a remediation profile for each severity level, select a remediation profile from the dropdown list.
- Optionally, if you selected File Type constraints, and choose a Block action for a severity level, you can see the Block till benign verdict by dynamic threat analysis option. Select to block users from uploading or downloading a file until Netskope dynamic threat analysis provides a benign verdict. The analysis can take up to 10 minutes. For more details, go to Creating a Threat Protection Policy for Patient Zero.
- Enter a name for the policy and click Save.
- This Threat Protection Policy only inspects traffic; it does not grant access to the private app. Create a separate Private App Access Policy with an Allow action for the same app and users, and place it after this Threat Protection rule in your policy order so the Threat Protection Profile is applied. (From R142 this order is no longer important.)
When the Fallback Action for Advanced File Scanning is set to Alert or Block, some events might not have policy name if there’s a TSS or DLP fail reason. There’s no rule hit because you excluded the Threat Protection rule. You don’t have a catch-all rule at the end of the policy.
Apply and Validate the Policy
After saving, verify the matching application access policy and ordering for your release, then click Apply Changes.
Use approved, harmless test content to trigger the selected detection and verify the expected severity action. Also test content that should not trigger the profile. Check the user, application, activity, profile, enforcement result, and any fallback reason in the applicable alerts.
For the shared validation checklist, see Validate Inspection.