

SaaS Security Posture Management continuously audits cloud service and app resources to identify compliance rule violations. The Inventory page displays a consolidated view of various cloud resources. To view the Inventory page, navigate to API-enabled Protection > Security Posture SaaS > Inventory in the Netskope UI.
Click the Resource Types tab to view the various cloud resources sorted by resource type. Under the Resource Types tab, the table displays the following information:
-
Resource Type: The cloud resource type.
-
App: Name of the application of the SaaS app.
-
App Suite: Name of the SaaS app.
-
App Category: The category the cloud application belongs to. This could be collaboration, CRM, email, security, etc.
-
Total Checks: Total number of checked resources.
-
Pass: Total number of passed resources.
-
# Rules Violated: Total number of failed resources.
-
# Resources: Total number of cloud resources.
-
Fail-Muted: Total number of failed resources that are muted.
-
Critical: Total number of resources failed for a rule with critical severity.
-
High: Total number of high severity failed resources.
-
Medium: Total number of medium severity failed resources.
-
Low: Total number of low severity failed resources.
-
Unknown: Total number of unknown resources.
– Click on a number in the table to view additional information.
Click the Instances tab to view the various cloud resources sorted by the cloud app instance. You can view a list of cloud app instances under Settings > Configure App Access > Classic > SaaS. Under the Instances tab, the table displays the following information:
-
Instance Name: Name of the cloud app instance that is used to connect the cloud app with Netskope.
-
App Suite: Name of the SaaS app.
-
Total Checks: Total number of checked resources.
-
Pass: Total number of passed resources.
-
# Rules Violated: Total number of failed resources.
-
Fail-Muted: Total number of failed resources that are muted.
-
Critical: Total number of resources failed for a rule with critical severity.
-
High: Total number of high severity failed resources.
-
Medium: Total number of medium severity failed resources.
-
Low: Total number of low severity failed resources.
-
Unknown: Total number of unknown resources.
– Click on a number to view additional information.
Click the Resources tab to view the various cloud resources. Under the Resources tab, the table displays the following information:
-
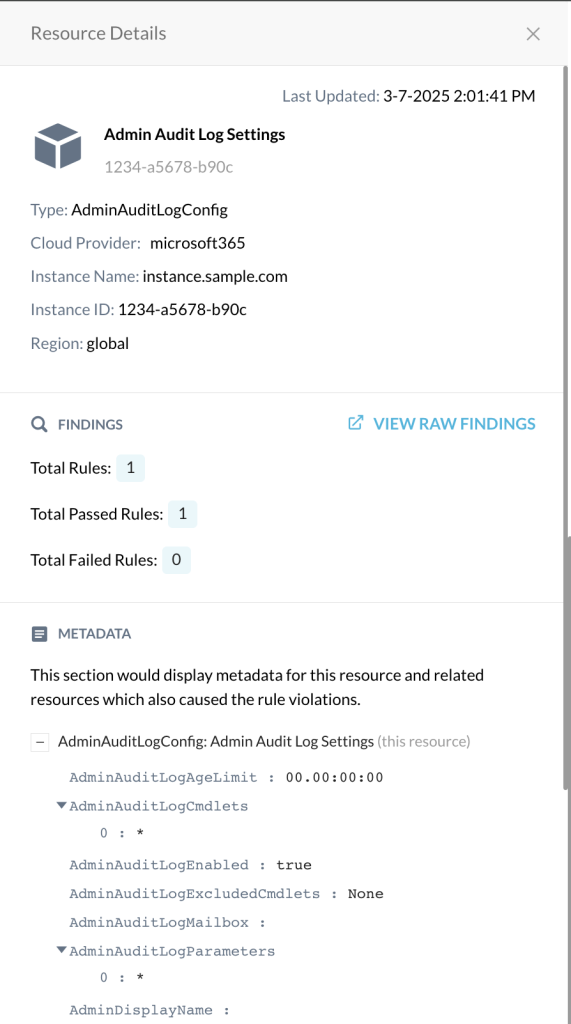
Resource Name: The name of the cloud resource. You can click a resource name to get additional information like resource type, cloud provider, instance name, region, compliance data, and metadata.
-
Resource Type: The cloud resource type.
-
App Suite: Name of the SaaS app.
-
App Name: Name of the application of the SaaS app.
-
Instance Name: Name of the cloud app instance that is used to connect the cloud app with Netskope.
-
Region Name: The location name of the cloud resource.
-
Region ID: The location ID of the cloud resource.
-
Netskope Instance Name: Name of the cloud account instance that is used to connect the cloud app with Netskope.
-
Instance ID: The unique ID of the Instance.
-
Parent Resource Type: This indicates the type of resource under which the specified resource is created. For example,
DeviceCompliancePolicyis created underDeviceManagement, henceDeviceManagementis the parent resource-type ofDeviceCompliancePolicy. -
Resource ID: Unique ID associated with the resource.
Click one of the resource names, the Resource Details panel opens, and it displays the following information:
-
Type: The SaaS resource type.
-
Cloud Provider: Name of the SaaS provider.
-
Instance Name: Name of the cloud app instance that is used to connect the cloud app with Netskope.
-
Instance ID: ID of the cloud app instance that is used to connect the cloud app with Netskope.
-
Region: The location name of the cloud resource.
-
RISK AND PERMISSIONS: This shows the Risk Level of only 3rd Party App resources and list and number of permissions granted by the resource. Learn more about the 3rd Party Apps Risk Levels.
-
FINDINGS: List of rules that failed on the particular resource with the severity.
-
METADATA: This displays the metadata for the resource and related resources that caused the rule violation on the resource.

Filters
Basic Filters
-
By default, the Resource Types, Instances, and Resources tabs display the latest audit results. You can choose to view the results time specific. Click the Time drop-down and select:
-
Latest Result: Shows the latest data.
-
As of Date: Shows the data until the specified date. Select the date and time in the date picker. Click Apply.
-
-
You can filter the result displayed on the page by selecting App Suite, App Name, Instance Name, and Resource Type.
-
Click Add Filter and select an option from the list. You can choose to filter based on the following options:
- The following filter values are redundant for SaaS applications. The values are same as the account ID of the SaaS application.
- Instance Group
- Instance Subgroup
- Instance ID
- Resource Name: Select Resource Name and enter a resource name in the search field.
- Resource ID: Select the resource ID of the cloud app. You can get the resource ID from the Findings > Raw Findings tab, then look for Resource Name & ID field.
- The following filter values are redundant for SaaS applications. The values are same as the account ID of the SaaS application.
Netskope Governance Language Filter
You can filter the result of your inventory by using Netskope Governance Language (NGL). For more information, see Netskope Governance Language.
-
Navigate to API-enabled Protection > Security Posture SaaS > Inventory.
-
Click the Resources tab
-
Beside + ADD FILTER, click the Switch to NGL icon.
-
On the search edit box, enter your NGL query.
-
Click Search.
Save Filter
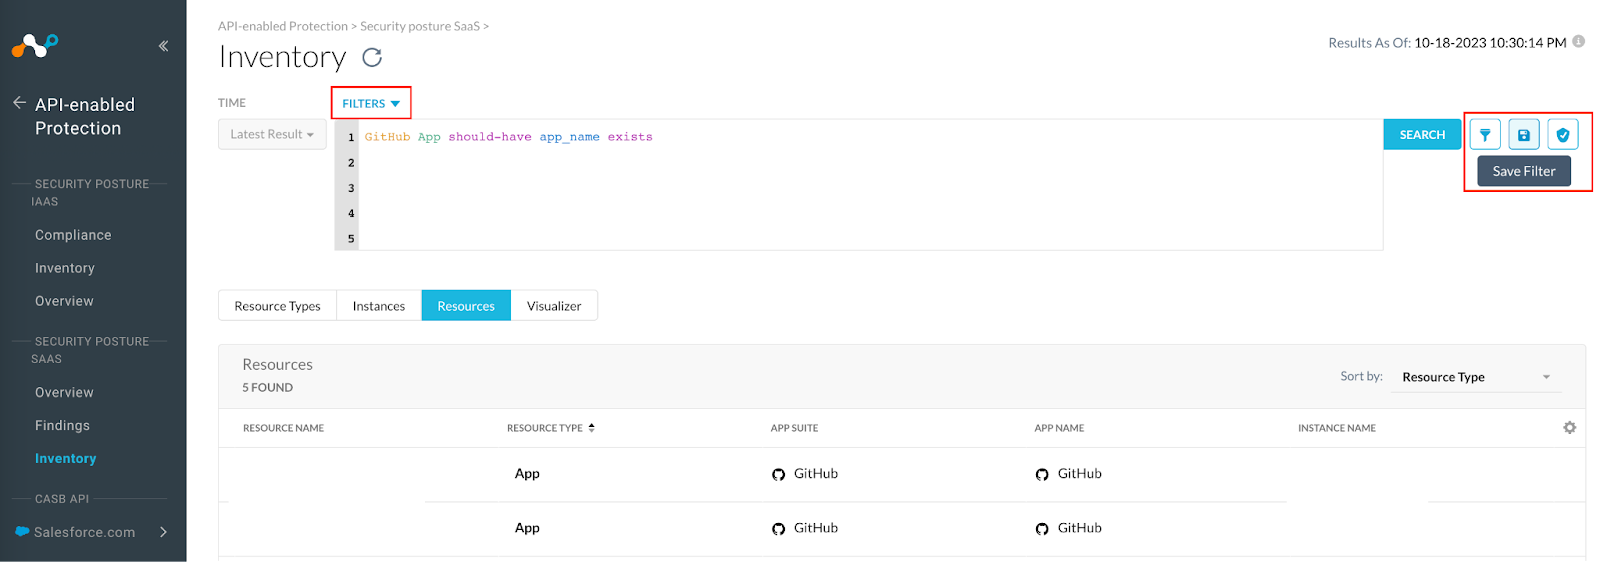
You can save the created filter using the Save Filter button, give a filter name and save the filter.
-
You can see the saved filters in the Filters dropdown > Created By Me tab and use these already saved filters later.
-
You can also see the shared filters in the Shared With Me tab, which are shared with you.
-
Go to the Filters dropdown > Manage Filters to rename, delete and share the filters you created within the tenant.
-
You can create a rule using this NGL filter, see Adding a New Custom Rule from Inventory to learn more.