

You can classify Windows devices based on these criteria:
- Criteria match: Checks for All or Any of the criteria selected.
- Encryption check: Checks for BitLocker drive encryption and/or PGP drive encryption.
- OPSWAT check: Checks for basic compliance or full compliance.
- Registry check: Checks for installed software and its versions by leveraging HKEY_LOCAL_MACHINE/SOFTWARE and firmware versions using HKEY_LOCAL_MACHINE\HARDWARE\. Can also check for current user, and Reg dword or sz and any other software or hardware information using registry keys.
- Device Tags: Checks for the device tags associated with the device.
- Process check: Checks for specified processes, like Chrome.exe.
- File check: Checks for specified files, such as file.txt. You must include the path and filename, for example, C:\Users\Public\file.txt.
- AD Domain check: Checks for AD domains, like company.domain-name. This check only applies for the traditional domains(Domain-joined) and not Entra ID(formerly known as Azure Active Directory).
- AV check: Checks the running status of the selected anti-virus product.
- OS check: Checks the OS edition and build number compliance.
- Certificate check: Checks for the specified certificate on the device.
You can use your own certificates or the certificates downloaded from the Netskope UI (refer to Trusted Certificates).
The certificate file must have a specific structure and be in PEM format. The Intermediate and Root certificates need to be combined into a single PEM file. The order of those two certs in that PEM file must be Intermediate first, and then Root below it.
Create Device Classification Rule For Versions From 127.0.0 Or Later
Earlier, the Device Classification Rules webUI provided only the Match Any or Match All operators to choose between criteria in a Device Classification rule. With the release of version 127.0.0, Netskope extends the support for the usage of logical operators AND/OR between criteria in a Device Classification rule.
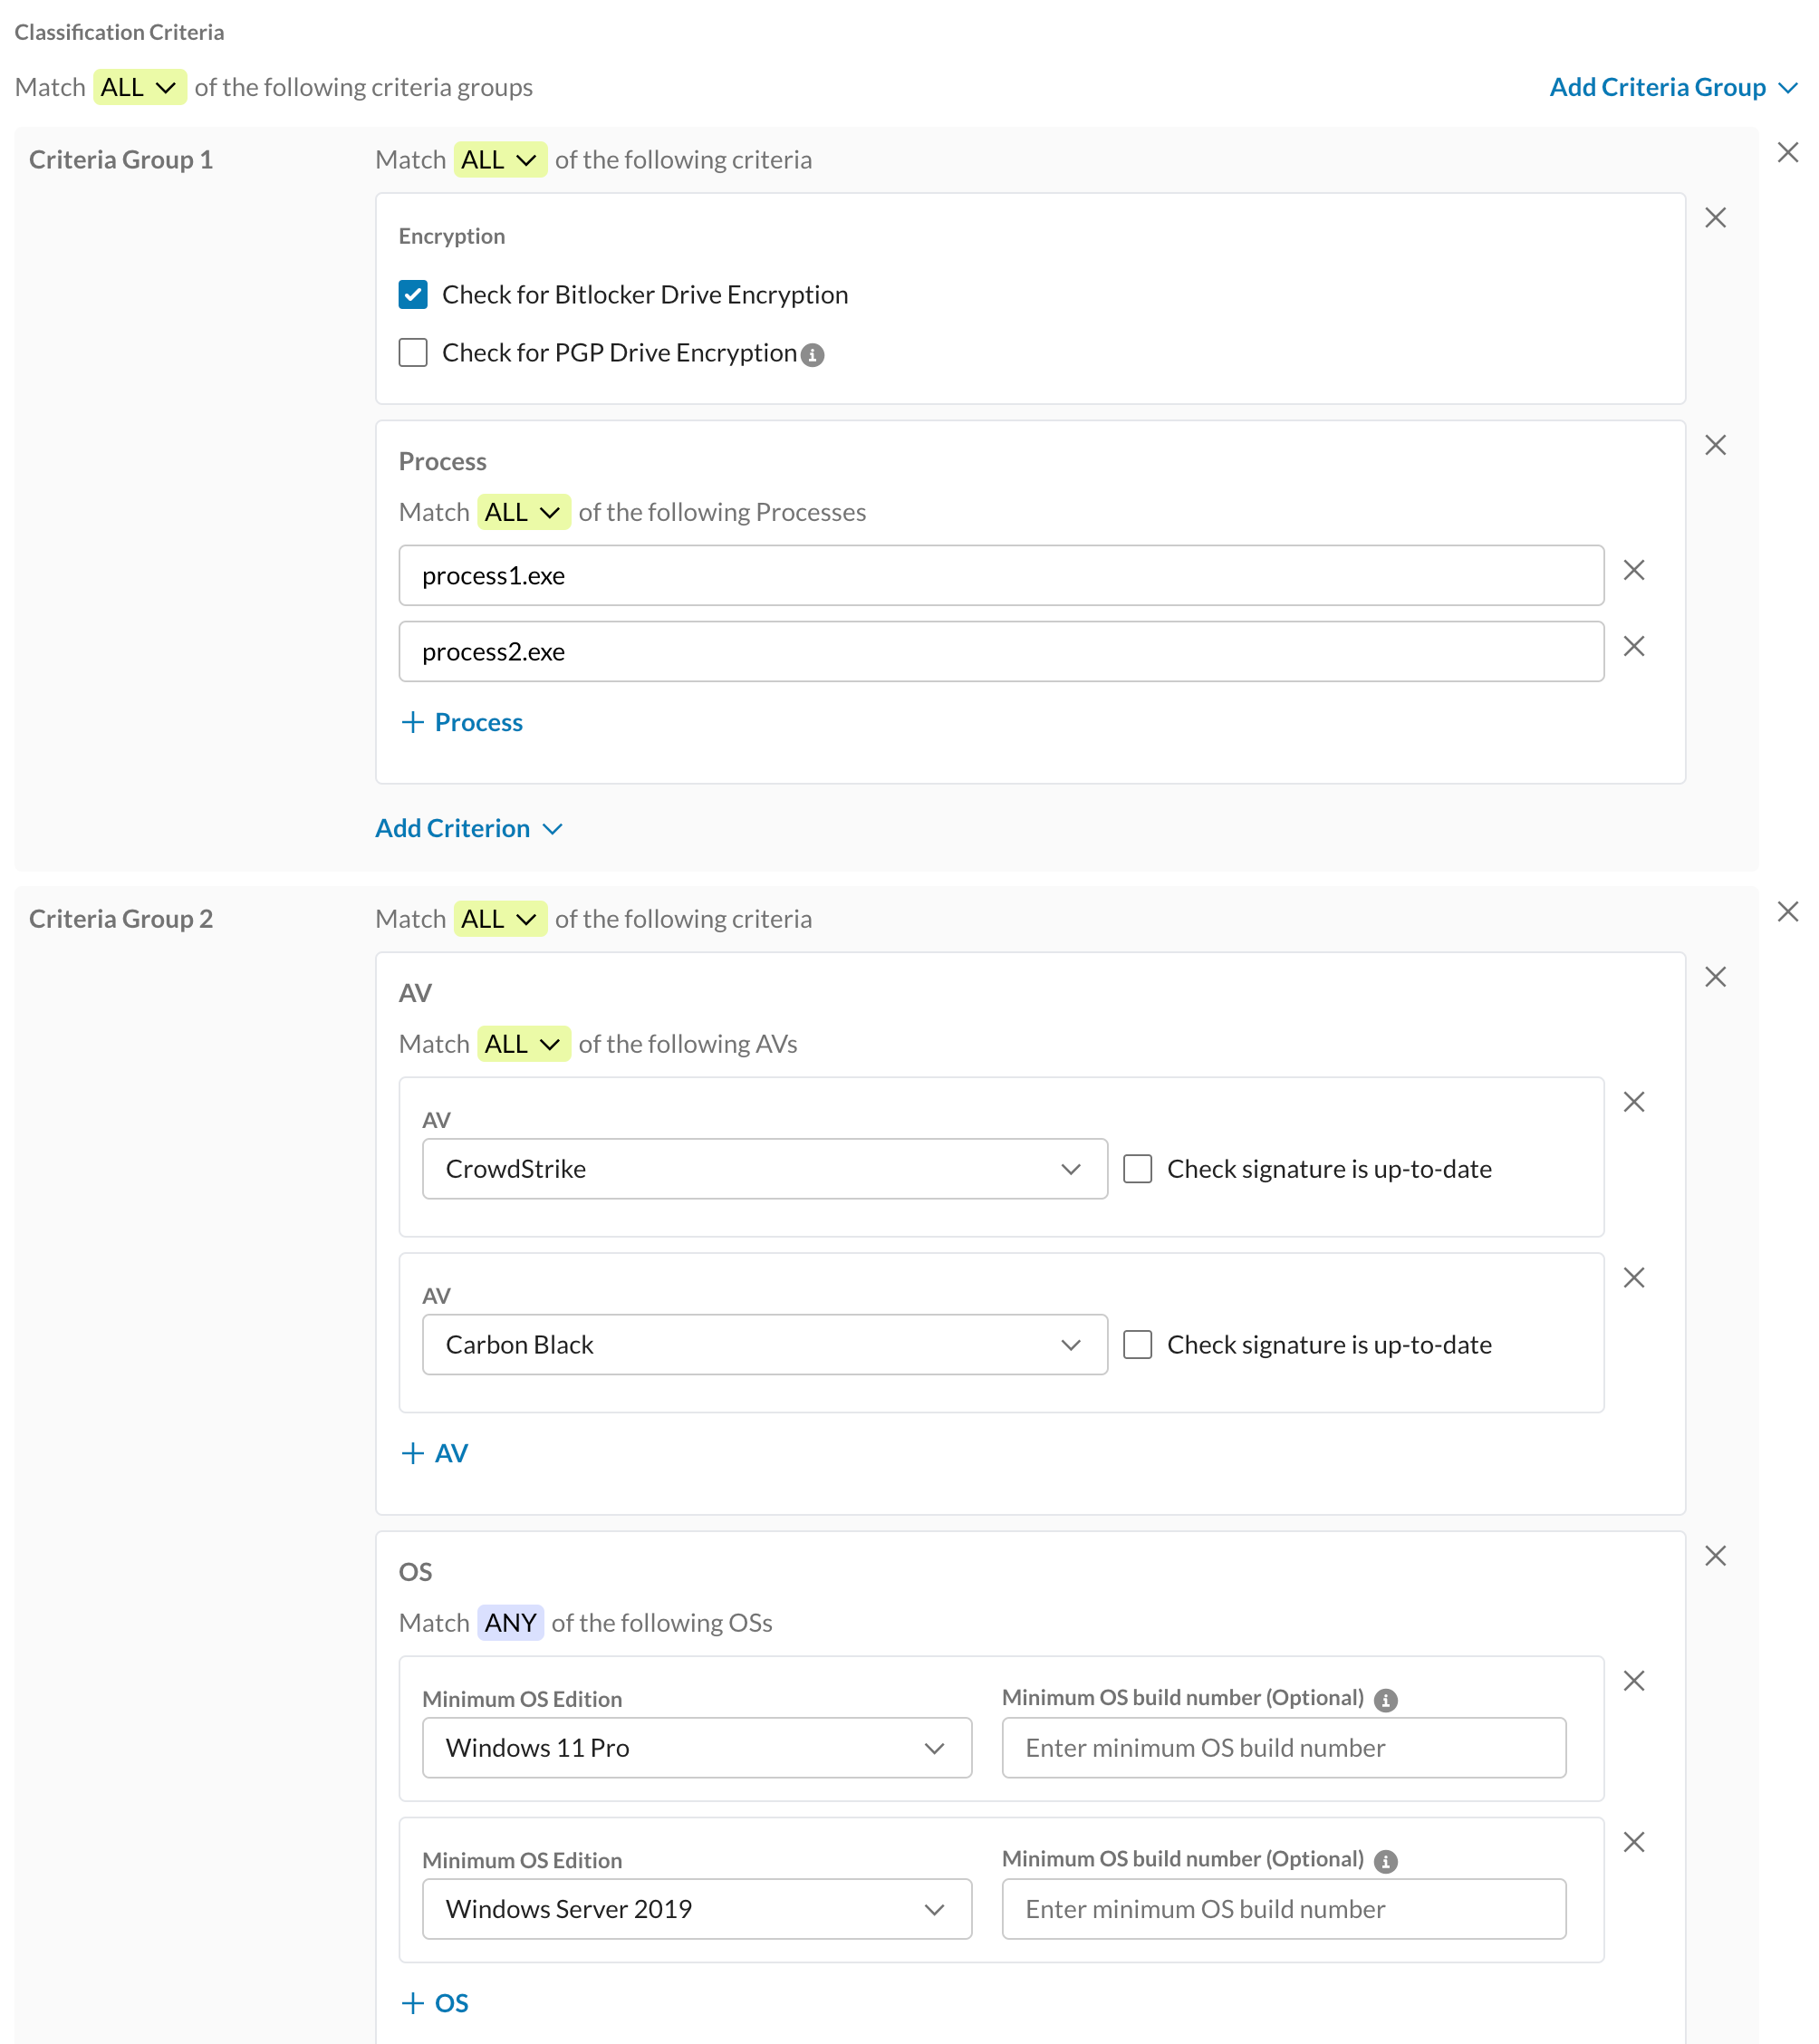
The logical operators work at three levels in a Device Classification Rule:
- Apply logical operators globally across all Criteria Groups within a device classification rule.
- Apply logical operators within a Criteria Group.
- Apply logical operators within certain criteria such as:
- File and Process
- File OR Process
To create a device classification rule for Windows:
-
Go to Settings > Manage > Device Classification.
-
Select Windows on the New Device Classification Rule dropdown list.
-
Follow these steps to classify your Windows device. Select options and enter the requested parameters.
-
Rule Name: Enter a name for this classification rule.
-
Device Classification: From the options displayed in the dropdown menu, choose the desired label you want to assign to this rule. You cannot assign more than one label to a rule.
-
Classification Criteria: In Add Criteria Group, select one of the following options:
You can create up to 16 criteria groups within a device classification rule. -
Encryption: To classify a device to be encrypted, choose one or both of these options:
-
BitLocker
-
PGP
All drives must be encrypted for Bitlocker to classify the devices as Managed. -
-
OPSWAT: Netskope can leverage OPSWAT capabilities (You need to install OPSWAT to use its capabilities) to identify the applications installed in the endpoint device and monitor them. To use an OPSWAT check, select one of the following from the Check Type dropdown menu and enter the Metaccess license key:
-
Full Compliance check: Netskope Client checks whether the MetaAccess agent is running to ensure that registry contains the latest compliance information. Also, check if the configured MetaAccess license on the WebUI matches the product license.
-
Basic Compliance check: Checks if the compliance policy check has a critical error. In case of an error, the basic compliance check fails.
-
-
Registry: To classify a device when one or more registry keys are found on a device, select the HKEY type from the dropdown list, and then enter the key and value. Next, select the registry type from the dropdown list and enter text in the Data field.
-
Device Tags: To check if the configured Device Tags are present in the device. You can select up to five device tags.
This is a Beta feature. Contact Netskope Support team or your Sales Representative to enable this feature for your tenant. -
Process: To classify a managed device based on the presence of any one or more processes. To enter the executable file name(s), click +Process and add the process names in the format text1.exe. You can add up to 16 process names.
-
File check: To classify a device based on the presence of one or more files. To enter the file name, click +File and add the file name in the format Sample.txt. You can add up to 16 file names.
-
AD Domain: To classify a device associated with any one or more domains listed, enter the domain name. This check only applies for the traditional domains(Domain-joined) and not Entra ID(formerly known as Azure Active Directory).
-
AV: To check the existence and status of an anti-virus product. The admin can select one or multiple AVs from the following predefined AV list:
-
Any
-
CrowdStrike
-
SentinelOne
-
Carbon Black
-
Microsoft Defender
-
Custom
The admin can select either one or multiple AV products from the dropdown menu. For example, if the admin selects SentinelOne and CrowdStrike at the same time, the Netskope Client checks either SentinelOne or CrowdStrike against the device classification rule.
If you select:
-
Any: This refers to any AV product that is enabled and running. The options in the AV dropdown get grayed out.

-
Custom: The admin must manually enter the type in the AV product name in the Custom AV Product Name field. This name must match the AV name registered within the Windows security center.
You also have the option to select Check signature is up-to-date to check AV signature file is up to date. This is optional.
Once you select the required details, Netskope Client uses the Windows Security Center(WSC) API to check the AV product running status and their signature status. For example, if you select CrowdStrike in the AV option and choose Check signature is up-to-date, Netskope Client checks if the selected AV name matches with the WSC registered name to verify the AV running status.
-
-
OS: To check and classify device compliance for the detected OS version that matches or is above the version information configured by the administrator. The OS check rule for Windows consists of two parts:
-
Minimum OS edition
-
Minimum Build number
The administrator can select one of the following predefined Windows OS editions and then enter the minimum build number in the MINIMUM OS BUILD NUMBER (Optional) field:
- Windows All
- Windows 10 All
- Windows 10 Enterprise
- Windows 10 Enterprise LTSC
- Windows 10 Education
- Windows 10 Pro Education
- Windows 10 Home
- Windows 10 Pro
- Windows 10 Pro for Workstations
- Windows 11 All
- Windows 11 Enterprise
- Windows 11 Education
- Windows 11 Pro Education
- Windows 11 Home
- Windows 11 Pro
- Windows 11 Pro for Workstations
- Windows Server 2012
- Windows Server 2016
- Windows Server 2019
- Windows Server 2022
If you do not enter the Build Number, the Client automatically assigns it as zero. You can add multiple OS editions and their respective build numbers on the user interface.
After the admin selects the OS editions and build number, Netskope Client checks the OS product name and verifies that the Windows build number is not less than the number mentioned in the rule.
-
-
Certificate: Checks for certificates on the device.
Certificate check functionality is behind a feature flag. Contact Netskope Support or your Sales Representative to enable it for your tenant.The administrator needs to upload the certificates: Intermediate and Root CA. The Netskope Client then verifies the end-user certificate to confirm if it is signed by the same certificate authority that was uploaded in the tenant webUI.
Prepare a Device Classification Certificate Rule
To upload a new certificate, click Select File, and then upload your certificate in Base-64 encoded .pem format. If you have multiple signing certificates to upload, you need to create multiple device classification rules for each certificate. For example, to upload CA-Certificate-A and CA-Certificate-B, create separate device classification rules: DC-Cert-Rule-A with CA-Certificate-A and DC-Cert-Rule-B with CA-Certificate-B. The new certificate added in each rule do not replace the previously added certificates in other rules. However, if you choose to replace an existing certificate, the new certificate replaces the previous one within the same rule.
Ensure that each PEM file begins with BEGIN CERTIFICATE and ends with END CERTIFICATE.A single PEM file can be a combination of the following:
-
Intermediate CA certificate
-
Root CA certificate
It is important to add certificates in the correct sequence in the certificate chain starting with Intermediate CA that issued the client certificate followed by the Root CA.
A correct PEM file is in the following format:
Begins with
—–BEGIN CERTIFICATE—– Ends with:
—–END CERTIFICATE—– Upload CA Certificates
Refer to the following examples to understand which CA certificates you need to upload in the webUI.
-
Example 1: Client Cert is signed by Root CA
-
Upload Root CA .pem file
-
-
Example 2: Client Cert is signed by Intermediate CA
-
Upload a single .pem file which contains Intermediate and Root CA
-
Order of the certs in the file should be Intermediate CA followed by Root CA
-
-
Example 3: Client Cert is signed by Intermediate CA-2
Intermediate CA-2 is signed by Intermediate CA-1
Intermediate CA-1 is signed by Root CA
-
Upload a single .pem file which contains Int CA-2, Int CA-1 and Root CA
-
Order of the certs in the file should be Int CA-2, Int CA-1, Root CA
-
Prepare Your Devices to Comply With the Certificate Check Rule
On Windows, Netskope Client checks for Certificate in the
-
Current User > Personal Certificate Store or
-
Local machine > Personal Certificate Store
Additional Certificate Check Options
-
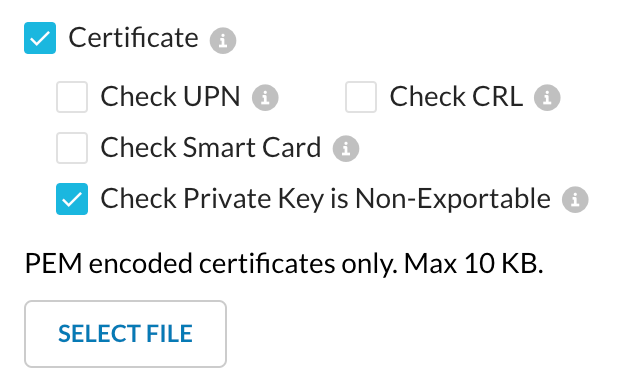
Check UPN: This check compares the current logged in UserPrincipalName with four fields present in the certificate: Subject CN, Subject Email, Subject Alternative RFC822, and Subject Alternative Principal Name. If any of these four fields match with the current login principal name, then the UPN Check is successful.
-
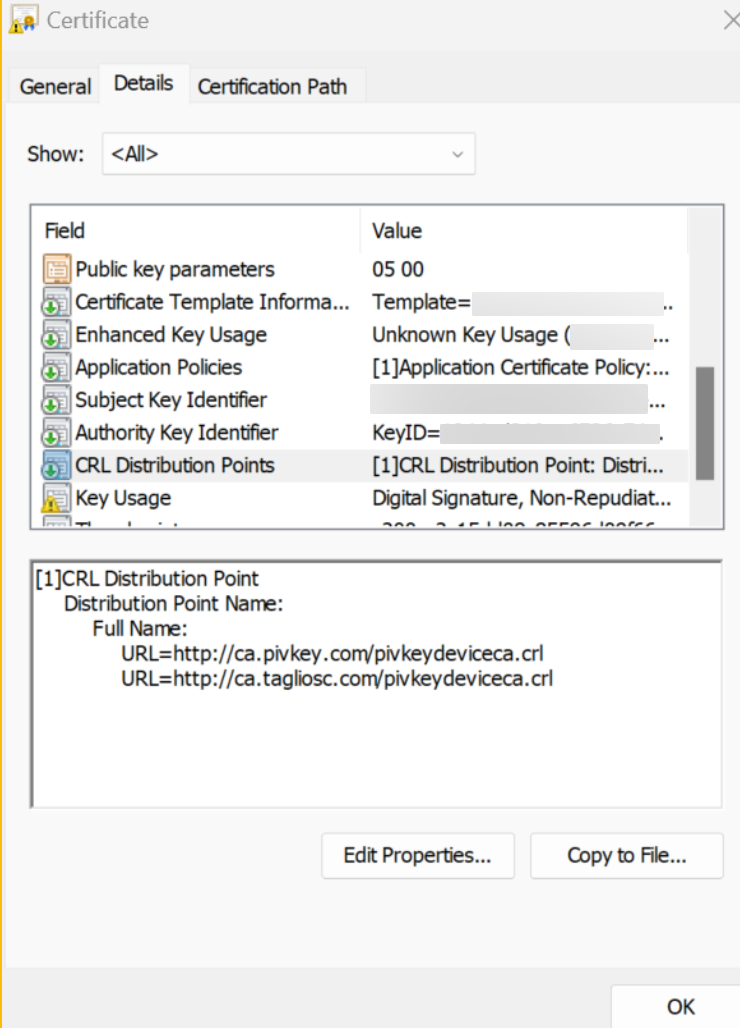
Check CRL: This option checks if the certificate is revoked.
Prerequisites:
-
Your certificate status must be OK for the entire certificate chain.
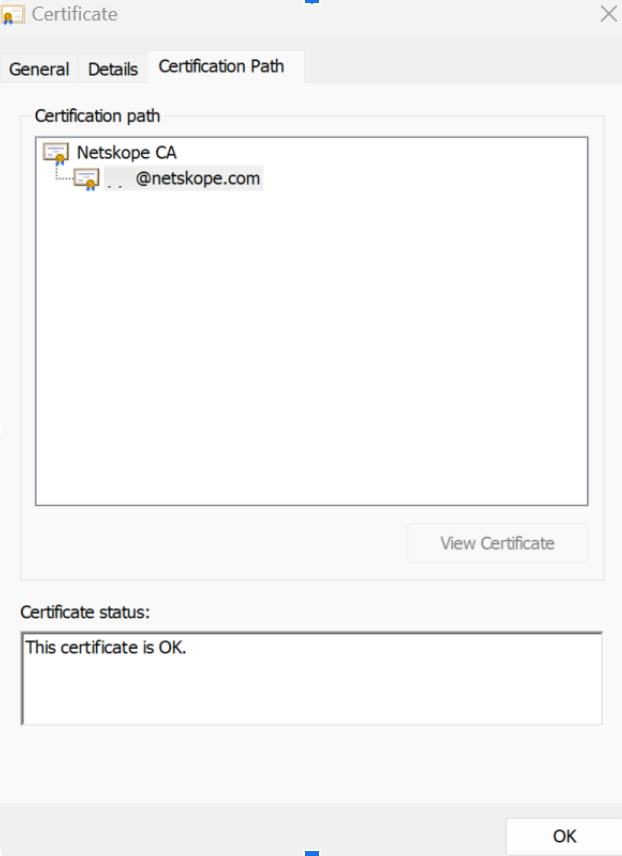
-
Your certificate must include a CRL Distribution Point URL.
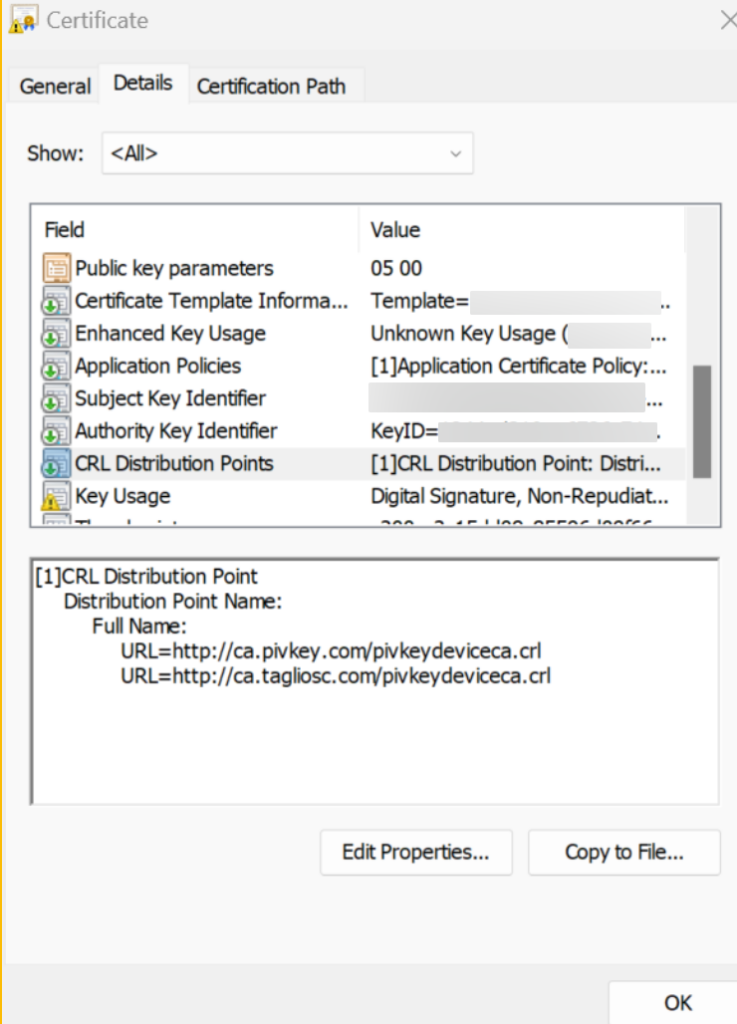
Netskope use Online Certificate Status Protocol (OCSP) and Certificate Revocation List (CRL) to check the revocation status of the SSL certificates. Netskope performs a real-time check of the certificate revocation status by checking the issuing Certificate Authority’s (CA) OCSP responder using the certificate serial number. If OCSP fails or is not available, Netskope performs the CRL check to determine the certificate revocation status.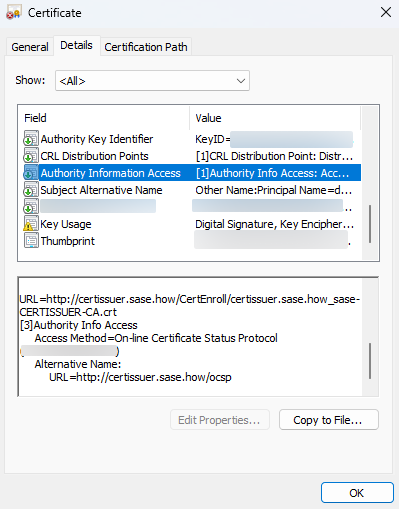
-
-
Check Smart Card: The Client leverages the Microsoft Windows Smart Card Architecture and supports it when the card vendor provides compatible Smart Card Minidrivers. If users enable the Smart Card option, Netskope Client checks Certificates on the card instead of the personal store. At the same time, the Netskope Client checks the Smart Card PIN.
The Smart Card option in Device Classification supports only one card in the device. For example, if Netskope Client does not support configurations where ‘Windows Hello for Business’ is enabled and your physical smart card is also inserted.
-
Check Private Key is Non-Exportable: This option adds an additional layer of security and verifies if the certificate’s private key is exportable. If the Non-Exportable Private Key setting is enabled the device is labelled as Unmanaged if the private key is exportable. If the private key is not exportable, device is labelled as Managed.
In case you do not select this option, it is easier to bypass the certificate check rule by copying a valid user certificate from a managed device to an unmanaged device and effectively causing the unmanaged device to be treated as managed.
-
-
-
Click Add Criterion to add more than one device classification option. You cannot add the same option twice in a single Criteria Group. The selected options remain greyed-out in a Criteria Group.
-
After you complete adding all the required criteria in the first group, select the logical operator Match All (AND) or Match Any (OR) to compare the criteria in the Device Classification Rule.
-
Next, click Add Criteria Group to add the second criteria.
-
Choose and add the required criteria in the second group along with the logical operator for that Criteria Group.
-
Choose the logical operator to match the various criteria added in each group.
-
When finished, click Save

Create Device Classification Rule for Versions Prior to 127.0.0
Go to Settings > Manage > Device Classification and select Windows on the New Device Classification dropdown list, and then follow these steps to classify your Windows device. Select options and enter the requested parameters.
-
Rule Name: Enter a name for this classification rule.
-
Device Classification: From the options displayed in the dropdown menu, choose the desired label you want to assign to this rule. You cannot assign more than one label to a rule.
-
Classification Criteria: Select an All or Any criteria match.
-
Encryption: To classify a device to be encrypted, choose one or both of these options:
-
BitLocker
-
PGP
-
-
OPSWAT: Netskope can leverage OPSWAT capabilities (You need to install OPSWAT to use its capabilities) to identify the applications installed in the endpoint device and monitor them. To use an OPSWAT check, select one of the following from the Check Type dropdown menu and enter the Metaccess license key:
-
Full Compliance check: Netskope Client checks whether the MetaAccess agent is running to ensure that registry contains the latest compliance information. Also, checks if the configured MetaAccess license on the WebUI matches the product license.
-
Basic Compliance check: Checks if the compliance policy check has a critical error. In case of an error, the basic compliance check fails.
-
-
Registry: To classify a device when one or more registry keys are found on a device, select the HKEY type from the dropdown list, and then enter the key and value. Next, select the registry type from the dropdown list and enter text in the Data field.
-
Process: To classify a managed device based on the presence of any one or more processes, enter the executable file name(s). Enter the file names as new line separated without any extra spaces between the lines. For example, you can enter the executable files like process1.exe, process2.exe, and process3.exe in the following format:
process1.exe
process2.exe
process3.exe
-
File check: To classify a device based on the presence of any one or more files, enter the path and file name.
-
AD Domain: To classify a device associated to any one or more domains listed, enter the domain name. This check only applies for the traditional domains(Domain-joined) and not Entra ID(formerly known as Azure Active Directory).
-
AV: To check the existence and status of an anti-virus product. The admin can select one or multiple AVs from the following predefined AV list:
-
Any
-
CrowdStrike
-
SentinelOne
-
Carbon Black
-
Microsoft Defender
-
Custom
 This option is supported only on Windows desktop.
The admin can select either one or multiple AV products from the dropdown menu. For example, if the admin selects SentinelOne and CrowdStrike at the same time, the Netskope Client checks either SentinelOne or CrowdStrike against the device classification rule.
If you select:
-
Any: This refers to any AV product that is enabled and running. The options in the AV dropdown get grayed out.
-
Custom: The admin must manually enter the type in the AV product name in the Custom AV Product Name field. This name must match the AV name registered within the Windows security center.
You also have the option to select Check signature is up-to-date to check AV signature file is up to date. This is optional.
Once you select the required details, Netskope Client uses the Windows Security Center(WSC) API to check the AV product running status and their signature status. For example, if you select CrowdStrike in the AV option and choose Check signature is up-to-date, Netskope Client checks if the selected AV name matches with the WSC registered name to verify the AV running status.
-
-
OS: To check and classify device compliance for the detected OS version that matches or is above the version information configured by the administrator. The OS check rule for Windows consists of two parts:
-
Minimum OS edition
-
Minimum Build number
The administrator can select one of the following predefined Windows OS editions and then enter the minimum build number in the MINIMUM OS BUILD NUMBER (Optional) field:
-
Windows All
-
Windows 10 All
-
Windows 10 Enterprise
-
Windows 10 Enterprise LTSC
-
Windows 10 Education
-
Windows 10 Pro Education
-
Windows 10 Home
-
Windows 10 Pro
-
Windows 10 Pro for Workstations
-
Windows 11 All
-
Windows 11 Enterprise
-
Windows 11 Education
-
Windows 11 Pro Education
-
Windows 11 Home
-
Windows 11 Pro
-
Windows 11 Pro for Workstations
-
Windows Server 2016
-
Windows Server 2019
-
Windows Server 2022
If you do not enter the Build Number, the Client automatically assigns it as zero. You can add multiple OS editions and their respective build numbers on the user interface.
After the admin selects the OS editions and build number, Netskope Client checks the OS product name and verifies that the Windows build number is not less than the number mentioned in the rule.
-
-
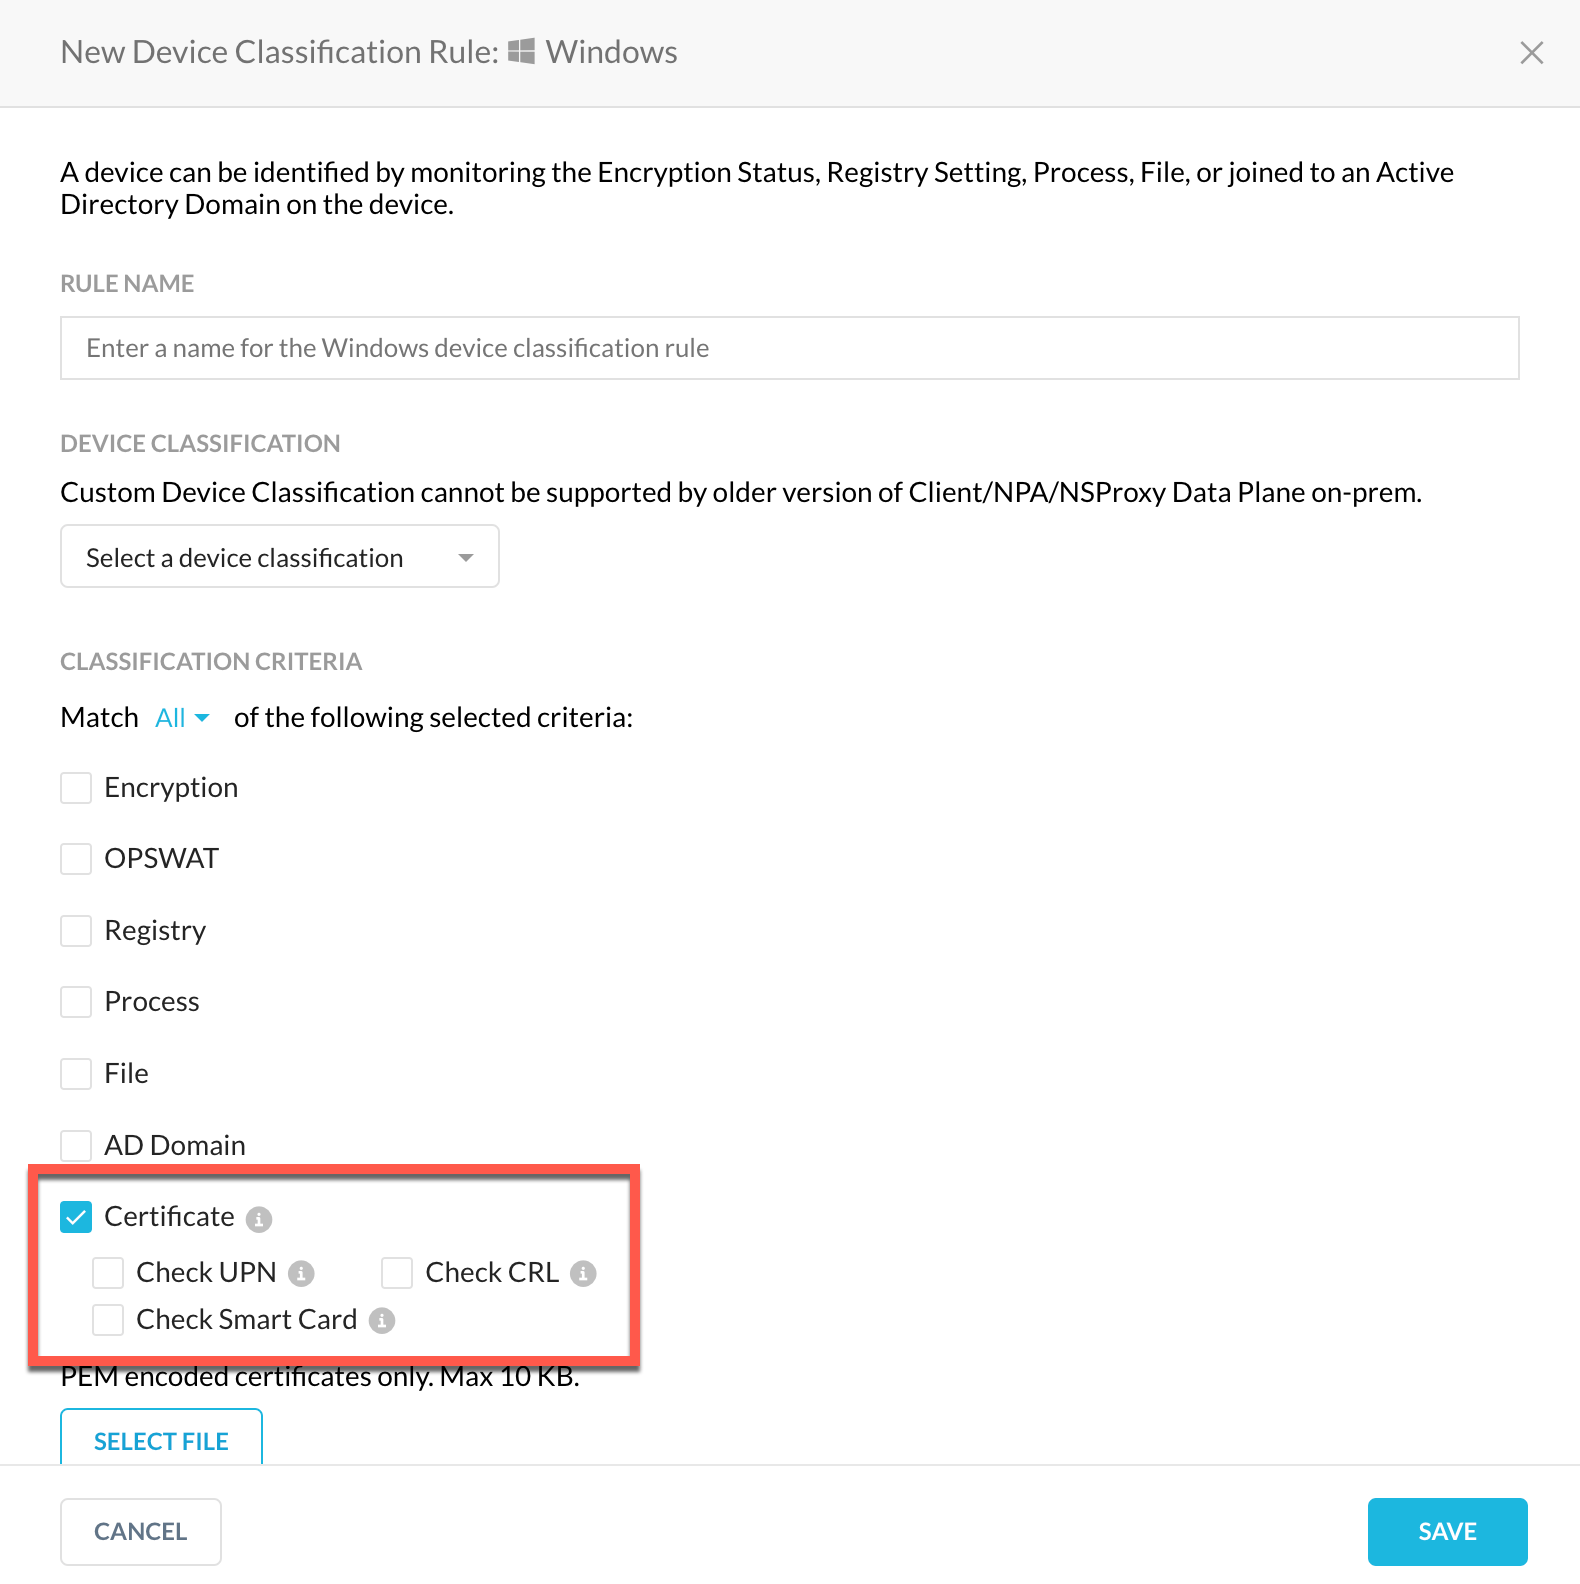
Certificate: Checks for certificates on the device.
Certificate check functionality is behind a feature flag. Contact Netskope Support or your Sales Representative to enable it for your tenant.The administrator needs to upload the certificates: Intermediate and Root CA. The Netskope Client then verifies the end-user certificate to confirm if it is signed by the same certificate authority that was uploaded in the tenant webUI.
Prepare a Device Classification Certificate Rule
To upload a new certificate, click Select File, and then upload your certificate in Base-64 encoded .pem format. If you have multiple signing certificates to upload, you need to create multiple device classification rules for each certificate. For example, to upload CA-Certificate-A and CA-Certificate-B, create separate device classification rules: DC-Cert-Rule-A with CA-Certificate-A and DC-Cert-Rule-B with CA-Certificate-B. The new certificate added in each rule do not replace the previously added certificates in other rules. However, if you choose to replace an existing certificate, the new certificate replaces the previous one within the same rule.
Ensure that each PEM file begins with BEGIN CERTIFICATE and ends with END CERTIFICATE.A single PEM file can be a combination of the following:
-
Intermediate CA certificate
-
Root CA certificate
It is important to add certificates in the correct sequence in the certificate chain starting with Intermediate CA that issued the client certificate followed by the Root CA.
A correct PEM file is in the following format:
Begins with
—–BEGIN CERTIFICATE—– Ends with:
—–END CERTIFICATE—– Upload CA Certificates
Refer to the following examples to understand which CA certificates you need to upload in the webUI.
-
Example 1: Client Cert is signed by Root CA
-
Upload Root CA .pem file
-
-
Example 2: Client Cert is signed by Intermediate CA
-
Upload a single .pem file which contains Intermediate and Root CA
-
Order of the certs in the file should be Intermediate CA followed by Root CA
-
-
Example 3: Client Cert is signed by Intermediate CA-2
Intermediate CA-2 is signed by Intermediate CA-1
Intermediate CA-1 is signed by Root CA
-
Upload a single .pem file which contains Int CA-2, Int CA-1 and Root CA
-
Order of the certs in the file should be Int CA-2, Int CA-1, Root CA
-
Prepare Your Devices to Comply With the Certificate Check Rule
On Windows, Netskope Client checks for Certificate in the
-
Current User > Personal Certificate Store or
-
Local machine > Personal Certificate Store
Additional Certificate Check Options
-
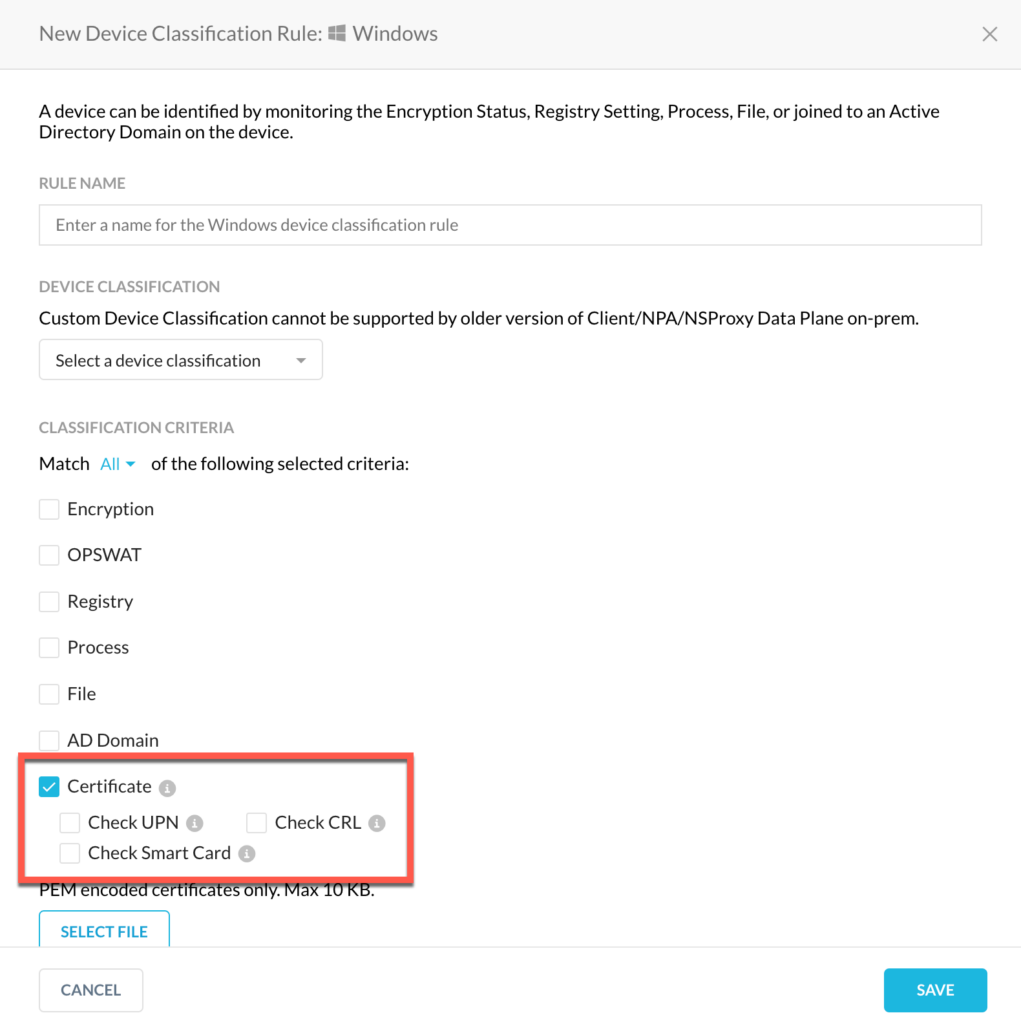
Check UPN: This check compares the current logged in UserPrincipalName with four fields present in the certificate: Subject CN, Subject Email, Subject Alternative RFC822, and Subject Alternative Principal Name. If any of these four fields match with the current login principal name, then the UPN Check is successful.
-
Check CRL: This option checks if the certificate is revoked.
Prerequisites:
-
Your certificate status must be OK for the entire certificate chain.
-
Your certificate must include a CRL Distribution Point URL.
-
-
Check Smart Card: The Client leverages the Microsoft Windows Smart Card Architecture and supports it when the card vendor provides compatible Smart Card Minidrivers. If users enable the Smart Card option, Netskope Client checks Certificates on the card instead of the personal store. At the same time, the Netskope Client checks the Smart Card PIN.
The Smart Card option in Device Classification supports only one card in the device. For example, if Netskope Client does not support configurations where ‘Windows Hello for Business’ is enabled and your physical smart card is also inserted.
-
Check Private Key is Non-Exportable: This option adds an additional layer of security and verifies if the certificate’s private key is exportable. If the Non-Exportable Private Key setting is enabled the device is labelled as Unmanaged if the private key is exportable. If the private key is not exportable, device is labelled as Managed.
In case you do not select this option, it is easier to bypass the certificate check rule by copying a valid user certificate from a managed device to an unmanaged device and effectively causing the unmanaged device to be treated as managed.
This is a Beta feature. Contact Netskope Support or your Sales Representative to enable this feature for your tenant.
-
-
When finished, click Save.

Configure a Real-time Protection Policy
After creating a device classification rule, you can use it in a Real-time Protection policy.
-
To use this Device Classification in a Real-time Protection policy, click Policies > Real-time Protection in the Netskope UI. Select an existing policy or click New Policy and choose a policy type.
-
Proceed through the Users, Cloud Apps + Web, DLP/Threat Protection, and Select Activities sections.
-
For Additional Attributes, click Access Method and select either Client, Mobile Profile, or Reverse Proxy, and then click Save. Click Device Classification, and then select label from Custom Device Management and Managed or Unmanaged from Device Classification, based on the devices you just classified.
-
Managed means the device is managed; the device posture information sent by the Client matches at least one of the device classification checks configured for that Client’s OS.
-
Unmanaged means the device is unmanaged; the device posture information sent by the Client matches none of the device classification checks configured for that Client’s OS.
-
-
When finished, click Save and then Next.
-
Combine device classification with other policy elements, like using the Block Action for specified applications for activities like uploading files from managed or unmanaged devices. Finish creating or updating this policy to establish this device classification. Click Apply Changes for this policy.
-
After the policy has been created, perform the process for which the policy was created. Next go to Skope IT > Application Events and click the magnifying icon for an event to open the Application Event Details panel. In the User section you’ll see a Device Classification field, which shows one of these device classifications.