

This document describes the available deployment methods and user enrolment options when installing the Netskope Client on macOS devices.
Supported Versions
Refer to Netskope Client Supported OS and Platform for more details on the supported MacOS versions.
Download Netskope Client Packages
You can download Netskope Client installers from Download Netskope Client and Scripts.
Install Netskope Client
You can install Netskope Client in macOS using one of the following methods:
Email Invite
You can install Netskope Client using an email invitation sent from the Netskope Admin console. To learn more, view: Email Invite.
After you receive the email:
-
Check your email from Netskope Onboarding and click the link for Mac Client.

-
Click Download. This downloads to your default location.
-
Click the installer file.
Administrator rights are required to unblock the Client and authorize all system prompts during installation to ensure proper functionality.-
To install the software, enter device password on Installer pop-up and click Install Software.
If the admin pre-approves Network Extension through MDM, the Netskope Client will install and activate seamlessly once the user runs the installer. -
Once the installation is complete, click Open System Setting on System Extension Blocked pop-up.

-
In System Settings, select Allow under Security in Privacy & Security.
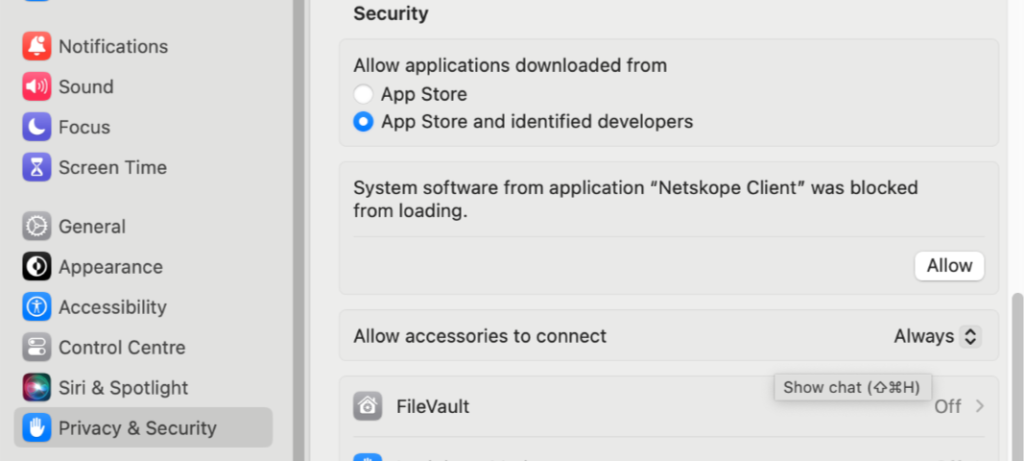
-
Enter the device password on Privacy & Security pop-up > select Modify Settings, and you can see the Netskope Client running on your taskbar.

-


PLIST
The installation method uses a Netskope script and a PLIST file to install Netskope Client and enroll the user. This method installs users on macOS devices in a single-user mode. The steps include:
-
Generate .plist file.
-
Execute script.
Generate .plist File
Run the following command in a terminal:
sudo /usr/libexec/PlistBuddy -c "add email string user@example.com" /Library/Managed\ Preferences/template.plist
Add PLIST files to “/Library/Managed Preferences“. The script fails if the “/Library/Managed Preferences “folder does not exist. Use the following command to create the folder:sudo mkdir “/Library/Managed Preferences”Execute Script
-
Download the configuration script: MAC-MDM-script.zip from the Netskope Support portal. The file contains the essential command-line executable scripts to install and configure Netskope Client.
-
Extract the contents of the downloaded script.
-
-
Execute this command in Terminal:
sudo ./mac_mdm_installconfig.sh 0 0 0 addon-<tenant-name>[.region].<tenant-domain> <Organization ID> <plist file name> preference_email enrollauthtoken=<enrollauthtoken> enrollencryptiontoken=<enrollencryptiontoken>
-
Place the Netskope Client installer in the same folder as the configuration script and install the Netskope client.
MDM Deployment Methods
Netskope offers support for a wide range of MDM solutions. For MDM-specific instructions on deploying Netskope Client, view Netskope Client Deployment Options.
Uninstall Client in macOS
To uninstall Client in macOS:
-
Click the Spotlight icon from your dock or the magnifying glass on the top of your taskbar. Use Spotlight or a manual review of installation applications to find application Remove Netskope Client.
-
Run Remove Netskope Client app.
-
You are prompted to enter administrative credentials during the uninstallation process.

-
The Netskope Client is uninstalled from your machine.
-
Click OK.
Tamperproofing of Netskope Client for macOS
This section describes ways to tamperproof various attributes of Netskope Client for macOS.
Tamperproof – macOS Processes
Tampering can be malicious or accidental. Netskope integrates APIs into each Netskope process and implements them to validate and monitor the Netskope Client binary paths, signatures, and file system permissions. The API detects anomalies, logs them, and terminates them.
You must explicitly enable the required configurations for tamperproofing, as they are disabled by default, in a local configuration file. The local configuration file helps you define new policies and must be in the PLIST format. Ensure to check that the tamperproof.plist file is available in the following location: /Library/Application Support/Netskope/STAgent/tamperproof.plist. The API checks for tampered files when you enable the process check in the PLIST configuration. If the API detects tampered files, the process self-terminates upon launch.
Prerequisites
-
Save the following tamperproof.plist file in
/Library/Application Support/Netskope/STAgent/tamperproof.plist. Modify this file according to your requirement.<?xml version="1.0" encoding="UTF-8" standalone="yes"?> <!DOCTYPE plist PUBLIC "-//Apple//DTD PLIST 1.0//EN" "http://www.apple.com/DTDs/PropertyList-1.0.dtd"> <plist version="1.0"> <dict> <key>TeamIdentifiers</key> <dict> <key>24W52P9M7W.com.netskope.client.Netskope-Client</key> <dict> <key>DenyTrace</key> <true/> <key>ProcessCheck</key> <dict> <key>Enabled</key> <true/> </dict> </dict> <key>24W52P9M7W.com.netskope.client.Netskope-Client.NetskopeClientMacAppProxy</key> <dict> <key>DenyTrace</key> <true/> <key>ProcessCheck</key> <dict> <key>Enabled</key> <true/> </dict> </dict> <key>24W52P9M7W.nsAuxiliarySvc</key> <dict> <key>DenyTrace</key> <true/> <key>ProcessCheck</key> <dict> <key>Enabled</key> <true/> </dict> </dict> <key>24W52P9M7W.nsdiag</key> <dict> <key>DenyTrace</key> <true/> <key>ProcessCheck</key> <dict> <key>Enabled</key> <true/> </dict> </dict> </dict> </dict> </plist>
-
Requires user root and -r–r–r– or -rw-r–r– permissions. The API ignores the file if it does not match these criteria.
To prevent tamperproof of the Netskope Client processes, admin can use any mechanism to implement this file according to their requirement. For example, use MDM solutions such as Microsoft Intune to enforce policies that restrict users from modifying the processes and policies.
If you are implementing or pushing the configuration file after installing Netskope Client, you must perform either system reboot or Netskope process restart to implement the configurations effectively.
Microsoft Intune
Follow the steps to create a profile:
-
Sign in to Microsoft Intune Admin Center.
-
Navigate to Devices > By Platform> macOS > Manage Devices > Scripts.
-
Click Add.
-
In Basics, enter a Name and Description.
-
Click Next.
-
In Script Settings, save and upload the following shell script file tamperproof.sh from your local storage in your computer.
#!/bin/bash

# Configuration
TARGET_DIR="/Library/Application Support/Netskope/STAgent"
FILE_PATH="$TARGET_DIR/tamperproof.plist"

# 1. Ensure target directory exists
if [ ! -d "$TARGET_DIR" ]; then
    mkdir -p "$TARGET_DIR"
    chmod 755 "$TARGET_DIR"
fi

# 2. Attach the plist content
cat <<EOF > "$FILE_PATH"
<?xml version="1.0" encoding="UTF-8"?>
<!DOCTYPE plist PUBLIC "-//Apple//DTD PLIST 1.0//EN" "http://www.apple.com/DTDs/PropertyList-1.0.dtd">
<plist version="1.0">
<dict>
    <key>PayloadEnabled</key>
    <true/>
    <key>UpdateSettings</key>
    <string>Automatic</string>
</dict>
</plist>
EOF

# 3. Secure permissions (Root-owned, World-readable)
chmod 644 "$FILE_PATH"
chown root:wheel "$FILE_PATH"

exit 0
Before uploading the saved shell script, you must modify it. Incorporate the tamperproof.plist script (refer prerequisites) into the shell script by replacing the existing shell script between lines 14 and 24 with the content from tamperproof.plist.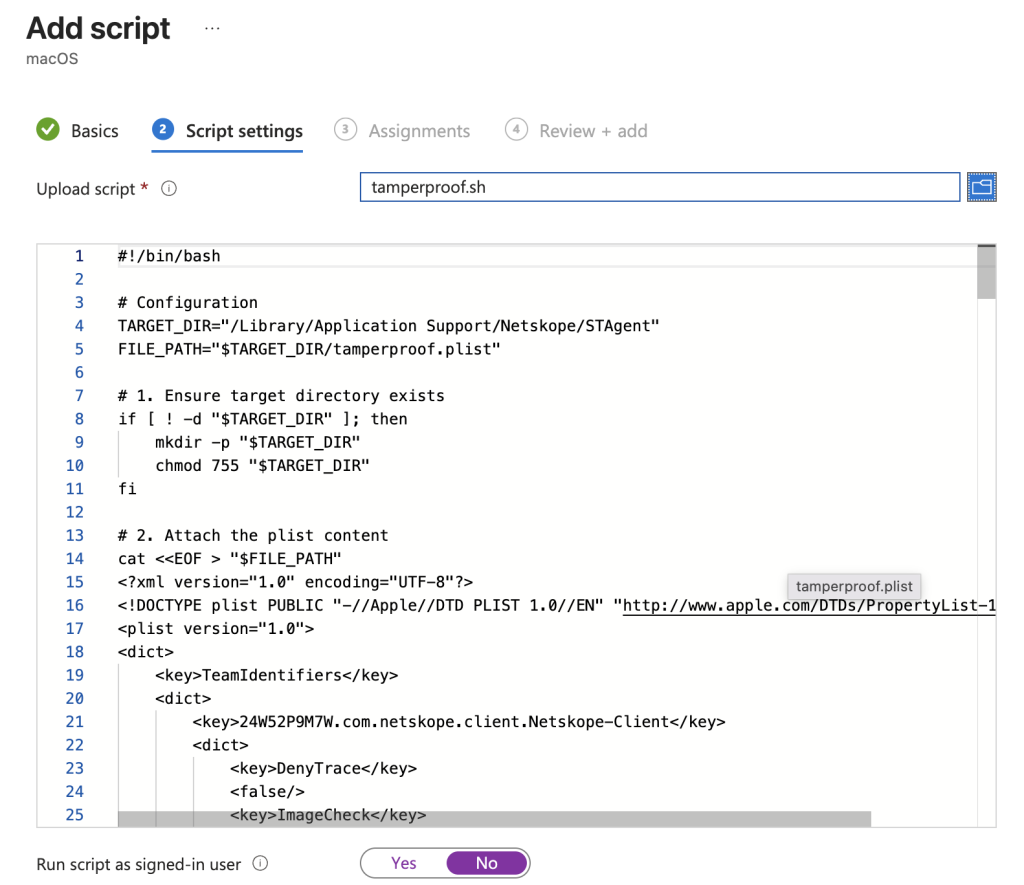
-
Make the following changes:
-
Run script as signed in users: NO
-
Hide script notifications on devices: Yes
-
Script frequency: Based on your requirement
-
Max number of times to retry if script fails: 3 times
-
-
Assign the script to groups, users, and/or devices.
-
Click Next to continue.
-
Under Review+Add, you can review the policy configurations.
-
Click Add.
The webUI now displays the newly created script details.

Tamperproof- Login and Background Items
Prior to macOS Ventura versions, the users had limited visibility to applications running in the background. With newer versions of macOS, background applications are available more prominently, making it easier for the end-users to view, enable, or disable them. To learn more, view Login and Background items.
When Netskope Client runs in the background, disabling its Client services can impact the functionality and potentially expose users to security risks. To prevent this, you can use MDM solutions such as VMware Workspace ONE and JAMF to enforce policies that restrict users from enabling or disabling the Client.
VMware Workspace ONE
The following configuration steps restrict users from disabling the Client in login items.
- Go to Resources > Profiles&Baselines > Profiles.
- Click Add > Add Profile.
- Select Apple macOS as the platform to start.
- Select Device Profile in Select Context.
- Enter profile name.
- Go to the Custom Settings section and click Add at the right corner of this section. The fields get enabled now.
- Provide the following custom payload information in the Custom Settings text-box:
<dict>
    <key>PayloadDisplayName</key>
    <string>Service Management - Managed Login Items</string>
    <key>PayloadIdentifier</key>
    <string>com.apple.servicemanagement.xxx</string>
    <key>PayloadType</key>
    <string>com.apple.servicemanagement</string>
    <key>PayloadUUID</key>
    <string>xxxxxxxx-xxxx-xxxx-xxxx-xxx</string>
    <key>PayloadVersion</key>
    <integer>1</integer><key>Rules</key>
    <array>
    <dict>
        <key>RuleType</key>
        <string>TeamIdentifier</string>
        <key>RuleValue</key>
        <string>24W52P9M7W</string>
    </dict>
    </array>
</dict>
Edit the Payload Identifier and UUID values.

Important
Currently, many MDM providers do not have the user interface (UI) option to disable this functionality. Hence, use Custom Settings to add the payload.
- Click Next.
- On the Assignment page, assign the profile to Smart Groups.
- Click Save and Publish.
JAMF
Using JAMF Pro, you can restrict users disabling Netskope Client from background services. This requires you to upload the following configuration PLIST (netskope login items.mobileconfig).
Configuration file:
<?xml version="1.0" encoding="UTF-8"?>
<!DOCTYPE plist PUBLIC "-//Apple//DTD PLIST 1.0//EN"
"http://www.apple.com/DTDs/PropertyList-1.0.dtd">
<plist version="1.0">
    <dict>
        <key>PayloadContent</key>
        <array>
            <dict>
                <key>PayloadDescription</key>
                <string>Allows for netskope to register a launch daemons and launch agents</string>
                <key>PayloadDisplayName</key>
                <string>Managed Login Items - Netskope Apps</string>
                <key>PayloadIdentifier</key>
                <string>com.netskope.servicemanagement.xxxxxxxx-xxxx-xxxx-xxxx-xxxxxxxxxxxx.</string>
                <key>PayloadUUID</key>
                <string>xxxxxxxx-xxxx-xxxx-xxxx-xxxxxxxxxxxx</string>
                <key>PayloadType</key>
                <string>com.apple.servicemanagement</string>
                <key>PayloadOrganization</key>
                <string>Netskope</string>
                <key>Rules</key>
                <array>
                    <dict>
                        <key>RuleType</key>
                        <string>TeamIdentifier</string>
                        <key>RuleValue</key>
                        <string>24W52P9M7W</string>
                        <key>Comment</key>
                        <string>Allow login items for netskope apps</string>
                    </dict>
                </array>
            </dict>
        </array>
        <key>PayloadDisplayName</key>
        <string>Managed Login Items - Netskope Apps</string>
        <key>PayloadIdentifier</key>
        <string>com.netskope.servicemanagement.xxxxxxxx-xxxx-xxxx-xxxx-xxxxxxxxxxxx</string>
        <key>PayloadUUID</key>
        <string>xxxxxxxx-xxxx-xxxx-xxxx-xxxxxxxxxxxx</string>
        <key>PayloadType</key>
        <string>Configuration</string>
        <key>PayloadScope</key>
        <string>System</string>
    </dict>
</plist>
To learn more, view Uploading a Configuration Profile for Managed Login Items.
Perform the following steps to upload PLIST file to JAMF:
- Log into JAMF with admin credentials.
- Go to Computers > Configuration Profiles.
- Click Upload.
- In Upload OS X Configuration Profile, click Choose File and select the file (netskope login items.mobileconfig) from your local machine.
- Click Upload. This navigates to the New macOS Configuration Profile.
- In the New macOS Configuration Profile, Name under General displays the Payload Display Name string provided in the PLIST file.
- Click Save.
- Click the Scope tab and configure the scope of the configuration profile.
- Click Save.
The configuration profile is now pushed to the target devices in your scope and you can view the new profile from Configuration Profiles.

To check the configuration profile from your macOS device, go to System Settings > General Settings > Profiles. Here you can see Managed Login Items – Netskope Apps listed under Devices (Managed) section.

Approve Full Disk Access Permission For macOS Sonoma(v14) or Later
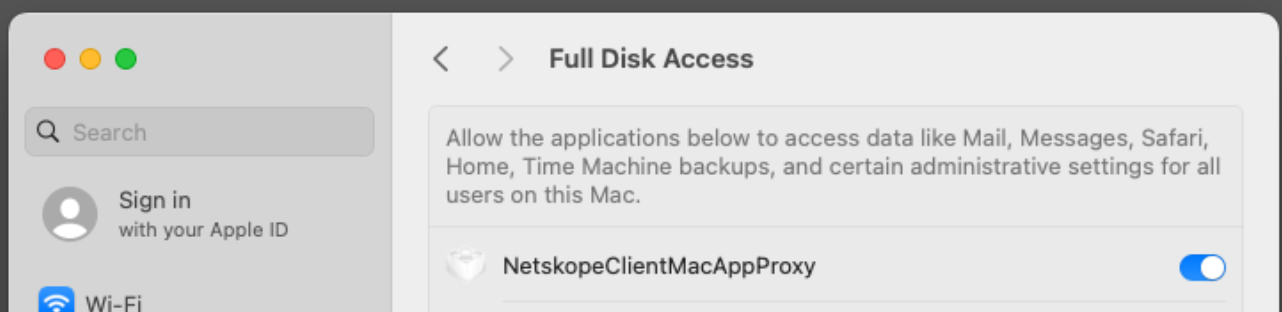
For Netskope Client deployments on macOS Sonoma and later, Netskope Client requires Full Disk Access Permissions. During installation, end-users can view a dialog box instructing them to approve these permissions in System Settings for Netskope’s NetskopeClientMacAppProxy.
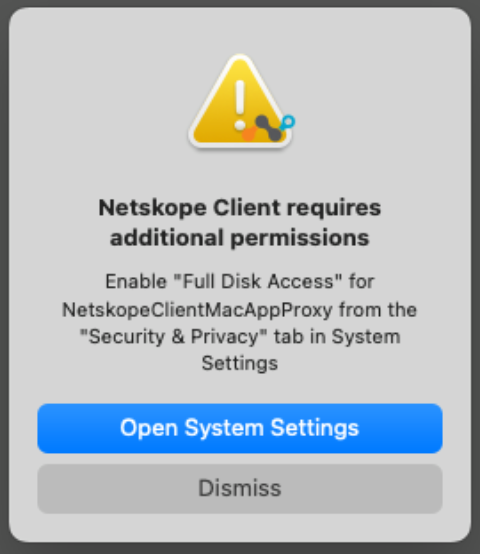
After you receive the dialog box, you can perform the following instructions:
-
Select System Settings from the dialog box.
-
Selecting this option automatically navigates the user to Full Disk Access under System Settings > Privacy & Security > Full Disk Access.
-
On the Full Disk Access screen, enable NetskopeClientMacAppProxy using the toggle button.
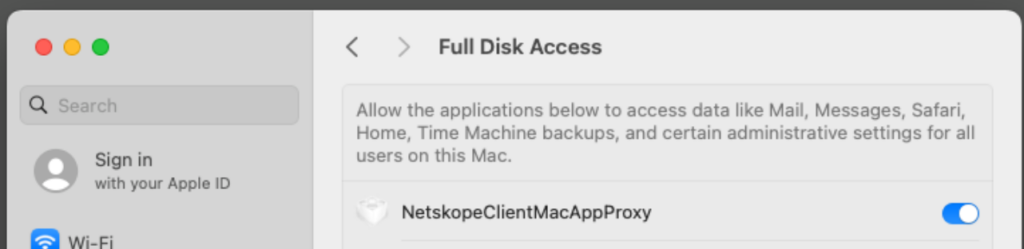
To suppress these pop-ups, administrators can provide necessary pre-authorization to devices using MDM policies. Pre-authorization requires the push of MDM payload (com.apple.TCC.configuration-profile-policy) to grant the Netskope Client’s system extension Full Disk Access. To learn more about the full disk access for MDMs, view Netskope Deployment Options.