

This document explains how to configure the AWS Inspector v1.0.0 plugin in the Netskope Cloud Exchange platform.This plugin is used to fetch Workloads from the AWS Inspector > Inventory > Findings for EC2 instance resources. This plugin also supports Create Suppression Rule action on AWS Inspector.
Conditions préalables
Pour réaliser cette intégration, vous avez besoin de :
- Un locataire Netskope (ou plusieurs, par exemple des instances de production et de développement/test).
- Un locataire Netskope Cloud Exchange avec le plugin Tenant et le plugin Risk Exchange déjà configurés.
- Connectivity to the AWS Inspector.
AWS Inspector Plugin Support
This plugin is used to fetch Workloads from the AWS Inspector > Inventory > Findings for EC2 instance resources. This plugin also supports Create Suppression Rule action on AWS Inspector.
| Type de données extraites | Actions |
|---|---|
| Workloads | Create Suppression Rule No Action |
Mises en correspondance
Mappings are used to view the pulled Workloads along with their respective details. Fields mapped during plugin configuration will be visible on the Records page after the data is pulled. Here are the suggested mappings to use while configuring the plugin.
Pull Mapping for Devices(Workloads)
| Netskope CRE Field | Champ du plugin | Type de données attendu | CRE Aggregate Strategy | Valeur de l'échantillon |
|---|---|---|---|---|
| Recherche d'un identifiant | findingArn | String | Unique | arn:aws:inspector2:us-east-1:123456789012:finding/abc123def456 |
| IP privé | resources[x].details.awsEc2Instance.ipV4Addresses[x] (private) | String | Unique | 10.0.1.45 |
| IP publique | resources[x].details.awsEc2Instance.ipV4Addresses[x] (public) | String | Overwrite | 52.23.145.210 |
| Region | resources[x].region | String | Overwrite | us-east-1 |
| Nom de la ressource | resources[x].tags[“Name”] | String | Overwrite | prod-web-server-01 |
| UID de la ressource | resources[x].id | String | Overwrite | i-0abcd1234ef567890 |
| Resource Tags | resources[x].tags | List | Overwrite | [“Env:prod”, “Team:platform”] |
| ID de sous-réseau | resources[x].details.awsEc2Instance.subnetId | String | Overwrite | subnet-0abc12345def67890 |
| VPC ID | resources[x].details.awsEc2Instance.vpcId | String | Overwrite | vpc-0a1b2c3d4e5f67890 |
| Sévérité | sévérité | String | Overwrite | HIGH |
| Titre de la constatation | title | String | Overwrite | CVE-2023-44487 – nghttp2 |
| Description de la constatation | description | String | Overwrite | A flaw was found in the HTTP/2 protocol… |
| Première vue | firstObservedAt | Datetime | Overwrite | 2024-01-15T08:30:00+00:00 |
| Dernière visite | lastObservedAt | Datetime | Overwrite | 2024-03-10T14:22:00+00:00 |
| Inspector Score | inspectorScore | Float | Overwrite | 8.5 |
| Exploit Available | exploitAvailable | String | Overwrite | YES |
| Type de recherche | type | String | Overwrite | PACKAGE_VULNERABILITY |
| Vulnerability ID | packageVulnerabilityDetails.vulnerabilityId | String | Overwrite | CVE-2023-44487 |
| Port | networkReachabilityDetails.openPortRange.begin | Integer | Overwrite | 443 |
| Protocole | networkReachabilityDetails.protocol | String | Overwrite | TCP |
| Score de risque | findingDetails[x].riskScore (via batch_get_finding_details) | Integer | Overwrite | 85 |
| EPSS Score | findingDetails[x].epssScore (via batch_get_finding_details) | Float | Overwrite | 0.04321 |
Permissions
AWS Inspector permissions to the IAM user to pull Workload information.
- inspector2:ListFindings
- inspector2:ListCoverage
- inspector2:BatchGetFindingDetails
- inspector2:CreateFilter
- inspector2:ListFilters
Détails de l'API
Liste des API utilisées
This plugin uses Python libraries to get findings of resource type EC2 Instance from AWS Inspector.
Bibliothèque : Le SDK AWS pour Python (Boto3)
Usage: The AWS SDK for Python (Boto3) to create, configure, and manage AWS services, such as Amazon Inspector. The SDK provides an object-oriented API as well as low-level access to AWS services.
Creating Inspector Client:
inspector_client = boto3.client(
         "inspector2",
         aws_access_key_id=self.aws_public_key,
         aws_secret_access_key=self.aws_private_key,
         aws_session_token=self.aws_session_token,
         region_name=self.configuration["region_name"].strip(),
         config=Config(
                proxies=self.proxy,
                user_agent=self.useragent,
                retries={
                         "total_max_attempts": 3,
                          "mode": standard,
                 },
         ),
)
Getting Inspector EC2 findings:
Parameters
{
    "filterCriteria": {
        "resourceType": [
            {"comparison": "EQUALS", "value": "AWS_EC2_INSTANCE"}
        ],
        "updatedAt": [
            {
                "startInclusive": start_time,
                "endInclusive": end_time,
            }
        ],
        "findingStatus": [
            {"comparison": "EQUALS", "value": "ACTIVE"}
        ],
    },
    "sortCriteria": {
        "field": "LAST_OBSERVED_AT",
        "sortOrder": "ASC",
    },
    "maxResults": BATCH_SIZE,
    # "nextToken": next_token  # included on subsequent pages
}
response = inspector_client.list_findings(**params)
Parameters
{
    "findingArns": chunk   # list of up to 10 Inspector finding ARNs
}
response = inspector_client.batch_get_finding_details(findingArns=chunk)
Checking existing Suppression rules:
Parameters
{
    "action": "SUPPRESS",
    "maxResults": LIST_FILTERS_MAX_RESULTS,
    # "nextToken": next_token  # included on subsequent pages
}
response = inspector_client.list_filters(**kwargs)
Performing to create Suppression rule action:
Parameters
{
    "name": rule_name,
    "action": "SUPPRESS",
    "filterCriteria": criteria,              # built from suppression params, e.g.:
    # {
    #   "findingArn":    [{"comparison": "EQUALS",  "value": "..."}],
    #   "resourceTags":  [{"comparison": "EQUALS",  "key": "k", "value": "v"}],
    # }
    "description": "Created by Netskope Cloud Exchange on <ISO-date>.",
    # "reason": reason  # optional, user-provided
}
response = inspector_client.create_filter(**kwargs)
arn = response.get("arn", "")
Matrice de performance
Below is the performance matrix conducted on a Large CE Stack with below-mentioned specifications by pulling 500k workloads.
| Description | Spécifications |
|---|---|
| Détails de la pile | Taille : Grande RAM : 32 GB CPU : 16 cœurs |
| Workloads fetched and updated from AWS Inspector | ~22 minutes |
Agent utilisateur
APN/1.1 (ahq9d89xj9gspapczzdb59goq)
Workflow
- Generate credentials for AWS Inspector authentication methods.
- Configure the AWS Inspector plugin.
- Configurez une règle de gestion.
- Configure an Action.
- Validez le plugin.
Regardez une vidéo
Cliquer sur « play » pour regarder une vidéo.
Obtaining configuration parameter
Create an AWS Inspector Policy
-
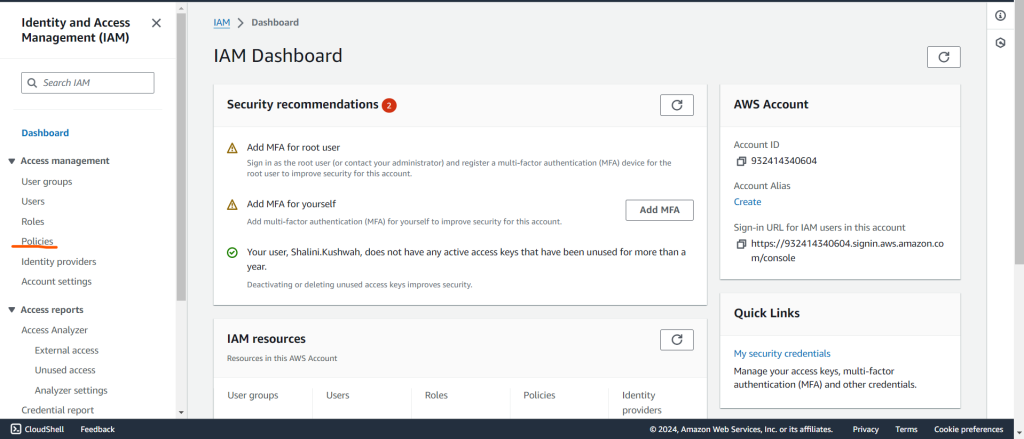
Search for “IAM” in the search box and from the left panel Click on “Policies”.
-
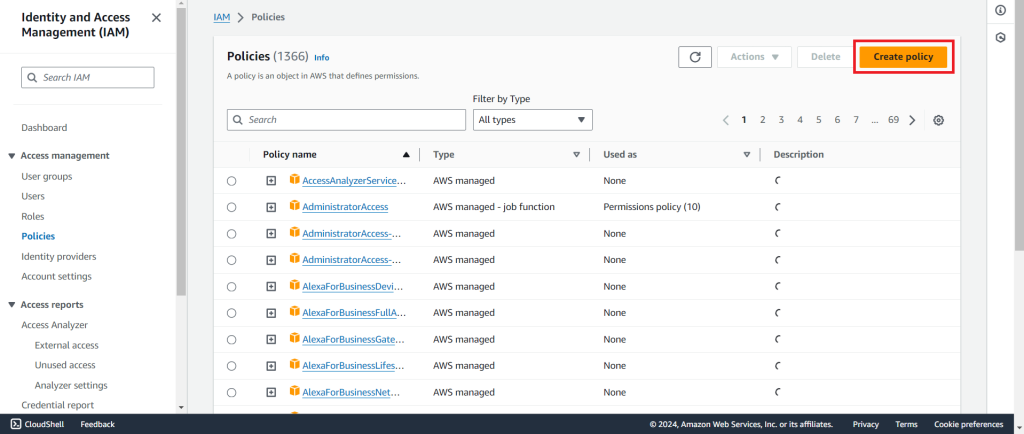
Click on Create Policy.
-
Click on the JSON tab, and enter the below-mentioned policy. Click on Next: Tags, Click on Next: Review.
{ "Version": "2012-10-17", "Statement": [ { "Sid": "Statement1", "Effect": "Allow", "Action": [ "inspector2:ListFindings", "inspector2:ListCoverage", "inspector2:BatchGetFindingDetails", "inspector2:CreateFilter", "inspector2:ListFilters" ], "Resource": "*" } ] } -
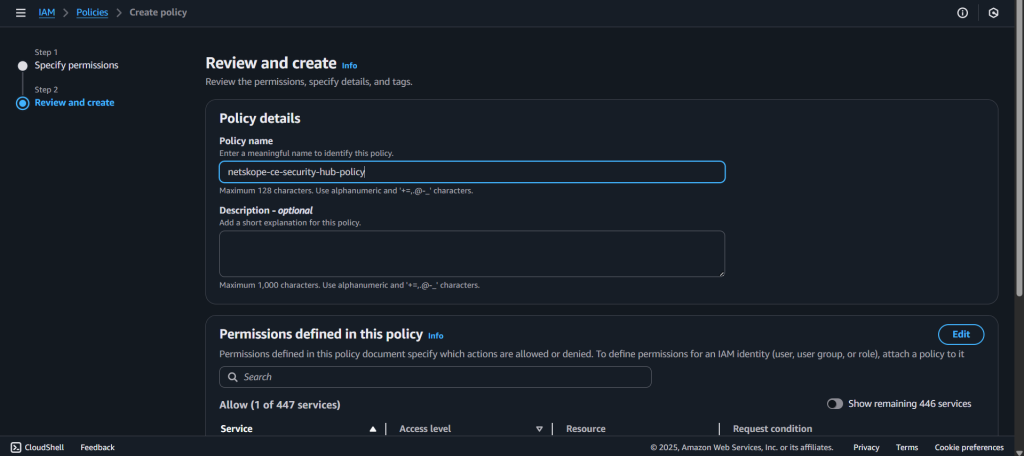
Enter Name and Click on Create Policy.
-
Attach this policy to the user, using the following steps:
-
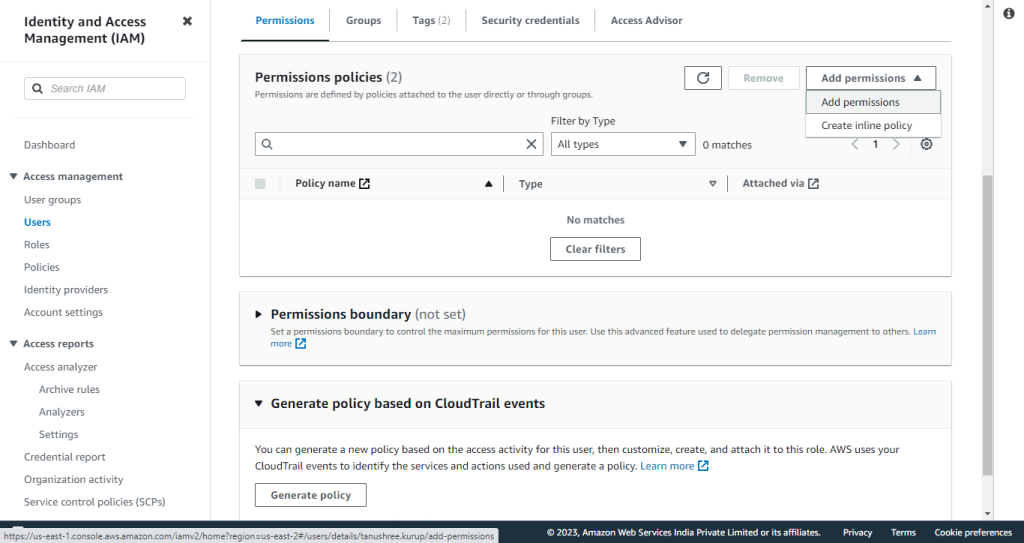
Navigate to IAM > Users. Select the user on which you want to attach a policy, and click on Add permissions and click on Add permissions options.
-
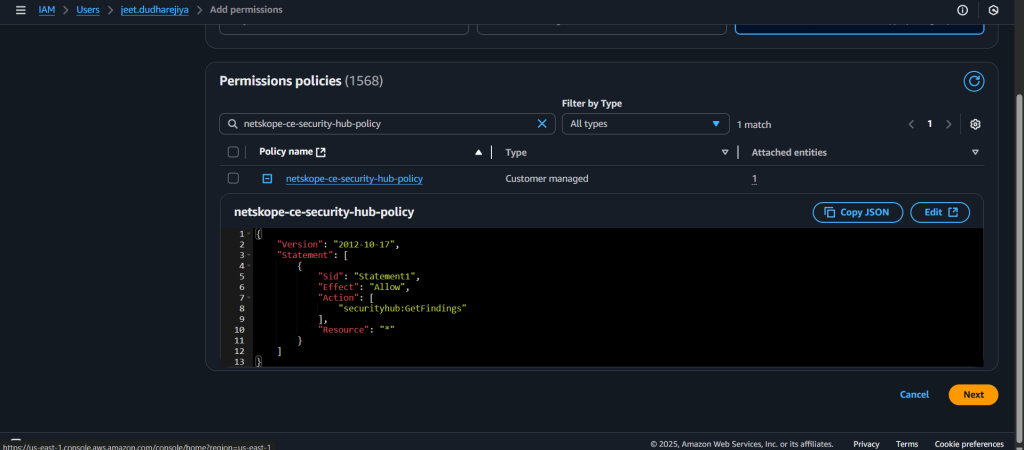
Select “Attach policies directly” option under Permissions options and search and select the policy created in the previous step for the source queue.
-
Click on Next and then click on Add permissions. Policy will be attached to the user.
-
-


Authentification IAM Role Anywhere
Conditions préalables
Le service AWS Certificate Manager doit être activé pour authentifier le plugin à l'aide de la méthode d'authentification AWS IAM Roles Anywhere.
Créer une politique
Cette politique contient les autorisations requises pour créer un certificat d'autorité de certification privé (y compris les autorisations pour créer une ancre de confiance et un profil) et pour utiliser les rôles IAM Anywhere.
- Allez sur Policy Generator et sélectionnez IAM Policy comme type de politique, entrez les détails de Add Statement, et générez une politique.
- Select Type de politique : Politique IAM
- Effet : Autoriser
- Service AWS : Autorité de certification privée AWS
- Actions :
- Créer une autorité de certification
- DescribeCertificateAuthority
- Obtenir un certificat
- Obtenir un certificat d'autorité
- Obtenir l'autorité de certification (GetCertificateAuthorityCsr)
- ImportCertificateAuthorityCertificate
- Délivrer un certificat
- Liste des autorités de certification
- ARN : *
- Cliquez sur Ajouter un relevé.

- Faites défiler l'écran vers le haut pour ajouter une autre déclaration.
- Select Type de politique : Politique IAM
- Effet : Autoriser
- Service AWS : Gestion des identités et des accès (IAM) d'AWS
- Actions :
- Politique de rattachement des rôles
- Créer une clé d'accès
- Créer un rôle
- Supprimer un rôle
- PassRole
- ARN : *
- Cliquez sur Ajouter un relevé.

- Faites défiler l'écran vers le haut pour ajouter une autre déclaration.
- Select Type de politique : Politique IAM
- Effet : Autoriser
- Service AWS : Gestionnaire de certificats AWS
- Actions :
- Décrire le certificat
- Certificat d'exportation
- Obtenir un certificat
- Liste des certificats
- ListTagsForCertificate
- Demande de certificat
- ARN : *
- Cliquez sur Ajouter un relevé.

- Faites défiler l'écran vers le haut pour ajouter une autre déclaration.
- Select Type de politique : Politique IAM
- Effet : Autoriser
- Service AWS : Gestion des identités et des accès AWS Rôles en tout lieu
- Actions :
- Créer un profil
- CreateTrustAnchor
- Obtenir un profil
- GetTrustAnchor
- Liste des profils
- ListTrustAnchors
- ARN : *
- Cliquez sur Ajouter un relevé.

- Cliquez sur Générer la politique.

- Copiez la politique car elle sera utilisée dans l'étape suivante pour créer la politique nécessaire à la création des certificats de l'AC privée.
- Allez sur AWS Console et sélectionnez IAM parmi Tous les Services. Cliquez sur Politiques dans le panneau de gauche, puis sur Créer une Politique.

- Copiez la politique dans l’onglet JSON, cliquez sur Suivante : Tags, puis cliquez À suivre : Critique
.

- Saisissez un nom (comme Netskope-ce-rolesAnywhere-policy) et cliquez sur Enregistrer les modifications.

Créer une autorité de certification privée
- Connectez-vous à la console AWS.
- Recherchez Certificate Manager.

- Cliquez sur AWS Private CA.
- Cliquez sur Créer une autorité de certification privée.

- Pour les options de mode, sélectionnez Usage général.
- Pour les options de type d'autorité de certification, sélectionnez Racine.

- Voici l’Organisation (O).

- Pour les options d’algorithme clé, sélectionnez RSA 2048.


- Ajoutez les tags s'il y en a (facultatif).
- Cochez la case dans la section Options d'autorisation de l'AC.
- Cochez la case dans la section Prix.
- Cliquez sur Créer pour créer le certificat d'autorité de certification.


- À partir des actions, Sélectionnez Installer le certificat d'autorité de certification.

- Cliquez sur Confirmer et installer.


Créer un ancrage de confiance
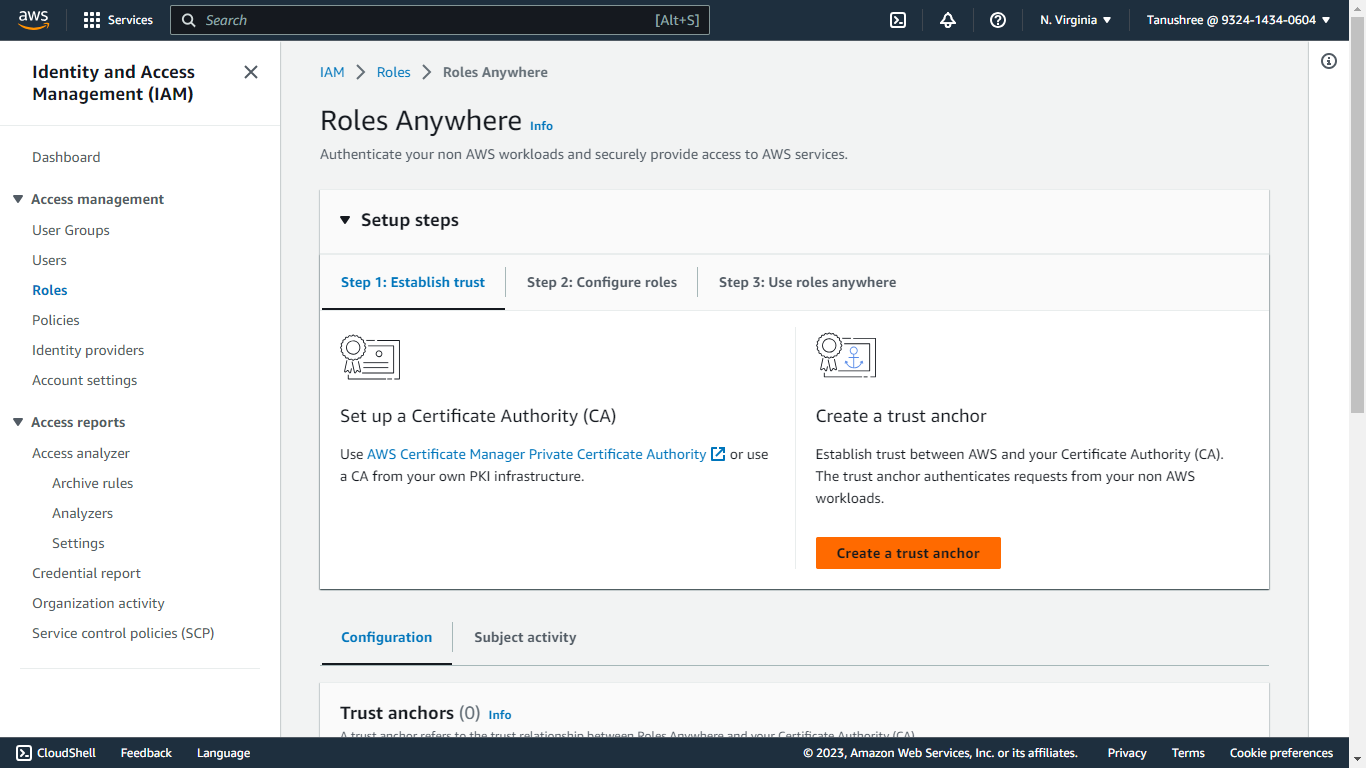
- Cherchez le service IAM , allez dans Rôles sous gestion d’accès, faites défiler jusqu’à Rôles n’importe où et sélectionnez Gérer.

- Cliquez sur Créer un ancre de confiance.
- Saisissez le nom d'une ancre de confiance.
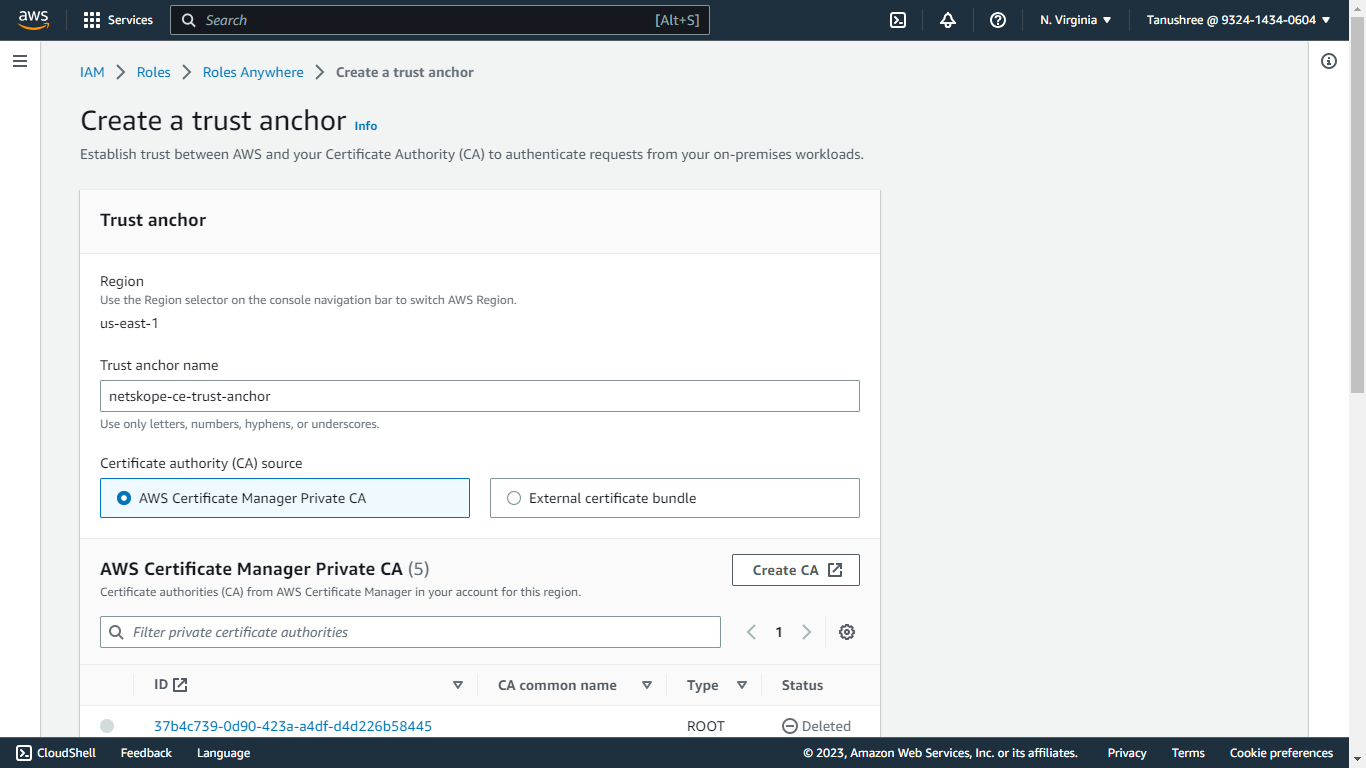
- Select AWS Certificate Manager Private CA (créé dans les étapes précédentes) comme source d'autorité de certification (CA). Select le certificat créé à l'étape précédente dans l'autorité de certification privée AWS.
- Ajoutez des étiquettes si nécessaire.
- Cliquez : Créer un ancrage de confiance.

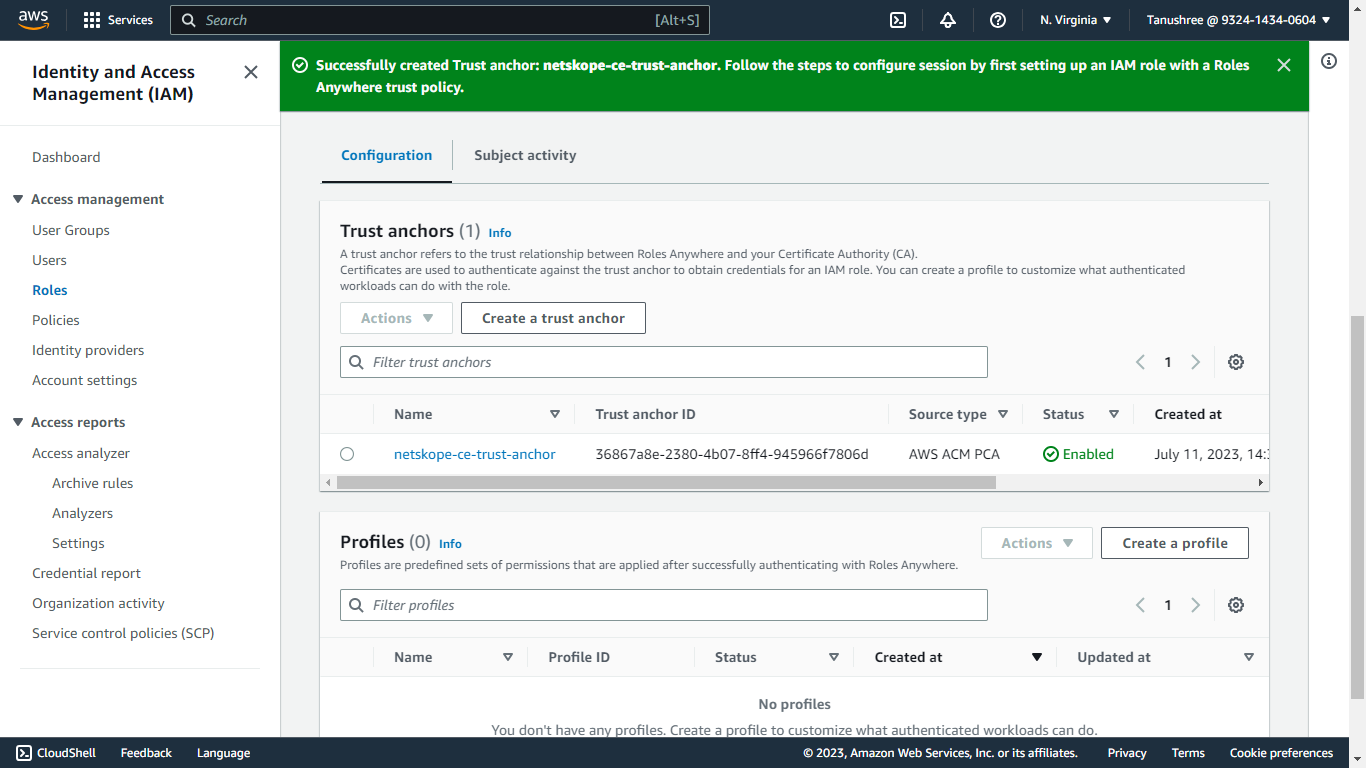
- Cliquez sur l'ancre de confiance créée et copiez l' ARN de l'ancre de confiance. Ce paramètre sera requis dans la configuration du plugin « Trust Anchor ARN » pour la méthode d'authentification AWS IAM Roles Anywhere.

Créer un rôle IAM
- Allez sur IAM services dans la console AWS.
- Cliquez sur Rôle dans le sous-menu Gestion de l'accès.
- Cliquez sur Créer un rôle.

- Dans le type d'entité de confiance, sélectionnez Stratégie de confiance personnalisée.

- Remplacez la politique de confiance personnalisée par cette politique de confiance. Cette politique contient les autorisations pour l'utilisation du service Rôles n'importe où :
{
    "Version": "2012-10-17",
    "Statement": [
        {
            "Effect": "Allow",
            "Principal": {
                "Service": [
                    "rolesanywhere.amazonaws.com"
                ]
            },
            "Action": [
                "sts:AssumeRole",
                "sts:TagSession",
                "sts:SetSourceIdentity"
            ]
        }
    ]
}
- Cliquez sur Suivant.
- Dans les politiques d'autorisation, sélectionnez la politique créée dans Créer une politique AWS Security Hub.
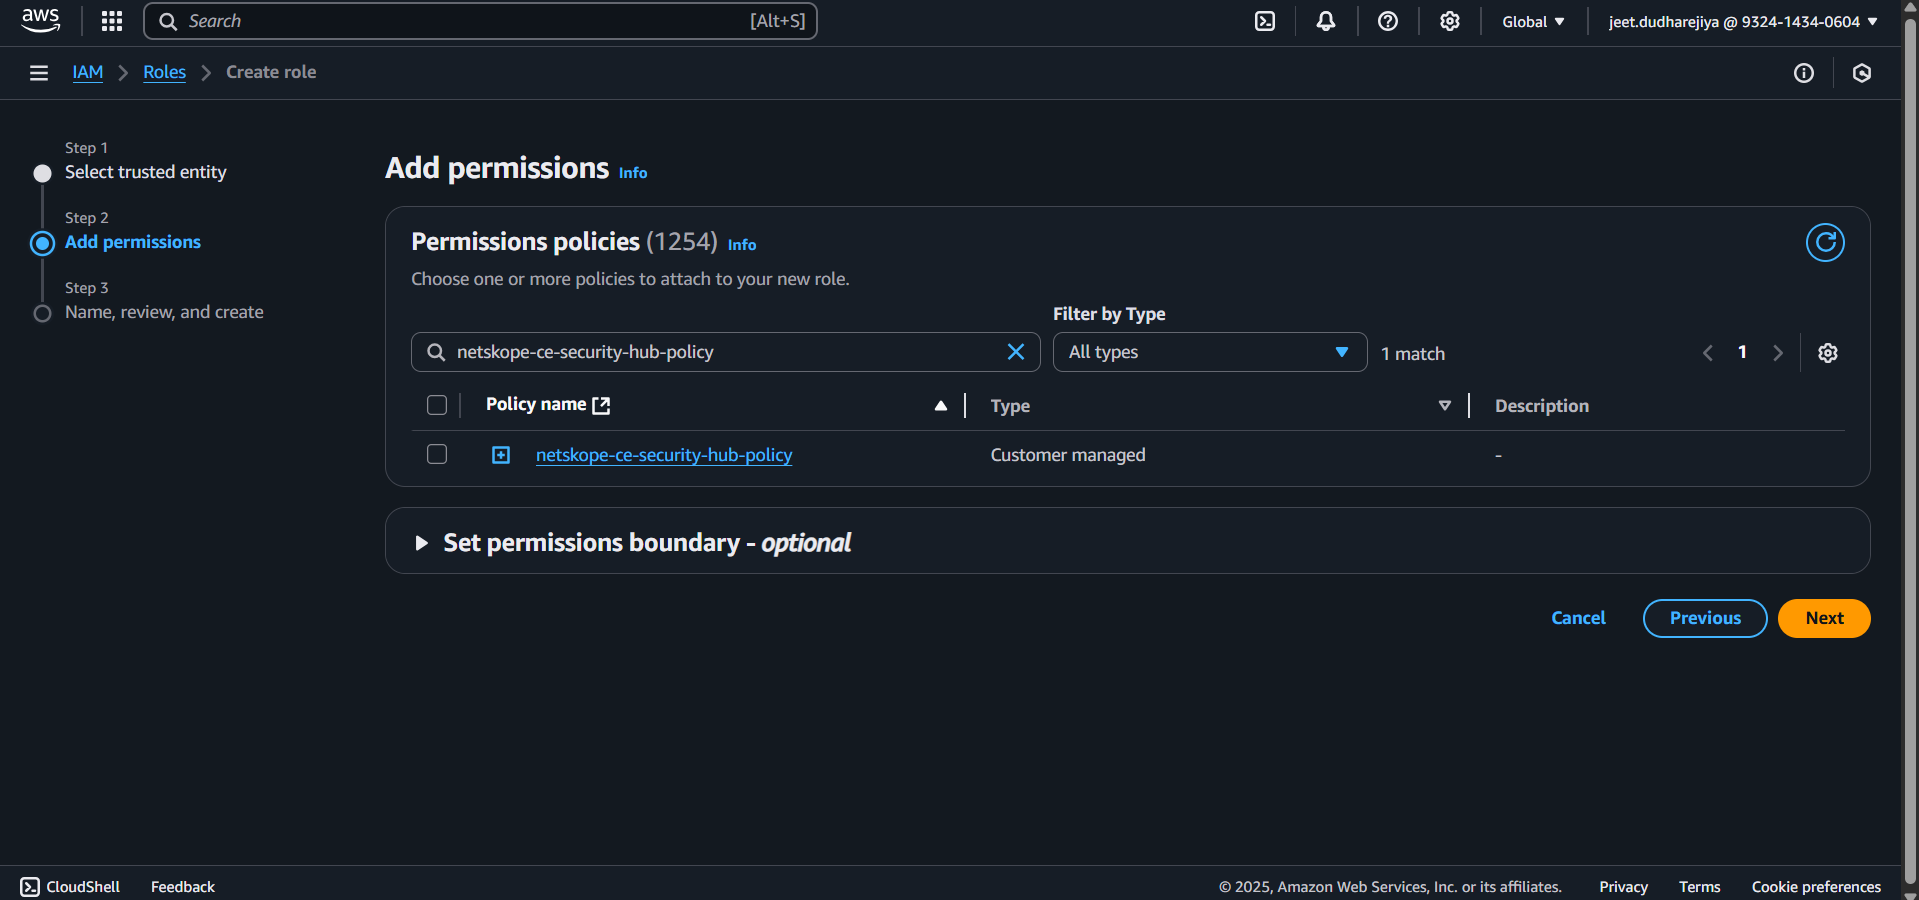
- Cliquez sur Suivant.
- Indiquez un nom de rôle (par exemple Netskope-ce-aws-verified-access-role) et une description pour ce rôle.
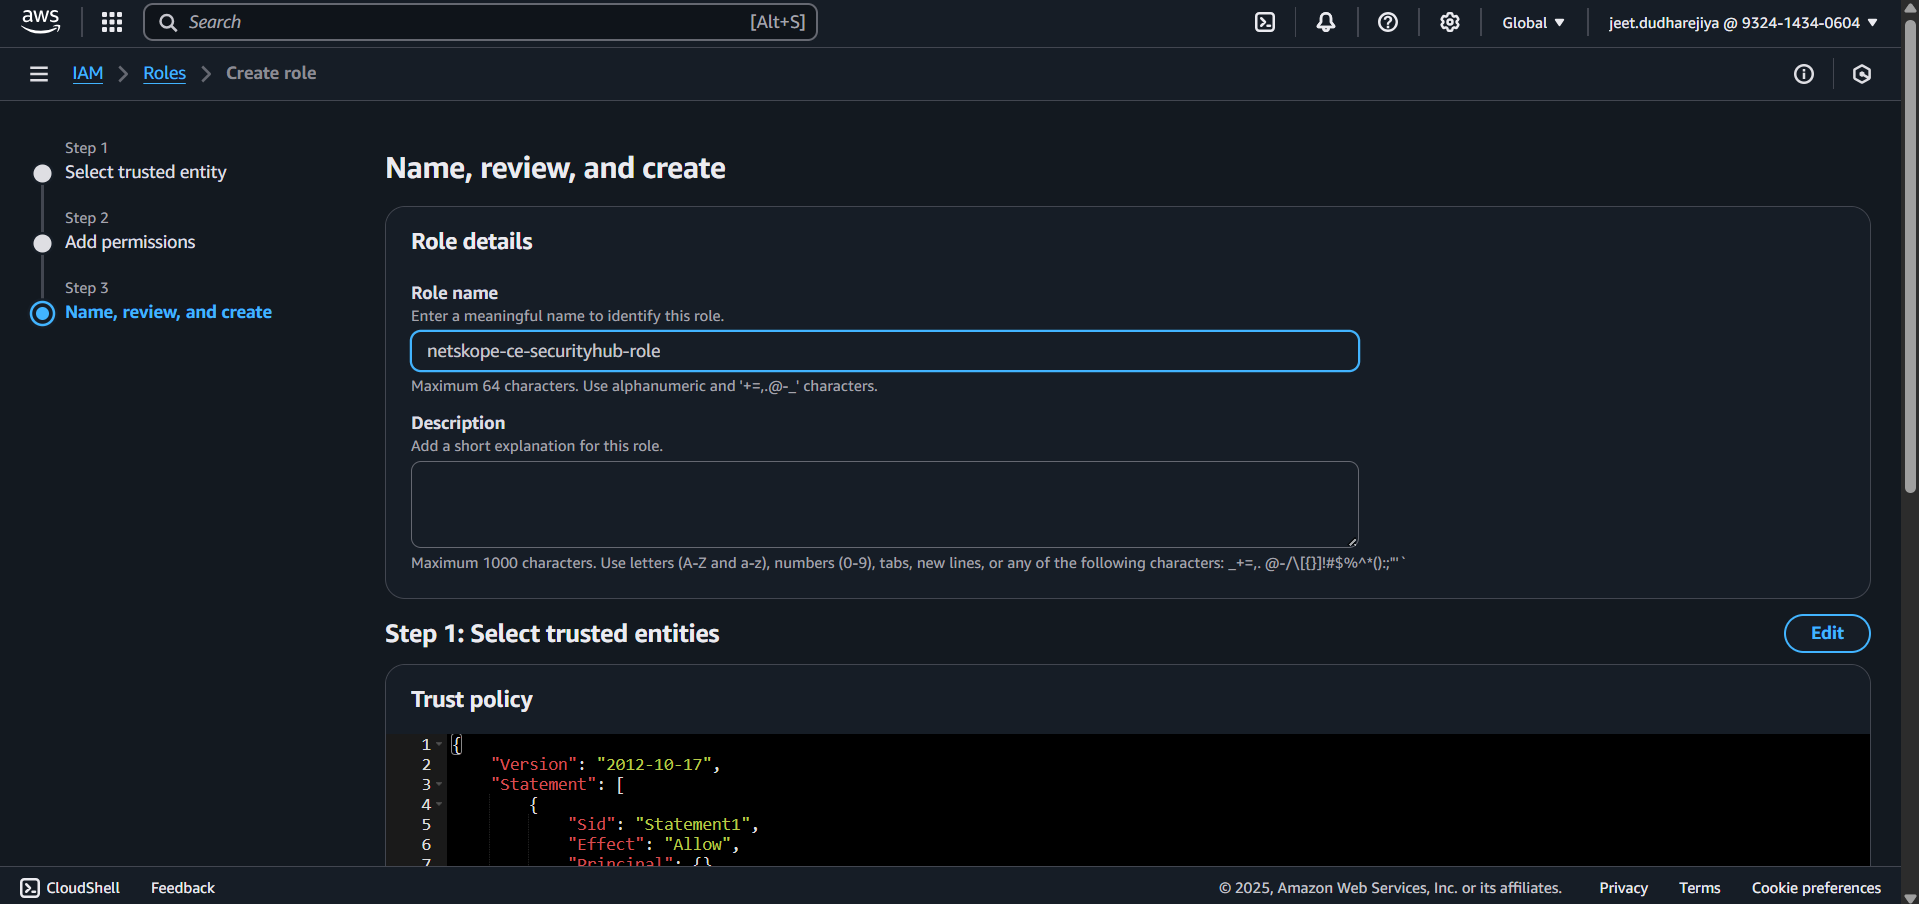
- Cliquez sur Créer un rôle. Recherchez le poste créé et cliquez sur le nom du rôle.
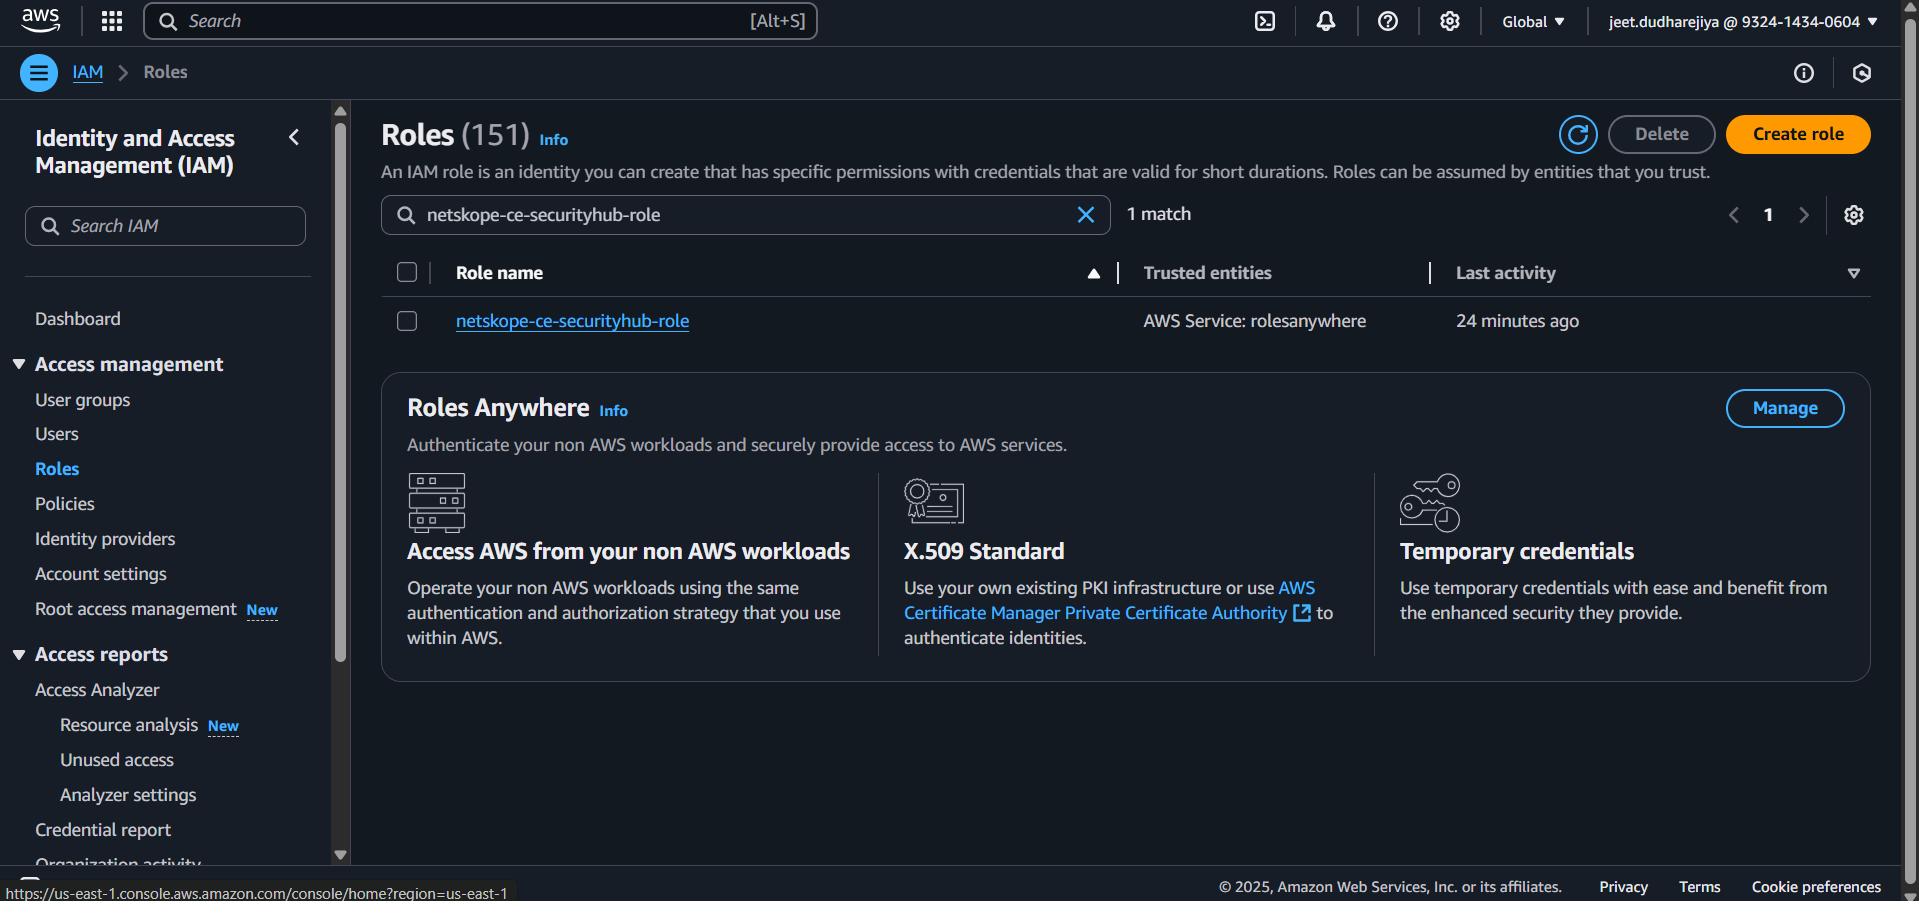
- Notez l'ARN du rôle.Il sera requis dans le paramètre ARN du rôle de la configuration du plugin pour la méthode d'authentification AWS IAM Roles Anywhere.

Créer un profil
- Select Rôles sous Gestion de l'accès.
- Faites défiler jusqu’à Rôles n’importe où et cliquez sur Gérer.

- Développez les étapes de la configuration.
- Cliquez sur Étape 2 : Configurer les rôles.
- Cliquez sur Configurer un profil.

- Saisissez un nom de profil.
- Select the role created in the Create IAM Role section.
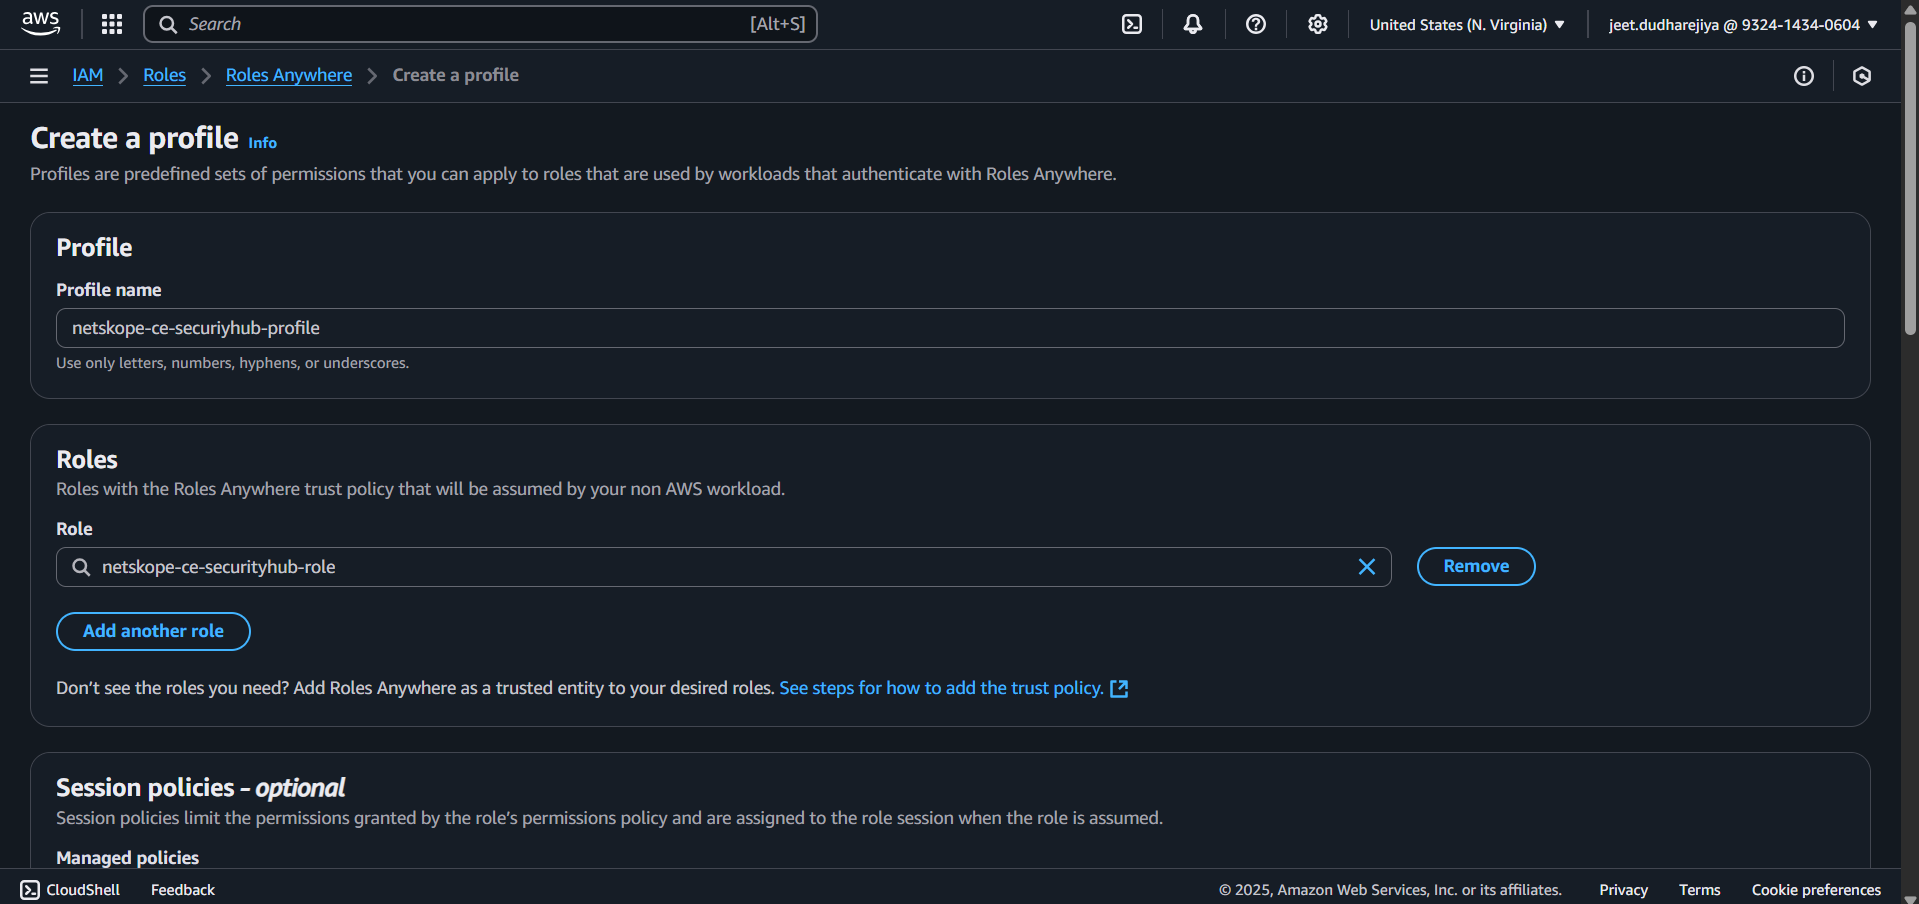
- Supprimez la politique d’assurance en ligne.

- Cliquez sur Créer un profil.

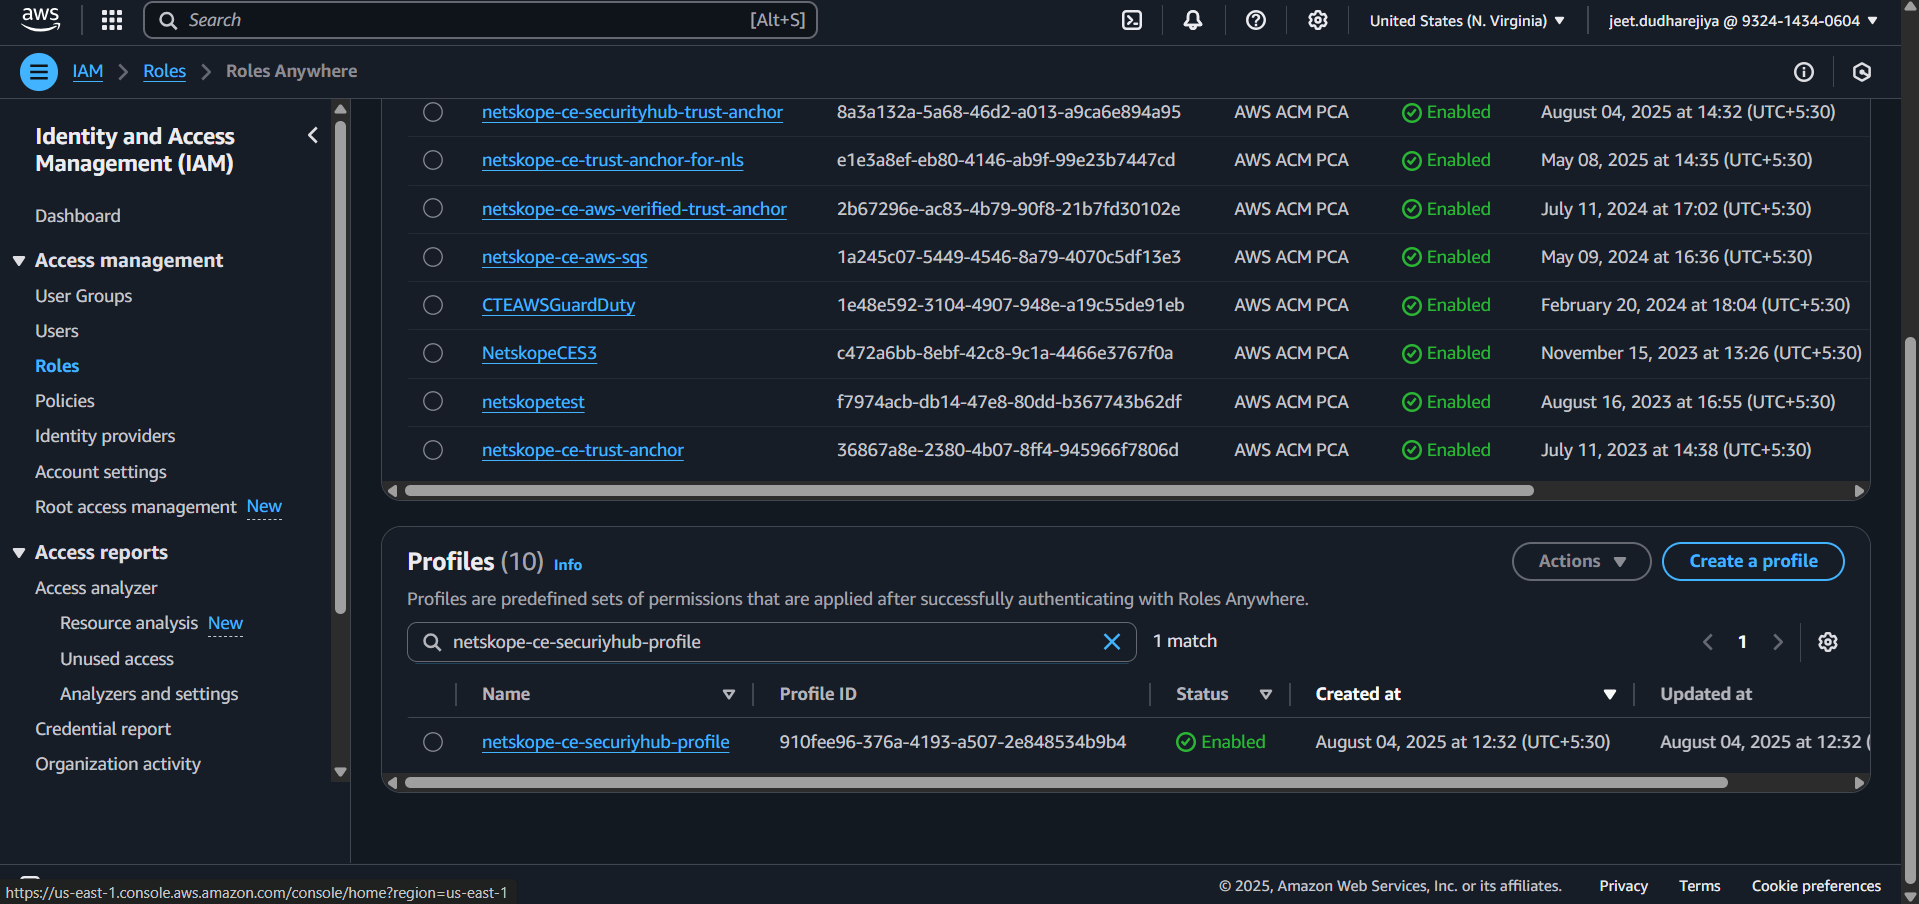
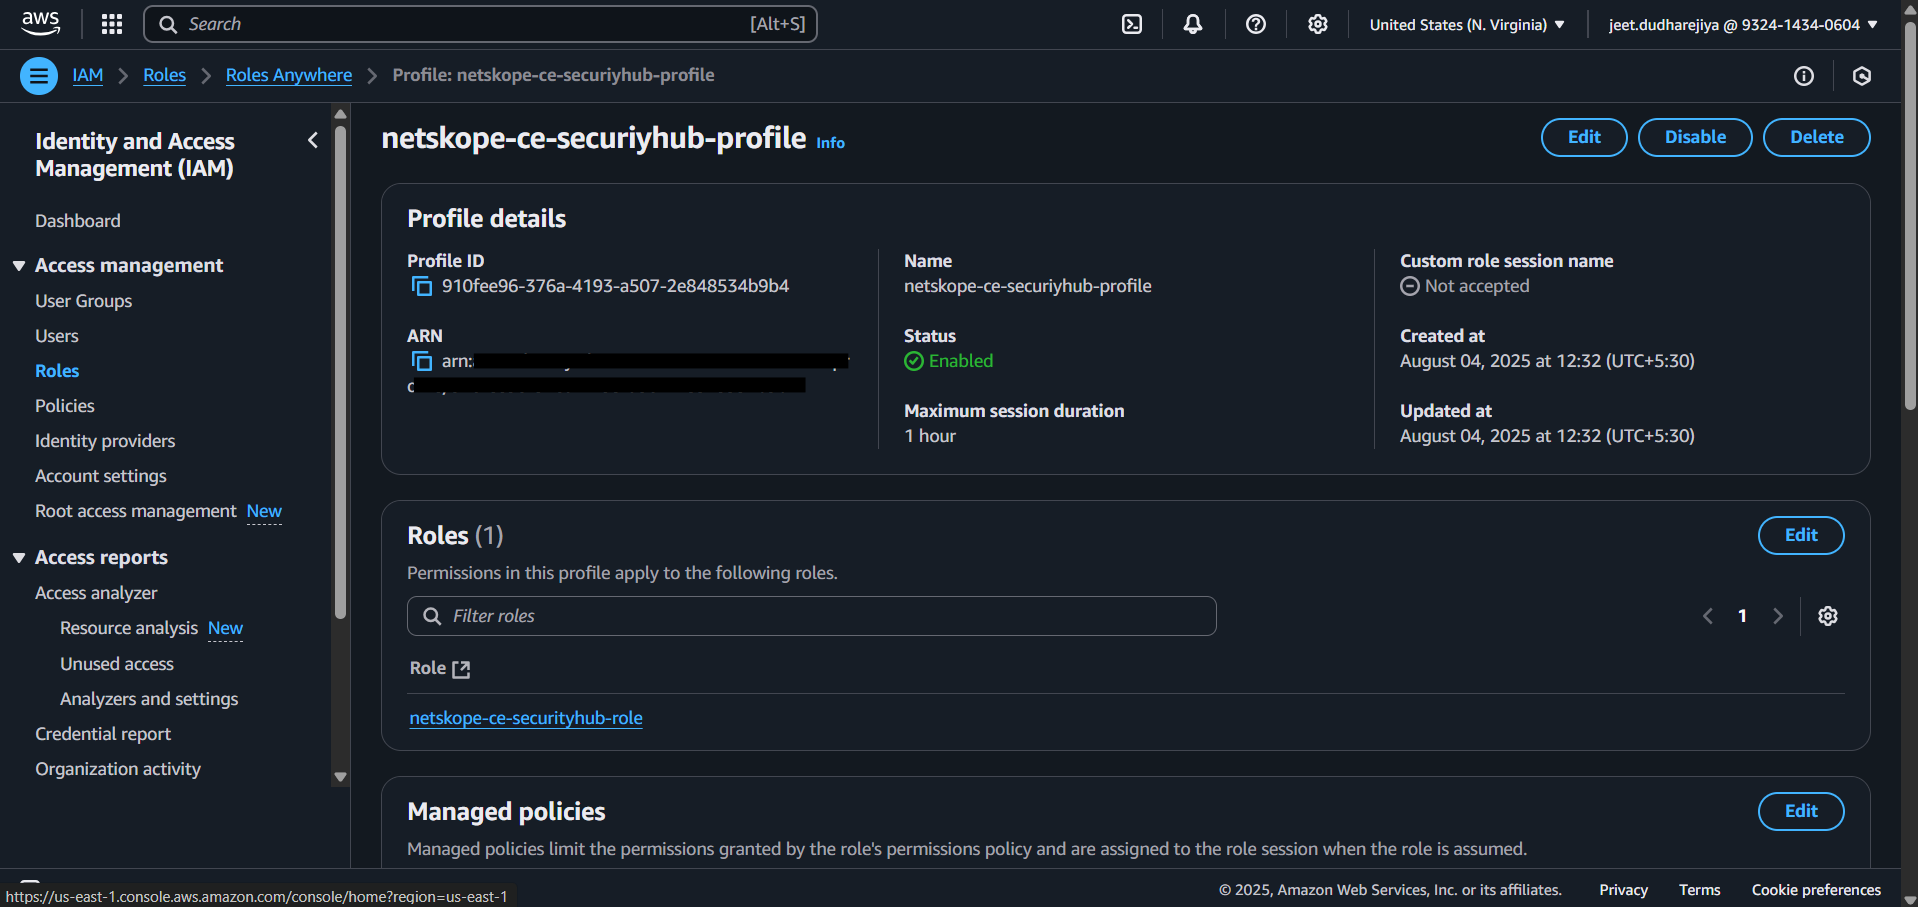
- Select le profil créé et copiez l'ARN du profil.
Demander un certificat privé
- Allez sur AWS Certificate Manager > Request certificate.
- Select Demandez un certificat privé.

- Cliquez sur Suivant.
- Select l'autorité de certification créée à l'étape précédente.

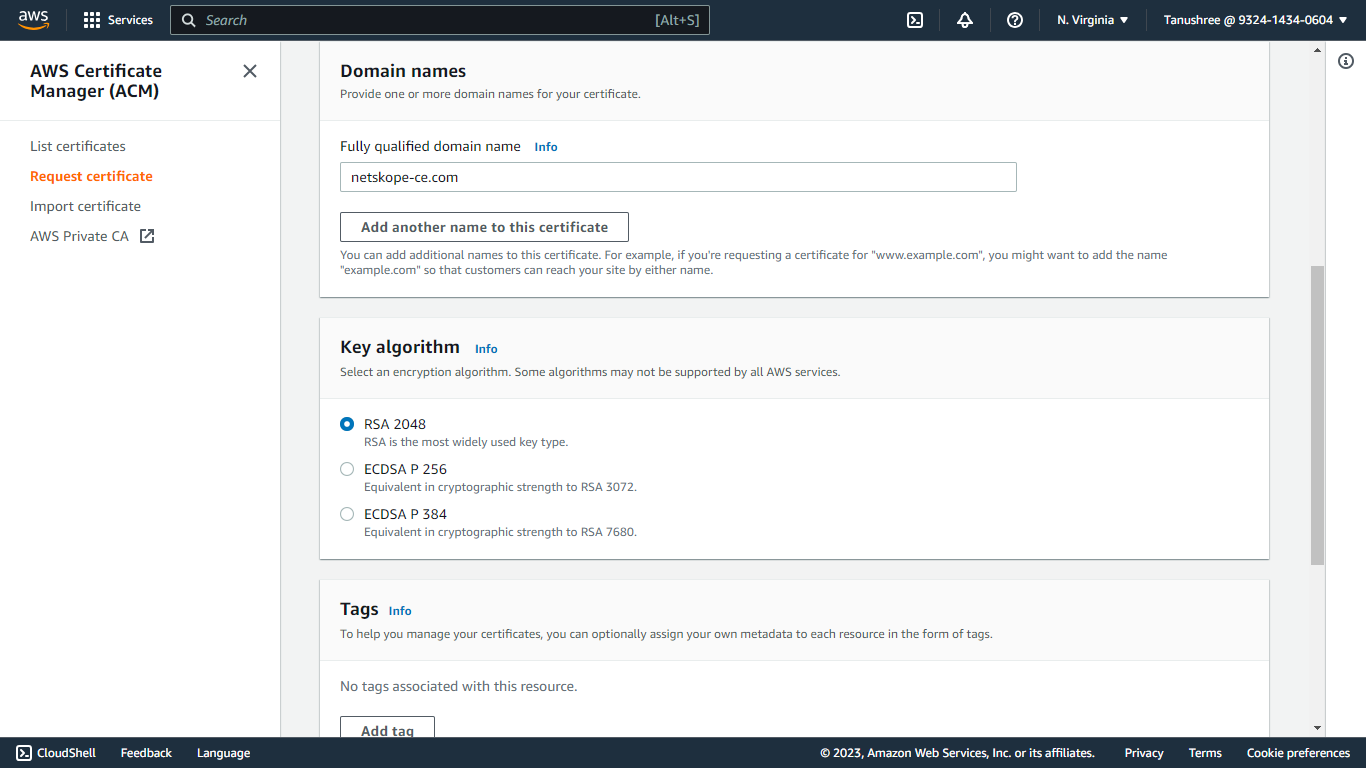
- Indiquez un nom de domaine dans le champ Fully qualified domain name, comme Netskope-ce-verified-access.com.
- Select RSA 2048 comme algorithme de clé.
- Ajoutez des étiquettes si nécessaire.
- Confirmez les autorisations de renouvellement du certificat.
- Cliquez sur Demander.

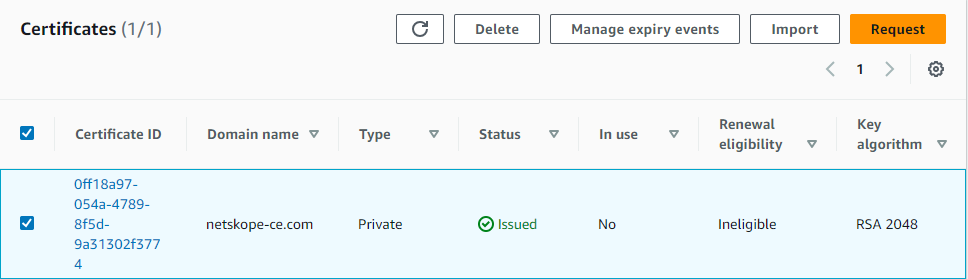
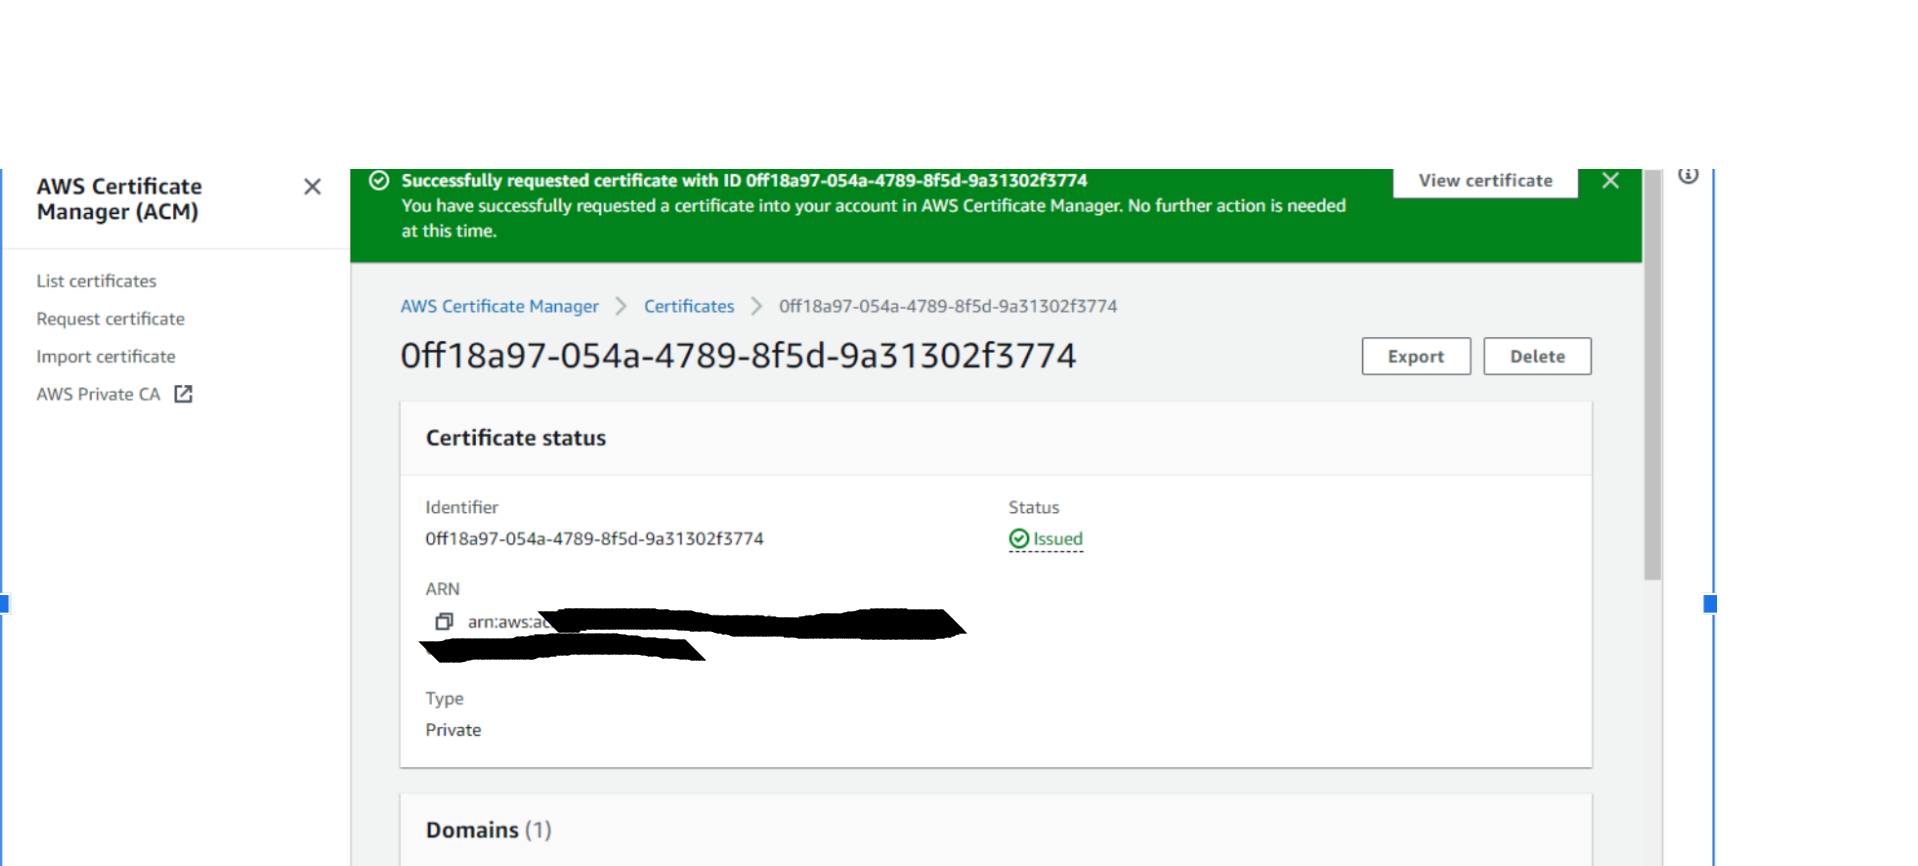
- Dans le volet de navigation d'AWS Certificate Manager, cliquez sur List certificates.
- Select le certificat créé précédemment.
- Cliquez sur Exporter.
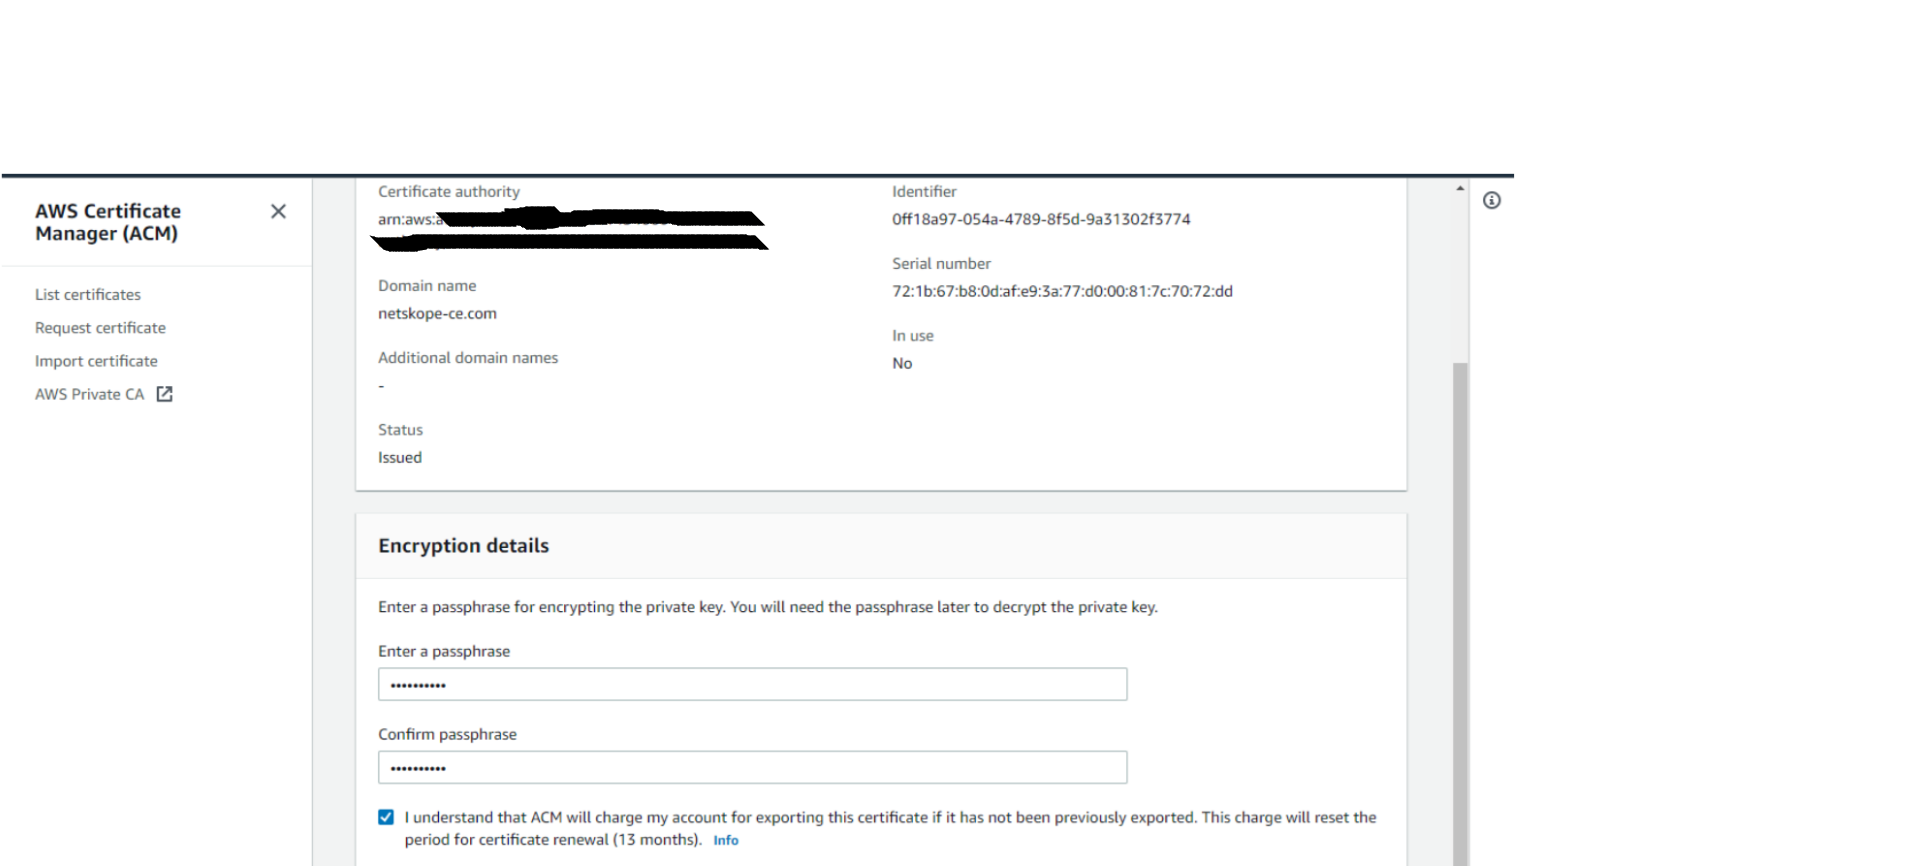
- Enter a passphrase. Make a note of the passphrase as it will be required for the Configuration of the AWS Security Lake Plugin using the AWS IAM Roles Anywhere Authentication method.
- Cliquez sur Générer un codage PEM.
- Téléchargez tout Certificats car elle ne sera plus visible. Pour New certificats, vous devrez les exporter à nouveau.
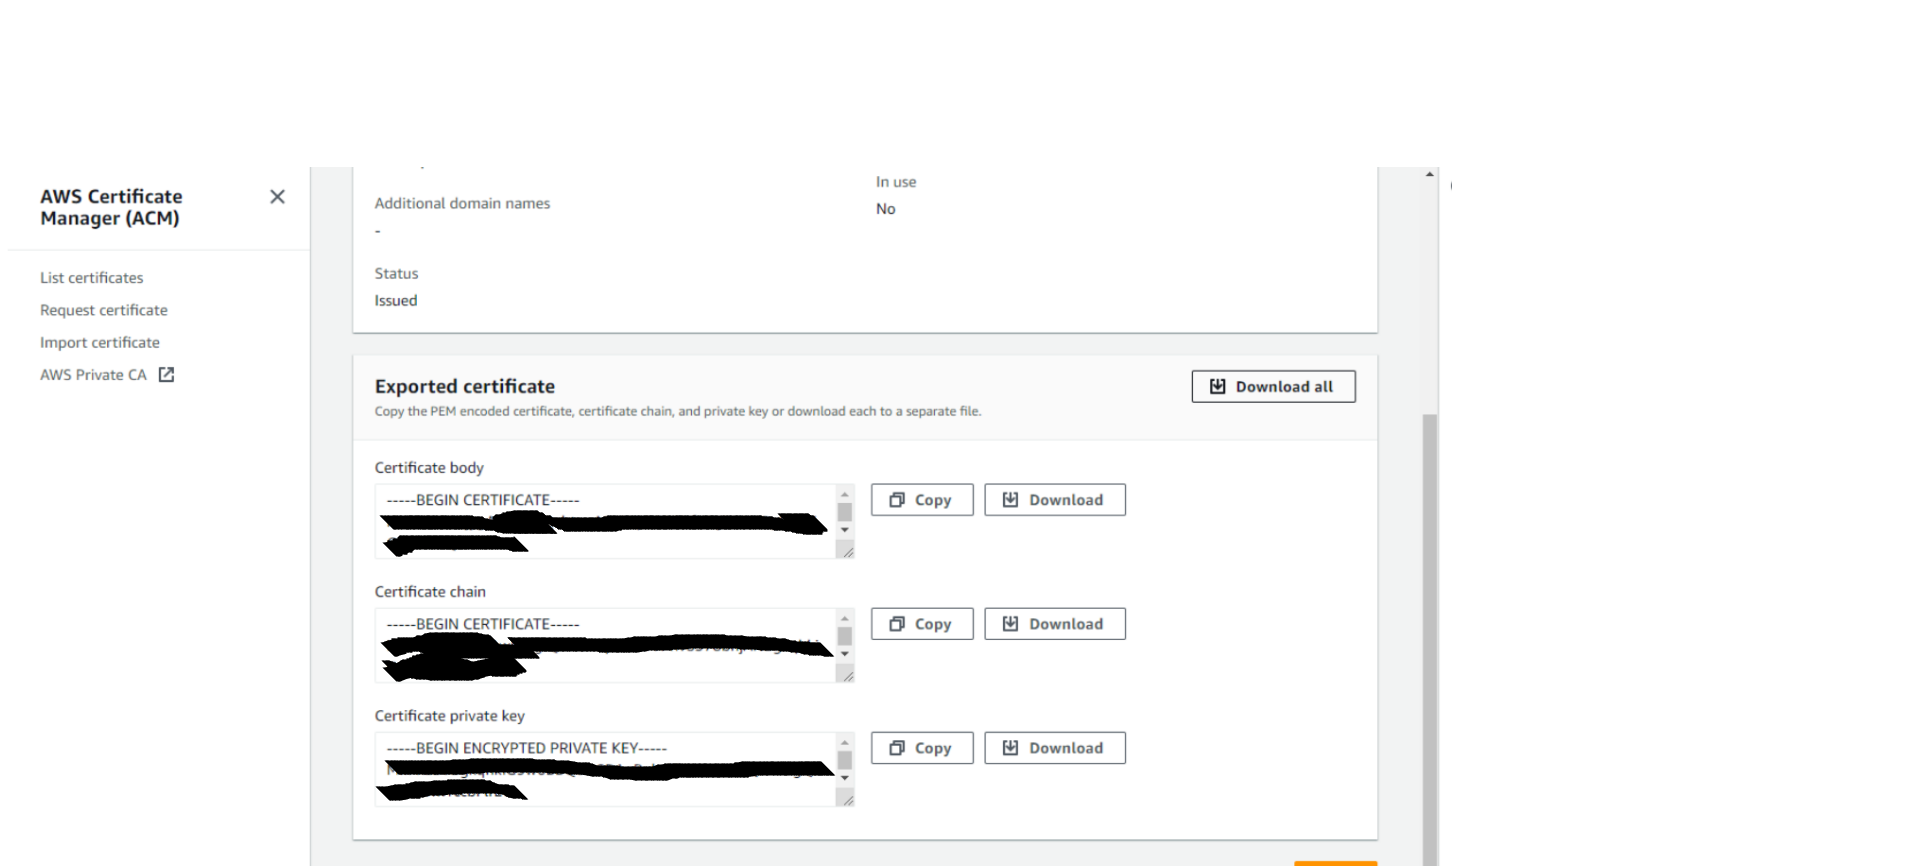
L’organisme du certificat, Certificate Private Key, sera nécessaire pour la configuration du plugin AWS Verified Access en utilisant la méthode d’authentification AWS IAM Roles Anywhere . Pour plus d’informations, rendez-vous sur AWS IAM Role Anywhere.
Authentification AWS
Créer un rôle
- Allez dans les services IAM dans la console AWS.
- Cliquez sur Créer un rôle.

- Select le service AWS.
- Sous Cas d'utilisation, sélectionnez EC2.
- Cliquez sur Suivant.

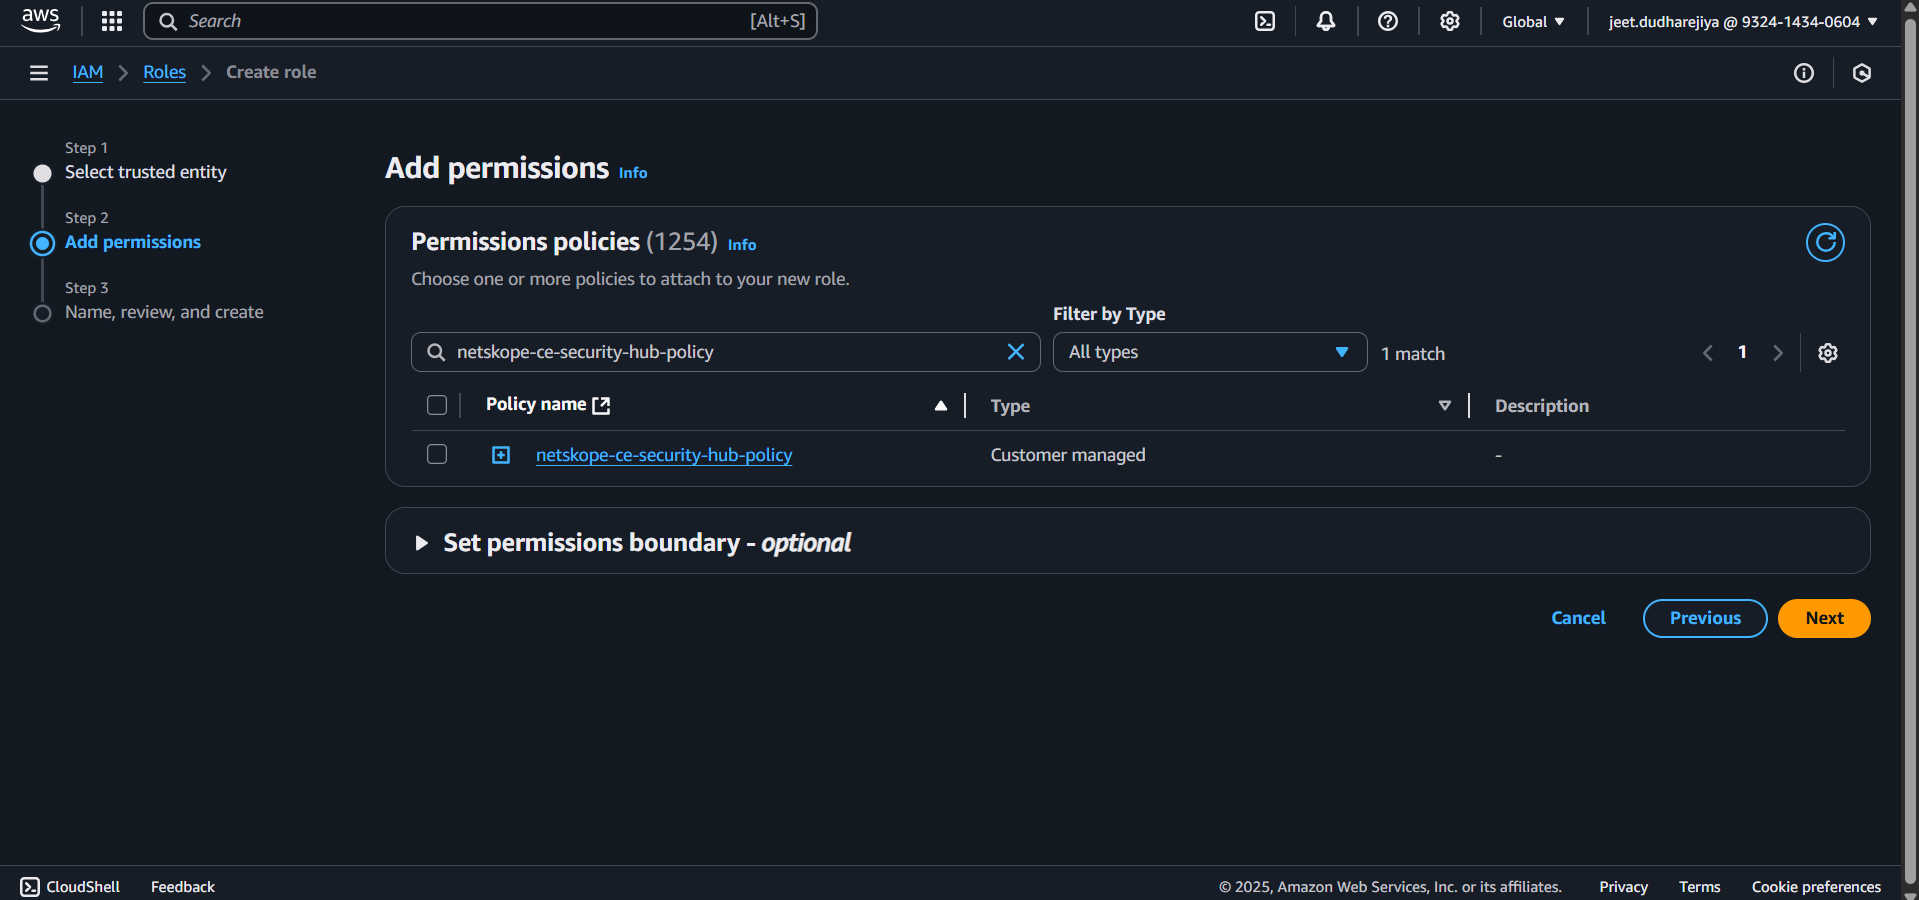
- Select la stratégie d'autorisation créée dans Créer une stratégie AWS Security Hub.
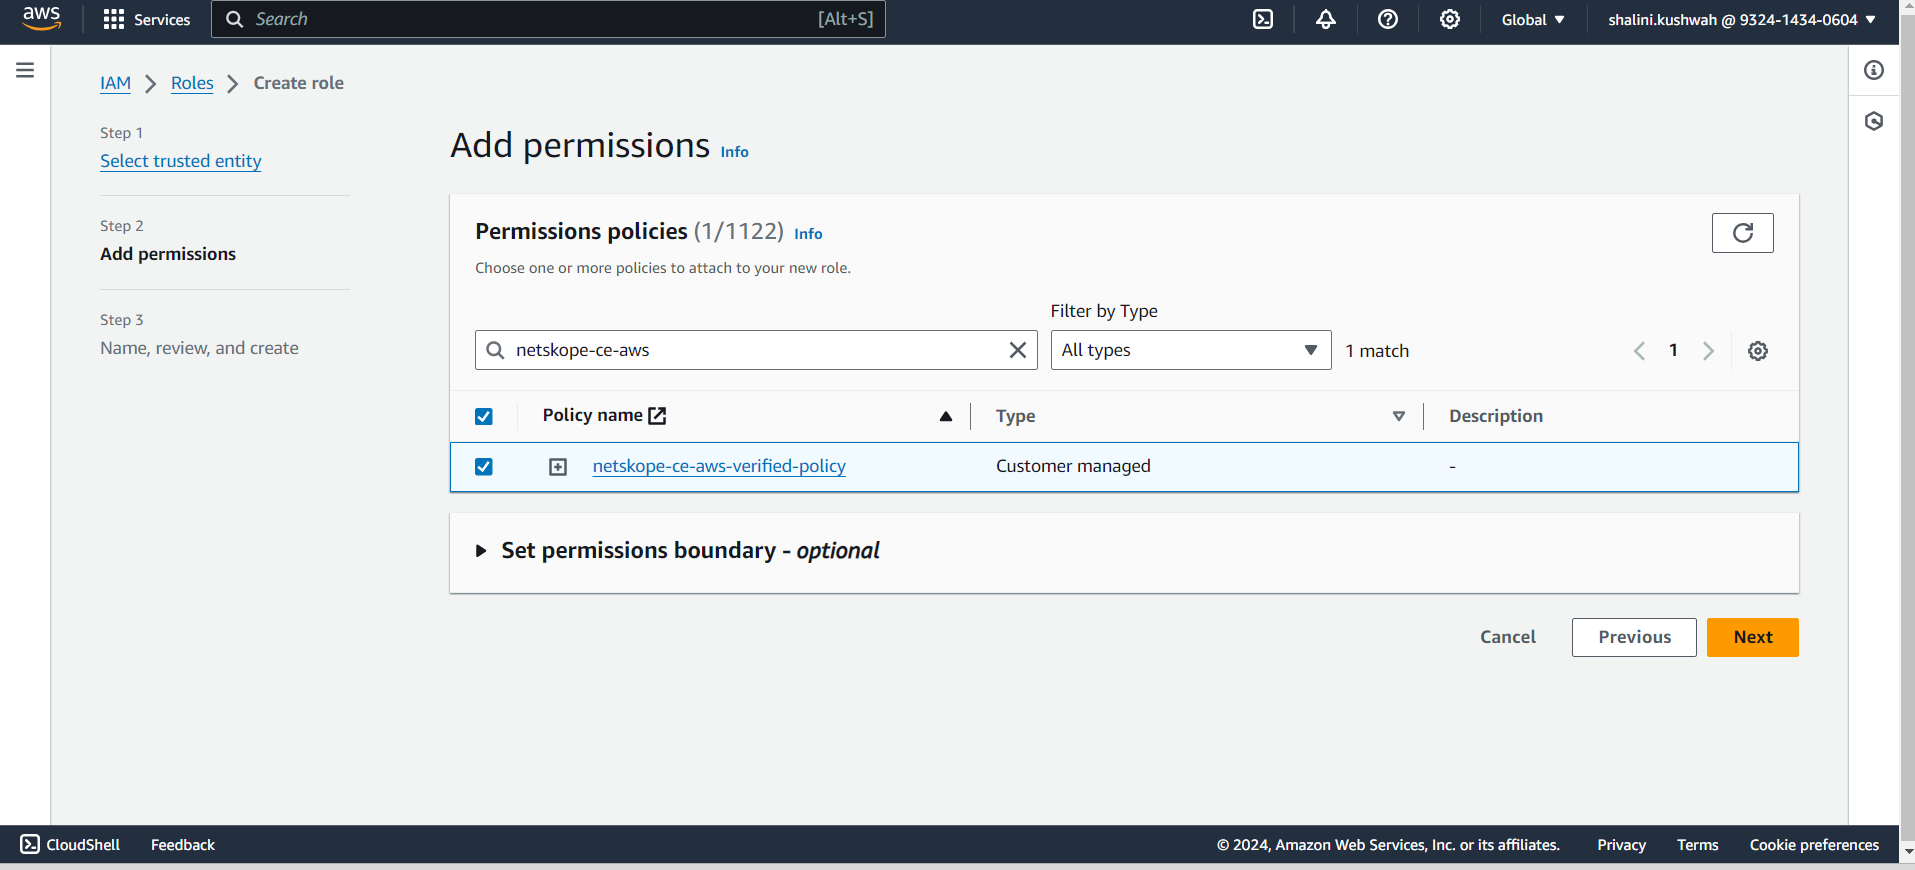
- Cliquez sur Suivant.
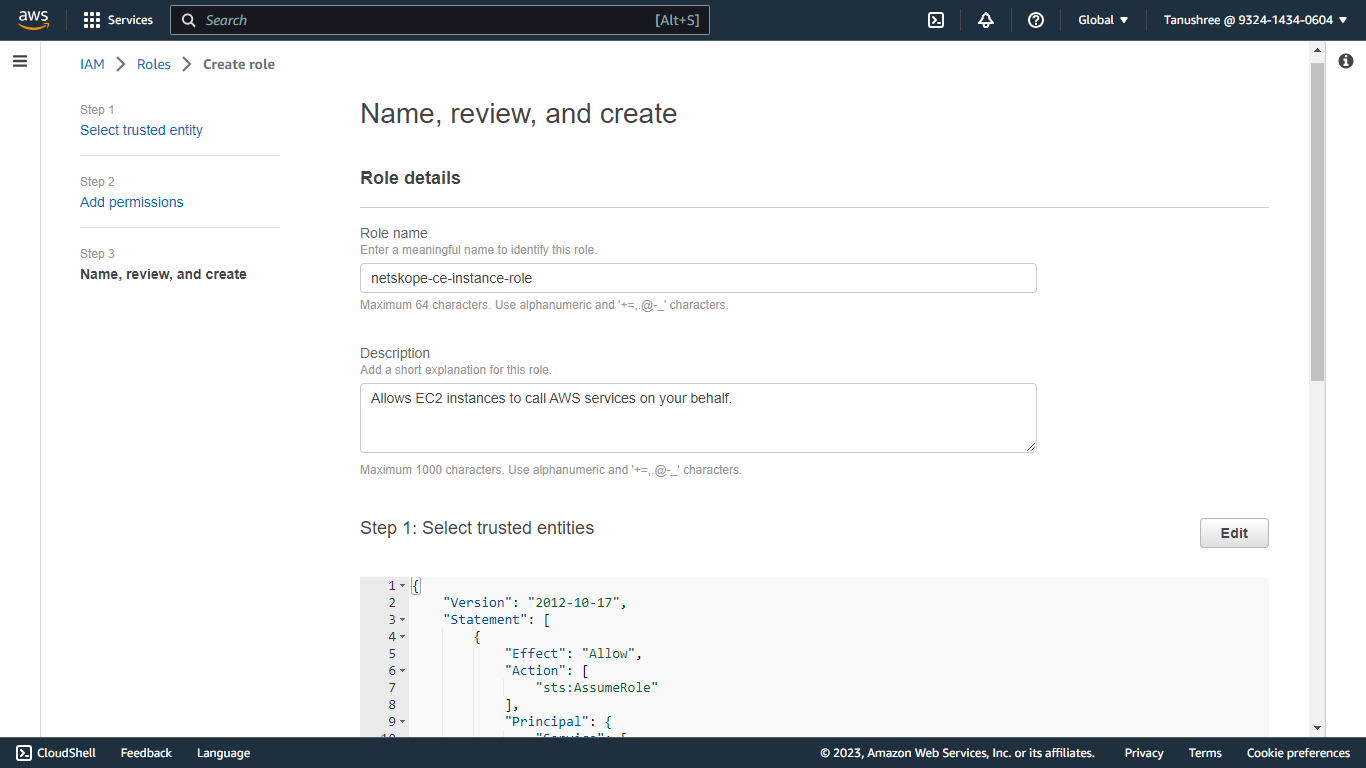
- Saisissez un nom de rôle et une description.
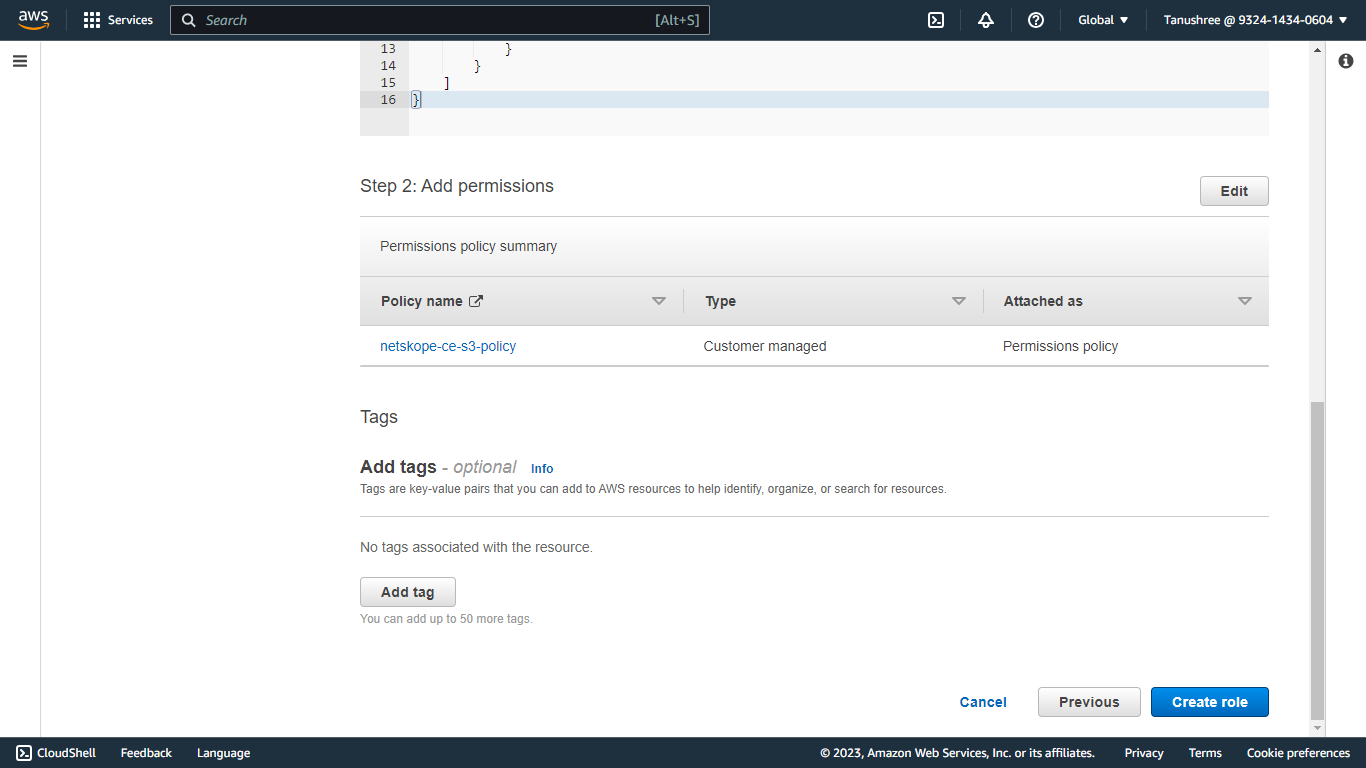
- Cliquez sur Créer un rôle.
Attribuer un rôle à une instance EC2
- Connectez-vous à la console de votre instance EC2.
- Cliquez sur Instances sous Instances.


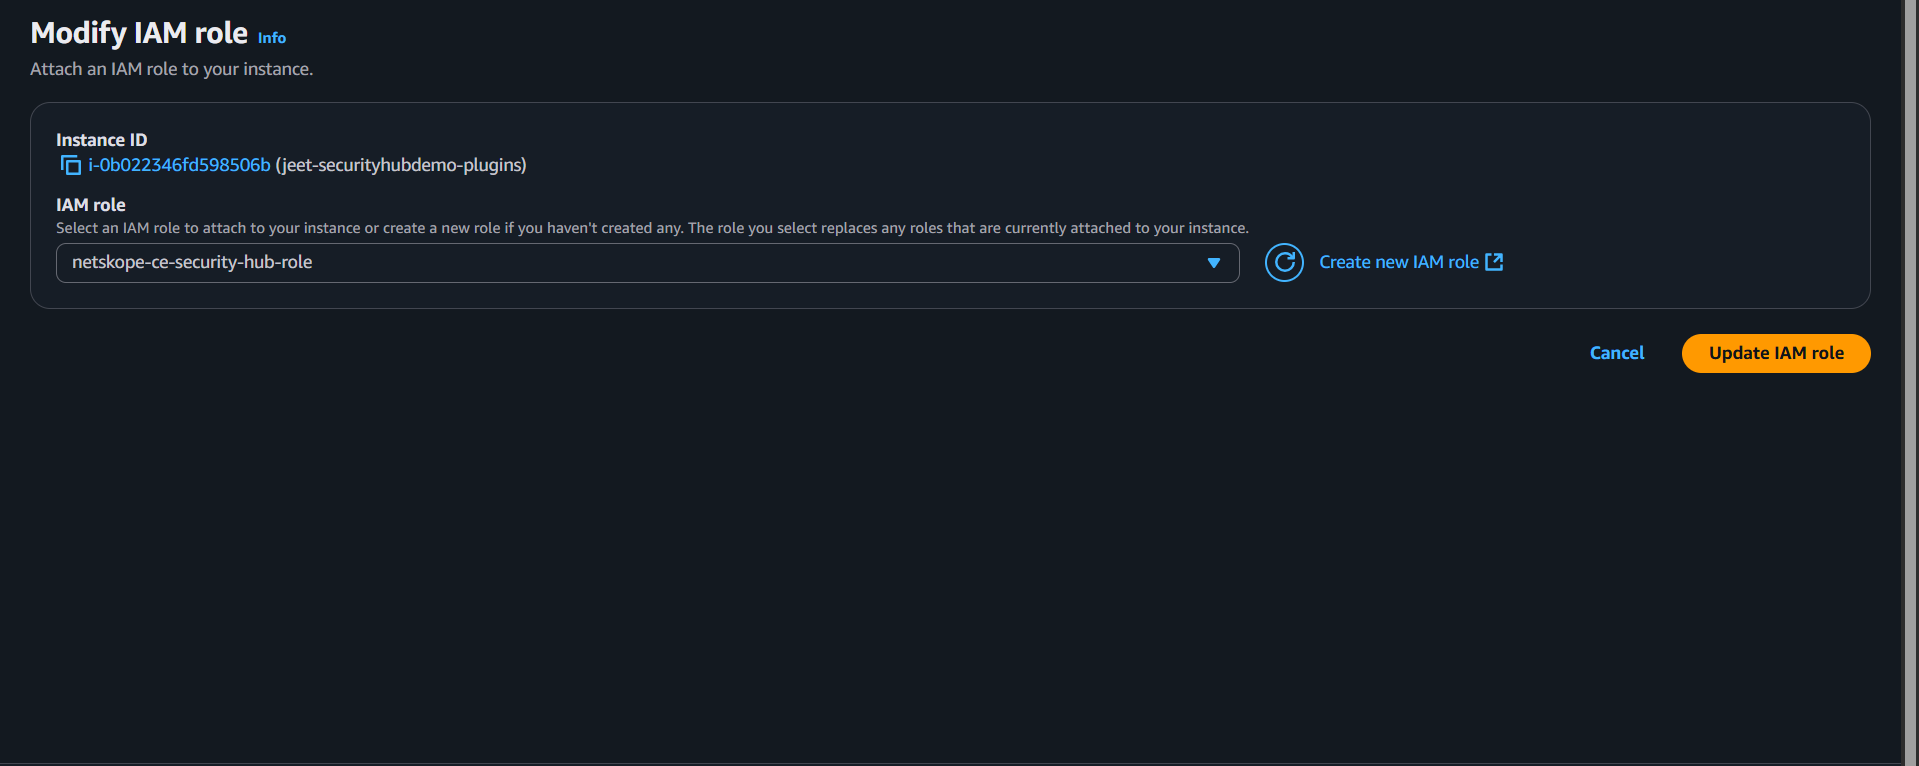
- Accédez à Action > Sécurité > Modifier le rôle IAM.

- Select le rôle que vous avez créé ci-dessus dans Créer un rôle. (Netskope-ce-instance-role).
- Cliquez sur Ajouter un rôle IAM ou Modifier un rôle IAM. Notez que l'instance EC2 et la file d'attente doivent se trouver dans la même région.
Configure the AWS Inspector Plugin
-
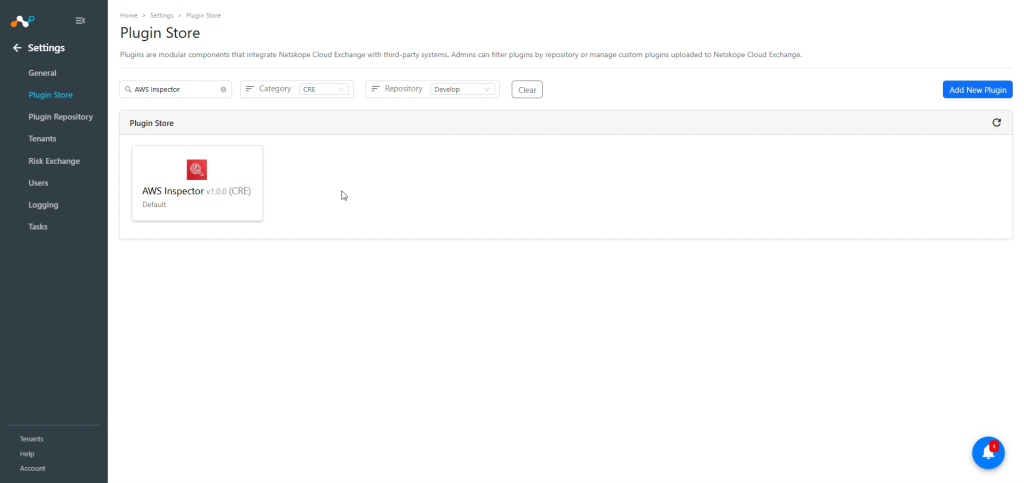
Dans Cloud Exchange, allez sur Settings > Plugin Store. Recherchez et sélectionnez le plugin AWS Inspector v1.0.0 (CRE).
-
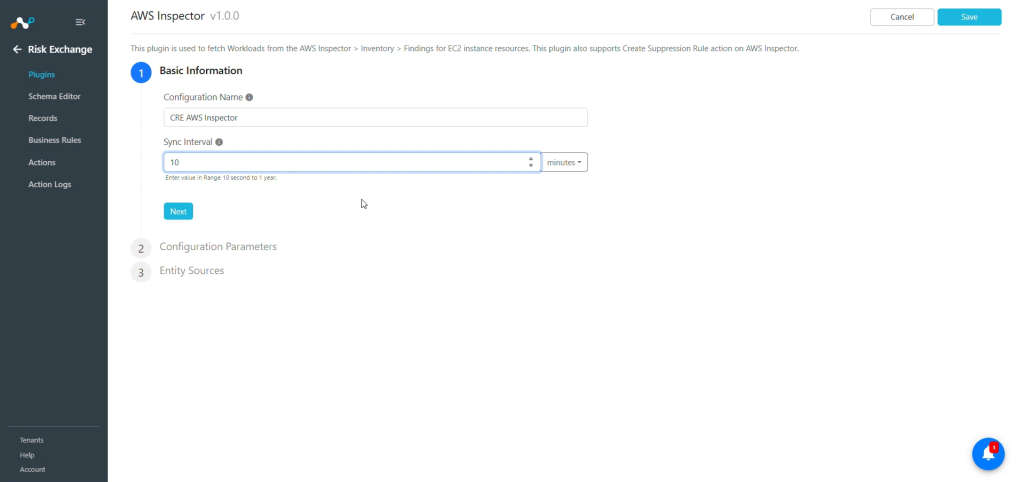
Add plugin configuration name and change sync interval if needed.
-
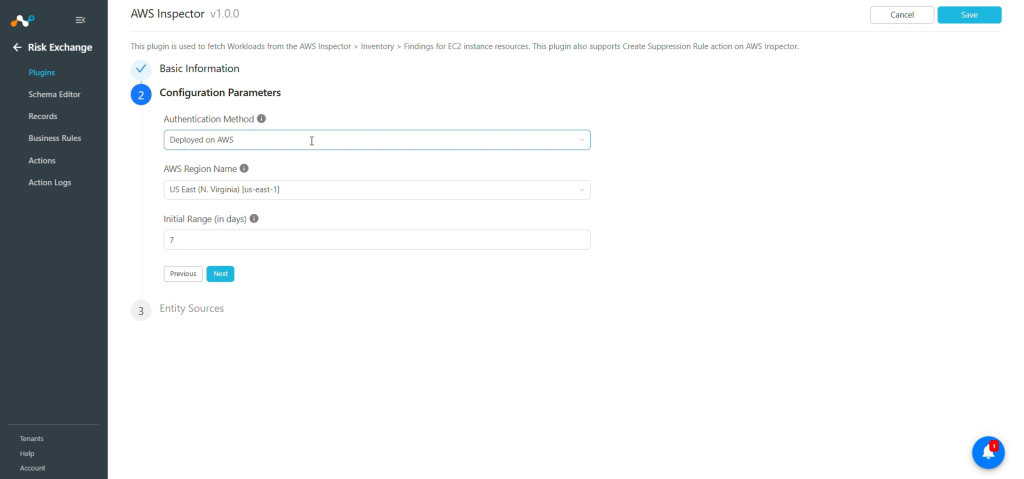
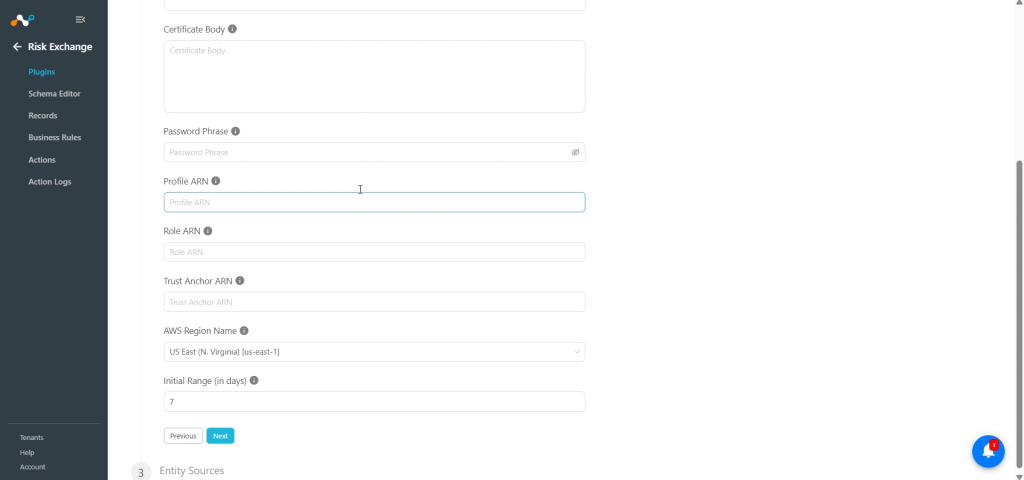
Cliquez sur Next et sur les paramètres de configuration :
-
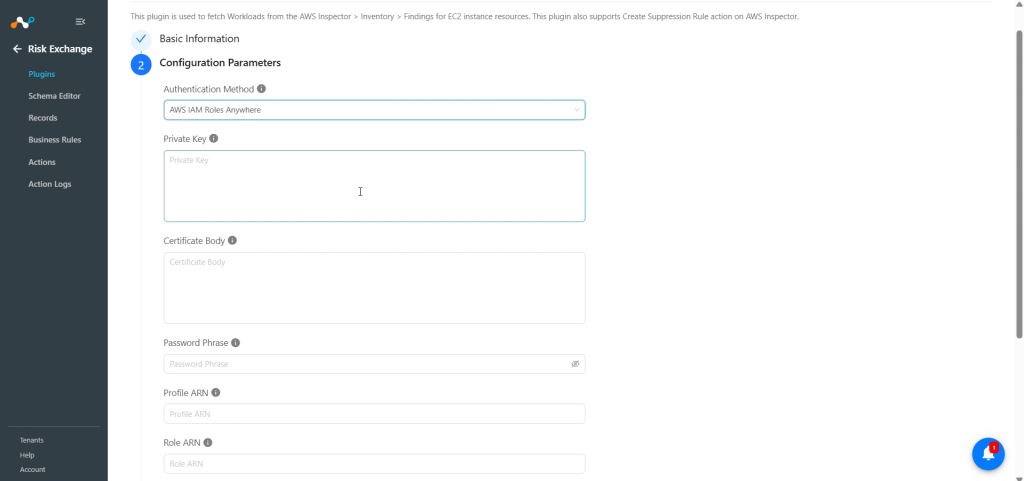
Authentication Method: Select la méthode à utiliser pour l'authentification (déployé sur AWS/AWS IAM Roles Anywhere)
-
Private Key: Clé privée pour décrypter le certificat privé de l'autorité de certification AWS. Requis pour le type d'authentification AWS IAM Roles Anywhere.
-
Certificate Body: Organisme de certification pour le certificat d'autorité de certification public/privé AWS. Requis pour le type d'authentification AWS IAM Roles Anywhere.
-
Password Phrase: Password Phrase for decrypting the CA Certificate. Required for the AWS IAM Roles Anywhere authentication type authentication type.
-
Profile ARN: ARN du profil AWS pour l'authentification du client AWS. Requis pour le type d'authentification AWS IAM Roles Anywhere.
-
Role ARN: ARN du rôle AWS pour l'authentification du client AWS. Requis pour le type d'authentification AWS IAM Roles Anywhere.
-
Trust Anchor ARN: ARN de l'Ancre de confiance AWS pour l'authentification du client AWS. Requis pour le type d'authentification AWS IAM Roles Anywhere.
-
AWS Region Name: Nom de la région AWS. Assurez-vous que le nom de la région correspond à celui de l'ARN du profil et de l'ARN de l'ancre de confiance.
-
Initial Range: Nombre de jours pour extraire les données pour l'exécution initiale.
-
-
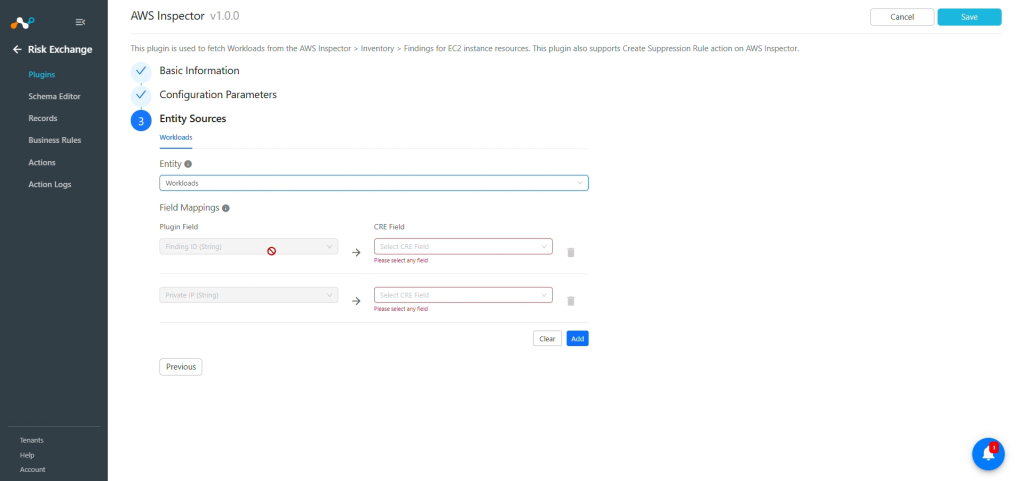
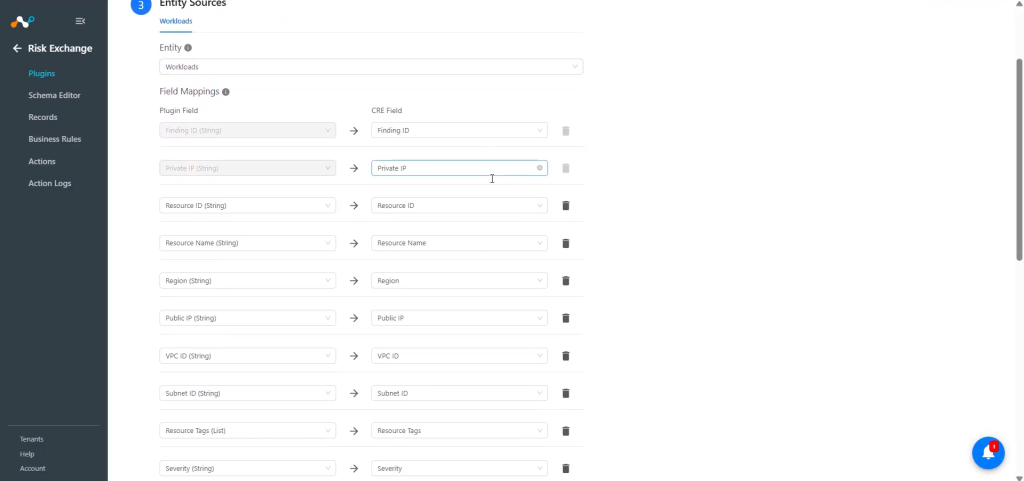
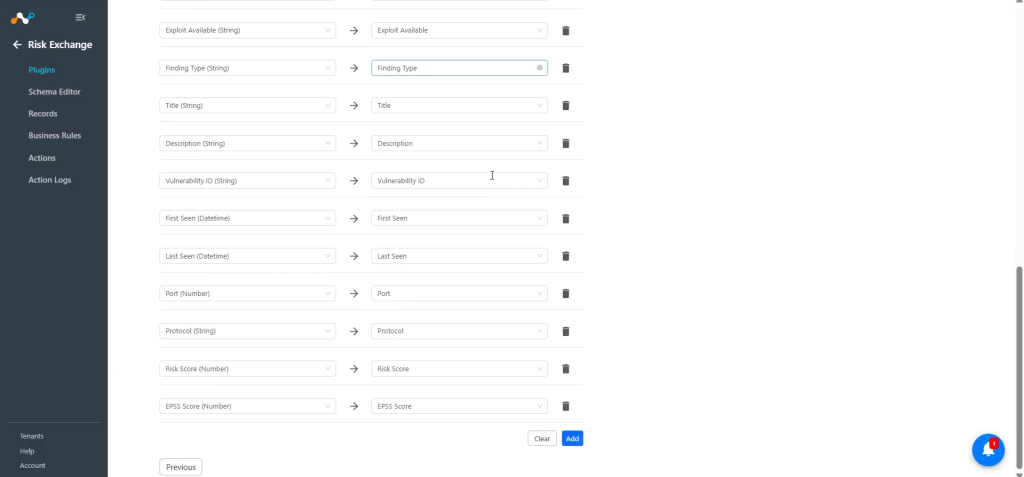
Cliquez sur Next et sélectionnez l'entité requise dans la liste déroulante Entité . Fournissez les mappages de champs conformément à vos exigences. Vous pouvez en créer un New en cliquant sur Add.
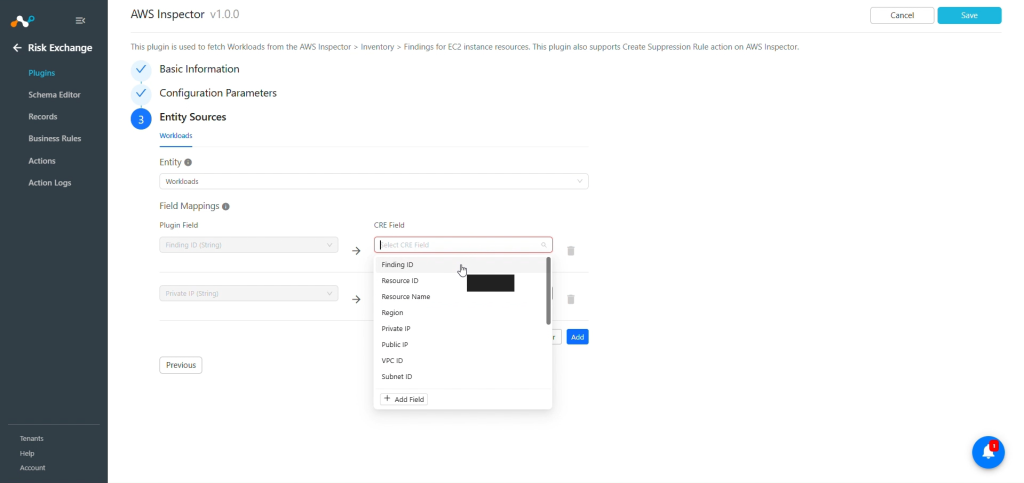
Pour créer un champ New, cliquez sur Add field.
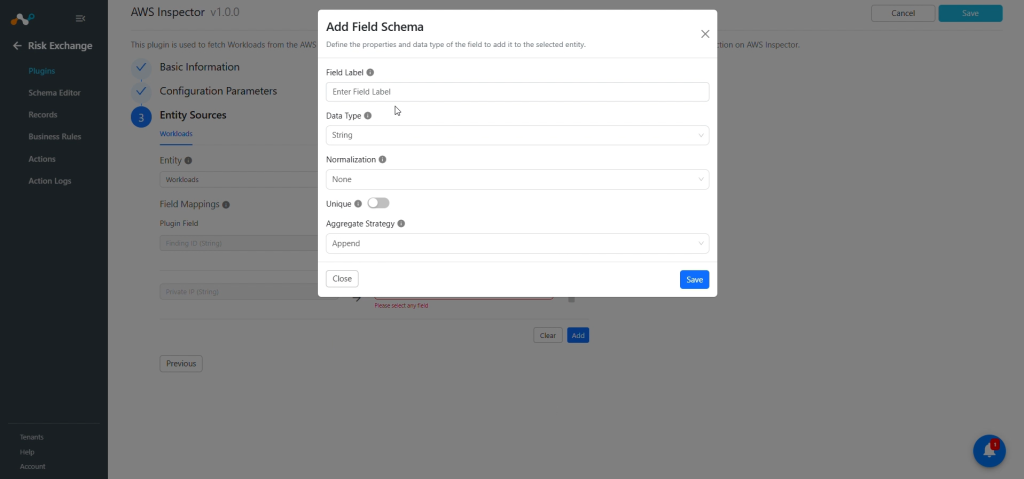
Indiquez l’étiquette de champ, le type de données, la normalisation et la stratégie d’agrégation selon vos besoins, puis cliquez sur Save.
Map the created fields:
Note
- Consultez la section Mappages lors de la configuration du plugin.
- Finding ID and Private IP fields will be required to pull the Workloads.
-
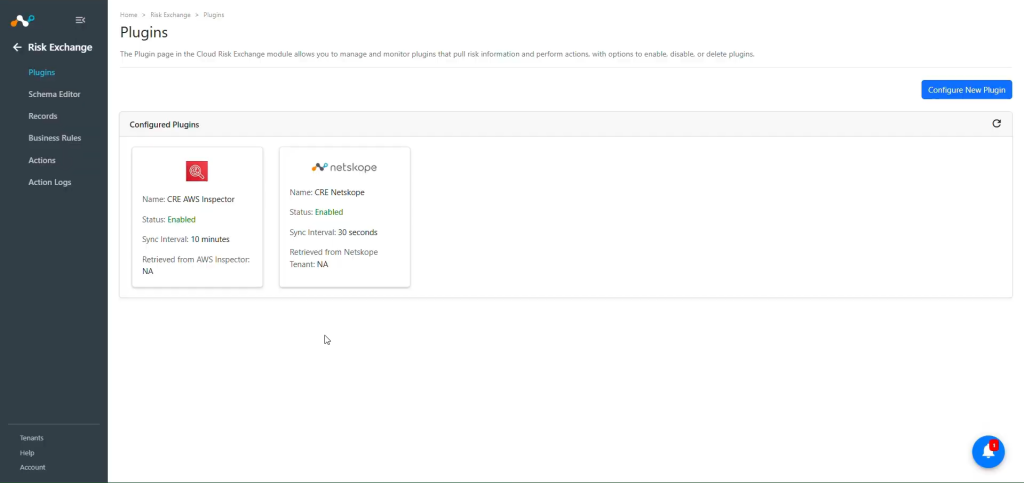
Cliquez sur Save.


Configure a Risk Exchange Business Rule for the AWS Inspector Plugin
-
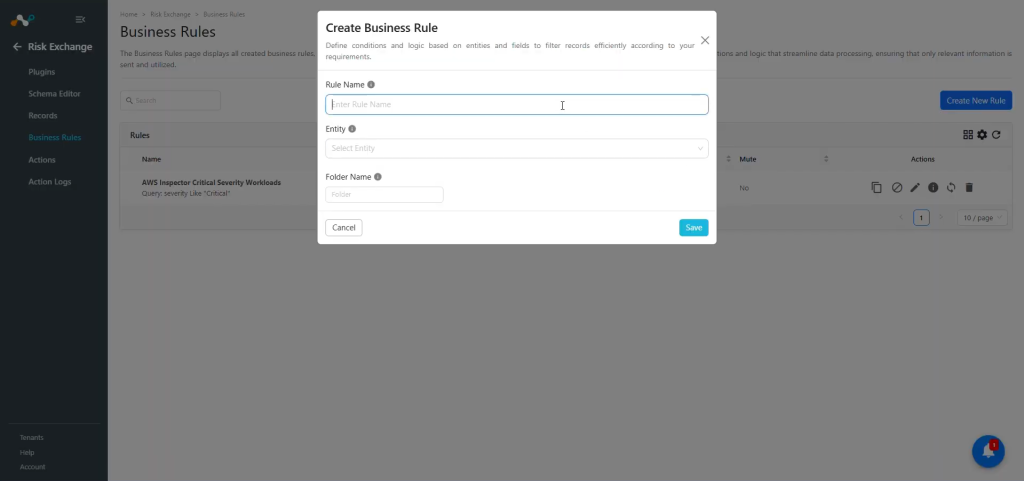
Dans Risk Exchange, cliquez sur Business Rules et Create New Rule.
-
Enter a Rule Name. Select the Entity for which Fields have been configured for the AWS Inspector plugin, and configure the query based on your requirements. This example filters the data fetched from the plugin.
-
Cliquez sur Save.

Configure Risk Exchange Actions for the AWS Inspector Plugin
The AWS Inspector plugin supports the following action types:
- Create Suppression Rule: Create Suppression Rule action can be used to create a suppression rule on AWS Inspector.
- Pas d'action : Aucune action ne sera effectuée pour cette action. Les utilisateurs peuvent générer des alertes UBA dans Ticket Orchestrator en utilisant cette action et en activant l'option Générer des alertes.
Create a Suppression Rule
-
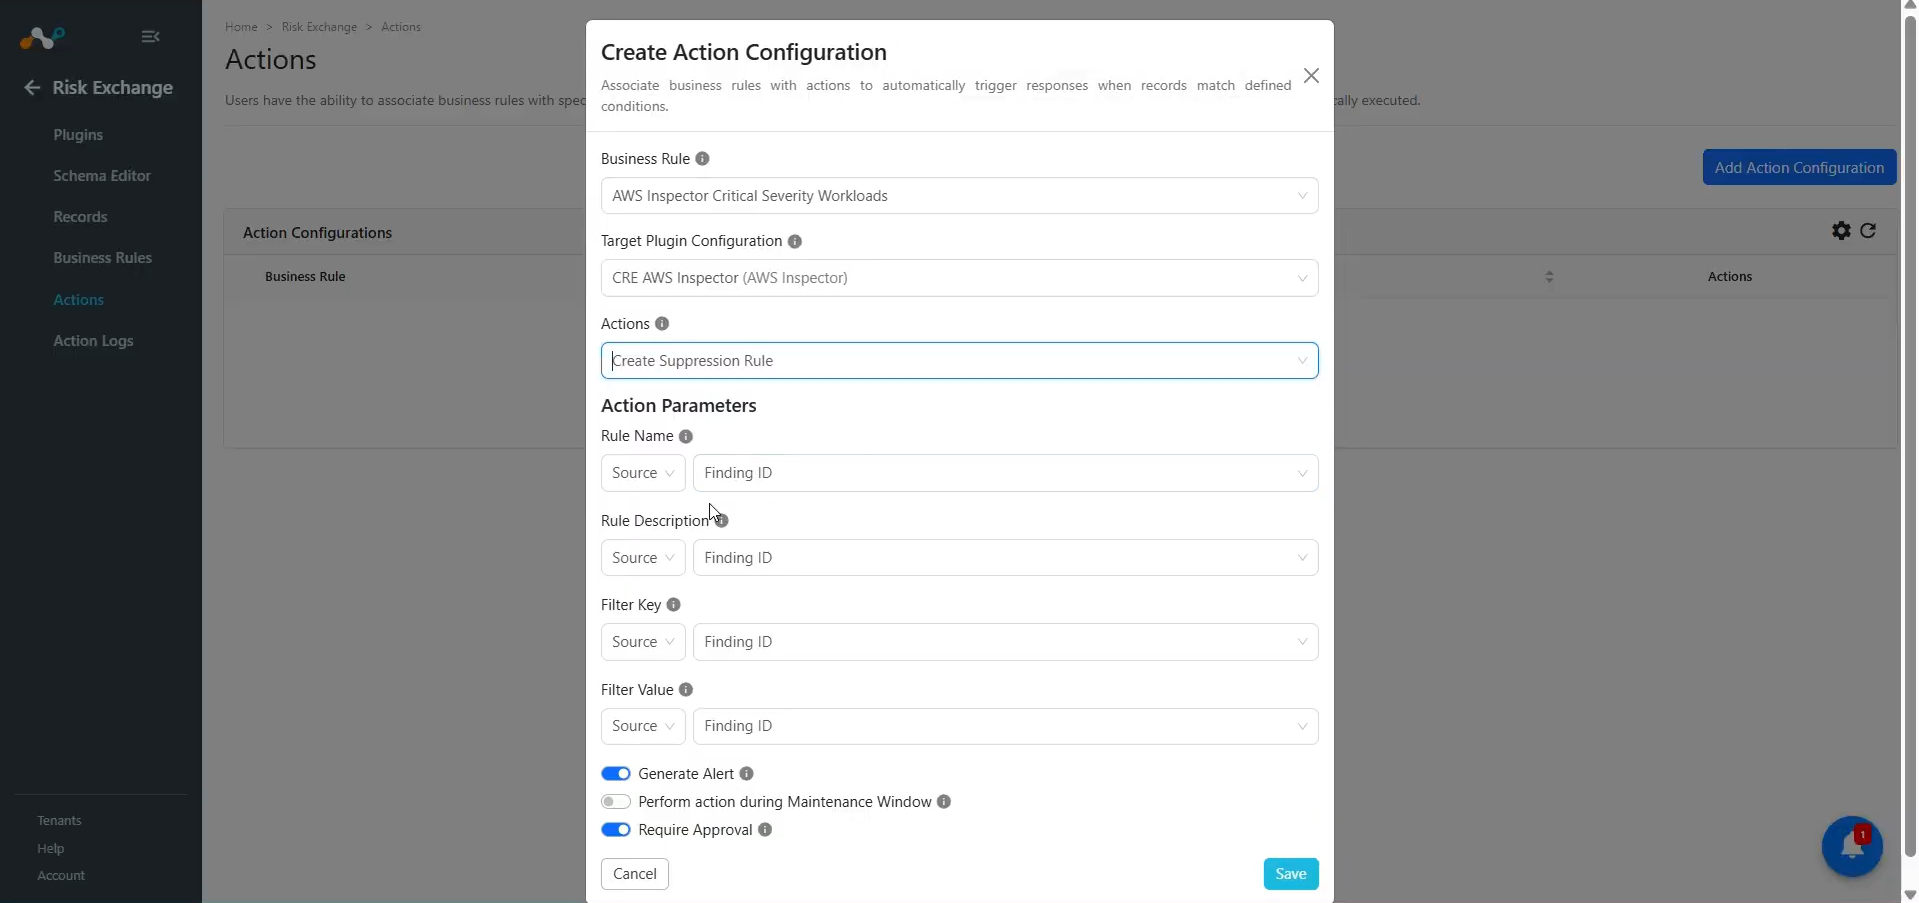
Dans Risk Exchange, allez à Actions et cliquez sur Add Action Configuration.
-
Select la règle métier, la configuration du plugin cible et l'action requises dans leurs listes déroulantes respectives.
-
Enable the Require Approval toggle if Approval is needed before performing action on the pulled records. If the Require Approval toggle is enabled, then users need to manually approve the execution of each action from Risk Exchange on the Action Logs page.
-
Enter the Action Parameters:
- Rule Name: Name of the Suppression rule to create in AWS Inspector. Provide rule name in Static field. A maximum of 128 characters are allowed.
- Rule Description: Description for Suppression rule. Provide a description in the Static field.
- Filter Key: The AWS Inspector field is used as the suppression filter criteria. Select from Static field dropdown.
- Filter Value: Value to match for the selected filter field. Map to a source field or provide a static value.
-
Cliquez sur Save.
No Action
- Dans Risk Exchange, allez à Actions et cliquez sur Add Action Configuration.
- Select la règle de gestion, la configuration et l'action requises dans leurs listes déroulantes respectives.
- Activez la case à cocher Exiger l' approbation si une approbation est nécessaire avant d'effectuer une action sur les enregistrements tirés.
- Cliquez sur Save.
Validate the AWS Inspector Plugin
Valider dans Cloud Exchange
To validate the pulling:.
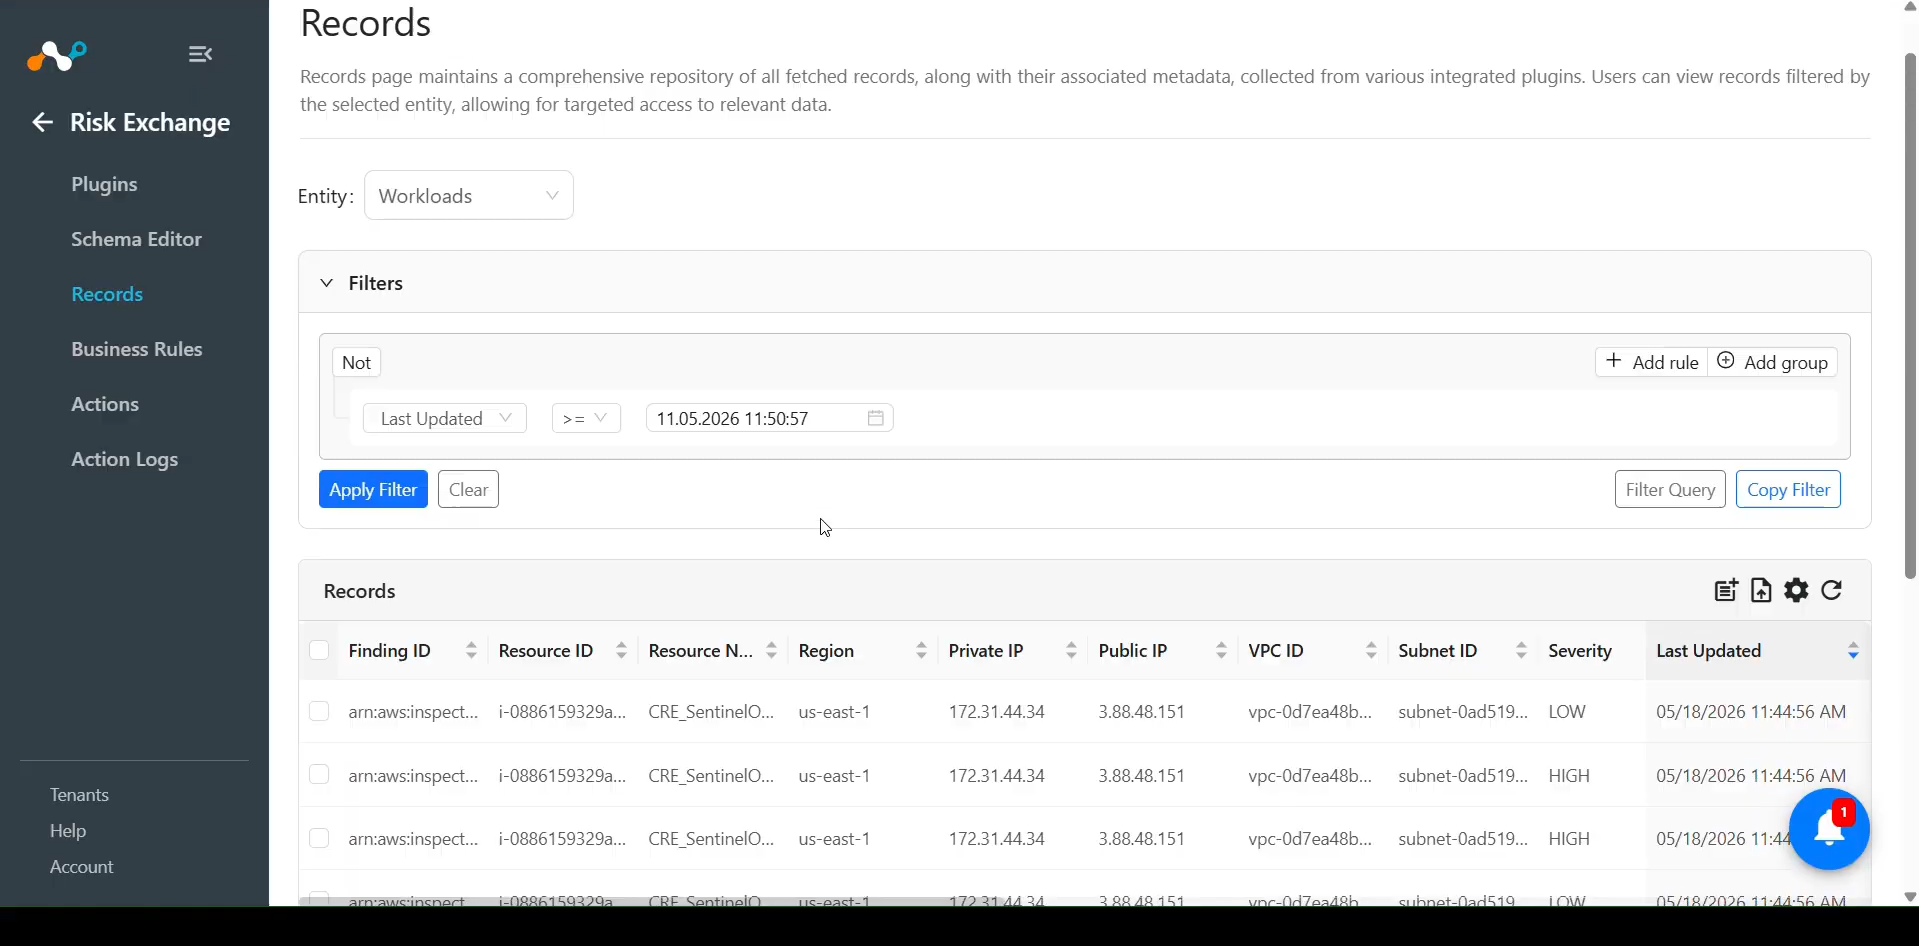
In Risk Exchange, and click on Records. Select the Entity that was selected while configuring the field mapping to view the pulled records.
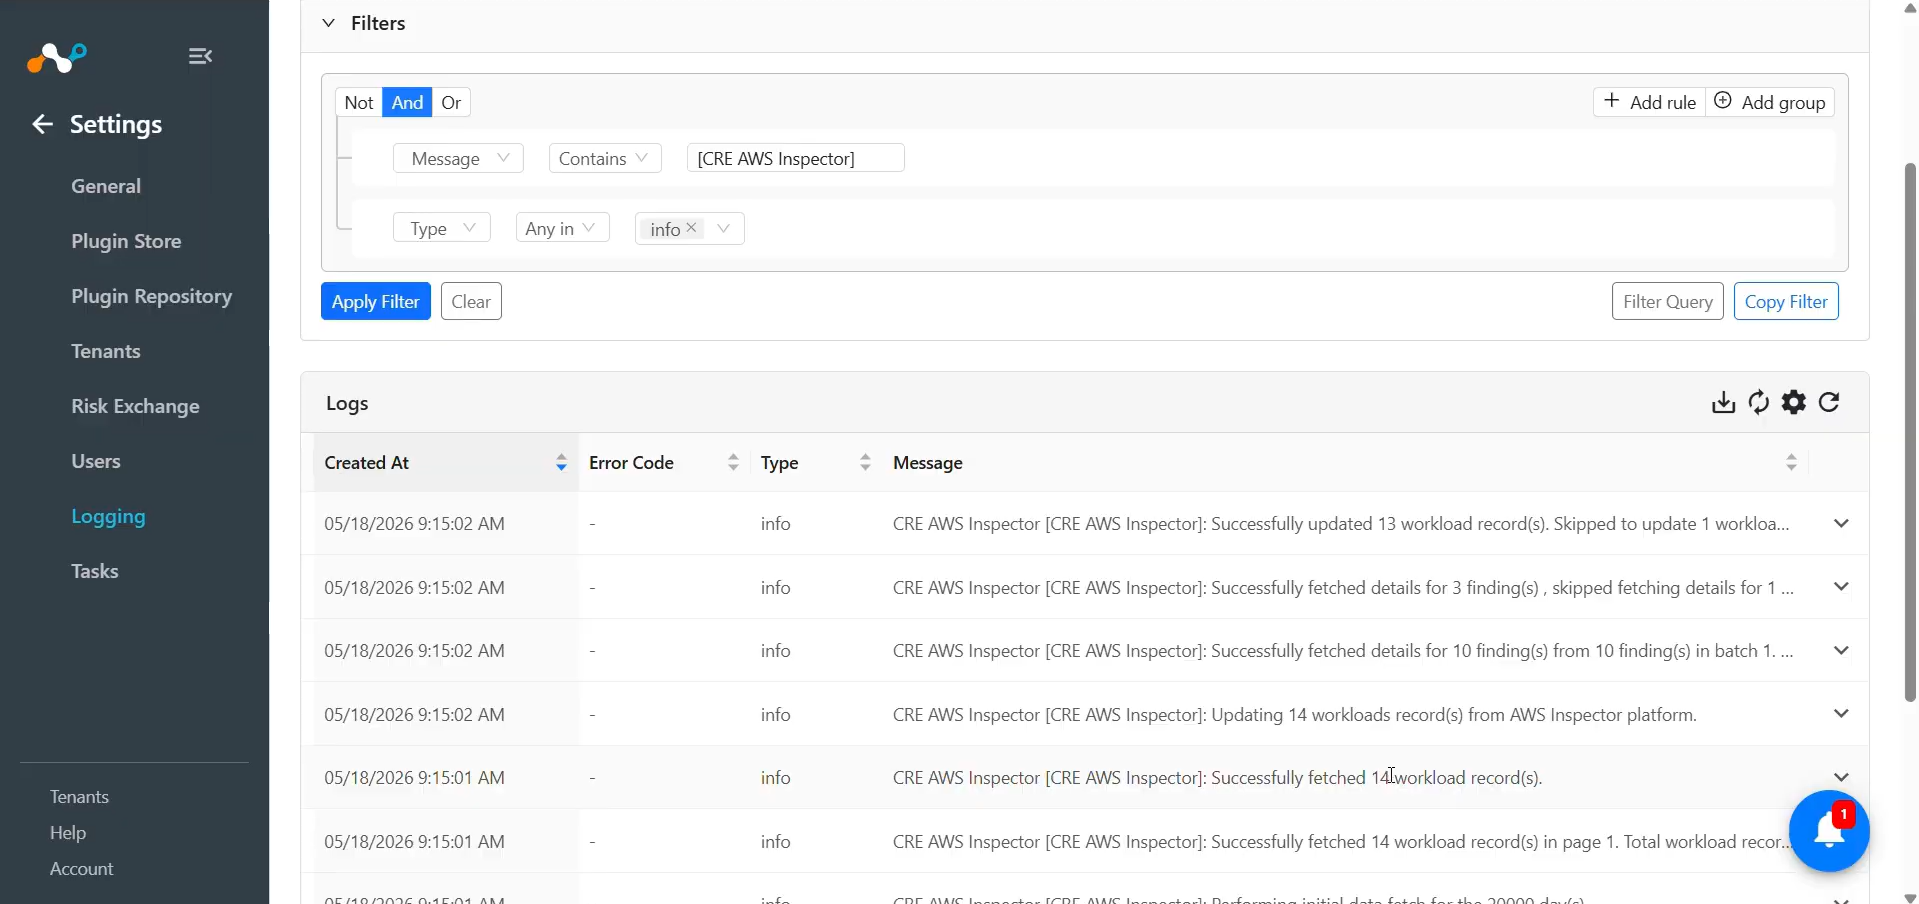
To verify the logs related to pulled records, navigate to the Home > Settings > Logging page and apply the filter with plugin name or plugin configuration name.
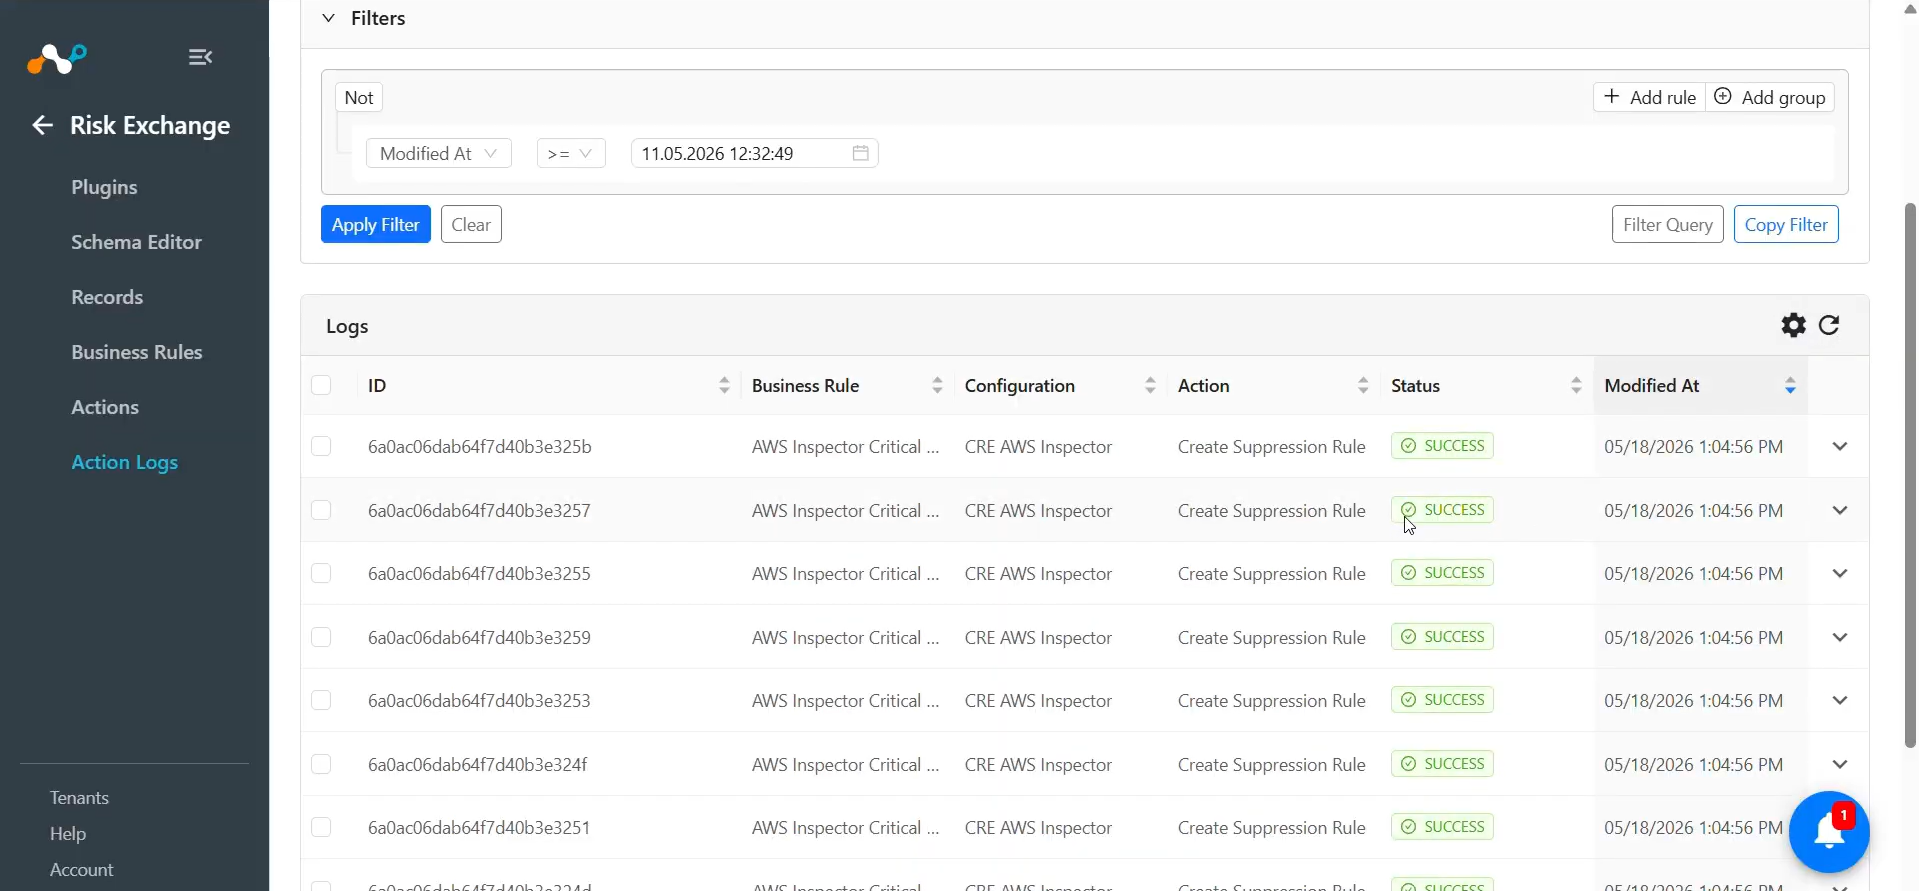
Logs for performed Create Suppression Rule action:
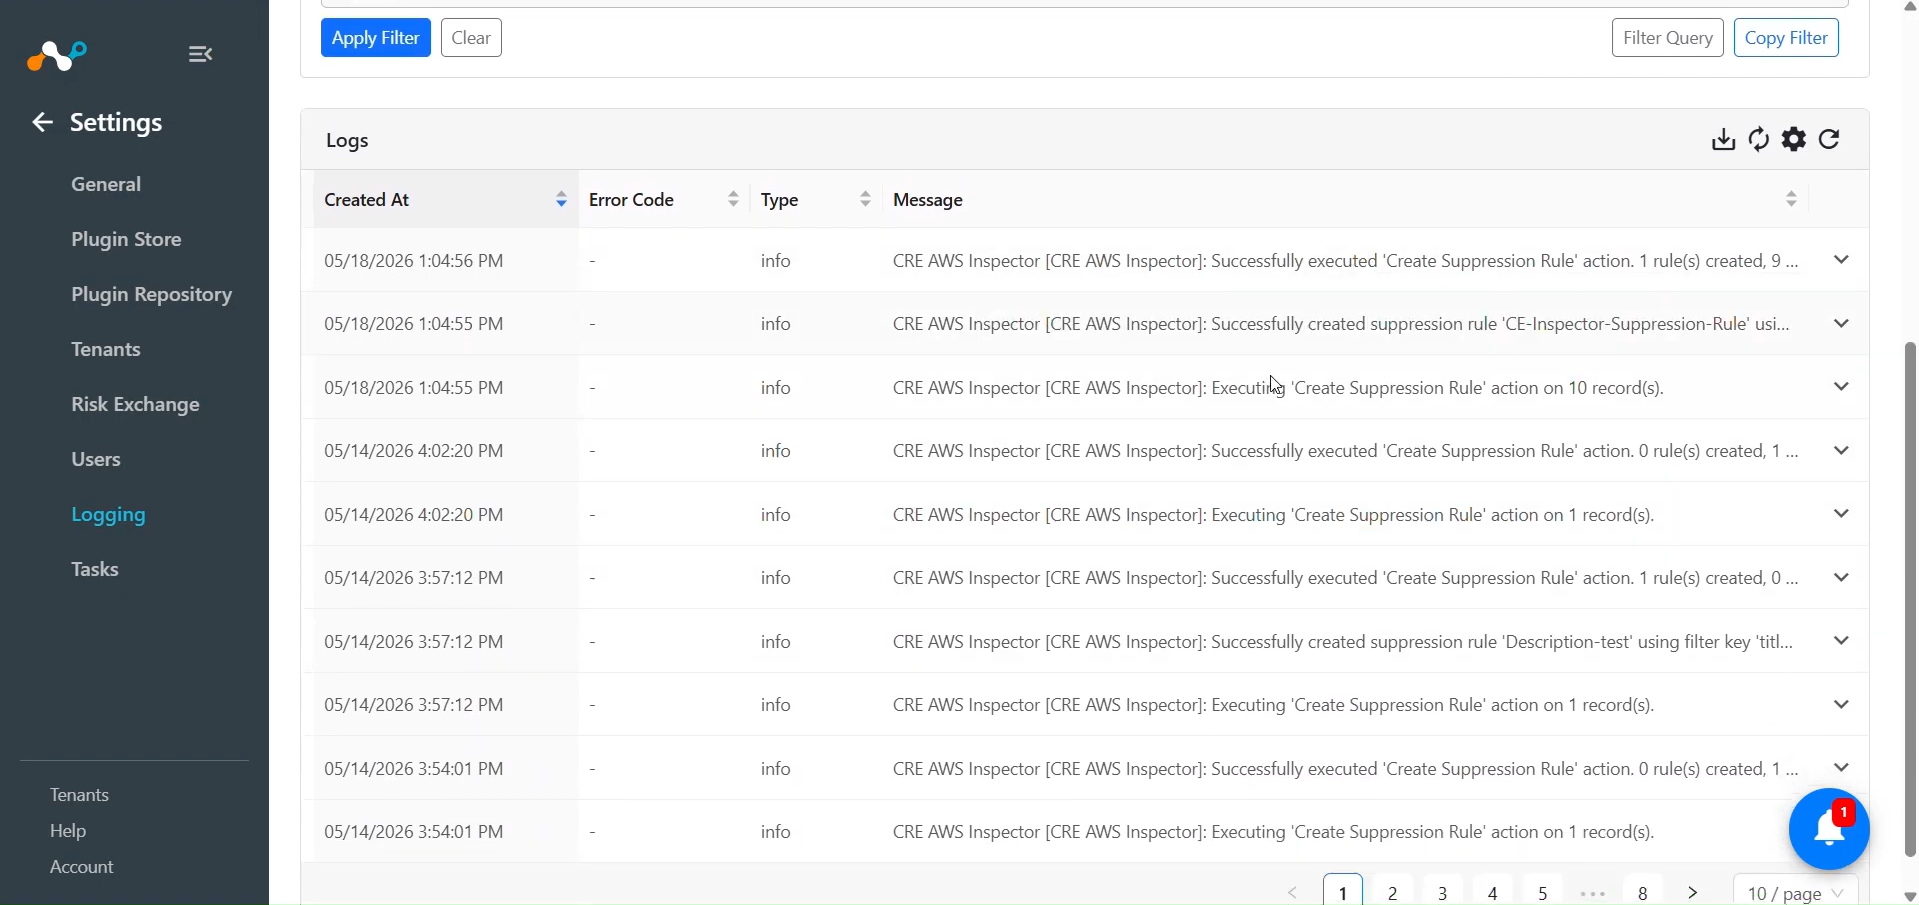
When a pulled record matches one of the configured business rules, the configured action will be performed on the record. This can be seen at Risk Exchange > Action Logs.
Validate in AWS Inspector
To validate the workloads available on AWS Inspector:
Log in to AWS instance, and go to the Inspector service.
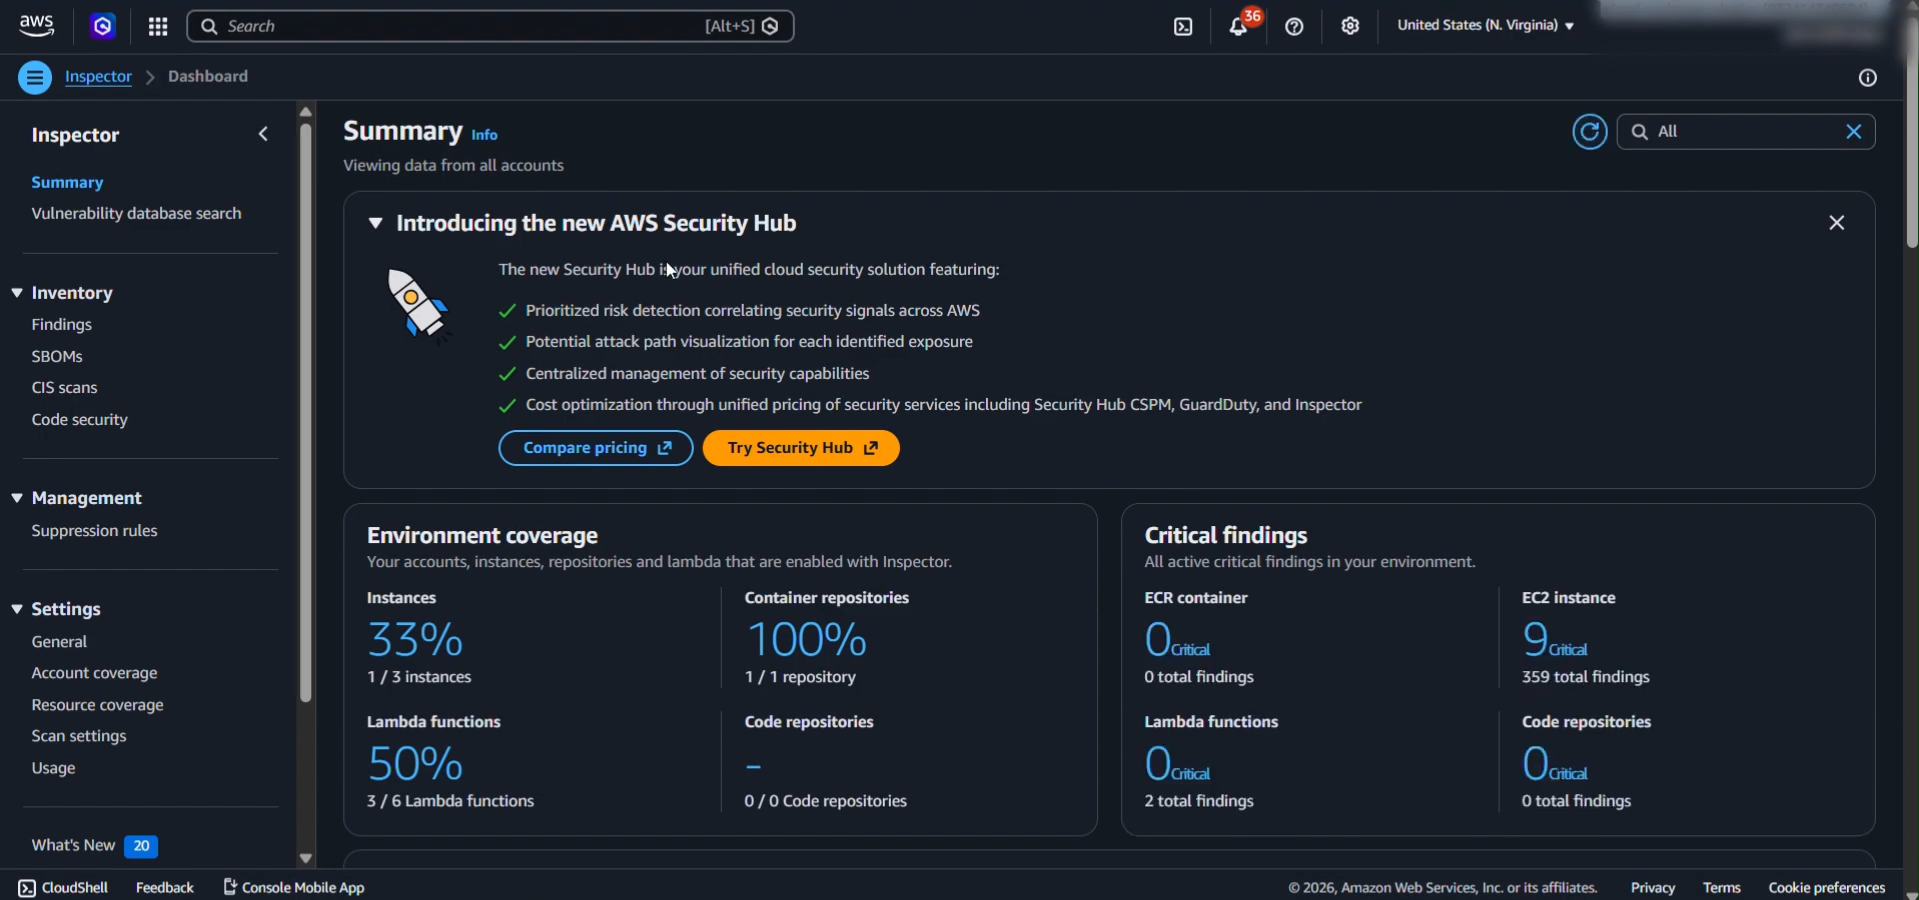
Move to the Findings page under Inventory.
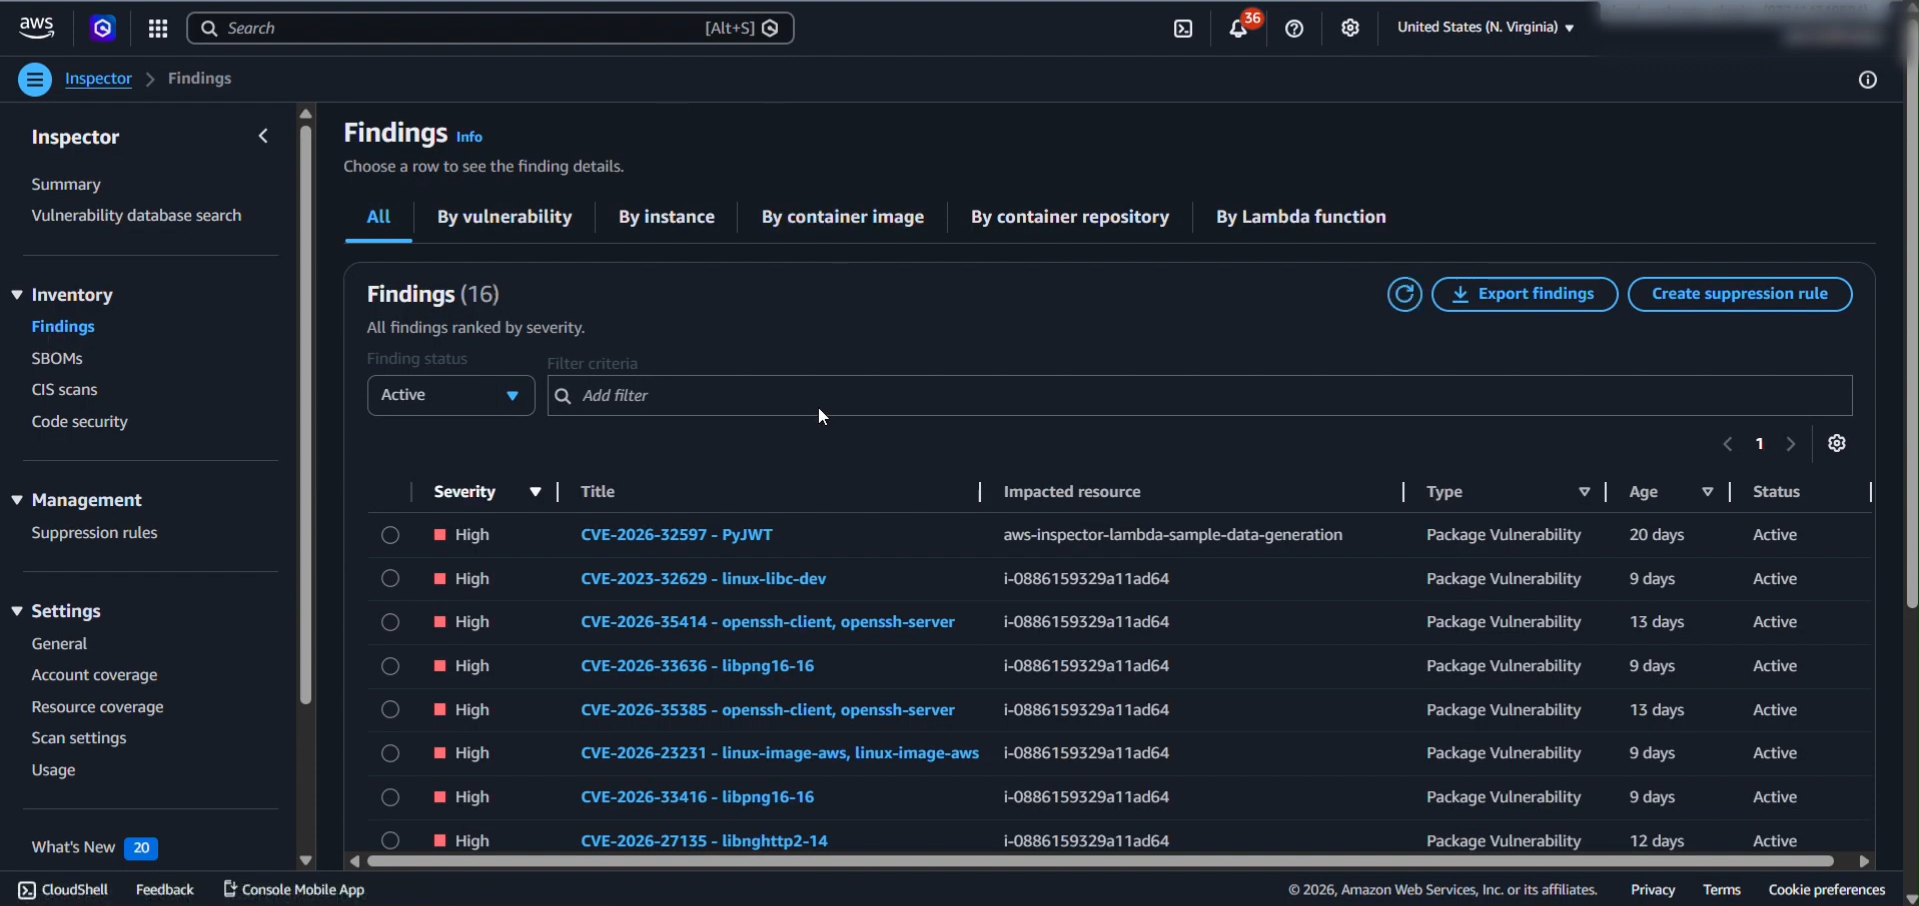
Here are all the findings listed. To check the details of a particular finding, click on that finding.
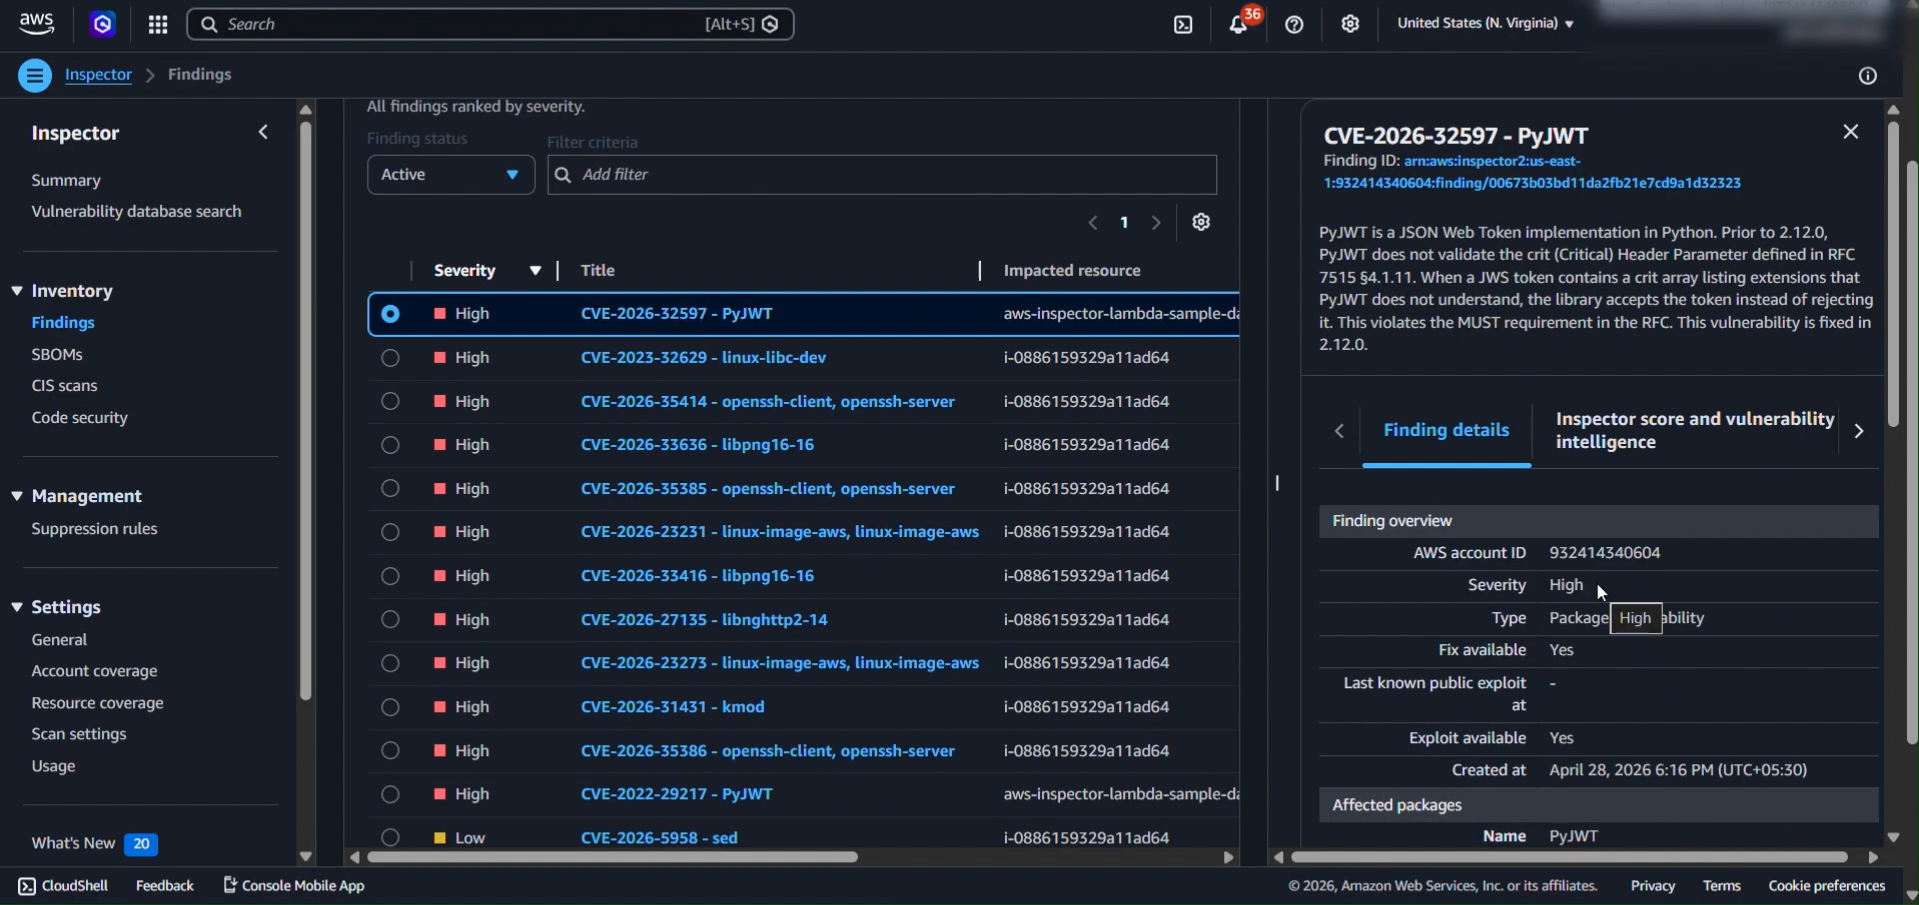
Validate the Create Suppression Rule Action
To validate the Create Suppression Rule Action, navigate to the Inspector service of AWS.
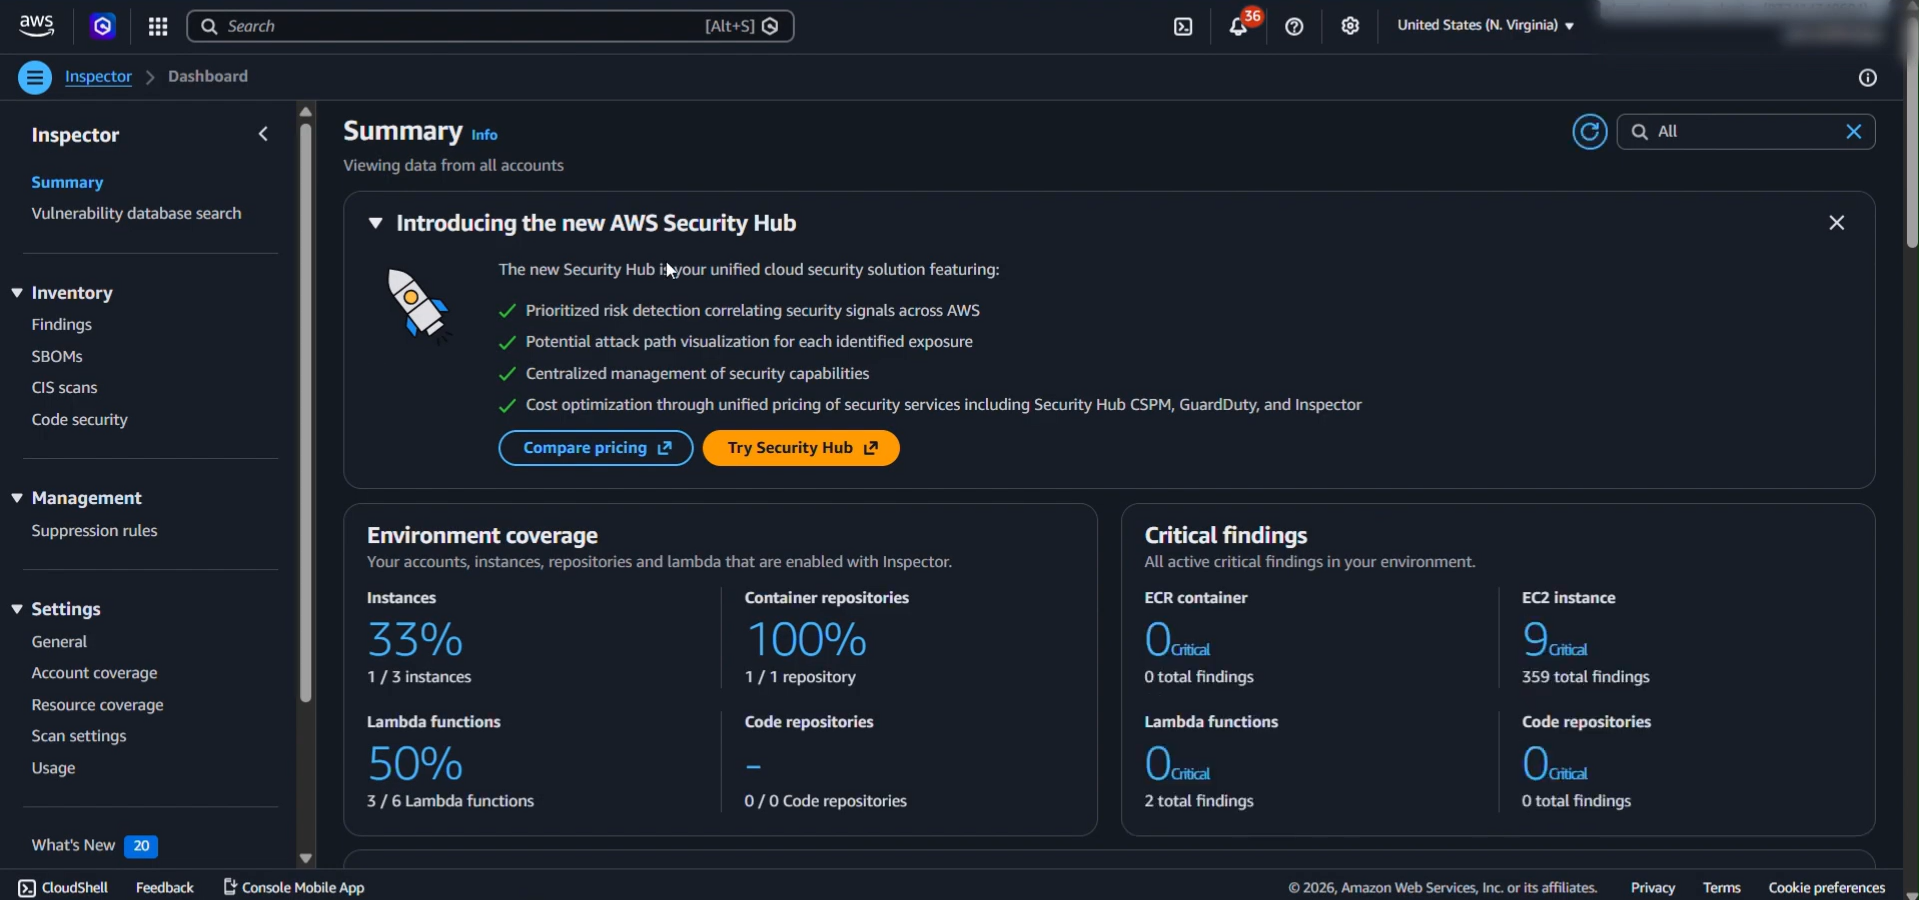
Go to the Suppression Rules page under the Management section.

Click on the created Suppression rule to verify the description and filter for the rule.
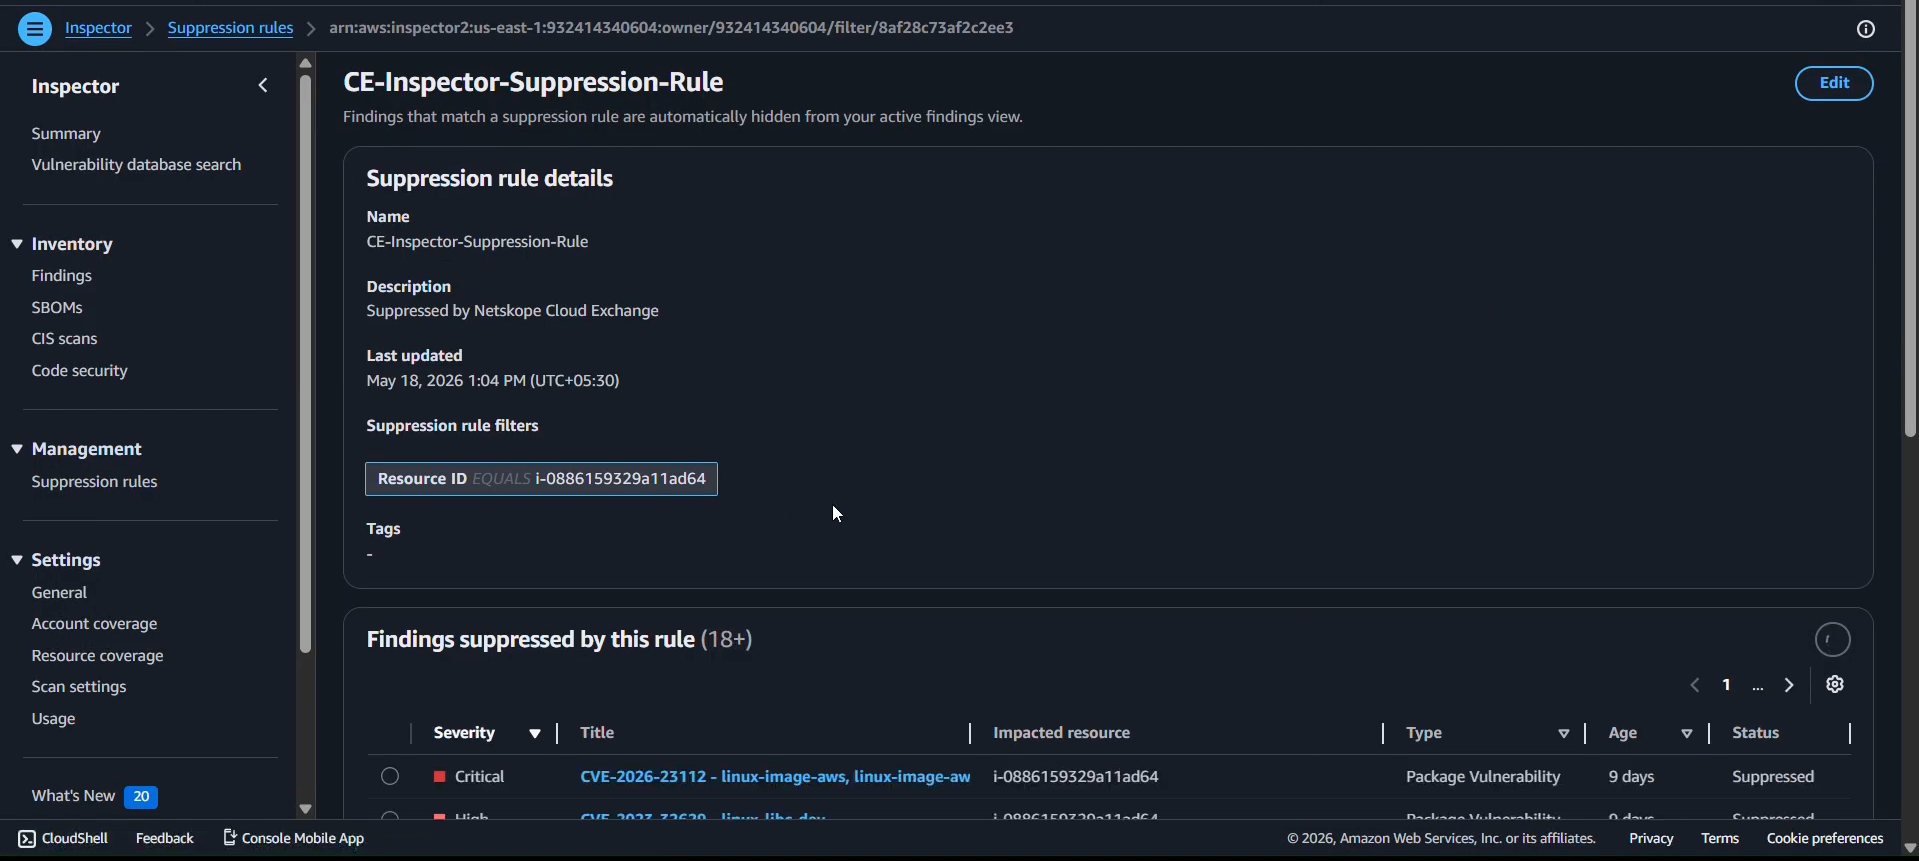
Troubleshooting AWS Inspector Plugin
Impossible d'extraire les charges de travail ou les valeurs des champs du plugin
If you are not able to pull Workloads from the AWS Security Hub Findings, it could be due to there being no data available to pull due to:
- Aucune donnée disponible pour le tirage.
- Aucun champ n'est cartographié.
What to do:
- Go to AWS Inspector > Findings. Check if the findings are available to pull for the same time range and same region name as provided in the plugin configuration.
- If the findings are available and still not pulled, check the Resource value for those findings. Only findings with the EC2 Instance or Amazon EC2 Instance Resource type are pulled.
- Si les résultats sont disponibles, assurez-vous que les champs sont mappés dans le plugin.
Problèmes lors de la configuration du plugin New
If you’re creating a new plugin with AWS IAM Roles Anywhere and see this error while configuring the plugin:

What to do:
Cette erreur peut signifier que l'ARN de l'ancrage de confiance, l'ARN du rôle ou l'ARN du profil a un identifiant de compte différent. Vous devez donc vérifier que les paramètres fournis sont générés à partir du même compte et qu'ils ont la même région.